一 引言
Spring Security Oauth2.0 的认证中心可以简单的理解为是对Spring Security的加强,也是通过FilterChainProxy(其原理可参考前面的Security源码分析)对客户端进行校验后在达到自定义token颁发站点,进行token的颁发,具体流程如下:
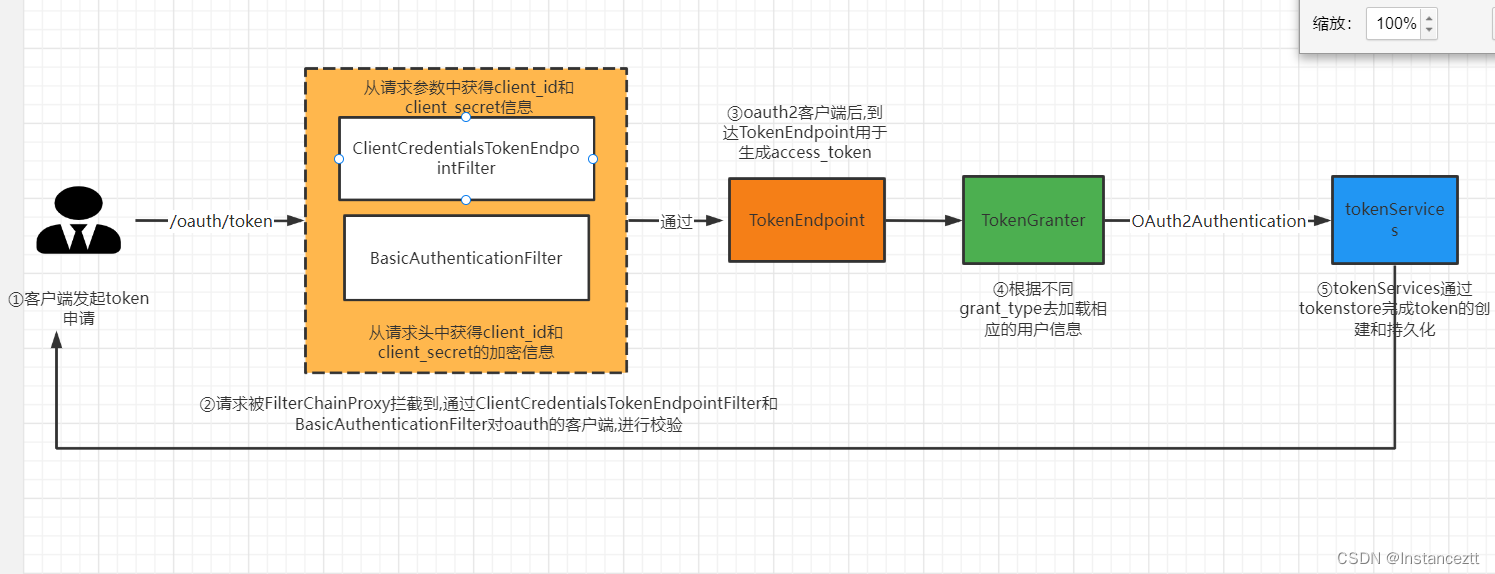
- 用户发起token申请请求(‘/oauth/token’),请求被FilterChainProxy过滤器拦截
- 在FilterChainProxy中通过,通过
ClientCredentialsTokenEndpointFilter和BasicAuthenticationFilte对oauth的客户端的client_id和client secret的正确性
ClientCredentialsTokenEndpointFilter: 获取请求参数中的client_id和client secret进行客户端的合法性校验
BasicAuthenticationFilte: 通过解析请求头中Authorization参数,在通过Base64解密获得client_id和client secret进行客户端的合法性校验(在实际开发中我们一般采用这种方式,防止秘钥的直接暴露) - 请求通过FilterChainProxy的层层校验后达到oauth颁发TokenEndpoint的站点,TokenEndpoint会根据当前请求的grant_type匹配到相应的处理器,不同的处理器,根据不同的参数去解析出OAuth2Authentication
- TokenService根据OAuth2Authentication在底层调用TokenStore去生成token,并根据不同的持久化策略,完成token的持久化
- 返回token给请求,就可以拿到该凭证作为请求凭证了
二 源码解析
通过前面的文章分析,我们知道SpeingSecurity通过FilterChainProxy来完成相应的校验,我们断点看看他经历了那些校验

我们主要观察的是ClientCredentialsTokenEndpointFilter和BasicAuthenticationFilte这两个过滤器,里面的其他的过滤器,在前面的一些文章里面做了相应的介绍,这里就不过多解释了.
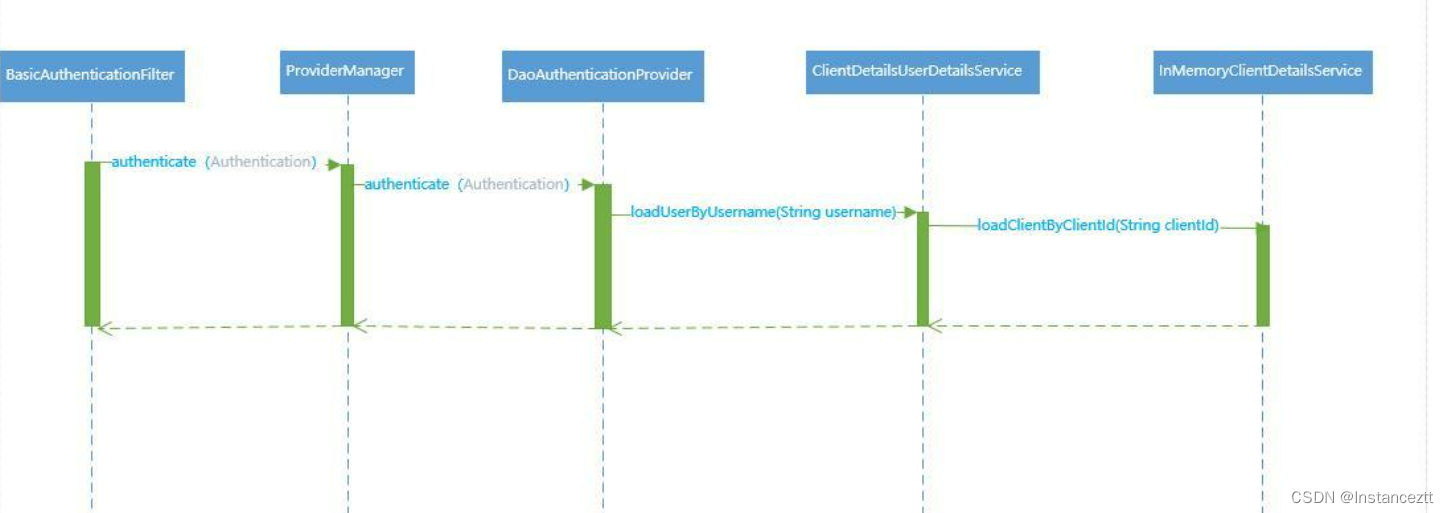
2.1 客户端认证流程
整合认证流程如下图所示:
这里我们以BasicAuthenticationFilte为例
先将client_id和client_secre通过如下方式base64进行加密

把加密的结果放在请求头Authorization中 以Basic+空格+加密结果发起请求
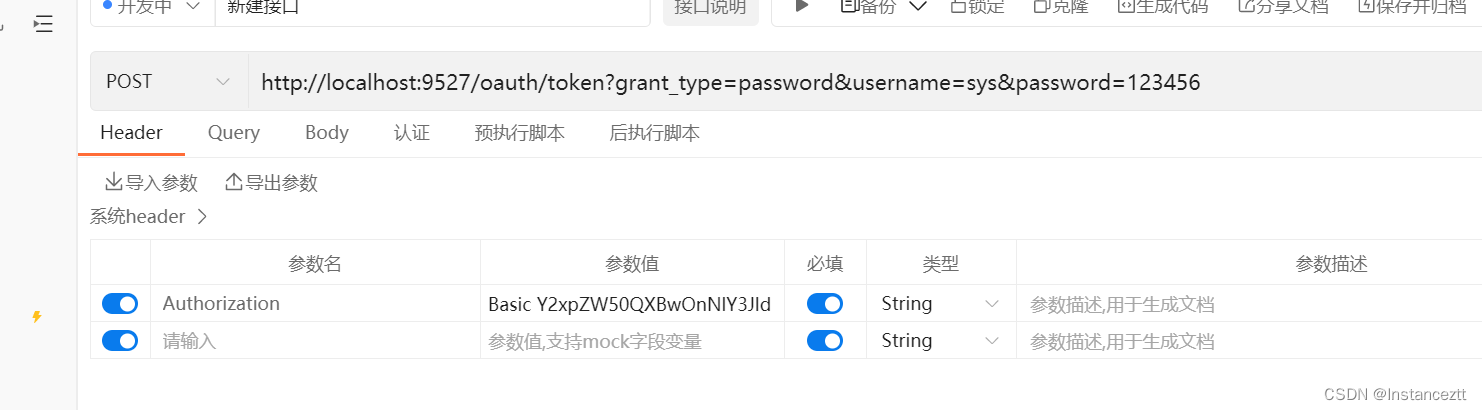
注意: 这里不要在请求参数中携带client_id和client_secre如果在参数中携带扎两个参数就会ClientCredentialsTokenEndpointFilter进行客户单合法性的校验,在BasicAuthenticationFilte不在进行合法性的校验
2.2.1 客户端认证流程源码详解
当用户通过用户名密码进行认证获取access_token的时候,首先需要认证的是客户端是否正确。验证方式是通过用户设置Header的Authorization ,最终序列化成Basic编码发送给认证服务。认证服务器通过BasicAuthenticationFilter过滤器进行实现。
BasicAuthenticationFilter 类结构分析
BasicAuthenticationFilter 类继承了OncePerRequestFilter,而OncePerRequestFilter是Spring框架自带的基础过滤器抽象类。
public class BasicAuthenticationFilter extends OncePerRequestFilter {


......
}
OncePerRequestFilter 是Spring默认的基础过滤器抽象类,其使用的设计模式是模板方法。封装核心的过滤条件,将需要实现的细节,移交给子类实现:
public abstract class OncePerRequestFilter extends GenericFilterBean {


    // 通过 final 定义的模板方法
	@Override
	public final void doFilter(ServletRequest request, ServletResponse response, FilterChain filterChain)
			throws ServletException, IOException {


		if (!(request instanceof HttpServletRequest) || !(response instanceof HttpServletResponse)) {


			throw new ServletException("OncePerRequestFilter just supports HTTP requests");
		}
		HttpServletRequest httpRequest = (HttpServletRequest) request;
		HttpServletResponse httpResponse = (HttpServletResponse) response;
		String alreadyFilteredAttributeName = getAlreadyFilteredAttributeName();
		boolean hasAlreadyFilteredAttribute = request.getAttribute(alreadyFilteredAttributeName) != null;
		if (hasAlreadyFilteredAttribute || skipDispatch(httpRequest) || shouldNotFilter(httpRequest)) {


			// Proceed without invoking this filter...
			filterChain.doFilter(request, response);
		}
		else {


			// Do invoke this filter...
			request.setAttribute(alreadyFilteredAttributeName, Boolean.TRUE);
			try {


			 // 具体的实现方式交给子类去实现
				doFilterInternal(httpRequest, httpResponse, filterChain);
			}
			finally {


				// Remove the "already filtered" request attribute for this request.
				request.removeAttribute(alreadyFilteredAttributeName);
			}
		}
	}
	// 子类需要实现的抽象方法,这里的实现是:BasicAuthenticationFilter 的doFilterInternal 方法
	protected abstract void doFilterInternal(
			HttpServletRequest request, HttpServletResponse response, FilterChain filterChain)
			throws ServletException, IOException;
}
BasicAuthenticationFilter 核心方法和参数分析
public class BasicAuthenticationFilter extends OncePerRequestFilter {


  // 通过构造方法,引入AuthenticationManager认证管理器。其核心的实现就是:ProviderManager
	private AuthenticationManager authenticationManager;
  // 构造方法
	public BasicAuthenticationFilter(AuthenticationManager authenticationManager) {


		Assert.notNull(authenticationManager, "authenticationManager cannot be null");
		this.authenticationManager = authenticationManager;
	}

 //模板方法的核心实现,用于认证客户端的正确性
	@Override
	protected void doFilterInternal(HttpServletRequest request,
			HttpServletResponse response, FilterChain chain)
					throws IOException, ServletException {


		// 从Header 头信息中获取Authorization的值
		// 通过方法extractAndDecodeHeader(header, request) 反序列出用户名和密码
		final boolean debug = this.logger.isDebugEnabled();
		String header = request.getHeader("Authorization");
		if (header == null || !header.toLowerCase().startsWith("basic ")) {


			chain.doFilter(request, response);
			return;
		}
		try {


			String[] tokens = extractAndDecodeHeader(header, request);
			assert tokens.length == 2;
			String username = tokens[0];
			if (debug) {


				this.logger
						.debug("Basic Authentication Authorization header found for user '"
								+ username + "'");
			}
			// 校验当前客户端用户是不是需要重新认证
			if (authenticationIsRequired(username)) {


			// 封装UsernamePasswordAuthenticationToken对象,该对象实现了Authentication 接口。
				UsernamePasswordAuthenticationToken authRequest = new UsernamePasswordAuthenticationToken(
						username, tokens[1]);
				authRequest.setDetails(
						this.authenticationDetailsSource.buildDetails(request));
				// 通过构造函数引入的AuthenticationManager进行认证
				//具体的显现方式,根据UsernamePasswordAuthenticationToken所对应的认证策略
				// 这里使用的认证策略是DaoAuthenticationProvider
				Authentication authResult = this.authenticationManager
						.authenticate(authRequest);
				if (debug) {


					this.logger.debug("Authentication success: " + authResult);
				}
				// 认证通过已经,将当前信息写入到SecurityContextHolder中
				SecurityContextHolder.getContext().setAuthentication(authResult);
				this.rememberMeServices.loginSuccess(request, response, authResult);

				onSuccessfulAuthentication(request, response, authResult);
			}

		}
		catch (AuthenticationException failed) {


			SecurityContextHolder.clearContext();
			if (debug) {


				this.logger.debug("Authentication request for failed: " + failed);
			}
			this.rememberMeServices.loginFail(request, response);
			onUnsuccessfulAuthentication(request, response, failed);
			if (this.ignoreFailure) {


				chain.doFilter(request, response);
			}
			else {


				this.authenticationEntryPoint.commence(request, response, failed);
			}
			return;
		}
		// 认证通过以后,调用下一个过滤器
		chain.doFilter(request, response);
	}

	private String[] extractAndDecodeHeader(String header, HttpServletRequest request)
			throws IOException {


		byte[] base64Token = header.substring(6).getBytes("UTF-8");
		byte[] decoded;
		try {


			decoded = Base64.getDecoder().decode(base64Token);
		}
		catch (IllegalArgumentException e) {


			throw new BadCredentialsException(
					"Failed to decode basic authentication token");
		}
		String token = new String(decoded, getCredentialsCharset(request));
		int delim = token.indexOf(":");
		if (delim == -1) {


			throw new BadCredentialsException("Invalid basic authentication token");
		}
		return new String[] {

     token.substring(0, delim), token.substring(delim + 1) };
	}

	private boolean authenticationIsRequired(String username) {


		// Only reauthenticate if username doesn't match SecurityContextHolder and user
		// isn't authenticated
		// (see SEC-53)
		Authentication existingAuth = SecurityContextHolder.getContext()
				.getAuthentication();

		if (existingAuth == null || !existingAuth.isAuthenticated()) {


			return true;
		}
		if (existingAuth instanceof UsernamePasswordAuthenticationToken
				&& !existingAuth.getName().equals(username)) {


			return true;
		}
}
通过基础认证服务器的核心代码模块分析可以知道,主要完成两件事情,第一:反序列化客户端的Header参数Authorization。第二:封装UsernamePasswordAuthenticationToken对象,调用认证管理器ProviderManager进行认证。
AbstractUserDetailsAuthenticationProvider 类结构分析
AbstractUserDetailsAuthenticationProvider 实现了AuthenticationProvider的 supports(Class<?> authentication)
方法
public abstract class AbstractUserDetailsAuthenticationProvider implements
		AuthenticationProvider, InitializingBean, MessageSourceAware {


		......
		}
AbstractUserDetailsAuthenticationProvider 核心方法参数分析
AbstractUserDetailsAuthenticationProvider 主要实现了AuthenticationProvider的两个核心方法:
AuthenticationProvider,supports。其次抽象出具体是实现细节方法:retrieveUser。交给子类:
DaoAuthenticationProvider 进行实现
public abstract class AbstractUserDetailsAuthenticationProvider implements
		AuthenticationProvider, InitializingBean, MessageSourceAware {


		// 实现	AuthenticationProvider 的认证方法
	public Authentication authenticate(Authentication authentication)
			throws AuthenticationException {


		Assert.isInstanceOf(UsernamePasswordAuthenticationToken.class, authentication,
				messages.getMessage(
						"AbstractUserDetailsAuthenticationProvider.onlySupports",
						"Only UsernamePasswordAuthenticationToken is supported"));
		// Determine username
		String username = (authentication.getPrincipal() == null) ? "NONE_PROVIDED"
				: authentication.getName();
		boolean cacheWasUsed = true;
		UserDetails user = this.userCache.getUserFromCache(username);
		if (user == null) {


			cacheWasUsed = false;
			try {


			// 调用子类实现的retrieveUser()的方法
				user = retrieveUser(username,
						(UsernamePasswordAuthenticationToken) authentication);
			}
			catch (UsernameNotFoundException notFound) {


				logger.debug("User '" + username + "' not found");

				if (hideUserNotFoundExceptions) {


					throw new BadCredentialsException(messages.getMessage(
							"AbstractUserDetailsAuthenticationProvider.badCredentials",
							"Bad credentials"));
				}
				else {


					throw notFound;
				}
			}
			Assert.notNull(user,
					"retrieveUser returned null - a violation of the interface contract");
		}
		try {


			preAuthenticationChecks.check(user);
			additionalAuthenticationChecks(user,
					(UsernamePasswordAuthenticationToken) authentication);
		}
		catch (AuthenticationException exception) {


			if (cacheWasUsed) {


				// There was a problem, so try again after checking
				// we're using latest data (i.e. not from the cache)
				cacheWasUsed = false;
				user = retrieveUser(username,
						(UsernamePasswordAuthenticationToken) authentication);
				preAuthenticationChecks.check(user);
				additionalAuthenticationChecks(user,
						(UsernamePasswordAuthenticationToken) authentication);
			}
			else {


				throw exception;
			}
		}
		postAuthenticationChecks.check(user);
		if (!cacheWasUsed) {


			this.userCache.putUserInCache(user);
		}
		Object principalToReturn = user;
		if (forcePrincipalAsString) {


**加粗样式**			principalToReturn = user.getUsername();
		}
		return createSuccessAuthentication(principalToReturn, authentication, user);
	}

	//实现了AuthenticationProvider的supports方法
	public boolean supports(Class<?> authentication) {


	//根据配置的策略方法为UsernamePasswordAuthenticationToken
			return (UsernamePasswordAuthenticationToken.class
					.isAssignableFrom(authentication));
		}

  // 检索用户细节交给子类实现
	protected abstract UserDetails retrieveUser(String username,
			UsernamePasswordAuthenticationToken authentication)
			throws AuthenticationException;
}
DaoAuthenticationProvider 核心方法参数分析
public class DaoAuthenticationProvider extends AbstractUserDetailsAuthenticationProvider {


	private static final String USER_NOT_FOUND_PASSWORD = "userNotFoundPassword";

	// 设置当前密码的加密模式
	private PasswordEncoder passwordEncoder;
   // 设置查询用户实现细节
	private UserDetailsService userDetailsService;

	public DaoAuthenticationProvider() {


		setPasswordEncoder(PasswordEncoderFactories.createDelegatingPasswordEncoder());
	}

	protected final UserDetails retrieveUser(String username,
			UsernamePasswordAuthenticationToken authentication)
			throws AuthenticationException {


		prepareTimingAttackProtection();
		try {


		// 通过查询用户实现细节类,查询当前客户端用户是否存在
			UserDetails loadedUser = this.getUserDetailsService().loadUserByUsername(username);
			if (loadedUser == null) {


				throw new InternalAuthenticationServiceException(
						"UserDetailsService returned null, which is an interface contract violation");
			}
			return loadedUser;
		}
		catch (UsernameNotFoundException ex) {


			mitigateAgainstTimingAttack(authentication);
			throw ex;
		}
		catch (InternalAuthenticationServiceException ex) {


			throw ex;
		}
		catch (Exception ex) {


			throw new InternalAuthenticationServiceException(ex.getMessage(), ex);
		}
	}

	private void prepareTimingAttackProtection() {


		if (this.userNotFoundEncodedPassword == null) {


			this.userNotFoundEncodedPassword = this.passwordEncoder.encode(USER_NOT_FOUND_PASSWORD);
		}
	}

	private void mitigateAgainstTimingAttack(UsernamePasswordAuthenticationToken authentication) {


		if (authentication.getCredentials() != null) {


			String presentedPassword = authentication.getCredentials().toString();
			this.passwordEncoder.matches(presentedPassword, this.userNotFoundEncodedPassword);
		}
	}
}
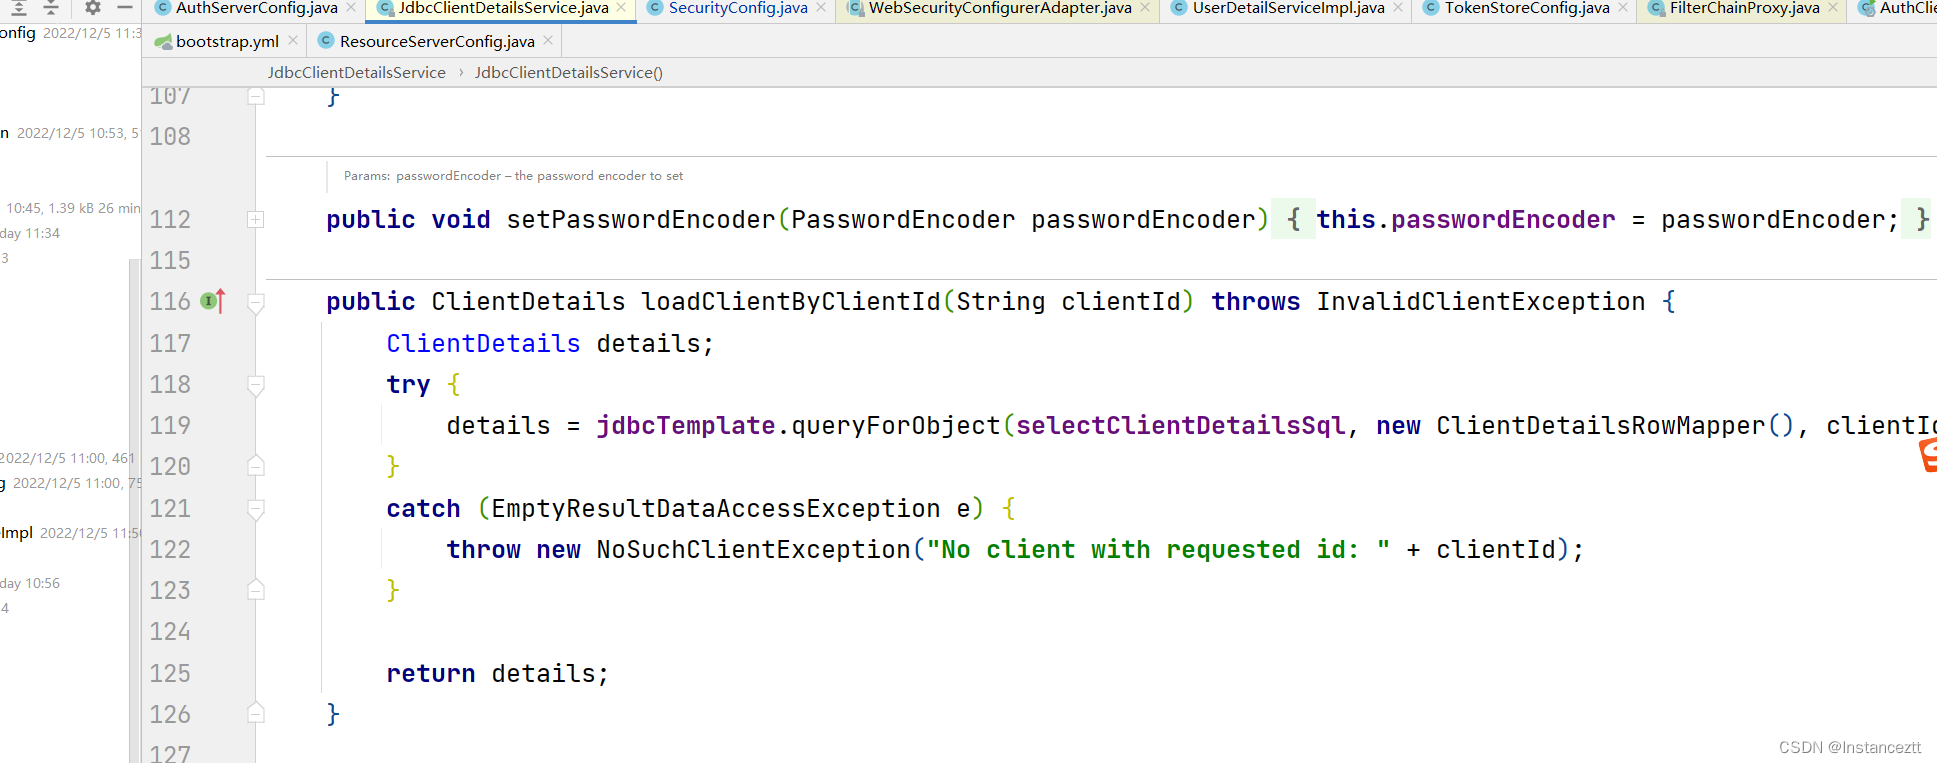
ClientDetailsUserDetailsService 类说明
ClientDetailsUserDetailsService 实现了UserDetailsService,通过loadUserByUsername()方法查询当前客户端是否存在。
public class ClientDetailsUserDetailsService implements UserDetailsService {


	private final ClientDetailsService clientDetailsService;
	private String emptyPassword = "";

	public ClientDetailsUserDetailsService(ClientDetailsService clientDetailsService) {


		this.clientDetailsService = clientDetailsService;
	}

	/**
	 * @param passwordEncoder the password encoder to set
	 */
	public void setPasswordEncoder(PasswordEncoder passwordEncoder) {


		this.emptyPassword = passwordEncoder.encode("");
	}

 // 通过 loadUserByUsername 查询当前的Client是否存在。
	public UserDetails loadUserByUsername(String username) throws UsernameNotFoundException {


		ClientDetails clientDetails;
		try {


			clientDetails = clientDetailsService.loadClientByClientId(username);
		} catch (NoSuchClientException e) {


			throw new UsernameNotFoundException(e.getMessage(), e);
		}
		String clientSecret = clientDetails.getClientSecret();
		if (clientSecret== null || clientSecret.trim().length()==0) {


			clientSecret = emptyPassword;
		}
		return new User(username, clientSecret, clientDetails.getAuthorities());
	}

}
我们采用的是JdbcClientDetailsService,通过查询数据库获得其具体配置
总结:
通过客户端认证源码分析可以得出,客户端的认证会发生在过滤器:BasicAuthenticationFilter中,其发生在用户的用户名密码认证之前。其内部认证通过ProviderManager策略模板,根据传入的Authentication类型指定认证的策略DaoAuthenticationProvider,通过DaoAuthenticationProvider查询当前客户端用户密码是否存在。我们项目采用的是:JdbcClientDetailsService,这里用户可以自己去实现客户端查询细节,通过启动配置类进行配置通过ClientDetailsServiceConfigurer的withClientDetails(ClientDetailsService clientDetailsService)方法进行设置。
三 token的获取

整个流程中主要核心分为:
- 用户的用户名密码认证
- 根据用户名,客户端信息,权限信息生成对应的Token
3.1 用户的用户名密码认证
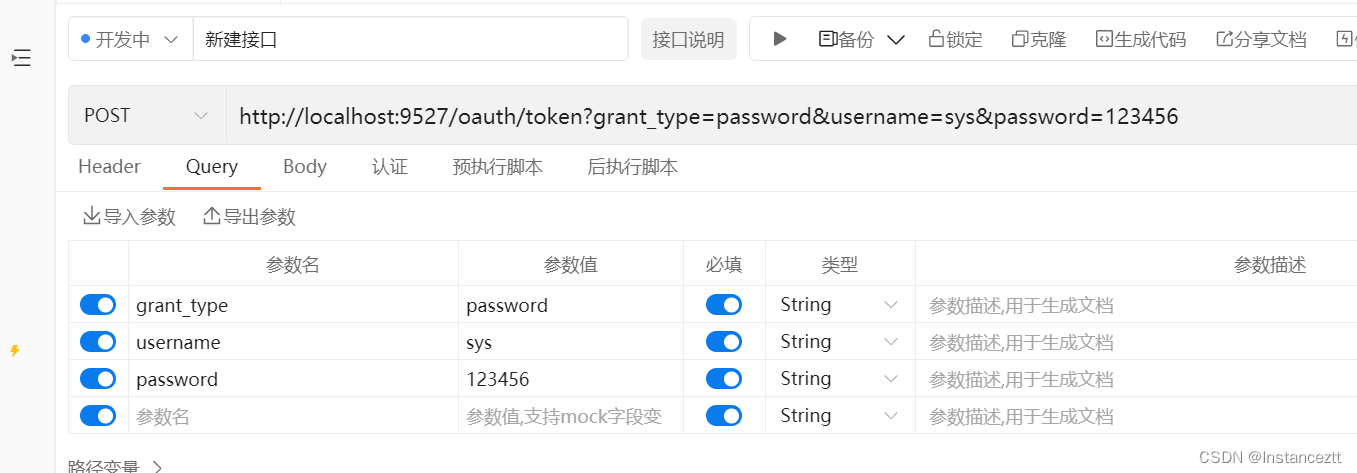
访问/oauth/token url 接口
该接口是实现生成AccessToken的入口。
@FrameworkEndpoint
public class TokenEndpoint extends AbstractEndpoint {


	@RequestMapping(value = "/oauth/token", method=RequestMethod.POST)
	public ResponseEntity<OAuth2AccessToken> postAccessToken(Principal principal, @RequestParam
	Map<String, String> parameters) throws HttpRequestMethodNotSupportedException {


		// 验证客户端是否认证成功
		if (!(principal instanceof Authentication)) {


			throw new InsufficientAuthenticationException(
					"There is no client authentication. Try adding an appropriate authentication filter.");
		}
		String clientId = getClientId(principal);
		// 根据ClientId查询当前客户端的详细信息
		ClientDetails authenticatedClient = getClientDetailsService().loadClientByClientId(clientId);
		// 根据客户端信息和请求参数,封装成TokenRequest对象
		TokenRequest tokenRequest = getOAuth2RequestFactory().createTokenRequest(parameters, authenticatedClient);
		// 再次校验当前客户端信息,防止有人修改造成不一致情况
		if (clientId != null && !clientId.equals("")) {


			// Only validate the client details if a client authenticated during this
			// request.
			if (!clientId.equals(tokenRequest.getClientId())) {


				// double check to make sure that the client ID in the token request is the same as that in the
				// authenticated client
				throw new InvalidClientException("Given client ID does not match authenticated client");
			}
		}
		if (authenticatedClient != null) {


			oAuth2RequestValidator.validateScope(tokenRequest, authenticatedClient);
		}
		if (!StringUtils.hasText(tokenRequest.getGrantType())) {


			throw new InvalidRequestException("Missing grant type");
		}
		if (tokenRequest.getGrantType().equals("implicit")) {


			throw new InvalidGrantException("Implicit grant type not supported from token endpoint");
		}
		if (isAuthCodeRequest(parameters)) {


			// The scope was requested or determined during the authorization step
			if (!tokenRequest.getScope().isEmpty()) {


				logger.debug("Clearing scope of incoming token request");
				tokenRequest.setScope(Collections.<String> emptySet());
			}

		if (isRefreshTokenRequest(parameters)) {


			// A refresh token has its own default scopes, so we should ignore any added by the factory here.
			tokenRequest.setScope(OAuth2Utils.parseParameterList(parameters.get(OAuth2Utils.SCOPE)));
		}
		// 获取AccessToken
		OAuth2AccessToken token = getTokenGranter().grant(tokenRequest.getGrantType(), tokenRequest);
		if (token == null) {


			throw new UnsupportedGrantTypeException("Unsupported grant type: " + tokenRequest.getGrantType());
		}
		return getResponse(token);
	}
}
从实现源码细节中可以看出,主要做了客户端校验,以及获取OAuth2AccessToken 的两件核心事件。在获取OAuth2AccessToken对象的过程中,首先需要做的是用户的用户名密码认证。
验证用户的用户名和密码
当前的认证模式为用户名密码认证方式,其Token的整体授权类的继承如下:
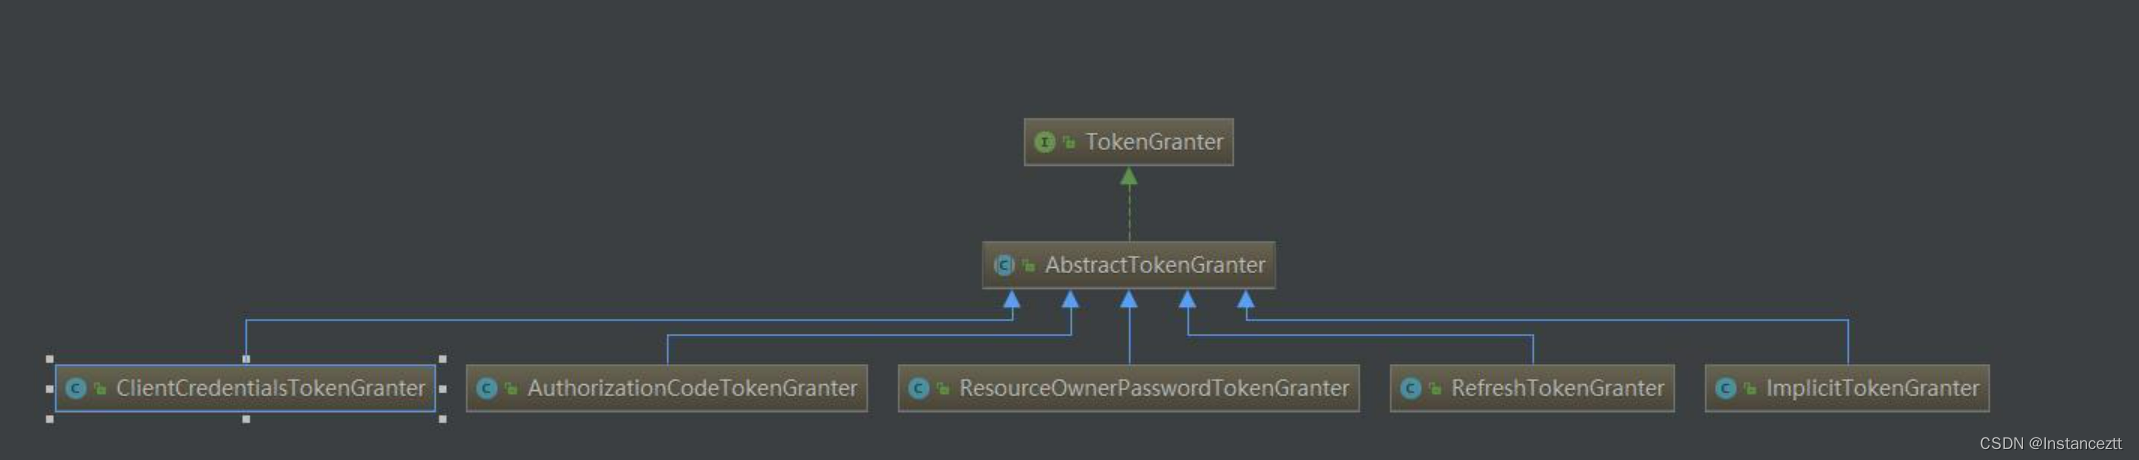
这里我们使用的是:ResourceOwnerPasswordTokenGranter 授权类。首先进行用户的用户名密码认证。其核心代码如下:
@Override
	protected OAuth2Authentication getOAuth2Authentication(ClientDetails client, TokenRequest tokenRequest) {


		Map<String, String> parameters = new LinkedHashMap<String, String>(tokenRequest.getRequestParameters());
		String username = parameters.get("username");
		String password = parameters.get("password");
		// Protect from downstream leaks of password
		parameters.remove("password");
		// 封装成UsernamePasswordAuthenticationToken对象,找到对应的认证方式。
		Authentication userAuth = new UsernamePasswordAuthenticationToken(username, password);
		((AbstractAuthenticationToken) userAuth).setDetails(parameters);
		try {


		// 认证当前的用户是不是存在
			userAuth = authenticationManager.authenticate(userAuth);
		}
		catch (AccountStatusException ase) {


			//covers expired, locked, disabled cases (mentioned in section 5.2, draft 31)
			throw new InvalidGrantException(ase.getMessage());
		}
		catch (BadCredentialsException e) {


			// If the username/password are wrong the spec says we should send 400/invalid grant
			throw new InvalidGrantException(e.getMessage());
		}
		// 如果当前用户不存在,即抛出异常
		if (userAuth == null || !userAuth.isAuthenticated()) {


			throw new InvalidGrantException("Could not authenticate user: " + username);
		}
		// 当前用户存在即封装成OAuth2Request对象
		OAuth2Request storedOAuth2Request = getRequestFactory().createOAuth2Request(client, tokenRequest);
		// 返回封装好的OAuth2Authentication实例对象
		return new OAuth2Authentication(storedOAuth2Request, userAuth);
	}
至此用户的用户名密码认证已经完成。接下来即是根据用户信息生成Token。
3.2 .生成OAuth2AccessToken对象
OAuth2AccessToken对象详解
这一步也是最关键的一步,即生成OAuth2AccessToken对象,里面封装了认证完成的所有信息,下面我们深入的去看下其源码。首先看下其类继承关系图:
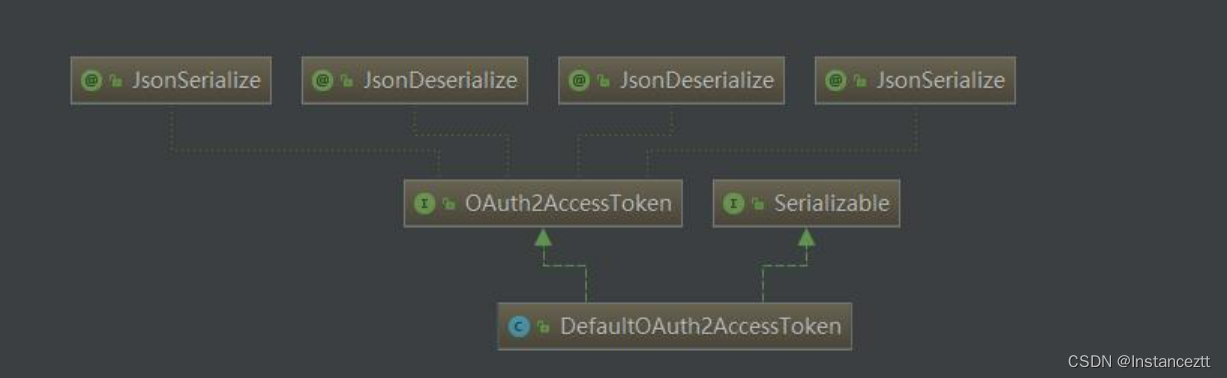
通过类继承图可以发现,其默认实现是:DefaultOAuth2AccessToken。其核心源码是:
public class DefaultOAuth2AccessToken implements Serializable, OAuth2AccessToken {


	private static final long serialVersionUID = 914967629530462926L;
// 生动的access_token
	private String value;
// 过期时间
	private Date expiration;
// 刷新token方式
	private OAuth2RefreshToken refreshToken;
// 当前权限
	private Set<String> scope;
// 额外的增强参数
	private Map<String, Object> additionalInformation = Collections.emptyMap();
//构造函数
	public DefaultOAuth2AccessToken(String value) {


		this.value = value;
	}

	@SuppressWarnings("unused")
	private DefaultOAuth2AccessToken() {


		this((String) null);
	}

 // 构造函数
	public DefaultOAuth2AccessToken(OAuth2AccessToken accessToken) {


		this(accessToken.getValue());
		setAdditionalInformation(accessToken.getAdditionalInformation());
		setRefreshToken(accessToken.getRefreshToken());
		setExpiration(accessToken.getExpiration());
		setScope(accessToken.getScope());
		setTokenType(accessToken.getTokenType());
	}
}
DefaultTokenServices 生成Token
DefaultTokenServices 是Token的默认生成类,通过分析DefaultTokenServices生成类源码,我们可以清晰的知道Token的生成方式。下面我们看下其核心源码实现。其中标注数字的如:1,2,3等注解,都会进一步解析
// 首先该类加了注解,保证其事务的完整性
@Transactional
	public OAuth2AccessToken createAccessToken(OAuth2Authentication authentication) throws AuthenticationException {


	// 1.查询当前Token是否已经存在于数据库中
		OAuth2AccessToken existingAccessToken = tokenStore.getAccessToken(authentication);
		OAuth2RefreshToken refreshToken = null;
		// 如果Token已经存在,做一下的逻辑处理
		if (existingAccessToken != null) {


		// 如果当前Token 已经存在,且已经过期。
			if (existingAccessToken.isExpired()) {


			// 如果当前的RefreshToken不为null的情况下。移除当前RefreshToken
				if (existingAccessToken.getRefreshToken() != null) {


					refreshToken = existingAccessToken.getRefreshToken();
					// The token store could remove the refresh token when the
					// access token is removed, but we want to
					// be sure...
					tokenStore.removeRefreshToken(refreshToken);
				}
				// 移除AccessToken
				tokenStore.removeAccessToken(existingAccessToken);
			}
			// 如果token没有过期,还是使用原来的Token,重新存储。为了防止有权限修改
			. {


				// Re-store the access token in case the authentication has changed
				tokenStore.storeAccessToken(existingAccessToken, authentication);
				return existingAccessToken;
			}
		}

		// Only create a new refresh token if there wasn't an existing one
		// associated with an expired access token.
		// Clients might be holding existing refresh tokens, so we re-use it in
		// the case that the old access token
		// expired.
		if (refreshToken == null) {


			refreshToken = createRefreshToken(authentication);
		}
		// But the refresh token itself might need to be re-issued if it has
		// expired.
		else if (refreshToken instanceof ExpiringOAuth2RefreshToken) {


			ExpiringOAuth2RefreshToken expiring = (ExpiringOAuth2RefreshToken) refreshToken;
			if (System.currentTimeMillis() > expiring.getExpiration().getTime()) {


				refreshToken = createRefreshToken(authentication);
			}
		}
		// 2.创建OAuth2AccessToken 实例
		OAuth2AccessToken accessToken = createAccessToken(authentication, refreshToken);
		tokenStore.storeAccessToken(accessToken, authentication);
		// In case it was modified
		refreshToken = accessToken.getRefreshToken();
		if (refreshToken != null) {


			tokenStore.storeRefreshToken(refreshToken, authentication);
		}
		return accessToken;
	}
查询当前Token的TokenId的生成方式
查询当前Token是否已经存在于数据库中,最核心的功能模块是,怎么获取TokenId。我们通过源码分析,了解其TokenId的生成方式,主要通过DefaultAuthenticationKeyGenerator 类进行实现的:
public class DefaultAuthenticationKeyGenerator implements AuthenticationKeyGenerator {


	private static final String CLIENT_ID = "client_id";
	private static final String SCOPE = "scope";
	private static final String USERNAME = "username";
	// 封装核心参数,到map集合中
	public String extractKey(OAuth2Authentication authentication) {


		Map<String, String> values = new LinkedHashMap<String, String>();
		OAuth2Request authorizationRequest = authentication.getOAuth2Request();
		if (!authentication.isClientOnly()) {


			values.put(USERNAME, authentication.getName());
		}
		values.put(CLIENT_ID, authorizationRequest.getClientId());
		if (authorizationRequest.getScope() != null) {


			values.put(SCOPE, OAuth2Utils.formatParameterList(new TreeSet<String>(authorizationRequest.getScope())));
		}
		return generateKey(values);
	}

	protected String generateKey(Map<String, String> values) {


		MessageDigest digest;
		try {


			digest = MessageDigest.getInstance("MD5");
			// 将核心的参数,变成字符串,在通过MD5加密
			byte[] bytes = digest.digest(values.toString().getBytes("UTF-8"));
			return String.format("%032x", new BigInteger(1, bytes));
		} catch (NoSuchAlgorithmException nsae) {


			throw new IllegalStateException("MD5 algorithm not available.  Fatal (should be in the JDK).", nsae);
		} catch (UnsupportedEncodingException uee) {


			throw new IllegalStateException("UTF-8 encoding not available.  Fatal (should be in the JDK).", uee);
		}
	}
}
通过分析源码可以发现,其生成方式,通过封装核心参数。主要有:客户端名称,用户名称,用户具备的权限信息,通过MD5加密生成TokenID。通过这段源码分析,可以确定,一个客户端,可以产生多个access_token。只要其权限,用户名不同即可。
创建OAuth2AccessToken实例对象的具体实现
创建OAuth2AccessToken中,比较核心的模块是access_token的实现方式。下面我们通过源码分析access_token是如何产生的。其实现类是:DefaultTokenServices
private OAuth2AccessToken createAccessToken(OAuth2Authentication authentication, OAuth2RefreshToken refreshToken) {


// 默认生成access_token的方式是UUID
		DefaultOAuth2AccessToken token = new DefaultOAuth2AccessToken(UUID.randomUUID().toString());
		int validitySeconds = getAccessTokenValiditySeconds(authentication.getOAuth2Request());
		if (validitySeconds > 0) {


			token.setExpiration(new Date(System.currentTimeMillis() + (validitySeconds * 1000L)));
		}
		token.setRefreshToken(refreshToken);
		token.setScope(authentication.getOAuth2Request().getScope());

		return accessTokenEnhancer != null ? accessTokenEnhancer.enhance(token, authentication) : token;
	}
通过源码分析,我们得出,其默认生成access_token的方式是:UUID.randomUUID().toString()。
四 Token持久化
默认的情况下,SpringOauth2.0 提供4种方式存储。第一种是提供了基于mysql的存储,第二种是基于redis的存储。第三种基于jvm的存储,第四种基于Jwt的存储方式。这里我们主要分析的是mysql的持久化和redis的持久化。首先分析下存储的实现类。
4.1 token存储的接口详解
token的存储是通过TokenStore这个接口实现的,下面我们分析下TokenStore的方法参数。
public interface TokenStore {


//读取指定的用户身份认证
	OAuth2Authentication readAuthentication(OAuth2AccessToken token);
// 根据token读取指定的用户身份认证
	OAuth2Authentication readAuthentication(String token);
// 存储token信息和用户认证信息
	void storeAccessToken(OAuth2AccessToken token, OAuth2Authentication authentication);
// 根据tokenValue读取token信息
	OAuth2AccessToken readAccessToken(String tokenValue);
// 移除token信息
	void removeAccessToken(OAuth2AccessToken token);
// 存储刷新token信息
	void storeRefreshToken(OAuth2RefreshToken refreshToken, OAuth2Authentication authentication);
// 读取刷新token信息
	OAuth2RefreshToken readRefreshToken(String tokenValue);
// 读取Token详细信息
	OAuth2AccessToken getAccessToken(OAuth2Authentication authentication);
// 通过客户端和用户名查询当前授权的所有token信息
	Collection<OAuth2AccessToken> findTokensByClientIdAndUserName(String clientId, String userName);
// 查询当前客户端下的所有用认证的token信息
	Collection<OAuth2AccessToken> findTokensByClientId(String clientId);
}
通过上面的分析,我们可以知道,当前存储的主键:token_id的生成规则是根据的:
	private static final String CLIENT_ID = "client_id";
	private static final String SCOPE = "scope";
	private static final String USERNAME = "username";
传输的这三个值做MD5生成的。所以,同一个客户端下,可以存在多个用户的token的信息。
4.2 TokenStore接口的实现详解
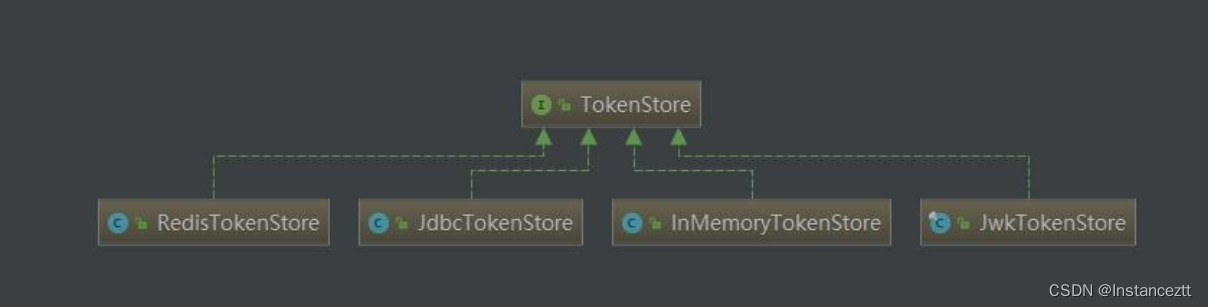
通过接口的实现可以得出,其主要的有四种方式来存储Token。
- RedisTokenStore 通过Redis的方式进行存储
- JdbcTokenStore 通过Jdbc序列化的方式进行存储
- InMemoryTokenStore 直接将当前的Token信息存储在JVM中。
- JwtTokenStroe 通过Jwt的方式进行存储
上面的四种方式进行Token的持久化存储。其中InMemoryTokenStore是将当前的token信息存储到jvm中,重启服务后当前token信息将不复存在。所以,只能在测试开发时候使用。
4.2.1 redis中token存储的元数据详解
数据存储在redis中,并不像存储在mysql中那样可以做关联查询,并且根据redis中的数据结构。SpringOauth2.0 在redis中的存储结构如下:
- auth_to_access
OAuth2Authentication相关信息加密后的值,value为string结构这个主要是通过OAuth2Authentication来获取OAuth2AccessToken - auth:token
value为string结构这个主要用来获取token的OAuth2Authentication,用来获取相应的权限信息 - client_id_to_access:clientId
value为list结构这个主要是存储了每个clientId申请的OAuth2AccessToken的集合
方便用来审计和应急处理跟clientId相关的token - access:token
value为string这个主要是通过token值来获取OAuth2AccessToken - uname_to_access:clientId:userId
value的结构是list存储OAuth2AccessToken的集合主要是为了通过clientId,userId来获取OAuth2AccessToken集合,方便用来获取及revoke approval