Flume概述
Flume 定义
Flume 是 Cloudera 提供的一个高可用的,高可靠的,分布式的海量日志采集、聚合和传输的系统。Flume 基于流式架构,灵活简单。
Flume最主要的作用就是,实时读取服务器本地磁盘的数据,将数据写入到HDFS。
Flume 基础架构
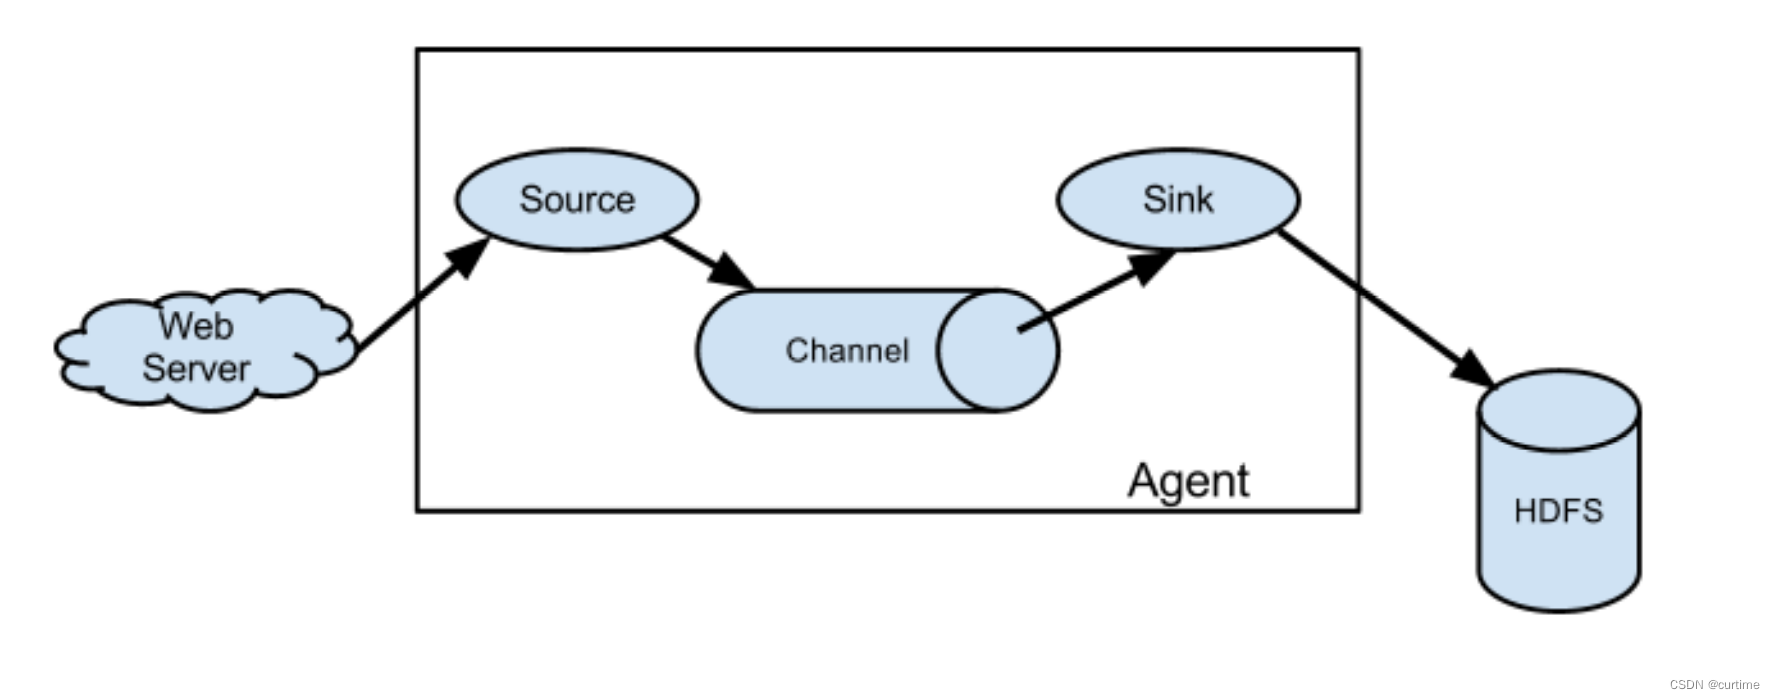
Agent
Agent 是一个 JVM 进程,它以事件的形式将数据从源头送至目的。
Agent 主要有 3 个部分组成,Source、Channel、Sink。
Source
Source 是负责接收数据到 Flume Agent 的组件。Source 组件可以处理各种类型、各种格式的日志数据,包括 avro、thrift、exec、jms、spooling directory、netcat、taildir、sequence generator、syslog、http、legacy。
Sink
Sink 不断地轮询 Channel 中的事件且批量地移除它们,并将这些事件批量写入到存储或索引系统、或者被发送到另一个 Flume Agent。
Sink 组件目的地包括 hdfs、logger、avro、thrift、ipc、file、HBase、solr、自定
义。
Channel
Channel 是位于 Source 和 Sink 之间的缓冲区。因此,Channel 允许 Source 和 Sink 运作在不同的速率上。Channel 是线程安全的,可以同时处理几个 Source 的写入操作和几个Sink 的读取操作。
Flume 自带两种 Channel:Memory Channel 和 File Channel。
Memory Channel 是内存中的队列。Memory Channel 在不需要关心数据丢失的情景下适用。如果需要关心数据丢失,那么 Memory Channel 就不应该使用,因为程序死亡、机器宕
机或者重启都会导致数据丢失。
File Channel 将所有事件写到磁盘。因此在程序关闭或机器宕机的情况下不会丢失数
据。
Flume 安装部署
解压
[root@guo146 install]# tar -zxf apache-flume-1.9.0-bin.tar.gz -C ../soft/
修改名称
[root@guo146 soft]# mv apache-flume-1.9.0-bin/ flume190
修改配置文件
[root@guo146 conf]# cp flume-env.sh.template flume-env.sh
[root@guo146 conf]# vim flume-env.sh
修改内容如下

安装
[root@guo146 conf]#  yum install -y nc
[root@guo147 conf]# yum install telnet-server -y
[root@guo147 conf]# yum install telnet.* -y
测试
在 conf 文件夹下创建 Flume Agent 配置文件netcat-logger.conf
添加内容如下:
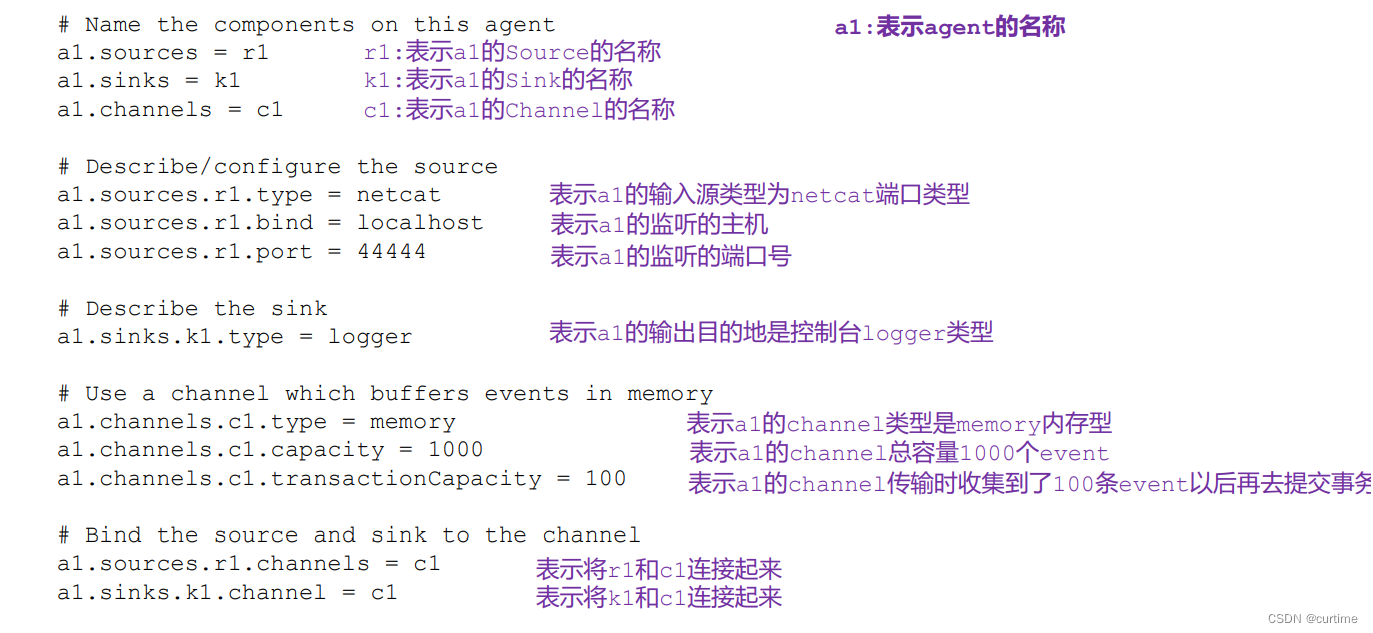
# Name the components on this agent
a1.sources = r1
a1.sinks = k1
a1.channels = c1

# Describe/configure the source
a1.sources.r1.type = netcat
a1.sources.r1.bind = 192.168.153.147
a1.sources.r1.port = 8888

# Describe the sink
a1.sinks.k1.type = logger
# Use a channel which buffers events in memory
a1.channels.c1.type = memory
a1.channels.c1.capacity = 1000
a1.channels.c1.transactionCapacity = 100

# Bind the source and sink to the channel
a1.sources.r1.channels = c1
a1.sinks.k1.channel = c1
配置文件解析
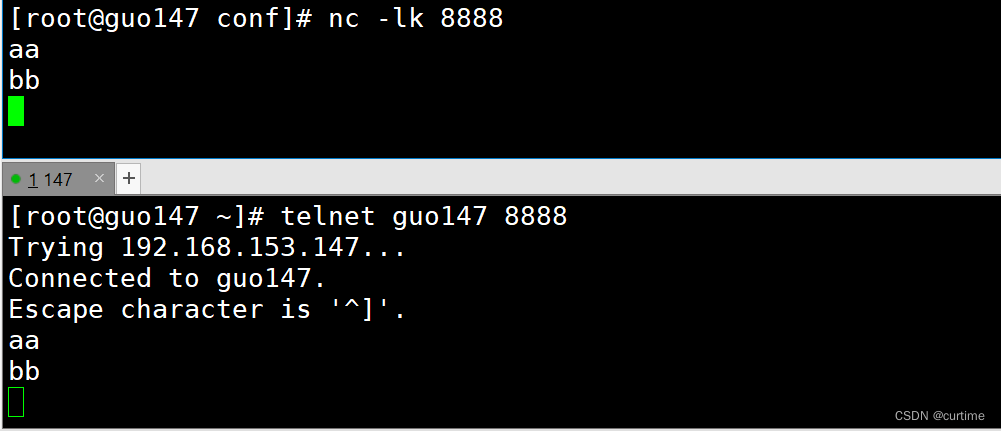
[root@guo147 conf]# nc -lk 8888
再打开一个窗口
[root@guo147 ~]# telnet guo147 8888
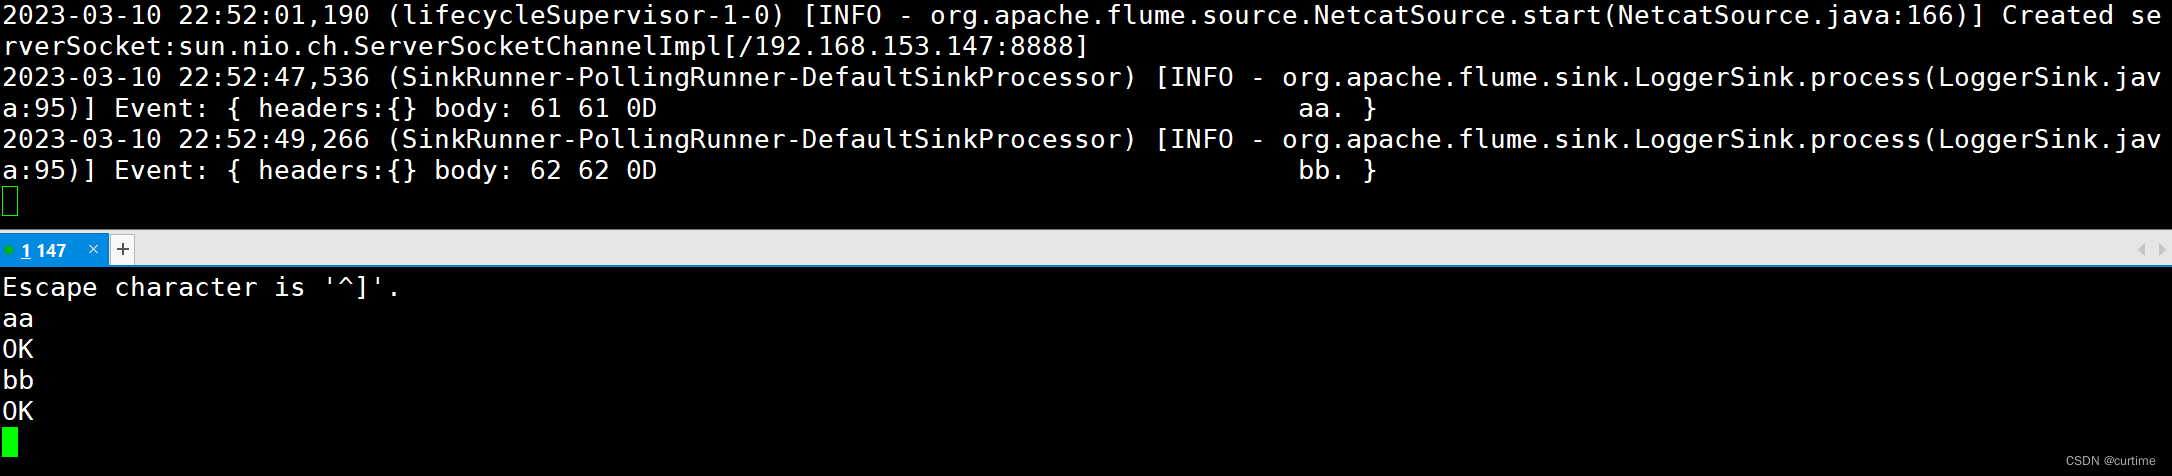
使用 Flume 监听一个端口,收集该端口数据,并打印到控制台
开启 flume 监听端口
使用上面配置好的netcat-logger.conf
[root@guo147 flume190]# bin/flume-ng agent --conf ./conf/ --name a1 --conf-file ./conf/netcat-logger.conf -Dflume.root.logger=INFO,console
参数说明:
–conf/-c:表示配置文件存储在 conf/目录
–name/-n:表示给 agent 起名为 a1
–conf-file/-f:flume 本次启动读取的配置文件是在 job 文件夹下的 flume-telnet.conf
文件。
-Dflume.root.logger=INFO,console :-D 表示 flume 运行时动态修改 flume.root.logger
参数属性值,并将控制台日志打印级别设置为 INFO 级别。日志级别包括:log、info、warn、
error。
使用 netcat 工具向本机的 8888 端口发送内容
[root@guo147 conf]# telnet 192.168.153.147 8888
输入aa回车bb
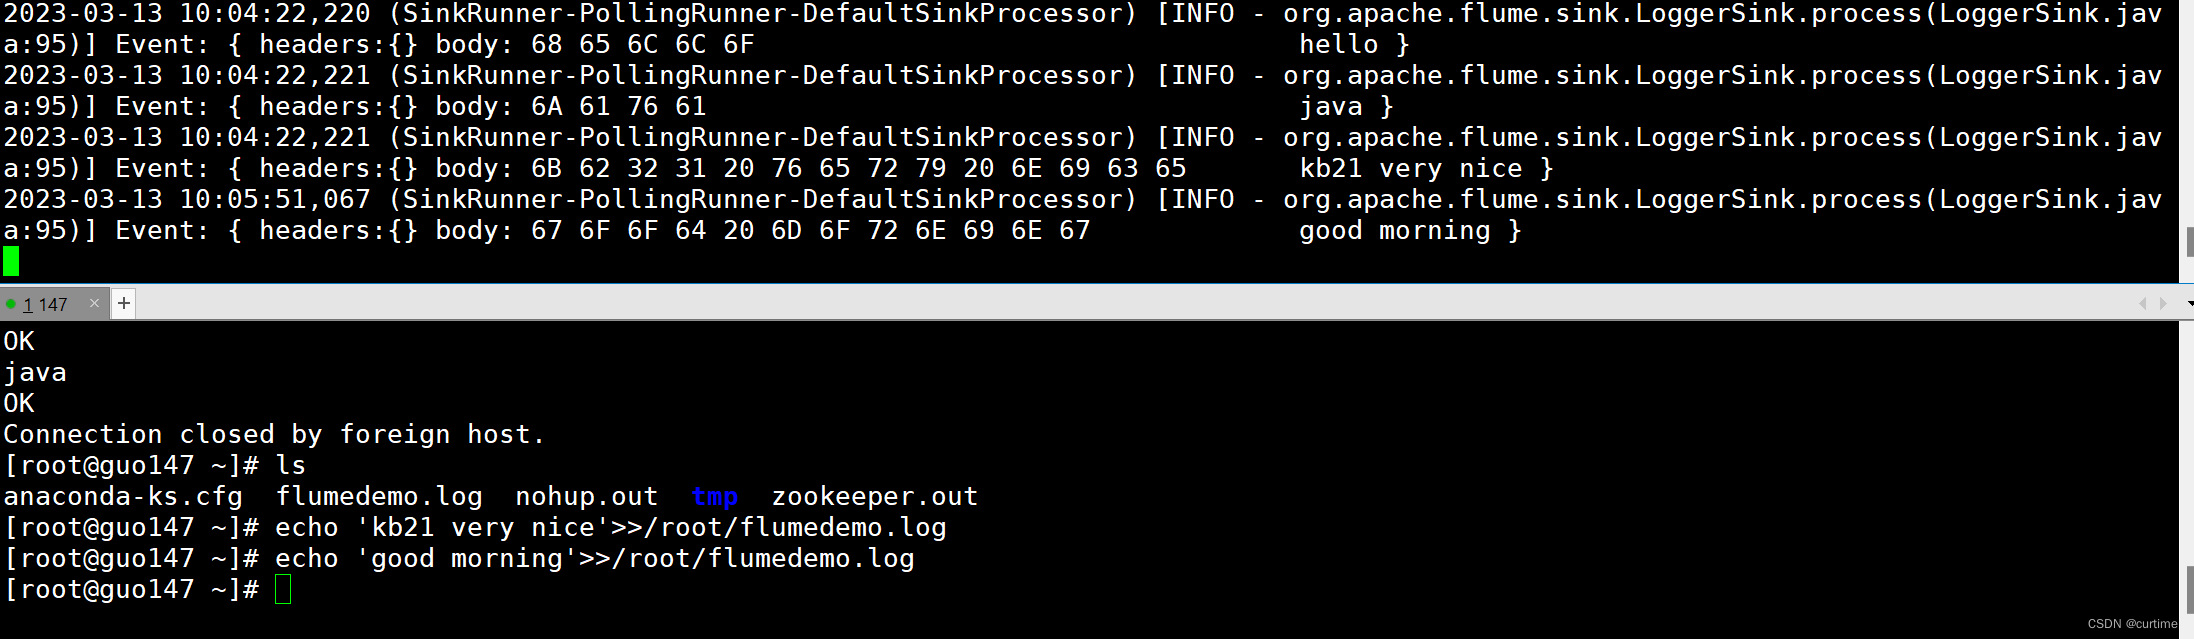
将指定文件中的内容输出到控制台
创建文件并添加内容
[root@guo147 ~]# vim flumedemo.log

hello
java
在file-flume-logger.conf文件中添加如下内容:
[root@guo147 flume190]# vim ./conf/file-flume-logger.conf

a2.sources=r1
a2.sinks=k1
a2.channels=c1

a2.sources.r1.type=exec
a2.sources.r1.command=tail -f /root/flumedemo.log

a2.channels.c1.type=memory
a2.channels.c1.capacity=1000
a2.channels.c1.transactionCapacity=100

a2.sinks.k1.type=logger

a2.sources.r1.channels=c1
a2.sinks.k1.channel=c1
开启监听端口
[root@guo147 flume190]# bin/flume-ng agent --conf ./conf/ --name a2 --conf-file ./conf/file-flume-logger.conf -Dflume.root.logger=INFO,console
先前添加的内容会输出到控制台,并支持动态更新