需求:
通过nexus搭建私服仓库存储docker镜像时,会出现磁盘占用很大的情况(我的磁盘都被占满了,680多G),这时候需要清理磁盘空间,该如何清理呢,本次通过实例进行讲述。
环境信息:
| 操作系统 | 应用 |
|---|---|
| Centos7.6 | nexus3.11.0.01 |
操作步骤
第一步:服务器上操作
本操作的目的是清除无用的docker镜像,但是如何判断为无用的,需要根据自己的业务来判断,我这里是把dev和test下的镜像全部清除掉
- 登录安装了nexus的服务器,进入nexus的安装目录
[root@localhost bin]# cd /home/nexus/nexus-3.11.0-01/bin
[root@localhost bin]# ll
总用量 7808
drwxrwxr-x. 2 nexus nexus    4096 5月  21 2018 contrib
-rw-r--r--. 1 root  root       51 9月   9 16:41 delete_image.log
-rwxr-xr-x. 1 root  root      596 9月   9 16:47 delete_image.sh  # 删除镜像脚本
-rwxr-xr-x. 1 nexus nexus   17269 4月  27 2018 nexus
-rwxr-xr-x. 1 root  root  7949500 9月   9 13:36 nexus-cli   # 确认存在该可执行文件,一般安装nexus后就会有
-rw-r--r--. 1 nexus nexus      15 4月  27 2018 nexus.rc
-rw-r--r--. 1 nexus nexus     465 4月  27 2018 nexus.vmoptions
[root@localhost bin]#
- 执行删除镜像脚本:
[root@localhost bin]# ./delete_image.sh
======= 2020年 09月 09日 星期三 16:34:42 CST ========
 Begin to delete docker images with tag.
 image is :dev/cloud-portal-asr
 tag is :dev
There are 1 images for dev/cloud-portal-asr
 delete image is:dev/cloud-portal-asr,tag is :dev
There are 1 images for dev/cloud-portal-asr
 image is :dev/cloud-storage-manage-server
 tag is :latest
There are 1 images for dev/cloud-storage-manage-server
 delete image is:dev/cloud-storage-manage-server,tag is :latest
There are 1 images for dev/cloud-storage-manage-server
 image is :dev/cloud-storage-server
 tag is :latest
There are 1 images for dev/cloud-storage-server
 delete image is:dev/cloud-storage-server,tag is :latest
There are 1 images for dev/cloud-storage-server
delete_image.sh脚本内容如下:
#!/usr/bin/bash
filename=`basename ${

     0%.*}` # 获取本脚本的文件名,不带后缀,用于日志文件
echo "======= `date` ========" > $filename.log  # 生成日志文件
echo -e "\033[35m Begin to delete docker images with tag. \033[0m" >> $filename.log
dir="/home/nexus/nexus-3.11.0-01/bin" # 定义nexus的安装目录,方便获取可执行文件
cd $dir
# 下面是获取镜像名称,这里是获取以test和dev开头的镜像名称,我现在就是要删除test和dev相关的镜像
images=`/home/nexus/nexus-3.11.0-01/bin/nexus-cli image ls | grep -E "^test|^dev"`

# 循环执行删除镜像
for image in $images;
do
        echo -e "\033[34m image is :$image \033[0m"
        tag=`./nexus-cli image tags -name $image`  # 根据镜像获取该镜像的tag
        echo -e "\033[34m tag is :$tag \033[0m"
        echo -e "\033[33m delete image is:$image,tag is :$tag \033[0m"
        ./nexus-cli image delete --name $image -tag $tag >> $filename.log  # 根据image和tag来执行删除镜像
done
脚本中已经解释了主要代码,其它代码只是辅助,可以忽略
因为删除镜像时必须要带-tag或者-keep参数,因为-keep值不能为0,所以我选择了带tag参数,也就是根据指定tag进行删除
如果你有很多tag,需要保留最新的几个tag,可以选择keep参数
这样镜像就已经删除完了,可以查看delete_image.log日志。
这时候虽然镜像时删除了,但是磁盘空间还没有释放出来,如下图:

可以看出来我们的home目录下磁盘占用还是100%,因此需要我们进行第二步来清理物理磁盘
第二步:nexus网页上操作
-
登录nexus网页端,http://172.16.6.108:8081/
-
进入tasks任务列表,创建task任务

- 执行task,可以选择手动执行,或者定时执行
- 手动执行
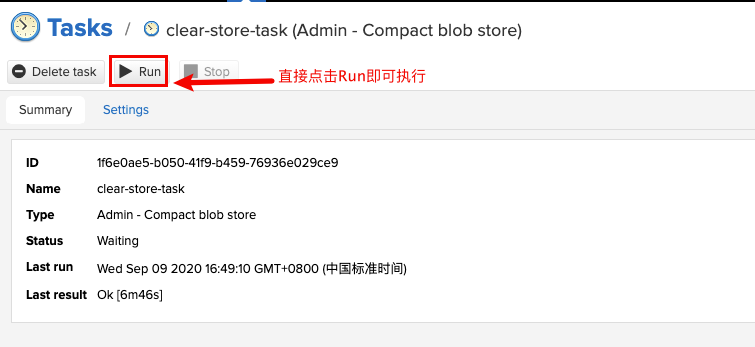
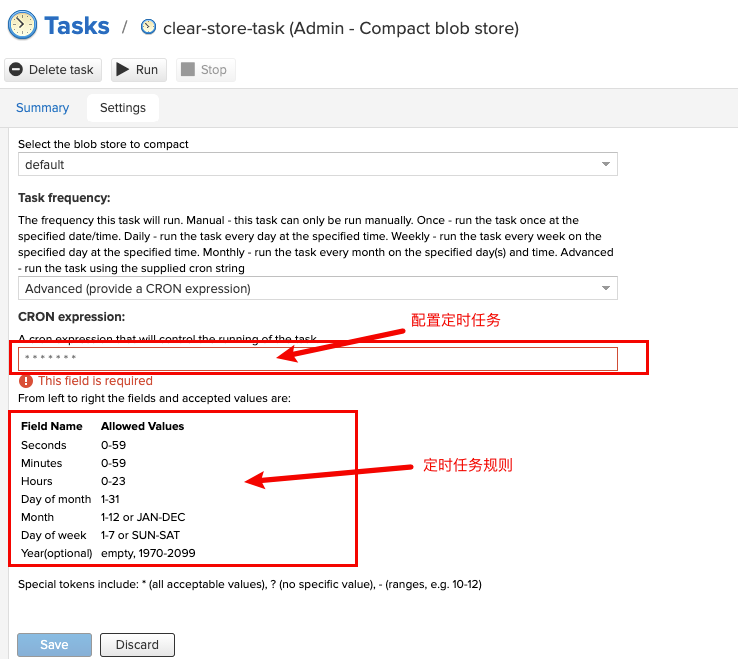
- 定时执行
点击settings进行设置定时任务
执行需要花费一些时间,具体时间根据你要删除的镜像多少和大小来判断,我删除了160多个镜像,释放了299G,花费了10分钟左右
再来看我们的磁盘占用情况
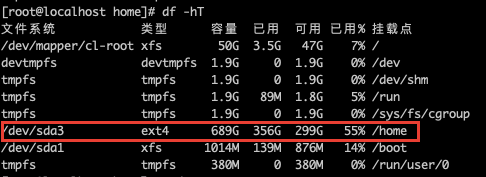
终于大功告成。
附录:nexus-cli常用命令
| 命令说明 | 命令 |
|---|---|
| 查看当前仓库中所有镜像 | nexus-cli image ls |
| 查看某一镜像的所有的tag | nexus-cli image tags -name $IMAGE_NAME |
| 查看某一镜像详细信息 | nexus-cli image info -name $IMAGE_NAME -tag $TAG |
| 删除指定tag的指定镜像 | nexus-cli image delete -name $IMAGE_NAME -tag $TAG |
| 仅保留最新的X个tag,其余全部删除 | nexus-cli image delete -name $IMAGE_NAME -keep X |
- 说明:-keep参数不能为0,所以如果该镜像只有一个tag,我们想删除,那就只能根据tag来删除,我上面的例子中就是这样