vue2x
生命周期有哪些?发送请求在那里
beforeCreate/created、beforeMounte/mounted、beforeUpdate/Updated、beforeDestory/destoryrd2.发送请求为什么不在beforeCreate里?beforeCreate和created有什么区别?
如果请求是在methods里封装好的,在beforeCreate调用的时候,beforeCreate阶段是获取不到methods里面的方法。3.进入组件会执行那些生命周期?
beforeCreate--created--beforeMount--mounted4.进入组件会执行那些生命周期?
beforeCreate--created--beforeMount--mounted5.父组件引入子组件,生命周期执行顺序是?
父:beforeCreate--created--beforeMount
子:beforeCreate--created--beforeMount--mounted
...
父:mounted
6.keep-alive
缓存当前组件7.加入keep-alive会执行那些生命周期?
beforeCreate--created--beforeMount--mounted--activated切换组件会执行activated8.在哪些情况下使用过那些生命周期?
created:单组件请求,或者请求的数据可以改变dom的渲染
mounted:子组件先于父组件请求,或者请求数据不会引起dom的重排
activated:多次进入相同的页面,可以判断页面的id是否相等,不相等就发请求
destroyed:关闭页面时记录视频播放的位置,下次打开时从记录位置开始播放
9.组件的通信方式
父传子:
父组件绑定,子组件通过props接收,但不能直接修改父组件的数据。
通过$parent直接获取父组件的值,可以直接修改父组件的数据。
通过依赖注入传值。
子传父:
通过事件的$emit()传递。
通过$children[0].xxx或者通过子组件身上的ref属性this.$refs.xxx.value
兄弟传值:
通过新的vue实例来中转
通过消息订阅与发布
通过全局事件总线$bus
通过vuex
10.子组件直接修改父组件的值?
子组件中用this.$parent去修改11.依赖注入,provoid/inject
父组件:provoid(){return {value:'xxx'}}
子组件:inject:['value']
12.父组件直接修改子组件数据
<List ref='child'></List>
this.$refs.child.xxx='xxxx'
13.slot插槽
匿名插槽
居名插槽
作用域插槽
14.如何封装组件?
15.vuex有哪些属性
state:全局共享属性
getters:state的监听属性,对属性进行二次计算
actions:异步,存放异步方法
mutations:唯一可以修改state的方法,同步操作,存放同步方法
modules:将vuex模块化
16.vuex使用state值
this.$store.state.xxx
辅助函数:
    import {mapState,mapGetters} from 'vuex'
    computed:{
        ...mapState(['xxx'])
    }
    this.$store.state.xxx
区别:使用this.$store.state.xxx可以直接修改state的值
    使用辅助函数不可以直接修改state的值
17.vuex中getters属性
 this.$store.getters.xxxx
 import {mapGetters} from 'vuex'
 computed:{
     ...mapGetters(['xxxx'])
 }
 {

    {xxx}}
18.vuex的mutations和actions的区别
相同点:mutations和actions都是存放全局方法的,这个全局的方法return的值拿不到
区别:
mutations是同步
actions返回的是一个Promise对象,可以执行异步操作
mutations是来修改state的值,actions是用来提交mutations
19.Vuex的持久化存储
vuex本身不是持久化存储,他是一个状态管理的仓库。
用localstorage
使用插件
20.路由的模式
hash模式:#,找不到页面时不会给发送请求,打包后自测可以看到内容
history模式:/,找不到页面时会发送请求,打包后自测看不到内容
21.导航故障,本页面跳转本页面
//mian.js
import VueRouter from 'vue-router'
const routerPush = VueRouter.prototype.push
VueRouter.prototype.push = function (location){
    return routerPush.call(this,location).catch(error=>error)
}
22.route和router的区别
$router:路由实例对象,和整个路由的属性和方法
$route:包含当前路由信息对象
23.导航守卫
全局守卫:
    brforeEach路由进入之前
    afterEach路由进入之后
路由独享守卫:
    beforeEnter路由进入之前
组件内守卫:
    beforeRouteEnter路由进入之前
    beforeRouteUpdate路由更新之前
    beforeRouteLeave路由离开之前
24.$nextTick
返回的参数是一个函数,是异步的,获取更新后的dom25.数据定义在return里面和外面的区别
外面单纯修改数据是不可以的,因为没有被getter和setter
里面的可以修改数据,被getter和setter了
26.computed计算属性
computed计算的结果值可以被修改,需要通过get/set写法。 27.watch
监听属性,发生改变才执行
深度监听需添加deep:true
28.methods和computed的区别
computed有缓存机制,methods没有缓存机制29.如何自定义指令
全局:
    //main.js
    Vue.directive('demo',{
        inserted:function(a,b,c){
            console.log(a,b,c)
        }
    })
    v-demo='123'
局部:
    export default {
        directives:{
            demo:{
                bind:function(el){
                    console.log(1)
                }
            }
        }
    }
30.v-for和v-if的优先级
vue2:v-for>v-if
vue3:v-if>v-for
31.$nextTick原理
异步行为
$nextTick(callback){
    return Promise.resolve().then(()=>{
        callback();
    })
}
32.vue数据驱动的原理
<div id='app'>
    <h1>{

    {str}}</h1>
    {

    { str }}
    <p>{

    {b}}</p>
    <button @click='btn'></button>
    <input name='' type='' v-model='str'/>
</div>
<script type="text/javascript" src="vue.js"></script>
<script type='text/javascript'>
    new Vue({
        el:'#app',
        data:{
            str:'n你好',
            b:'这是柒月北辰定义的data数据'
        },
        beforeCreate(){},
        created(){},
        beforeMount(){},
        mounted(){},
        methods:{
            btn(){
                alert(this.str)
                this.str='12345'
            }
        }
    })
</script>
class Vue{
    constructor(options){
        this.$options=options;
        //生命周期
        if(typeof options.beforeCreate=='function'){
            options.beforeCreate.bind(this)();
        }
        //获取data对象
        this.$data=options.data;
        this.proxyData();
        this.observe();
        if(typeof options.created=='function'){
            options.created.bind(this)();
        }
        if(typeof options.beforeMount=='function'){
            options.beforeMount.bind(this)();
        }
        if(typeof options.mounted=='function'){
            options.mounted.bind(this)();
        }
        //获取el节点
        this.$el=document.querySelector(options.el);
        //解析模板的方法
        this.compile(this.$el);
    }
    proxyData(){
        for(let key in this.$data){
            Object.defineProperty(this,key,{
                get(){
                    return this.$data[key];
                },
                set(val){
                    this.$data[key]=val;
                }
            })
        }
    }
    //this.str生效并修改
    observe(){
        for(let key in this.$data){
            let value=this.$data[key];
            let that=this;
            Object.defineProperty(this.$data,key,{
                get(){
                    return value;
                },
                set(val){
                    value=val;
                    if(that.$watchEvent[key]){
                        that.$watchEvent[key].forEach((item,index)=>{
                            item.update();
                        })
                    }
                }
            })
        }
    }
    compile(node){
        node.childNodes.forEach(item,index)=>{
            //元素节点
            if(item.nodeType==1){
                if(item.hasAttribute('@click')){
                    let vmKey=item.getAttribute('@click'.trim());
                    item.addEventListener('click',(event)=>{
                        this.eventFn=this.$options.methods['vmKey'].bind(this);
                        this.eventFn(event);
                    })
                }
                //v-model原理实现
                if(item.hasAttribute('v-model')){
                    let vmKey=item.getAttribute('v-model'.trim());
                    if(this.hasOwnProperty(vmKey)){
                        item.value=this[vmKey];
                    }
                    item.addEventListener('input',(event)=>{
                        this[vmKey]=item.value;
                    })
                }
                if(item.childNodes.length>0){
                    this.compile(item);
                }
            }
            //文本节点
            if(item.nodeType==3){
                let reg=/\{\{(.*?)\}\}/g;
                let text=item.textContent;
                //给节点赋值
                item.textContent=text.replace(reg,(match,vmKey)=>{
                    vmKey=vmKey.trim();
                    if(this.hasOwnProperty(vmKey)){
                        //this.str生效并修改
                        let watch=new Watch(this,vmKey,item,'textContent');
                        if(this.$watchEvent[vmKey]){
                            this.$watchEvent[vmKey].push(watch);
                        }else{
                            this.$watchEvent[vmKey]=[];
                            this.$watchEvent[vmKey].push(watch);
                        }
                    }
                    return this.$data[vmKey];
                })
            }
        }
    }
}
//this.str生效并修改
class Watch{
    constructor(vm,key,node,attr){
        this.vm=vm;
        this.key=key;
        this.node=node;
        this.attr=attr;
    }
    update(){
        this.node[this.attr]=this.vm[this.key];
    }
}
33.双向数据绑定原理
通过Obiect.defineProperty()劫持数据发生的改变,如果数据发生改变(在set中进行赋值),触发update方法进行更新节点内容,从而实现了数据双向绑定的原理。34.什么是mvvm
model-view-viewModel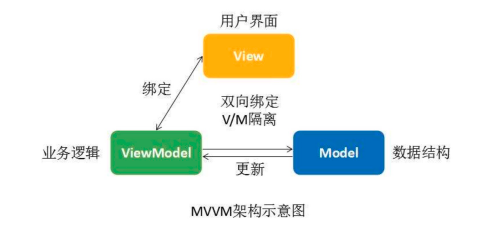
35.axios请求的封装
axios.get('http://xxxx?a=1&b=2')
axios.post('http://xxxxx',{
    a:1,
    b:2
})
axios({
    url:'xxx',
    params:{},
    data:{},
    method:'get',
    haeaders:{},
    timeout:5000,
    responseType:'json--响应的数据,默认json'
})
npm install axios -S
import axios from 'axios'
方法一:
import axios from 'axios'
axios.get('http://xxxx?a=1').then(res=>{

})
方法二:
import axios from 'axios'
axios({
    url:'http://xxxxxxxx',
    params:{
        a:1
    },
    methods:'get'
}).then(res=>{

})
开发环境解决跨域:
//vue.config.js
devServer:{
    proxy:'http://xxxxxx:3000'
}
//使用
axios.get('/list').then(res=>{})
封装axios
import axios from 'axios'
const instance=axios.create({
    //baseUrl:'http://xxxxxx.com'
    baseUrl:process.env.VUE_APP_TITLE=='schj'?process.env.VUE_APP_BASE_API:''
});
//添加请求拦截器
instance.interceptors.request.use(function(config){
    //在请求之前做些什么
    return config;
},function(error){
    return Promise.reject(error);
});
//添加响应拦截器
instance.interceptors.response.use(function(response){
    //对相应数据做点什么
    return response.data;
},function(error){
    return Promise.reject(error)
});
export default instance;
api解耦封装
import request from 'util/request';
export function reqSearch(data){
    return request({
        url:'/api/course/search',
        method:'post',
        data
    })
}
//使用
import {reqSearch} from '/api'
reqSearch({a:1,b:2})
生产环境打包后配置代理不生效----可配置环境变量解决
env.development文件
    VUE_APP_TITLE=开发环境
    VUE_APP_BASE_API='https://xxxxxxxx'
env.production文件
    VUE_APP_TITLE=生产环境
    VUE_APP_BASE_API='https://xxxxxxxx'
调用
process.env.VUE_APP_BASE_API