1.wc命令
统计文件内容:统计文件中的单词数量(word count)等信息。
wc命令格式:wc [选项]…目标文件
常用命令选项:
● -l:统计行数
● -w:统计单词个数
● -c:统计字节数
注:不带任何选项的wc命令,默认同时使用-lwc三个选项.
wc -l命令
[root@clr /usr]# cat 2.txt
1
2
3
4
5
6
7
8
9
10
11
12
13
14
15
16
17
18
19
20
[root@clr /usr]# wc -l 2.txt  #统计2.txt这个文件中的行数
20 2.txt
[root@clr /usr]# cat 2.txt |wc -l  #利用管道符查看并统计指定文件的行数,只显示行数,不显示文件名
20
wc -w命令
[root@clr /usr]# cat 3.txt
123      456    789
[root@clr /usr]# wc -w 3.txt   #统计3.txt这个文件中的单词数
3 3.txt
wc -c命令
[root@clr /usr]# wc -c 3.txt  #统计指定文件中单词的数量
12 3.txt
[root@clr /usr]# cat 3.txt   #行首和文档结尾处\n结束符,也算一个字节数
123
4455ffd
wc命令不加任何选项,默认同时显示-lwc三个选项的功能;

[root@clr /usr]# cat 3.txt | wc  #wc结合管道符一起使用,不显示文件名,依次表示2行内容,2个单词,12个字节数
      2       2      12
1.1 wc命令总结
-
wc -l:显示总行数,包括空行占用的行数也计入在内;
-
wc -w:按照空格、tab或换行进行统计单词数;
-
wc -c:按照空格、tab或空行统计字节数(空行、换行符以及结尾符都算作是一个单独的字节);
2.grep命令
在文件中查找并显示包含指定字符串的行
grep命令格式:grep [选项]…查找条件 目标文件
常用命令选项:
-i、-v、-n、-c、-e
查找条件设置:
-
要查找的字符串以双引号括起来
-
“^…” 表示以…开头,”…$”表示以…结尾
-
“^$”表示空行
grep命令

grep -i命令
[root@clr ~]# grep -i system anaconda-ks.cfg   #查询指定文件中所有含有system的行,并且不区分大小写
# System authorization information
# System language
# System services
# System timezone
# X Window System configuration information
# System bootloader configuration
@network-file-system-client

[root@clr ~]# grep "^#" anaconda-ks.cfg   #查找指定文件中,所有以#号开头的行,并显示出来
#version=DEVEL
# System authorization information
# Use CDROM installation media
# Use graphical install
# Run the Setup Agent on first boot
# Keyboard layouts
# System language
# Network information
# Root password
# System services
# System timezone
# X Window System configuration information
# System bootloader configuration
# Partition clearing information
# Disk partitioning information

[root@clr ~]# grep "[0-9]$" anaconda-ks.cfg  #查找并显示指定文件中,以数字结尾的行
auth --enableshadow --passalgo=sha512
lang zh_CN.UTF-8
rootpw --iscrypted $6$rn9yK8kuso3pcHaI$mi0mdf/UQf9p2PdB/zkG1Zmyh7DtvL2Ckgr1aFjTJP1tFPKwRLaKUzUxLtKvR2b995g4JqOcTuWd6EF/ad4xa0
part / --fstype="xfs" --ondisk=sda --size=37926
part swap --fstype="swap" --ondisk=sda --size=3969
@x11
grep -v命令
[root@clr ~]# grep -v "^#" anaconda-ks.cfg #反向查询并显示所有不以#号开头的行(-v方向查询并显示后面参数未匹配到的内容)
auth --enableshadow --passalgo=sha512
cdrom
graphical
firstboot --enable
ignoredisk --only-use=sda
keyboard --vckeymap=cn --xlayouts='cn'
lang zh_CN.UTF-8

network  --bootproto=dhcp --device=ens33 --onboot=off --ipv6=auto --no-activate
network  --hostname=localhost.localdomain

rootpw --iscrypted $6$rn9yK8kuso3pcHaI$mi0mdf/UQf9p2PdB/zkG1Zmyh7DtvL2Ckgr1aFjTJP1tFPKw
[root@clr ~]# cat abc.txt
1
2
3
4


5
6
7
8
9


10

[root@clr ~]# grep -v "^$" abc.txt #查询并显示不是空行的行(反向匹配)
1
2
3
4
5
6
7
8
9
10

grep -c命令
[root@clr ~]# grep "^#" anaconda-ks.cfg   #查询并显示所有以#号开头的行
#version=DEVEL
# System authorization information
# Use CDROM installation media
# Use graphical install
# Run the Setup Agent on first boot
# Keyboard layouts
# System language
# Network information
# Root password
# System services
# System timezone
# X Window System configuration information
# System bootloader configuration
# Partition clearing information
# Disk partitioning information

[root@clr ~]# grep "^#" anaconda-ks.cfg | wc -l  #统计以#号开头的行数
15

[root@clr ~]# grep -c "^#" anaconda-ks.cfg   #统计以#号开头匹配的行数
15

[root@clr ~]# grep "cn" anaconda-ks.cfg #统计指定文件中含有cn字符串的行数
keyboard --vckeymap=cn --xlayouts='cn'

[root@clr ~]# grep -c "cn" anaconda-ks.cfg  #统计匹配指定文件中含有cn字符串的行数
1
grep -o命令
[root@clr ~]# grep "cn" anaconda-ks.cfg #查询并显示指定文件中含有cn的行数
keyboard --vckeymap=cn --xlayouts='cn'
[root@clr ~]# grep -o "cn" anaconda-ks.cfg #统计指定文件中匹配到的指定字符串(cn)的次数
cn
cn

[root@clr ~]# grep -o "cn" anaconda-ks.cfg | wc -l  #统计指定文件中匹配到的指定字符串(cn)的次数,并将次数统计出来
2
grep命令选项的混合使用;
[root@clr ~]# grep "no" anaconda-ks.cfg  #查询并显示指定文件中含有no字符串的行
ignoredisk --only-use=sda
network  --bootproto=dhcp --device=ens33 --onboot=off --ipv6=auto --no-activate
clearpart --none --initlabel
@^gnome-desktop-environment
@gnome-desktop
pwpolicy root --minlen=6 --minquality=1 --notstrict --nochanges --notempty
pwpolicy user --minlen=6 --minquality=1 --notstrict --nochanges --emptyok
pwpolicy luks --minlen=6 --minquality=1 --notstrict --nochanges --notempty

[root@clr ~]# grep -c "no" anaconda-ks.cfg   #统计指定文件中,含有no字符串的行数
8

[root@clr ~]# grep -o  "no" anaconda-ks.cfg   #统计并显示指定文件中,匹配到no字符串的次数
no
no
no
no
no
no
no
no
no
no
no
no
no
[root@clr ~]# grep -o  "no" anaconda-ks.cfg | wc -l #统计并显示指定文件中,匹配到no字符串的次数,并统计显示次数
13
grep -n命令
[root@clr ~]# grep -n  "no" anaconda-ks.cfg   #查询并显示指定文件中含有no字符串的行,并将该行在原文件中的行数显示出来
10:ignoredisk --only-use=sda
17:network  --bootproto=dhcp --device=ens33 --onboot=off --ipv6=auto --no-activate
32:clearpart --none --initlabel
38:@^gnome-desktop-environment
46:@gnome-desktop
66:pwpolicy root --minlen=6 --minquality=1 --notstrict --nochanges --notempty
67:pwpolicy user --minlen=6 --minquality=1 --notstrict --nochanges --emptyok
68:pwpolicy luks --minlen=6 --minquality=1 --notstrict --nochanges --notempty
grep -e命令
[root@clr ~]# grep -e "^#" -e "^@" anaconda-ks.cfg #查询并显示指定文件中以#号开头,或者以@开头的内容(-e多条件查询,和其他选项一起使用时,选项-e放在最后)(实现或的作用)
#version=DEVEL
# System authorization information
# Use CDROM installation media
# Use graphical install
# Run the Setup Agent on first boot
# Keyboard layouts
@java-platform
@multimedia
@network-file-system-client
@networkmanager-submodules
@print-client
@x11
[root@clr ~]# grep -e "^#" -e "^@" anaconda-ks.cfg | grep "on" #先查询以#开头或者以@开头的行,然后将查询后的内容作为参数传递给管道符,查询并显示其中含有on字符串的行(实现且的作用)
#version=DEVEL
# System authorization information
# Use CDROM installation media
# Run the Setup Agent on first boot
# Network information
# System timezone
# X Window System configuration information
# System bootloader configuration
# Partition clearing information
# Disk partitioning information
@^gnome-desktop-environment
@fonts
查询并显示指定文件中:不区分大小写,含有system字符串,并且以数字结尾的行;
[root@clr ~]# cat anaconda-ks.cfg | grep -ie "system" -e "[0-9]$" #查询并显示指定文件中:不区分大小写,含有system字符串,并且以数字结尾的行;
# System authorization information
auth --enableshadow --passalgo=sha512
# System language
lang zh_CN.UTF-8
rootpw --iscrypted $6$rn9yK8kuso3pcHaI$mi0mdf/UQf9p2PdB/zkG1Zmyh7DtvL2Ckgr1aFjTJP1tFPKwRLaKUzUxLtKvR2b995g4JqOcTuWd6EF/ad4xa0
# System services
# System timezone
# X Window System configuration information
# System bootloader configuration
part / --fstype="xfs" --ondisk=sda --size=37926
part swap --fstype="swap" --ondisk=sda --size=3969
@network-file-system-client
@x11
grep -E命令
[root@clr ~]# grep "^#|^@" anaconda-ks.cfg   #正则表达式在grep命令中起不到作用
[root@clr ~]# grep -E  "^#|^@" anaconda-ks.cfg #查询并显示指定文件中以#号开头,或者以@开头的行
#version=DEVEL
# System authorization information
# Use CDROM installation media
# Use graphical install
# Run the Setup Agent on first boot
@network-file-system-client
@networkmanager-submodules
@print-client
@x11

[root@clr ~]# egrep "^#|^@" anaconda-ks.cfg  #查询并显示指定文件中以#号开头,或者以@开头的行,效果等同于grep -E
#version=DEVEL
# System authorization information
# Use CDROM installation media
# Use graphical install
# Run the Setup Agent on first boot
@network-file-system-client
@networkmanager-submodules
@print-client
@x11
grep -A命令
[root@clr ~]# cat anaconda-ks.cfg | grep -in "system timezone"  #查看指定文件中含有"system timezone" 字符串,不区分大小写,并且显示出字符串所在原文件中的行号
24:# System timezone

[root@clr ~]# cat anaconda-ks.cfg | grep -A 5  -in "system timezone" #查看指定文件中含有"system timezone" 字符串,不区分大小写,并且显示出字符串所在原文件中的行号,以及所在行号后面的5行内容,一并显示出来
24:# System timezone
25-timezone Asia/Shanghai --isUtc
26-user --name=cCLR --password=$6$gy7MYQ5UGcLxJrGX$GgqRkJhqVMt2uvInbArGKjqkYdYtw2GJhqA/Y5mHly6eqzQUiIDjw8q/2t9K42l1TOvW0hRI1QoK/R3V3hJUo0 --iscrypted --gecos="CLR"
27-# X Window System configuration information
28-xconfig  --startxonboot
29-# System bootloader configuration
grep -B命令
[root@clr ~]# cat anaconda-ks.cfg | grep -in "system timezone"  #查看指定文件中含有"system timezone" 字符串,不区分大小写,并且显示出字符串所在原文件中的行号
24:# System timezone

[root@clr ~]# cat anaconda-ks.cfg | grep -B 5  -in "system timezone"#查看指定文件中含有"system timezone" 字符串,不区分大小写,并且显示出字符串所在原文件中的行号,以及所在行号前面的5行内容,一并显示出来
19-
20-# Root password
21-rootpw --iscrypted $6$rn9yK8kuso3pcHaI$mi0mdf/UQf9p2PdB/zkG1Zmyh7DtvL2Ckgr1aFjTJP1tFPKwRLaKUzUxLtKvR2b995g4JqOcTuWd6EF/ad4xa0
22-# System services
23-services --enabled="chronyd"
24:# System timezone
grep -C命令
[root@clr ~]# cat anaconda-ks.cfg | grep -in "system timezone"  #查看指定文件中含有"system timezone" 字符串,不区分大小写,并且显示出字符串所在原文件中的行号
24:# System timezone

[root@clr ~]# cat anaconda-ks.cfg | grep -C 5  -in "system timezone"#查看指定文件中含有"system timezone" 字符串,不区分大小写,并且显示出字符串所在原文件中的行号,以及所在行号的前后各5行的内容,一并显示出来
19-
20-# Root password
21-rootpw --iscrypted $6$rn9yK8kuso3pcHaI$mi0mdf/UQf9p2PdB/zkG1Zmyh7DtvL2Ckgr1aFjTJP1tFPKwRLaKUzUxLtKvR2b995g4JqOcTuWd6EF/ad4xa0
22-# System services
23-services --enabled="chronyd"
24:# System timezone
25-timezone Asia/Shanghai --isUtc
26-user --name=cCLR --password=$6$gy7MYQ5UGcLxJrGX$GgqRkJhqVMt2uvInbArGKjqkYdYtw2GJhqA/Y5mHly6eqzQUiIDjw8q/2t9K42l1TOvW0hRI1QoK/R3V3hJUo0 --iscrypted --gecos="CLR"
27-# X Window System configuration information
28-xconfig  --startxonboot
29-# System bootloader configuration
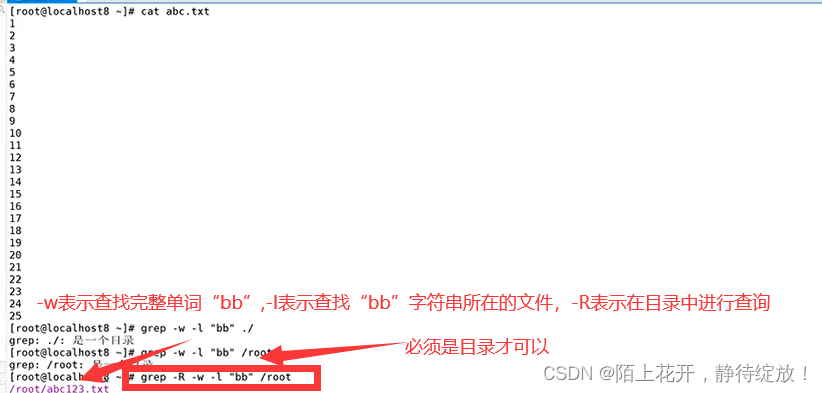
grep -l命令
2.1 grep命令总结
-
-i:直找时不区分大小写
-
-v:显示不包含匹配条件的所有行(反向查询,反向匹配)
-
-c:只输出匹配到的总行数(而不是匹配到的次数)
-
-n:显示匹配行及行号
-
-e:可实现多个查找条件的匹配,逻辑or关系(实现或的关系)
-
-E:支持使用扩展正则表达式,相当于使用egrep命令
-
-o:精确匹配,统计并显示统计匹配到的次数,即”仅匹配”之意。
-
-A n:显示匹配行和它后面的n行。
-
-B n:显示匹配行和它前面的n行。
-
-C n:显示匹配行和它前后的各n行。
-
-l:列出文件内容符合指定样式的文件。
-
-w:只显示满足完整目标单词所在的行。
注意:一般通配符用来匹配文件名,正则表达式匹配文件内容。
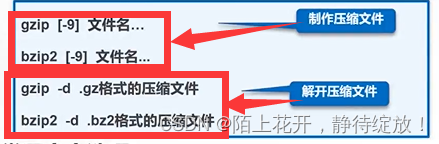
3.gzip、bzip2命令
制作压缩文件、解开压缩文件
备注:压缩比【1-9】,压缩比为1,表示压缩比最小,但压缩速度最快;压缩比为9,表示压缩比最大,但压缩速度最慢,默认值为6,此时压缩最平衡。
常用命令选项:
-9、-d
[root@clr ~]# gzip -9 456.txt  #压缩456.txt文件
[root@clr ~]# ls    #可以看到只有压缩文件,没有原文件
123.txt    456.txt.gz  abc.txt          initial-setup-ks.cfg  模板  文档  桌面
2.txt.bz2  abc456      anaconda-ks.cfg  lyg11.txt             视频  下载
3344.txt   abc.tat     gzy              公共                  图片  音乐
[root@clr ~]# gzip -d 456.txt.gz  #解压缩
[root@clr ~]# ls   #可以看到只有原文件,没有压缩文件
123.txt    456.txt  abc.txt          initial-setup-ks.cfg  模板  文档  桌面
2.txt.bz2  abc456   anaconda-ks.cfg  lyg11.txt             视频  下载
3344.txt   abc.tat  gzy              公共                  图片  音乐
[root@clr ~]# bzip2 -9 456.txt   #bzip2方式压缩
[root@clr ~]# ls
123.txt    456.txt.bz2  abc.txt          initial-setup-ks.cfg  模板  文档  桌面
2.txt.bz2  abc456       anaconda-ks.cfg  lyg11.txt             视频  下载
3344.txt   abc.tat      gzy              公共                  图片  音乐
[root@clr ~]# bzip2 -d 456.txt.bz2   #解压缩
[root@clr ~]# ls
123.txt    456.txt  abc.txt          initial-setup-ks.cfg  模板  文档  桌面
2.txt.bz2  abc456   anaconda-ks.cfg  lyg11.txt             视频  下载
3344.txt   abc.tat  gzy              公共                  图片  音乐
注意:无论是gzip方式还是bzip2方式,原文件与压缩文件只能存在其一,原文件存在,压缩文件就不在;压缩文件存在,源文件就不在。
3.1 gunzip、bunzip2命令
gunzip命令 等价于 gzip -d命令

- bzip2和bunzip2命令的用法与gzip、gunzip命令基本相同。
[root@clr ~]# gzip 456.txt
[root@clr ~]# bzip2 abc.txt
[root@clr ~]# ls
123.txt    456.txt.gz  abc.txt.bz2      initial-setup-ks.cfg  模板  文档  桌面
2.txt.bz2  abc456      anaconda-ks.cfg  lyg11.txt             视频  下载
3344.txt   abc.tat     gzy              公共                  图片  音乐
[root@clr ~]# gunzip 456.txt.gz  #gunzip解压缩.gz类型的压缩文件
[root@clr ~]# bunzip2 abc.txt.bz2   #bunzip2解压缩.bz2类型的文件
[root@clr ~]# ls
123.txt    456.txt  abc.txt          initial-setup-ks.cfg  模板  文档  桌面
2.txt.bz2  abc456   anaconda-ks.cfg  lyg11.txt             视频  下载
3344.txt   abc.tat  gzy              公共                  图片  音乐
4.tar命令
制作归档文件、释放归档文件
tar [选项]…归档文件名 原文件或目录
tar [选项]…归档文件名 -C 目标目录
常用命令选项
●-c、-x、-v、-f、-p、-t、-C、-z、-j
注意:解压缩时,可以不用加是何种类型方式解压缩系统会自动识别,但是压缩时,必须要说明是何种类型方式压缩。
tar -czvf命令
[root@clr ~]# tar -czvf clr.tar.gz *.txt  #将所有以.txt结尾的文件全都压缩到一起,并重命名为clr.tar.gz
123.txt/
123.txt/ly.txt
3344.txt
456.txt
abc.txt
lyg11.txt

[root@clr ~]# ls  #可以看到原文件与压缩文件依然都存在
123.txt    456.txt  abc.txt          gzy                   公共  图片  音乐
2.txt.bz2  abc456   anaconda-ks.cfg  initial-setup-ks.cfg  模板  文档  桌面
3344.txt   abc.tat  clr.tar.gz       lyg11.txt             视频  下载
tar -tf命令
[root@clr ~]# tar -tf clr.tar.gz  #查看压缩包内都有那些文件
123.txt/
123.txt/ly.txt
3344.txt
456.txt
abc.txt
lyg11.txt
[root@clr ~]# tar cjf root.tar.bz2 *  #以.bz2方式压缩,将所有文件以及目录压缩到一起,并重命名为root.tar.bz2
[root@clr ~]# ls   #可以看到此时原文件和压缩文件都存在
123.txt    456.txt  abc.txt          gzy                   root.tar.bz2  视频  下载
2.txt.bz2  abc456   anaconda-ks.cfg  initial-setup-ks.cfg  公共          图片  音乐
3344.txt   abc.tat  clr.tar.gz       lyg11.txt             模板          文档  桌面
[root@clr ~]# tar tf root.tar.bz2   #查看压缩包内的目录以及文件
123.txt/ly.txt
2.txt.bz2
3344.txt
456.txt
abc456
abc.tat
abc.txt
anaconda-ks.cfg
clr.tar.gz
gzy/
gzy/11/
gzy/11/22/
gzy/11/22/33/
gzy/11/22/33/44/
gzy/test1.txt
gzy/1.txt
gzy/2.txt
gzy/3.txt
gzy/4.txt
gzy/5.txt
gzy/6.txt
gzy/a/
gzy/b/
gzy/c/
gzy/file10.txt
gzy/file11.txt
gzy/file12.txt
gzy/file13.txt
gzy/file14.txt
gzy/file15.txt
gzy/file16.txt
gzy/file17.txt
gzy/file18.txt
gzy/file19.txt
gzy/file20.txt
initial-setup-ks.cfg
lyg11.txt
公共/
模板/
视频/
图片/
文档/
下载/
音乐/
桌面/
tar -C命令
[root@clr ~]# mv clr.tar.gz root.tar.bz2 /opt/ #将两个指定的压缩文件移动到/opt/目录下
[root@clr ~]# cd /opt/
[root@clr /opt]# ls
1.txt  3.txt.bak  clr  clr_bak  clr.tar.gz  file1,txt  file2,txt  root.tar.bz2
[root@clr /opt]# mkdir root   #创建root目录
[root@clr /opt]# tar xf root.tar.bz2 -C root  #将root.tar.bz2压缩文件解压缩,并解压到root目录中
[root@clr /opt]# cd root/
[root@clr /opt/root]# ls  #可以查看到指定压缩文件,已经解压缩
123.txt    456.txt  abc.txt          gzy                   公共  图片  音乐
2.txt.bz2  abc456   anaconda-ks.cfg  initial-setup-ks.cfg  模板  文档  桌面
3344.txt   abc.tat  clr.tar.gz       lyg11.txt             视频  下载
4.1 zip命令
[root@clr /opt]# ls
1.txt  3.txt.bak  clr  clr_bak  clr.tar.gz  file1,txt  file2,txt  root  root.tar.bz2
[root@clr /opt]# zip test.zip 1.txt file1,txt  #压缩1.txt和file1,txt,并重命名为root.tar.bz2
	dding: 1.txt (deflated 27%)
  adding: file1,txt/ (stored 0%)
[root@clr /opt]# ls   #可以看到原文件和压缩文件都存在
1.txt  3.txt.bak  clr  clr_bak  clr.tar.gz  file1,txt  file2,txt  root  root.tar.bz2  test.zip
[root@clr /opt]# mv test.zip /mnt  #将压缩文件移动到/mnt目录下
[root@clr /opt]# cd /mnt
[root@clr /mnt]# ls
test.zip
[root@clr /mnt]# unzip test.zip  #解压缩
Archive:  test.zip
  inflating: 1.txt
   creating: file1,txt/
[root@clr /mnt]# ls
1.txt  file1,txt  test.zip
unzip -d命令
[root@clr /mnt]# unzip test.zip -d /tmp #将test.zip压缩文件解压到/tmp目录中
Archive:  test.zip
  inflating: /tmp/1.txt
   creating: /tmp/file1,txt/
[root@clr /mnt]# cd /tmp
[root@clr /tmp]# ls  #压缩文件都原文件都存在
1.txt
anaconda.log
file1,txt
hsperfdata_root
ifcfg.log