在这篇文章中,记录的是我对《视觉SLAM十四讲》第七讲——视觉里程计1实践部分中,三角测量代码的理解以及相关函数的解释。
理论方面的知识可以见我另一篇博客:
《视觉SLAM十四讲》ch7学习笔记(1)—— 视觉里程计1_sticker_阮的博客-CSDN博客_视觉slam十四讲ch7
关于2D-2D点求解相机位姿可参考我另一篇博客:
《视觉SLAM十四讲》ch7学习笔记(2)——实践部分对数约束求解相机运动的代码解析_sticker_阮的博客-CSDN博客
1.代码解析
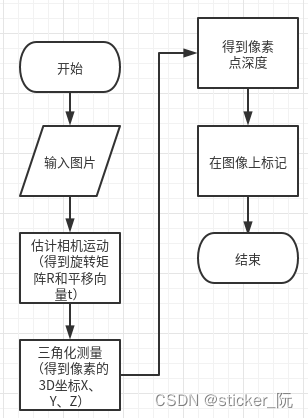
代码的主要架构如下:

代码源码以及解析如下:
#include <iostream>
#include <opencv2/opencv.hpp>
#include<chrono>
// #include "extra.h" // used in opencv2
using namespace std;
using namespace cv;

//自定义的函数声明
void find_feature_matches(
  const Mat &img_1, const Mat &img_2,
  std::vector<KeyPoint> &keypoints_1,
  std::vector<KeyPoint> &keypoints_2,
  std::vector<DMatch> &matches);

void pose_estimation_2d2d(
  const std::vector<KeyPoint> &keypoints_1,
  const std::vector<KeyPoint> &keypoints_2,
  const std::vector<DMatch> &matches,
  Mat &R, Mat &t);

void triangulation(
  const vector<KeyPoint> &keypoint_1,
  const vector<KeyPoint> &keypoint_2,
  const std::vector<DMatch> &matches,
  const Mat &R, const Mat &t,
  vector<Point3d> &points
);

/// 作图用
inline cv::Scalar get_color(float depth) {
  float up_th = 50, low_th = 10, th_range = up_th - low_th;
  if (depth > up_th) depth = up_th;
  if (depth < low_th) depth = low_th;
  return cv::Scalar(255 * depth / th_range, 0, 255 * (1 - depth / th_range));
}

// 像素坐标转相机归一化坐标
Point2f pixel2cam(const Point2d &p, const Mat &K);

int main(int argc, char **argv) {
  if (argc != 3) {
    cout << "usage: triangulation img1 img2" << endl;
    return 1;
  }
  chrono::steady_clock::time_point t1=chrono::steady_clock::now();
  //-- 读取图像
  Mat img_1 = imread(argv[1], CV_LOAD_IMAGE_COLOR); //前面引号里的是图片的位置
  Mat img_2 = imread(argv[2], CV_LOAD_IMAGE_COLOR);

  vector<KeyPoint> keypoints_1, keypoints_2;
  vector<DMatch> matches;
  find_feature_matches(img_1, img_2, keypoints_1, keypoints_2, matches);
  cout << "一共找到了" << matches.size() << "组匹配点" << endl;

  //-- 估计两张图像间运动
  Mat R, t;
  pose_estimation_2d2d(keypoints_1, keypoints_2, matches, R, t);

  //-- 三角化
  vector<Point3d> points;
  triangulation(keypoints_1, keypoints_2, matches, R, t, points);

  //-- 验证三角化点与特征点的重投影关系
  Mat K = (Mat_<double>(3, 3) << 520.9, 0, 325.1, 0, 521.0, 249.7, 0, 0, 1);
  Mat img1_plot = img_1.clone();
  Mat img2_plot = img_2.clone();
  for (int i = 0; i < matches.size(); i++) {
    // 第一个图
    float depth1 = points[i].z;
    cout <<"第"<<i<<"个匹配点的depth: "<< depth1 << endl;
    Point2d pt1_cam = pixel2cam(keypoints_1[matches[i].queryIdx].pt, K);
    cv::circle(img1_plot, keypoints_1[matches[i].queryIdx].pt, 2, get_color(depth1), 2,8,0);

    // 第二个图
    Mat pt2_trans = R * (Mat_<double>(3, 1) << points[i].x, points[i].y, points[i].z) + t;
    float depth2 = pt2_trans.at<double>(2, 0);
    cv::circle(img2_plot, keypoints_2[matches[i].trainIdx].pt, 2, get_color(depth2), 2);
  }
  cv::imshow("img 1", img1_plot);
  cv::imshow("img 2", img2_plot);
  chrono::steady_clock::time_point t2=chrono::steady_clock::now();
  chrono::duration<double>time_used=chrono::duration_cast<chrono::duration<double>>(t2-t1);
  cout<<"time spent by project: "<<time_used.count()<<"second"<<endl;
  cv::waitKey();

  return 0;
}

void find_feature_matches(const Mat &img_1, const Mat &img_2,
                          std::vector<KeyPoint> &keypoints_1,
                          std::vector<KeyPoint> &keypoints_2,
                          std::vector<DMatch> &matches) {
  //-- 初始化
  Mat descriptors_1, descriptors_2;
  // used in OpenCV3
  Ptr<FeatureDetector> detector = ORB::create();
  Ptr<DescriptorExtractor> descriptor = ORB::create();
  // use this if you are in OpenCV2
  // Ptr<FeatureDetector> detector = FeatureDetector::create ( "ORB" );
  // Ptr<DescriptorExtractor> descriptor = DescriptorExtractor::create ( "ORB" );
  Ptr<DescriptorMatcher> matcher = DescriptorMatcher::create("BruteForce-Hamming");
  //-- 第一步:检测 Oriented FAST 角点位置
  detector->detect(img_1, keypoints_1);
  detector->detect(img_2, keypoints_2);

  //-- 第二步:根据角点位置计算 BRIEF 描述子
  descriptor->compute(img_1, keypoints_1, descriptors_1);
  descriptor->compute(img_2, keypoints_2, descriptors_2);

  //-- 第三步:对两幅图像中的BRIEF描述子进行匹配,使用 Hamming 距离
  vector<DMatch> match;
  // BFMatcher matcher ( NORM_HAMMING );
  matcher->match(descriptors_1, descriptors_2, match);

  //-- 第四步:匹配点对筛选
  double min_dist = 10000, max_dist = 0;

  //找出所有匹配之间的最小距离和最大距离, 即是最相似的和最不相似的两组点之间的距离
  for (int i = 0; i < descriptors_1.rows; i++) {
    double dist = match[i].distance;
    if (dist < min_dist) min_dist = dist;
    if (dist > max_dist) max_dist = dist;
  }

  printf("-- Max dist : %f \n", max_dist);
  printf("-- Min dist : %f \n", min_dist);

  //当描述子之间的距离大于两倍的最小距离时,即认为匹配有误.但有时候最小距离会非常小,设置一个经验值30作为下限.
  for (int i = 0; i < descriptors_1.rows; i++) {
    if (match[i].distance <= max(2 * min_dist, 30.0)) {
      matches.push_back(match[i]);
    }
  }
}

void pose_estimation_2d2d(
  const std::vector<KeyPoint> &keypoints_1,
  const std::vector<KeyPoint> &keypoints_2,
  const std::vector<DMatch> &matches,
  Mat &R, Mat &t) {
  // 相机内参,TUM Freiburg2
  Mat K = (Mat_<double>(3, 3) << 520.9, 0, 325.1, 0, 521.0, 249.7, 0, 0, 1);//内参矩阵

  //-- 把匹配点转换为vector<Point2f>的形式
  vector<Point2f> points1;
  vector<Point2f> points2;

  for (int i = 0; i < (int) matches.size(); i++) {
    points1.push_back(keypoints_1[matches[i].queryIdx].pt);
    points2.push_back(keypoints_2[matches[i].trainIdx].pt);
  }

  //-- 计算本质矩阵
  Point2d principal_point(325.1, 249.7);        //相机主点, TUM dataset标定值
  int focal_length = 521;            //相机焦距, TUM dataset标定值
  Mat essential_matrix;
  essential_matrix = findEssentialMat(points1, points2, focal_length, principal_point);

  //-- 从本质矩阵中恢复旋转和平移信息.
  recoverPose(essential_matrix, points1, points2, R, t, focal_length, principal_point);
  cout<<"R 矩阵:"<<endl<< R <<endl;
}

void triangulation(
  const vector<KeyPoint> &keypoint_1,
  const vector<KeyPoint> &keypoint_2,
  const std::vector<DMatch> &matches,
  const Mat &R, const Mat &t,
  vector<Point3d> &points) {
//T1和T2矩阵是相机位姿矩阵
  Mat T1 = (Mat_<float>(3, 4) <<
    1, 0, 0, 0,
    0, 1, 0, 0,
    0, 0, 1, 0);
  Mat T2 = (Mat_<float>(3, 4) <<
    R.at<double>(0, 0), R.at<double>(0, 1), R.at<double>(0, 2), t.at<double>(0, 0),
    R.at<double>(1, 0), R.at<double>(1, 1), R.at<double>(1, 2), t.at<double>(1, 0),
    R.at<double>(2, 0), R.at<double>(2, 1), R.at<double>(2, 2), t.at<double>(2, 0)
  );

  Mat K = (Mat_<double>(3, 3) << 520.9, 0, 325.1, 0, 521.0, 249.7, 0, 0, 1);
  vector<Point2f> pts_1, pts_2;
  for(int i=0;i<matches.size();i++)
  {
    DMatch m=matches[i];
     // 将像素坐标转换至归一化坐标
    pts_1.push_back(pixel2cam(keypoint_1[m.queryIdx].pt, K));
    pts_2.push_back(pixel2cam(keypoint_2[m.trainIdx].pt, K));
  }
  // for (DMatch m:matches) {

  // }

  Mat pts_4d;
  cv::triangulatePoints(T1, T2, pts_1, pts_2, pts_4d);//输出三角化后的特征点的3D坐标,是齐次坐标系,是四维的。因此需要将前三个维度除以第四个维度以得到非齐次坐标xyz

  // 转换成非齐次坐标
  for (int i = 0; i < pts_4d.cols; i++) {
    Mat x = pts_4d.col(i);
    x /= x.at<float>(3, 0); // 归一化 同时除以最后一维数
    Point3d p(
      x.at<float>(0, 0),
      x.at<float>(1, 0),
      x.at<float>(2, 0)
    );
    points.push_back(p);
  }
}

Point2f pixel2cam(const Point2d &p, const Mat &K) {
  return Point2f
    (
      (p.x - K.at<double>(0, 2)) / K.at<double>(0, 0),
      (p.y - K.at<double>(1, 2)) / K.at<double>(1, 1)
    );
}
2.相关函数介绍
(1)cv::triangulatePoints()函数
cv::triangulatePoints(T1, T2, pts_1, pts_2, pts_4d);
其中的四个参数分别表示:T1,T2是两个相机的位姿,pts_1,pts_2是特征点在两个相机坐标系下的坐标,pts_4d是输出三角化后的特征点的3D坐标,是四维的奇次坐标。因此需要将前三个维度除以第四个维度以得到非齐次坐标xyz。
(2)cv::circle()函数
函数原型
CV_EXPORTS_W void circle(InputOutputArray img, Point center, int radius,
const Scalar& color, int thickness = 1,
int lineType = LINE_8, int shift = 0);
最后一个参数shift指的是坐标和半径小数点的位数,如果设为1,就相当于对坐标和半径值右移了1位,画的圆的实际位置和半径都变为设定值的一半。
作用:在制定图像上,以某个像素点为圆心画圆。
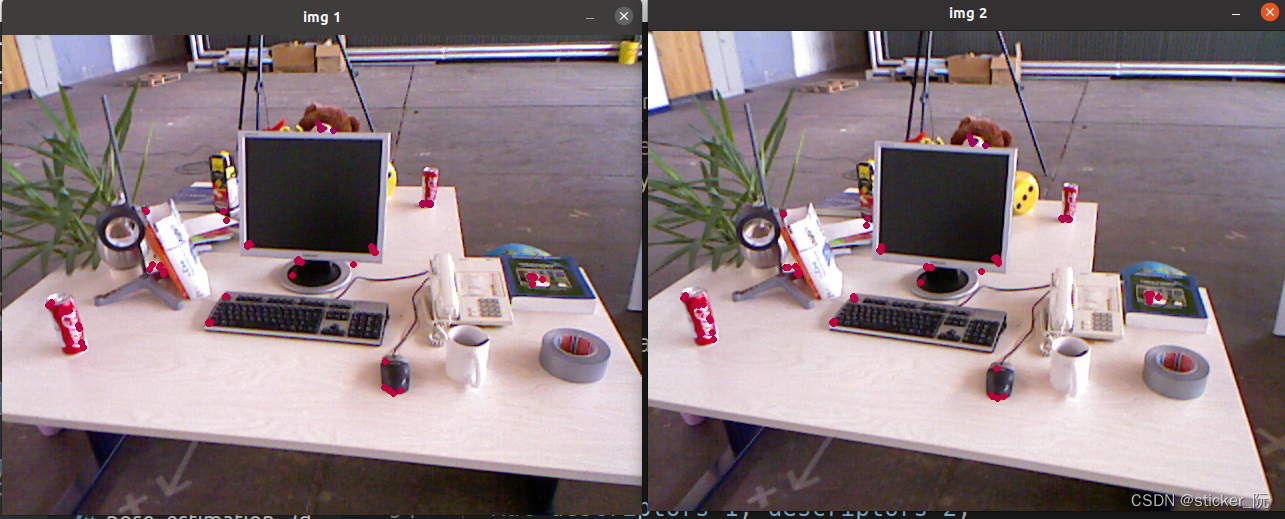
3.效果展示


