在机缘巧合下(其实就是上GitHub无意发现的),找到了一个Tesseract的Unity工程,测试发现不仅识别效果很好,而且支持多平台。
一、下载工程
GitHub - Neelarghya/tesseract-unity: Standalone OCR plugin for Unity using TesseractStandalone OCR plugin for Unity using Tesseract. Contribute to Neelarghya/tesseract-unity development by creating an account on GitHub. https://github.com/Neelarghya/tesseract-unity 下载完成后,解压出来。可以直接用Unity打开,我用的是2020.3.3.(工程名称是我自己改的)

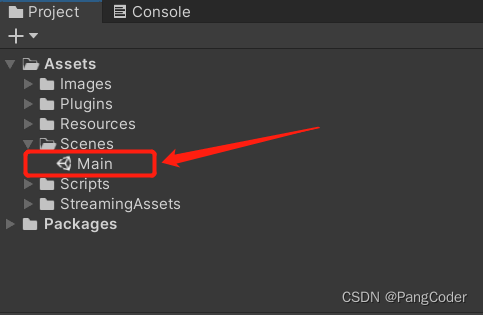
在Scenes目录里的Main是工程的演示路径,直接运行,可以看出识别效果很好。
效果如下。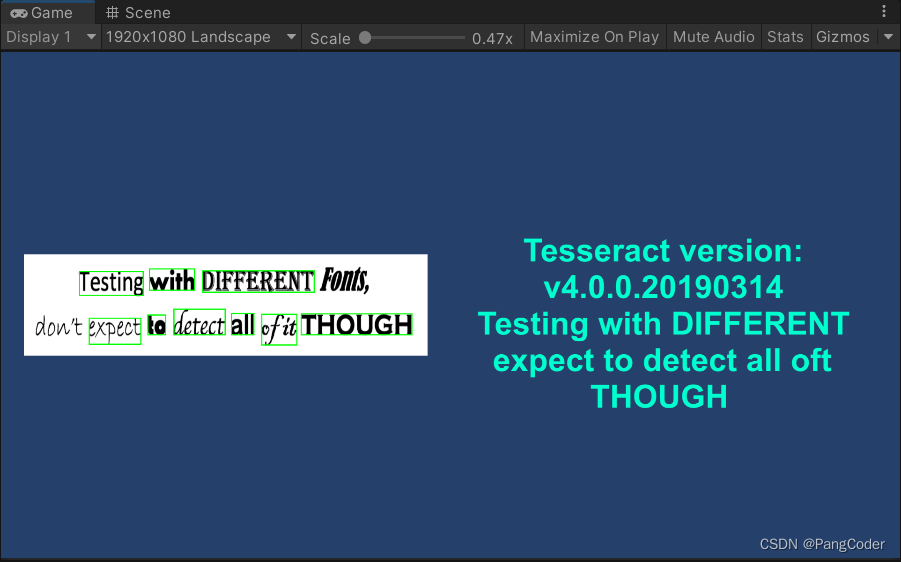
接下来我们要做的就是把他迁移进OpenCV工程。
二、迁移插件
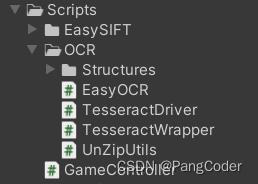
在这里我就不导出插件了,直接复制文件夹。我们需要的三个文件夹“Plugins”、“Scripts”和“StreamingAssets”,将它们复制出来,粘贴进OpneCV工程。例如 ,主要是OCR文件夹
三、插件使用
新建一个脚本类,我的叫EasyOCR,如下
using System.Collections;
using System.Collections.Generic;
using UnityEngine;
using OpenCvSharp;
using OpenCvSharp.Util;
using OpenCvSharp.XFeatures2D;
using System;


public delegate void RecoginzeCall(string a);

public class EasyOCR
{
    private TesseractDriver _tesseractDriver;
    private bool IsSetUp = false;//确保已经启用成功
    private Texture2D mainTexture;//待识别图片
    private RecoginzeCall CallBack = null;

    public EasyOCR()
    {
        _tesseractDriver= _tesseractDriver = new TesseractDriver();
        //启用OCR,
        _tesseractDriver.Setup(OnSetupCompleteRecognize);
        IsSetUp = false;
    }
    public void Recoginze(Mat Img, RecoginzeCall _call)
    {
        Mat tempImg = Img.CvtColor(ColorConversionCodes.BGR2GRAY).MedianBlur(5).Threshold(185, 255, ThresholdTypes.BinaryInv);
        Texture2D temp = OpenCvSharp.Unity.MatToTexture(tempImg);
        CallBack = _call;
        mainTexture = temp;
        OnSetupCompleteRecognize();
    }
    public void Recoginze(Texture2D _texture, RecoginzeCall _call)
    {
        Texture2D texture = new Texture2D(_texture.width, _texture.height, TextureFormat.ARGB32, false);
        texture.SetPixels32(_texture.GetPixels32());
        texture.Apply();
        mainTexture = texture;
        OnSetupCompleteRecognize();
    }
    ///懒,就写在一个函数里了
    private void OnSetupCompleteRecognize()
    {
        if(!IsSetUp)
        {
            IsSetUp = true;
            return;
        }
        //识别,结果会以string形式返回,
        string data=_tesseractDriver.Recognize(mainTexture);
        if(CallBack!=null)
        {
            CallBack(data);
        }
    }
}
上述代码给了两个检测函数,因为Tesseract对于白底黑字的检测效果会好很多,因此如果你的待检测图片不是黑白的,就需要使用OpenCV进行二值化一下。这点非常重要。
接下来给个示例代码,我在Update里调用OCR功能实现“伪实时”检测
private EasyOCR OCR;
private Mat CheckMat;

void Start()
{

     OCR = new EasyOCR();
     ///打开相机
     StartCoroutine(OpenCamera());
}
void Update()
{

    if (Tex != null && Tex.didUpdateThisFrame)
    {
        Mat Frame = OpenCvSharp.Unity.TextureToMat(Tex);
        OpenCvSharp.Rect Roi = new OpenCvSharp.Rect(760, 440, 400, 400);

        CheckTimes++;
        if (CheckTimes>24)
        {
            CheckTimes = 0;
            CheckMat = Frame.SubMat(Roi).Clone().Resize(new Size(200, 200));
            StartCoroutine(FrameCheck());
        }

        Cv2.Rectangle(Frame, Roi, new Scalar(0, 255, 255));
        Destroy(Capture.texture);
        Capture.texture = OpenCvSharp.Unity.MatToTexture(Frame);
     }

}
IEnumerator FrameCheck()
{
    yield return new WaitForSeconds(0.0f);
    //开始检测并给个回调函数
    OCR.Recoginze(CheckMat, OnChecked);
}上述部分主要是做了一次Resize,改变了Roi区域大小,加快检测速度。对于Tesseract检测来说耗时会很长,因此我是隔一段时间检测一次。对于字体清晰,占图像画面比例较大的,可以适当Resize一下来加快检测进度。