qiankun是什么:
基于 single-spa 进行二次开发,是一种类似于微服务的架构,是将一个大型应用拆分成若干个更小、更简单,可以独立开发、测试和部署的子应用,然后由一个基座应用根据路由进行应用切换,主要是为了解决大型工程在变更、维护、扩展等方面的困难而提出的!
qiankun的优势:
1、技术兼容性好,各个子应用可以基于不同的技术架构;
2、接入方式,让你接入微应用像使用 iframe 一样简单;
3、耦合性更低,各个团队可以独立开发,互不干扰;
4、可维护性和扩展性更好,便于局部升级和增量升级;
5、JS 沙箱,确保微应用之间 全局变量/事件 不冲突;
qiankun的劣势:
1、无法支持多实例场景;
2、对vite很不友好,需要改动很多的代码;
3、子应用间的资源共享能力较差,使得项目总体积变大;
4、开发人员要处理分布式系统的复杂性;
5、总体的项目体积比较大,运行服务有时较慢;
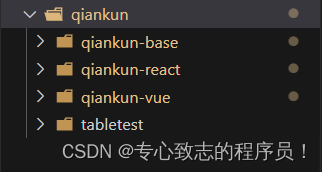
我的qiankun目录结构:
创建主应用:
mkdir qiankun(可自定义文件名)
//创建文件
cd qiankun
//进入文件
vue create qiankun-base(可自定义文件名)
//创建vue项目
cd qiankun-base
//进入创建好的项目
npm i qiankun -s
//进入项目下载qiankun
npm run serve
//起服务
一、 在vue create qiankun-base的时候要注意:
1、手动选择版本(最好选择手动)

2、检查项目所需的功能(最好不要选择linter/formatter这个是ESlint)

3、选择要启动项目的Vue.js版本

4、对路由器使用history模式

5、选择一个css预处理器(一定要选择scss要不然后期想使用很麻烦)

6、你喜欢把babel放在哪里

7、将其另存为将来项目的预设

8、打开项目,进入项目,启动项目cd main(文件名),进入后要下载 npm i qiankun –s,然后再npm run serve(启动服务)!此步骤缺一不可!
二、需要改动的vue和js文件:
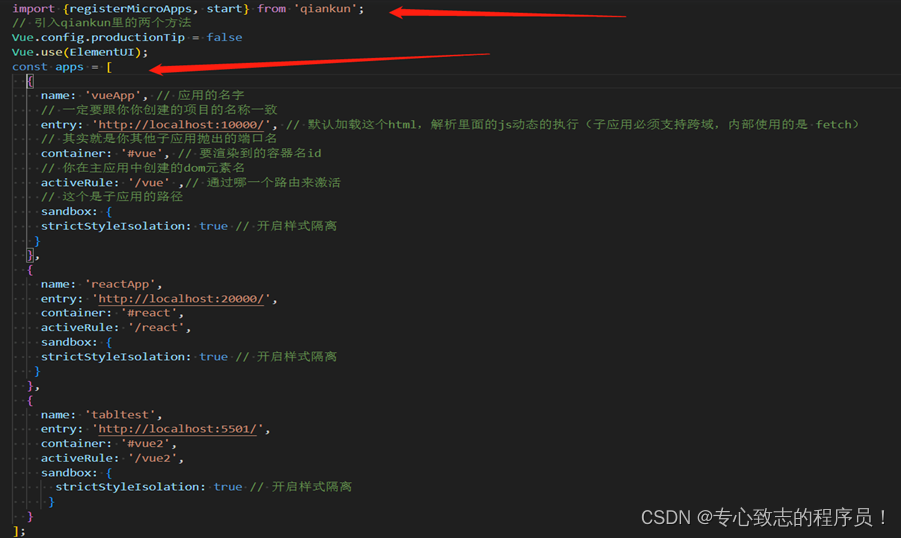
1、打开文件src下的main.js按照以下操作(要下载并挂载element ui后边菜单要用):

import Vue from 'vue'
import App from './App.vue'
import router from './router'
import ElementUI from 'element-ui';
import 'element-ui/lib/theme-chalk/index.css';

import {registerMicroApps, start} from 'qiankun';
// 引入qiankun里的两个方法
Vue.config.productionTip = false
Vue.use(ElementUI);
const apps = [
  {
    name: 'vueApp', // 应用的名字
    // 一定要跟你你创建的项目的名称一致
    entry: 'http://localhost:10000/', // 默认加载这个html,解析里面的js动态的执行(子应用必须支持跨域,内部使用的是 fetch)
    // 其实就是你其他子应用抛出的端口名
    container: '#vue', // 要渲染到的容器名id
    // 你在主应用中创建的dom元素名
    activeRule: '/vue' ,// 通过哪一个路由来激活
    // 这个是子应用的路径
    sandbox: {
    strictStyleIsolation: true // 开启样式隔离
   }
  },
  {
    name: 'reactApp',
    entry: 'http://localhost:20000/',
    container: '#react',
    activeRule: '/react',
    sandbox: {
    strictStyleIsolation: true // 开启样式隔离
   }
  },
  {
    name: 'tabltest',
    entry: 'http://localhost:5501/',
    container: '#vue2',
    activeRule: '/vue2',
    sandbox: {
      strictStyleIsolation: true // 开启样式隔离
     }
  }
];

registerMicroApps(apps); // 注册应用
start(); // 开启应用

new Vue({
  router,
  render: h => h(App)
}).$mount('#app')
2、文件src下的App.vue按照操作:(注意)不要给外层div盒子加id、class或其他预选择器:
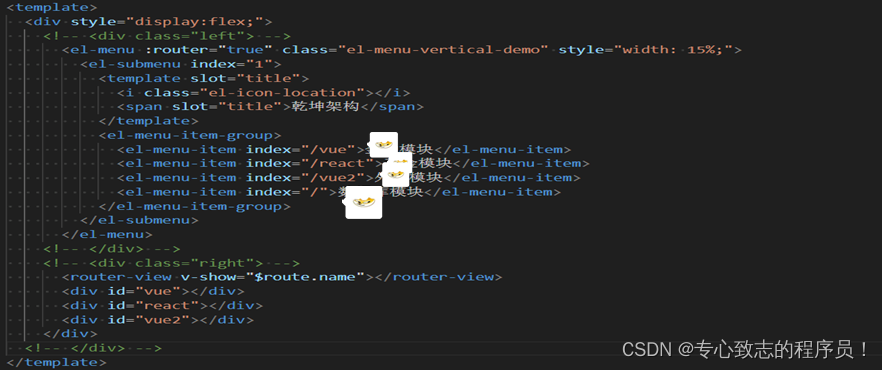
<template>
<div style="display:flex;">
<!-- <div class="left"> -->
<el-menu :router="true" class="el-menu-vertical-demo" style="width: 15%;">
<el-submenu index="1">
<template slot="title">
<i class="el-icon-location"></i>
<span slot="title">乾坤架构</span>
</template>
<el-menu-item-group>
<el-menu-item index="/vue">xx模块</el-menu-item>
<el-menu-item index="/react">xx模块</el-menu-item>
<el-menu-item index="/vue2">xx模块</el-menu-item>
<el-menu-item index="/">xx模块</el-menu-item>
</el-menu-item-group>
</el-submenu>
</el-menu>
<!-- </div> -->
<!-- <div class="right"> -->
<router-view v-show="$route.name"></router-view>
<div id="vue"></div>
<div id="react"></div>
<div id="vue2"></div>
</div>
<!-- </div> -->
</template>
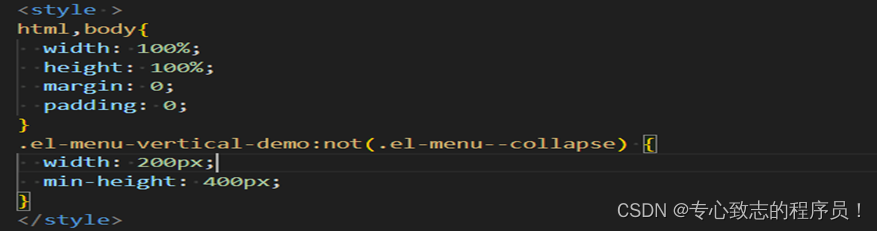
<style >
html,body{
width: 100%;
height: 100%;
margin: 0;
padding: 0;
}
.el-menu-vertical-demo:not(.el-menu--collapse) {
width: 200px;
min-height: 400px;
}
</style>
主应用需要操作的就结束了!
创建vue子应用:
cd..
//外层主应用的外层
vue create qiankun-vue
//创建子应用
cd qiankun-vue
//进入子应用
npm run serve
//启动服务注意:子应用不需要下载qiankun
一、对vue子应用做的操作:
1、请学习主应用的下载操作;
2、打开并进入下载的子应用中src下的main.js;

import Vue from 'vue'
import App from './App.vue'
import router from './router'
Vue.config.productionTip = false
let instance = null;
function render(props) {
  // props 组件通信
  instance = new Vue({
    router,
    render: h => h(App)
  }).$mount('#app') // 这里是挂载到自己的HTML中,基座会拿到这个挂载后的HTML,将其插入进去
}

if (!window.__POWERED_BY_QIANKUN__) { // 如果是独立运行,则手动调用渲染
  render();
}
if(window.__POWERED_BY_QIANKUN__){ // 如果是qiankun使用到了,则会动态注入路径
  __webpack_public_path__ = window.__INJECTED_PUBLIC_PATH_BY_QIANKUN__;
}

// 根据 qiankun 的协议需要导出 bootstrap/mount/unmount
export async function bootstrap(props) {

};
export async function mount(props) {
  render(props);
};
export async function unmount(props) {
  instance.$destroy();
};
3、进入的子应用中vue.config.js(如果没有vue.config.js的话创建一个这样的js文件);

module.exports = {
  devServer: {
    port: 10000,
    headers:{
      'Access-Control-Allow-Origin': '*' // 允许跨域
    }
  },
  configureWebpack: {
    output: {
      library: 'vueApp',
      libraryTarget: 'umd'
    }
  }
};
4、打开并进入下载的子应用中src下的router文件下的index.js(不改变在主应用切换子应用的路由是无法切换);
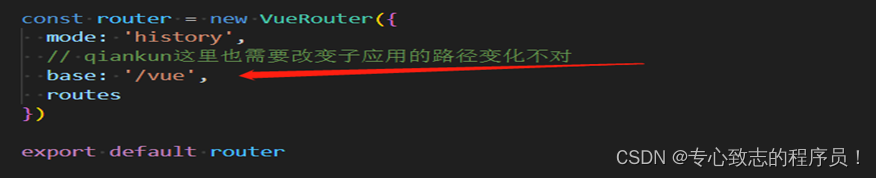
const router = new VueRouter({
  mode: 'history',
  // qiankun这里也需要改变子应用的路径变化不对
  base: '/vue',
  routes
})
以上就是vue子应用要改变的文件及其代码!
创建react子应用:
cd..
//回退到qiankun文件夹中(如果在就不必做此操作)
npx create-react-app qiankun-react
//创建react项目
cd qiankun-react
//进入react项目中
npm start
//起服务
注意:子应用不需要下载qiankun
一、对react子应用做的操作:
1、在终端输入命令npx create-react-app reactapp;

npx create-react-app qiankun-react2、找到src下的index.js配置箭头所指及以下方法;

import React from 'react';
import ReactDOM from 'react-dom';
import './index.css';
import App from './App';

function render(){
  ReactDOM.render(
    <React.StrictMode>
      <App />
    </React.StrictMode>,
    document.getElementById('root')
  );
}
if(!window.__POWERED_BY_QIANKUN__){
  render();
}
export async function bootstrap(){

}
export async function mount() {
  render()
}
export async function unmount(){
  ReactDOM.unmountComponentAtNode( document.getElementById('root'));
}3、找到config-overrides.js文件里配置若没有创建一个文件config-overrides.js;

module.exports = {
    webpack:(config)=>{
        config.output.library = 'reactApp';
        config.output.libraryTarget = 'umd';
        config.output.publicPath = 'http://localhost:20000/';
        return config;
    },
    devServer:(configFunction)=>{
        return function (proxy,allowedHost){
            const config = configFunction(proxy,allowedHost);
            config.headers = {
                "Access-Control-Allow-Origin":'*'
            }
            return config
        }
    }
}
4、找到src下的serviceWorker.js文件给里面添加方法,函数,拦截(如果子应用在主应用中报错再将此代码与你的这个文件代码替换);

// This optional code is used to register a service worker.
// register() is not called by default.

// This lets the app load faster on subsequent visits in production, and gives
// it offline capabilities. However, it also means that developers (and users)
// will only see deployed updates on subsequent visits to a page, after all the
// existing tabs open on the page have been closed, since previously cached
// resources are updated in the background.

// To learn more about the benefits of this model and instructions on how to
// opt-in, read https://bit.ly/CRA-PWA

const isLocalhost = Boolean(
  window.location.hostname === 'localhost' ||
    // [::1] is the IPv6 localhost address.
    window.location.hostname === '[::1]' ||
    // 127.0.0.0/8 are considered localhost for IPv4.
    window.location.hostname.match(
      /^127(?:\.(?:25[0-5]|2[0-4][0-9]|[01]?[0-9][0-9]?)){3}$/
    )
);

export function register(config) {
  if (process.env.NODE_ENV === 'production' && 'serviceWorker' in navigator) {
    // The URL constructor is available in all browsers that support SW.
    const publicUrl = new URL(process.env.PUBLIC_URL, window.location.href);
    if (publicUrl.origin !== window.location.origin) {
      // Our service worker won't work if PUBLIC_URL is on a different origin
      // from what our page is served on. This might happen if a CDN is used to
      // serve assets; see https://github.com/facebook/create-react-app/issues/2374
      return;
    }

    window.addEventListener('load', () => {
      const swUrl = `${process.env.PUBLIC_URL}/service-worker.js`;

      if (isLocalhost) {
        // This is running on localhost. Let's check if a service worker still exists or not.
        checkValidServiceWorker(swUrl, config);

        // Add some additional logging to localhost, pointing developers to the
        // service worker/PWA documentation.
        navigator.serviceWorker.ready.then(() => {
          console.log(
            'This web app is being served cache-first by a service ' +
              'worker. To learn more, visit https://bit.ly/CRA-PWA'
          );
        });
      } else {
        // Is not localhost. Just register service worker
        registerValidSW(swUrl, config);
      }
    });
  }
}

function registerValidSW(swUrl, config) {
  navigator.serviceWorker
    .register(swUrl)
    .then(registration => {
      registration.onupdatefound = () => {
        const installingWorker = registration.installing;
        if (installingWorker == null) {
          return;
        }
        installingWorker.onstatechange = () => {
          if (installingWorker.state === 'installed') {
            if (navigator.serviceWorker.controller) {
              // At this point, the updated precached content has been fetched,
              // but the previous service worker will still serve the older
              // content until all client tabs are closed.
              console.log(
                'New content is available and will be used when all ' +
                  'tabs for this page are closed. See https://bit.ly/CRA-PWA.'
              );

              // Execute callback
              if (config && config.onUpdate) {
                config.onUpdate(registration);
              }
            } else {
              // At this point, everything has been precached.
              // It's the perfect time to display a
              // "Content is cached for offline use." message.
              console.log('Content is cached for offline use.');

              // Execute callback
              if (config && config.onSuccess) {
                config.onSuccess(registration);
              }
            }
          }
        };
      };
    })
    .catch(error => {
      console.error('Error during service worker registration:', error);
    });
}

function checkValidServiceWorker(swUrl, config) {
  // Check if the service worker can be found. If it can't reload the page.
  fetch(swUrl, {
    headers: { 'Service-Worker': 'script' },
  })
    .then(response => {
      // Ensure service worker exists, and that we really are getting a JS file.
      const contentType = response.headers.get('content-type');
      if (
        response.status === 404 ||
        (contentType != null && contentType.indexOf('javascript') === -1)
      ) {
        // No service worker found. Probably a different app. Reload the page.
        navigator.serviceWorker.ready.then(registration => {
          registration.unregister().then(() => {
            window.location.reload();
          });
        });
      } else {
        // Service worker found. Proceed as normal.
        registerValidSW(swUrl, config);
      }
    })
    .catch(() => {
      console.log(
        'No internet connection found. App is running in offline mode.'
      );
    });
}

export function unregister() {
  if ('serviceWorker' in navigator) {
    navigator.serviceWorker.ready
      .then(registration => {
        registration.unregister();
      })
      .catch(error => {
        console.error(error.message);
      });
  }
}
以上就是react子应用需要操作的东西!