目录
1、概念
延时队列,队列内部是有序的,最重要的特性就体现在它的延时属性上,延时队列中的元素是希望在指定时间到了以后或之前取出和处理,简单来说,延时队列就是用来存放需要在指定时间被处理的元素的队列。
2、使用场景
- 订单在十分钟之内未支付则自动取消。
- 新创建的店铺,如果在十天内都没有上传过商品,则自动发送消息提醒。
- 账单在一周内未支付,则自动结算。
- 用户注册成功后,如果三天内没有登陆则进行短信提醒。
- 用户发起退款,如果三天内没有得到处理则通知相关运营人员。
- 预定会议后,需要在预定的时间点前十分钟通知各个与会人员参加会议。
这些场景都有一个特点,需要在某个事件发生之后或者之前的指定时间点完成某一项任务,如:发生订单生成事件,在十分钟之后检查该订单支付状态,然后将未支付的订单进行关闭;
看起来似乎使用定时任务,一直轮询数据,每秒查一次,取出需要被处理的数据,然后处理不就完事了吗?如果数据量比较少,确实可以这样做,
-
比如:对于“如果账单一周内未支付则进行自动结算”这样的需求,如果对于时间不是严格限制,而是宽松意义上的一周,那么每天晚上跑个定时任务检查一下所有未支付的账单,确实也是一个可行的方案。
-
但对于数据量比较大,并且时效性较强的场景,如:“订单十分钟内未支付则关闭“,短期内未支付的订单数据可能会有很多,活动期间甚至会达到百万甚至千万级别,对这么庞大的数据量仍旧使用轮询的方式显然是不可取的,很可能在一秒内无法完成所有订单的检查,同时会给数据库带来很大压力,无法满足业务要求而且性能低下。

3、RabbitMQ 中的 TTL
Time-To-Live and Expiration — RabbitMQ
TTL 是什么呢 ?
TTL 是 RabbitMQ 中一个消息或者队列的属性,表明一条消息或者该队列中的所有 消息的最大存活时间,单位是毫秒。
如果一条消息设置了 TTL 属性或者进入了设置 TTL 属性的队列,那么这 条消息如果在 TTL 设置的时间内没有被消费,则会成为"死信"。如果同时配置了队列的 TTL 和消息的 TTL,那么较小的那个值将会被使用,有两种方式设置 TTL。
该消息最多可以驻留在队列中 60 秒:
// 消息设置 TTL
byte[] messageBodyBytes = "Hello, world!".getBytes();
AMQP.BasicProperties properties = new AMQP.BasicProperties.Builder()
                                   .expiration("60000")
                                   .build();
channel.basicPublish("my-exchange", "routing-key", properties, messageBodyBytes);
// 队列设置 TTL
Map<String, Object> args = new HashMap<String, Object>();
args.put("x-message-ttl", 60000);
channel.queueDeclare("myqueue", false, false, false, args);
4、整合 SpringBoot
4.1、初始化
创建 springboot 项目,导入依赖
<!--RabbitMQ 依赖-->
<dependency>
    <groupId>org.springframework.boot</groupId>
    <artifactId>spring-boot-starter-amqp</artifactId>
</dependency>
<!--RabbitMQ 测试依赖-->
<dependency>
    <groupId>org.springframework.amqp</groupId>
    <artifactId>spring-rabbit-test</artifactId>
    <scope>test</scope>
</dependency>
<dependency>
    <groupId>org.springframework.boot</groupId>
    <artifactId>spring-boot-starter-web</artifactId>
</dependency>
<dependency>
    <groupId>com.alibaba</groupId>
    <artifactId>fastjson</artifactId>
    <version>2.0.10</version>
</dependency>
<dependency>
    <groupId>org.projectlombok</groupId>
    <artifactId>lombok</artifactId>
</dependency>
<!--swagger-->
<dependency>
    <groupId>io.springfox</groupId>
    <artifactId>springfox-swagger2</artifactId>
    <version>3.0.0</version>
</dependency>
<dependency>
    <groupId>io.springfox</groupId>
    <artifactId>springfox-swagger-ui</artifactId>
    <version>3.0.0</version>
</dependency>
4.2、修改配置文件
spring:
  rabbitmq:
    host: 192.168.40.25
    port: 5672
    username: mianbao
    password: admin
4.3、添加Swagger 配置类
/**
 * @desc
 * @auth llp
 * @date 2022年08月08日 23:34
 */
@Configuration
@EnableSwagger2
public class SwaggerConfig {


    @Bean
    public Docket webApiConfig(){


        return new Docket(DocumentationType.SWAGGER_2)
                .groupName("webApi")
                .apiInfo(webApiInfo())
                .select()
                .build();
    }
    private ApiInfo webApiInfo(){


        return new ApiInfoBuilder()
                .title("rabbitmq 接口文档")
                .description("本文档描述了 rabbitmq 微服务接口定义")
                .version("1.0")
                .contact(new Contact("mianbao", "http://192.168.40.25:15672/","[email protected]")).build();
    }
}
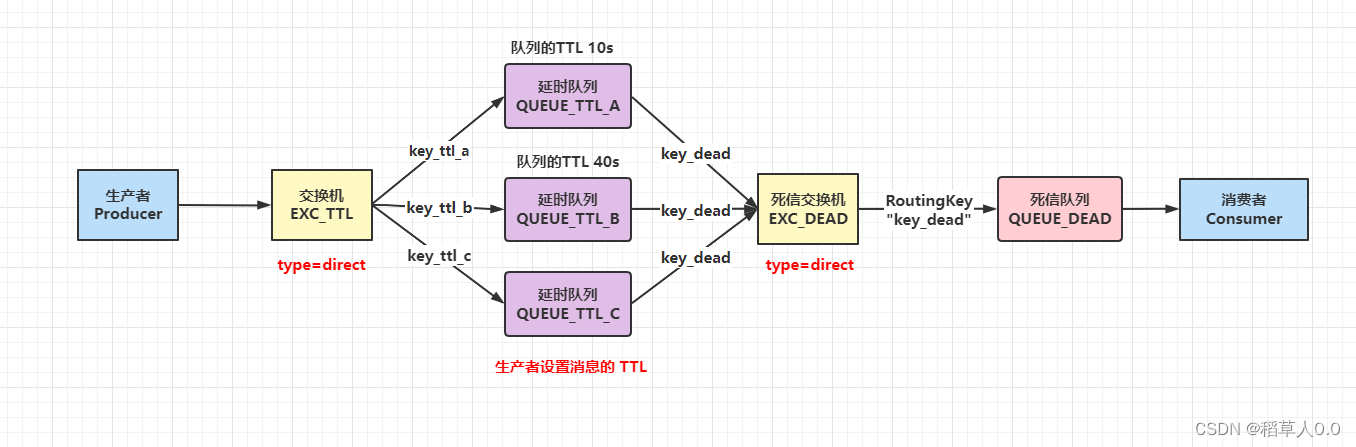
5、队列 TTL 实战
5.1、代码架构图
创建两个队列 Queue_ttl1 和 Queue_ttl2,两者队列 TTL 分别设置为 10S 和 40S,然后在创建一个交换机 Exc_ttl 和死信交 换机 Exc_dead,它们的类型都是 direct,创建一个死信队列 Queue_dead,它们的绑定关系如下:

5.2、配置类代码
/**
 * @desc TTL 队列,配置类
 * @auth llp
 * @date 2022年08月08日 23:57
 */
@Configuration
public class TtlQueueConfig {


    public static final String EXC_TTL = "EXC_TTL";
    public static final String QUEUE_TTL_A = "QUEUE_TTL_A";
    public static final String QUEUE_TTL_B = "QUEUE_TTL_B";
    public static final String EXC_DEAD = "EXC_DEAD";
    public static final String QUEUE_DEAD = "QUEUE_DEAD";

    // 声明 EXC_TTL
    @Bean("EXC_TTL")
    public DirectExchange excTtl(){


        return new DirectExchange(EXC_TTL);
    }

    // 声明 EXC_DEAD
    @Bean("EXC_DEAD")
    public DirectExchange excDead(){


        return new DirectExchange(EXC_DEAD);
    }

    // 声明队列 QUEUE_TTL_A ttl 为 10s 并绑定到对应的死信交换机
    @Bean("QUEUE_TTL_A")
    public Queue queueTtlA(){


        Map<String, Object> args = new HashMap<>(3);
        //声明当前队列绑定的死信交换机
        args.put("x-dead-letter-exchange", EXC_DEAD);
        //声明当前队列的死信路由 key
        args.put("x-dead-letter-routing-key", "key_dead");
        //声明队列的 TTL
        args.put("x-message-ttl", 10000);
        return QueueBuilder.durable(QUEUE_TTL_A).withArguments(args).build();
    }

    // 声明队列 QUEUE_TTL_A 绑定 EXC_TTL 交换机
    @Bean
    public Binding queueTtlABindingExcTtl(
            @Qualifier("QUEUE_TTL_A") Queue queueTtlA,
            @Qualifier("EXC_TTL") DirectExchange excTtl){


        return BindingBuilder.bind(queueTtlA).to(excTtl).with("key_ttl_a");
    }

    //声明队列 QUEUE_TTL_B ttl 为 40s 并绑定到对应的死信交换机
    @Bean("QUEUE_TTL_B")
    public Queue queueTtlB(){


        Map<String, Object> args = new HashMap<>(3);
        //声明当前队列绑定的死信交换机
        args.put("x-dead-letter-exchange", EXC_DEAD);
        //声明当前队列的死信路由 key
        args.put("x-dead-letter-routing-key", "key_dead");
        //声明队列的 TTL
        args.put("x-message-ttl", 40000);
        return QueueBuilder.durable(QUEUE_TTL_B).withArguments(args).build();
    }

    //声明队列 QUEUE_TTL_B 绑定 EXC_TTL 交换机
    @Bean
    public Binding queueTtlBBindingExcTtl(
            @Qualifier("QUEUE_TTL_B") Queue queueTtlB,
            @Qualifier("EXC_TTL") DirectExchange excTtl){


        return BindingBuilder.bind(queueTtlB).to(excTtl).with("key_ttl_b");
    }

    //声明死信队列 QUEUE_DEAD
    @Bean("QUEUE_DEAD")
    public Queue queueD(){


        return new Queue(QUEUE_DEAD);
    }

    //声明死信队列 QUEUE_DEAD 绑定关系
    @Bean
    public Binding queueDeadBindingExcDead(
            @Qualifier("QUEUE_DEAD") Queue queueDead,
            @Qualifier("EXC_DEAD") DirectExchange excDead) {


        return BindingBuilder.bind(queueDead).to(excDead).with("key_dead");
    }
}
5.3、消息生产者代码
/**
 * @desc
 * @auth llp
 * @date 2022年08月09日 22:31
 */
@Slf4j
@RestController
@RequestMapping("/ttl")
public class SendMsgController {


    @Resource
    private RabbitTemplate rabbitTemplate;
	// 开始发消息
    @GetMapping("/sendMsg/{message}")
    public void sendMsg(@PathVariable String message){


        log.info("当前时间:{}, 发送一条消息:{} 给两个TTL队列", new Date(), message);
        rabbitTemplate.convertAndSend(TtlQueueConfig.EXC_TTL, "key_ttl_a", "消息来自TTL为 10s 的队列 => "+message);
        rabbitTemplate.convertAndSend(TtlQueueConfig.EXC_TTL, "key_ttl_b", "消息来自TTL为 40s 的队列 => "+message);
    }
}
5.4、消息消费者代码
/**
 * @desc
 * @auth llp
 * @date 2022年08月09日 22:39
 */
@Slf4j
@Component
public class QueueDeadConsumer {


    @RabbitListener(queues = TtlQueueConfig.QUEUE_DEAD)
    public void receiveQueueDead(Message message, Channel channel){


        String msg = new String(message.getBody());
        log.info("当前时间:{}, 接收到的消息为:{}", new Date(), msg);
    }
}
5.5、启动测试与问题
启动访问地址:localhost:8080/ttl/sendMsg/HelloWorld

注意:由于队列的先进先出特性,只有当过期的消息到了队列的顶端(队首),才会被真正的丢弃或者进入死信队列。所以在考虑使用 RabbitMQ 来实现延迟任务队列的时候,需要确保业务上每个任务的延迟时间是一致的。如果遇到不同的任务类型需要不同的延时的话,需要为每一种不同延迟时间的消息建立单独的消息队列。
思考: 当增加一个新的时间需求,就要新增一个队列,这里只有 10S 和 40S 两个时间选项,如果需要一个小时后处理,那么就需要增加 TTL 为一个小时的队列,如果是预定会议室然 后提前通知这样的场景,岂不是要增加无数个队列才能满足需求?
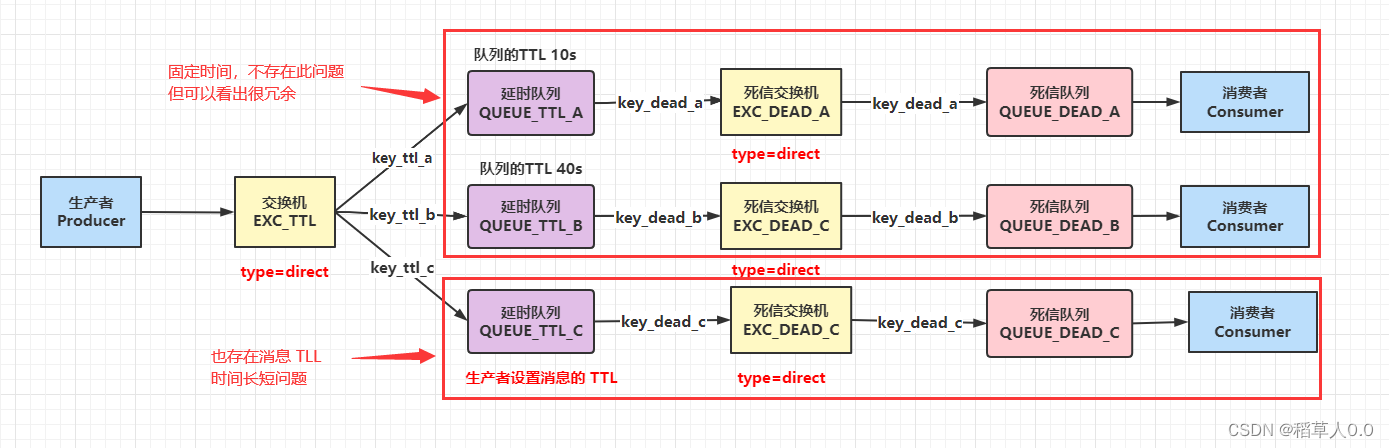
6、延时队列优化
6.1、优化后的代码架构图
RoutingKey 用
.做分隔符比较正确,学了后面忘记前面
声明一个 QUEUE_TTL_C 队列,该队列存储来之生产者设置消息 TTL 的消息。
6.2、配置类代码
@Configuration
public class TtlQueueConfig {


    public static final String QUEUE_TTL_C = "QUEUE_TTL_C";

	//声明队列 QUEUE_TTL_C 并绑定到对应的死信交换机
    @Bean("QUEUE_TTL_C")
    public Queue queueTtlC(){


        Map<String, Object> args = new HashMap<>(3);
        //声明当前队列绑定的死信交换机
        args.put("x-dead-letter-exchange", EXC_DEAD);
        //声明当前队列的死信路由 key
        args.put("x-dead-letter-routing-key", "key_dead");
        return QueueBuilder.durable(QUEUE_TTL_C).withArguments(args).build();
    }

    //声明队列 QUEUE_TTL_C 绑定 EXC_TTL 交换机
    @Bean
    public Binding queueTtlCBindingExcTtl(
            @Qualifier("QUEUE_TTL_C") Queue queueTtlC,
            @Qualifier("EXC_TTL") DirectExchange excTtl){


        return BindingBuilder.bind(queueTtlC).to(excTtl).with("key_ttl_c");
    }
}
6.3、消息生产者代码
    // 开始发消息 消息 TTL
    @GetMapping("/sendExpirationMsg/{message}/{ttlTime}")
    public void sendMsg(@PathVariable String message, @PathVariable String ttlTime){


        log.info("当前时间:{}, 发送一条时长为 {}ms的消息: {} 给 {} 队列", new Date(), ttlTime, message, TtlQueueConfig.QUEUE_TTL_C);
        rabbitTemplate.convertAndSend(TtlQueueConfig.EXC_TTL, "key_ttl_c", message,
                (msg)-> {


                    msg.getMessageProperties().setExpiration(ttlTime);
                    return msg;
                });
    }
6.4、启动测试与问题
访问地址:http://localhost:8080/ttl/sendExpirationMsg/Hello/2000
访问地址:http://localhost:8080/ttl/sendExpirationMsg/Hello/20000

问题: 看起来似乎没什么问题,但是在最开始的时候,就介绍过如果使用在消息属性上设置 TTL 的方式,消息可能并不会按时 “死亡“,因为 RabbitMQ 只会检查第一个消息是否过期,如果过期则丢到死信队列, 如果第一个消息的延时时长很长,而第二个消息的延时时长很短,第二个消息并不会优先得到执行。
还需考虑消费者处理消息的时间
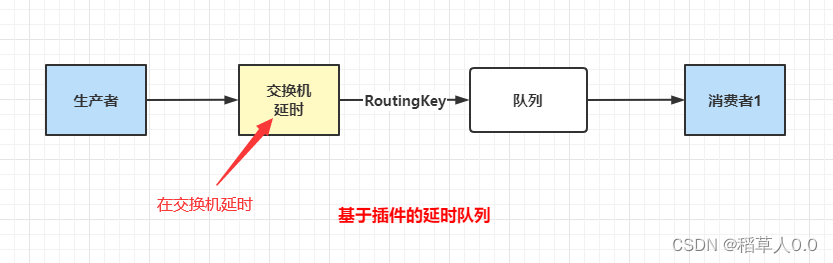
7、RabbitMQ 插件实现延时队列
如果不能实现在消息粒度上的 TTL,并使其在设置的TTL 时间 及时死亡,就无法设计成一个通用的延时队列。
7.1、安装延时队列插件
插件官网地址:Community Plugins — RabbitMQ
注意: 插件版本要和 RabbitMQ 版本一致
下载 rabbitmq_delayed_message_exchange 插件:将延迟消息(或预定消息)添加到 RabbitMQ 的插件。
# RabbitMQ 的安装目录
cd /usr/lib/rabbitmq/lib/rabbitmq_server-3.10.0/plugins
# 将下载的插件放到 RabbitMQ 安装目录的 plugins 目录下
cp /usr/local/rabbitmq/rabbitmq_delayed_message_exchange-3.10.0.ez /usr/lib/rabbitmq/lib/rabbitmq_server-3.10.0/plugins
# 安装插件
rabbitmq-plugins enable rabbitmq_delayed_message_exchange
# 重启 RabbitMQ
systemctl restart rabbitmq-server
验证是否安装成功,查看 RabbitMQ 的 web 管理界面,新增交换机是否有 x-delayed-message :

基于插件的延时队列
7.2、实战代码架构图
基于直接类型的延时交换机。

7.3、配置类代码
x-delayed-type 就是之前学的几个类型,这个延时交换机和队列如何进行匹配 direct 就是直接用 routingkey 匹配,也可以使用其他类型。
/**
 * @desc
 * @auth llp
 * @date 2022年08月10日 22:26
 */
@Configuration
public class DelayedQueueConfig {


    // 交换机
    public static final String DELAYED_EXCHANGE = "delayed.exchange";
    // 队列
    public static final String DELAYED_QUEUE = "delayed.queue";
    // 路由键
    public static final String DELAYED_ROUTING_KEY = "delayed.routingkey";

    // 声明交换机 基于插件的
    @Bean
    public CustomExchange delayedExchange(){


        Map<String, Object> args = new HashMap<>();
        // 自定义交换机的类型
        args.put("x-delayed-type", "direct");
        /**
         * 1、交换机的名称
         * 2、交换机的类型
         * 3、是否需要持久化
         * 4、是否需要自动删除
         * 5、其他参数
         */
        return new CustomExchange(DELAYED_EXCHANGE, "x-delayed-message", true, false, );
    }

    // 声明队列
    @Bean
    public Queue delayedQueue(){


        return new Queue(DELAYED_QUEUE);
    }

    // 绑定
    @Bean
    public Binding delayedQueueBindingDelayedExchange(
            @Qualifier("delayedQueue") Queue delayedQueue,
            @Qualifier("delayedExchange")CustomExchange delayedExchange){


        return BindingBuilder.bind(delayedQueue).to(delayedExchange).with(DELAYED_ROUTING_KEY).noargs();
    }
}
7.4、生产者代码
// 开始发消息 基于插件的延时队列  消息 延时时间
@GetMapping("/sendDelayedMsg/{message}/{delayedTime}")
public void sendMsg(@PathVariable String message, @PathVariable Integer delayedTime){


    log.info("当前时间:{}, 发送一条时长为 {}ms的消息给延时队列 ==> {}", new Date(), delayedTime, message);
    rabbitTemplate.convertAndSend(
        DelayedQueueConfig.DELAYED_EXCHANGE,
        DelayedQueueConfig.DELAYED_ROUTING_KEY,
        message,
        (msg)-> {


            msg.getMessageProperties().setDelay(delayedTime);
            return msg;
        });
}
7.5、消费者代码
@Slf4j
@Component
public class DelayedQueueConsumer {


    @RabbitListener(queues = DelayedQueueConfig.DELAYED_QUEUE)
    public void receiveDelayedQueue(Message message, Channel channel){


        String msg = new String(message.getBody());
        log.info("当前时间:{}, 接收到延时队列的消息为:{}", new Date(), msg);
    }
}
7.6、运行测试
此次先发送延时长的消息,再发送延时短的消息。检测是否能够先消费延时短的消息:
访问地址:localhost:8080/ttl/sendDelayedMsg/20秒/20000
再访问地址:localhost:8080/ttl/sendDelayedMsg/2秒/2000

先消费延时为 2s 的消息,符合逻辑。
8、总结
延时队列在需要延时处理的场景下非常有用,使用 RabbitMQ 来实现延时队列可以很好的利用 RabbitMQ 的特性,如:消息可靠发送、消息可靠投递、死信队列来保障消息至少被消费一次以及未被正 确处理的消息不会被丢弃。 另外,通过 RabbitMQ 集群的特性,可以很好的解决单点故障问题,不会因为 单个节点挂掉导致延时队列不可用或者消息丢失。
当然,延时队列还有很多其它选择,比如利用 Java 的 DelayQueue,利用 Redis 的 zset,利用 Quartz 或者利用 kafka 的时间轮,这些方式各有特点,看需要适用的场景