K8s的安装与部署
准备四台虚拟机,使用centos7操作系统,搭建集群系统。

先搭建好一台虚拟机的环境,其他机器克隆就行。
开启虚拟机
虚拟机参数:
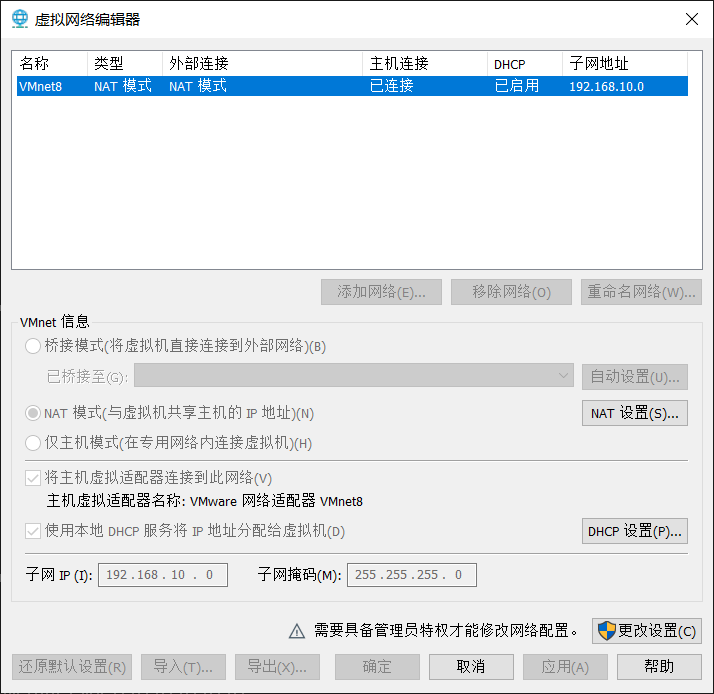
- 网络使用NAT模式
- 内存2g以上
- 2cpu (不然后面会报错)
- 硬盘我配的30g

如果网络连接不成功,可以配置试试这篇博客https://blog.csdn.net/duyuanjun123/article/details/119833105
第一次我的网络一直连不通是因为初始化系统时我没把网络连接开开在初始化操作系统的时候注意一下。
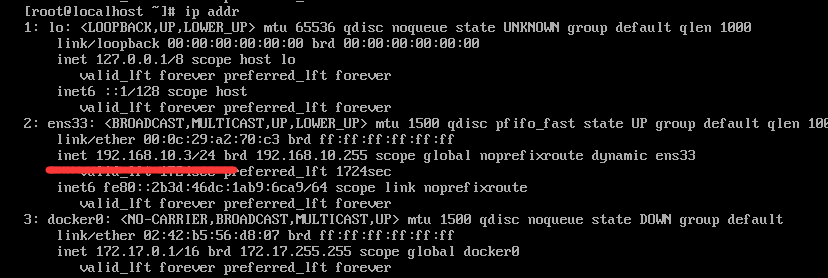
在虚拟机中使用ip addr命令查看虚拟机ip

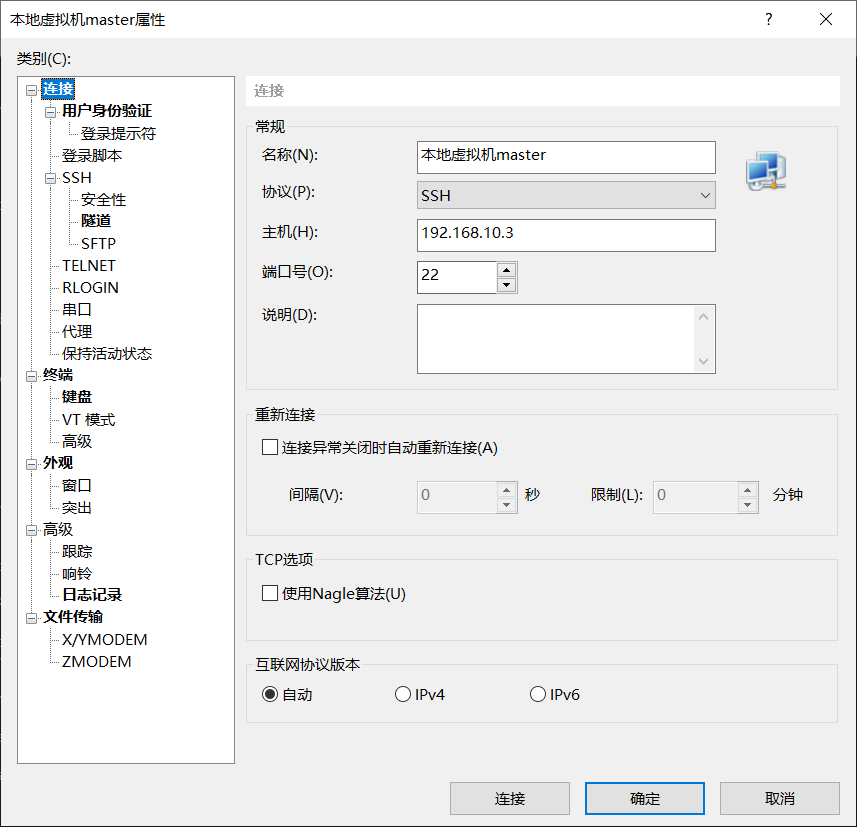
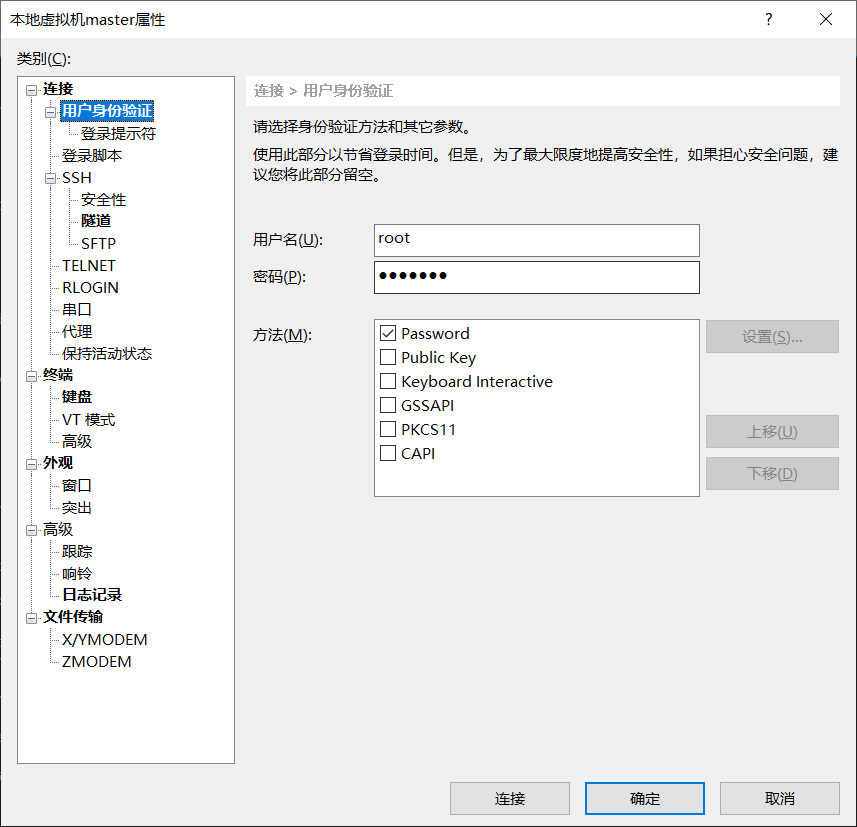
因为虚拟机操作多少有点不方便,所以使用xshell或者fianlshell 连接
配置yum源
连接成功配置一下yum源
-
下载wget命令
yum install wget -y -
备份旧的yum仓库源
cd /etc/yum.repos.d mkdir repobak # 创建文件夹,保存备份文件 mv *.repo repobak #备份repo文件到文件 -
清理旧包
~yum clean all -
下载新的阿里的yum源仓库,阿里的开源镜像:https://developer.aliyun.com/mirror/
wget -O /etc/yum.repos.d/CentOS-Base.repo http://mirrors.aliyun.com/repo/Centos-7.repo -
继续下载第二个仓库 epel仓库
wget -O /etc/yum.repos.d/epel.repo http://mirrors.aliyun.com/repo/epel-7.repo -
生成yum源缓存并更新yum源
yum makecache
yum update
下载docker
# 1、卸载旧的版本
yum remove docker \
				docker-client \
				docker-client-lastest \
				docker-common \
				docker-latest \
				docker-latest-logrotate \
				docekr-engine

# 2、需要的安装包
yum install -y yum-utils

# 3、设置镜像仓库 (阿里云镜像)
yum-config-manager --add-repo http://mirrors.aliyun.com/docker-ce/linux/centos/docker-ce.repo

# 更新yum软件包索引
	yum makecache fast

# 4、安装docker相关的内容 docker-ce 社区办 ee企业版
	yum install docker-ce docker-ce-cli containerd.io

# 5、启动docker
	systemctl start docker

# 6、测试docker是否启动成功
	docker -version
安装Kubernetes
配置安装源地址
cat <<EOF > /etc/yum.repos.d/kubernetes.repo
[kubernetes]
name=Kubernetes
baseurl=https://mirrors.aliyun.com/kubernetes/yum/repos/kubernetes-el7-x86_64
enabled=1
gpgcheck=1
repo_gpgcheck=1
gpgkey=https://mirrors.aliyun.com/kubernetes/yum/doc/yum-key.gpg https://mirrors.aliyun.com/kubernetes/yum/doc/rpm-package-key.gpg
EOF
如下出现错误
[Errno -1] repomd.xml signature could not be verified for kubernetes
则是 repo 的 gpg 验证不通过导致的,可以修改repo_gpgcheck=0跳过验证。
最后,安装Kubernetes的关键组件。
setenforce o

yum install -y kubelet kubeadm kubectl
# 启动kubelet、kubeadm、kubectl服务 kubeadm将使用kubelet服务以容器的方式部署和启动Kubernetes的主要服务,所以需要先启动kubelet服务。
systemctl enable kubelet && systemctl start kubelet
克隆虚拟机
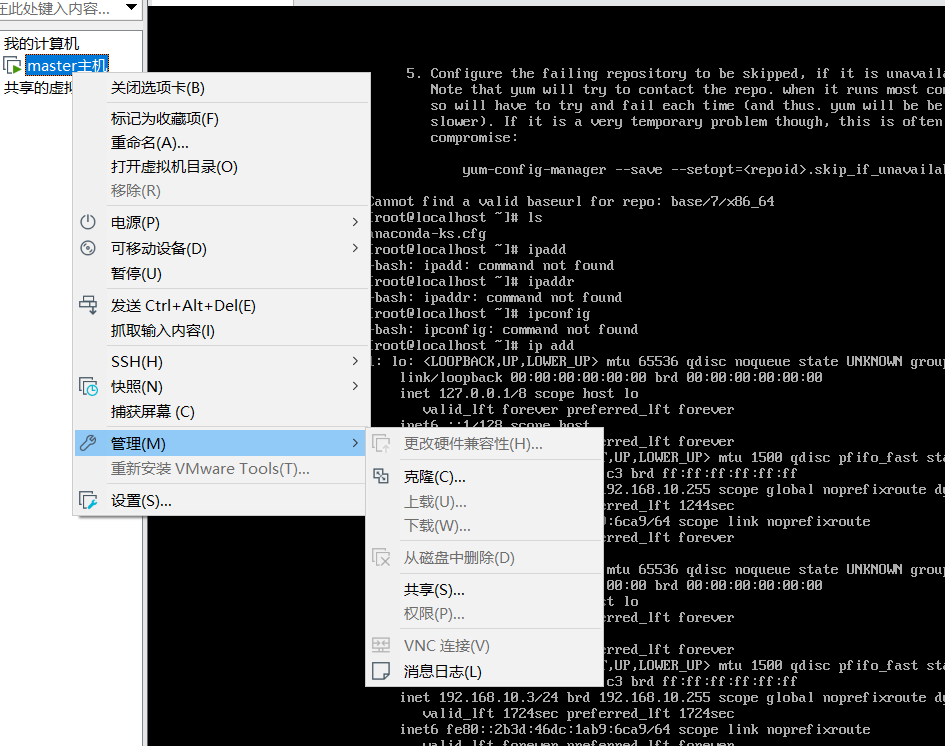
克隆出node1节点
Master的安装和配置
所有节点关闭Selinux、iptables、swap分区
systemctl stop firewalld
systemctl disable firewalld
iptables -F && iptables -X && iptables -F -t nat && iptables -X -t nat
iptables -P FORWARD ACCEPT
swapoff -a
sed -i '/ swap / s/^\(.*\)$/#\1/g' /etc/fstab
setenforce 0
sed -i 's/^SELINUX=.*/SELINUX=disabled/' /etc/selinux/config
拉取kubernetes默认配置
kubeadm config print init-defaults > init-config.yaml
打开该文件查看,发现配置的镜像仓库如下:
imageRepository: k8s.gcr.io
该镜像仓库如果连不上,可以用国内的镜像代替:imageRepository: registry.aliyuncs.com/google_containers
打开init-config.yaml,然后进行相应的修改,可以指定kubernetesVersion版本,pod的选址访问等。
kubernetes镜像拉取
kubeadm config images pull --config=init-config.yaml
采用国内镜像的方案,由于coredns的标签问题,会导致拉取coredns:v1.8.4拉取失败,这时候我们可以手动拉取,并自己打标签。失败信息如下:

**解决方案:**手动拉取镜像
从docker hub上手动拉取镜像:
docker pull registry.aliyuncs.com/google_containers/coredns:1.8.4
修改标签:
# 重命名
docker tag registry.aliyuncs.com/google_containers/coredns:1.8.4 registry.aliyuncs.com/google_containers/coredns:v1.8.4
# 删除原有镜像
docker rmi registry.aliyuncs.com/google_containers/coredns:1.8.4
以下是镜像默认的标签:v1.8.4 ,而在镜像中的标签是1.8.4,所以会导致拉取失败。

运行kubeadm init安装master节点
kubeadm init --apiserver-advertise-address 192.168.10.3 --apiserver-bind-port=6443 --pod-network-cidr=10.244.0.0/16 --service-cidr=10.96.0.0/12 --kubernetes-version=1.24.1 --image-repository registry.aliyuncs.com/google_containers
如下报错解决方案
- CPU数量问题 将虚拟机cpu数量设置为2即可
the number of available CPUs 1 is less than the required 2
[ERROR CRI]: container runtime is not running: output: time="2021-08-17T22:43:15+08:00" level=fatal msg="getting status of runtime: rpc error: code = Unimplemented desc = unknown service runtime.v1alpha2.RuntimeService"
解决方案:
rm /etc/containerd/config.toml
systemctl restart containerd
kubeadm init安装失败后需要重新执行,此时要先执行kubeadm reset命令。
若出现下面问题
Unable to connect to the server: x509: certificate signed by unknown authority (possibly because of "crypto/rsa: verification error" while trying to verify candidate authority certificate "kubernetes")
解决办法
  mkdir -p $HOME/.kube
  sudo cp -i /etc/kubernetes/admin.conf $HOME/.kube/config
  sudo chown $(id -u):$(id -g) $HOME/.kube/config
再次尝试安装出现如下问题
The HTTP call equal to ‘curl -sSL http://localhost:10248/healthz’ failed with error: Get “http://localhost:10248/healthz”: dial tcp [::1]:10248: connect: connection refused.

通过systemctl status kubelet 可以看到kubelet 挂掉了。
● kubelet.service - kubelet: The Kubernetes Node Agent
   Loaded: loaded (/usr/lib/systemd/system/kubelet.service; enabled; vendor preset: disabled)
  Drop-In: /usr/lib/systemd/system/kubelet.service.d
           └─10-kubeadm.conf
   Active: activating (auto-restart) (Result: exit-code) since 四 2022-06-09 15:36:26 CST; 146ms ago
     Docs: https://kubernetes.io/docs/
  Process: 12064 ExecStart=/usr/bin/kubelet $KUBELET_KUBECONFIG_ARGS $KUBELET_CONFIG_ARGS $KUBELET_KUBEADM_ARGS $KUBELET_EXTRA_ARGS (code=exited, status=1/FAILURE)
 Main PID: 12064 (code=exited, status=1/FAILURE)
网上百度问题有很多种
第一种 docker 和 kubelet 的驱动不一致
查看docker驱动
docker info|grep Driver
Cgroup Driver: cgroupfs
查看kubelet驱动
systemctl show *--property=Environment kubelet |cat*

修改docker驱动,查看/etc/docker/daemon.json文件,没有的话,手动创建,添加以下内容
{


  "registry-mirrors": ["https://ogeydad1.mirror.aliyuncs.com"], "exec-opts": ["native.cgroupdriver=systemd"]
}
重启docker
systemctl daemon-reload

systemctl restart docker
重启kubelet
systemctl daemon-reload

systemctl restart kubelet
第二种 swap分区没有关
使用 swapoff -a 命令关闭所有分区
还有可能是防火墙没有关
systemctl stop firewalld
systemctl disable firewalld
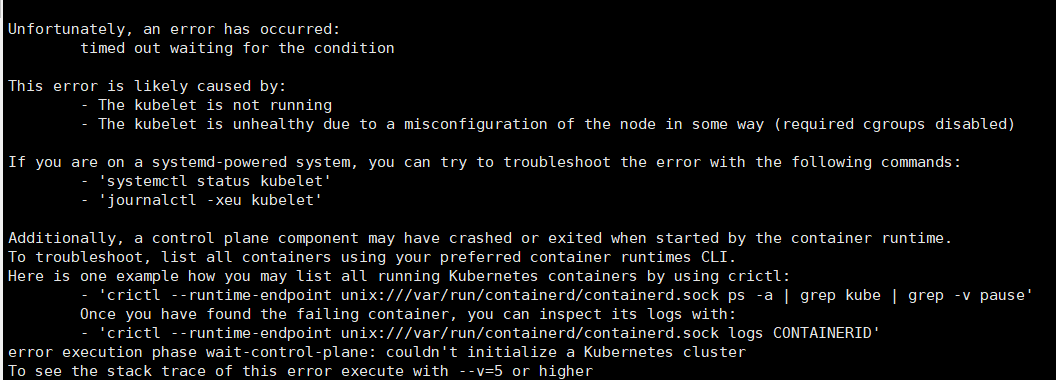
接着试初始化,出现如下报错
[kubelet-check] Initial timeout of 40s passed.

Unfortunately, an error has occurred:
    timed out waiting for the condition

This error is likely caused by:
    - The kubelet is not running
    - The kubelet is unhealthy due to a misconfiguration of the node in some way (required cgroups disabled)

If you are on a systemd-powered system, you can try to troubleshoot the error with the following commands:
    - 'systemctl status kubelet'
    - 'journalctl -xeu kubelet'

Additionally, a control plane component may have crashed or exited when started by the container runtime.
To troubleshoot, list all containers using your preferred container runtimes CLI.
Here is one example how you may list all running Kubernetes containers by using crictl:
    - 'crictl --runtime-endpoint unix:///var/run/containerd/containerd.sock ps -a | grep kube | grep -v pause'
    Once you have found the failing container, you can inspect its logs with:
    - 'crictl --runtime-endpoint unix:///var/run/containerd/containerd.sock logs CONTAINERID'
error execution phase wait-control-plane: couldn't initialize a Kubernetes cluster
To see the stack trace of this error execute with --v=5 or higher
接着看日志发现kubelet报错
master kubelet[15135]: E0521 21:07:57.697075 15135 kubelet.go:2419] "Error getting node" err="node
查博客得知,应该是版本太高了,v1.24 已经弃用了dockershim ,换成v1.23.0 试试https://blog.csdn.net/weixin_66536807/article/details/124903478
# 删除kubeadm、kubelet、kubectl
yum remove kubeadm、kubelet、kubectl

# 安装1.23.0 版本
yum install -y kubeadm-1.23.0-0  kubelet-1.23.0-0 kubectl-1.23.0-0 --disableexcludes=kubernetes
kubeadm init --apiserver-advertise-address 192.168.10.3 --apiserver-bind-port=6443 --pod-network-cidr=10.244.0.0/16 --service-cidr=10.96.0.0/12 --kubernetes-version=1.23.0 --image-repository registry.aliyuncs.com/google_containers

成功!!!
# 根据提示创建文件夹,执行命令
mkdir -p $HOME/.kube
sudo cp -i /etc/kubernetes/admin.conf $HOME/.kube/config
sudo chown $(id -u):$(id -g) $HOME/.kube/config
Node 节点安装和配置
-
node节点所在的机器也要按照前置环境的步骤走一遍(我是之前创建有快照,直接按着快照复制了一个node)
-
安装像master那样增加kubernetes的yum源
安装kubelet 和 kubeadm
yum install -y kubeadm-1.23.0-0 kubelet-1.23.0-0 --disableexcludes=kubernetes
运行以下命令,并设置开机启动:
systemctl enable docker && systemctl start docker
systemctl enable kubelet && systemctl start kubelet
执行join命令:
# 该命令来自master安装成功后的最后两行信息
kubeadm join 192.168.10.3:6443 --token 7adbpw.vph00nljcfvjf3t0 \
	--discovery-token-ca-cert-hash sha256:d28a79426cf1f5e92edcb8f48a9bd70d4a9ff9f1e231519f28600cfeaa91452a
出现bug
kubetcl *join* node节点加入集群 *卡住*,无响应
在kubectl join xxxx 的最后加入一个参数--v=2
# 该命令来自master安装成功后的最后两行信息
kubeadm join 192.168.10.3:6443 --token 7adbpw.vph00nljcfvjf3t0 \
	--discovery-token-ca-cert-hash sha256:d28a79426cf1f5e92edcb8f48a9bd70d4a9ff9f1e231519f28600cfeaa91452a -- v=2
默认token有效期为24小时,当过期之后,该token就不可用了。这时就需要重新创建token,可以直接使用命令快捷生成:
kubeadm token create --print-join-command
又出现bug
k8s.io/dns/pkg/dns/dns.go:150: Failed to list *v1.Service: Get https://10.96.0.1:443/api/v1/services?resourceVersion=0: dial tcp 10.96.0.1:443: getsockopt: no route to host
搜了老半天找到解决办法
# 回到kubernees-maser  依次输入列命令
systemctl stop kubelet
systemctl stop docker
iptables --flush
iptables -tnat --flush
systemctl start kubelet
systemctl start docker
又出现bug
The HTTP call equal to 'curl -sSL http://localhost:10248/healthz' failed with error: Get "http://localhost:10248/healthz": dial tcp [::1]:10248: connect: connection refused.
这个是之前的bug,我忘记配置了 docker和Kubernetes 的驱动不一致导致的
还是不管用 后来感觉好像是swap 没关掉试了试 swapoff -a 终于成功了。
此时,在master节点上执行kubectl get nodes能看到该node节点表示成功,此时状态还是NOT Ready。
安装网络插件
  # 安装Calico CNI插件
  kubectl apply -f "https://docs.projectcalico.org/manifests/calico.yaml"
  # 安装weave插件
  kubectl apply -f "https://cloud.weave.works/k8s/net?k8s-version=$(kubectl version | base64 | tr -d '\n')"
再次查看状态发现还是有两个是处于containerCreating状态
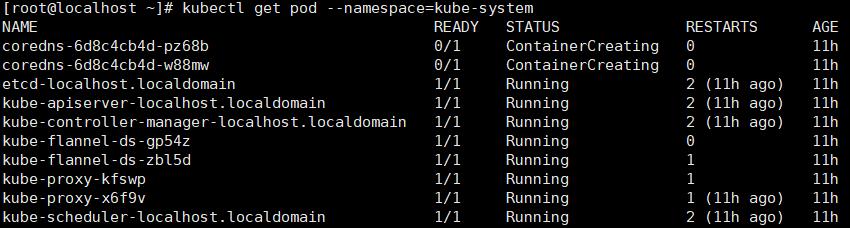
使用命令查看详细信息 kubectl describe pod coredns-6d8c4cb4d-qmp6g --namespace=kube-system
Events:
  Type     Reason                  Age                   From               Message
  ----     ------                  ----                  ----               -------
  Normal   Scheduled               20m                   default-scheduler  Successfully assigned kube-system/coredns-6d8c4cb4d-qmp6g to master
  Warning  FailedCreatePodSandBox  20m                   kubelet            Failed to create pod sandbox: rpc error: code = Unknown desc = [failed to set up sandbox container "bf1732938b8edbad4c1e768934e616f50e1496e933efd0880b80226645d3e627" network for pod "coredns-6d8c4cb4d-qmp6g": networkPlugin cni failed to set up pod "coredns-6d8c4cb4d-qmp6g_kube-system" network: error getting ClusterInformation: Get "https://[10.96.0.1]:443/apis/crd.projectcalico.org/v1/clusterinformations/default": x509: certificate signed by unknown authority (possibly because of "crypto/rsa: verification error" while trying to verify candidate authority certificate "kubernetes"), failed to clean up sandbox container "bf1732938b8edbad4c1e768934e616f50e1496e933efd0880b80226645d3e627" network for pod "coredns-6d8c4cb4d-qmp6g": networkPlugin cni failed to teardown pod "coredns-6d8c4cb4d-qmp6g_kube-system" network: error getting ClusterInformation: Get "https://[10.96.0.1]:443/apis/crd.projectcalico.org/v1/clusterinformations/default": x509: certificate signed by unknown authority (possibly because of "crypto/rsa: verification error" while trying to verify candidate authority certificate "kubernetes")]
  Normal   SandboxChanged          4m55s (x71 over 20m)  kubelet            Pod sandbox changed, it will be killed and re-created
出现个问题
搜博客 发现kubeadm reset命令执行后的输出结果:
The reset process does not clean CNI configuration. To do so, you must remove /etc/cni/net.d

The reset process does not reset or clean up iptables rules or IPVS tables.
If you wish to reset iptables, you must do so manually by using the "iptables" command.

If your cluster was setup to utilize IPVS, run ipvsadm --clear (or similar)
to reset your system's IPVS tables.

The reset process does not clean your kubeconfig files and you must remove them manually.
Please, check the contents of the $HOME/.kube/config file.
然后根据上面的提示把/etc/cni/net.d目录删掉,然后重新执行kubeadm init命令就可以了。
验证k8s集群是否安装完成
- 执行==kubectl get pods --all-namespaces==看pod状态是否都正确
- 如果发现错误状态的pod,可以执行==kubectl --namespace=kube-system describe pod <pod_name>==来查看错误原因。
附:
删除工作节点:kubectl delete nodes k8s-node1
修改hostname :hostnamectl set-hostname newname
查看kubelet 日志 :journalctl -xefu kubelet## K8s的安装与部署
准备四台虚拟机,使用centos7操作系统,搭建集群系统。

先搭建好一台虚拟机的环境,其他机器克隆就行。
开启虚拟机
虚拟机参数:
- 网络使用NAT模式
- 内存2g以上
- 2cpu (不然后面会报错)
- 硬盘我配的30g
如果网络连接不成功,可以配置试试这篇博客https://blog.csdn.net/duyuanjun123/article/details/119833105
第一次我的网络一直连不通是因为初始化系统时我没把网络连接开开在初始化操作系统的时候注意一下。
在虚拟机中使用ip addr命令查看虚拟机ip
因为虚拟机操作多少有点不方便,所以使用xshell或者fianlshell 连接
配置yum源
连接成功配置一下yum源
-
下载wget命令
yum install wget -y -
备份旧的yum仓库源
cd /etc/yum.repos.d mkdir repobak # 创建文件夹,保存备份文件 mv *.repo repobak #备份repo文件到文件 -
清理旧包
~yum clean all -
下载新的阿里的yum源仓库,阿里的开源镜像:https://developer.aliyun.com/mirror/
wget -O /etc/yum.repos.d/CentOS-Base.repo http://mirrors.aliyun.com/repo/Centos-7.repo -
继续下载第二个仓库 epel仓库
wget -O /etc/yum.repos.d/epel.repo http://mirrors.aliyun.com/repo/epel-7.repo -
生成yum源缓存并更新yum源
yum makecache
yum update
下载docker
# 1、卸载旧的版本
yum remove docker \
				docker-client \
				docker-client-lastest \
				docker-common \
				docker-latest \
				docker-latest-logrotate \
				docekr-engine

# 2、需要的安装包
yum install -y yum-utils

# 3、设置镜像仓库 (阿里云镜像)
yum-config-manager --add-repo http://mirrors.aliyun.com/docker-ce/linux/centos/docker-ce.repo

# 更新yum软件包索引
	yum makecache fast

# 4、安装docker相关的内容 docker-ce 社区办 ee企业版
	yum install docker-ce docker-ce-cli containerd.io

# 5、启动docker
	systemctl start docker

# 6、测试docker是否启动成功
	docker -version
安装Kubernetes
配置安装源地址
cat <<EOF > /etc/yum.repos.d/kubernetes.repo
[kubernetes]
name=Kubernetes
baseurl=https://mirrors.aliyun.com/kubernetes/yum/repos/kubernetes-el7-x86_64
enabled=1
gpgcheck=1
repo_gpgcheck=1
gpgkey=https://mirrors.aliyun.com/kubernetes/yum/doc/yum-key.gpg https://mirrors.aliyun.com/kubernetes/yum/doc/rpm-package-key.gpg
EOF
如下出现错误
[Errno -1] repomd.xml signature could not be verified for kubernetes
则是 repo 的 gpg 验证不通过导致的,可以修改repo_gpgcheck=0跳过验证。
最后,安装Kubernetes的关键组件。
setenforce o

yum install -y kubelet kubeadm kubectl
# 启动kubelet、kubeadm、kubectl服务 kubeadm将使用kubelet服务以容器的方式部署和启动Kubernetes的主要服务,所以需要先启动kubelet服务。
systemctl enable kubelet && systemctl start kubelet
克隆虚拟机
克隆出node1节点
Master的安装和配置
所有节点关闭Selinux、iptables、swap分区
systemctl stop firewalld
systemctl disable firewalld
iptables -F && iptables -X && iptables -F -t nat && iptables -X -t nat
iptables -P FORWARD ACCEPT
swapoff -a
sed -i '/ swap / s/^\(.*\)$/#\1/g' /etc/fstab
setenforce 0
sed -i 's/^SELINUX=.*/SELINUX=disabled/' /etc/selinux/config
拉取kubernetes默认配置
kubeadm config print init-defaults > init-config.yaml
打开该文件查看,发现配置的镜像仓库如下:
imageRepository: k8s.gcr.io
该镜像仓库如果连不上,可以用国内的镜像代替:imageRepository: registry.aliyuncs.com/google_containers
打开init-config.yaml,然后进行相应的修改,可以指定kubernetesVersion版本,pod的选址访问等。
kubernetes镜像拉取
kubeadm config images pull --config=init-config.yaml
采用国内镜像的方案,由于coredns的标签问题,会导致拉取coredns:v1.8.4拉取失败,这时候我们可以手动拉取,并自己打标签。失败信息如下:
**解决方案:**手动拉取镜像
从docker hub上手动拉取镜像:
docker pull registry.aliyuncs.com/google_containers/coredns:1.8.4
修改标签:
# 重命名
docker tag registry.aliyuncs.com/google_containers/coredns:1.8.4 registry.aliyuncs.com/google_containers/coredns:v1.8.4
# 删除原有镜像
docker rmi registry.aliyuncs.com/google_containers/coredns:1.8.4
以下是镜像默认的标签:v1.8.4 ,而在镜像中的标签是1.8.4,所以会导致拉取失败。
运行kubeadm init安装master节点
kubeadm init --apiserver-advertise-address 192.168.10.3 --apiserver-bind-port=6443 --pod-network-cidr=10.244.0.0/16 --service-cidr=10.96.0.0/12 --kubernetes-version=1.24.1 --image-repository registry.aliyuncs.com/google_containers
如下报错解决方案
- CPU数量问题 将虚拟机cpu数量设置为2即可
the number of available CPUs 1 is less than the required 2
[ERROR CRI]: container runtime is not running: output: time="2021-08-17T22:43:15+08:00" level=fatal msg="getting status of runtime: rpc error: code = Unimplemented desc = unknown service runtime.v1alpha2.RuntimeService"
解决方案:
rm /etc/containerd/config.toml
systemctl restart containerd
kubeadm init安装失败后需要重新执行,此时要先执行kubeadm reset命令。
若出现下面问题
Unable to connect to the server: x509: certificate signed by unknown authority (possibly because of "crypto/rsa: verification error" while trying to verify candidate authority certificate "kubernetes")
解决办法
  mkdir -p $HOME/.kube
  sudo cp -i /etc/kubernetes/admin.conf $HOME/.kube/config
  sudo chown $(id -u):$(id -g) $HOME/.kube/config
再次尝试安装出现如下问题
The HTTP call equal to ‘curl -sSL http://localhost:10248/healthz’ failed with error: Get “http://localhost:10248/healthz”: dial tcp [::1]:10248: connect: connection refused.
通过systemctl status kubelet 可以看到kubelet 挂掉了。
● kubelet.service - kubelet: The Kubernetes Node Agent
   Loaded: loaded (/usr/lib/systemd/system/kubelet.service; enabled; vendor preset: disabled)
  Drop-In: /usr/lib/systemd/system/kubelet.service.d
           └─10-kubeadm.conf
   Active: activating (auto-restart) (Result: exit-code) since 四 2022-06-09 15:36:26 CST; 146ms ago
     Docs: https://kubernetes.io/docs/
  Process: 12064 ExecStart=/usr/bin/kubelet $KUBELET_KUBECONFIG_ARGS $KUBELET_CONFIG_ARGS $KUBELET_KUBEADM_ARGS $KUBELET_EXTRA_ARGS (code=exited, status=1/FAILURE)
 Main PID: 12064 (code=exited, status=1/FAILURE)
网上百度问题有很多种
第一种 docker 和 kubelet 的驱动不一致
查看docker驱动
docker info|grep Driver
Cgroup Driver: cgroupfs
查看kubelet驱动
systemctl show *--property=Environment kubelet |cat*
修改docker驱动,查看/etc/docker/daemon.json文件,没有的话,手动创建,添加以下内容
{


  "registry-mirrors": ["https://ogeydad1.mirror.aliyuncs.com"], "exec-opts": ["native.cgroupdriver=systemd"]
}
重启docker
systemctl daemon-reload

systemctl restart docker
重启kubelet
systemctl daemon-reload

systemctl restart kubelet
第二种 swap分区没有关
使用 swapoff -a 命令关闭所有分区
还有可能是防火墙没有关
systemctl stop firewalld
systemctl disable firewalld
接着试初始化,出现如下报错
[kubelet-check] Initial timeout of 40s passed.

Unfortunately, an error has occurred:
    timed out waiting for the condition

This error is likely caused by:
    - The kubelet is not running
    - The kubelet is unhealthy due to a misconfiguration of the node in some way (required cgroups disabled)

If you are on a systemd-powered system, you can try to troubleshoot the error with the following commands:
    - 'systemctl status kubelet'
    - 'journalctl -xeu kubelet'

Additionally, a control plane component may have crashed or exited when started by the container runtime.
To troubleshoot, list all containers using your preferred container runtimes CLI.
Here is one example how you may list all running Kubernetes containers by using crictl:
    - 'crictl --runtime-endpoint unix:///var/run/containerd/containerd.sock ps -a | grep kube | grep -v pause'
    Once you have found the failing container, you can inspect its logs with:
    - 'crictl --runtime-endpoint unix:///var/run/containerd/containerd.sock logs CONTAINERID'
error execution phase wait-control-plane: couldn't initialize a Kubernetes cluster
To see the stack trace of this error execute with --v=5 or higher
接着看日志发现kubelet报错
master kubelet[15135]: E0521 21:07:57.697075 15135 kubelet.go:2419] "Error getting node" err="node
查博客得知,应该是版本太高了,v1.24 已经弃用了dockershim ,换成v1.23.0 试试https://blog.csdn.net/weixin_66536807/article/details/124903478
# 删除kubeadm、kubelet、kubectl
yum remove kubeadm、kubelet、kubectl

# 安装1.23.0 版本
yum install -y kubeadm-1.23.0-0  kubelet-1.23.0-0 kubectl-1.23.0-0 --disableexcludes=kubernetes
kubeadm init --apiserver-advertise-address 192.168.10.3 --apiserver-bind-port=6443 --pod-network-cidr=10.244.0.0/16 --service-cidr=10.96.0.0/12 --kubernetes-version=1.23.0 --image-repository registry.aliyuncs.com/google_containers
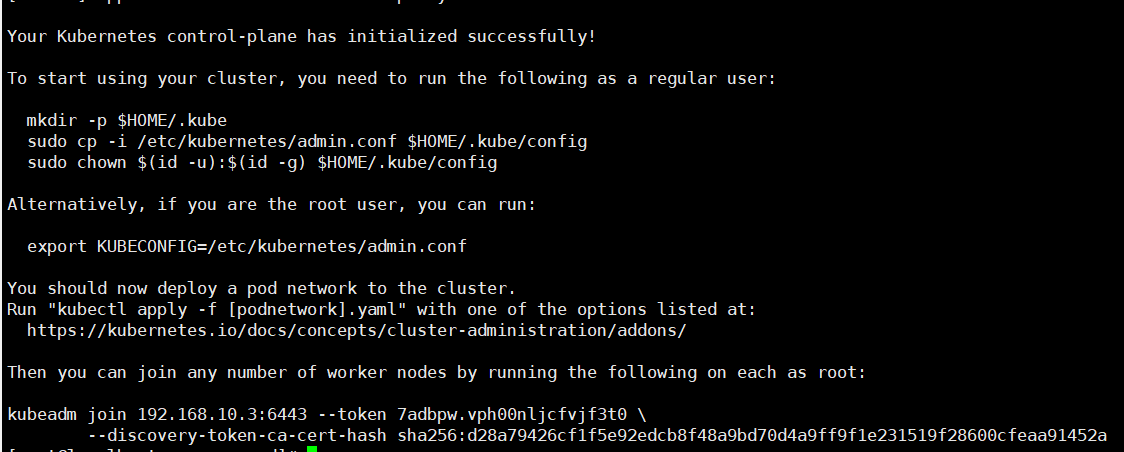
成功!!!
# 根据提示创建文件夹,执行命令
mkdir -p $HOME/.kube
sudo cp -i /etc/kubernetes/admin.conf $HOME/.kube/config
sudo chown $(id -u):$(id -g) $HOME/.kube/config
Node 节点安装和配置
-
node节点所在的机器也要按照前置环境的步骤走一遍(我是之前创建有快照,直接按着快照复制了一个node)
-
安装像master那样增加kubernetes的yum源
安装kubelet 和 kubeadm
yum install -y kubeadm-1.23.0-0 kubelet-1.23.0-0 --disableexcludes=kubernetes
运行以下命令,并设置开机启动:
systemctl enable docker && systemctl start docker
systemctl enable kubelet && systemctl start kubelet
执行join命令:
# 该命令来自master安装成功后的最后两行信息
kubeadm join 192.168.10.3:6443 --token 7adbpw.vph00nljcfvjf3t0 \
	--discovery-token-ca-cert-hash sha256:d28a79426cf1f5e92edcb8f48a9bd70d4a9ff9f1e231519f28600cfeaa91452a
出现bug
kubetcl *join* node节点加入集群 *卡住*,无响应
在kubectl join xxxx 的最后加入一个参数--v=2
# 该命令来自master安装成功后的最后两行信息
kubeadm join 192.168.10.3:6443 --token 7adbpw.vph00nljcfvjf3t0 \
	--discovery-token-ca-cert-hash sha256:d28a79426cf1f5e92edcb8f48a9bd70d4a9ff9f1e231519f28600cfeaa91452a -- v=2
默认token有效期为24小时,当过期之后,该token就不可用了。这时就需要重新创建token,可以直接使用命令快捷生成:
kubeadm token create --print-join-command
又出现bug
k8s.io/dns/pkg/dns/dns.go:150: Failed to list *v1.Service: Get https://10.96.0.1:443/api/v1/services?resourceVersion=0: dial tcp 10.96.0.1:443: getsockopt: no route to host
搜了老半天找到解决办法
# 回到kubernees-maser  依次输入列命令
systemctl stop kubelet
systemctl stop docker
iptables --flush
iptables -tnat --flush
systemctl start kubelet
systemctl start docker
又出现bug
The HTTP call equal to 'curl -sSL http://localhost:10248/healthz' failed with error: Get "http://localhost:10248/healthz": dial tcp [::1]:10248: connect: connection refused.
这个是之前的bug,我忘记配置了 docker和Kubernetes 的驱动不一致导致的
还是不管用 后来感觉好像是swap 没关掉试了试 swapoff -a 终于成功了。
此时,在master节点上执行kubectl get nodes能看到该node节点表示成功,此时状态还是NOT Ready。
安装网络插件
  # 安装Calico CNI插件
  kubectl apply -f "https://docs.projectcalico.org/manifests/calico.yaml"
  # 安装weave插件
  kubectl apply -f "https://cloud.weave.works/k8s/net?k8s-version=$(kubectl version | base64 | tr -d '\n')"
再次查看状态发现还是有两个是处于containerCreating状态

使用命令查看详细信息 kubectl describe pod coredns-6d8c4cb4d-qmp6g --namespace=kube-system
Events:
  Type     Reason                  Age                   From               Message
  ----     ------                  ----                  ----               -------
  Normal   Scheduled               20m                   default-scheduler  Successfully assigned kube-system/coredns-6d8c4cb4d-qmp6g to master
  Warning  FailedCreatePodSandBox  20m                   kubelet            Failed to create pod sandbox: rpc error: code = Unknown desc = [failed to set up sandbox container "bf1732938b8edbad4c1e768934e616f50e1496e933efd0880b80226645d3e627" network for pod "coredns-6d8c4cb4d-qmp6g": networkPlugin cni failed to set up pod "coredns-6d8c4cb4d-qmp6g_kube-system" network: error getting ClusterInformation: Get "https://[10.96.0.1]:443/apis/crd.projectcalico.org/v1/clusterinformations/default": x509: certificate signed by unknown authority (possibly because of "crypto/rsa: verification error" while trying to verify candidate authority certificate "kubernetes"), failed to clean up sandbox container "bf1732938b8edbad4c1e768934e616f50e1496e933efd0880b80226645d3e627" network for pod "coredns-6d8c4cb4d-qmp6g": networkPlugin cni failed to teardown pod "coredns-6d8c4cb4d-qmp6g_kube-system" network: error getting ClusterInformation: Get "https://[10.96.0.1]:443/apis/crd.projectcalico.org/v1/clusterinformations/default": x509: certificate signed by unknown authority (possibly because of "crypto/rsa: verification error" while trying to verify candidate authority certificate "kubernetes")]
  Normal   SandboxChanged          4m55s (x71 over 20m)  kubelet            Pod sandbox changed, it will be killed and re-created
出现个问题
搜博客 发现kubeadm reset命令执行后的输出结果:
The reset process does not clean CNI configuration. To do so, you must remove /etc/cni/net.d

The reset process does not reset or clean up iptables rules or IPVS tables.
If you wish to reset iptables, you must do so manually by using the "iptables" command.

If your cluster was setup to utilize IPVS, run ipvsadm --clear (or similar)
to reset your system's IPVS tables.

The reset process does not clean your kubeconfig files and you must remove them manually.
Please, check the contents of the $HOME/.kube/config file.
然后根据上面的提示把/etc/cni/net.d目录删掉,然后重新执行kubeadm init命令就可以了。
验证k8s集群是否安装完成
- 执行==kubectl get pods --all-namespaces==看pod状态是否都正确
- 如果发现错误状态的pod,可以执行==kubectl --namespace=kube-system describe pod <pod_name>==来查看错误原因。
附:
删除工作节点:kubectl delete nodes k8s-node1
修改hostname :hostnamectl set-hostname newname
查看kubelet 日志 :journalctl -xefu kubelet