工具及准备介绍:
1.本文使用的开发软件是eclipse1.7
2.需要下载postgresqlpostgresql-9.2-1002.jdbc3.jar (需要的话在我的资源上下载);需要数据库管理软件Navicat
3.本文是用JDBC连接数据库,通过读取".sql"文件,实现对Postgresql数据库的查询插入操作
实施步骤
1.先远程连接上数据库
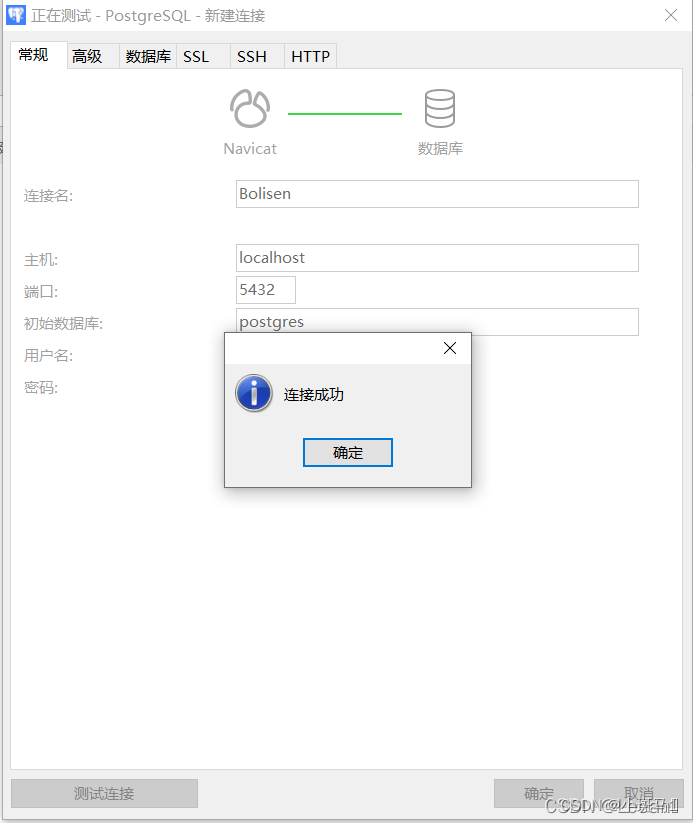
(1)打数据库管理软件Navicat,点击左上角的连接,选择PostgreSQL。

(2)填写连接信息,此处只要填写连接名和密码(安装PgSQL时设置的密码),其他的默认即可。localhost为本机地址(远程连接填写其IP地址),5432是PgSQL数据库的端口。填写完连接信息后,点击测试连接,如果连接成功对话框即表示PgSQL Server已开启。点击确定完成PgSQL数据库的连接。
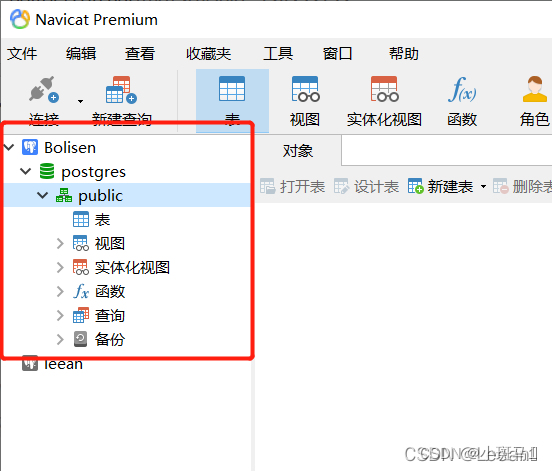
连接完成以后,在左侧会看到连接信息,其中Bolisen子目录下的postgres是一个初始的PgSQL数据库,可以直接使用。也可以选中postgres右击选择新建数据库创建一个新的PgSQL数据库。
插一句(如果项目jar包会导入布局啥的已建好请忽略此条)
开始前的java项目创建省略,下面贴一下我的简单项目图 :!jar包导入的话:新建一个lib(名字随意)文件夹把下载的jar包放进去–>鼠标右击jar包 -->点击Build Path -->然后你点击第一个把它rebuild进去,它就会进入到Referenced Libraries里面(见图一)。dao包主要写对数据的插入方法;Demo包是测试代码;util包是工具包,写连接数据库这些的方法这里插入图片描述
图一: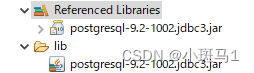
2.开始写Java代码
2.1首先连接数据库(配置文件方式连接)
(1)项目下建一个.properties文件,例如本文的dbcpconfig.properties文件,文件名可自己取,下面贴一下我的配置文件内容:
driver=org.postgresql.Driver
url=jdbc:postgresql://10.167.81.11:27500/postgres?characterEncoding=utf-8
username=user
password=zzr1100!

<!-- \u521D\u59CB\u5316\u8FDE\u63A5 -->
initialSize=10
<!--\u6700\u5927\u8FDE\u63A5\u6570\u91CF  -->
maxActive=50
<!-- \u6700\u5927\u7A7A\u95F2\u8FDE\u63A5 -->
maxIdle=20
<!-- \u6700\u5C0F\u7A7A\u95F2\u8FDE\u63A5 -->
minIdle=5
<!-- \u8D85\u65F6\u7B49\u5F85\u65F6\u95F4\u4EE5\u6BEB\u79D2\u4E3A\u5355\u4F4D 6000\u6BEB\u79D2/1000\u7B49\u4E8E60\u79D2 -->
maxWait=60000在这里插入代码片
注意:后面的初始化大小最大容量这些参数一定要写,不然就连不通
(2).连接数据库的Java代码,如下:
public class JDBCUtils {
	       private static Properties prop;
	       static {
	              prop = new Properties();
	              try {
	                    InputStream is= JDBCUtils.class.getClassLoader().getResourceAsStream(
	                                   "dbcpconfig.properties");
	                    prop.load(is);
	                     Class.forName(prop.getProperty("driver"));//加载驱动
	              } catch (Exception e) {
	            	  	System.out.println("出错了");
	                     throw new RuntimeException(e);

	              }
	       }
	       //获取连接
	       public static Connection getConnection(Connection conn) {
	              if (conn==null) {
	                     try {
	                            conn=DriverManager.getConnection(prop.getProperty("url"),
	                            prop.getProperty("username"),
	                            prop.getProperty("password"));
	                     } catch (SQLException e) {
	                            throw new RuntimeException(e);
	                     }
	              }
	                return conn;
	       }
	       //关闭资源
	       public static void close(Connection conn,PreparedStatement prep,ResultSet rs){
	        if(rs != null){
	            try {
	                rs.close();
	            } catch (SQLException e) {
	                e.printStackTrace();
	            } finally{
	                rs = null;
	            }
	        }
	        if(prep != null){
	            try {
	                prep.close();
	            } catch (SQLException e) {
	                e.printStackTrace();
	            } finally{
	                prep = null;
	            }
	        }
	        if(conn != null){
	            try {
	                conn.close();
	            } catch (SQLException e) {
	                e.printStackTrace();
	            } finally{
	                conn = null;
	            }
	        }
	    }
	       public static void close(Connection conn,PreparedStatement prep){
	    	   if(prep != null){
		            try {
		                prep.close();
		            } catch (SQLException e) {
		                e.printStackTrace();
		            } finally{
		                prep = null;
		            }
		        }
		        if(conn != null){
		            try {
		                conn.close();
		            } catch (SQLException e) {
		                e.printStackTrace();
		            } finally{
		                conn = null;
		            }
		        }
	       }
}
在这里插入代码片
2.2建一个.sql文件,读取文件执行插入操作
(1)本文以插入操作举例说明:如下图新建一个sqlfile(名随意)文件夹,再新建一个.sql文件,里面写入你要插入数据的sql语句(注意这里面我只写了一行插入语句进行测试,如果写多行插入语句 ,需要自行再添加逻辑代码)附本文 sql语句示例供参考

INSERT INTO hxdb.person( name, age, sex)VALUES (?, ?, ?)
(2)Java读取sql文件实现
public class FileReader {

	    public static String readText() {
	    	String filePath="sqlfile/insert.sql";
	    	StringBuilder sb=new StringBuilder();
	        //通过路径创建文件
	        File file = new File(filePath);
	        if (file.isFile() && file.exists()) {
	            try( //文件编码为gbk,这里做个转换
		                InputStreamReader isr = new InputStreamReader(new FileInputStream(file), "utf-8");
		                //字符缓冲流
		                BufferedReader br = new BufferedReader(isr);) {
	            		String line=null;
	                while ((line = br.readLine()) != null) {
	                	sb.append(line);
	                }

	            } catch (IOException e) {
	                e.printStackTrace();
	                System.out.println("文件读取错误!");
	            }
	        }else {
	            System.out.println("文件不存在!");
	        }
	        return sb.toString();
	    }
}
(3)插入数据操作方法类附本文参考(本文Symfware类主要封装查询插入这些方法,实际类名你自己根据项目取好)
public class Symfware {
PreparedStatement ps = null;
Connection con=null;
ResultSet resultSet=null;
int result=0;
//1.查询person表中所有内容
public void selectPerson(String line) {
con=JDBCUtils.getConnection(con);//连接数据库
try {
ps=con.prepareStatement(line);
System.out.println(ps);
resultSet=ps.executeQuery();
while (resultSet.next()) {
String id = resultSet.getString("name"); //读取当前行名为id的列的数据
int age1 = resultSet.getInt("age");
// int sex1 = resultSet.getInt("sex");
//System.out.println("name:"+id+"age:"+age1);
}
} catch (SQLException e) {
e.printStackTrace();
}finally {
JDBCUtils.close(con, ps,resultSet);
}
}
//2.插入 sql 操作
public int insertContent(String name,int age,int sex ) {
String sql=FileReader.readText();//读取到的sql
con=JDBCUtils.getConnection(con);
try {
con.setAutoCommit(false);
ps=con.prepareStatement(sql);
ps.setString(1, name);
ps.setInt(2, age);
ps.setInt(3, sex);
result=ps.executeUpdate();
System.out.println(result + "11111多少行");
con.commit();
} catch (SQLException e) {
e.printStackTrace();
}finally {
JDBCUtils.close(con, ps);
}
return result;
}
}
2.3终于到最后一步了,测试结果
以下贴上本文的测试例子
public class Test1 {
	public static void main(String[] args) {

		 Symfware symfware=new Symfware();
		 symfware.insertContent("1111", 1238, 0);

	}
}
好嘞!谢谢观看,希望能帮到你
题外话:哈哈哈,我的这篇csdn博文还是我今年毕业后七月份进入一个项目组,期间经历的一小段作业,隔了折磨久才有时间想着把它记录一下,但愿其中细节我没搞错(哈哈哈)如有问题,还请见谅!谢谢