如果大家觉得文章有错误内容,欢迎留言或者私信讨论~
个人学习笔记版
上一篇文章我们了解了组成 Tomcat NioEndpoint 组件的各个部分以及它们的作用,今天我们的目标是攻略这些组件是如何在项目中被应用的,让我们开始吧。
前引
通过之前的学习我们知道,NioEndpoint 组件负责 I/O 操作,也就是连接器的一部分,那么我们来到 NioEndpoint 源代码处,可以看到方法 startInternal,是不是联想到了什么?是的,Tomcat 通过 Lifecycle 来进行组件的生命周期管理,通过组合模式,只要最上层的父类组件创建、启动(调用start方法),其子类也会随之创建、启动。另外为了处理冗余代码,Tomcat 利用模板方法编写了 LifecycleBase 类,相对的,子类的启动方法也就变成了startInternal。
回顾完 Tomcat 的启动设计之后,我们来到 AbstractEndpoint,在该类里我们就可以找到 LimitLatch、Acceptor、Poller 等组件的创建实现。
public abstract class AbstractEndpoint<S,U> {


	 public final void start() throws Exception {


	    if (bindState == BindState.UNBOUND) {


	    	// 绑定监听的端口
	        bindWithCleanup();
	        bindState = BindState.BOUND_ON_START;
	    }
	    // 这里构建了 LimitLatch、Poller、Acceptor...
	    startInternal();
	}
}
绑定监听端口
作为连接器,我们需要通过指定的端口接受信息。通过上面的bindWithCleanup方法我们一路来到NioEndpoint#bind 方法,看到:
 @Override
public void bind() throws Exception {


    initServerSocket();

	// 忽略不必要代码
}

 protected void initServerSocket() throws Exception {


    if (getUseInheritedChannel()) {


        // 忽略不必要代码
    } else {


    	// 经典的 java nio 写法
        serverSock = ServerSocketChannel.open();
        socketProperties.setProperties(serverSock.socket());
        InetSocketAddress addr = new InetSocketAddress(getAddress(), getPortWithOffset());
        serverSock.socket().bind(addr,getAcceptCount());
    }
    serverSock.configureBlocking(true); //mimic APR behavior
}
bind 方法是我们需要注意的。第二个参数表示操作系统的等待队列长度,上一篇文章提到,当应用层面的连接数到达最大值时,操作系统可以继续接收连接,那么操作系统能继续接收的最大连接数就是这个队列长度,可以通过 acceptCount 参数配置,默认是 100。
public abstract class AbstractEndpoint<S,U> {


  private int acceptCount = 100;
}
回AbstractEndpoint#startInternal ctrl + 鼠标右键直接来到 NioEndpoint 的实现,我们就可以看到各个组件在这里被创建、初始化与启动:
 @Override
public void startInternal() throws Exception {


	if (!running) {


		// 忽略不必要代码

		// Create worker collection
        if (getExecutor() == null) {


            createExecutor();
         }

         initializeConnectionLatch();

         // Start poller thread
         poller = new Poller();
         Thread pollerThread = new Thread(poller, getName() + "-Poller");
         pollerThread.setPriority(threadPriority);
         pollerThread.setDaemon(true);
         pollerThread.start();

         startAcceptorThread();
	}
}
让我们再通过该图回忆一下个组件的功能:
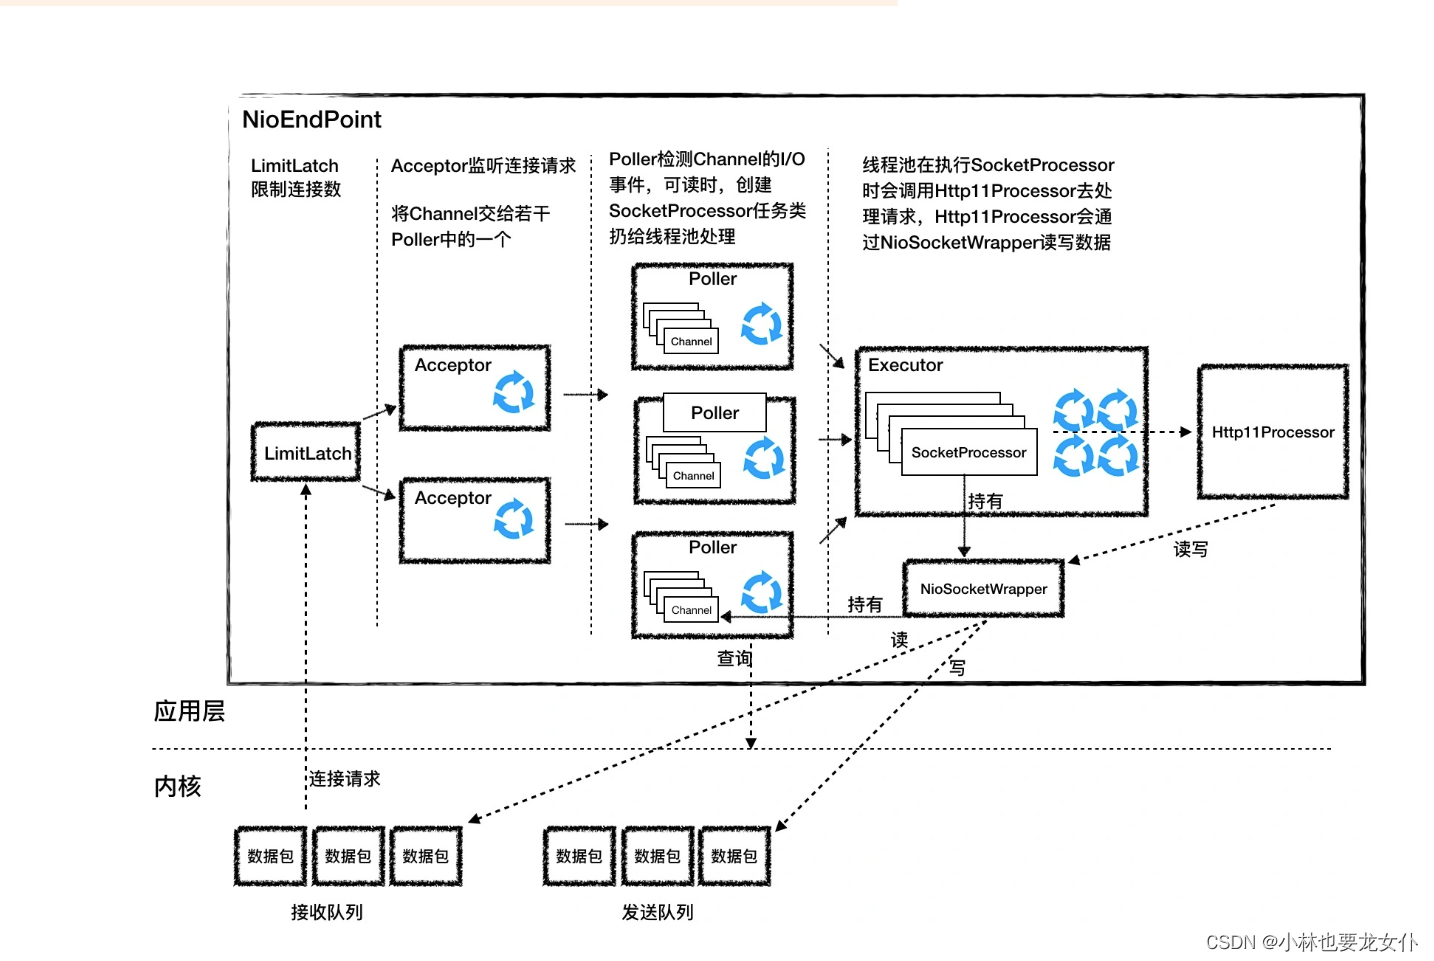
LimitLatch
LimitLatch 的创建就是简单的 new 操作,并且默认的最大连接数是 8*1024
public abstract class AbstractEndpoint<S,U> {


	protected LimitLatch initializeConnectionLatch() {


	    if (maxConnections==-1) {


	        return null;
	    }
	    if (connectionLimitLatch==null) {


	        connectionLimitLatch = new LimitLatch(getMaxConnections());
	    }
	    return connectionLimitLatch;
	}
}

public class LimitLatch {


	public LimitLatch(long limit) {


        this.limit = limit;
        this.count = new AtomicLong(0);
        this.sync = new Sync();
    }
}
LimitLatch 内部定义了内部类 Sync,而 Sync 扩展了 AQS(在 Java API 文档中标明 AQS 的子类应定义为非公共内部帮助类,用于实现其封闭类的同步属性)。AQS 是分为独占和共享两种模式,当以独占模式获取时,其他线程尝试的获取无法成功。多个线程获取共享模式可能(但不一定)成功,LimitLatch 的内部类 Sync 实现的抽象方法则属于共享模式。
并且 AQS 本身是具备先进先出(FIFO)等待队列的阻塞锁和相关同步器,但是 LimitLatch 中的 Sync 则依赖自己的 AtomicLong count 作为信号量来进行判断。
用户线程通过调用 LimitLatch 的 countUpOrAwait 方法来拿到锁,如果暂时无法获取,这个线程会被阻塞到 AQS 的队列中。那 AQS 怎么知道是阻塞还是不阻塞用户线程呢?其实这是由 AQS 的使用者来决定的,也就是内部类 Sync 来决定的,因为 Sync 类重写了 AQS 的 tryAcquireShared() 方法。它的实现逻辑是如果当前连接数 count 小于 limit,线程能获取锁,返回 1,否则返回 -1。
AQS
一般而言要使用 AQS 作为同步类的基础,就需要重写以下几个方法:
// 独占
tryAcquire(int)
tryRelease(int)
// 共享
tryAcquireShared(int)
tryReleaseShared(int)
isHeldExclusively()
// 默认调用都是抛出 UnsupportedOperationException 异常
官方推荐实现这些方法必须是内部线程安全的,代码逻辑简短且不会阻塞的。AQS 中的其他方法被定义为了 final,不支持重写。以下是 AQS 实现的示例:
public class Mutex implements Lock, Serializable {


    private class Sync extends AbstractQueuedSynchronizer {


        @Override
        protected boolean isHeldExclusively() {


            return getState() == 1;
        }

        @Override
        protected boolean tryAcquire(int acquires) {


            assert acquires == 1; // Otherwise unused
            if (compareAndSetState(0, 1)) {


                setExclusiveOwnerThread(Thread.currentThread());
                return true;
            }
            return false;
        }

        @Override
        protected boolean tryRelease(int releases) {


            assert releases == 1; // Otherwise unused
            if (getState() == 0) throw new IllegalMonitorStateException();
            setExclusiveOwnerThread(null);
            setState(0);
            return true;
        }

        Condition newCondition() {


            return new ConditionObject();
        }

        // Deserializes properly
        private void readObject(ObjectInputStream s)
            throws IOException, ClassNotFoundException {


            s.defaultReadObject();
            setState(0); // reset to unlocked state
        }
    }

    // The sync object does all the hard work. We just forward to it.
    private final Sync sync = new Sync();

    @Override
    public void lock() {


        sync.acquire(1);
    }

    @Override
    public void lockInterruptibly() throws InterruptedException {


        sync.acquireInterruptibly(1);
    }

    @Override
    public boolean tryLock() {


        return sync.tryAcquire(1);
    }

    @Override
    public boolean tryLock(long timeout, TimeUnit unit) throws InterruptedException {


        return sync.tryAcquireNanos(1, unit.toNanos(timeout));
    }

    @Override
    public void unlock() {


        sync.release(1);
    }

    @Override
    public Condition newCondition() {


        return sync.newCondition();
    }
}
Acceptor
看完 LimitLatch 的源码,我们再看startAcceptorThread()。Acceptor 跑在一个独立的线程里,它在一个死循环里内调用 accept 方法来接受新连接,一旦有新连接请求的到来,accpet 方法返回一个 Channel 对象,接着把 Channel 对象交给 Poller 去处理。
Acceptor 的创建流程非常简单:
 protected void startAcceptorThread() {


        acceptor = new Acceptor<>(this);
        String threadName = getName() + "-Acceptor";
        acceptor.setThreadName(threadName);
        Thread t = new Thread(acceptor, threadName);
        t.setPriority(getAcceptorThreadPriority());
        t.setDaemon(getDaemon());
        t.start();
    }
Accpetor run() 的方法可以总结为通过观测 endpoint 或者 Tomcat 的状态以及利用 LimitLatch 的countUpOrAwaitConnection 方法来确定是否要接受 SocketChannel:
public class Acceptor<U> implements Runnable {


	@Override
    public void run() {


		// 忽略 感兴趣的同学可以自己去看

		// 如果达到最大连接数 等待
		endpoint.countUpOrAwaitConnection();

	 	if (endpoint.isPaused()) {


        	continue;
        }

		// 接受下一次服务器传入的连接
		socket = endpoint.serverSocketAccept();

		// 给拿到的 SocketChannel 设置对应的处理器
		// 如果失败就关闭它
		if (!endpoint.setSocketOptions(socket)) {


	         endpoint.closeSocket(socket);
        }
	}
}

public class NioEndpoint extends AbstractJsseEndpoint<NioChannel,SocketChannel> {


	@Override
    protected SocketChannel serverSocketAccept() throws Exception {


        SocketChannel result = serverSock.accept();

        // 忽略不必要代码
        return result;
    }

	@Override
    protected boolean setSocketOptions(SocketChannel socket) {


		 NioSocketWrapper socketWrapper = null;
		 try {


		 	// 就是通过 NioSocketWrapper 类将 channel 与对应的 handler、poller 绑定在一起
			 NioChannel channel = null;
            if (nioChannels != null) {


                channel = nioChannels.pop();
            }
            if (channel == null) {


                SocketBufferHandler bufhandler = new SocketBufferHandler(
                        socketProperties.getAppReadBufSize(),
                        socketProperties.getAppWriteBufSize(),
                        socketProperties.getDirectBuffer());
                if (isSSLEnabled()) {


                    channel = new SecureNioChannel(bufhandler, this);
                } else {


                    channel = new NioChannel(bufhandler);
                }
            }
            NioSocketWrapper newWrapper = new NioSocketWrapper(channel, this);
            channel.reset(socket, newWrapper);
            connections.put(socket, newWrapper);
            socketWrapper = newWrapper;

			// 忽略不必要代码

	 	    poller.register(socketWrapper);
		 } catch(Throwable t) {


		 	// 忽略不必要代码
		 }
	}
}
Poller 与 SocketProcessor
Poller 也是跑在一个单独的线程,本质上一个 selector,它的创建过程如下:
// Start poller thread
poller = new Poller();
Thread pollerThread = new Thread(poller, getName() + "-Poller");
pollerThread.setPriority(threadPriority);
pollerThread.setDaemon(true);
pollerThread.start();
Poller 是 NioEndpoint 的一个内部类,它内部维护了一个 selector、和一个 PollerEvent 类型的 channel 数组。前者就是我提到的本质上是一个 selector,可以看到它的构造函数:
public Poller() throws IOException {


	this.selector = Selector.open();
}
因为 Poller 本身也是一个 Runnable 实现类,所以对于后者,它在一个死循环里不断检测 Channel 的数据就绪状态,一旦有 Channel 可读,就生成一个 SocketProcessor 任务对象扔给 Executor 去处理。
我们知道,Poller 会创建 SocketProcessor 任务类交给线程池处理,而 SocketProcessor 实现了 Runnable 接口,用来定义 Executor 中线程所执行的任务,主要就是调用 Http11Processor 组件来处理请求。Http11Processor 读取 Channel 的数据来生成 ServletRequest 对象,这里请你注意:
Http11Processor 并不是直接读取 Channel 的。这是因为 Tomcat 支持同步非阻塞 I/O 模型和异步 I/O 模型,在 Java API 中,相应的 Channel 类也是不一样的,比如有 AsynchronousSocketChannel 和 SocketChannel,为了对 Http11Processor 屏蔽这些差异,Tomcat 设计了一个包装类叫作 SocketWrapper,Http11Processor 只调用 SocketWrapper 的方法去读写数据。
Executor
后续会专门讲解 Tomcat 的 Executor。