-
- 服务端 code
-
- pom 依赖
- application.yml 文件详解
- JWTConfig 类
- JWT 工具类
- SecurityConfig 类
- SelfUserEntity、SelfUserDetailsService 类
- UserAuthAccessDeniedHandler 类
- UserAuthenticationEntryPointHandler 类
- UserLoginFailureHandler 类
- UserLoginSuccessHandler 类
- UserLogoutSuccessHandler 类
- JWTAuthenticationTokenFilter 类
- UserAuthenticationProvider 类
- UserPermissionEvaluator 类
- 管理员权限控制
- 普通用户权限控制
- Vue 引入流程
- 前后端交互流程
- 总结
该篇文章,主要基于 Spring 体系下 Security 组件编写的简单案例,结合 Vue 前端对权限功能进行验证
服务端 code
pom 依赖
<!-- spring下组件都依赖于当前parent标签 由它进行版本管理-->
 <parent>
   <groupId>org.springframework.boot</groupId>
   <artifactId>spring-boot-starter-parent</artifactId>
   <version>2.1.6.RELEASE</version>
   <relativePath/>
</parent>

<dependencies>
  <!-- SpringBoot集成web所需依赖-->
  <dependency>
    <groupId>org.springframework.boot</groupId>
    <artifactId>spring-boot-starter-web</artifactId>
  </dependency>
  <!-- mysql驱动依赖-->
  <dependency>
    <groupId>mysql</groupId>
    <artifactId>mysql-connector-java</artifactId>
    <scope>runtime</scope>
  </dependency>
  <dependency>
    <groupId>org.projectlombok</groupId>
    <artifactId>lombok</artifactId>
    <optional>true</optional>
  </dependency>
  <!--Security依赖 -->
  <dependency>
    <groupId>org.springframework.boot</groupId>
    <artifactId>spring-boot-starter-security</artifactId>
  </dependency>
  <!-- MybatisPlus 核心库 -->
  <dependency>
    <groupId>com.baomidou</groupId>
    <artifactId>mybatis-plus-boot-starter</artifactId>
    <version>3.1.0</version>
  </dependency>
  <!-- 引入阿里数据库连接池 -->
  <dependency>
    <groupId>com.alibaba</groupId>
    <artifactId>druid</artifactId>
    <version>1.1.6</version>
  </dependency>
  <!-- StringUtilS工具 -->
  <dependency>
    <groupId>org.apache.commons</groupId>
    <artifactId>commons-lang3</artifactId>
    <version>3.5</version>
  </dependency>
  <!-- JSON工具 -->
  <dependency>
    <groupId>com.alibaba</groupId>
    <artifactId>fastjson</artifactId>
    <version>1.2.45</version>
  </dependency>
  <!-- JWT依赖 -->
  <dependency>
    <groupId>org.springframework.security</groupId>
    <artifactId>spring-security-jwt</artifactId>
    <version>1.0.9.RELEASE</version>
  </dependency>
  <dependency>
    <groupId>io.jsonwebtoken</groupId>
    <artifactId>jjwt</artifactId>
    <version>0.9.0</version>
  </dependency>
  <!-- thymeleaf模板引擎-->
  <dependency>
    <groupId>org.springframework.boot</groupId>
    <artifactId>spring-boot-starter-thymeleaf</artifactId>
  </dependency>
</dependencies>
application.yml 文件详解
# 配置端口
server:
  port: 8764
  servlet:
    context-path: /
spring:
  # 配置数据源   数据库稍后有
  datasource:
    driver-class-name: com.mysql.cj.jdbc.Driver
    url: jdbc:mysql://localhost:3306/sans_security?serverTimezone=UTC&useUnicode=true&characterEncoding=utf-8&zeroDateTimeBehavior=convertToNull&useSSL=false
    username: root
    password: myroot
    type: com.alibaba.druid.pool.DruidDataSource
  # 该配置最初是在本地实现 security配置是否管用 不需要可不配置
  thymeleaf:
    prefix: classpath:/templates/
    check-template-location: true
    suffix: .html
    encoding: UTF-8
    servlet:
      content-type: text/html
    mode: HTML5
    cache: false

# JWT配置
jwt:
  # 密匙KEY
  secret: JWTSecret
  # HeaderKEY
  tokenHeader: Authorization
  # Token前缀字符
  tokenPrefix: Security-c
  # 过期时间 单位秒 1天后过期=86400 7天后过期=604800
  expiration: 86400
  # 配置不需要认证的接口
  antMatchers: /index/**,/login/**,/favicon.ico,*.html,/index,/isPermission
# Mybatis-plus相关配置
mybatis-plus:
  # xml扫描,多个目录用逗号或者分号分隔(告诉 Mapper 所对应的 XML 文件位置)
  mapper-locations: classpath:mapper/*.xml
  # 以下配置均有默认值,可以不设置
  global-config:
    db-config:
      #主键类型 AUTO:"数据库ID自增" INPUT:"用户输入ID",ID_WORKER:"全局唯一ID (数字类型唯一ID)", UUID:"全局唯一ID UUID";
      id-type: AUTO
      #字段策略 IGNORED:"忽略判断"  NOT_NULL:"非 NULL 判断")  NOT_EMPTY:"非空判断"
      field-strategy: NOT_EMPTY
      #数据库类型
      db-type: MYSQL
  configuration:
    # 是否开启自动驼峰命名规则映射:从数据库列名到Java属性驼峰命名的类似映射
    map-underscore-to-camel-case: true
    # 返回map时true:当查询数据为空时字段返回为null,false:不加这个查询数据为空时,字段将被隐藏
    call-setters-on-nulls: true
    # 这个配置会将执行的sql打印出来,在开发或测试的时候可以用
    log-impl: org.apache.ibatis.logging.stdout.StdOutImpl
JWTConfig 类
/**
 * JWT配置类
 * @author vnjohn
 * @since 2022-12-12
**/
@Getter
@Component
@ConfigurationProperties(prefix = "jwt")
public class JWTConfig {


    /**
     * 密钥KEY
     */
    public static String secret;
    /**
     * TokenKey
     */
    public static String tokenHeader;
    /**
     * Token前缀字符
     */
    public static String tokenPrefix;
    /**
     * 过期时间
     */
    public static Integer expiration;
    /**
     * 不需要认证的接口
     */
    public static String antMatchers;


    public void setSecret(String secret) {


        this.secret = secret;
    }

    public void setTokenHeader(String tokenHeader) {


        this.tokenHeader = tokenHeader;
    }

    public void setTokenPrefix(String tokenPrefix) {


        this.tokenPrefix = tokenPrefix;
    }

    public void setExpiration(Integer expiration) {


        this.expiration = expiration * 1000;
    }

    public void setAntMatchers(String antMatchers) {


        this.antMatchers = antMatchers;
    }
}
JWT 工具类
/**
 * JWT工具类
 * @author vnjohn
 * @since 2022-12-12
**/
@Slf4j
public class JWTTokenUtil {


    /**
     * 私有化构造器
     */
    private JWTTokenUtil(){

    }

    /**
     * 生成Token
     * @author zwq
     * @date 2020/4/4
     * @param selfUserEntity
     * @return
     **/
    public static String createAccessToken(SelfUserEntity selfUserEntity){


        // 登陆成功生成JWT
        String token = Jwts.builder()
                // 放入用户名和用户ID
                .setId(selfUserEntity.getUserId()+"")
                // 主题
                .setSubject(selfUserEntity.getUsername())
                // 签发时间
                .setIssuedAt(new Date())
                // 签发者
                .setIssuer("sans")
                // 自定义属性 放入用户拥有权限
                .claim("authorities", JSON.toJSONString(selfUserEntity.getAuthorities()))
                // 失效时间
                .setExpiration(new Date(System.currentTimeMillis() + JWTConfig.expiration))
                // 签名算法和密钥
                .signWith(SignatureAlgorithm.HS512, JWTConfig.secret)
                .compact();
        return token;
    }
}
SecurityConfig 类
/**
 * SpringSecurity 配置类
 * @author vnjohn
 * @since 2022-12-12
**/
@Configuration
@EnableWebSecurity
@EnableGlobalMethodSecurity(prePostEnabled = true) //开启权限注解,默认是关闭的
public class SecurityConfig extends WebSecurityConfigurerAdapter {


    /**
     * 自定义登录成功处理器
     */
    @Autowired
    private UserLoginSuccessHandler userLoginSuccessHandler;
    /**
     * 自定义登录失败处理器
     */
    @Autowired
    private UserLoginFailureHandler userLoginFailureHandler;
    /**
     * 自定义注销成功处理器
     */
    @Autowired
    private UserLogoutSuccessHandler userLogoutSuccessHandler;
    /**
     * 自定义暂无权限处理器
     */
    @Autowired
    private UserAuthAccessDeniedHandler userAuthAccessDeniedHandler;
    /**
     * 自定义未登录的处理器
     */
    @Autowired
    private UserAuthenticationEntryPointHandler userAuthenticationEntryPointHandler;
    /**
     * 自定义登录逻辑验证器
     */
    @Autowired
    private UserAuthenticationProvider userAuthenticationProvider;

    /**
     * 加密方式
     */
    @Bean
    public BCryptPasswordEncoder bCryptPasswordEncoder(){


        return new BCryptPasswordEncoder();
    }
    /**
     * 注入自定义PermissionEvaluator
     */
    @Bean
    public DefaultWebSecurityExpressionHandler userSecurityExpressionHandler(){


        DefaultWebSecurityExpressionHandler handler = new DefaultWebSecurityExpressionHandler();
        handler.setPermissionEvaluator(new UserPermissionEvaluator());
        return handler;
    }

    /**
     * 配置登录验证逻辑
     */
    @Override
    protected void configure(AuthenticationManagerBuilder auth){


        //这里可启用我们自己的登陆验证逻辑
        auth.authenticationProvider(userAuthenticationProvider);
    }

    /**
     * 配置 security 控制逻辑
     **/
    @Override
    protected void configure(HttpSecurity http) throws Exception {


        http.authorizeRequests()
                // 不进行权限验证的请求或资源(从配置文件中读取)
               .antMatchers(JWTConfig.antMatchers.split(",")).permitAll()
                // 其他的需要登陆后才能访问  其他url都需要验证
                .anyRequest().authenticated()
                .and()
                // 配置未登录自定义处理类
                .httpBasic().authenticationEntryPoint(userAuthenticationEntryPointHandler)
                .and()
                // 配置登录地址
                .formLogin()
                //配置security表单登录页面地址 默认是login
                .loginPage("/login")
                //配置security提交form表单请求的接口地址 默认是/login/userLogin
                .loginProcessingUrl("/myLoginForm")
                //设置security提交的用户名属性值是那个 默认是username
                .usernameParameter("userName")
                //设置security提交的密码属性名是那个 默认是password
                .passwordParameter("passWord")
                //.successForwardUrl("/success")  登录成功跳转的请求 集成thymeleaf已经测试过了
                //配置登录失败页
                //.failureForwardUrl("/error")
                // 配置登录成功自定义处理类
                .successHandler(userLoginSuccessHandler)
                // 配置登录失败自定义处理类
                .failureHandler(userLoginFailureHandler)
                .and()
                // 配置登出地址
                .logout()
                .logoutUrl("/login/userLogout")
                // 配置用户登出自定义处理类
                .logoutSuccessHandler(userLogoutSuccessHandler)
                .and()
                // 配置没有权限自定义处理类
                .exceptionHandling().accessDeniedHandler(userAuthAccessDeniedHandler)
                .and()
                // 开启跨域
                .cors()
                .and()
                // 取消跨站请求伪造防护
                .csrf().disable();
        // 基于Token不需要session
        http.sessionManagement().sessionCreationPolicy(SessionCreationPolicy.STATELESS);
        // 禁用缓存
        http.headers().cacheControl();
        // 添加JWT过滤器
        http.addFilter(new JWTAuthenticationTokenFilter(authenticationManager()));
    }
SelfUserEntity、SelfUserDetailsService 类
UserDetails 接口、UserDetailsService 接口是 Security 给用户提供的接口,我们需要基于自己的逻辑创建类去实现它
SelfUserEntity 类
/**
 * SpringSecurity 用户实体
 * 注意:这里必须要实现 UserDetails 接口
 * @author vnjohn
 * @since 2022-12-12
**/
@Data
public class SelfUserEntity implements Serializable, UserDetails {


	private static final long serialVersionUID = 1L;
	/**
	 * 用户ID
	 */
	private Long userId;
	/**
	 * 用户名
	 */
	private String username;
	/**
	 * 密码
	 */
	private String password;
	/**
	 * 状态:NORMAL正常  PROHIBIT禁用
	 */
	private String status;

	/**
	 * 用户角色
	 */
	private Collection<GrantedAuthority> authorities;
	/**
	 * 账户是否过期
	 */
	private boolean isAccountNonExpired = false;
	/**
	 * 账户是否被锁定
	 */
	private boolean isAccountNonLocked = false;
	/**
	 * 证书是否过期
	 */
	private boolean isCredentialsNonExpired = false;
	/**
	 * 账户是否有效
	 */
	private boolean isEnabled = true;


	@Override
	public Collection<GrantedAuthority> getAuthorities() {


		return authorities;
	}
	@Override
	public boolean isAccountNonExpired() {


		return isAccountNonExpired;
	}
	@Override
	public boolean isAccountNonLocked() {


		return isAccountNonLocked;
	}
	@Override
	public boolean isCredentialsNonExpired() {


		return isCredentialsNonExpired;
	}
	@Override
	public boolean isEnabled() {


		return isEnabled;
	}
}
SelfUserDetailsService 类
/**
 * SpringSecurity 用户的业务实现
 * 实现 UserDetailsService 接口里面的方法 实现自己的逻辑
 * @author vnjohn
 * @since 2022-12-12
**/
@Component
public class SelfUserDetailsService implements UserDetailsService {


    @Autowired
    private SysUserService sysUserService;

    @Override
    public SelfUserEntity loadUserByUsername(String username) throws UsernameNotFoundException {


        // 查询用户信息
        SysUserEntity sysUserEntity =sysUserService.selectUserByName(username);
        if (sysUserEntity!=null){


            // 组装参数
            SelfUserEntity selfUserEntity = new SelfUserEntity();
            BeanUtils.copyProperties(sysUserEntity,selfUserEntity);
            return selfUserEntity;
        }
        return null;
    }
}
UserAuthAccessDeniedHandler 类
暂无权限处理类,SecurityConfig 配置类已注入
/**
 * 暂无权限处理类
 * @author vnjohn
 * @since 2022-12-12
**/
@Component
public class UserAuthAccessDeniedHandler implements AccessDeniedHandler{


    /**
     * 暂无权限返回结果
     **/
    @Override
    public void handle(HttpServletRequest request, HttpServletResponse response, AccessDeniedException exception){


        ResultUtil.responseJson(response,ResultUtil.resultCode(403,"未授权"));
    }
}
UserAuthenticationEntryPointHandler 类
用户未登录处理类,SecurityConfig 类已注入
/**
 * 用户未登录处理类
 * @author vnjohn
 * @since 2022-12-12
**/
@Component
public class UserAuthenticationEntryPointHandler implements AuthenticationEntryPoint {


    /**
     * 用户未登录返回结果
     **/
    @Override
    public void commence(HttpServletRequest request, HttpServletResponse response, AuthenticationException exception){


        ResultUtil.responseJson(response,ResultUtil.resultCode(401,"未登录"));
    }
}
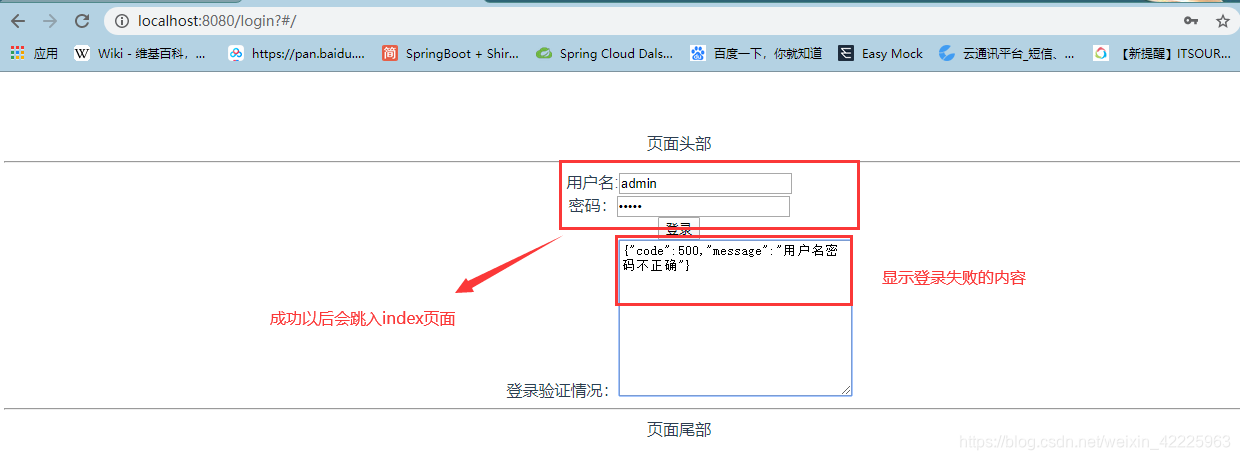
UserLoginFailureHandler 类
登录失败处理类,SecurityConfig 类已注入
/**
 * 登录失败处理类
 * @author vnjohn
 * @since 2022-12-12
**/
@Slf4j
@Component
public class UserLoginFailureHandler implements AuthenticationFailureHandler {


    /**
     * 登录失败返回结果
     **/
    @Override
    public void onAuthenticationFailure(HttpServletRequest request, HttpServletResponse response, AuthenticationException exception) throws IOException {


        // 这些对于操作的处理类可以根据不同异常进行不同处理
        if (exception instanceof UsernameNotFoundException){


            log.info("【登录失败】"+exception.getMessage());
            ResultUtil.responseJson(response,ResultUtil.resultCode(500,"用户名不存在"));
        }
        if (exception instanceof LockedException){


            log.info("【登录失败】"+exception.getMessage());
            ResultUtil.responseJson(response,ResultUtil.resultCode(500,"用户被冻结"));
        }
        if (exception instanceof BadCredentialsException){


            log.info("【登录失败】"+exception.getMessage());
            ResultUtil.responseJson(response,ResultUtil.resultCode(500,"用户名密码不正确"));
        }
        ResultUtil.responseJson(response,ResultUtil.resultCode(500,"登录失败"));
    }
}
UserLoginSuccessHandler 类
登录成功处理类 ,SecurityConfig 类已注入
/**
 * 登录成功处理类
 * @author vnjohn
 * @since 2022-12-12
**/
@Slf4j
@Component
public class UserLoginSuccessHandler implements AuthenticationSuccessHandler {


    /**
     * 登录成功返回结果
     **/
    @Override
    public void onAuthenticationSuccess(HttpServletRequest request, HttpServletResponse response, Authentication authentication) throws IOException, ServletException {


        // 组装JWT
        SelfUserEntity selfUserEntity =  (SelfUserEntity) authentication.getPrincipal();
        String token = JWTTokenUtil.createAccessToken(selfUserEntity);
        token = JWTConfig.tokenPrefix + token;
        // 封装返回参数
        Map<String,Object> resultData = new HashMap<>();
        resultData.put("code","200");
        resultData.put("msg", "登录成功");
        resultData.put("token",token);
        ResultUtil.responseJson(response,resultData);
    }
}
UserLogoutSuccessHandler 类
登出成功处理类,SecurityConfig 类已注入
/**
 * 登出成功处理类
 * @author vnjohn
 * @since 2022-12-12
**/
@Component
public class UserLogoutSuccessHandler implements LogoutSuccessHandler {


    /**
     * 用户登出返回结果,这里应该同时让前端清除掉 Token
     **/
    @Override
    public void onLogoutSuccess(HttpServletRequest request, HttpServletResponse response, Authentication authentication){


        Map<String,Object> resultData = new HashMap<>();
        resultData.put("code","200");
        resultData.put("msg", "登出成功");
        SecurityContextHolder.clearContext();
        ResultUtil.responseJson(response,ResultUtil.resultSuccess(resultData));
    }
}
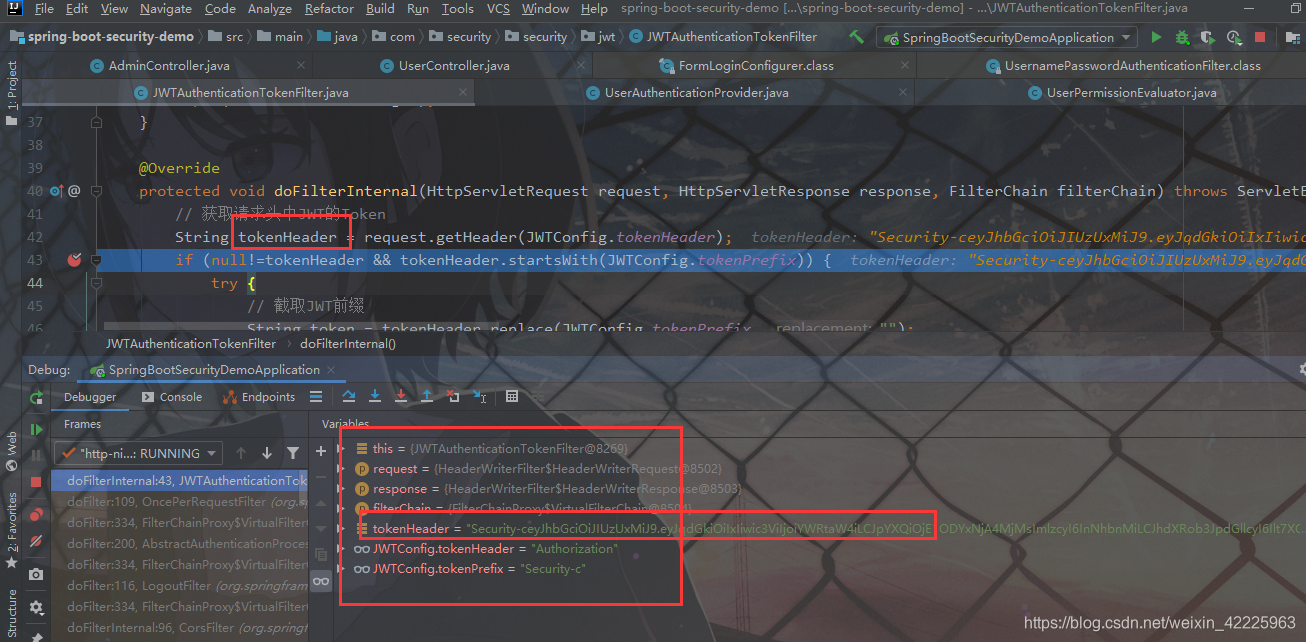
JWTAuthenticationTokenFilter 类
JWT 接口请求校验拦截器,SecurityConfig 类已注入
/**
* JWT接口请求校验拦截器
* 请求接口时会进入这里验证 Token 是否合法和过期
* @author vnjohn
* @since 2022-12-12
**/
@Slf4j
public class JWTAuthenticationTokenFilter extends BasicAuthenticationFilter {
public JWTAuthenticationTokenFilter(AuthenticationManager authenticationManager) {
super(authenticationManager);
}
@Override
protected void doFilterInternal(HttpServletRequest request, HttpServletResponse response, FilterChain filterChain) throws ServletException, IOException {
// 获取请求头中JWT的Token
String tokenHeader = request.getHeader(JWTConfig.tokenHeader);
if (null!=tokenHeader && tokenHeader.startsWith(JWTConfig.tokenPrefix)) {
try {
// 截取JWT前缀
String token = tokenHeader.replace(JWTConfig.tokenPrefix, "");
// 解析JWT
Claims claims = Jwts.parser()
.setSigningKey(JWTConfig.secret)
.parseClaimsJws(token)
.getBody();
// 获取用户名
String username = claims.getSubject();
String userId=claims.getId();
if(!StringUtils.isEmpty(username)&&!StringUtils.isEmpty(userId)) {
// 获取角色
List<GrantedAuthority> authorities = new ArrayList<>();
String authority = claims.get("authorities").toString();
if(!StringUtils.isEmpty(authority)){
List<Map<String,String>> authorityMap = JSONObject.parseObject(authority, List.class);
for(Map<String,String> role : authorityMap){
if(!StringUtils.isEmpty(role)) {
authorities.add(new SimpleGrantedAuthority(role.get("authority")));
}
}
}
//组装参数
SelfUserEntity selfUserEntity = new SelfUserEntity();
selfUserEntity.setUsername(claims.getSubject());
selfUserEntity.setUserId(Long.parseLong(claims.getId()));
selfUserEntity.setAuthorities(authorities);
UsernamePasswordAuthenticationToken authentication = new UsernamePasswordAuthenticationToken(selfUserEntity, userId, authorities);
SecurityContextHolder.getContext().setAuthentication(authentication);
}
} catch (ExpiredJwtException e){
log.info("Token过期");
} catch (Exception e) {
log.info("Token无效");
}
}
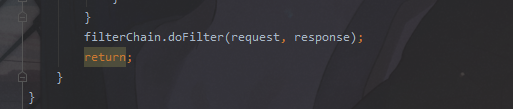
filterChain.doFilter(request, response);
return;
}
}
UserAuthenticationProvider 类
自定义登录验证,SecurityConfig 类已注入
/**
 * 自定义登录验证
 * @author vnjohn
 * @since 2022-12-12
**/
@Component
public class UserAuthenticationProvider implements AuthenticationProvider {


    @Autowired
    private SelfUserDetailsService selfUserDetailsService;
    @Autowired
    private SysUserService sysUserService;
    @Override
    public Authentication authenticate(Authentication authentication) throws AuthenticationException {


        // 获取表单输入中返回的用户名
        String userName = (String) authentication.getPrincipal();
        // 获取表单中输入的密码
        String password = (String) authentication.getCredentials();
        // 查询用户是否存在
        SelfUserEntity userInfo = selfUserDetailsService.loadUserByUsername(userName);
        if (userInfo == null) {


            throw new UsernameNotFoundException("用户名不存在");
        }
        // 我们还要判断密码是否正确,这里我们的密码使用BCryptPasswordEncoder进行加密的
        if (!new BCryptPasswordEncoder().matches(password, userInfo.getPassword())) {


            throw new BadCredentialsException("密码不正确");
        }
        // 还可以加一些其他信息的判断,比如用户账号已停用等判断
        if (userInfo.getStatus().equals("PROHIBIT")){


            throw new LockedException("该用户已被冻结");
        }
        // 角色集合
        Set<GrantedAuthority> authorities = new HashSet<>();
        // 查询用户角色
        List<SysRoleEntity> sysRoleEntityList = sysUserService.selectSysRoleByUserId(userInfo.getUserId());
        for (SysRoleEntity sysRoleEntity: sysRoleEntityList){


            authorities.add(new SimpleGrantedAuthority("ROLE_" + sysRoleEntity.getRoleName()));
        }
        userInfo.setAuthorities(authorities);
        // 进行登录
        return new UsernamePasswordAuthenticationToken(userInfo, password, authorities);
    }
    @Override
    public boolean supports(Class<?> authentication) {


        return true;
    }
}
UserPermissionEvaluator 类
自定义权限注解验证,SecurityConfig 类已注入
/**
 * 自定义权限注解验证
 * @author vnjohn
 * @since 2022-12-12
**/
@Component
public class UserPermissionEvaluator implements PermissionEvaluator {


    @Autowired
    private SysUserService sysUserService;

    /**
     * hasPermission 鉴权方法
     * 这里仅仅判断 PreAuthorize 注解中的权限表达式
     * 实际中可以根据业务需求设计数据库通过 targetUrl 和 permission 做更复杂鉴权
     * 当然 targetUrl 不一定是URL可以是数据Id还可以是管理员标识等,这里根据需求自行设计
     **/
    @Override
    public boolean hasPermission(Authentication authentication, Object targetUrl, Object permission) {


        // 获取用户信息
        SelfUserEntity selfUserEntity =(SelfUserEntity) authentication.getPrincipal();
        // 查询用户权限(这里可以将权限放入缓存中提升效率)
        Set<String> permissions = new HashSet<>();
        List<SysMenuEntity> sysMenuEntityList = sysUserService.selectSysMenuByUserId(selfUserEntity.getUserId());
        for (SysMenuEntity sysMenuEntity:sysMenuEntityList) {


            permissions.add(sysMenuEntity.getPermission());
        }
        // 权限对比
        if (permissions.contains(permission.toString())){


            return true;
        }
        return false;
    }
    @Override
    public boolean hasPermission(Authentication authentication, Serializable targetId, String targetType, Object permission) {


        return false;
    }
}
以上的 handler、jwtFilter 来说,都是为了实现登录流程,登录时需要走我们对应登录认证handler(UserAuthenticationProvider类),等我们方法上有标识 hasPermission注解时会走我们对应的权限认证handler(UserPermissionEvaluator类):
如下:
管理员权限控制
ROLE_ADMIN 角色 controller
/**
* 管理
* @author vnjohn
* @since 2022-12-12
**/
@RestController
@RequestMapping("/admin")
public class AdminController {
@Autowired
private SysUserService sysUserService;
@Autowired
private SysRoleService sysRoleService;
@Autowired
private SysMenuService sysMenuService;
/**
* 查询管理端信息
**/
@PreAuthorize("hasRole('ADMIN')")
@GetMapping("/info")
public Map<String,Object> userLogin(){
Map<String,Object> result = new HashMap<>();
SelfUserEntity userDetails = SecurityUtil.getUserInfo();
result.put("title","管理端信息");
result.put("data",userDetails);
return ResultUtil.resultSuccess(result);
}
/**
* 拥有 ADMIN 或 USER 角色可以访问
**/
@PreAuthorize("hasAnyRole('ADMIN','USER')")
@RequestMapping(value = "/list",method = RequestMethod.GET)
public Map<String,Object> list(){
Map<String,Object> result = new HashMap<>();
List<SysUserEntity> sysUserEntityList = sysUserService.list();
result.put("title","拥有用户或者管理员角色都可以查看");
result.put("data",sysUserEntityList);
return ResultUtil.resultSuccess(result);
}
/**
* 拥有 ADMIN、USER 角色可以访问
**/
@PreAuthorize("hasRole('ADMIN') and hasRole('USER')")
@RequestMapping(value = "/menuList",method = RequestMethod.GET)
public Map<String,Object> menuList(){
Map<String,Object> result = new HashMap<>();
List<SysMenuEntity> sysMenuEntityList = sysMenuService.list();
result.put("title","拥有用户和管理员角色都可以查看");
result.put("data",sysMenuEntityList);
return ResultUtil.resultSuccess(result);
}
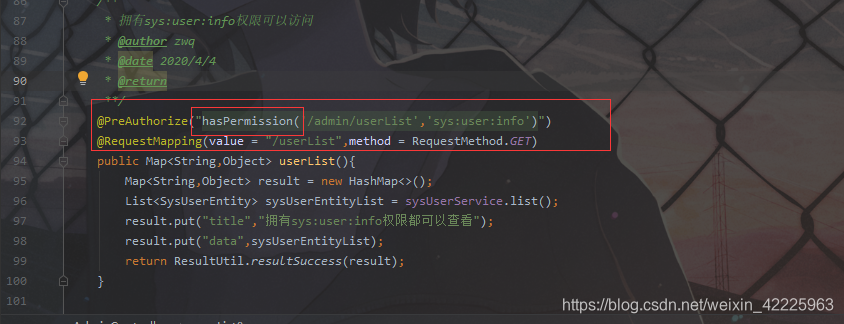
/**
* 拥有 sys:user:info 权限可以访问
*/
@PreAuthorize("hasPermission('/admin/userList','sys:user:info')")
@RequestMapping(value = "/userList",method = RequestMethod.GET)
public Map<String,Object> userList(){
Map<String,Object> result = new HashMap<>();
List<SysUserEntity> sysUserEntityList = sysUserService.list();
result.put("title","拥有sys:user:info权限都可以查看");
result.put("data",sysUserEntityList);
return ResultUtil.resultSuccess(result);
}
/**
* 拥有 ADMIN 角色、sys:role:info 权限可以访问
**/
@PreAuthorize("hasRole('ADMIN') and hasPermission('/admin/adminRoleList','sys:role:info')")
@RequestMapping(value = "/adminRoleList",method = RequestMethod.GET)
public Map<String,Object> adminRoleList(){
Map<String,Object> result = new HashMap<>();
List<SysRoleEntity> sysRoleEntityList = sysRoleService.list();
result.put("title","拥有ADMIN角色和sys:role:info权限可以访问");
result.put("data",sysRoleEntityList);
return ResultUtil.resultSuccess(result);
}
}
普通用户权限控制
ROLE_USER 角色 controller
/**
 * 普通用户
 * @author vnjohn
 * @since 2022-12-12
**/
@RestController
@RequestMapping("/user")
public class UserController {


    @Autowired
    private SysMenuService sysMenuService;

    /**
     * 用户端信息
     **/
    @RequestMapping(value = "/info",method = RequestMethod.GET)
    public Map<String,Object> userLogin(){


        Map<String,Object> result = new HashMap<>();
        SelfUserEntity userDetails = (SelfUserEntity) SecurityContextHolder.getContext().getAuthentication() .getPrincipal();
        result.put("title","用户端信息");
        result.put("data",userDetails);
        return ResultUtil.resultSuccess(result);
    }

    /**
     * 拥有 USER 角色、sys:user:info 权限可以访问
     **/
    @PreAuthorize("hasRole('USER') and hasPermission('/user/menuList','sys:user:info')")
    @RequestMapping(value = "/menuList",method = RequestMethod.GET)
    public Map<String,Object> sysMenuEntity(){


        Map<String,Object> result = new HashMap<>();
        List<SysMenuEntity> sysMenuEntityList = sysMenuService.list();
        result.put("title","拥有USER角色和sys:user:info权限可以访问");
        result.put("data",sysMenuEntityList);
        return ResultUtil.resultSuccess(result);
    }
}
Vue 引入流程
前言
本篇简单的介绍 Vue 简单使用,主要为了测试验证与后端接口的权限功能是否能正常使用
安装 Node.js
1.进入Node.js 官网:https://nodejs.org/en/
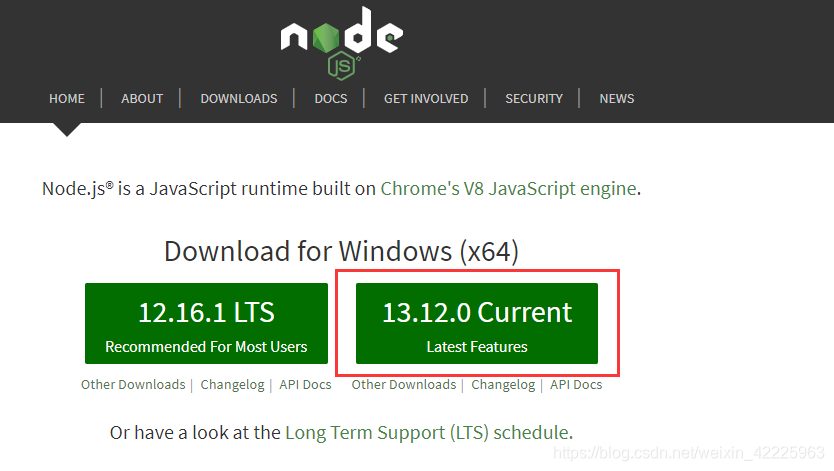
下载完成以后得到**.msi**文件 下一步下一步安装好即可
安装完成以后,按 windows+r 打开命令行,输入 「node -v、npm -v」查看是否有出现版本标识,node 自带 npm,如下:

3.安装 cnpm
执行命令 npm install -g cnpm --registry=https://registry.npm.taobao.org ,使用 npm 国内镜像(npm 国内镜像 https://npm.taobao.org/)cnpm 命令代替默认的 npm 命令,增加依赖包加载速度且避免资源限制

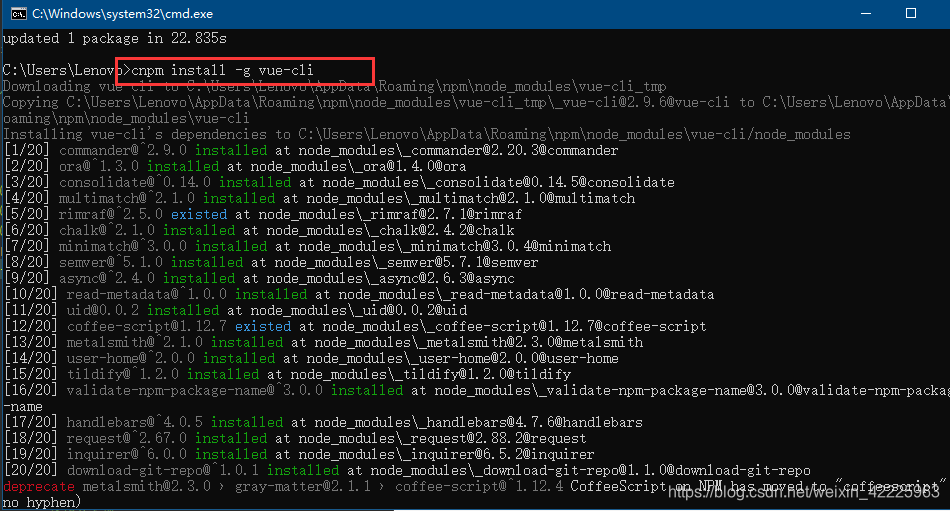
4.cnpm 安装脚手架 vue-cli
在命令行中运行命令 cnpm install -g vue-cli 安装脚手架
5.将 Vue 项目建立在电脑的其他磁盘下,使用 E: 进入 E 盘,cd vue-workspace 进入 E:\vue-workspace
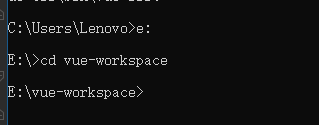
在输入新建项目命令:vue init webpack javalsj-vue,完成以後:
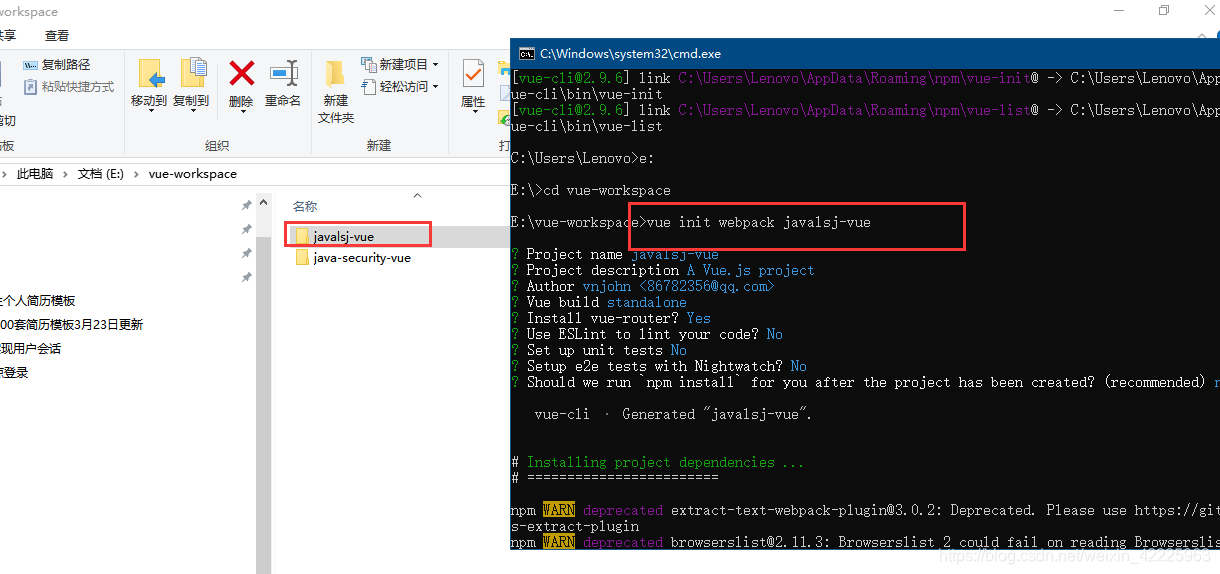
切换到刚刚所安装的项目目录,此时的项目是不能够启动的,我们需要将项目对应的依赖给安装起来,使用 cnpm install :

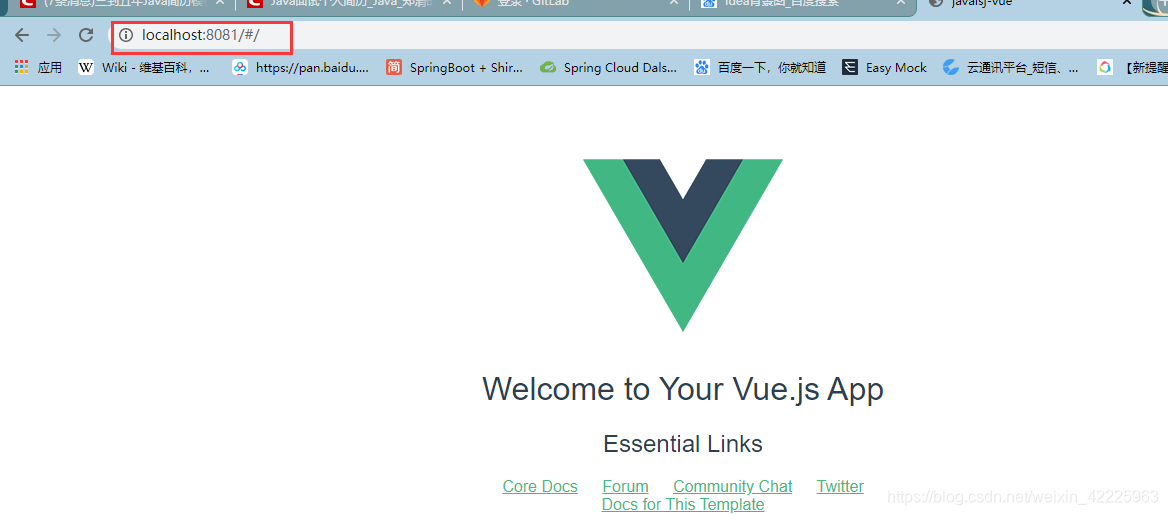
以上成功以后,运行命令 npm run dev

访问 localhost:8081,至此:安装成功
构建 Vue 登录页面及 Cookie 存取
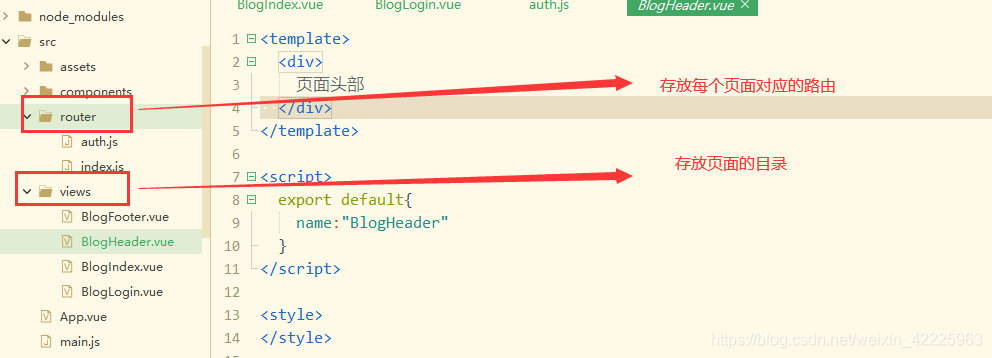
如上图新建一个 views 目录存放我们所新建的 vue 文件
BlogHeader.vue
该header内容后面要引入到每个页面中
<template>
  <div>
    页面头部
  </div>
</template>

<script>
  export default{


    name:"BlogHeader"
  }
</script>
<style>
</style>
BlogFooter.vue
把 footer 内容引入到每个页面中
<template>
  <div>
    页面尾部
  </div>
</template>
<script>
  export default{


    name:"BlogFooter"
  }
</script>
<style>
</style>
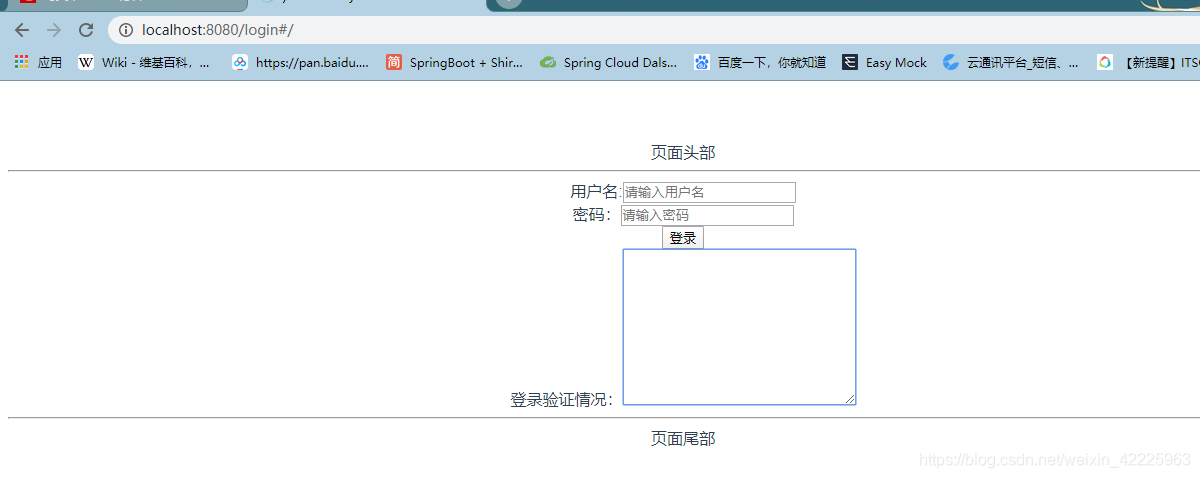
BlogLogin.vue
该login登录页
<template>
  <div>
    <!-- 头部的内容 第二个字母大写可以用-代替   对应下面import的blogHeader-->
    <blog-header></blog-header>
    <hr />
    <form>
      <div>
        用户名:<input type="text" v-model="loginInfoVo.username" placeholder="请输入用户名" />
        <br />
        密码:<input type="password" v-model="loginInfoVo.password" placeholder="请输入密码" />
        <br />
        <button v-on:click="login">登录</button>
        <br />
        登录验证情况:<textarea cols="30" rows="10" v-model="responseResult"></textarea>
      </div>
    </form>
    <hr />
    <!-- 尾部的内容 第二个字母大写可以用-代替  对应下面import的blogFooter-->
    <blog-footer/>
  </div>
</template>
<script>
  import blogHeader from '@/views/BlogHeader.vue'
  import blogFooter from '@/views/BlogFooter.vue'
  import {

      setToken} from '@/router/auth.js'  //auth.js
  import {

      getToken} from '@/router/auth.js'  //auth.js
  export default {


    name: 'login',
    // blogHeader、blogFooter组件给申明到components里面然后在template里面使用
    components: {


      blogHeader,
      blogFooter
    },
    data() {


      return {


        loginInfoVo: {


          username: '',
          password: ''
        },
        responseResult: []
      }
    },
    methods: {


      login() {


        this.$axios
        //该接口是我们JAVA后端中在security中配置好的form 表单提交的页面
        //此处使用拼接的方式而不是放入data的方式,这是一个值得注意的地方
        // security下的源码默认的是POST请求,但是它使用的是request.getParameter(name)的方式
        //来获取我们输入的用户和密码的 以致我们需要拼接进URL参数 后端的security才能识别出来
          .post('/myLoginForm?userName=' + this.loginInfoVo.username + "&passWord=" + this.loginInfoVo.password)
          .then(res => {


            if (res.data.code == 200) {


              console.log(res.data.msg)
              console.log(res.data.token)
              setToken(res.data.token)
              console.log("获得token为:" + getToken().token)
              this.$router.push("/index")//登录成功以后 跳转index页面
            }
            this.responseResult = JSON.stringify(res.data)
          })
          .catch(failResponse => {

      })
      }
    }
  }
</script>
以上 Security 处理的方式是这样的,在我们的UsernamePasswordAuthenticationFilter 类下:
第一步:将 request 对象放入获取参数里头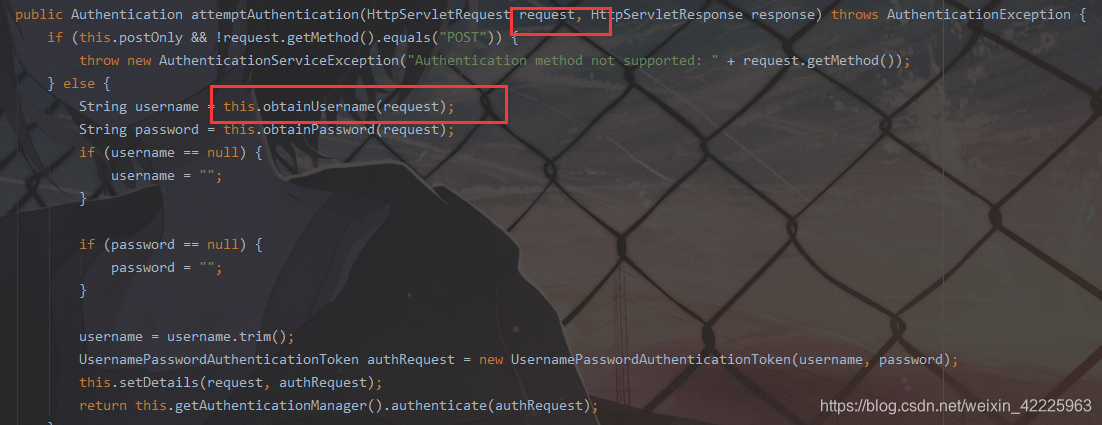
第二步:通过 request.getParameter() 方法获得参数以后不能使用 POST 请求数据放 data 里的方式,而只能使用 POST 请求后加参数拼接的方式传入后端才能识别

auth.js、index.js
auth.js(全局 header 存入、token 获取) & index.js(存放路由)
router 目录下两个比较重要的 js 文件,index.js 是存放我们页面的路由(访问地址)的地方 auth.js 是存入后端访问的 token 值存入 cookie 的地方,以便前端每次请求后端的时候都携带上对应的 token 被我们后端所配置 JwtFilter 扫描到,内容如下:
auth.js内容
import Cookies from 'js-cookie'   //引入这个 需要在命令行下 cpm install js-cookie
import axios from 'axios'
const TokenKey = 'Authorization' //该TokenKey是需要和后端配置的一样的 上面后端流程中 yml中有配置这个
export function setToken(token) {


  Cookies.set(TokenKey, token) //存入cookie
	// 创建axios实例  全局加入header
	axios.defaults.headers.common['Authorization'] = token
}
export function getToken() {


    return {


        token: Cookies.get(TokenKey)
    }
}
index.js 内容
import Vue from 'vue'
import Router from 'vue-router'
import HelloWorld from '@/components/HelloWorld'
import BlogLogin from '@/views/BlogLogin.vue'
import BlogIndex from '@/views/BlogIndex.vue'
Vue.use(Router)
export default new Router({


  routes: [
    {


      path: '/',
      name: 'login',
     component: BlogLogin
    },
    {


      path: '/index',
      name: 'BlogIndex',
      component: BlogIndex
    },
    {


      path: '/login',
      name: 'login',
      component: BlogLogin
    }
  ]
})
前后端交互流程
使用 localhost:8080/login 访问登录页
index.vue
<template>
<div>
    <blog-header></blog-header>
    <hr/>
    <div>
      这是首页,嘻嘻嘻。
      <button v-on:click="targeAdmin">我是管理员</button>
      <button v-on:click="targeUser">我是用户</button>
    </div>
    <div>
      <textarea v-model="msg" cols="50" rows="20"></textarea>
    </div>
    <hr/>
    <blog-footer></blog-footer>
  </div>
</template>

<script>
import blogHeader from '@/views/BlogHeader.vue'
import blogFooter from '@/views/BlogFooter.vue'

export default {


  name: 'BlogIndex',
  // blogHeader/blogFooter组件给申明到components里面然后在template里面使用
  components: {

       blogHeader, blogFooter },
  data(){


    return {


      msg:''
    }
  },
  methods:{


    targeAdmin () {

      //该方法需要ROLE_ADMIN角色 和 admin:adminRoleList 权限标识才能访问
      this.msg=''
      this.$axios
        .get('/admin/adminRoleList').then(res => {


          this.msg= JSON.stringify(res.data)
           console.log(res.data.title)
        })
        .catch(failResponse => {

      })
    },
    targeUser(){

      //该方法需要ROLE_USER角色 和 user:info权限标识才能访问
      this.msg=''
      this.$axios.get("/user/info").then(res => {


         this.msg= JSON.stringify(res.data)
         console.log(res.data.title)
      })
      .catch(failResponse => {

      })
    }
  }
}
</script>
管理员请求交互
输入账号:admin,密码:123456 登录成功,cookie 也设置进去了 接下来可以请求接口了

补充上一个重要的配置!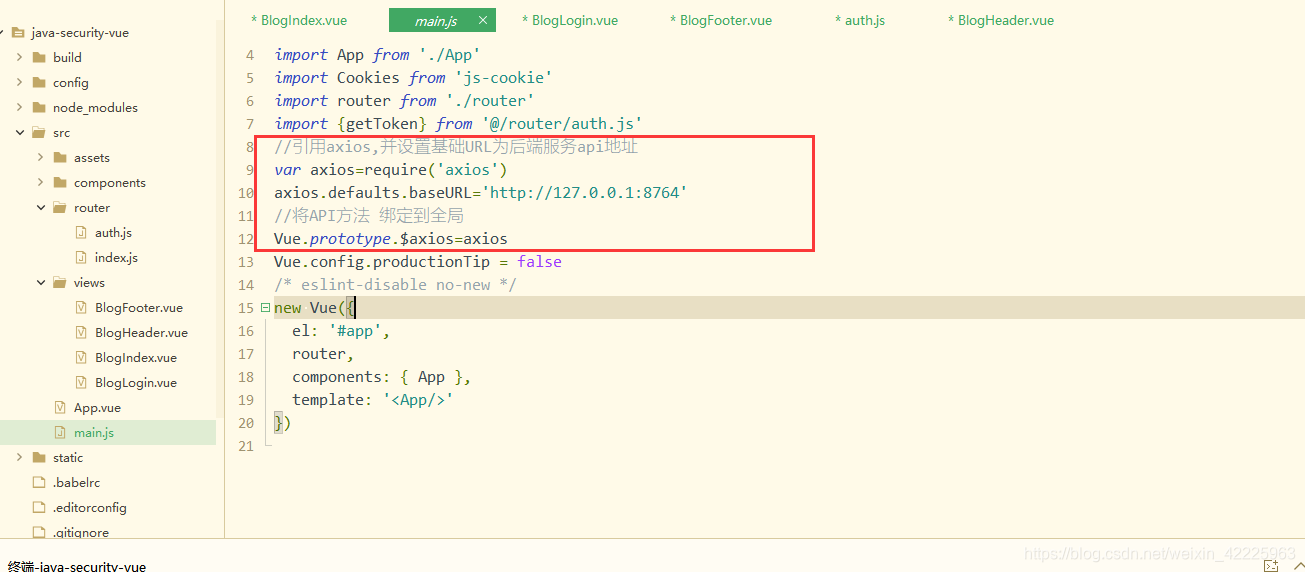
//引用axios,并设置基础URL为后端服务api地址
var axios=require('axios')
//前缀必须加上的请求接口地址
axios.defaults.baseURL='http://127.0.0.1:8764'
//将API方法 绑定到全局
Vue.prototype.$axios=axios
流程如下:
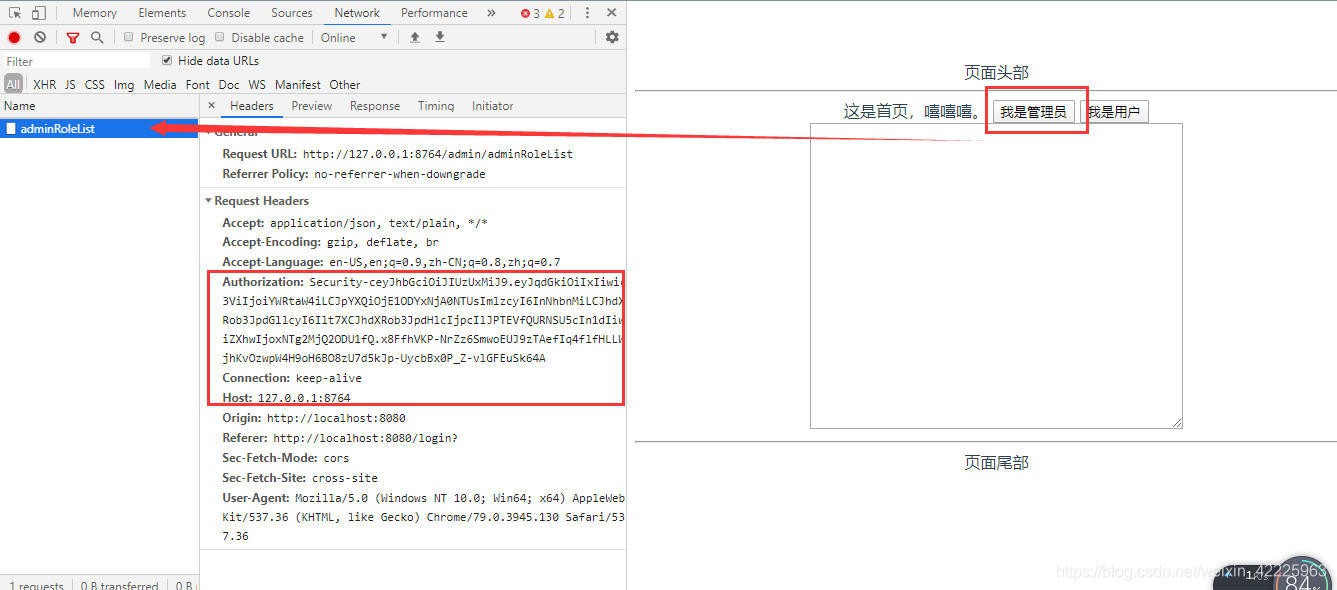
请求后端接口 token 带上了
后端拦截到了,并知道当前的用户具有 ROLE_ADMIN、ROLE_USER 角色,则放权通过
请求接口带有权限标识的我们对应的权限认证 handler 也拦截到了

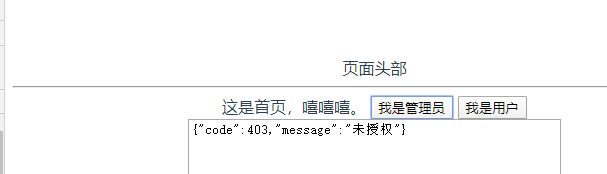
普通用户请求交互
换个用户登录,账号:user,密码:123456,当前用户是没有接口权限标识 sys:role:info 的权限,不会放过权限认证,到达我们的未权限认证 handler:

总结
本次 Vue 之旅比较简单,只是简单的授权与权限认证、不认证(都给予对应的信息)至于全局拦截 code 后面再补上
SpringBoot 后端跨域支持「由于前端与后端端口不同,会导致前后端联调时出现跨域问题」,代码补上
@Configuration
public class CorsConfig {


    public CorsConfig() {


    }

    @Bean
    public CorsFilter corsFilter() {


        // 1. 添加cors配置信息
        CorsConfiguration config = new CorsConfiguration();
//        config.addAllowedOrigin("http://localhost:8080");
        config.addAllowedOrigin("*");
        // 设置是否发送cookie信息
        config.setAllowCredentials(true);
        // 设置允许请求的方式
        config.addAllowedMethod("*");
        // 设置允许的header
        config.addAllowedHeader("*");
        // 2. 为url添加映射路径
        UrlBasedCorsConfigurationSource corsSource = new UrlBasedCorsConfigurationSource();
        corsSource.registerCorsConfiguration("/**", config);
        // 3. 返回重新定义好的corsSource
        return new CorsFilter(corsSource);
    }
}
后端源码如下:https://github.com/vnjohn/springBoot-security
前端源码如下:https://github.com/vnjohn/security-vue
更多技术文章:vnjohn 博客