【Netty客户端-实现模拟硬件设备在线】
通过Netty服务端达到和硬件设备进行通信,现需要对服务端连接进行压测,来测试出当前服务器上能够达到的最大连接数。通过思考和验证使用了2种方式可进行Socket压测。
- 通过netty客户端实现 (需要写大量代码)
- 通过jmeter来实现 (需要写通信维持心跳数据生成脚本)
通过Netty客户端实现硬件设备在线模拟
1. 通过netty客户端实现
1.1 实现Netty客户端
@Slf4j
public class NettyClient {


    private final String inetHost;
    private final Integer inetPort;

    public NettyClient(String inetHost, Integer inetPort) {


        this.inetHost = inetHost;
        this.inetPort = inetPort;
    }

    public void createClient() {


        //客户端只需要实现一个线程组即可
        NioEventLoopGroup group = new NioEventLoopGroup();
        Bootstrap bootstrap = new Bootstrap();
        bootstrap.group(group)
                .channel(NioSocketChannel.class)
                .handler(new ChannelInitializer<NioSocketChannel>() {


                    @Override
                    protected void initChannel(NioSocketChannel ch) throws Exception {


                        ChannelPipeline pipeline = ch.pipeline();
                        //添加编码器
                        pipeline.addLast(new NettyClientEncoder());
                        //添加客户端处理器
                        pipeline.addLast(new NettyClientHandler());
                    }
                });
        ChannelFuture channelFuture;
        try {


            channelFuture = bootstrap.connect(inetHost, inetPort).sync();
            channelFuture.addListener((ChannelFutureListener) channelFuture1 -> {


                if (channelFuture1.isSuccess()) {


                    log.info("Successfully connect to remote server, remote peer = " + inetHost + ":" + inetPort);
                } else {


                    log.error("Can not connect to remote server, remote peer = " + inetHost + ":" + inetPort);
                }
            });
            channelFuture.channel().closeFuture().sync();
        } catch (InterruptedException e) {


            e.printStackTrace();
        } finally {


            group.shutdownGracefully();
        }
    }
}
1.2 实现客户端处理器
public class NettyClientHandler extends SimpleChannelInboundHandler {


    public NettyClientHandler() {


    }

    private static final ConcurrentHashMap<String, Channel> client = new ConcurrentHashMap<>();
    /**
     * 模拟硬件网关前缀
     */
    private static final String gwCodePre = "11AA12";

    /**
     * 硬件网关后缀 - 压测时需要生成几万个设备该参数用来递增
     */
    private static Integer gwCodeSuf = 100000;

    public static void setGwCodeSuf(Integer gwCodeSuf) {


        NettyClientHandler.gwCodeSuf = gwCodeSuf + 1;
    }

    public static ConcurrentHashMap<String, Channel> getClient() {


        return client;
    }

    /**
     * 连接成功后触发 - 模拟硬件心跳发送给服务端
     */
    @Override
    public void channelActive(ChannelHandlerContext ctx) throws Exception {


        Channel channel = ctx.channel();
        //拼接出硬件设备唯一Code
        String gwCode = gwCodePre + gwCodeSuf;
        MessageEntity message = new MessageEntity(gwCode, "01", "01");
        //24-58-18-00-01-01-11-AA-0B-F2-2F-0B-01-01-01-10-00-00-01-00-00-00-C1-57
        //24-58-30-00-01-01-11-AA-12-10-00-00-01-01-01-10-00-00-01-00-00-00-C4-57
        message.setMsgLength("1800");
        message.setMsgData("0110000001000000");
        channel.writeAndFlush(message);
        client.put(gwCode, channel);
        setGwCodeSuf(gwCodeSuf);
    }

    @Override
    public void exceptionCaught(ChannelHandlerContext ctx, Throwable cause) throws Exception {


        super.exceptionCaught(ctx, cause);
    }

    @Override
    protected void channelRead0(ChannelHandlerContext ctx, Object msg) throws Exception {


        System.out.println("收到服务端消息:" + msg.toString());
    }
}
1.3 实现客户端编码器
public class NettyClientEncoder extends MessageToByteEncoder {


    @Override
    protected void encode(ChannelHandlerContext ctx, Object o, ByteBuf out) throws Exception {


        MessageEntity message = (MessageEntity) o;
        // 起始域
        StringBuilder msg = new StringBuilder("2458");
        // 长度域
        if (message.getMsgData() == null) {


            message.setMsgData("");
        }
        msg.append(message.getMsgLength());
        // 信息域
        msg.append(message.getMsgInformation());
        // 控制域
        msg.append(message.getMsgControl());
        // MAC地址
        msg.append(message.getMsgGwMac());
        // 主功能码
        msg.append(message.getMsgMainCode());
        // 辅功能码
        msg.append(message.getMsgAuxiliaryCode());
        // 数据域
        msg.append(message.getMsgData());
        // 校验 - 服务端用来验证该条数据的正确性
        msg.append(Objects.requireNonNull(DataTypeConvert.getChecksum(msg.substring(0))).toUpperCase());
        // 结束符
        msg.append(LimsProtocolConstant.END);

        log.info("----> 初始数据【{}】 : {}", message.getMsgGwMac(), Decoder.strSplit(msg.toString()));
        //将字符串转换成byte
        byte[] bytes = DataTypeConvert.hexStringToBytes(msg.toString());
        //写入发送
        out.writeBytes(bytes);
    }
}
2. 启动客户端(多线程)
一个客户端代表一个线程,如果需要达到压测目的就需要通过多线程来模拟出多个客户端。
2.1 实现启动线程
public class StartClientThread implements Runnable{


   /**
    *  netty服务端主机ip
    */
    private String inetHost;
   /**
    *  netty服务端监听的端口
    */
    private Integer inetPort;

    public StartClientThread(String inetHost, Integer inetPort) {


        this.inetHost = inetHost;
        this.inetPort = inetPort;
    }

    @Override
    public void run() {


        NettyClient client = new NettyClient(inetHost, inetPort);
        client.createClient();
    }
}
2.2 创建线程池,提供对外启动接口
@RestController
@EnableScheduling
@SpringBootApplication
public class ClientApplication {


    private static final ThreadFactory NAME_THREAD_FACTORY = new ThreadFactoryBuilder().setNameFormat("netty-client-pool-%d").build();

    private static final ExecutorService EXECUTOR = new ThreadPoolExecutor(
            0,
            Integer.MAX_VALUE,
            60L,
            TimeUnit.SECONDS,
            new SynchronousQueue<>(),
            NAME_THREAD_FACTORY,
            new ThreadPoolExecutor.AbortPolicy()
    );

    public static ExecutorService getExecutor() {


        return EXECUTOR;
    }

    public static void newTask(Runnable r) {


        EXECUTOR.execute(r);
    }

    @GetMapping("/start")
    public Integer startClient(@RequestParam("inetHost") String inetHost, @RequestParam("inetPort") Integer inetPort) {


        newTask(new StartClientThread(inetHost, inetPort));
        return 1;
    }

    public static void main(String[] args) {


        SpringApplication.run(ClientApplication.class, args);
    }
}
2.3 实现心跳定时任务
@Slf4j
@Configuration
public class HeartbeatTask {


    /**
     *  心跳定时任务,用来定时发送心跳给服务端。从而达到在线状态
     */
    @Scheduled(cron = "0/30 * * * * ? ")
    public void task() {


        ConcurrentHashMap<String, Channel> client = NettyClientHandler.getClient();
        Set<Map.Entry<String, Channel>> entrySet = client.entrySet();
        for (Map.Entry<String, Channel> entry : entrySet) {


            String gwCode = entry.getKey();
            Channel channel = entry.getValue();
            log.info("网关:{} 发送心跳", gwCode);
            MessageEntity message = new MessageEntity(gwCode, "01", "01");
            message.setMsgLength("1800");
            message.setMsgData("0110000001000000");
            channel.writeAndFlush(message);
        }
    }
}
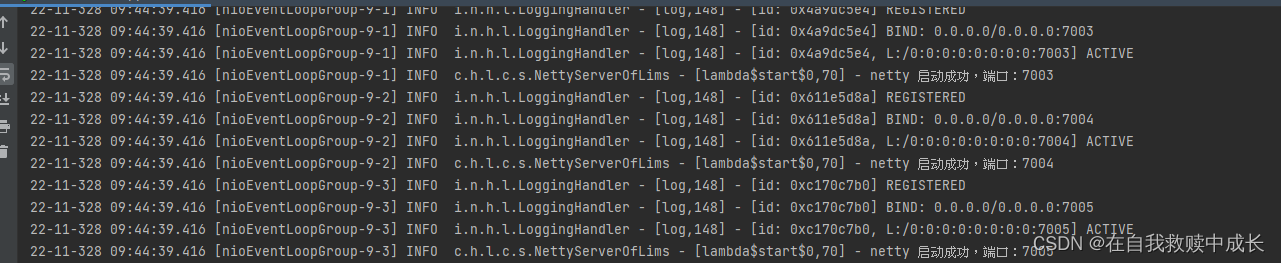
3. 验证
3.1 启动netty服务端
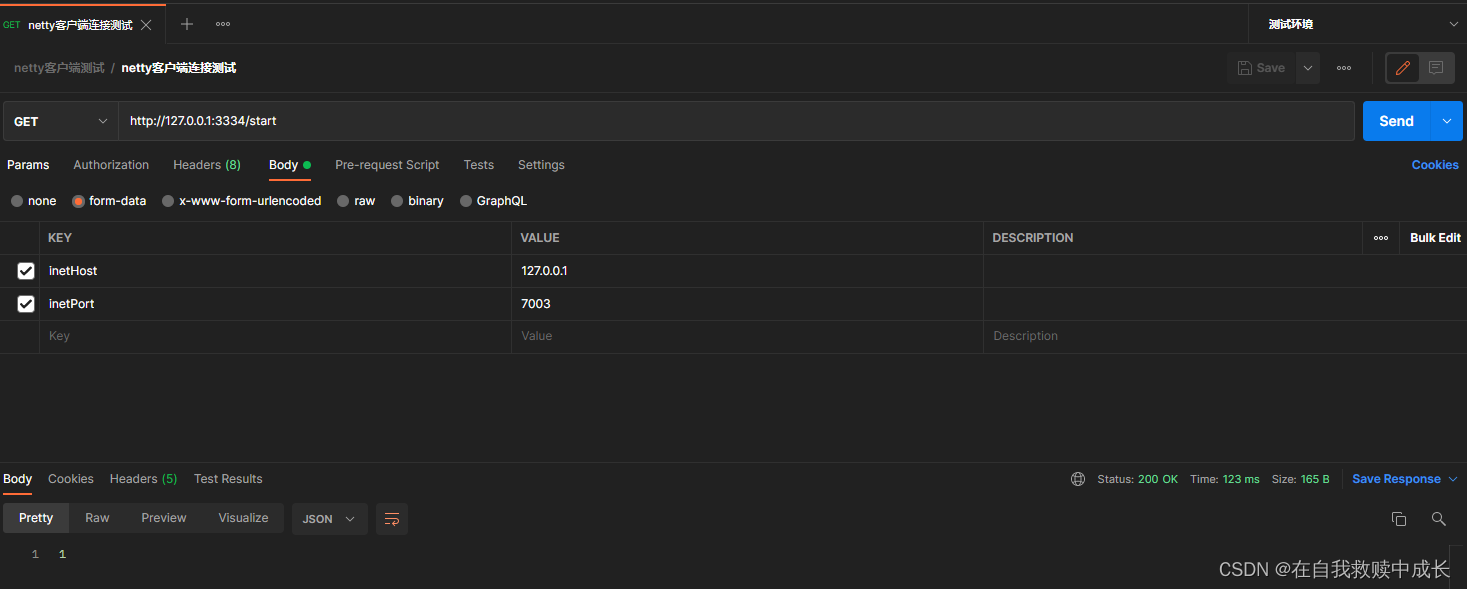
3.2 启动Netty客户端-使用Postman进行测试
3.3 查看服务端是否收到心跳

3.4 查看netty客户端定时心跳是否发送

4. 总结
通过netty客户端来简单模拟硬件设备心跳,要想实现几万甚至十几万设备的模拟,那么就会开启相对应的线程数,对测试的机器有一定的硬件条件。而且无法生成像jmeter一样的聚合报告。且需要人工查看和计算出服务器压测指标。
使用jmeter对socket进行压测
通过jmeterc测试工具来进行socket压测,相比较上述方法会非常简洁。只需要实现socket要发送的文件即可。
1. 下载jmeter测试工具
下载Jmeter,官网地址:https://jmeter.apache.org/download_jmeter.cgi
具体安装步骤和使用方法这里就不太多阐述。
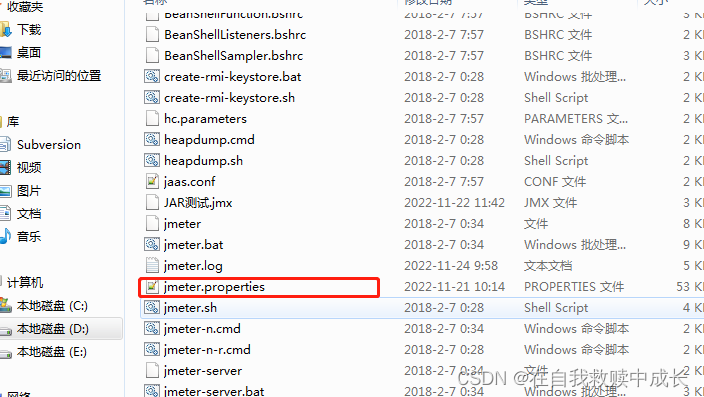
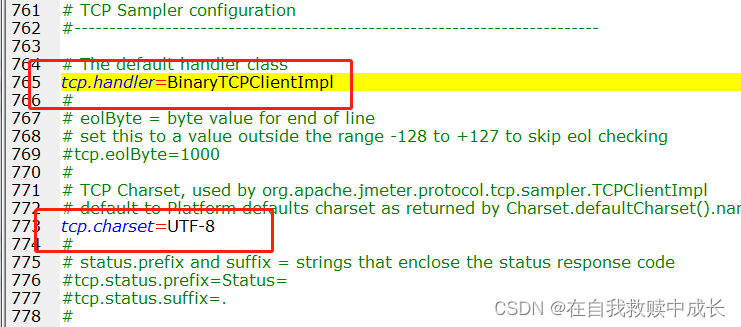
1.1 进入安装包bin目录,对jmeter.properties进行配置文件修改
1.2 修改配置文件后保存退出
2. 编写心跳数据生成脚本
public class Script {


    public static void main(String[] args) {


        Scanner scanner = new Scanner(System.in);
        int count = scanner.nextInt();
        int fixe = 100000;
        FileOutputStream fos = null;
        try {


            fos = new FileOutputStream(new File("D:/data.txt"));
            for (int i = 1; i <= count; i++) {


                // 起始域
                StringBuilder msg = new StringBuilder("485918000101");
                //网关code
                msg.append("11AA0B");
                msg.append(fixe + i);
                //心跳常量
                msg.append("01010110000001000000");
                // 校验
                msg.append(Objects.requireNonNull(getChecksum(msg.toString().toUpperCase())).toUpperCase());
                // 结束符
                msg.append("57");
                byte[] bytes = msg.toString().getBytes(StandardCharsets.UTF_8);
                fos.write(bytes);
                fos.write("\r\n".getBytes());
                fos.flush();
            }
        } catch (IOException e) {


            e.printStackTrace();
        } finally {


            try {


                assert fos != null;
                fos.close();
            } catch (IOException e) {


                e.printStackTrace();
            }
        }

    }

    public static String getChecksum(String data) {


        int len = data.length();
        if ((len % 2) != 0) {


            return null;
        }
        len = len / 2;
        int checksum = 0;
        for (int iLen = 0; iLen < len; iLen++) {


            String dataTmp = data.substring(iLen * 2, (iLen + 1) * 2);
            checksum += Integer.parseInt(dataTmp, 16);
            checksum = checksum % 256;
        }
        return int2Hex(checksum, 1);
    }

    public static String int2Hex(int intData, int byteSize) {


        String hexString = Integer.toHexString(intData);
        String rs = "";
        int pos;
        for (pos = hexString.length(); pos >= 2; pos -= 2) {


            rs += hexString.substring(pos - 2, pos);
        }
        if (pos == 1) {


            rs += "0";
            rs += hexString.substring(0, pos);
        }
        int dataSize = rs.length();
        byteSize *= 2;
        while (dataSize < byteSize) {


            rs += "00";
            dataSize += 2;
        }
        return rs.toUpperCase();
    }
}
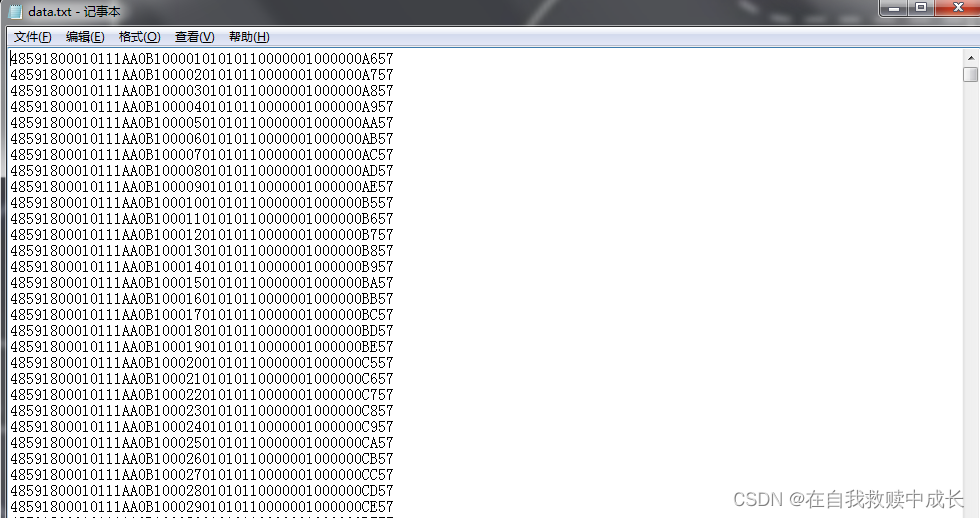
执行脚本后,会在D盘生成data.txt测试数据包
3. 启动jmeter进行socket压测
3.1 进入jmeter测试工具后,添加线程组

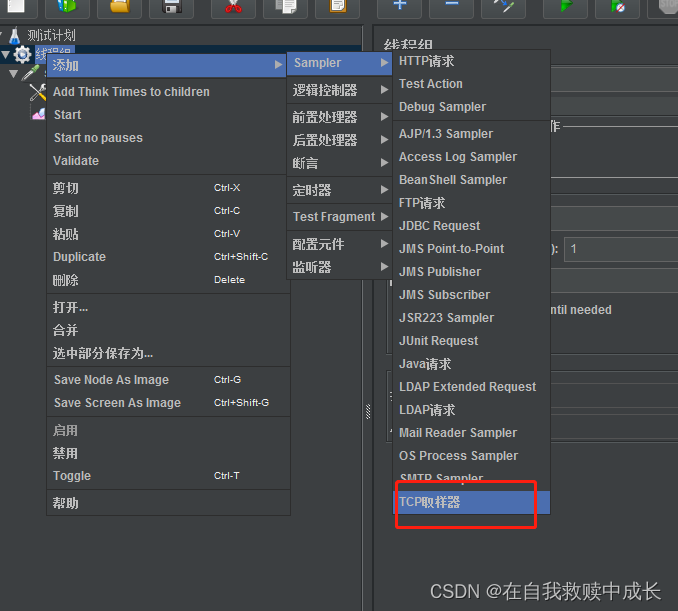
3.2 第二步,添加TCP取样器
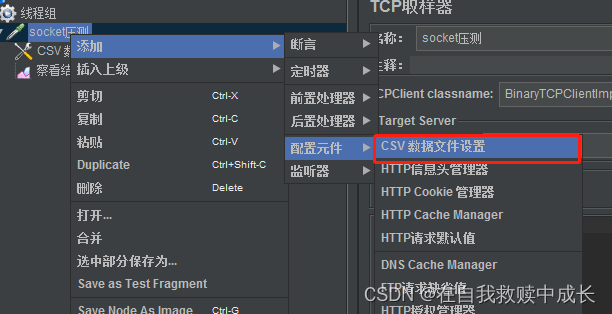
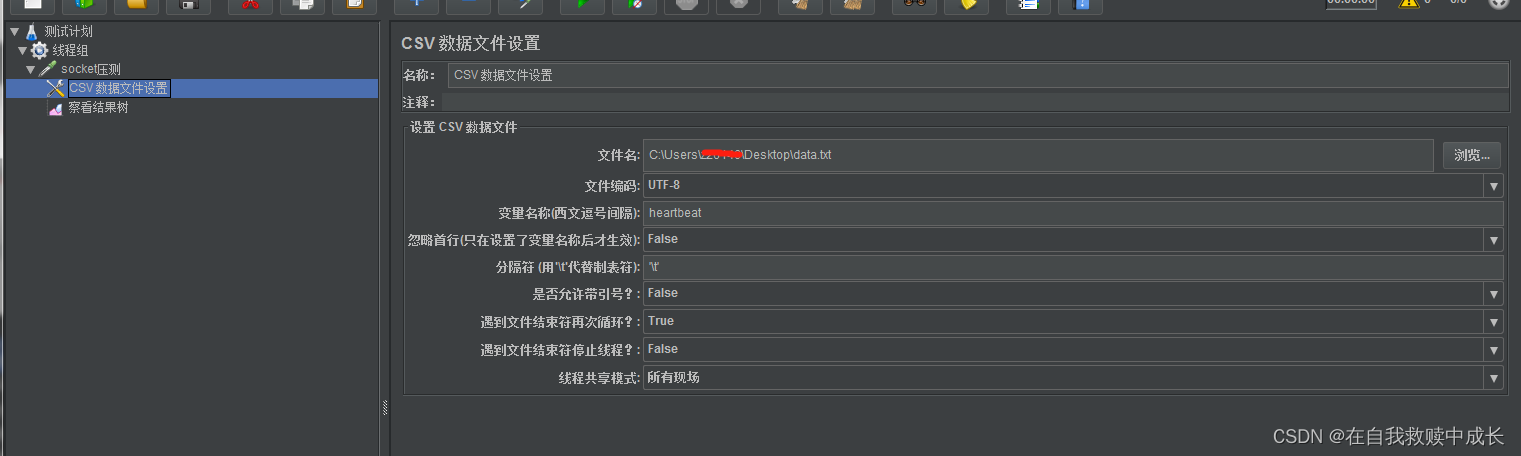
3.3 第三步,添加CSV数据文件设置
这里是用来读取我们上面脚本生成的心跳数据。从而实现动态数据加载
3.4 第四步,编辑CSV
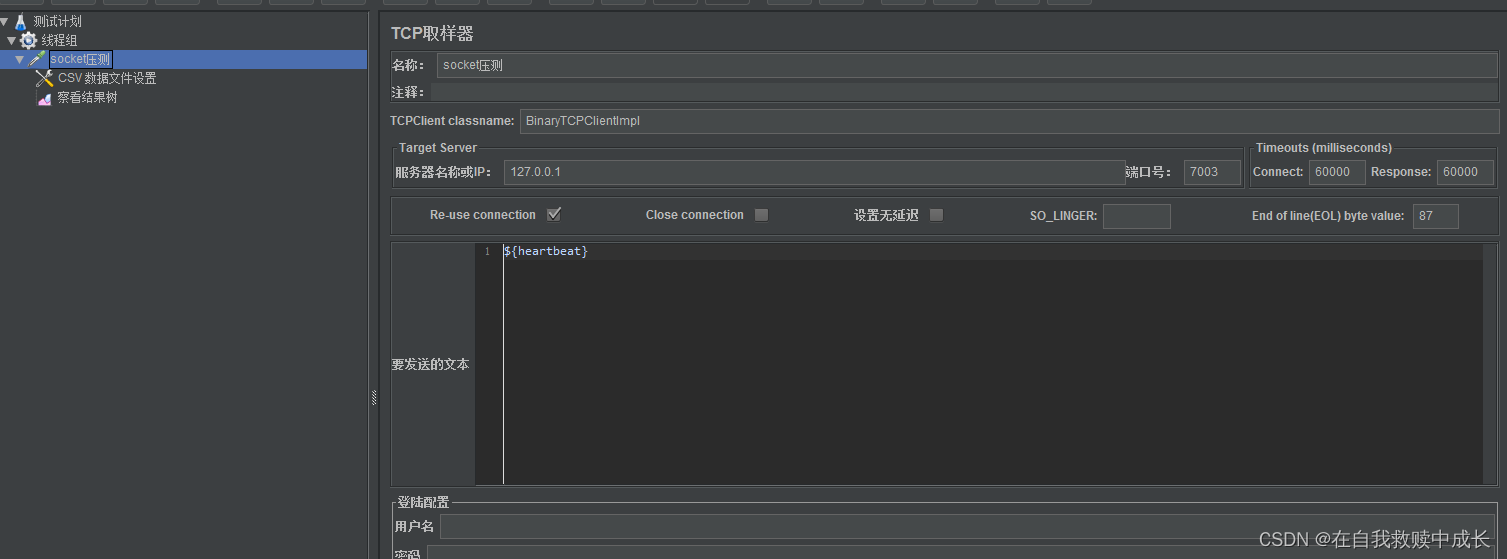
3.5 第五步,编辑TCP取样器
这里${heartbeat} 就是我们上面配置的CSV中的变量名称。
4. 验证
启动后通过结果数可以看到10个线程(10个客户端)压测成功。
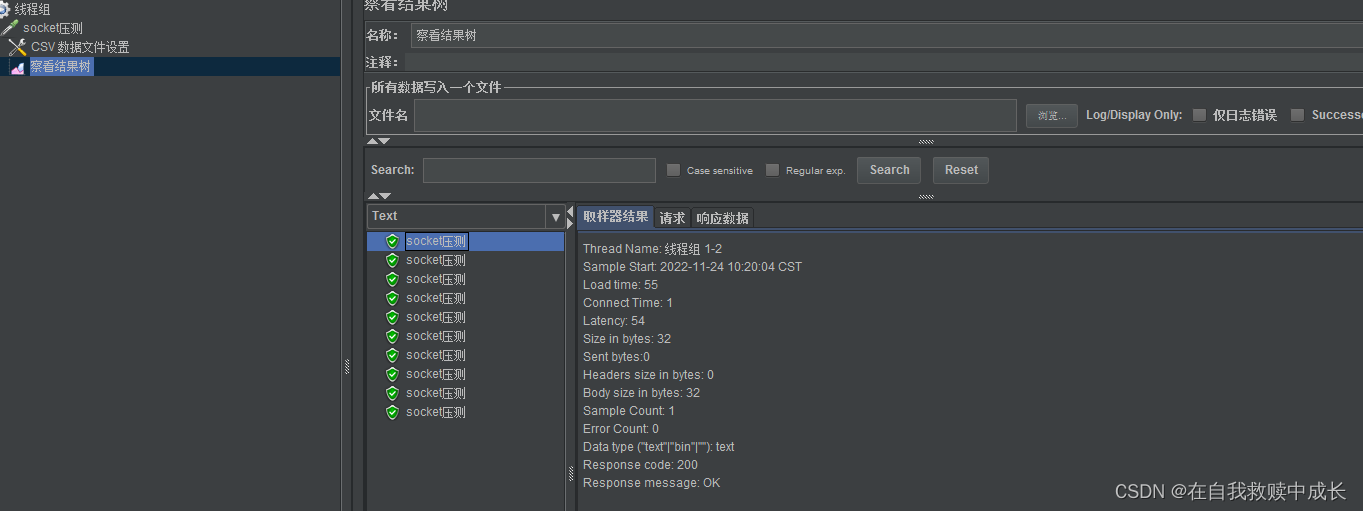
服务端也正常接收到心跳数据。

4. 总结
相比第一种方法,使用jmeter来进行压测要简单很多,但使用jmeter来压测socket无法维持心跳,jmeter线程只能不断循环发送这种方式来维持。