前言
早些时候,博主介绍过Redis的使用:Java开发 - Redis初体验,Redie是基于缓存的一项技术,对于Redis,博主此处不再赘述,不了解的可以去看这篇文章,但Redis缓存并不是顶峰,本文要讲的内容就是Redis的辅助工具:SpringCache——的使用。有了SpringCache,Redis便可如虎添翼,使用效果更上一层楼,下面,我们就一起来见识见识SpringCache的厉害吧。
SpringCache简介
听名字,我们就知道,SpringCache是Spring大家族的一员,所以Spring很好的兼容了SpringCache,它实现了基于注解的缓存功能,只需要简单地加一个注解,就能实现缓存功能,大大简化我们在业务中操作缓存的代码,比如redisTemplate,这些东西就可以省略了。
Spring Cache提供了一层抽象,底层可以切换不同的cache实现。具体就是通过CacheManager接口来统一不同的缓存技术。CacheManager是Spring提供的各种缓存技术抽象接口,不同的缓存技术需要实现不同的CacheManager,我们大致来看下都有哪些:
| CacheManager | 简介 |
|---|---|
| EhCacheCacheManager | 使用EhCache作为缓存技术 |
| GuavaCacheManager | 使用Google的GuavaCache作为缓存技术 |
| RedisCacheManager | 使用Redis作为缓存技术 |
从业这么多年,在博主还不做后端的时候,听得最多的就是Redis,所以,今天我就以Redis缓存为基础,来讲解SpringCache的使用。
SpringCache注解介绍
SpringCache发挥作用,主要用到了以下四个注解,不要小看了这四个注解,他们起到了举足轻重的作用。
在这之前,让我们先一起创建一个项目吧,方便大家进行测试。
创建MyBatisPlus基础项目
创建项目
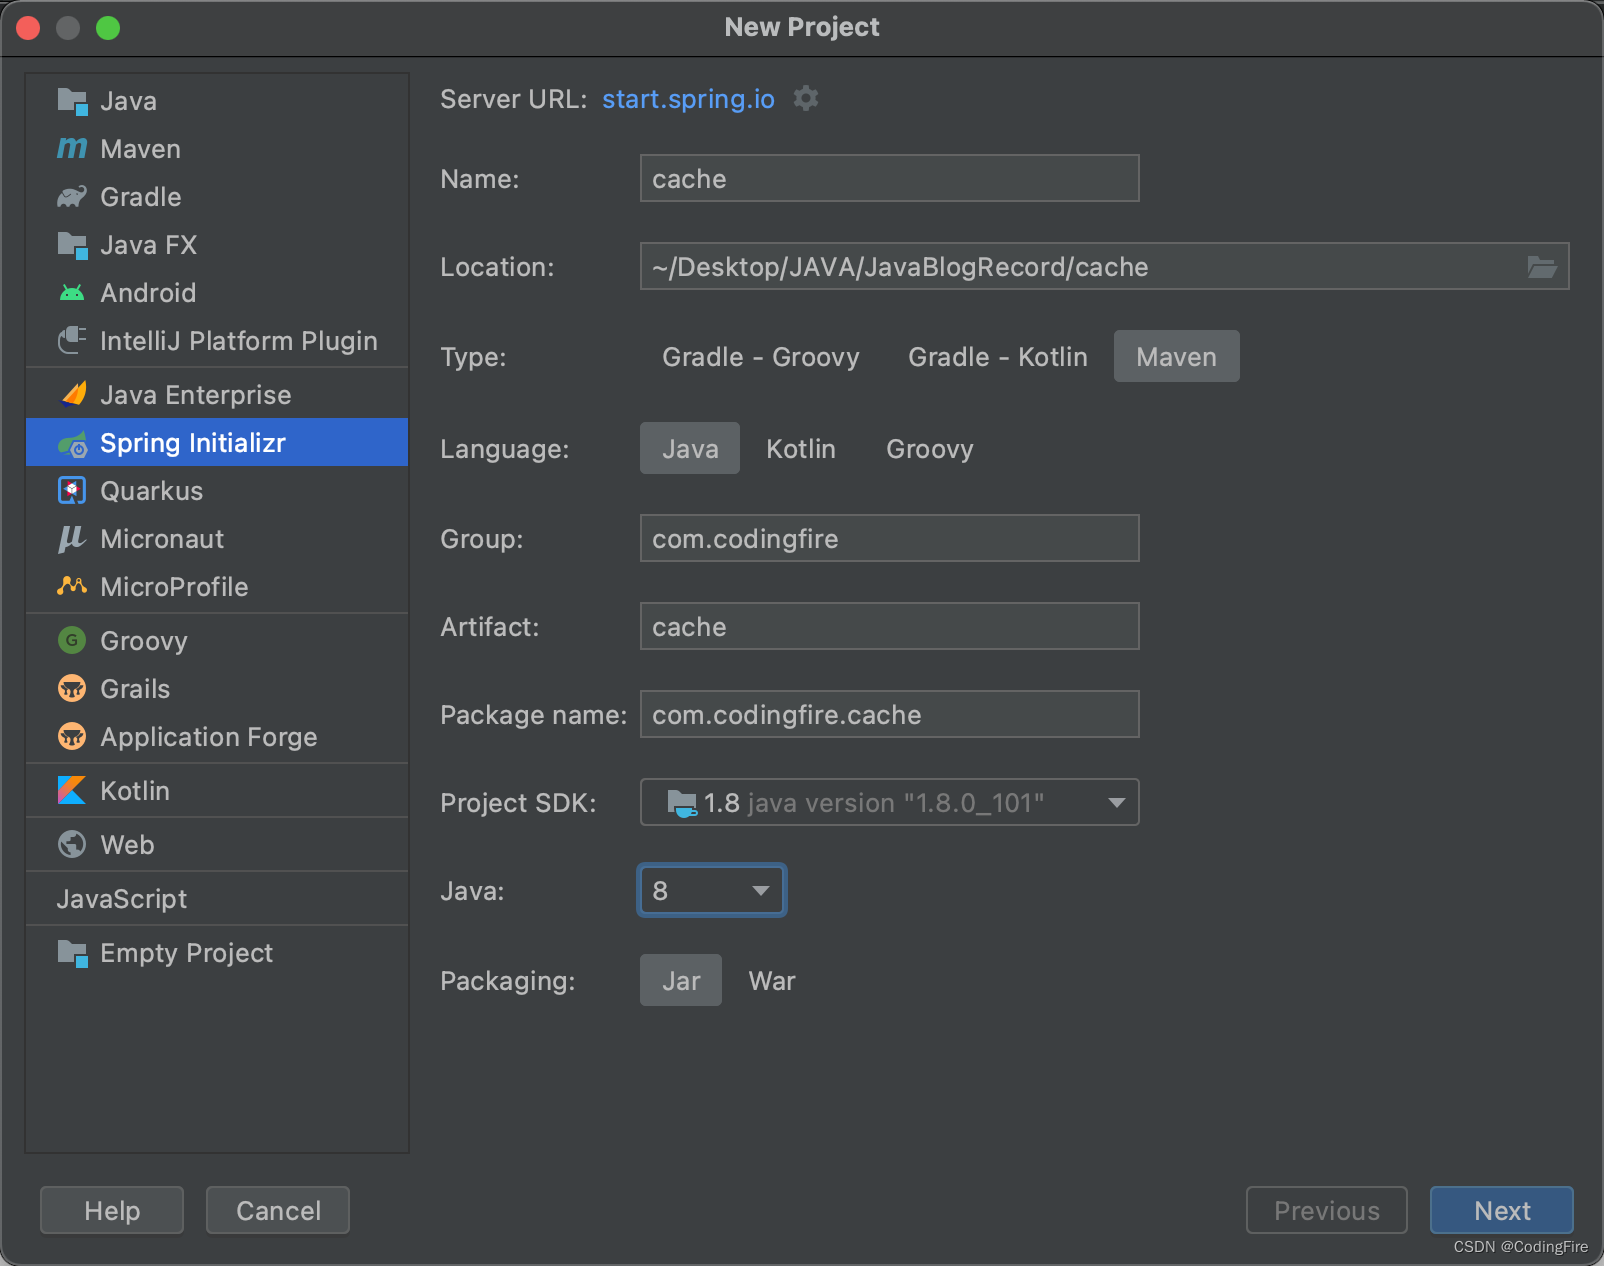
添加依赖
<?xml version="1.0" encoding="UTF-8"?>
<project xmlns="http://maven.apache.org/POM/4.0.0" xmlns:xsi="http://www.w3.org/2001/XMLSchema-instance"
         xsi:schemaLocation="http://maven.apache.org/POM/4.0.0 https://maven.apache.org/xsd/maven-4.0.0.xsd">
    <modelVersion>4.0.0</modelVersion>
    <parent>
        <groupId>org.springframework.boot</groupId>
        <artifactId>spring-boot-starter-parent</artifactId>
        <version>2.6.0</version>
        <relativePath/> <!-- lookup parent from repository -->
    </parent>
    <groupId>com.codingfire</groupId>
    <artifactId>cache</artifactId>
    <version>0.0.1-SNAPSHOT</version>
    <name>cache</name>
    <description>Demo project for Spring Boot</description>
    <properties>
        <java.version>1.8</java.version>
    </properties>
    <dependencies>
        <dependency>
            <groupId>org.springframework.boot</groupId>
            <artifactId>spring-boot-starter</artifactId>
        </dependency>
        <dependency>
            <groupId>mysql</groupId>
            <artifactId>mysql-connector-java</artifactId>
            <version>8.0.26</version>
            <scope>runtime</scope>
        </dependency>
        <dependency>
            <groupId>org.springframework.boot</groupId>
            <artifactId>spring-boot-starter-test</artifactId>
            <scope>test</scope>
        </dependency>
        <!--不要导入错误的依赖  不要再添加mybatis依赖-->
        <dependency>
            <groupId>com.baomidou</groupId>
            <artifactId>mybatis-plus-boot-starter</artifactId>
            <version>3.4.1</version>
        </dependency>
        <dependency>
            <groupId>com.alibaba</groupId>
            <artifactId>druid</artifactId>
            <version>1.1.6</version>
        </dependency>
        <dependency>
            <groupId>org.projectlombok</groupId>
            <artifactId>lombok</artifactId>
        </dependency>
        <dependency>
            <groupId>org.springframework.boot</groupId>
            <artifactId>spring-boot-starter-web</artifactId>
        </dependency>
    </dependencies>

    <build>
        <plugins>
            <plugin>
                <groupId>org.springframework.boot</groupId>
                <artifactId>spring-boot-maven-plugin</artifactId>
            </plugin>
        </plugins>
    </build>

</project>
创建基础架构
entity.User
package com.codingfire.cache.entity;

import lombok.Data;

import java.io.Serializable;

@Data
public class User implements Serializable {
    private Long id;
    private String username;
    private String password;
    private Integer age;
    private String phone;
}
mapper.UserMapper
package com.codingfire.cache.mapper;

import com.baomidou.mybatisplus.core.mapper.BaseMapper;
import com.codingfire.cache.entity.User;
import org.apache.ibatis.annotations.Mapper;

@Mapper
public interface UserMapper extends BaseMapper<User> {
}
service.IUserService
package com.codingfire.cache.service;

import com.baomidou.mybatisplus.extension.service.IService;
import com.codingfire.cache.entity.User;

public interface IUserService extends IService<User> {
}
service.impl.UserServiceImpl
package com.codingfire.cache.service.impl;

import com.baomidou.mybatisplus.extension.service.impl.ServiceImpl;
import com.codingfire.cache.entity.User;
import com.codingfire.cache.mapper.UserMapper;
import com.codingfire.cache.service.IUserService;
import org.springframework.stereotype.Service;

@Service
public class UserServiceImpl extends ServiceImpl<UserMapper, User> implements IUserService {

}
controller.UserController
package com.codingfire.cache.controller;

import org.springframework.web.bind.annotation.RequestMapping;
import org.springframework.web.bind.annotation.RestController;

@RestController
@RequestMapping("/user")
public class UserController {
}
创建数据库表
create database if not exists s_cache character set utf8;
use s_cache;
CREATE TABLE user (
id bigint(20) primary key auto_increment,
username varchar(32) not null,
password varchar(32) not null,
age int(3) not null ,
phone varchar(32) not null
);

配置yml
spring:
  datasource:
    type: com.alibaba.druid.pool.DruidDataSource
    driver-class-name: com.mysql.cj.jdbc.Driver
    url: jdbc:mysql://localhost:3306/s_cache?useSSL=false&useUnicode=true&characterEncoding=utf-8&serverTimezone=Asia/Shanghai&allowMultiQueries=true&allowPublicKeyRetrieval=true
    username: root
    password: xxxx
到这里,准备工作就做完了,上周刚写了MyBatisPlus,我们刚好拿来练练手,没看过的传送门: Java开发 - MybatisPlus框架初体验
@EnableCaching
@EnableCaching的作用是:开启缓存注解功能,需要添加到启动类上。这个没有太多的使用可以说,干就完了。但接下来这三个可是三王般的存在,学起来可要下点功夫了。虽然简单,案例还是要给的:
package com.codingfire.cache;

import org.springframework.boot.SpringApplication;
import org.springframework.boot.autoconfigure.SpringBootApplication;
import org.springframework.cache.annotation.EnableCaching;

@SpringBootApplication
@EnableCaching
public class CacheApplication {

    public static void main(String[] args) {
        SpringApplication.run(CacheApplication.class, args);
    }

}
@Cacheable
@Cacheable的作用是:在方法执行前,spring先查看缓存中是否有数据,如果有数据,则直接返回前端缓存数据;若没有数据,调用方法获取数据并将方法返回值放到缓存中。
这段话说的比较片面,要想理解其使用,还是有些模棱两可,也并不是直接添加了此注解就可以的,还需要几个关键参数的配合。
@Cacheable一般用在查询方法上,所以才有了上面那句介绍。@Cacheable共有四个属性参数供使用:
- cacheNames|value:指定当前缓存属于哪个模块下,相当于设置一个文件夹,完全的自定义,随便其名,符合命名规范即可;
- key:就是具体的key的名称标识 存到缓存中真正的键名是:cacheNames::key;
- condition:满足某个条件才会进行缓存数据;
- unless:不满足某个条件才会进行缓存数据;
案例
为了能查询到,我们先在数据库中添加几条数据:

接着我们以第一条的id去数据库中查找:
    @Autowired
    private IUserService userService;

    @Autowired
    CacheManager cacheManager;

    @Cacheable(cacheNames = "user",key = "#id")
    @GetMapping("/{id}")
    public User getById(@PathVariable Long id){
        User user = userService.getById(id);
        return user;
    }
为了方便查看缓存,我们添加CacheManager,在方法中打断点,运行debug模式,使用postman发起请求,然后通过CacheManager跟踪缓存中数据的变化: 
在这里,cachemanager看到没?第一次获取,是没有缓存的,请求结束后就有了,所以在第二次请求的时候,里面是有第一次的缓存的,我们发起第二次请求,注意,第二次查询的id需要换一个人,否则因为已经存入缓存,就不会执行我们的这个方法,连断点都不会走了:

第二次可以看到缓存中已经存在了第一次查询的数据。
然后我们看看另外两个注解:
@Cacheable(cacheNames = "user",key = "#id",unless = "#result==null")
@Cacheable(cacheNames = "user",key = "#id",condition = "#result!=null")
为空的时候就不会存缓存了,其实很好理解,博主就不一一测试了,感兴趣的小伙伴用不存在的id查询,一试就知。
@CachePut
@CachePut多用在修改或更新方法上,然后保存其返回值到缓存,@CachePut注解只有两个属性:
- cacheNames|value:指定当前缓存属于哪个模块下,相当于设置一个文件夹,完全的自定义,随便其名,符合命名规范即可;
- key:就是具体的key的名称标识 存到缓存中真正的键名是:cacheNames::key;
- condition:满足某个条件才会进行缓存数据;
- unless:不满足某个条件才会进行缓存数据;
对了,忘记说了,key值我们不能给一个固定的值,Spring对于key的命名有固定的规则,可以使用方法调用的对象,方法名,方法参数,方法返回值来进行设置key的名称,具体如下:
- #result:获取方法的返回值
- #root.method、#root.target、#root.caches:获取方法的调用目标对象
- #root.methodName:获取方法名
- #root.args[1]、#a1 :根据索引获取方法的参数
- #name:根据参数名获取方法参数
案例
    @PostMapping
    @CachePut(value = "userCache", key = "#user.id")
    public User add(User user) {
        userService.save(user);
        return user;
    }
为了方便大家查看,我们来修改下上面的方法:
    @PostMapping
    @CachePut(value = "user", key = "#user.id")
//    @CachePut(value = "user", key = "#backUser.id")
    public User add(User user) {
        userService.save(user);
        User backUser = user;
        return backUser;
    }
这样是不是可以更方便区分参数和返回值。 和上面的方法一样,打断点,一步步执行,查看缓存中数据。
@CacheEvict
@CacheEvict一般用在增删改方法上 ,一旦发现用户对数据做了修改(增删改), 就删除缓存中的数据,和上面两个注解不太一样,@CacheEvict不支持unless和condition,但是有一个allEntries属性可用,意思是当前分类下,全部删除,当前分类就是value/cacheNames。
下面,我们来看看它怎么用。
案例
    //@CacheEvict(cacheNames = "user",key="#id")
    @CacheEvict(cacheNames = "user",allEntries = true)
    @DeleteMapping("/{id}")
    public void delete(@PathVariable Long id){
        userService.removeById(id);
    }
可以选择单个删除,也可以选择全部删除,那么有没有多个删除呢?有!看代码:
//    @Caching(evict = {
//            @CacheEvict(cacheNames = "user",key = "#ids[0]"),
//            @CacheEvict(cacheNames = "user",key = "#ids[1]")
//    })
    @CacheEvict(value = "userCache",key = "#root.args[0]") //#root.args[0] 代表第一个参数
    @PostMapping("/deletes")
    public void deletes(@RequestBody List<Long> ids){
        userService.removeByIds(ids);
    }
但是,你应该发现了一点问题,多指定删除,如果ids很大,甚至你不知道size,怎么办?有点无解,所以还是不建议这么做,建议删除当前分类下所有缓存。
关于测试,博主就不再贴出来了,自行完成即可。
SpringCache和Redis
说完了SpringCache,大家估计都很好奇,Redis呢?现在,它来了,SpringCache和Redis的结合使用堪称bug级别,连redis的代码都省略了,你就说厉不厉害。
那么为什么要和Redis一起使用呢?如果你前面测试了,你就会发现,每次重启后,缓存数据都清空了,这在真实项目中是不是很不友好?我们还指望这些数据来帮我们加快查询的速度呢,你重启一次清空一次,缓存的重新建立可是需要很多时间的,怎么办呢?上Redis!
下面,就让我们一起来使用Spring Boot来整合Redis和SpringCache吧!
Spring Boot整合SpringCache和Redis
添加依赖
<!--cache起步依赖-->
<dependency>
    <groupId>org.springframework.boot</groupId>
    <artifactId>spring-boot-starter-cache</artifactId>
</dependency>
<!--redis起步依赖-->
<dependency>
    <groupId>org.springframework.boot</groupId>
    <artifactId>spring-boot-starter-data-redis</artifactId>
</dependency>
添加配置
spring:
  datasource:
    type: com.alibaba.druid.pool.DruidDataSource
    driver-class-name: com.mysql.cj.jdbc.Driver
    url: jdbc:mysql://localhost:3306/s_cache?useSSL=false&useUnicode=true&characterEncoding=utf-8&serverTimezone=Asia/Shanghai&allowMultiQueries=true&allowPublicKeyRetrieval=true
    username: root
    password: xxxx
  redis:
    database: 0
    host: localhost
    port: 6379
    password:
    jedis:
      pool:
        #最大连接数
        max-active: 8
        #最大阻塞等待时间(负数表示没限制)
        max-wait: -1
        #最大空闲
        max-idle: 8
        #最小空闲
        min-idle: 0
        #连接超时时间
        timeout: 10000
    cache:
      redis:
        time-to-live: 360000000
测试
做完这些,直接运行项目即可,但是切记要先启动Redis服务。接着通过postman发起请求:

我们到Redis可视化工具看看:

我们前面受过存储的格式,大家还记得吗? cacheNames::key,但是问题又来了,你发现存储的数据是乱码,这这这!这是为什么?
这是因为我们没有设置Redis的序列化方式,下面我们来配置下:
我们把早起学习Redis使用的配置类添加进来:
package com.codingfire.cache.config;

import org.springframework.context.annotation.Bean;
import org.springframework.context.annotation.Configuration;
import org.springframework.data.redis.connection.RedisConnectionFactory;
import org.springframework.data.redis.core.RedisTemplate;
import org.springframework.data.redis.serializer.RedisSerializer;

import java.io.Serializable;

@Configuration
public class RedisConfig0 {

    @Bean
    public RedisTemplate<String, Serializable> redisTemplate(RedisConnectionFactory redisConnectionFactory) {
        RedisTemplate<String, Serializable> redisTemplate = new RedisTemplate<>();
        redisTemplate.setConnectionFactory(redisConnectionFactory);
        redisTemplate.setKeySerializer(RedisSerializer.string());
        redisTemplate.setValueSerializer(RedisSerializer.json());
        return redisTemplate;
    }
}
清空缓存,执行添加方法后,发现依然是乱码: 看来事情并没有我想的那么简单 ,原来的配置类不行了,肯定是因为SpringCache的缘故导致的,不要慌,我们换一种序列化方式,上面的就删掉吧:
package com.codingfire.cache.config;
import org.springframework.boot.autoconfigure.cache.CacheProperties;
import org.springframework.boot.context.properties.EnableConfigurationProperties;
import org.springframework.context.annotation.Bean;
import org.springframework.context.annotation.Configuration;
import org.springframework.data.redis.cache.RedisCacheConfiguration;
import org.springframework.data.redis.serializer.GenericJackson2JsonRedisSerializer;
import org.springframework.data.redis.serializer.RedisSerializationContext;
import org.springframework.data.redis.serializer.StringRedisSerializer;

@Configuration
@EnableConfigurationProperties(CacheProperties.class) // 加载缓存配置类
public class RedisConfig {

    @Bean
    public RedisCacheConfiguration redisCacheConfiguration(CacheProperties cacheProperties) {
        RedisCacheConfiguration config = RedisCacheConfiguration.defaultCacheConfig();
        // 设置缓存key的序列化方式
        config =
                config.serializeKeysWith(
                        RedisSerializationContext.SerializationPair.fromSerializer(
                                new StringRedisSerializer()));
        // 设置缓存value的序列化方式(JSON格式)
        config =
                config.serializeValuesWith(
                        RedisSerializationContext.SerializationPair.fromSerializer(
                                new GenericJackson2JsonRedisSerializer()));
        CacheProperties.Redis redisProperties = cacheProperties.getRedis();
        if (redisProperties.getTimeToLive() != null) {
            config = config.entryTtl(redisProperties.getTimeToLive());
        }
        if (redisProperties.getKeyPrefix() != null) {
            config = config.prefixKeysWith(redisProperties.getKeyPrefix());
        }
        if (!redisProperties.isCacheNullValues()) {
            config = config.disableCachingNullValues();
        }
        if (!redisProperties.isUseKeyPrefix()) {
            config = config.disableKeyPrefix();
        }
        return config;
    }
}
接着,我们再运行项目,执行post添加用户请求:

看看图中的存储格式对了吗?果然是啊!换成get接口获取用户数据试试,如果细心点,你会发现请求瞬间就回来,这是因为你添加用户后,数据就已经存入了Redis,下次查询时,不会再查询数据库,而是直接从Redis中找。
结语
快乐的时光总是短暂的,到这里,SpringCache就给大家介绍完了,如果有了解的地方,欢迎留言讨论,有些的不对的,也欢迎指出。本以为随便写写要不了多大的篇幅,没想到还是写了1w+字,咱们下一篇再见了。