阅读前可参考
https://blog.csdn.net/MinggeQingchun/article/details/128547426
一、Linux系统管理
(一)查看Linux系统版本
1、查看Linux内核版本
1、cat /proc/version:Linux查看当前操作系统版本信息
2、uname -a:Linux查看版本当前操作系统内核信息

2、查看Linux系统版本
1、lsb_release -a
这个命令适用于所有的Linux发行版,包括RedHat、SUSE、Debian…等发行版
注:使用该命令时提示command not found,需要安装yum install redhat-lsb -y
 2、cat /etc/redhat-release
这种方法只适合Redhat系的Linux
![]()
3、cat /etc/issue
此命令也适用于所有的Linux发行版
3、uname的使用
uname命令用于打印当前系统相关信息(内核版本号、硬件架构、主机名称和操作系统类型等)
uname -a显示全部信息
-m或--machine:显示电脑类型;
-r或--release:显示操作系统的发行编号;
-s或--sysname:显示操作系统名称;
-v:显示操作系统的版本;
-p或--processor:输出处理器类型或"unknown";
-i 或--hardware-platform:输出硬件平台或"unknown";
-o或--operating-system:输出操作系统名称;
--help:显示帮助;
--version:显示版本信息
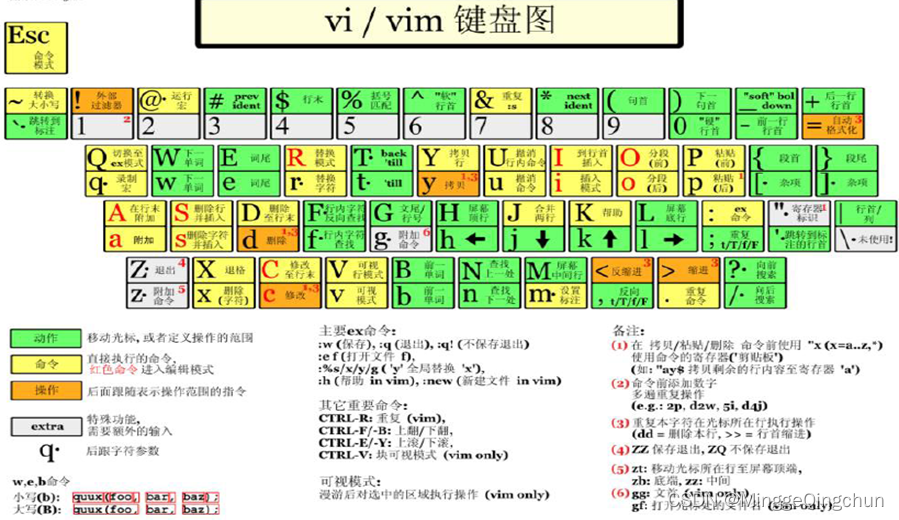
(二)vi 和 vim
vi编辑器是Linux和Unix上最基本的文本编辑器,工作在字符模式下。由于不需要图形界面,vi是效率很高的文本编辑器。
vim是vi的增强版,比vi更容易使用。vi的命令几乎全部都可以在vim上使用
1、vi和vim三种常见模式:
一般模式:以vi/vim 命令打开一个文档就直接进入一般模式了(默认模式)。在这个模式中,可以使用『上下左右』按键来移动光标,可以使用『删除字符』或『删除整行』快捷键来处理文档内容,也可以使用『复制、粘贴』快捷键来处理文件数据,。可以查看文件的内容,但是不能编辑文件内容
编辑模式:按下i, I, o, O, a, A, r, R等任何一个字母之后才会进入编辑模式, 一般按 i 即可。可以编辑文件内容,但是不能保存编辑的内容,按Esc键,可以回到一般模式
命令行模式:在一般模式下,按shift+ :,进入命令行模式
输入: q!:不保存强制退出编辑器
wq:保存并且退出编辑器
q:只是退出编辑器

2、vi和vim常用快捷键
1、一般模式拷贝当前行(yy) , 拷贝当前行向下的5行(5yy),并粘贴(p)
2、一般模式删除当前行(dd) , 删除当前行向下的5行(5dd)
3、一般模式下,在文件中查找某个单词,[命令模式下:(/关键字),回车查找, 输入(n) 就是查找下一个]
4、一般模式下,使用快捷键到达文档的最首行[gg]和最末行[G]
5、一般模式下,在一个文件中输入"xxxx" ,然后又撤销这个动作(u)
6、一般模式下,并将光标移动到10行shift+g
第一步:输入10
第二步:输入shift+g
第三步:回车
7、命令行模式下,设置文件的行号,取消文件的行号.[命令行下(: set nu) 和(:set nonu)]
8、其它快捷键:
(三)用户管理
Linux系统是一个多用户多任务的操作系统,任何一个要使用系统资源的用户,都必须首先向系统管理员申请一个账号,然后以这个账号的身份进入系统。root用户是系统默认创建的管理员账号
1、添加用户
useradd [选项] 用户名
[root@localhost home]# useradd zhangsan
[root@localhost home]# cd /home/
[root@localhost home]# ll
total 4
drwx------. 15 ming     ming     4096 Jan  5 17:28 ming
drwx------.  3 zhangsan zhangsan   78 Jan  6 10:48 zhangsan
(1)创建一个用户zhangsan
(2)在/home目录下创建用的根目录,目录名称默认跟用户名相同
(3)在linux中任何一个用户都至少属于一个组,新建用户时如果不指定组,则会新建一个组,组名跟用户名相同,并且把该用户添加到该组中
useradd zhangsan
创建一个账号叫zhangsan,此时会创建账号、创建一个组zhangsan并且把zhangsan分到此组中、还会在/home下创建一个目录叫zhangsan作为新创建用户的根目录
useradd -d /home/lisiDir lisi
创建一个账号叫lisi,并且给lisi指定家目录/lisiDir
[root@localhost home]# useradd -d /home/lisiDir lisi
[root@localhost home]# ll
total 4
drwx------.  3 lisi     lisi       78 Jan  6 10:39 lisiDir
drwx------. 15 ming     ming     4096 Jan  5 17:28 ming
drwx------.  3 zhangsan zhangsan   78 Jan  6 10:36 zhangsan
2、用户设置密码
passwd zhangsan
[root@localhost home]# passwd zhangsan
Changing password for user zhangsan.
New password:
Retype new password:
passwd: all authentication tokens updated successfully.
3、删除用户
userdel [选项] 用户名
[root@localhost home]# userdel zhangsan
[root@localhost home]# ll
total 4
drwx------.  3 lisi lisi   78 Jan  6 10:39 lisiDir
drwx------. 15 ming ming 4096 Jan  5 17:28 ming
drwx------.  3 1001 1001   78 Jan  6 10:36 zhangsan
userdel zhangsan:删除用户zhangsan,保留zhangsan的主目录,在/home 目录下还能看到 /zhangsan目录
userdel -r lisi
删除用户lisi,并且把lisi的主目录也删除
[root@localhost home]# userdel -r lisi
[root@localhost home]# ll
total 4
drwx------. 15 ming ming 4096 Jan  5 17:28 ming
drwx------.  3 1001 1001   78 Jan  6 10:36 zhangsan
4、查看用户信息
id 用户名
id zhangsan:查看用户zhangsan的信息
[root@localhost home]# id zhangsan
uid=1001(zhangsan) gid=1001(zhangsan) groups=1001(zhangsan)
5、切换用户
su 用户名
su zhangsan:切换到zhangsan用户
注:从高权限用户切换到低权限用户时,不需要输密码;否则,需要输密码
另:exit命令可以回到原来的用户
[root@localhost home]# su zhangsan
[zhangsan@localhost home]$ su root
Password:
[root@localhost home]#
(四)用户组管理
Linux的组类似于角色,系统可以对有共性的多个用户进行统一的管理。每一个用户都至少属于一个组,创建用户时如果不指定组,会默认创建一个跟用户名相同的组,并且把新创建的用户分配到组中,root用户默认属于root组
1、添加组
groupadd 组名
groupadd dev:创建一个组dev
2、删除组
groupdel 组名
groupdel dev:删除组dev
[root@localhost home]# groupadd dev
[root@localhost home]# groupdel dev
3、添加用户到组
gpasswd -a 用户名 组名
gpasswd -a zhangsan dev:将张三用户添加到dev组中
[root@localhost home]# gpasswd -a zhangsan dev
Adding user zhangsan to group dev
[root@localhost home]# id zhangsan
uid=1001(zhangsan) gid=1001(zhangsan) groups=1001(zhangsan),1002(dev)
4、添加用户到指定组
useradd -g 组名 用户名
useradd –g dev zhangsan:添加用户zhangsan,并且指定zhangsan属于组dev
[root@localhost home]# useradd -g dev lisi
[root@localhost home]# id lisi
uid=1002(lisi) gid=1002(dev) groups=1002(dev)
5、将用户从组中移除
gpasswd -d 用户名 组名
gpasswd -d zhangsan dev:将张三用从dev组中移除
[root@localhost home]# gpasswd -d zhangsan dev
Removing user zhangsan from group dev
[root@localhost home]# id zhangsan
uid=1001(zhangsan) gid=1001(zhangsan) groups=1001(zhangsan)
(五)系统操作命令
1、关机
shutdown now 立即关机
shutdown -h xx 定时关机
shutdown -r now 立即重启(现在重新启动计算机)
2、重启
reboot 立即重启
3、同步数据库(把内存的数据同步到磁盘)
sync
(六)帮助命令
1、查看linux系统手册上的帮助信息:man 命令
man ls
分屏显示、按回车翻一行、按空格翻一页、按q退出查看
2、查看命名的内置帮助信息:help 命令
help cd
二、目录、文件命令
(一)目录命令
1、pwd指令;查看当前所在目录
查看当前所在目录:pwd
[root@localhost ~]# pwd
/root
2、ls、ll 指令;查看指定目录下所有的子目录和文件列表
ls [选项] [指定目录] :查看指定目录下所有的子目录和文件列表(默认平铺方式)
常用选项
(1)-a :显示当前目录所有的文件和目录,包括隐藏的
(2)-l :以列表的方式显示信息,相当于ll
ll [选项] [指定目录]:查看指定目录下所有的子目录和文件列表(列表方式)
ls /home(默认平铺方式)
ls 查看当前目录下所有的子目录和文件列表
ls -l /home :以列表形式显示
ls -a /home:显示指定目录下所有的子目录和文件(包括虚拟的目录)
ls -al /home:以列表形式显示指定目录下所有的子目录和文件(包括虚拟的目录)
[root@localhost /]# ll /home
total 4
drwx------. 15 ming ming 4096 Jan  5 17:28 ming
[root@localhost /]# ls /home
ming
[root@localhost /]# ls -l /home
total 4
drwx------. 15 ming ming 4096 Jan  5 17:28 ming
[root@localhost /]# ls -a /home
.  ..  ming
[root@localhost /]# ls -al /home
total 4
drwxr-xr-x.  3 root root   18 Jan  6 12:00 .
dr-xr-xr-x. 17 root root  233 Jan  4 11:36 ..
drwx------. 15 ming ming 4096 Jan  5 17:28 ming
3、cd 指令;切换目录
cd 目录名
切换到指定目录
绝对路径(以/开头的目录)和相对路径(以目录名开头的目录,从当前目录下开始查找)
cd ~ 或者cd :回到自己的主目录
cd .. 回到当前目录的上一级目录
1、绝对目录:以盘符开始的目录叫绝对目录,从盘符开始查找目标目录
cd /opt/testDir
~:当前用户的根目录。在任何目录下执行:cd ~,进入当前用户的根目录
2、相对目录:以目录名开始的目录叫相对目录,从当前目录开始查找目标目录
cd testDir
..:当前目录的上一级目录,从的当前目录开始查找它的上一级目录
.:当前目录,在当前目录下执行某条脚本指令,xx.sh ====> ./xx.sh
4、mkdir 指令;创建目录
mkdir [选项] 目录名
创建目录
mkdir /opt/test/test1:在/opt/test目录下创建一个目录test1(使用绝对目录)
-p :创建多级目录
mkdir -p /opt/test/test1/test2: 在/opt/test目录下创建目录test1,并且在test1下创建test2(一次创建多级目录)
[root@localhost opt]# mkdir /opt/test/test1
mkdir: cannot create directory ‘/opt/test/test1’: No such file or directory
[root@localhost opt]# mkdir -p /opt/test/test1
[root@localhost opt]# cd /opt/test/test1/
[root@localhost test1]# pwd
/opt/test/test1
5、rmdir 指令;删除一个空目录
rmdir 目录名
[root@localhost test1]# ll
total 4
-rw-r--r--. 1 root root 8 Jan  6 14:43 test.txt
[root@localhost test1]# rmdir /opt/test/test1/
rmdir: failed to remove ‘/opt/test/test1/’: Directory not empty
[root@localhost test1]# rm test.txt
rm: remove regular file ‘test.txt’? Y
[root@localhost /]# rmdir /opt/test
[root@localhost /]# cd /opt/
[root@localhost opt]# ll
total 4
drwxr-xr-x. 2 root root  6 Mar 26  2015 rh
-rw-r--r--. 1 root root 53 Jan  5 17:55 test.txt
(二)文件命令
1、touch:创建一个或多个空文件
touch 文件名列表(文件名之间用空格隔开)
[root@localhost opt]# touch t1.txt
[root@localhost opt]# touch t1.txt t2.txt
[root@localhost opt]# ll
total 4
drwxr-xr-x. 2 root root  6 Mar 26  2015 rh
-rw-r--r--. 1 root root  0 Jan  6 15:50 t1.txt
-rw-r--r--. 1 root root  0 Jan  6 15:50 t2.txt
-rw-r--r--. 1 root root 53 Jan  5 17:55 test.txt
2、cp [选项] source(源文件目录) dest(目标目录):复制文件或目录
-r :递归复制整个文件夹
cp t1.txt test :把t1.txt文件复制到test目录中
cp -r test test1:把test目录复制到test目录中(递归地复制目录)
[root@localhost opt]# cp t1.txt test
[root@localhost opt]# cd test
[root@localhost test]# ll
total 0
-rw-r--r--. 1 root root 0 Jan  6 15:56 t1.txt


[root@localhost opt]# cp -r test test1
[root@localhost opt]# cd test1
[root@localhost test1]# ll
total 0
drwxr-xr-x. 2 root root 20 Jan  6 16:01 test
(1)将一个文件夹下的所有内容复制到另一个文件夹下
cp -r /home/packageA/* /home/cp/packageB/
或
cp -r /home/packageA/. /home/cp/packageB/
(2)将一个文件夹复制到另一个文件夹下
cp -r /home/packageA /home/packageB3、rm 文件名或者目录名;删除文件或者目录
删除一个文件夹及其下面的所有文件
rm -rf /home/packageA-r 表示向下递归,不管有多少级目录,一并删除
-f 表示直接强行删除,不作任何提示
rm t1.txt 提示删除文件
rm -f t2.txt 强制删除文件
rm -r test2 提示递归删除目录
rm -rf test5 强制递归删除目录
4、mv source(源) dest(目标);移动目录或者文件
mv test.txt test1
mv test1 test2
mv t3.txt t3_new.txt 文件重命名
注:如果目标中已经存在该文件或者目录,则会提示是否覆盖
(1)移动一个文件夹到另一个文件夹下面
mv /home/packageA /home/packageB/
或
mv /home/packageA /home/packageB
(2)移动一个文件夹下的所有内容到另一个文件夹下面
mv /home/packageA/* /home/packageB/5、cat 文件名;查看文件内容
-n :显示行号
文件内容一次性显示出来
cat t4.txt
cat -n t4.txt 显示行号
[root@localhost opt]# cat -n t1.txt
     1	uerhfei
     2	fwerjhfiewhf
     3	hfiewhvir
     4	hfcuiescir
     5	hgicewrvuewr
6、 more 文件名;分页查看文件文件内容
分页查看文件文件内容:more 文件名 一次性加载文件所有内容到内存,分页显示
按回车翻一行、按空格翻一页
more t1.txt
7、less 文件名:分页查看文件文件内容
分页查看文件文件内容:less 文件名 分页加载文件所有内容到内存,分页显示
less t1.txt
按回车翻一行、按空格翻一页,按q退出查看
8、head [选项] 文件名;查看文件的头10行
head t1.txt
head -n 5 t1.txt
[root@localhost opt]# head -n 2 t1.txt
uerhfei
fwerjhfiewhf
9、tail [选项] 文件名;查看文件的后10行
[root@localhost opt]# tail -n 2 t1.txt
hfcuiescir
hgicewrvuewr
[root@localhost opt]# tail t1.txt
uerhfei
fwerjhfiewhf
hfiewhvir
hfcuiescir
hgicewrvuewr
10、echo;输出系统变量或者常量的值到命令行终端
[root@localhost opt]# echo $JAVA_HOME

[root@localhost opt]# echo $PATH
/usr/lib64/qt-3.3/bin:/usr/local/sbin:/usr/local/bin:/usr/sbin:/usr/bin:/root/bin
11、> 文件名;把前一个查看命令的结果输出到指定的文件中
如果目标文件不存在,则新建一个文件
如果目标文件已存在,则把文件以前的内容覆盖
ls > ret.txt
ls -al > ret.txt
cat ret.txt > t1.txt 文件内容的复制
[root@localhost opt]# ls > ret.txt
[root@localhost opt]# ll
total 12
-rw-r--r--. 1 root root 45 Jan  6 16:16 ret.txt
drwxr-xr-x. 2 root root  6 Mar 26  2015 rh
-rw-r--r--. 1 root root 55 Jan  6 16:06 t1.txt
-rw-r--r--. 1 root root  0 Jan  6 15:50 t2.txt
drwxr-xr-x. 2 root root 20 Jan  6 15:56 test
drwxr-xr-x. 3 root root 18 Jan  6 16:01 test1
-rw-r--r--. 1 root root 53 Jan  5 17:55 test.txt
[root@localhost opt]# ls -al > ret.txt
[root@localhost opt]# cat ret.txt
total 8
drwxr-xr-x.  5 root root 100 Jan  6 16:16 .
dr-xr-xr-x. 17 root root 233 Jan  4 11:36 ..
-rw-r--r--.  1 root root   0 Jan  6 16:16 ret.txt
drwxr-xr-x.  2 root root   6 Mar 26  2015 rh
-rw-r--r--.  1 root root  55 Jan  6 16:06 t1.txt
-rw-r--r--.  1 root root   0 Jan  6 15:50 t2.txt
drwxr-xr-x.  2 root root  20 Jan  6 15:56 test
drwxr-xr-x.  3 root root  18 Jan  6 16:01 test1
-rw-r--r--.  1 root root  53 Jan  5 17:55 test.txt
[root@localhost opt]# cat ret.txt >t1.txt
[root@localhost opt]# cat t1.txt
total 8
drwxr-xr-x.  5 root root 100 Jan  6 16:16 .
dr-xr-xr-x. 17 root root 233 Jan  4 11:36 ..
-rw-r--r--.  1 root root   0 Jan  6 16:16 ret.txt
drwxr-xr-x.  2 root root   6 Mar 26  2015 rh
-rw-r--r--.  1 root root  55 Jan  6 16:06 t1.txt
-rw-r--r--.  1 root root   0 Jan  6 15:50 t2.txt
drwxr-xr-x.  2 root root  20 Jan  6 15:56 test
drwxr-xr-x.  3 root root  18 Jan  6 16:01 test1
-rw-r--r--.  1 root root  53 Jan  5 17:55 test.txt
12、>> 文件名;把前一个查看命令的结果追加输出到指定的文件中
如果目标文件不存在,则新建一个文件
如果目标文件已存在,则在文件原来内容的基础上进行追加
ls > ret.txt
ls -al >> ret.txt
cat t1.txt >> ret.txt
[root@localhost opt]# ls -al >> ret1.txt
[root@localhost opt]# cat ret1.txt
total 12
drwxr-xr-x.  5 root root 116 Jan  6 16:19 .
dr-xr-xr-x. 17 root root 233 Jan  4 11:36 ..
-rw-r--r--.  1 root root   0 Jan  6 16:19 ret1.txt
-rw-r--r--.  1 root root 436 Jan  6 16:16 ret.txt
drwxr-xr-x.  2 root root   6 Mar 26  2015 rh
-rw-r--r--.  1 root root 436 Jan  6 16:17 t1.txt
-rw-r--r--.  1 root root   0 Jan  6 15:50 t2.txt
drwxr-xr-x.  2 root root  20 Jan  6 15:56 test
drwxr-xr-x.  3 root root  18 Jan  6 16:01 test1
-rw-r--r--.  1 root root  53 Jan  5 17:55 test.txt
[root@localhost opt]# vi t2.txt
[root@localhost opt]# cat t2.txt
fihi
[root@localhost opt]# cat t2.txt >> ret1.txt
[root@localhost opt]# cat ret1.txt
total 12
drwxr-xr-x.  5 root root 116 Jan  6 16:19 .
dr-xr-xr-x. 17 root root 233 Jan  4 11:36 ..
-rw-r--r--.  1 root root   0 Jan  6 16:19 ret1.txt
-rw-r--r--.  1 root root 436 Jan  6 16:16 ret.txt
drwxr-xr-x.  2 root root   6 Mar 26  2015 rh
-rw-r--r--.  1 root root 436 Jan  6 16:17 t1.txt
-rw-r--r--.  1 root root   0 Jan  6 15:50 t2.txt
drwxr-xr-x.  2 root root  20 Jan  6 15:56 test
drwxr-xr-x.  3 root root  18 Jan  6 16:01 test1
-rw-r--r--.  1 root root  53 Jan  5 17:55 test.txt
fihi
三、时间和日期
1、date;查看或者设置系统的日期或者时间
date 查看系统当前的完整的日期和时间
date +%Y:系统当前的年份
date +%m :系统当前的月份
date +%d :系统当前的日期
date '+%Y-%m-%d %H:%M:%S':按yyyy-MM-dd HH:mm:ss格式显示
date -S '2021-01-01 10:30:30' :设置当前的系统时间
[root@localhost opt]# date
Fri Jan  6 16:22:28 CST 2023
[root@localhost opt]# date + %Y
date: extra operand ‘%Y’
Try 'date --help' for more information.
[root@localhost opt]# date +%Y
2023
[root@localhost opt]# date +%m
01
[root@localhost opt]# date +%d
06
[root@localhost opt]# date '+%Y-%m-%d %H:%M:%S'
2023-01-06 16:23:39
2、cal;查看系统日历
cal:查看当前月份的日历
cal 2022:查看指定年份的日历
[root@localhost opt]# cal
    January 2023
Su Mo Tu We Th Fr Sa
 1  2  3  4  5  6  7
 8  9 10 11 12 13 14
15 16 17 18 19 20 21
22 23 24 25 26 27 28
29 30 31

[root@localhost opt]# cal 2022
                               2022

       January               February                 March
Su Mo Tu We Th Fr Sa   Su Mo Tu We Th Fr Sa   Su Mo Tu We Th Fr Sa
                   1          1  2  3  4  5          1  2  3  4  5
 2  3  4  5  6  7  8    6  7  8  9 10 11 12    6  7  8  9 10 11 12
 9 10 11 12 13 14 15   13 14 15 16 17 18 19   13 14 15 16 17 18 19
16 17 18 19 20 21 22   20 21 22 23 24 25 26   20 21 22 23 24 25 26
23 24 25 26 27 28 29   27 28                  27 28 29 30 31
30 31
        April                   May                   June
Su Mo Tu We Th Fr Sa   Su Mo Tu We Th Fr Sa   Su Mo Tu We Th Fr Sa
                1  2    1  2  3  4  5  6  7             1  2  3  4
 3  4  5  6  7  8  9    8  9 10 11 12 13 14    5  6  7  8  9 10 11
10 11 12 13 14 15 16   15 16 17 18 19 20 21   12 13 14 15 16 17 18
17 18 19 20 21 22 23   22 23 24 25 26 27 28   19 20 21 22 23 24 25
24 25 26 27 28 29 30   29 30 31               26 27 28 29 30

        July                  August                September
Su Mo Tu We Th Fr Sa   Su Mo Tu We Th Fr Sa   Su Mo Tu We Th Fr Sa
                1  2       1  2  3  4  5  6                1  2  3
 3  4  5  6  7  8  9    7  8  9 10 11 12 13    4  5  6  7  8  9 10
10 11 12 13 14 15 16   14 15 16 17 18 19 20   11 12 13 14 15 16 17
17 18 19 20 21 22 23   21 22 23 24 25 26 27   18 19 20 21 22 23 24
24 25 26 27 28 29 30   28 29 30 31            25 26 27 28 29 30
31
       October               November               December
Su Mo Tu We Th Fr Sa   Su Mo Tu We Th Fr Sa   Su Mo Tu We Th Fr Sa
                   1          1  2  3  4  5                1  2  3
 2  3  4  5  6  7  8    6  7  8  9 10 11 12    4  5  6  7  8  9 10
 9 10 11 12 13 14 15   13 14 15 16 17 18 19   11 12 13 14 15 16 17
16 17 18 19 20 21 22   20 21 22 23 24 25 26   18 19 20 21 22 23 24
23 24 25 26 27 28 29   27 28 29 30            25 26 27 28 29 30 31
30 31
四、搜索查找指令
(一)find
find [搜索范围][搜索标准] 关键字
-name:按名称查找,支持通配符。
-user:按用户名查找
-size:按文件大小查找
find *.txt 搜索当前目录下,所有的.txt文件
find *e* 搜索当前目录下,所有名称中包含e的那些文件或者目录
find /etc *.txt 搜索/etc目录下所有.txt文件
find /etc -size +5k 搜索/etc目录下所有大于5k的文件
find /etc -size =5k 搜索/etc目录下所有等于5k的文件
find /etc -size -5k 搜索/etc目录下所有小于5k的文件
find /etc -user zhangsan 搜索/etc目录下所有的所有者是zhangsan的文件和目录
[root@localhost opt]# ll
total 20
-rw-r--r--. 1 root root 493 Jan  6 16:20 ret1.txt
-rw-r--r--. 1 root root 436 Jan  6 16:16 ret.txt
drwxr-xr-x. 2 root root   6 Mar 26  2015 rh
-rw-r--r--. 1 root root 436 Jan  6 16:17 t1.txt
-rw-r--r--. 1 root root   5 Jan  6 16:19 t2.txt
drwxr-xr-x. 2 root root  20 Jan  6 15:56 test
drwxr-xr-x. 3 root root  18 Jan  6 16:01 test1
-rw-r--r--. 1 root root  53 Jan  5 17:55 test.txt
[root@localhost opt]# find *.txt
ret1.txt
ret.txt
t1.txt
t2.txt
test.txt
[root@localhost opt]# find *r*
ret1.txt
ret.txt
rh

[root@localhost opt]# find /opt -size -1k
/opt/test/t1.txt
/opt/test1/test/t1.txt
(二)locate
locate:在整棵目录树中搜索文件或者目录,都是根据名称搜索,效率高
locate指令可以快速在整个系统中定位文件路径。locate指令利用事先建立的系统中所有文件名称及路径的locate数据库实现快速定位给定的文件。locate指令无需遍历整个文件系统,查询速度较快。为了保证查询结果的准确度,管理员必须定期更新locate时刻
updatedb,首先执行数据库同步命令(保证数据实时性)
locate 关键字
[root@localhost opt]# updatedb
[root@localhost opt]# locate *.txt
/opt/ret.txt
/opt/ret1.txt
/opt/t1.txt
/opt/t2.txt
/opt/test.txt
/opt/test/t1.txt
/opt/test1/test/t1.txt
(三)grep
grep [选项] 查找的源文件内容
-n:显示匹配行和行号
-i:忽略大小写
说明:grep 过滤查找,管道符,“|”,表示将前一个命令的处理结果输出传递给后面的命令处理
find *.txt|grep new 搜索当前目录下,所有名称包含new的.txt文件
find /etc -size -5k|grep firefox
cat t1.txt|grep beijing
cat t1.txt|grep -ni beijing:-i 忽略大小写,-n 显示行号
ls -al|grep new
[root@localhost opt]# find *.txt|grep ret
ret1.txt
ret.txt

[root@localhost opt]# cat t1.txt|grep shanghai
shanghai
[root@localhost opt]# cat t1.txt|grep -ni shanghai
2:Welcome to Shanghai!
3:shanghai
4:SHangHai
5:Shanghai
6:shangHai

[root@localhost opt]# ls -al|grep ret
-rw-r--r--.  1 root root 493 Jan  6 16:20 ret1.txt
-rw-r--r--.  1 root root 436 Jan  6 16:16 ret.txt
五、压缩,解压
1、gzip 和 gunzip;压缩或者解压单个文件
gzip 文件
压缩文件,将文件压缩为*.gz文件存放在原文件所在目录,压缩成功后会把原文件删除。用于压缩单个文件
gunzip 文件
解压缩文件命令,解压成功后存放在原压缩文件所在目录,并且把原压缩文件删除
gzip ret.txt
gunzip ret.txt.gz
[root@localhost opt]# gzip ret.txt
[root@localhost opt]# ll
total 20
-rw-r--r--. 1 root root 493 Jan  6 16:20 ret1.txt
-rw-r--r--. 1 root root 187 Jan  6 16:16 ret.txt.gz
drwxr-xr-x. 2 root root   6 Mar 26  2015 rh
-rw-r--r--. 1 root root  70 Jan  6 17:01 t1.txt
-rw-r--r--. 1 root root   5 Jan  6 16:19 t2.txt
drwxr-xr-x. 2 root root  20 Jan  6 15:56 test
drwxr-xr-x. 3 root root  18 Jan  6 16:01 test1
-rw-r--r--. 1 root root  53 Jan  5 17:55 test.txt
[root@localhost opt]# gunzip ret.txt.gz
[root@localhost opt]# ll
total 20
-rw-r--r--. 1 root root 493 Jan  6 16:20 ret1.txt
-rw-r--r--. 1 root root 436 Jan  6 16:16 ret.txt
drwxr-xr-x. 2 root root   6 Mar 26  2015 rh
-rw-r--r--. 1 root root  70 Jan  6 17:01 t1.txt
-rw-r--r--. 1 root root   5 Jan  6 16:19 t2.txt
drwxr-xr-x. 2 root root  20 Jan  6 15:56 test
drwxr-xr-x. 3 root root  18 Jan  6 16:01 test1
-rw-r--r--. 1 root root  53 Jan  5 17:55 test.txt
2、zip 和 unzip ;压缩(打包)或者解压多个文件和目录
(1)zip [选项] XX.zip 将要压缩的内容
将指定文件或目录压缩成XXX.zip文件,用于压缩所有文件结构
-r:递归压缩,即压缩目录
[root@localhost opt]# zip test.zip ret1.txt ret.txt t1.txt
  adding: ret1.txt (deflated 65%)
  adding: ret.txt (deflated 63%)
  adding: t1.txt (deflated 26%)
[root@localhost opt]# ll
total 24
-rw-r--r--. 1 root root 493 Jan  6 16:20 ret1.txt
-rw-r--r--. 1 root root 436 Jan  6 16:16 ret.txt
drwxr-xr-x. 2 root root   6 Mar 26  2015 rh
-rw-r--r--. 1 root root  70 Jan  6 17:01 t1.txt
-rw-r--r--. 1 root root   5 Jan  6 16:19 t2.txt
drwxr-xr-x. 2 root root  20 Jan  6 15:56 test
drwxr-xr-x. 3 root root  18 Jan  6 16:01 test1
-rw-r--r--. 1 root root  53 Jan  5 17:55 test.txt
-rw-r--r--. 1 root root 835 Jan  6 18:03 test.zip
(2)unzip [选项] XX.zip
-d 目录:指定解压后文件的存放目录
zip test.zip ret.txt t1.txt test2
unzip test.zip -d test3
[root@localhost opt]# unzip test.zip -d test2
Archive:  test.zip
  inflating: test2/ret1.txt
  inflating: test2/ret.txt
  inflating: test2/t1.txt
3、tar;压缩(打包)或者解压多个文件和目录
tar [选项] XX.tar.gz [打包的内容]
打包或者解压文件
-c:产生.tar.gz打包文件
-v:显示详细信息
-f:指定压缩后的文件名
-z:打包同时压缩
-x:解压.tar.gz文件
-C: 指定解压到哪个目录
tar -zcvf xxx.tar.gz 文件或者目录列表
tar -zxvf xxx.tar.gz -C 解压目录名
[root@localhost opt]# tar -zcvf test.tar.gz ret.txt test.zip test
ret.txt
test.zip
test/
test/t1.txt

[root@localhost opt]# tar -zxvf test.tar.gz -C /opt/test3
ret.txt
test.zip
test/
test/t1.txt
[root@localhost opt]# cd test3
[root@localhost test3]# ll
total 8
-rw-r--r--. 1 root root 436 Jan  6 16:16 ret.txt
drwxr-xr-x. 2 root root  20 Jan  6 15:56 test
-rw-r--r--. 1 root root 835 Jan  6 18:03 test.zip
六、 权限,组,目录,文件
(一)组
1、组
在linux中的每个用户必须属于一个组,不能独立于组外,可以改变用户所属组
在linux中每个文件有所有者、所在的组、其它组,也可以改变文件所在组
2、文件/目录的所有者
一般为文件的创建者,谁创建了该文件,就自然的成为该文件的所有者,默认情况下所有者所在的组也即使文件所在的组
在文件或者目录看来,linux系统中所有的用户分为三类:
(1)所有者:默认情况下,文件或者目录的所有者都是创建者,可以修改
(2)同组用户:跟文件或者目录属于同一个组的用户
(3)其它组用户:既不是文件或者目录的所有者,也不是同组用户
1、查看文件的所有者和所在的组:
ls -l
[root@localhost opt]# ls -l
total 28
-rw-r--r--. 1 root root 493 Jan  6 16:20 ret1.txt
-rw-r--r--. 1 root root 436 Jan  6 16:16 ret.txt
drwxr-xr-x. 2 root root   6 Mar 26  2015 rh
-rw-r--r--. 1 root root  70 Jan  6 17:01 t1.txt
-rw-r--r--. 1 root root   5 Jan  6 16:19 t2.txt
drwxr-xr-x. 2 root root  20 Jan  6 15:56 test
drwxr-xr-x. 3 root root  18 Jan  6 16:01 test1
drwxr-xr-x. 2 root root  51 Jan  6 18:04 test2
drwxr-xr-x. 3 root root  49 Jan  6 18:07 test3
-rw-r--r--. 1 root root 981 Jan  6 18:07 test.tar.gz
-rw-r--r--. 1 root root  53 Jan  5 17:55 test.txt
-rw-r--r--. 1 root root 835 Jan  6 18:03 test.zip
[root@localhost opt]# ls -ahl t1.txt
-rw-r--r--. 1 root root 70 Jan  6 17:01 t1.txt
2、查看文件所有者和所在组
ls –ahl 文件名
(a-all,h-human,l-list)
3、修改文件所有者
chown 新所有者 文件名
chown 新的所有者:新的组 文件名或者目录名
chown zhangsan t1.txt
[root@localhost opt]# chown zhangsan t1.txt
[root@localhost opt]# ll
total 28
-rw-r--r--. 1 root     root 493 Jan  6 16:20 ret1.txt
-rw-r--r--. 1 root     root 436 Jan  6 16:16 ret.txt
drwxr-xr-x. 2 root     root   6 Mar 26  2015 rh
-rw-r--r--. 1 zhangsan root  70 Jan  6 17:01 t1.txt
-rw-r--r--. 1 root     root   5 Jan  6 16:19 t2.txt
drwxr-xr-x. 2 root     root  20 Jan  6 15:56 test
drwxr-xr-x. 3 root     root  18 Jan  6 16:01 test1
drwxr-xr-x. 2 root     root  51 Jan  6 18:04 test2
drwxr-xr-x. 3 root     root  49 Jan  6 18:07 test3
-rw-r--r--. 1 root     root 981 Jan  6 18:07 test.tar.gz
-rw-r--r--. 1 root     root  53 Jan  5 17:55 test.txt
-rw-r--r--. 1 root     root 835 Jan  6 18:03 test.zip
chown -R zhangsan test3 不会改变test3下的文件所有者
[root@localhost opt]# chown -R zhangsan test
[root@localhost opt]# ll
total 28
-rw-r--r--. 1 root     root 493 Jan  6 16:20 ret1.txt
-rw-r--r--. 1 root     root 436 Jan  6 16:16 ret.txt
drwxr-xr-x. 2 root     root   6 Mar 26  2015 rh
-rw-r--r--. 1 zhangsan root  70 Jan  6 17:01 t1.txt
-rw-r--r--. 1 root     root   5 Jan  6 16:19 t2.txt
drwxr-xr-x. 2 zhangsan root  20 Jan  6 15:56 test
drwxr-xr-x. 3 root     root  18 Jan  6 16:01 test1
drwxr-xr-x. 2 root     root  51 Jan  6 18:04 test2
drwxr-xr-x. 3 root     root  49 Jan  6 18:07 test3
-rw-r--r--. 1 root     root 981 Jan  6 18:07 test.tar.gz
-rw-r--r--. 1 root     root  53 Jan  5 17:55 test.txt
-rw-r--r--. 1 root     root 835 Jan  6 18:03 test.zip
chown zhangsan:dev t4.txt
chown zhangsan:dev test2
[root@localhost opt]# chown zhangsan:dev t2.txt
[root@localhost opt]# ll
total 28
-rw-r--r--. 1 root     root 493 Jan  6 16:20 ret1.txt
-rw-r--r--. 1 root     root 436 Jan  6 16:16 ret.txt
drwxr-xr-x. 2 root     root   6 Mar 26  2015 rh
-rw-r--r--. 1 zhangsan root  70 Jan  6 17:01 t1.txt
-rw-r--r--. 1 zhangsan dev    5 Jan  6 16:19 t2.txt
drwxr-xr-x. 2 zhangsan root  20 Jan  6 15:56 test
drwxr-xr-x. 3 root     root  18 Jan  6 16:01 test1
drwxr-xr-x. 2 root     root  51 Jan  6 18:04 test2
drwxr-xr-x. 3 root     root  49 Jan  6 18:07 test3
-rw-r--r--. 1 root     root 981 Jan  6 18:07 test.tar.gz
-rw-r--r--. 1 root     root  53 Jan  5 17:55 test.txt
-rw-r--r--. 1 root     root 835 Jan  6 18:03 test.zip
chown -R zhangsan:dev test2 递归修改目录的所有者和所在的组
[root@localhost opt]# chown -R zhangsan:dev test2
[root@localhost opt]# ll test2
total 12
-rw-r--r--. 1 zhangsan dev 493 Jan  6 16:20 ret1.txt
-rw-r--r--. 1 zhangsan dev 436 Jan  6 16:16 ret.txt
-rw-r--r--. 1 zhangsan dev  70 Jan  6 17:01 t1.txt
4、修改文件所在组
chgrp 新组名 文件名
-R 如果是目录则使其下所有子文件或目录递归生效
chgrp dev t2.txt
chgrp -R dev test3
[root@localhost opt]# chgrp dev2 ret.txt
[root@localhost opt]# ll
total 28
-rw-r--r--. 1 root     root 493 Jan  6 16:20 ret1.txt
-rw-r--r--. 1 root     dev2 436 Jan  6 16:16 ret.txt
drwxr-xr-x. 2 root     root   6 Mar 26  2015 rh
-rw-r--r--. 1 zhangsan root  70 Jan  6 17:01 t1.txt
-rw-r--r--. 1 zhangsan dev    5 Jan  6 16:19 t2.txt
drwxr-xr-x. 2 zhangsan root  20 Jan  6 15:56 test
drwxr-xr-x. 3 root     root  18 Jan  6 16:01 test1
drwxr-xr-x. 2 zhangsan dev   51 Jan  6 18:04 test2
drwxr-xr-x. 3 root     root  49 Jan  6 18:07 test3
-rw-r--r--. 1 root     root 981 Jan  6 18:07 test.tar.gz
-rw-r--r--. 1 root     root  53 Jan  5 17:55 test.txt
-rw-r--r--. 1 root     root 835 Jan  6 18:03 test.zip
[root@localhost opt]# chgrp -R dev2 test3
[root@localhost opt]# ll test3
total 8
-rw-r--r--. 1 root dev2 436 Jan  6 16:16 ret.txt
drwxr-xr-x. 2 root dev2  20 Jan  6 15:56 test
-rw-r--r--. 1 root dev2 835 Jan  6 18:03 test.zip
(二)权限
一个用户至少属于一个组,也可以属于多个组
一个文件或者目录也必须属于一个,并且只能属于一个组
在一个文件或者目录看来,linux系统中所有的用户可以分为三类:
1、所有者
2、同组用户
3、其它组用户
1、文件或者目录的三种权限
在linux中,任何文件或者目录都有三种权限:读(Read)、写(Write)、执行(Execute)
对于文件而言
读:可以读取、查看文件的内容, 比如:cat、more、less、head、tail等
写:可以修改文件的内容,比如:vi或者vim等
执行:如果该文件是可执行文件(.sh),可以直接运行,比如:./xxx.sh
对于目录而言
读:可以读取、查看目录下边的内容,比如:ls等
写:可以修改目录中的内容,创建子目录、删除子目录、创建文件、删除文件、重名文件或者目录
执行:可以进入该目录, 比如:cd等
2、文件或者目录的权限控制
在linux中,任何一个文件或者目录都有三部分权限:所有者权限、同组用户权限、其它组用户权限
第一部分权限:所有者权限,文件或者目录的所有者对该文件所拥有的权限,使用r、w、x分表表示读、写、执行的权限。比如:rwx:拥有读写执行的权限,r-x:拥有读和执行的权限,r--:只拥有读的权限,---:没有任何权限
第二部分权限:同组用户权限,文件或者目录的同组用户对该文件所拥有的权限,使用r、w、x分表表示读、写、执行的权限
第三部分权限:其它组用户权限,文件或者目录的其它组用户对该文件所拥有的权限
使用r、w、x分表表示读、写、执行的权限
3、查看文件或者目录的权限:
ls -aul
4、修改文件或者目录的权限:chmod
用r、w、x分辨表示读、写、执行的权限
用u、g、o、a分别表示给所有者、同组用户、其它组用户、所有用户修改权限
用+、-、=分别表示给指定的用户增加、减少、设置对应的权限
chmod g-w,o+w t5.txt
chmod g=rwx t5.txt
chmod a-r t5.txt
5、使用数字的方式修改文件或者目录的权限
每一个权限可以用一个数字来表示
r、w、x
4、2、1
2^2 2^1 2^0
每一个文件或者目录都有三部分权限,每一部分权限都可以用一组数据之和来表示,三部分权限就是一组三个数据序列
chmod 777 t5.txt
chmod 753 t5.txt
https://blog.csdn.net/qq_55660421/article/details/123867265 【Linux】文件权限一共10位长度,分成四段,第三段表示的内容是什么
https://blog.csdn.net/liuskyter/article/details/120697488 linux权限数字详解
drwxr-xr-x
d :第一段,表示文件类型(文件?目录)
rwx: 第二段,文件所有者权限
r-x:第三段,文件所有者所在组权限
r-x:第四段,其他用户权限
Linux用户分为:拥有者、组群(Group)、其他(other) linux中的文件属性过分四段,如-rwzrwz--- 第一段-是指文件类型表示这是个普通文件 文件类型部分 -为:表示文件 d为:表示文件夹 l为:表示链接文件,可以理解为windows中的快捷方式(linkfile) b为:表示里面可以供存储周边设备 c为:表示里面为一次性读取装置 第二段rwz是指拥有者具有可读可写可执行的权限 类似于windows中的所有者权限比如administrator对文件具有修改、读取和执行权限 第三段rwz是指所属于这个组的成员对于这个文件具有,可读可写可执行的权限 类似于windows中的组权限比如administrators组,属于这个组的成员对于文件的都有可读可写可执行权限 第四段---是指其他人对于这个文件没有任何权限
1-3位数字代表文件所有者的权限
4-6位数字代表同组用户的权限
7-9数字代表其他用户的权限
读取权限:等于4 用 r 表示
写入权限:等于2 用 w 表示
执行权限:等于1 用 x 表示
七、网络管理
在linux的配置文件:
vi /etc/sysconfig/network-scripts/ifcfg-ens33
BOOTPROTO="static"
ONBOOT="yes"
IPADDR=192.168.130.128
GATEWAY=192.168.130.2
DNS=192.168.130.2
重启linux: reboot
八、服务进程
1、查看正在运行的进程:ps
ps  //只会显示应用进程
ps -e //显示所有进程
ps -ef //以全格式的形式显示所有进程

/用于查看linux系统中某一些软件或者应用是否处于启动状态
ps -ef|grep mysql
2、关闭进程:
使用ps命令查看进程的PID
使用命令kill -9 PID
九、软件安装包
(一)RPM包
RPM是一种用于互联网下载包的打包及安装工具,它包含在某些Linux分发版中。它生成具有.RPM扩展名的文件。RPM是RedHat Package Manager(RedHat软件包管理工具)的缩写,类似windows的setup.exe
rpm –qa :查询所安装的所有软件包
rpm –qa|more:分页查询所安装的所有软件包
rmp –qa|grep xxx:过滤查询安装的指定软件包
rpm –e 选项 软件包名称

选项说明:

         --nodeps 表示强制删除,用于被删除的软件包有依赖的情况
rpm 选项 RPM包全路径名
选项说明:
-i=install 安装
-v=verbose 提示
-h=hash 进度条
1、在目录/run/media/root/CentOS 7 x86_64/Packages下找到firefox安装包:
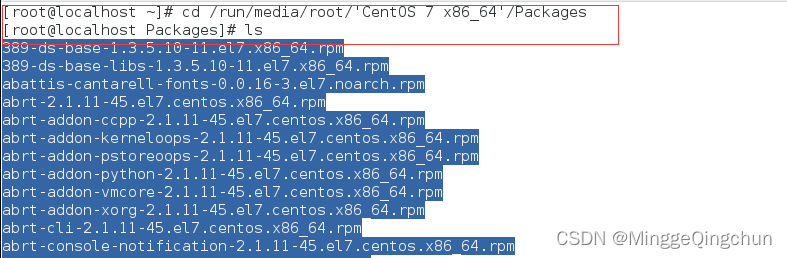
2、拷贝安装包到/opt目录下

3、安装firefox

(二)YUM包
Yum 是一个Shell前端软件包管理器。基于RPM包管理,能够从指定的服务器(在公网上)自动下载RPM包并且安装,可以自动处理依赖性关系,并且一次安装所有依赖的软件包
yum list[ installed]|grep xx
功能描述:查询YUM服务器上的[已经安装到本地的]软件包
yum install 包名
下载安装
YUM包的卸载:yum remove firefox.x86_64十、搭建JAVAEE开发环境
(一)安装JDK
1、先将软件 上传到/opt 下
2、解压缩到/opt目录下

3、配置环境变量的配置文件vim /etc/profile
JAVA_HOME=/opt/jdk1.8.0_121

PATH=$JAVA_HOME/bin:$PATH

CLASSPATH=$JAVA_HOME/lib:.

export JAVA_HOME PATH CLASSPATH
4、使配置文件生效
![]()
5、测试安装成功

6、在目录/home/zhangsan下编写HelloWorld.java编译并运行

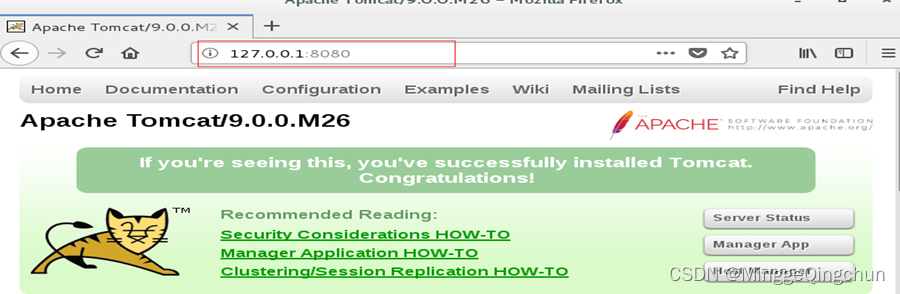
(二)安装Tomcat
1、先将软件上传到/opt 下
2、解压到/opt

3、启动tomcat

4、Linux上访问tomcat
5、windows上访问tomcat

注意:从其它机器上访问需要关闭linux的防火墙