Hello,大家好,这里是在宿舍呆着,避免成为小阳人的GIS宇宙。要说WebGIS比较火的库当初Cesium.js了,基于二维三维地图展示,结合Threejs可以做一些炫酷的特效,常用于智慧城市比如智慧水利、智慧政务等等啊,经常是搭配大屏可视化一起来做,本期呢就带着大家从0开始做一个Cesium的小项目
项目效果
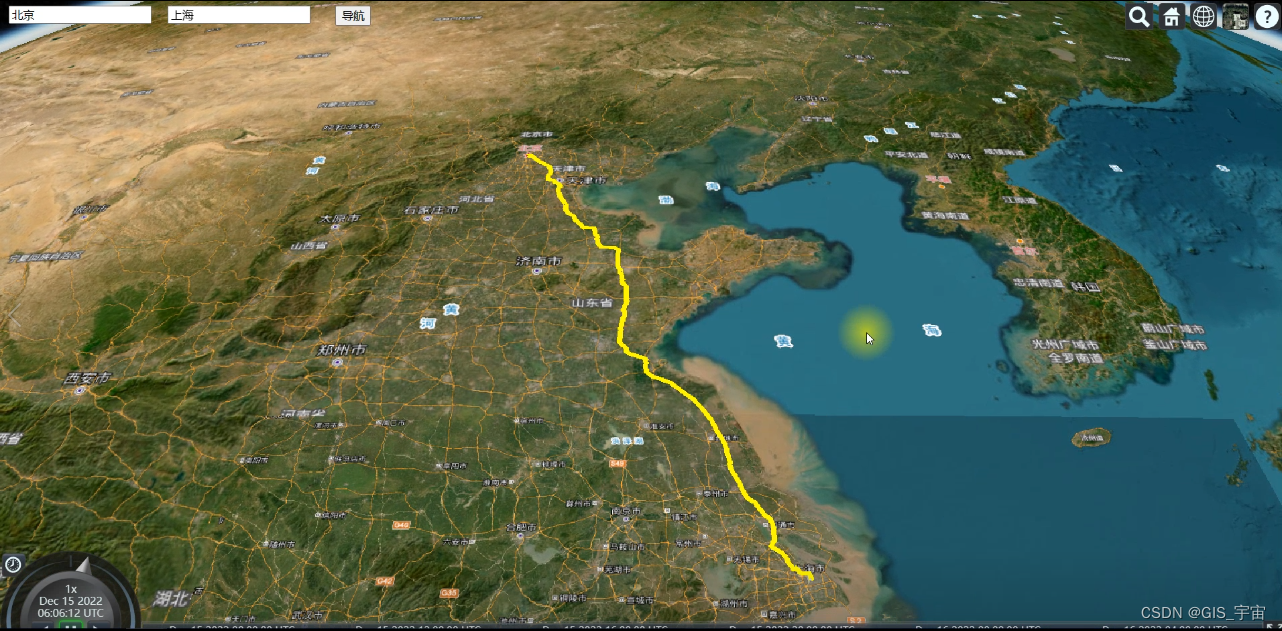
我们今天要实现的是一个路径规划的功能,有两个输入框。输入起点终点,然后查询,得到规划的路径,效果如下:

我们会用到以下库:
-
Axios:用于发送请求,请求高德地图的地理编码API
-
Jquery:也用于发送请求
-
Cesium:地图框架
-
Vue:前端框架
前期准备
路径规划目前我们没有路网数据,所以自己做不了(后面可以出一期),因此我们可以请求百度地图的api,但前提是我们有起点和终点的经纬度,没有人会用经纬度来导航吧?因此我们还需要进行地理编码,把中文转化具体的地理位置(经纬度),这里我们用了高德的api,最后我们地图需要切片数据,默认会用Cesium自带的资源,因此也要注册一个cesium的账号,来获取token,如果用了自己的底图资源也可不用,为了演示的方便,我们还是申请一下,因为cesium还是自带了很多的资源,便于后期的学习。
- 注册Cesium.ion获取token
- 注册高德地图Api,获取key
- 注册百度地图Api,获取key
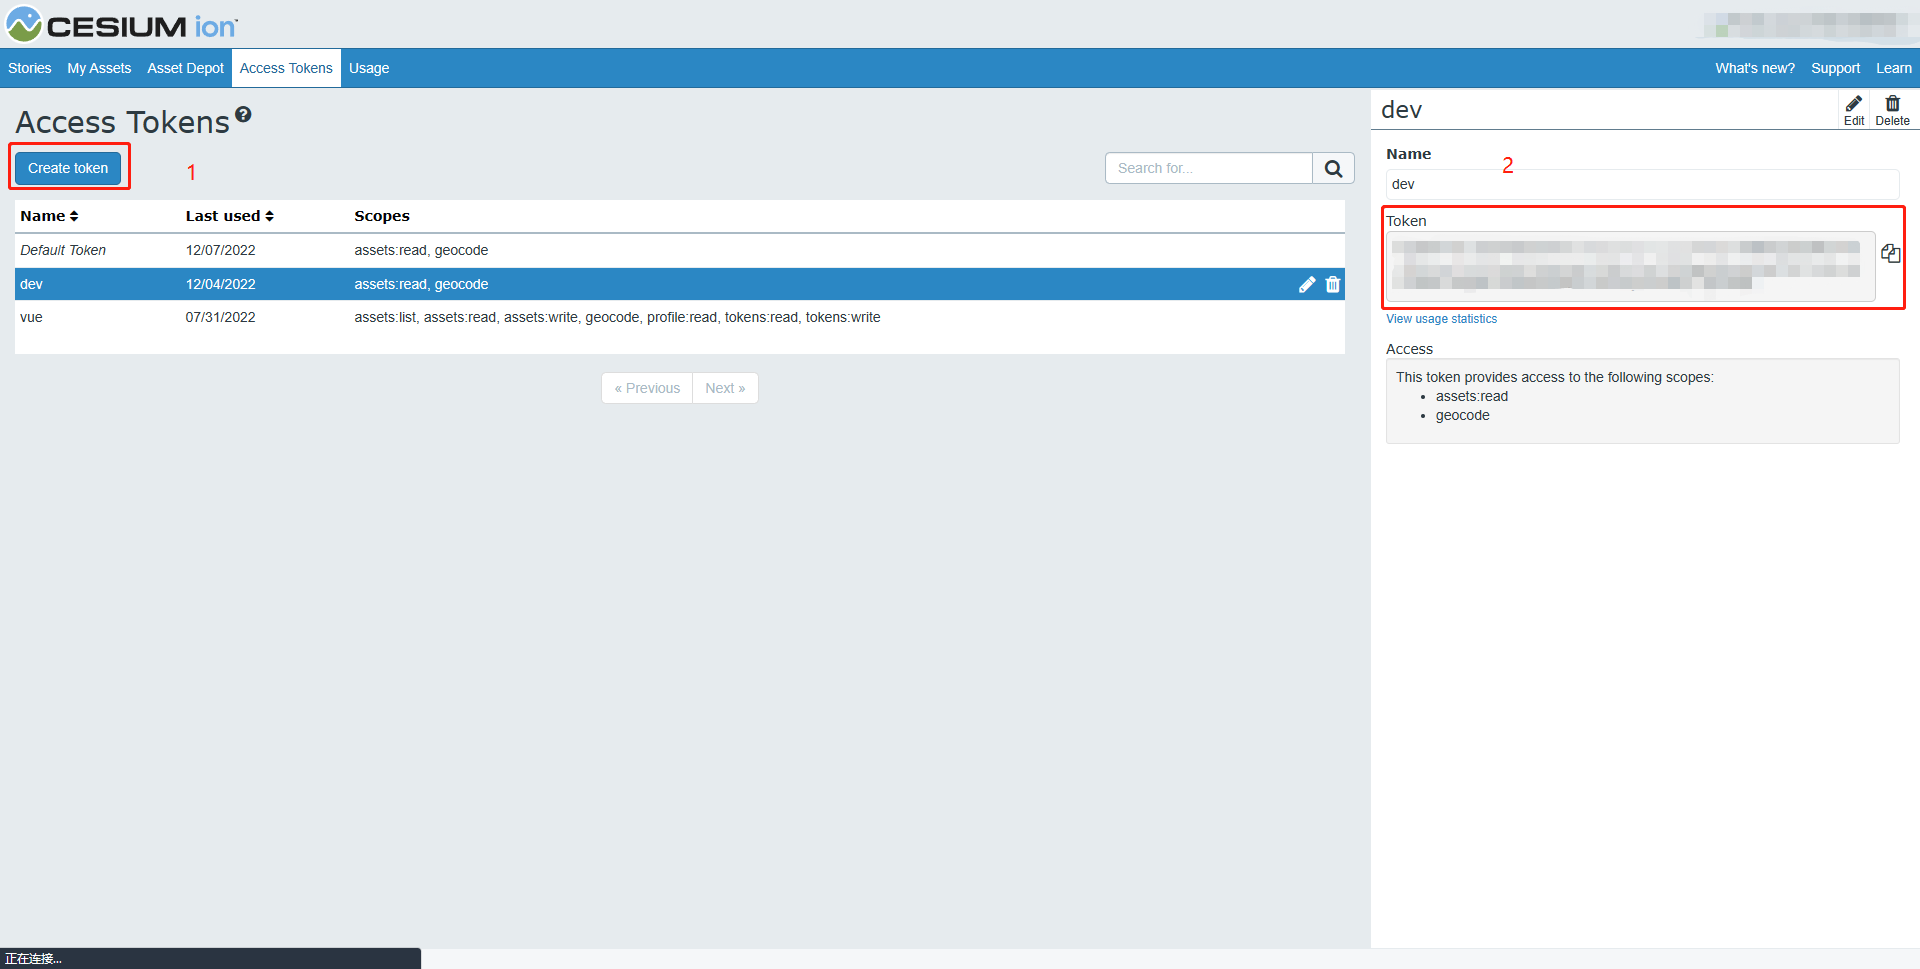
注册cesium ion
Access Tokens | Cesium ion,注册后获取token:

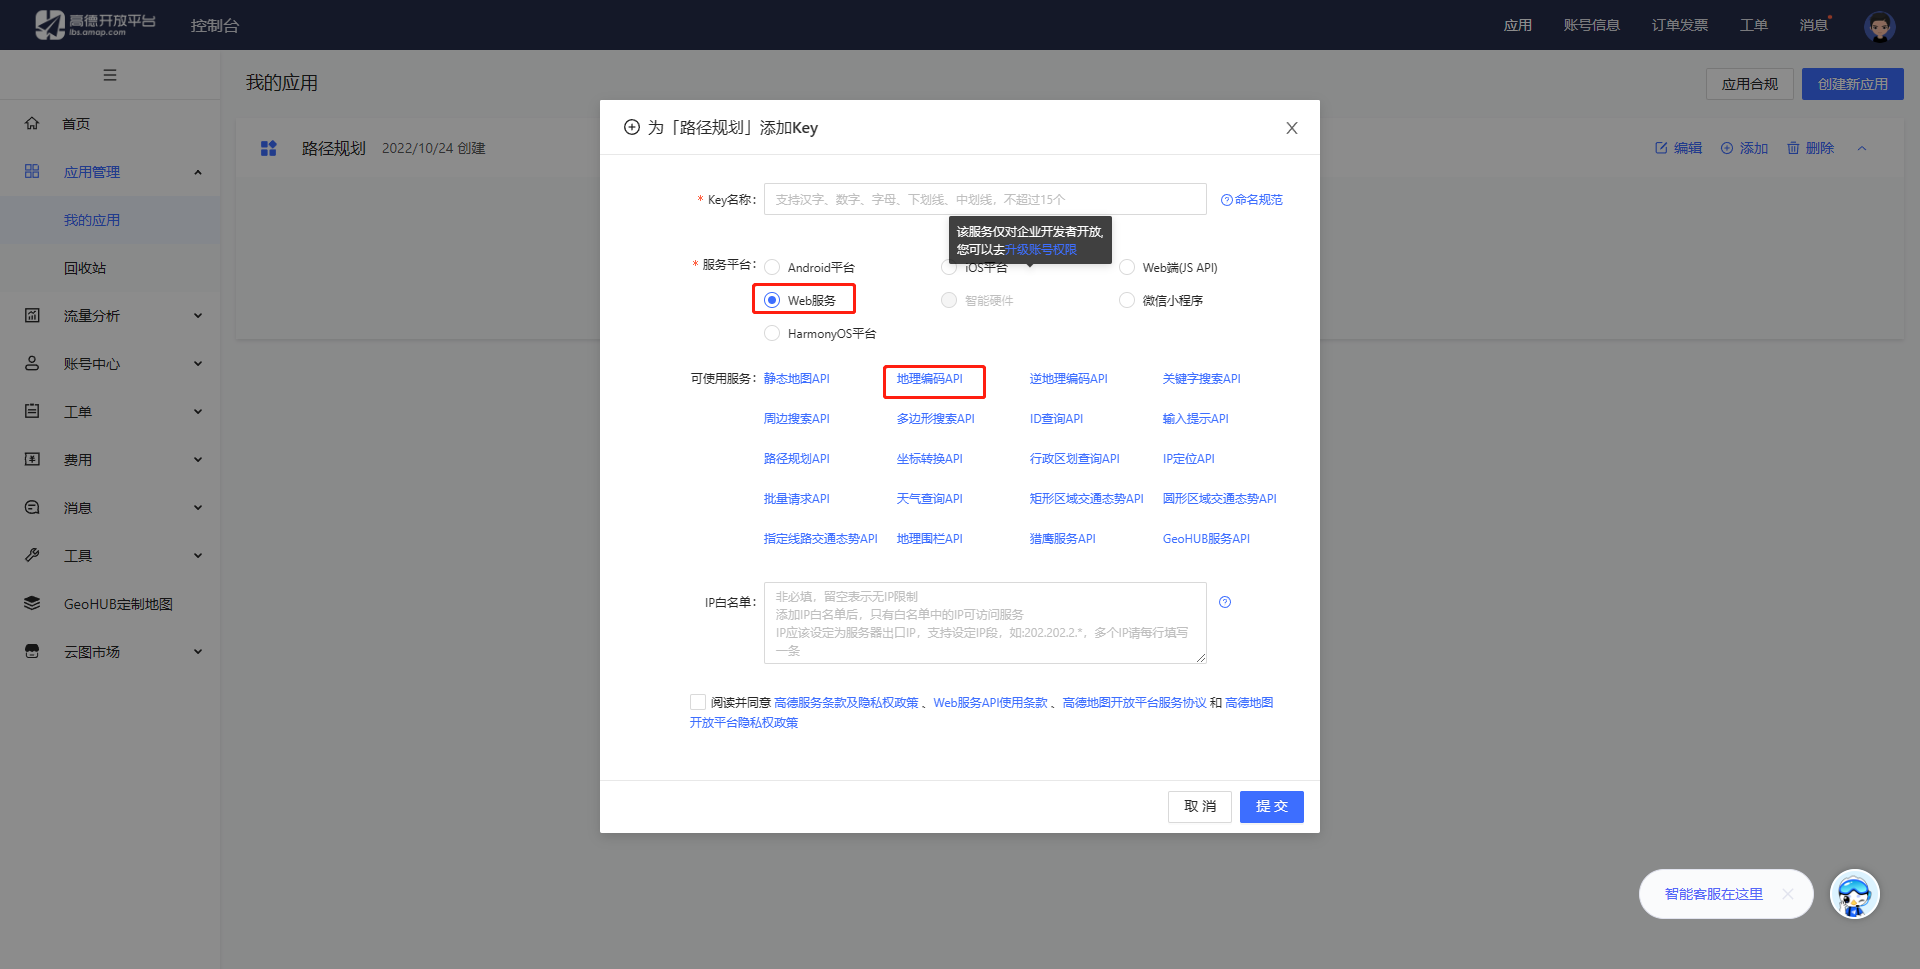
注册高德地图API
记得选择Web服务,里面是包括地理编码api的,然后会给你个key
注册百度地图API
注意下选择服务端就行,里面服务包括了路径规划,之所以用百度而不用高德是因为,高德的路径规划返回的没有经纬度,后面就没办法绘制线段了。

代码时间
1. 项目结构:
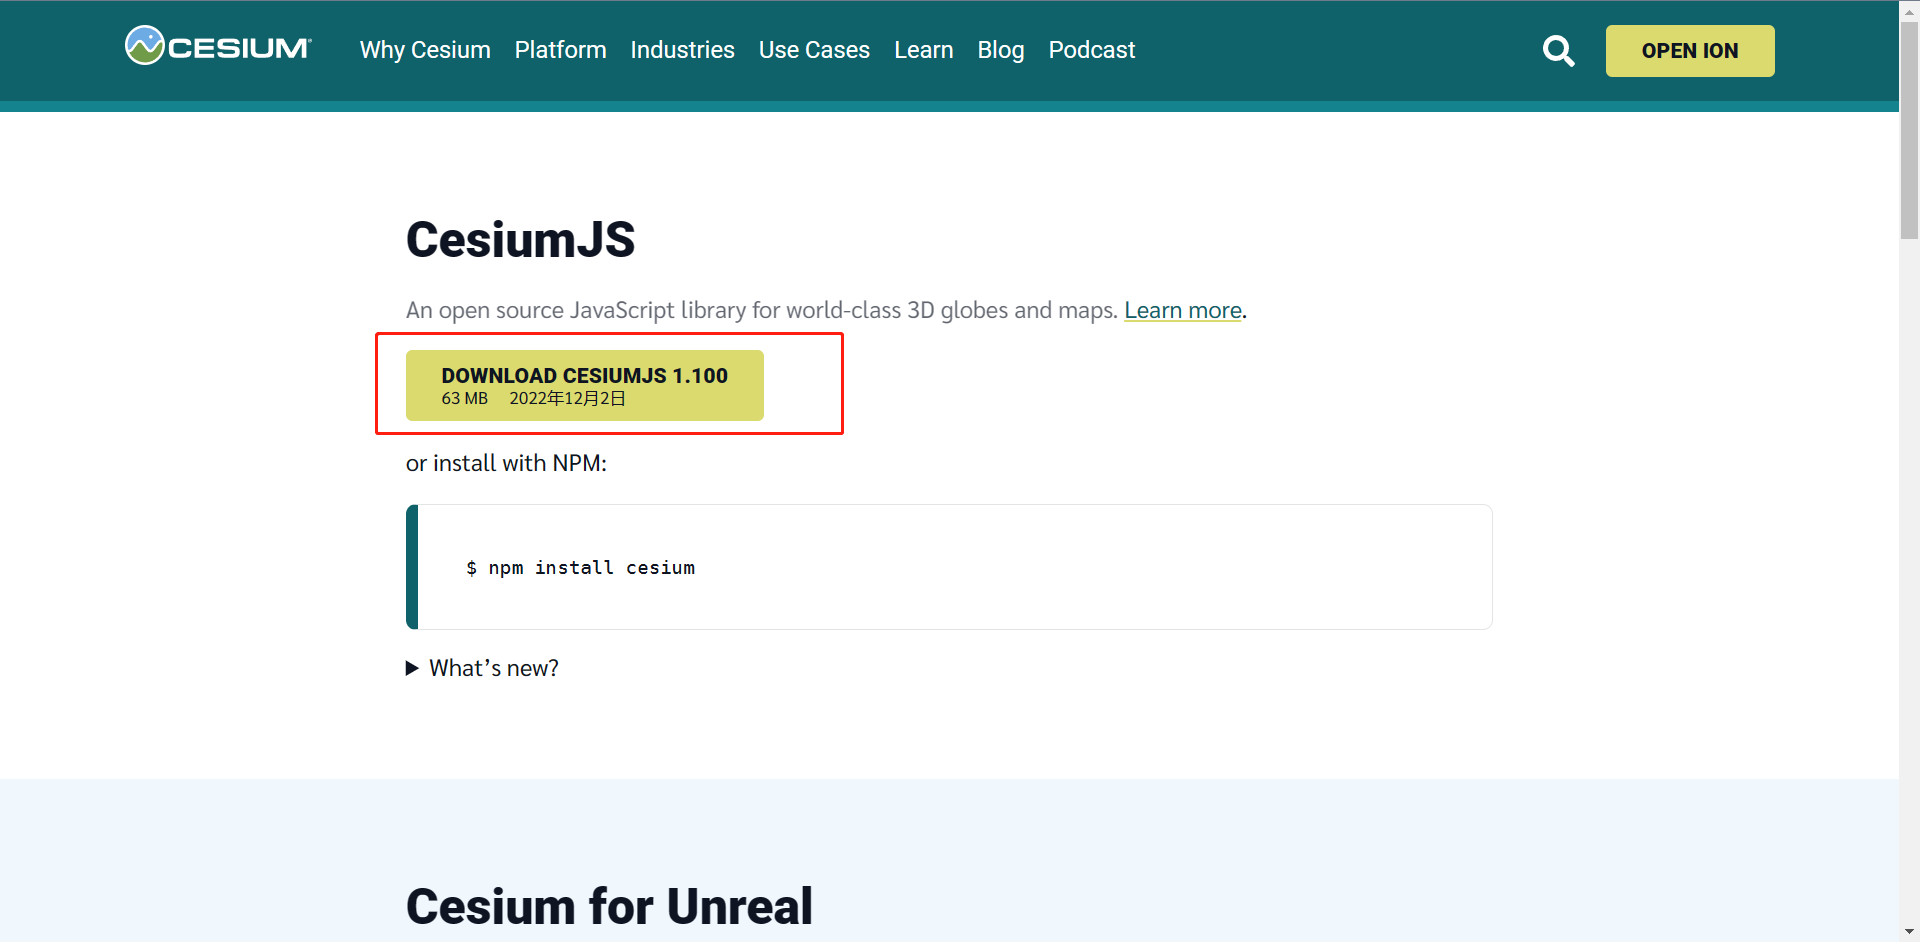
一个Demo.html文件和public文件夹(里面放置cesium下载的内容:)

下载cesium库Downloads – Cesium,并放在public文件夹中
2. Html引用我们文件
<!DOCTYPE html>
<html lang="en">

<head>
  <meta charset="utf-8">
  <meta http-equiv="X-UA-Compatible" content="IE=edge">
  <meta name="viewport"
    content="width=device-width, initial-scale=1, maximum-scale=1, minimum-scale=1, user-scalable=no">
  <title>Hello World!</title>
<!-- 引入jquery、cesium、axios、vue. -->
  <script src="public/Cesium-1.100/Build/Cesium/Cesium.js"></script>
  <script src="https://cdn.jsdelivr.net/npm/axios/dist/axios.min.js"></script>
  <script src="https://unpkg.com/vue@3/dist/vue.global.js"></script>
  <script src="http://ajax.aspnetcdn.com/ajax/jQuery/jquery-1.8.0.js"></script>
  <style>
<!-- 引入cesium的css文件. -->
    @import url(public/Cesium-1.100/Build/Cesium/Widgets/widgets.css);

    html,
    body,
    #cesiumContainer {


      width: 100%;
      height: 100%;
      margin: 0;
      padding: 0;
      overflow: hidden;
    }

    #input1 {


      position: absolute;
      top: 10px;
      left: 10px;
    }

    #input2 {


      position: absolute;
      top: 10px;
      left: 200px;
    }

    #navibutton {


      position: absolute;
      top: 10px;
      left: 400px;
    }
  </style>
</head>

<body>
<!-- id为app的div作为vue可操作的容器. -->
  <div id="app">
<!-- id为cesiumContainer的div作为地图的容器. -->
    <div id="cesiumContainer"></div>
<!-- 在vue中通过@click给按钮绑定点击事件函数. -->
    <button id="navibutton" @click="search">导航</button>
<!-- 在vue中通过v-model给输入框绑定响应式的变量,这个变量在data里申明. -->
    <input id="input1" v-model="input1" placeholder="请输入起点地点名称">
    <input id="input2" v-model="input2" placeholder="请输入终点地点名称">
  </div>

</body>

</html>
3. 使用vue管理页面
我们看看这段代码,首先我们通过解析赋值,从vue中获取了createApp函数,这个函数是承载了所有我们后面的操作,并通过mount绑定了id为app的元素,因为要做到响应式,其实vue是通过虚拟dom来对app元素里面的内容进行操作,比如响应式更新我们的input,新建元素等等。
    const {

     createApp } = Vue
    var viewer,
    cesiumKey = '这里写你自己申请的token',
    aMapKey = '这里写你自己申请的key'',
    baiduKey = '这里写你自己申请的key'
    createApp({


      data() {


        return {


          input1: '北京',
          input2: '上海',
        }
      },
    }).mount('#app')
在vue中,我们所有的函数都写在methods里面,如下所示:
我们写了一个createMap函数,初始化了一个cesium地图,并在mounted里面用this.createMap()调用,因为vue的生命周期mounted里才会获取到dom,更多可以去了解一下vue的生命周期。
    createApp({


      data() {


        return {


          input1: '北京',
          input2: '上海',
        }
      },
      methods: {


        createMap() {


          Cesium.Ion.defaultAccessToken = cesiumKey;
	// 传入id,初始化地图
          viewer = new Cesium.Viewer('cesiumContainer', {


            infoBox: false,
            imageryProvider: new Cesium.UrlTemplateImageryProvider({

     url: " http://webrd02.is.autonavi.com/appmaptile? lang=zh_cn&size = 1&scale = 1&style = 8&x = {x} &y = {y} &z ={z} ", })
          });
          viewer.bottomContainer.style.display = "none";//隐藏bottomContainer
          var imageList = viewer.baseLayerPicker.viewModel.imageryProviderViewModels;
          //使用第4个(索引为3,内容为ESRI世界影像)imageryProvider作为默认的地形数据提供者
          //以免使用默认的BING服务,有时刷不出图像的情况
          viewer.baseLayerPicker.viewModel.selectedImagery = imageList[3];
          //加入中文注记
          //增加一个图层:天地图全球影像中文注记服务
          var imageLabelCn = new Cesium.ImageryLayer(new Cesium.WebMapTileServiceImageryProvider({


            url: 'http://t0.tianditu.com/cia_w/wmts?tk=a2ca005a710864da5d797e35e0f45b3b',
            layer: 'cia',
            style: 'default',
            format: 'tiles',
            tileMatrixSetID: 'w',
            maximumLevel: 18
          }));
          viewer.scene.imageryLayers.add(imageLabelCn);
          viewer.camera.setView({


            destination: Cesium.Cartesian3.fromDegrees(110, 30, 15000000.0), // 设置位置
            orientation: {


              heading: Cesium.Math.toRadians(0.0), // 方向
              pitch: Cesium.Math.toRadians(-90.0),// 倾斜角度
              roll: 0
            }
          });
        },
      mounted() {


        this.createMap()
      },
    }).mount('#app')
4. 地理编码
使用axios.js请求高德地图的地理编码,获取文本位置的经纬度坐标
        async getAddress(loc) {


          const response = await axios.get(`https://restapi.amap.com/v3/geocode/geo?address=${

      loc}&key=${

      aMapKey}`)
          return response.data.geocodes[0].location
        },
        async getRoad(loc, loc2) {


          const response = await axios.get(`https://restapi.amap.com/v3/direction/driving?origin=${

      loc}&destination=${

      loc2}&key=${

      aMapKey}`)
          return response
        },
5. 路径规划
getJsonpPosition函数是根据起点终点的经纬度进行路径规划,并以jsonp的格式返回,这种方法可以解决百度地图api跨域的问题
然后当点击按钮的时候会调用search函数,获取input的值,然后地理编码变成经纬度,再调用getJsonpPosition获取到线段的经纬度数组,最后用createpolyline绘制路径。
        getJsonpPosition(start, end) {


          $.ajax(
            {


              url: `https://api.map.baidu.com/direction/v2/driving?origin=${

      start}&destination=${

      end}&ak=${

      baiduKey}`,//GET请求
              type: "get",
              dataType: "jsonp",
              async: false,
              jsonp: "callback",//传递给请求处理程序或页面的,用以获得jsonp回调函数名的参数名(一般默认为:callback)
              success: (response) => {


                console.log(response);
                let resArr = []
                if (response.status == 0) {


                  const res = response.result.routes[0].steps.map((item) => {


                    const stringArr = item.path.split(';')
                    stringArr.map((x) => {


                      numArr = x.split(',')
                      resArr.push(...numArr)
                    })
                  })
                  resArr = resArr.map((item) => {


                    return Number(item)
                  })
                  console.log(resArr)
                  this.createpolyline(resArr, viewer)
                }
              }
            }
          )
        },
        async search() {


          console.log(this.input1, this.input2,)
          if (this.input1 == '' || this.input2 == '') {


            alert('输入框不能为空!')
            return
          }
          const data = await this.getAddress(this.input1)
          const data2 = await this.getAddress(this.input2)
          const data_1 = data.split(',')
          const data_2 = data2.split(',')
          data_1.reverse()
          const data_string1 = data_1.join(',')
          data_2.reverse()
          const data_string2 = data_2.join(',')
          console.log(data_string1, data_string2,)
          this.getJsonpPosition(data_string1, data_string2)
        },
        createpolyline(positons, viewer, color = "#ff0") {


          const polyline = viewer.entities.add({


            polyline: {


              positions: Cesium.Cartesian3.fromDegreesArray(positons),
              clampToGround: true,
              width: 6,
              material: Cesium.Color.fromCssColorString(color),
              clampToGround: true
            }
          });
	// 视图定位到线段
          viewer.flyTo(polyline)
          return polyline;
        },
总结
这个项目其实还有很多完善的地方,比如点击按钮发送请求有一段时间,应该加一个loading的动效,界面过于朴素等等。
代码我已经上传到Gitte:https://gitee.com/z129812/cesium_search
这里是GIS宇宙我们下期再见