前言
注意!该文章的所有数据库相关操作需要用户自行实现!
数据库:
-- 创建数据库
drop database if exists mycnblog;
create database mycnblog DEFAULT CHARACTER SET utf8mb4;
-- 使用数据数据
use mycnblog;
-- 创建表[用户表]
drop table if exists userinfo;
create table userinfo(
id int primary key auto_increment,
username varchar(100) not null,
password varchar(32) not null,
photo varchar(500) default '',
createtime datetime default now(),
updatetime datetime default now(),
`state` int default 1
) default charset 'utf8mb4';
-- 添加一个用户信息
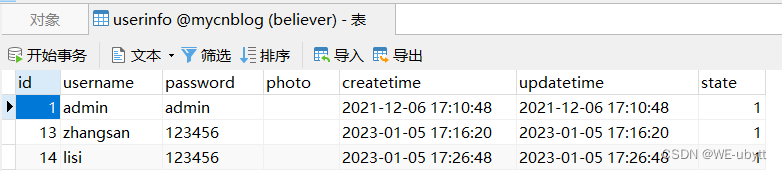
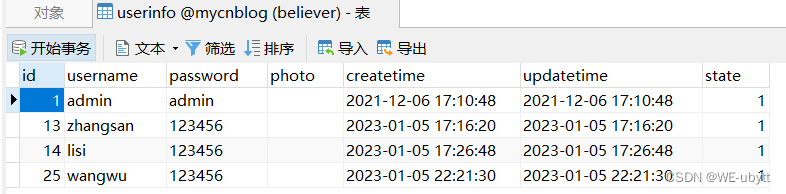
INSERT INTO `mycnblog`.`userinfo` (`id`, `username`, `password`, `photo`, `createtime`, `updatetime`, `state`) VALUES
(1, 'admin', 'admin', '', '2021-12-06 17:10:48', '2021-12-06 17:10:48', 1);
UserInfo:
package com.example.demo.model;

import lombok.Data;

import java.util.Date;

/**
 * 用户信息
 * 普通的实体类,用于 MyBatis 做数据库表(userinfo)的映射
 * 注意事项:标准类属性名称和 userinfo 表的字段完全一致()。
 */
@Data
public class UserInfo {


    /**
     * 用户id
     */
    private Integer id;
    /**
     * 用户名
     */
    private String username;
    /**
     * 密码
     */
    private String password;
    /**
     * 电话号码
     */
    private String photo;
    /**
     * 创建时间
     */
    private Date createTime;
    /**
     * 修改时间
     */
    private Date updateTime;
    /**
     * 状态
     */
    private Integer state;
    /**
     * 文章
     */
    private String title;
}
UserInfoMapper:
package com.example.demo.mapper;

import com.example.demo.model.UserInfo;
import org.apache.ibatis.annotations.Mapper;
import org.apache.ibatis.annotations.Param;

import java.util.List;

/**
 * 使用 @Mapper,让接口变为 mybatis 的接口,不可忽略
 */
@Mapper
public interface UserInfoMapper {


    /**
     * 查询所有的信息
     * @return
     */
    public List<UserInfo> getAll();

    /**
     * 查询所有的信息(根据排序条件进行排序)
     * @param order
     * @return
     */
    public List<UserInfo> getAllByOrder(@Param("order")String order);

    /**
     * 根据id查询
     * @param id
     * @return
     */
    public UserInfo getUserById(@Param("id")Integer id);

    /**
     * 根据用户名查询
     * @param username
     * @return
     */
    public UserInfo getUserByName(@Param("username")String username);

    /**
     * 用户登录
     * @param username
     * @param password
     * @return
     */
    public UserInfo login(@Param("username")String username,
                          @Param("password")String password);

    /**
     * 多条用户的删除
     * @param ids
     * @return
     */
    public Integer delByIds(List<Integer> ids);

    /**
     * 查询用户的所有文章
     * @param id
     * @return
     */
    public List<UserInfo> getArticleListByUid(@Param("id")Integer id);

    /**
     * 增加用户
     * @param username
     * @param password
     * @param photo
     * @return
     */
    public Integer add(@Param("username")String username,
                       @Param("password")String password,
                       @Param("photo")String photo);
}
UserInfoMapper.xml:
<?xml version="1.0" encoding="UTF-8"?>
<!DOCTYPE mapper PUBLIC "-//mybatis.org//DTD Mapper 3.0//EN" "http://mybatis.org/dtd/mybatis-3-mapper.dtd">
<mapper namespace="com.example.demo.mapper.UserInfoMapper">
    <resultMap id="BashMap" type="com.example.demo.model.UserInfo">
        <id column="id" property="id"></id>
        <result column="username" property="username"></result>
        <result column="password" property="password"></result>
        <result column="photo" property="photo"></result>
        <result column="createTime" property="createTime"></result>
        <result column="updateTime" property="updateTime"></result>
        <result column="state" property="state"></result>
    </resultMap>

    <select id="getAll" resultMap="BashMap">
        select *
        from userinfo
    </select>

    <select id="getAllByOrder" resultType="com.example.demo.model.UserInfo">
        select *
        from userinfo
        order by id ${order}
    </select>

    <select id="getUserById" resultType="com.example.demo.model.UserInfo">
        select *
        from userinfo
        where id = #{id}
    </select>

    <select id="getUserByName" resultType="com.example.demo.model.UserInfo">
        select * from userinfo
        <where>
            <if test="username!=null">
                and username = #{username}
            </if>
        </where>
    </select>

    <select id="login" resultType="com.example.demo.model.UserInfo">
        select *
        from userinfo
        where username = #{username}
          and password = #{password}
    </select>

    <delete id="delByIds">
        delete from userinfo where id in
        <foreach collection="ids" item="id" open="(" close=")" separator=",">
            #{id}
        </foreach>
    </delete>

    <select id="getArticleListByUid" resultType="com.example.demo.model.UserInfo">
        select u.*, a.title as title
        from userinfo u
                 left join articleinfo a
                           on u.id = a.uid
        where u.id = #{id}
    </select>

    <insert id="add">
        insert into userinfo
        <trim prefix="(" suffix=")" suffixOverrides=",">
            <if test="username!=null">
                username,
            </if>
            <if test="password!=null">
                password,
            </if>
            <if test="photo!=null">
                photo,
            </if>
        </trim>
        values
        <trim prefix="(" suffix=")" suffixOverrides=",">
            <if test="username!=null">
                #{username},
            </if>
            <if test="password!=null">
                #{password},
            </if>
            <if test="photo!=null">
                #{photo},
            </if>
        </trim>
    </insert>
</mapper>
一、Spring 中事务的实现
Spring 中的事务操作分为两类:
- 编程式事务(⼿动写代码操作事务)。
- 声明式事务(利⽤注解⾃动开启和提交事务)。
我们先来回顾一下 MySQL 中事务的使用吧:
1、MySQL 中的事务使用
事务在 MySQL 有 3 个重要的操作(开启事务、提交事务、回滚事务):
-- 开启事务
start transaction;
-- 业务执⾏
-- 提交事务
commit;
-- 回滚事务
rollback;
2、Spring 编程式事务(了解)
Spring ⼿动操作事务和上⾯ MySQL 操作事务类似,它也是有 3 个重要操作步骤:

- 开启事务(获取事务)。
- 提交事务。
- 回滚事务。
SpringBoot 内置了两个对象,DataSourceTransactionManager ⽤来获取事务(开启事务)、提交或回滚事务的,而 TransactionDefinition 是事务的属性,在获取事务的时候需要将 TransactionDefinition 传递进去从⽽获得⼀个事务 TransactionStatus:
package com.example.demo.controller;

import com.example.demo.service.UserInfoService;
import org.springframework.beans.factory.annotation.Autowired;
import org.springframework.jdbc.datasource.DataSourceTransactionManager;
import org.springframework.transaction.TransactionDefinition;
import org.springframework.transaction.TransactionStatus;
import org.springframework.util.StringUtils;
import org.springframework.web.bind.annotation.RequestMapping;
import org.springframework.web.bind.annotation.RestController;

@RestController
@RequestMapping("/user")
public class UserController {


    @Autowired
    private UserInfoService userInfoService;
    @Autowired
    private DataSourceTransactionManager dataSourceTransactionManager;
    @Autowired
    private TransactionDefinition transactionDefinition;

    @RequestMapping("/add")
    public int add(String username, String password) {


        // 非空效验
        if(!StringUtils.hasLength(username)||!StringUtils.hasLength(password)){


            return 0;
        }
        // 事务
        TransactionStatus transactionStatus =
                dataSourceTransactionManager.getTransaction(transactionDefinition);
        int result = userInfoService.add(username, password, null);
        System.out.println("增加影响行数:"+result);
        // 提交事务 or 回滚事务
        dataSourceTransactionManager.rollback(transactionStatus);
        return result;
    }
}
但这样操作过于繁琐,实际上 声明式事务 更加简洁:
3、Spring 声明式事务(自动)
在需要的⽅法上添加 @Transactional 注解就可以实现 声明式事务:
package com.example.demo.controller;

import com.example.demo.service.UserInfoService;
import org.springframework.beans.factory.annotation.Autowired;
import org.springframework.jdbc.datasource.DataSourceTransactionManager;
import org.springframework.transaction.TransactionDefinition;
import org.springframework.transaction.TransactionStatus;
import org.springframework.transaction.annotation.Transactional;
import org.springframework.util.StringUtils;
import org.springframework.web.bind.annotation.RequestMapping;
import org.springframework.web.bind.annotation.RestController;

@RestController
@RequestMapping("/user")
public class UserController {


    @Autowired
    private UserInfoService userInfoService;

    @RequestMapping("/add2")
    @Transactional
    public int add2(String username, String password) {


        // 非空效验
        if(!StringUtils.hasLength(username)||!StringUtils.hasLength(password)){


            return 0;
        }
        int result = userInfoService.add(username, password, null);
        System.out.println("增加影响行数:"+result);
        return result;
    }
}
声明式事务执行流程:
- 方法执行之前先开启事务,当方法成功执行完成后,会自动提交事务;
- 但是如果执行过程中发生了异常,那么事务会自动回滚。
package com.example.demo.controller;

import com.example.demo.service.UserInfoService;
import org.springframework.beans.factory.annotation.Autowired;
import org.springframework.jdbc.datasource.DataSourceTransactionManager;
import org.springframework.transaction.TransactionDefinition;
import org.springframework.transaction.TransactionStatus;
import org.springframework.transaction.annotation.Transactional;
import org.springframework.util.StringUtils;
import org.springframework.web.bind.annotation.RequestMapping;
import org.springframework.web.bind.annotation.RestController;

@RestController
@RequestMapping("/user")
public class UserController {


    @Autowired
    private UserInfoService userInfoService;

    @RequestMapping("/add2")
    @Transactional
    public int add2(String username, String password) {


        // 非空效验
        if (!StringUtils.hasLength(username) || !StringUtils.hasLength(password)) {


            return 0;
        }
        int result = userInfoService.add(username, password, null);
        System.out.println("增加影响行数:" + result);
        int num = 10 / 0;
        return result;
    }
}
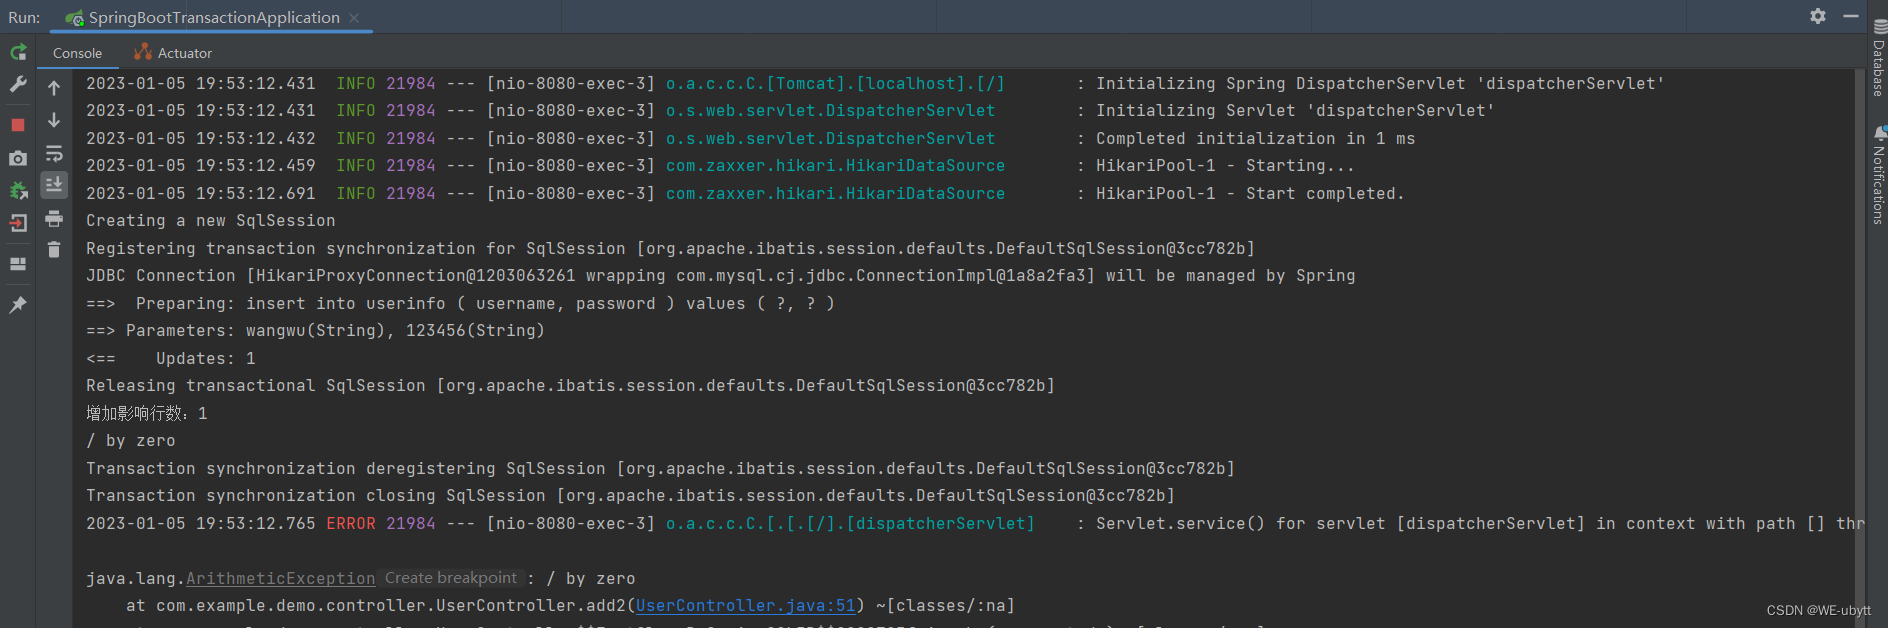
运行结果为:
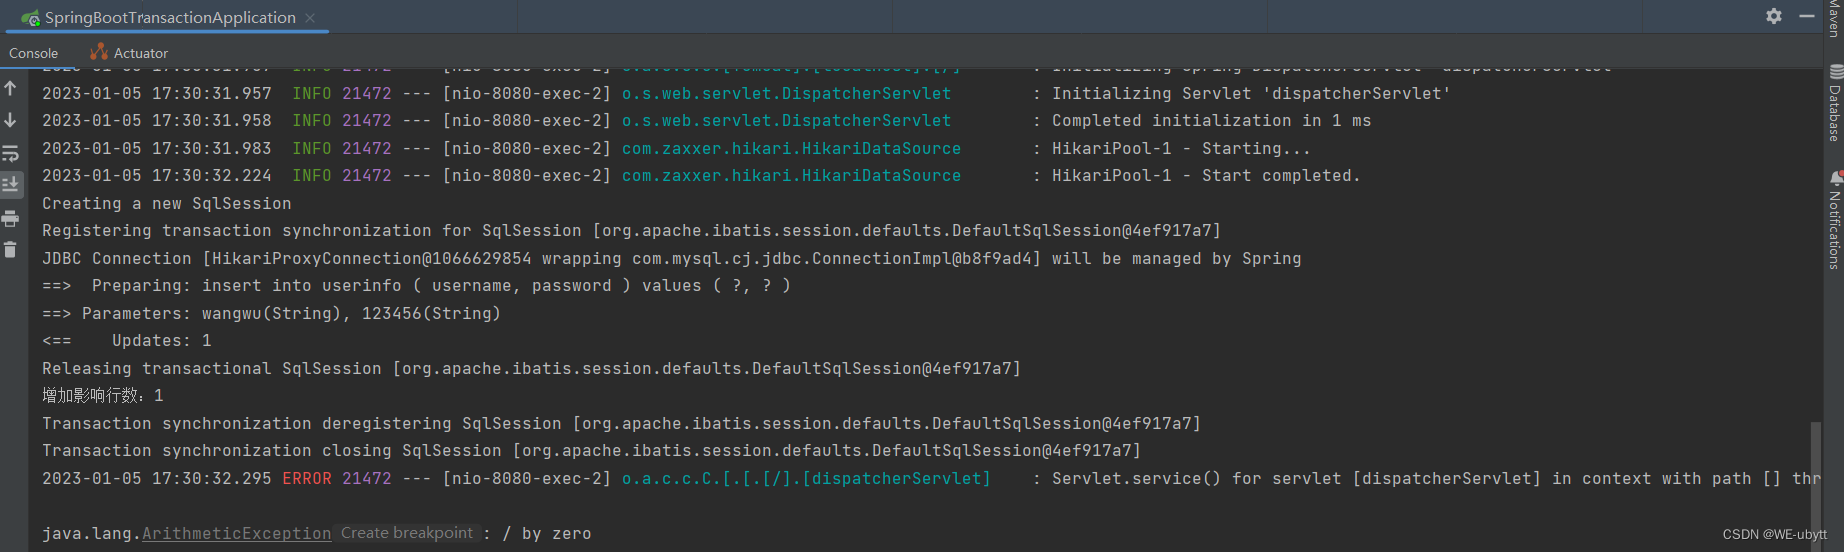
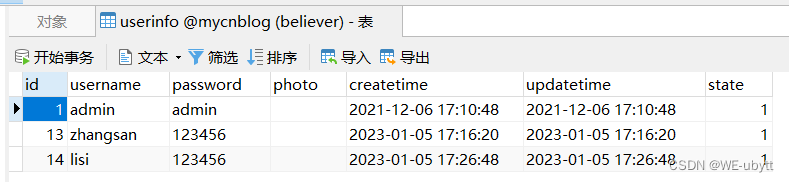
这里查询数据库就能发现,虽然增加成功了,但是因为程序运行过程中发生了异常,事务回滚,所以数据库里并没有数据。
① @Transactional 作用范围
@Transactional 可以⽤来修饰⽅法或类:
- 修饰⽅法时:需要注意只能应⽤到 public ⽅法上,否则不⽣效。推荐此种⽤法。
- 修饰类时:表明该注解对该类中所有的 public ⽅法都⽣效。
② @Transactional 参数说明
| 参数 | 作用 |
|---|---|
| value | 当配置了多个事务管理器时,可以使用该属性指定选择哪个事务管理器 |
| transactionManager | 当配置了多个事务管理器时,可以使用该属性指定选择哪个事务管理器 |
| propagation | 事务的传播行为,默认值为 Propagation.REQUIRED |
| isolation | 事务的隔离级别,默认值为 Isolation.DEFAULT |
| timeout | 事务的超时时间,默认值为 -1.如果超过该时间限制但事务还没有完成,则自动回滚事务 |
| readOnly | 指定事务是否为只读事务,默认值为 false.为了忽略那些不需要事务的方法,比如读取数据,可以设置 read-only 为 true |
| rollbackFor | 用于指定能够触发事务回滚的异常类型,可以指定多个异常类型 |
| rollbackForClassName | 用于指定能够触发事务回滚的异常类型,可以指定多个异常类型 |
| noRollbackFor | 抛出指定的异常类型,不回滚事务,也可以指定多个异常类型 |
| noRollbackForClassName | 抛出指定的异常类型,不回滚事务,也可以指定多个异常类型 |
③ 注意事项
@Transactional 在异常被捕获的情况下,不会进⾏事务⾃动回滚:
package com.example.demo.controller;

import com.example.demo.service.UserInfoService;
import org.springframework.beans.factory.annotation.Autowired;
import org.springframework.jdbc.datasource.DataSourceTransactionManager;
import org.springframework.transaction.TransactionDefinition;
import org.springframework.transaction.TransactionStatus;
import org.springframework.transaction.annotation.Transactional;
import org.springframework.util.StringUtils;
import org.springframework.web.bind.annotation.RequestMapping;
import org.springframework.web.bind.annotation.RestController;

@RestController
@RequestMapping("/user")
public class UserController {


    @Autowired
    private UserInfoService userInfoService;

    @RequestMapping("/add2")
    @Transactional
    public int add2(String username, String password) {


        // 非空效验
        if (!StringUtils.hasLength(username) || !StringUtils.hasLength(password)) {


            return 0;
        }
        int result = userInfoService.add(username, password, null);
        System.out.println("增加影响行数:" + result);
        try {


            int num = 10 / 0;
        }catch (Exception e){


            System.out.println(e.getMessage());
        }
        return result;
    }
}
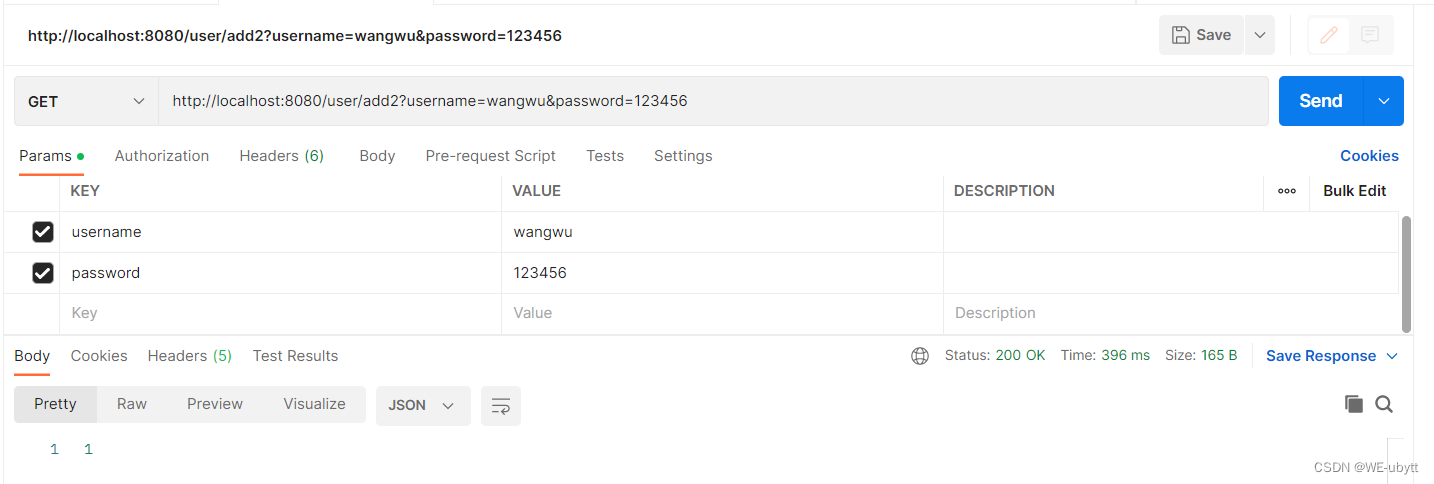
postman 测试:
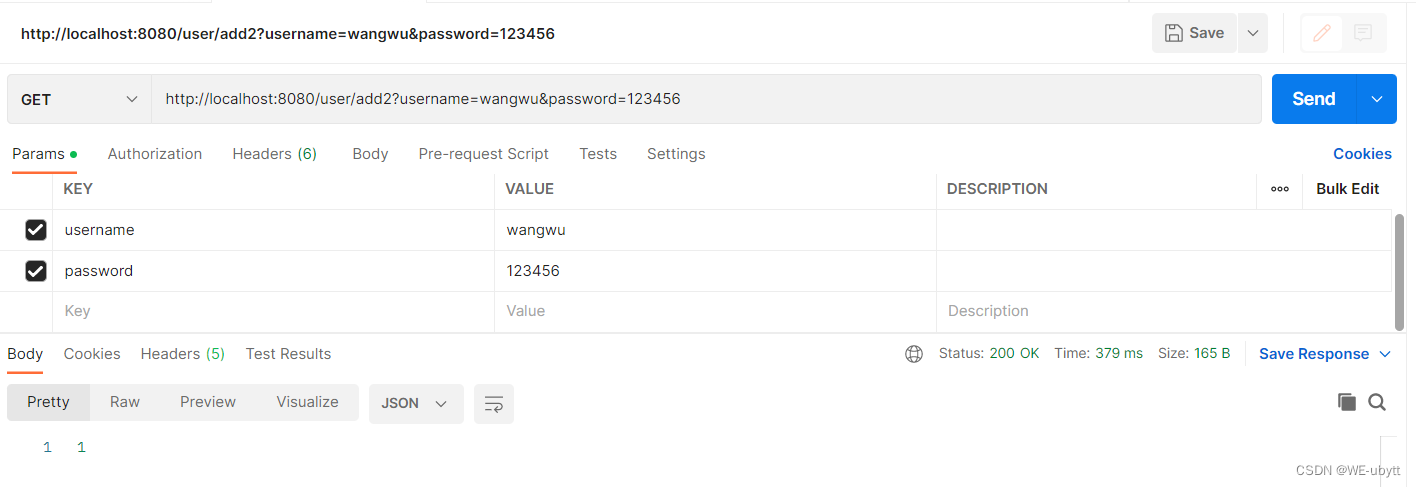
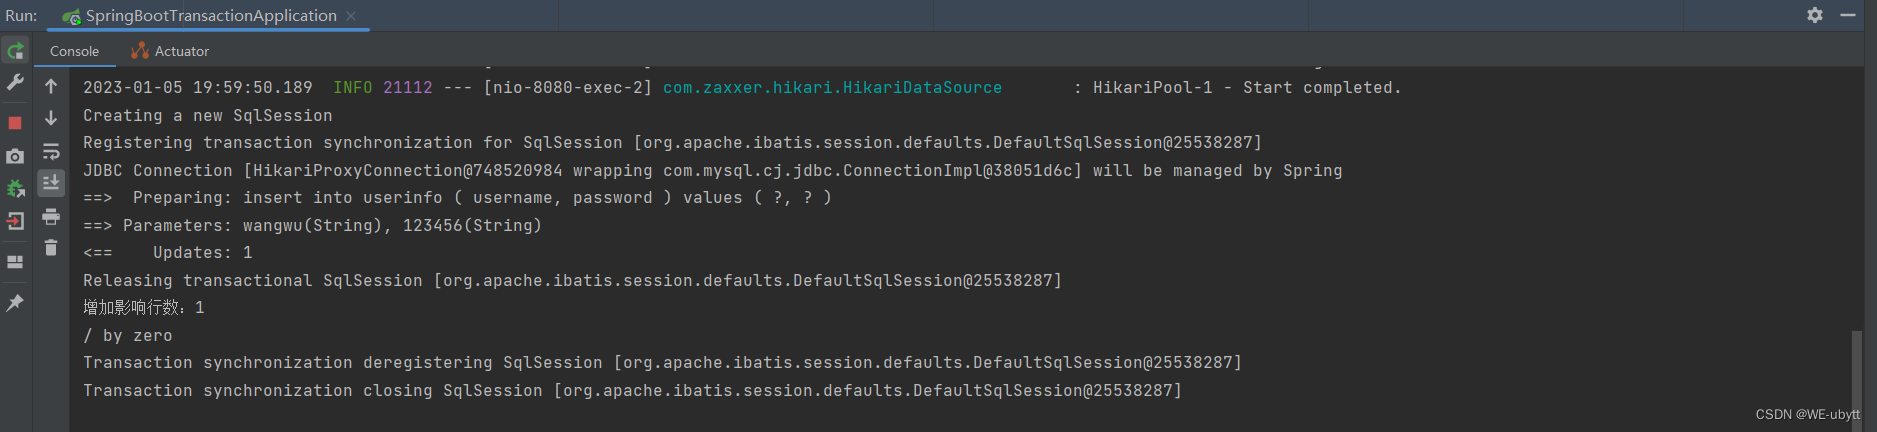
日志信息:
数据库信息:

这里的异常被捕获了,在框架看来,程序员知道此处可能会发生异常,并且异常被捕获了,那么程序员就有能力解决这个异常,所以在框架看来,就没有问题了,就不会进行回滚。
对于声明式事务,我们有两种方式进行手动回滚:
Ⅰ. 抛出异常
直接将异常重新抛出,事务就会自动回滚:
package com.example.demo.controller;

import com.example.demo.service.UserInfoService;
import org.springframework.beans.factory.annotation.Autowired;
import org.springframework.jdbc.datasource.DataSourceTransactionManager;
import org.springframework.transaction.TransactionDefinition;
import org.springframework.transaction.TransactionStatus;
import org.springframework.transaction.annotation.Transactional;
import org.springframework.util.StringUtils;
import org.springframework.web.bind.annotation.RequestMapping;
import org.springframework.web.bind.annotation.RestController;

@RestController
@RequestMapping("/user")
public class UserController {


    @Autowired
    private UserInfoService userInfoService;

    @RequestMapping("/add2")
    @Transactional
    public int add2(String username, String password) {


        // 非空效验
        if (!StringUtils.hasLength(username) || !StringUtils.hasLength(password)) {


            return 0;
        }
        int result = userInfoService.add(username, password, null);
        System.out.println("增加影响行数:" + result);
        try {


            int num = 10 / 0;
        }catch (Exception e){


            System.out.println(e.getMessage());
            throw e;
        }
        return result;
    }
}
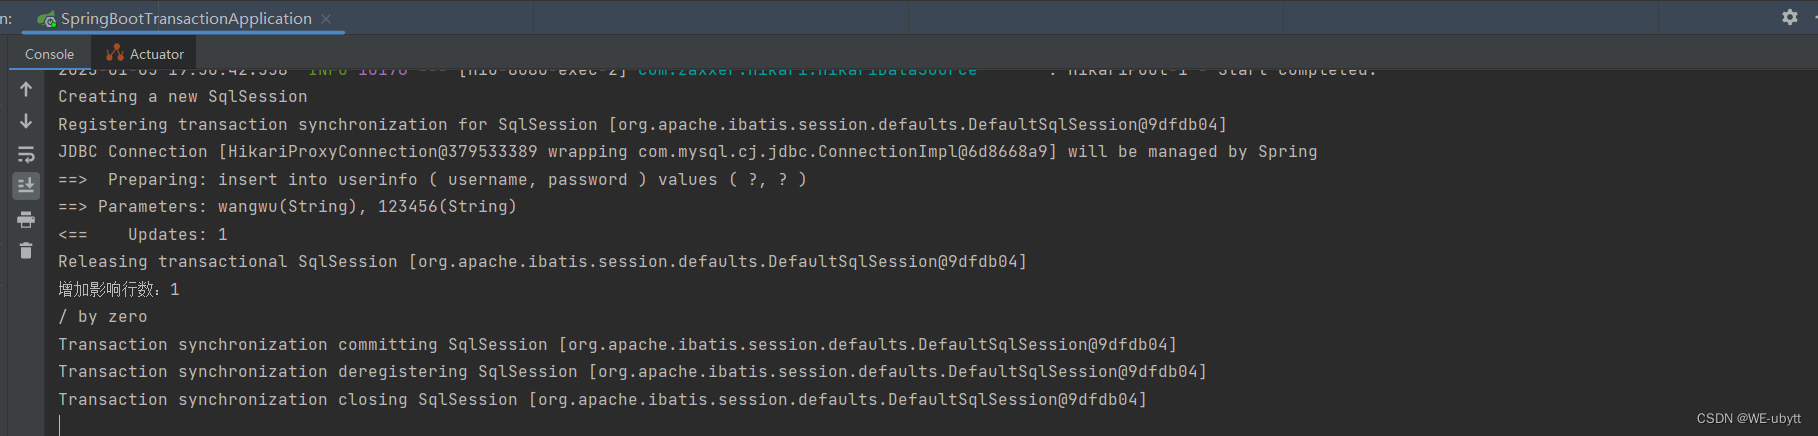
postman测试:
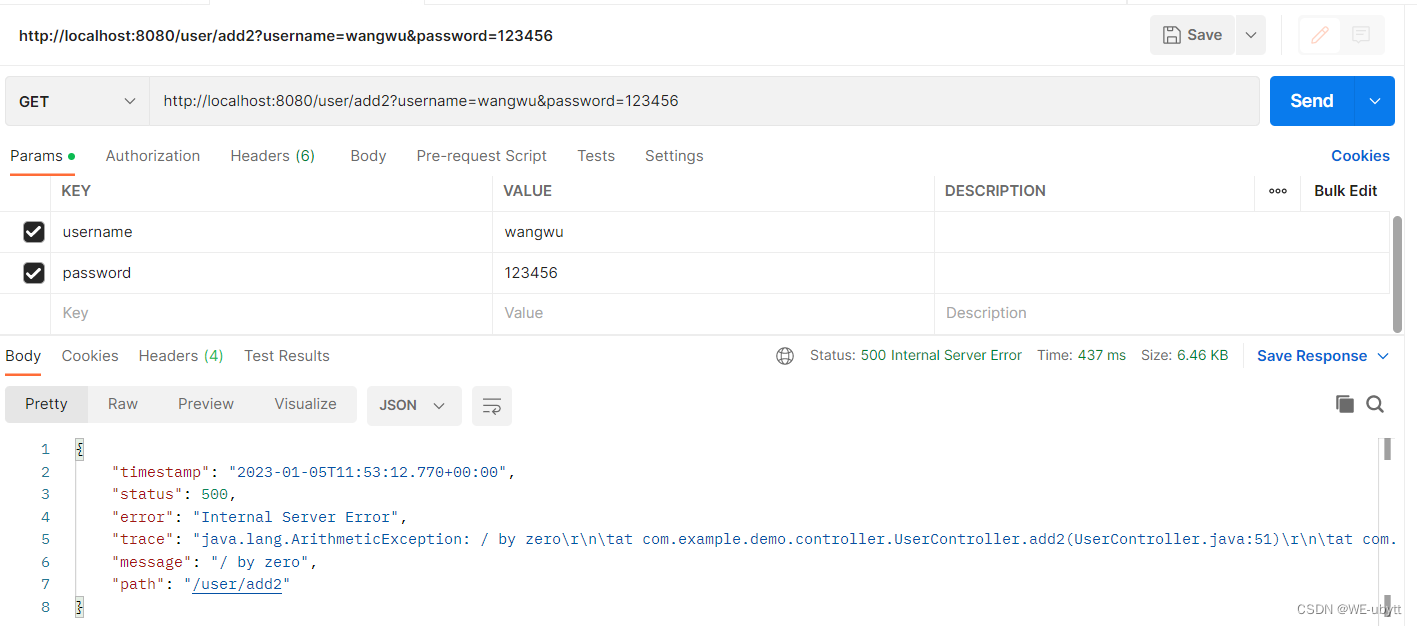
日志信息:
数据库信息:
Ⅱ. 手动回滚
使⽤ TransactionAspectSupport.currentTransactionStatus() 可以得到当前的事务,然后设置回滚⽅法 setRollbackOnly 就可以实现回滚:
package com.example.demo.controller;

import com.example.demo.service.UserInfoService;
import org.springframework.beans.factory.annotation.Autowired;
import org.springframework.jdbc.datasource.DataSourceTransactionManager;
import org.springframework.transaction.TransactionDefinition;
import org.springframework.transaction.TransactionStatus;
import org.springframework.transaction.annotation.Transactional;
import org.springframework.transaction.interceptor.TransactionAspectSupport;
import org.springframework.util.StringUtils;
import org.springframework.web.bind.annotation.RequestMapping;
import org.springframework.web.bind.annotation.RestController;

@RestController
@RequestMapping("/user")
public class UserController {


    @Autowired
    private UserInfoService userInfoService;

    @RequestMapping("/add2")
    @Transactional
    public int add2(String username, String password) {


        // 非空效验
        if (!StringUtils.hasLength(username) || !StringUtils.hasLength(password)) {


            return 0;
        }
        int result = userInfoService.add(username, password, null);
        System.out.println("增加影响行数:" + result);
        try {


            int num = 10 / 0;
        }catch (Exception e){


            System.out.println(e.getMessage());
            // 手动回滚事务
            TransactionAspectSupport.currentTransactionStatus().setRollbackOnly();
        }
        return result;
    }
}
postman测试:
日志信息:
数据库信息:
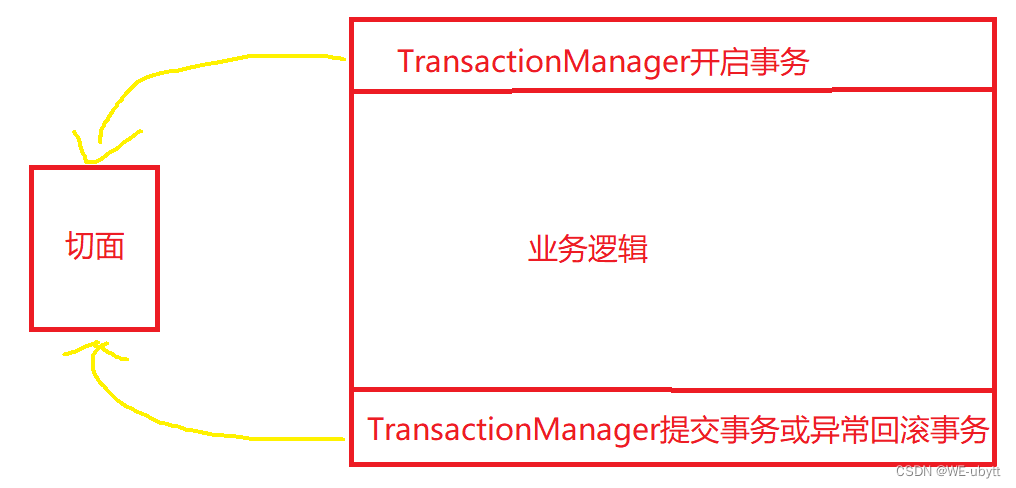
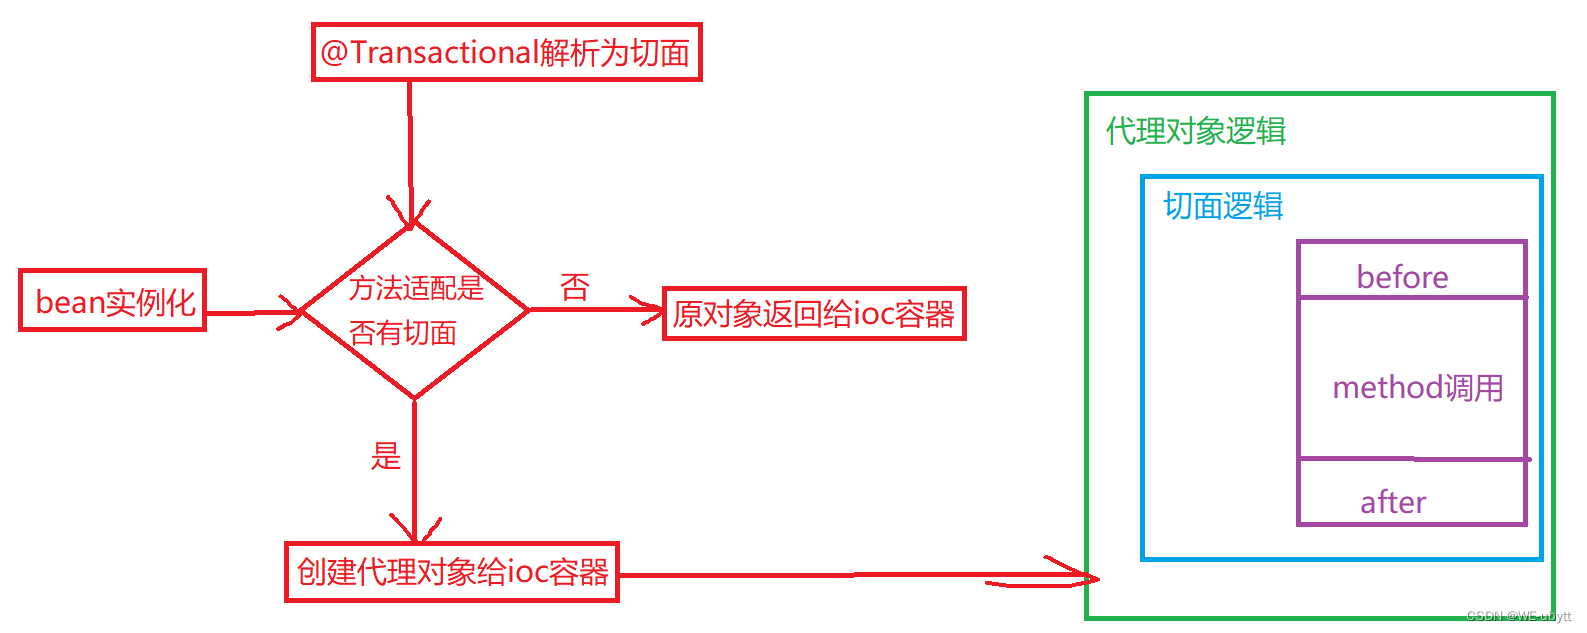
④ @Transactional ⼯作原理
@Transactional 是基于 AOP 实现的,AOP ⼜是使⽤动态代理实现的。如果⽬标对象实现了接⼝,默认情况下会采⽤ JDK 的动态代理,如果⽬标对象没有实现了接⼝,会使⽤ CGLIB 动态代理。
@Transactional 在开始执⾏业务之前,通过代理先开启事务,在执⾏成功之后再提交事务。如果中途遇到的异常,则回滚事务。
@Transactional 实现思路预览:
@Transactional 具体执⾏细节如下图所示:
二、事务隔离级别
1、事务特性回顾
事务有4 ⼤特性(ACID):
- 原⼦性(Atomicity,或称不可分割性):⼀个事务(transaction)中的所有操作,要么全部完成,要么全部不完成,不会结束在中间某个环节。事务在执⾏过程中发⽣错误,会被回滚(Rollback)到事务开始前的状态,就像这个事务从来没有执⾏过⼀样。
- ⼀致性(Consistency):在事务开始之前和事务结束以后,数据库的完整性没有被破坏。这表示写⼊的资料必须完全符合所有的预设规则,这包含资料的精确度、串联性以及后续数据库可以⾃发性地完成预定的⼯作。
- 持久性(Durability):事务处理结束后,对数据的修改就是永久的,即便系统故障也不会丢失。
- 隔离性(Isolation,⼜称独⽴性):数据库允许多个并发事务同时对其数据进⾏读写和修改的能⼒,隔离性可以防⽌多个事务并发执⾏时由于交叉执行而导致数据的不⼀致。事务隔离分为不同级别,包括读未提交(Read uncommitted)、读提交(read committed)、可重复读(repeatable read)和串行化(Serializable)。
⽽这 4 种特性中,只有隔离性(隔离级别)是可以设置的。
事务的隔离级别就是为了防⽌,其他的事务影响当前事务执⾏的⼀种策略。
2、Spring 中设置事务隔离级别
Spring 中事务隔离级别可以通过 @Transactional 中的 isolation 属性进⾏设置:

① MySQL 事务隔离级别有 4 种
- READ UNCOMMITTED:读未提交,也叫未提交读,该隔离级别的事务可以看到其他事务中未提交的数据。该隔离级别因为可以读取到其他事务中未提交的数据,⽽未提交的数据可能会发⽣回
滚,因此我们把该级别读取到的数据称之为脏数据,把这个问题称之为脏读。 - READ COMMITTED:读已提交,也叫提交读,该隔离级别的事务能读取到已经提交事务的数据,因此它不会有脏读问题。但由于在事务的执⾏中可以读取到其他事务提交的结果,所以在不同时间的相同 SQL 查询中,可能会得到不同的结果,这种现象叫做不可重复读。
- REPEATABLE READ:可重复读,是 MySQL 的默认事务隔离级别,它能确保同⼀事务多次查询的结果⼀致。但也会有新的问题,⽐如此级别的事务正在执⾏时,另⼀个事务成功的插⼊了某条数据,但因为它每次查询的结果都是⼀样的,所以会导致查询不到这条数据,⾃⼰重复插⼊时⼜失败(因为唯⼀约束的原因)。明明在事务中查询不到这条信息,但⾃⼰就是插⼊不进去,这就叫幻读(Phantom Read)。
- SERIALIZABLE:序列化,事务最⾼隔离级别,它会强制事务排序,使之不会发⽣冲突,从⽽解决了脏读、不可重复读和幻读问题,但因为执⾏效率低,所以真正使⽤的场景并不多。
| 事务隔离级别 | 脏读 | 不可重复读 | 幻读 |
|---|---|---|---|
| 读未提交(READ UNCOMMITTED) | √ | √ | √ |
| 读已提交(READ COMMITTED) | × | √ | √ |
| 可重复读(REPEATABLE READ) | × | × | √ |
| 串行化(SERIALIZABLE) | × | × | × |
- 脏读:⼀个事务读取到了另⼀个事务修改的数据之后,后⼀个事务⼜进⾏了回滚操作,从⽽导致第⼀个事务读取的数据是错误的。
- 不可重复读:⼀个事务两次查询得到的结果不同,因为在两次查询中间,有另⼀个事务把数据修改了。
- 幻读:⼀个事务两次查询中得到的结果集不同,因为在两次查询中另⼀个事务有新增了⼀部分数据。
在数据库中通过以下 SQL 查询全局事务隔离级别和当前连接的事务隔离级别:
-- mysql8以下:
select @@global.tx_isolation,@@tx_isolation;
-- mysql8:
select @@global.transaction_isolation,@@transaction_isolation;
结果如下:

② Spring 事务隔离级别有 5 种
Spring 中事务隔离级别包含以下 5 种:
- Isolation.DEFAULT:以连接的数据库的事务隔离级别为主。
- Isolation.READ_UNCOMMITTED:读未提交,可以读取到未提交的事务,存在脏读。
- Isolation.READ_COMMITTED:读已提交,只能读取到已经提交的事务,解决了脏读,存在不可重复读。
- Isolation.REPEATABLE_READ:可重复读,解决了不可重复读,但存在幻读(MySQL默认级别)。
- Isolation.SERIALIZABLE:串⾏化,可以解决所有并发问题,但性能太低
相⽐于 MySQL 的事务隔离级别,Spring 的事务隔离级别只是多了⼀个 Isolation.DEFAULT(以数据库的全局事务隔离级别为主)。
三、Spring 事务传播机制
1、定义
Spring 事务传播机制定义了多个包含了事务的⽅法,相互调⽤时,事务是如何在这些⽅法间进⾏传递的。
2、作用
事务隔离级别是保证多个并发事务执⾏的可控性的(稳定性的)。
而事务传播机制是保证⼀个事务在多个调用方法间的可控性的(稳定性的)。

3、分类
Spring 中事务传播机制可以通过 @Transactional 中的 propagation 属性进⾏设置:
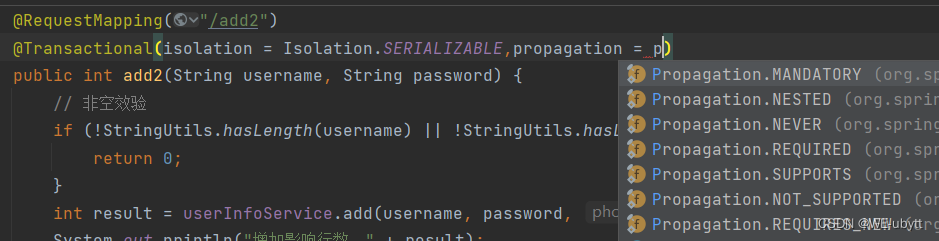
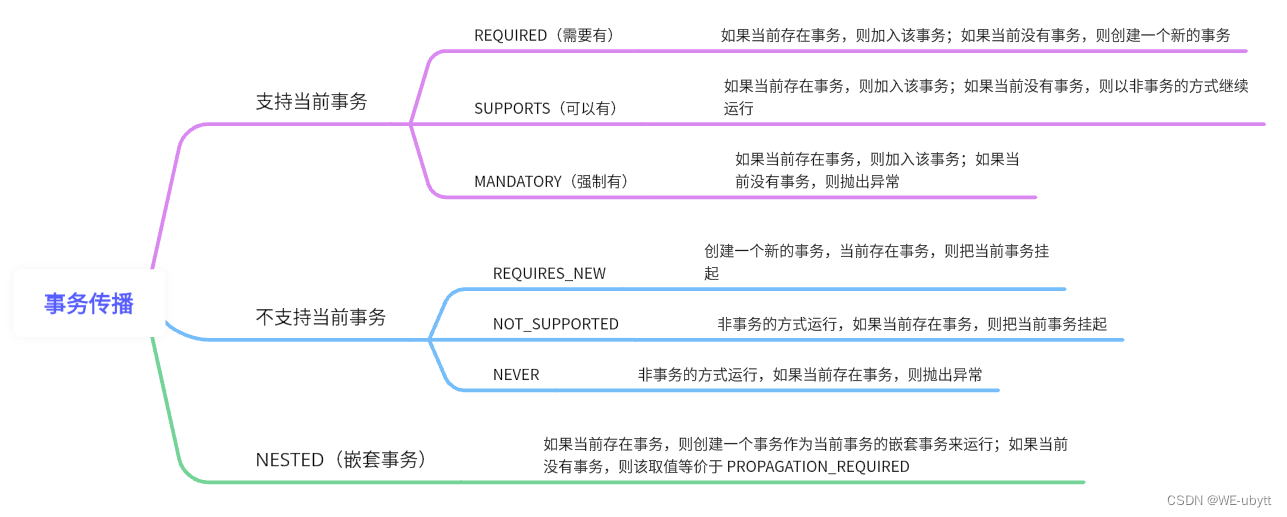
Spring 事务传播机制包含以下 7 种:
- Propagation.REQUIRED:默认的事务传播级别,它表示如果当前存在事务,则加⼊该事务;如果当前没有事务,则创建⼀个新的事务。
- Propagation.SUPPORTS:如果当前存在事务,则加⼊该事务;如果当前没有事务,则以非事务的方式继续运行。
- Propagation.MANDATORY:(mandatory:强制性)如果当前存在事务,则加⼊该事务;如果当
前没有事务,则抛出异常。 - Propagation.REQUIRES_NEW:表示创建⼀个新的事务,如果当前存在事务,则把当前事务挂
起。也就是说不管外部⽅法是否开启事务,Propagation.REQUIRES_NEW 修饰的内部⽅法会新开启自己的事务,且开启的事务相互独⽴,互不干扰。 - Propagation.NOT_SUPPORTED:非事务的方式运行,如果当前存在事务,则把当前事务挂起。
- Propagation.NEVER:非事务的方式运行,如果当前存在事务,则抛出异常。
- Propagation.NESTED:如果当前存在事务,则创建⼀个事务作为当前事务的嵌套事务来运行;如果当前没有事务,则该取值等价于 PROPAGATION_REQUIRED。
以上 7 种传播⾏为,可以根据是否⽀持当前事务分为以下 3 类:
4、使用
① 支持当前事务(REQUIRED)
UserInfoService:
package com.example.demo.service;

import com.example.demo.mapper.UserInfoMapper;
import com.example.demo.model.UserInfo;
import org.springframework.beans.factory.annotation.Autowired;
import org.springframework.stereotype.Service;
import org.springframework.transaction.annotation.Propagation;
import org.springframework.transaction.annotation.Transactional;
import org.springframework.transaction.interceptor.TransactionAspectSupport;

import java.util.List;

@Service
public class UserInfoService {


    @Autowired
    private UserInfoMapper userInfoMapper;

    /**
     * 增加用户
     *
     * @param username
     * @param password
     * @param photo
     * @return
     */
    @Transactional(propagation = Propagation.REQUIRED)
    public Integer add(String username, String password, String photo) {


        return userInfoMapper.add(username, password, photo);
    }

    @Transactional(propagation = Propagation.REQUIRED)
    public Integer save(String username, String password, String photo) {


        try {


            int result = 10 / 0;
        } catch (Exception e) {


            System.out.println("e:" + e.getMessage());
            TransactionAspectSupport.currentTransactionStatus().setRollbackOnly();
        }
        return userInfoMapper.add(username, password, photo);
    }
}
UserController:
package com.example.demo.controller;

import com.example.demo.service.UserInfoService;
import org.springframework.beans.factory.annotation.Autowired;
import org.springframework.jdbc.datasource.DataSourceTransactionManager;
import org.springframework.transaction.TransactionDefinition;
import org.springframework.transaction.TransactionStatus;
import org.springframework.transaction.annotation.Isolation;
import org.springframework.transaction.annotation.Propagation;
import org.springframework.transaction.annotation.Transactional;
import org.springframework.transaction.interceptor.TransactionAspectSupport;
import org.springframework.util.StringUtils;
import org.springframework.web.bind.annotation.RequestMapping;
import org.springframework.web.bind.annotation.RestController;

@RestController
@RequestMapping("/user")
public class UserController {


    @Autowired
    private UserInfoService userInfoService;

    @RequestMapping("/add2")
    @Transactional(propagation = Propagation.REQUIRED)
    public int add2(String username, String password) {


        // 非空效验
        if (!StringUtils.hasLength(username) || !StringUtils.hasLength(password)) {


            return 0;
        }
        int result = userInfoService.add(username, password, null);
        System.out.println("增加影响行数:" + result);

        int result2 = userInfoService.save(username, password, null);
        System.out.println("增加影响行数:" + result2);
        return result;
    }
}
执⾏结果:程序报错,数据库没有插⼊任何数据。
执⾏流程描述:
- UserInfoService 中的 add 方法正常执行完成。
- UserInfoService 中的 save 方法报错,因为使⽤的是 UserController 中的事务,所以整个事务回滚。
- 数据库中没有插⼊任何数据,也就是步骤 1 中的⽤户插⼊⽅法也回滚了。
② NESTED 嵌套事务
UserInfoService:
package com.example.demo.service;

import com.example.demo.mapper.UserInfoMapper;
import com.example.demo.model.UserInfo;
import org.springframework.beans.factory.annotation.Autowired;
import org.springframework.stereotype.Service;
import org.springframework.transaction.annotation.Propagation;
import org.springframework.transaction.annotation.Transactional;
import org.springframework.transaction.interceptor.TransactionAspectSupport;

import java.util.List;

@Service
public class UserInfoService {


    @Autowired
    private UserInfoMapper userInfoMapper;

    /**
     * 增加用户
     *
     * @param username
     * @param password
     * @param photo
     * @return
     */
    @Transactional(propagation = Propagation.REQUIRED)
    public Integer add(String username, String password, String photo) {


        return userInfoMapper.add(username, password, photo);
    }

    @Transactional(propagation = Propagation.NESTED)
    public Integer save(String username, String password, String photo) {


        try {


            int result = 10 / 0;
        } catch (Exception e) {


            System.out.println("e:" + e.getMessage());
            TransactionAspectSupport.currentTransactionStatus().setRollbackOnly();
        }
        return userInfoMapper.add(username, password, photo);
    }
}
UserController:
package com.example.demo.controller;

import com.example.demo.service.UserInfoService;
import org.springframework.beans.factory.annotation.Autowired;
import org.springframework.jdbc.datasource.DataSourceTransactionManager;
import org.springframework.transaction.TransactionDefinition;
import org.springframework.transaction.TransactionStatus;
import org.springframework.transaction.annotation.Isolation;
import org.springframework.transaction.annotation.Propagation;
import org.springframework.transaction.annotation.Transactional;
import org.springframework.transaction.interceptor.TransactionAspectSupport;
import org.springframework.util.StringUtils;
import org.springframework.web.bind.annotation.RequestMapping;
import org.springframework.web.bind.annotation.RestController;

@RestController
@RequestMapping("/user")
public class UserController {


    @Autowired
    private UserInfoService userInfoService;

    @RequestMapping("/add2")
    @Transactional(propagation = Propagation.REQUIRED)
    public int add2(String username, String password) {


        // 非空效验
        if (!StringUtils.hasLength(username) || !StringUtils.hasLength(password)) {


            return 0;
        }
        int result = userInfoService.add(username, password, null);
        System.out.println("增加影响行数:" + result);

        int result2 = userInfoService.save(username, password, null);
        System.out.println("增加影响行数:" + result2);
        return result;
    }
}
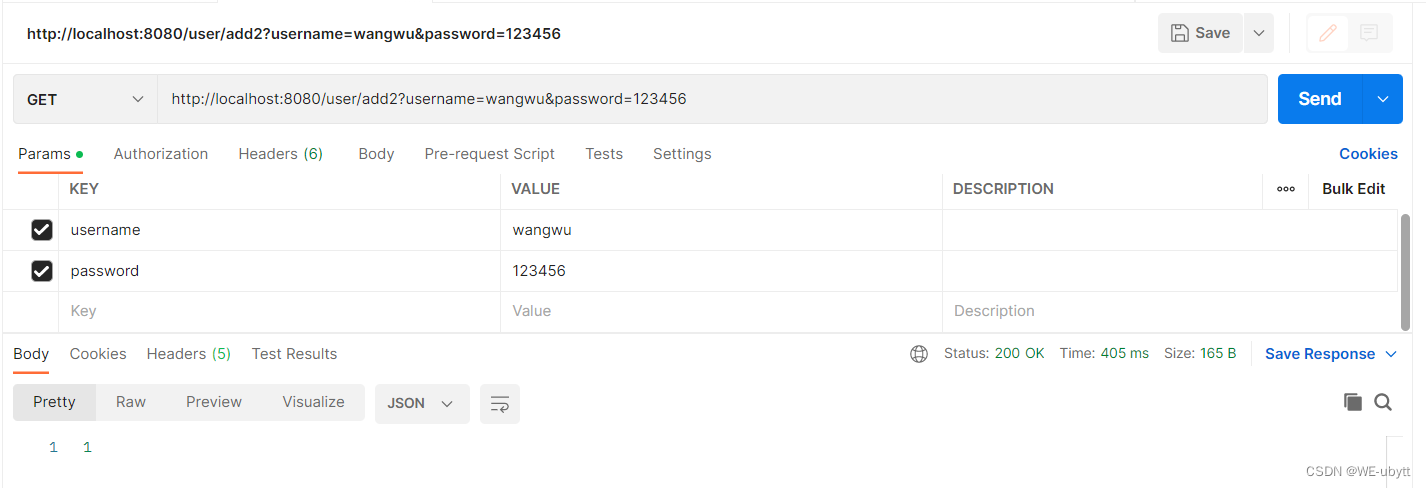
postman测试:
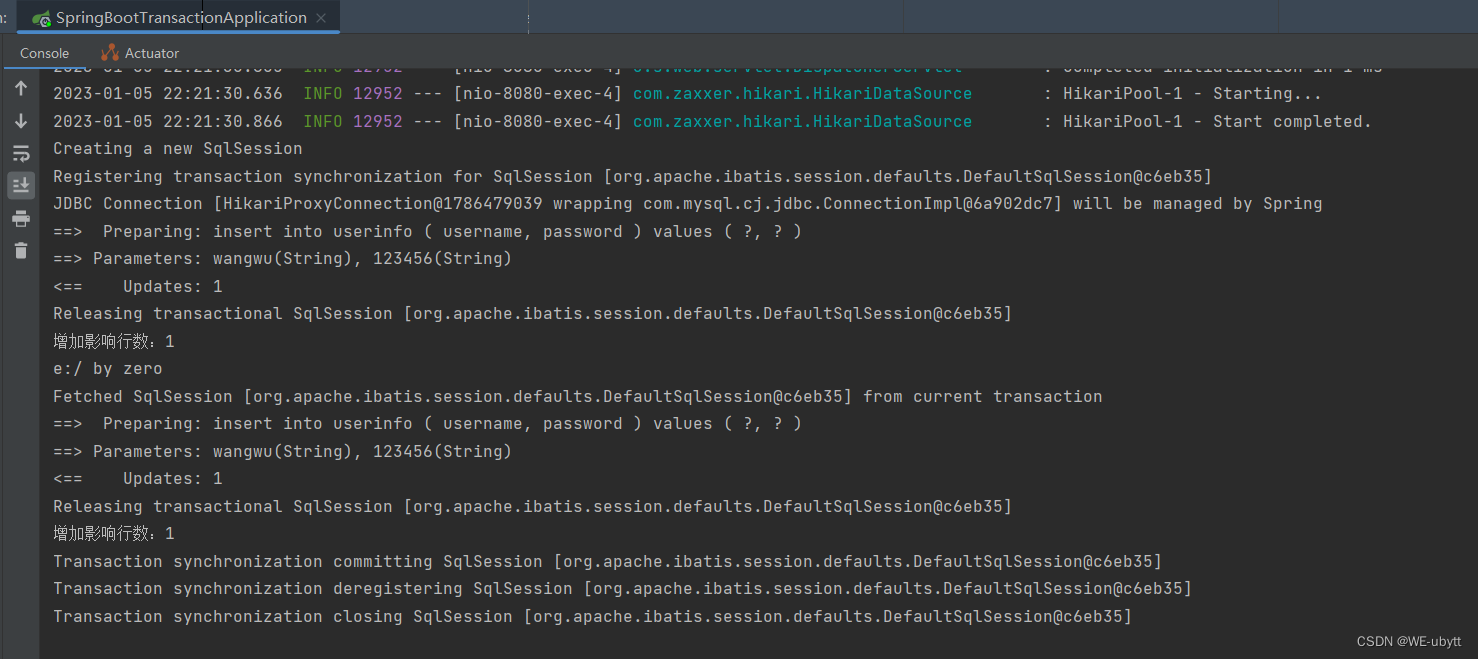
日志信息:
数据库信息:
执⾏结果:程序报错,数据库插⼊1条数据。
执⾏流程描述:
- UserInfoService 中的 add 方法正常执行完成。
- UserInfoService 中的 save 方法报错,因为是嵌套 UserController 中的事务,所以局部回滚。
- 数据库中插⼊1条数据,也就是步骤 1 中的 add ⽅法插入成功。
③ 嵌套事务和加入事务有什么区别?
- 整个事务如果全部执⾏成功,⼆者的结果是⼀样的。
- 如果事务执⾏到⼀半失败了,那么加⼊事务整个事务会全部回滚;⽽嵌套事务会局部回滚,不会影 响上⼀个⽅法中执⾏的结果。