
目录
一、概念
1. Pinia => Pinia
Pinia(发音为/piːnjʌ/,如英语中的“peenya”)是最接近piña(西班牙语中的菠萝)的词
- Pinia开始于大概2019年,最初是作为一个实验为Vue重新设计状态管理,让它用起来像组合式API(Composition API)
- 从那时到现在,最初的设计原则依然是相同的,并且目前同时兼容Vue2、Vue3,也并不要求你使用Composition API
- Pinia本质上依然是一个状态管理的库,用于跨组件、页面进行状态共享(这点和Vuex、Redux一样)
2. Pinia和Vuex的对比
01 - 不是已经有Vuex了吗?为什么还要用Pinia
- Pinia 最初是为了探索 Vuex 的下一次迭代会是什么样子,结合了 Vuex 5 核心团队讨论中的许多想法
- 最终,团队意识到Pinia已经实现了Vuex5中大部分内容,所以最终决定用Pinia来替代Vuex
- 与 Vuex 相比,Pinia 提供了一个更简单的 API,具有更少的仪式,提供了 Composition-API 风格的 API
- 最重要的是,在与 TypeScript 一起使用时具有可靠的类型推断支持
02 - 和Vuex相比,Pinia有很多的优势
- mutations 不再存在
- 他们经常被认为是 非常 冗长
- 他们最初带来了 devtools 集成,但这不再是问题
- 更友好的TypeScript支持,Vuex之前对TS的支持很不友好
- 不再有modules的嵌套结构
- 可以灵活使用每一个store,它们是通过扁平化的方式来相互使用的
- 也不再有命名空间的概念,不需要记住它们的复杂关系
- Pinia的store中的 getters、actions 可以使用this,this代表当前sotre对象

二、使用Pinia
1. 安装
npm install pinia2. 创建Pinia
创建stores文件夹,并在其中创建个index.js
// 1. 导入
import { createPinia } from 'pinia';

// 2. 创建
const pinia = createPinia();

// 3. 导出
export default pinia;
3. 在main.js中引入
import { createApp } from 'vue';
import App from './App.vue';
// 1. 导入
import pinia from './stores';
// 2. use一下
createApp(App).use(pinia).mount('#app');
三、Store
1. 概念
Store :
- 一个 Store (如 Pinia)是一个实体,它会持有为绑定到你组件树的状态和业务逻辑,也就是保存了全局的状态
- 它有点像始终存在,并且每个人都可以读取和写入的组件
- 你可以在你的应用程序中定义任意数量的Store来管理你的状态
Store有三个核心概念 :
- state、getters、actions
- 等同于组件的data、computed、methods
- 一旦 store 被实例化,可以直接在 store 上访问 state、getters 和 actions 中定义的任何属性
2. 创建
定义一个Store :
- Store 是使用 defineStore() 定义
- 并且它需要一个唯一名称,作为第一个参数传递
在stores文件夹创建 counter.js 文件
// 1, 导入
import { defineStore } from 'pinia';
// 2. 创建一个store
/**
 * 第一个参数 : 唯一的名称
 * 第二个参数 : 传入配置
 * 返回值 : 返回一个函数,调用这个函数,即可拿到当前store
 */
const userCounterStore = defineStore('counterStore', {
  state: () => ({
    count: 66
  })
});

export default userCounterStore;
3. 使用
<template>
  <div class="app">App 页面</div>
  <h2>1. counterStore : {

   { counterStore.count }}</h2>
  <h2>2. toRefs : {

   { aCount }}</h2>
  <h2>3. storeToRefs : {

   { bCount }}</h2>

  <button @click="changCount">改变count</button>
</template>

<script setup>
import { toRefs } from 'vue';
import { storeToRefs } from 'pinia';
// 1. 导入该函数
import userCounterStore from '@/stores/module/counter';

// 2. 调用,获得store
const counterStore = userCounterStore();

// 3. 拿到state值
/**
 * 注意 : 直接解构可以拿到值,但并不是响应式的了
 * 1. 使用 toRefs
 * 2. 使用pinia提供的 storeToRefs
 */
// toRefs
const { count: aCount } = toRefs(counterStore);
// storeToRefs
const { count: bCount } = storeToRefs(counterStore);

// 监听点击
const changCount = () => {
  // 可以直接操作!!!
  counterStore.count++;
};
</script>
4. 效果

四、核心概念State
1. 定义State
// 1, 导入
import { defineStore } from 'pinia';
// 2. 创建一个store
/**
 * 第一个参数 : 唯一的名称
 * 第二个参数 : 传入配置
 * 返回值 : 返回一个函数,调用这个函数,即可拿到当前store
 */
const userCounterStore = defineStore('counterStore', {
  state: () => ({
    count: 66,
    name: 'coder',
    age: 19
  })
});

export default userCounterStore;
2. 读取写入State
默认情况下,可以通过 store 实例访问状态来直接读取和写入状态
<script setup>
import Home from './views/Home.vue';
// 1. 导入该函数
import { toRefs } from 'vue';
import { storeToRefs } from 'pinia';
import userCounterStore from '@/stores/module/counter';

// 2. 调用,获得store
const counterStore = userCounterStore();
// 3. 拿到state值
const { count } = storeToRefs(counterStore);

// 监听点击
const changCount = () => {
  // 1. 读取
  console.log(counterStore.count);
  // 2. 写入
  counterStore.count++;
};
</script>
3. 重置State
可以通过调用 store 上的 $reset() 方法将状态 重置 到其初始值
// 重置
const resetState = () => {
  // 回到初始值
  counterStore.$reset();
};
4. 改变State
除了直接用 store.counter++ 修改 store,还可以调用 $patch 方法
允许同时应用多个更改
// 监听点击
const changCount = () => {
// 一起更改数据
counterStore.$patch({
count: 99,
name: 'star',
// 如果输入新增的属性,没有用哒!
buy: ref('abvc')
});
console.log(counterStore);
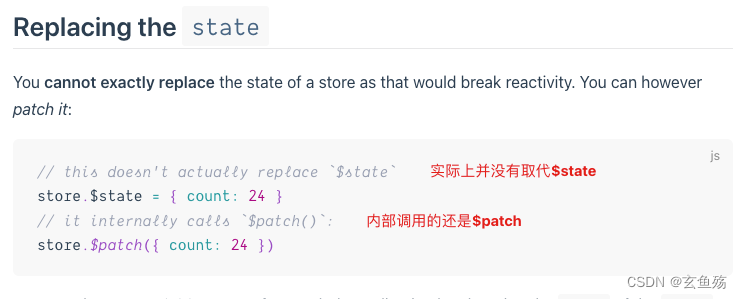
};5. 替换State
可以通过将其 $state 属性设置为新对象来替换 Store 的整个状态
五、核心概念Getters
1. 基本使用
代码
const userCounterStore = defineStore('counterStore', {
  state: () => ({
    count: 66,
    name: 'coder',
    age: 19
  }),
  getters: {
    // 1. 定义getterts
    doubleCount(state) {
      // 2. 通过state参数拿到count
      console.log(state.count);
      // 3. 通过this拿到参数
      console.log(this.count);
    }
  }
});
使用
<template>
  <div>home</div>
  <h2>count : {

   { counterStore.count }}</h2>
  <hr />
  <h2>count : {

   { counterStore.doubleCount }}</h2>

  <button @click="changCount">改变count</button>
</template>

<script setup>
import { toRefs } from 'vue';
import userCounterStore from '@/stores/module/counter';
// 1. 获取store
const counterStore = userCounterStore();
// 2. 解构,变成响应式
const { doubleCount } = toRefs(counterStore);
console.log(doubleCount);

// 监听点击
const changCount = () => {
  // 3. 改变store
  counterStore.count++;
  // 4. 输出
  console.log(doubleCount.value);
};
</script>
2. 在getter中使用其他的getter
getters: {
  doubleCount(state) {
    return this.count * 2;
  },
  othersGetter() {
    // 通过this来拿
    return this.doubleCount;
  }
}
3. getters支持返回一个函数
可以用来传递参数到getters
代码
getters: {
  doubleCount(state) {
    return this.count * 2;
  },
  formatName() {
    // 返回一个函数,可以传递参数进来
    return (lastName) => {
      return this.name + lastName;
    };
  }
}
使用
<template>
  <h2>{

   { counterStore.formatName('123') }}</h2>
  <button @click="changCount">改变count</button>
</template>

<script setup>
import { toRefs } from 'vue';
import userCounterStore from '@/stores/module/counter';
// 1. 获取store
const counterStore = userCounterStore();
// 2. 解构,变成响应式
const { formatName } = toRefs(counterStore);

const changCount = () => {
  // 3. 使用函数
  console.log(formatName.value('444'));
  // 也可以直接使用,看情况而定
  counterStore.formatName('123')
};
</script>
4. getters使用别的store中的数据
导入其他的store,使用即可,很方便
userOtherStore(){
  // 1. 导入其他soter
  const otherStore = userOtherStore()
  // 2. 拿到数据 ....
  otherStore.getters()
}
六、核心概念Actions
actions => 非常适合定义业务逻辑
1. 基本使用
代码
const userCounterStore = defineStore('counterStore', {
  state: () => ({
    count: 66,
    name: 'coder',
    age: 19
  }),
  actions: {
    increment() {
      this.count++;
    },
    // 这里的参数指调用时传递过来的参数
    incrementNum(num) {
      this.count += num;
    }
  }
});
使用
<script setup>
import userCounterStore from '@/stores/module/counter';
// 1. 获取store
const counterStore = userCounterStore();
// 2. 解构
const { increment, incrementNum } = counterStore;
// 3. 调用
increment();
incrementNum(33);
</script>
2. 异步操作
代码
const userCounterStore = defineStore('counterStore', {
  state: () => ({
    arrList: []
  }),
  actions: {
    async fetchDataList() {
      // 1. 请求
      const res = await fetch('http:xxxxx');
      const data = await res.json();
      this.arrList = data.list;
      // 2. 返回值,相当于 return Promise.resolve(data)
      return data;
    }
  }
});
使用
<script setup>
import userCounterStore from '@/stores/module/counter';
// 1. 获取store
const counterStore = userCounterStore();
// 2. 解构
const { fetchDataList } = counterStore;
// 3. 调用
fetchDataList().then((res) => {
  // 因为返回的时promise,所以可以在then中拿到数据
  console.log(res);
});
</script>