
一、接口请求体-文件
files:参数用来解决文件上传接口
key:需要替换为文件名
value:对应的二进制流
1、第一种方法
import requests

r1=requests.post("https://www.baidu.com/post",
                files={

    "hogwarts_file":open("1.text",'rb')},
                 )
2、第二种方法
files:参数用来解决文件上传接口
通过value元组传递,实现指定filename的需求
r2=requests.post("https://www.baidu.com/post",

                files={

    "file":('kobe.txt',open("1.text",'rb'))},
                 )
二、接口请求体-form表单
1、什么是 form 请求
数据量不大
数据层级不深的情况
通常以键值对传递
form格式传参,用data接收请求参数
import requests
class TestReq:

    def test_data(self):
        data={

    "kobe":"py1"}
        #通过data参数传入请求体信息
        r=requests.post("https://www.baidu.com/post",data=data)
        print(r.json())
        #区别
        #print(r.text)
json格式传参,用json接收请求参数
import requests
class TestReq:

    def test_json(self):
        data = {

    "kobe": "py1"}
        # 通过json参数传入请求体信息
        r = requests.post("https://www.baidu.com/post", json=data)
        print(r.json())
        #print(r.text)
三、接口请求体 - XML
用data来接收xml格式的传参
import requests

xml= """<?xml version='1.0'encoding='utf-8'?>
<a>6</a>"""

headers = {

    'Content-Type': 'application/xml'}
r = requests.post('https://www.baidu.com/post', data=xml, headers=headers).text

print(r)
四、xml 响应断言
可扩展标记语言(Extensible Markup Language)的缩写
也是一种结构化的数据
1、方法一:XMLSession
r.text:以xml格式形式,获取响应信息
r.xml.links:获取响应中所有的链接,以列表形式展示
r.xml.raw_xml:以字节格式返回响应内容
r.xml.text:返回各个标签下面的内容
xpath方法
1、获取language标签下的内容
first=True:只返回一条数据
r.xml.xpath(“//language”,first=True)
2、获取link标签下所有的的内容
items = r.xml.xpath('//link')
    res=[]
    for item in items:
        res.append(item.text)
    print(res)
from requests_xml import XMLSession

def test_xml():
    #设置session
    session=XMLSession()
    r=session.get("https://www.nasa.gov/rss/dyn/lg_image_of_the_day.rss")
    #print(r.text)
    #print(r.xml.links)         #links 可以拿到响应中所有的链接,列表
    #print(r.xml.raw_xml)       #raw_xml 以字节格式返回响应内容
    #print(r.xml.text)           #text  返回各个标签下面的内容

    #通过xpath
    # 获取language标签下的内容
    item=r.xml.xpath('//language',first=True)   #first=True:只返回一条数据
    print(item.text)

    #因为返回的是对象,所以需要调用text属性获取具体的值
    item1=r.xml.xpath('//link',first=True)
    print(item1.text)

    items = r.xml.xpath('//link')
    res=[]
    for item in items:
        res.append(item.text)
    print(res)

    assert "http://www.nasa.gov/" in res
2、方法二:xml.etree.ElementTree
import xml.etree.ElementTree as ET

def test_etree():
    #设置session
    session=XMLSession()
    r=session.get("https://www.nasa.gov/rss/dyn/lg_image_of_the_day.rss")

    # 自己封装xml解析方法
    root=ET.fromstring(r.text)
    items=root.findall(".//link")
    result=[]
    for i in items:
        result.append(i.text)
        print(i.text)
    assert "http://www.nasa.gov/" in result
五、cookie 处理
1、Cookie使用场景
在接口测试过程中,很多情况下,需要发送的请求附带cookies,才会得到正常的响应的结果。所以使用python+requests进行接口自动化测试也是同理,需要在构造接口测试用例时加入cookie。
2、传递Cookie的两种方式
通过请求头信息传递
import requests
def test_demo():
    url = 'https://www.baidu.com/cookies'
    header={

    "Cookie":"werwr=yu",
            'User-Agent': 'python'}
    r=requests.get(url=url,headers=header)
    print(r.request.headers)        #获取请求体信息
通过请求的关键字参数cookies传递
def test_demo1():
    url = 'https://www.baidu.com/cookies'
    header={

    'User-Agent': 'python'}
    cookie_data={

    "kobe":"kobe",
                 "kobe1": "kobe1",
                 }
    r=requests.get(url=url,headers=header,cookies=cookie_data)
    print(r.request.headers)        #获取请求体信息
六、超时处理

timeout参数设置超时时间,timeout对应的值通常是一个数字类型;提高容错性、健康性
import requests

class TestReq:
    def test_timeout(self):
        #todo timeout参数设置超时时间,timeout对应的值通常是一个数字类型;提高容错性、健康性
        r=requests.get('https://www.baidu.com/cookies',timeout=3)
        print(r)
七、代理配置
1、使用代理之前和使用代理之后对比

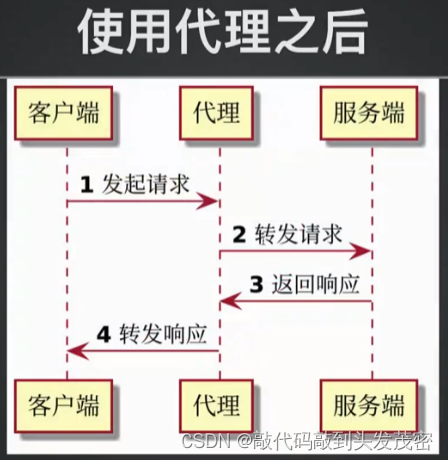
2、代理在接口自动化的使用场景
测试脚本,更直观的排查请求错误,相当于编写代码时的debug
获取没有错误的,真实的接口请求响应信息
通过代理获取自动化测试的请求响应
对比两次请求响应的区别
3、如何使用
a、设定代理格式
b、通过proxies 参数传递代理设置
c、开启代理工具监听请求
verify=False:不会认证https
import requests

#定义一个代理的配置信息,key值为协议,value为工具的配置
proxy={


    "http":"http://127.0.0.1:8080",
    "https":"http://127.0.0.1:8080"
}

#通过proxies传递代理配置
#verify=False:不会认证https
data={

    "a":1}
requests.post(url = 'https://www.baidu.com/post',
              json=data,
              proxies=proxy,
              verify=False)
八、多层嵌套响应断言
1、什么是多层嵌套结构
层级多。
嵌套关系复杂。
{


  "errcode": 0,
  "errmsg": "ok",
  "userid": "zhangsan",
  "name": "张三",
  "department": [1, 2],
  "order": [1, 2],
  "position": "后台工程师",
  "mobile": "13800000000",
  "gender": "1",
  "email": "[email protected]",
  "biz_mail": "[email protected]",
  "is_leader_in_dept": [1, 0],
  "direct_leader": ["lisi", "wangwu"],
  "avatar": "http://wx.qlogo.cn/mmopen/ajNVdqHZLLA3WJ6DSZUfiakYe37PKnQhBIeOQBO4czqrnZDS79FH5Wm5m4X69TBicnHFlhiafvDwklOpZeXYQQ2icg/0",
  "thumb_avatar": "http://wx.qlogo.cn/mmopen/ajNVdqHZLLA3WJ6DSZUfiakYe37PKnQhBIeOQBO4czqrnZDS79FH5Wm5m4X69TBicnHFlhiafvDwklOpZeXYQQ2icg/100",
  "telephone": "020-123456",
  "alias": "jackzhang",
  "address": "广州市海珠区新港中路",
  "open_userid": "xxxxxx",
  "main_department": 1,
  "extattr": {


    "attrs": [
      {


        "type": 0,
        "name": "文本名称",
        "text": {


          "value": "文本"
        }
      },
      {


        "type": 1,
        "name": "网页名称",
        "web": {


          "url": "http://www.test.com",
          "title": "标题"
        }
      }
    ]
  },
  "status": 1,
  "qr_code": "https://open.work.weixin.qq.com/wwopen/userQRCode?vcode=xxx",
  "external_position": "产品经理",
  "external_profile": {


    "external_corp_name": "企业简称",
    "wechat_channels": {


      "nickname": "视频号名称",
      "status": 1
    },
    "external_attr": [
      {


        "type": 0,
        "name": "文本名称",
        "text": {


          "value": "文本"
        }
      },
      {


        "type": 1,
        "name": "网页名称",
        "web": {


          "url": "http://www.test.com",
          "title": "标题"
        }
      },
      {


        "type": 2,
        "name": "测试app",
        "miniprogram": {


          "appid": "wx8bd80126147dFAKE",
          "pagepath": "/index",
          "title": "my miniprogram"
        }
      }
    ]
  }
}
2、复杂场景响应提取
提取errcode 对应的值:res[“errcode”]
提取 title 对应的值:res[“extattr”][“external_profile”][“external_attr”][1][“web”][“title”]
3、JSONPath 简介
在 JSON 数据中定位和提取特定信息的查询语言。
JSONPath 使用类似于 XPath 的语法,使用路径表达式从 JSON 数据中选择和提取数据。
相比于传统的提取方式,更加灵活,并且支持定制化。
提取errcode 对应的值:$.errcode
提取 title 对应的值:$..title
4、JSONPath 语法
| 符号 | 描述 |
|---|---|
| $ | 查看的根节点对象,用于表示一个json数据,可以是数组或者对象 |
| @ | 过滤器,处理的当前节点对象 |
* |
通配符 |
. |
获取子节点 |
.. |
递归搜索,筛选所有符合条件的节点 |
?() |
过滤器表达式,筛选操作 |
| [start:end] | 数组片段,区间[start:end],不包含end |
| [A]或[A,B] | 迭代对象下标,表示一个或者多个数组下标 |
{


  "store": {


    "book": [
      {


        "category": "reference",
        "author": "Nigel Rees",
        "title": "Sayings of the Century",
        "price": 8.95
      },
      {


        "category": "fiction",
        "author": "Evelyn Waugh",
        "title": "Sword of Honour",
        "price": 12.99
      },
      {


        "category": "fiction",
        "author": "Herman Melville",
        "title": "Moby Dick",
        "isbn": "0-553-21311-3",
        "price": 8.99
      },
      {


        "category": "fiction",
        "author": "J. R. R. Tolkien",
        "title": "The Lord of the Rings",
        "isbn": "0-395-19395-8",
        "price": 22.99
      }
    ],
    "bicycle": {


      "color": "red",
      "price": 19.95
    }
  },
  "expensive": 10
}
获取所有书籍的作者:$.book.author
获取所有作者:$..author
获取 store 下面的所有内容: $.store
获取所有的价格: $..price
获取第三本书: $..book[2]
获取所有包含 isbn 的书籍: $..book[?(@.isbn)]
获取所有价格小于 10 的书:$..price[?(@.price<10)]
获取所有书籍的数量:$..book.length
5、JSONPath 与代码结合
环境安装:pip install jsonpath
import jsonpath
import requests

def test_jsonpath():
    data = {

    "kobe": "py1"}
    r = requests.post("https://www.baidu.com/post", json=data)
    print(r.json())
    #todo jsonpath的返回值,如果找到的话,不管找到多少个结果,返回的结果都是列表;如果没有找到返回False
    print(jsonpath.jsonpath(r.json(),'$..json'))    #列表格式