文章目录
提示:以下是本篇文章正文内容,下面案例可供参考
一、负载均衡
1.Load Balance是什么
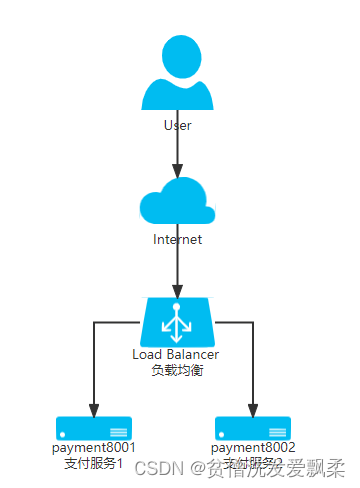
LB(Load Balance,负载均衡)是一种集群技术
是高可用网络基础架构的关键组件,通常用于将工作负载分布到多个服务器来提高网站、应用、数据库或其他服务的性能和可靠性。
起初我们提供一个支付微服务供消费者使用。

当同时有很多用户去访问此服务,超出了其能处理的极限,就有可能造成整个支付服务瘫痪
通过引入负载均衡,当一个支付服务出现故障时,可调用另一个支付服务,保证服务的正常运行
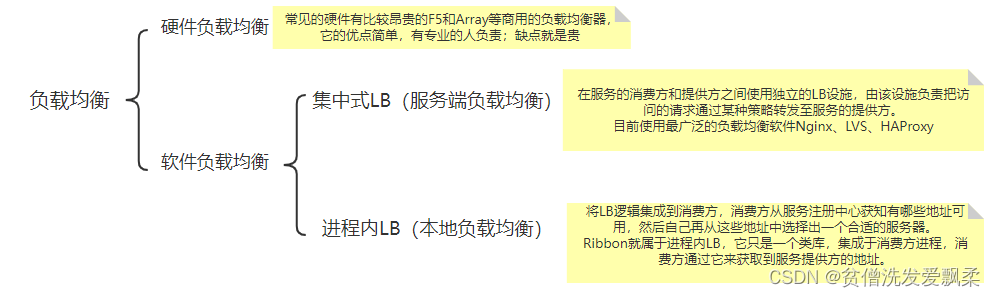
2.负载均衡的分类
Ribbon本地负载均衡客户端和 Nginx服务端负载均衡区别:
Nginx是服务器负载均衡,客户端所有请求都会交给nginx,然后由nginx实现转发请求。即负载均衡是由服务端实现的。
Ribbon本地负载均衡,在调用微服务接口时候,会在注册中心上获取注册信息服务列表之后缓存到JVM本地,由本地JVM进程进行负载均衡,从而在本地实现RPC远程服务调用技术。
二、Ribbon详解
1.什么是Ribbon
Spring Cloud Ribbon是基于Netflix Ribbon实现的一套客户端负载均衡的工具。
Ribbon 是 Spring Cloud Netflix 模块的子模块,它是 Spring Cloud 对 Netflix Ribbon 的二次封装。通过它,我们可以将面向服务的 REST 模板(RestTemplate)请求转换为客户端负载均衡的服务调用。
Ribbon 是 Spring Cloud 体系中最核心、最重要的组件之一。它虽然只是一个工具类型的框架,并不像 Eureka Server(服务注册中心)那样需要独立部署,但它几乎存在于每一个使用 Spring Cloud 构建的微服务中。
Spring Cloud 微服务之间的调用,API 网关的请求转发等内容,实际上都是通过 Spring Cloud Ribbon 来实现的.
总结:Ribbon的主要功能是提供客户端的负载均衡和服务调用
2.Ribbon目前进入维护模式
Ribbon的Git地址:https://github.com/Netflix/ribbon

Eureka对Ribbon进行了集成,我们只需要添加Eureka的注解
 <dependency>
            <groupId>org.springframework.cloud</groupId>
            <artifactId>spring-cloud-starter-netflix-eureka-client</artifactId>
        </dependency>
点进去可以看到Ribbon的注解
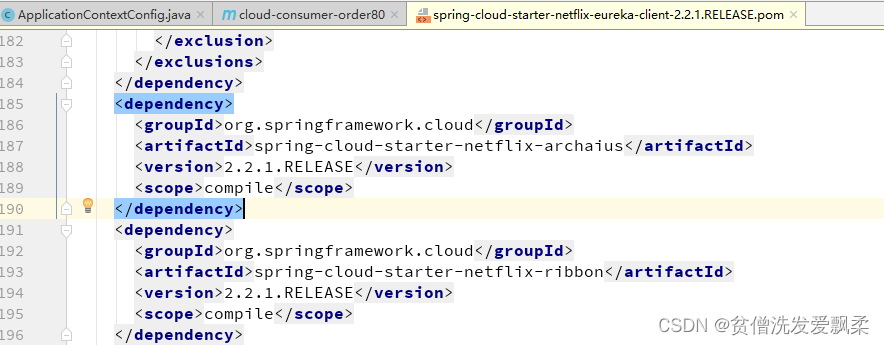
总结:Ribbon其实就是一个软负载均衡的客户端组件,它可以和其他所需请求的客户端结合使用,和eureka结合只是其中的一个实例
3.Ribbon的工作流程
在我们用Eureka做注册中心,支付服务集群化后,我们通过@LoadBalanced注解负载均衡的作用,以便自由的切换不同的支付服务。我们的订单服务的请求往往是通过RestTemplate发起的。
Ribbon就是负载均衡+RestTemplate
@Configuration
public class ApplicationContextConfig {


    @Bean
    @LoadBalanced   //使用@LoadBalanced注解赋予RestTemplate负载均衡的能力
    public RestTemplate getRestTemplate(){


        return  new RestTemplate();
    }
}
RestTemplate就是一个Spring提供了Http 请求工具类,为什么只需要添加一个注解就能达到负载均衡的效果呢
查看LoadBalancerAutoConfiguration负载均衡自动配置类
Ribbon将所有标记@LoadBalanced注解的RestTemplate保存到一个List集合当中
public class LoadBalancerAutoConfiguration {


    @LoadBalanced
    @Autowired(        required = false    )
    private List<RestTemplate> restTemplates = Collections.emptyList();
接着往下看
 @Bean
        @ConditionalOnMissingBean
        public RetryLoadBalancerInterceptor ribbonInterceptor(LoadBalancerClient loadBalancerClient, LoadBalancerRetryProperties properties, LoadBalancerRequestFactory requestFactory, LoadBalancedRetryFactory loadBalancedRetryFactory) {


            return new RetryLoadBalancerInterceptor(loadBalancerClient, properties, requestFactory, loadBalancedRetryFactory);
        }
发现new了一个拦截器,点进去
public ClientHttpResponse intercept(final HttpRequest request, final byte[] body, final ClientHttpRequestExecution execution) throws IOException {


      ...
            ServiceInstance serviceInstance = null;
            if (context instanceof LoadBalancedRetryContext) {


                LoadBalancedRetryContext lbContext =(LoadBalancedRetryContext)context;
                serviceInstance = lbContext.getServiceInstance();            }
       //从负载均衡器中获取一个可用的服务
            if (serviceInstance == null) {


                serviceInstance = this.loadBalancer.choose(serviceName);
            }
      //执行负载均衡器的execute获取结果
            ClientHttpResponse response = (ClientHttpResponse)this.loadBalancer.execute(serviceName, serviceInstance, this.requestFactory.createRequest(request, body, execution));
            int statusCode = response.getRawStatusCode();
         ...
    }
通过代码可以看出,此时这个拦截类并没有设置给RestTemplate对象
回到LoadBalancerAutoConfiguration负载均衡自动配置类
        @Bean
        @ConditionalOnMissingBean
        public RestTemplateCustomizer restTemplateCustomizer(final RetryLoadBalancerInterceptor loadBalancerInterceptor) {


            return (restTemplate) -> {


                List<ClientHttpRequestInterceptor> list = new ArrayList(restTemplate.getInterceptors());
                list.add(loadBalancerInterceptor);
                restTemplate.setInterceptors(list);
            };
通过restTemplate.setInterceptors(list)给所有标记了@LoadBalanced注解的RestTemplate对象设置拦截器,此时就具备了负载的作用
获取所有标识@LoadBalanced注解的RestTemplate(可以理解成获取那些开启了Ribbon负载均衡功能的RestTemplate),然后将Ribbon默认的拦截器LoadBalancerInterceptor添加到RestTemplate中,这样当使用RestTemplate发起http请求时就会起到拦截的作用。
Ribbon源码解析推荐方志明的博客:https://www.fangzhipeng.com/springcloud/2017/08/11/Ribbon-resources.html
总结Ribbon的原理:
- 获取@LoadBalanced注解标记的RestTemplate。
- RestTemplate添加一个拦截器(filter),当使用RestTemplate发起http调用时进行拦截。
- 在filter拦截到该请求时,获取该次请求服务集群的全部列表信息。
- 根据规则从集群中选取一个服务作为此次请求访问的目标。
- 访问该目标,并获取返回结果。
4.Ribbon内置的负载均衡策略
Ribbon通过使用IRule接口,根据特定算法从所有服务中,选择一个服务
IRule的接口实现类:
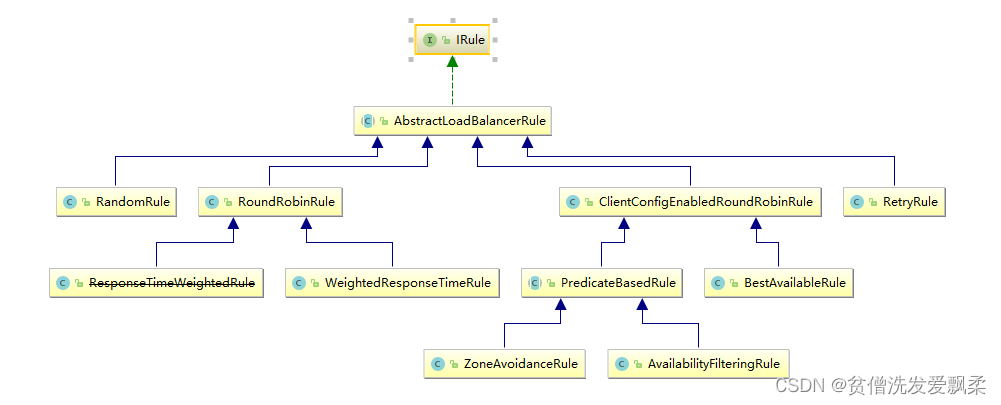
- RoundRobinRule 默认使用的轮询算法
- RandomRule 随机算法
- RetryRule 先按照RoundRobinRule的策略获取服务,如果获取服务失败则在指定时间内会进行重试
- WeightedResponseTimeRule轮询算法的扩展,响应速度越快的服务选择权重越大
- BestAvailableRule 选择最小请求数
- AvailabilityFilteringRule 先过滤掉故障实例,再选择并发较小的实例
- ZoneAvoidanceRule 根据server的zone区域和可用性来轮询选择
5.Ribbon负载规则替换
官方文档指出 自定义配置类不能放在@ComponentScan所扫描的当前包下以及子包下

(1)新建一个MySelfRule类
选择随机策略
@Configuration
public class MySelfRule {


    @Bean
    public IRule myRule(){


        return  new RandomRule();
    }
}
(2)主启动添加@RibbonClient注解
@SpringBootApplication
@EnableEurekaClient
//表示访问CLOUD-PAYMENT-SERVICE的服务时,使用我们自定义的负载均衡算法
@RibbonClient(name = "CLOUD-PAYMENT-SERVICE",configuration = MySelfRule.class)
public class OrderMain80 {


    public static void main(String[] args) {


        SpringApplication.run(OrderMain80.class,args);
    }
}
5.RoundRobinRule源码分析
(1)域定义和构造器
public class RoundRobinRule extends AbstractLoadBalancerRule {


	//AtomicInteger原子整型类,用于计算对应请求调用服务器的下标
    private AtomicInteger nextServerCyclicCounter;
    private static final boolean AVAILABLE_ONLY_SERVERS = true;
    private static final boolean ALL_SERVERS = false;

    private static Logger log = LoggerFactory.getLogger(RoundRobinRule.class);

    public RoundRobinRule() {


        //初始化为0
        nextServerCyclicCounter = new AtomicInteger(0);
    }
    public RoundRobinRule(ILoadBalancer lb) {


        this();
        setLoadBalancer(lb);
    }
}
(2)负载均衡核心方法:choose()方法
public Server choose(ILoadBalancer lb, Object key) {


        if (lb == null) {


            log.warn("no load balancer");
            return null;
        }

        Server server = null;//调用服务器初始化为null
        int count = 0;//计数初始化为0
    	//还没选到执行的server,并且选择的次数没超过10次,进行选择server
        while (server == null && count++ < 10) {


            //lb.getReachableServers();返回所有可用的服务实例,即状态为up的实例
            List<Server> reachableServers = lb.getReachableServers();
            //lb.getAllServers();返回请求的服务下所有服务实例
            List<Server> allServers = lb.getAllServers();
            //二者的实例数量
            int upCount = reachableServers.size();
            int serverCount = allServers.size();

            //若服务实例不存在,或无可用实例。返回提示日志
            if ((upCount == 0) || (serverCount == 0)) {


                log.warn("No up servers available from load balancer: " + lb);
                return null;
            }
			//incrementAndGetModulo(serverCount)方法直接计算返回了调用服务器server的下标
            int nextServerIndex = incrementAndGetModulo(serverCount);
            //获取到下标为nextServerIndex的服务器server
            server = allServers.get(nextServerIndex);

            //若无法获取到server,进行线程让步进入下一次循环。
            if (server == null) {


                /* Transient. */
                Thread.yield();
                continue;
            }
			//当选取的server存活并可用,则返回服务调用方进一步操作
            if (server.isAlive() && (server.isReadyToServe())) {


                return (server);
            }

            // Next.为下一次准备
            server = null;
        }

    	//选择超10次,无法获取到server,打印日志
        if (count >= 10) {


            log.warn("No available alive servers after 10 tries from load balancer: "
                    + lb);
        }
        return server;
    }
(3)计算返回调用服务器server下标的关键方法:incrementAndGetModulo(int modulo)
//CAS操作加自旋锁
private int incrementAndGetModulo(int modulo) {


    //死循环作自旋
    for (;;) {


        	//获取nextServerCyclicCounter的值
            int current = nextServerCyclicCounter.get();
            //加1取余
        	int next = (current + 1) % modulo;
        	//进行CAS判断,保证上一步计算过程中,没有被其他线程或外部修改。若当前nextServerCyclicCounter与current值相同,则为true并将其设置为计算后的next。
            if (nextServerCyclicCounter.compareAndSet(current, next))
                return next;
        }
    }
java.util.concurrent.atomic 的包里有 AtomicInteger等原子类的类,主要用于在高并发环境下的高效程序处理,来帮助我们简化同步处理.
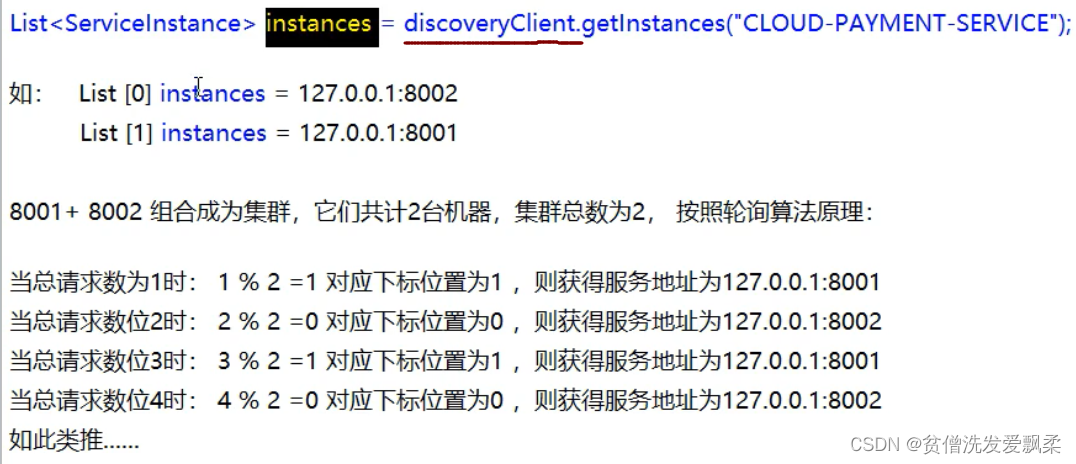
int next = (current + 1) % modulo;
rest接口第几次请求数 % 服务器集群总数量 = 实际调用服务器位置下标,每次服务重启动后rest接口计数从1开始。
6.自己实现轮询算法
(1)修改支付服务8001和8002的 controller
查看端口号
 @GetMapping(value = "/payment/lb")
    public String getPaymentLB() {


        return serverPort;//返回服务接口
    }
(2)去掉启动类的@RibbonClient注解和restTemplate的@LoadBalanced注解
@Configuration
public class ApplicationContextConfig {


    @Bean
    //@LoadBalanced //使用@LoadBalanced注解赋予RestTemplate负载均衡的能力
    public RestTemplate getRestTemplate(){


        return  new RestTemplate();
    }
}
@SpringBootApplication
@EnableEurekaClient
//@RibbonClient(name = "CLOUD-PAYMENT-SERVICE",configuration = MySelfRule.class)
public class OrderMain80 {


    public static void main(String[] args) {


        SpringApplication.run(OrderMain80.class,args);
    }
}
(3)创建LoadBalancer接口
package com.heng.config;

import org.springframework.cloud.client.ServiceInstance;
import java.util.List;


public interface LoadBalancer {


    ServiceInstance instances(List<ServiceInstance> serviceInstances);
}
(4)创建LoadBalancer接口实现类
package com.heng.config;

import org.springframework.cloud.client.ServiceInstance;
import org.springframework.stereotype.Component;
import java.util.List;
import java.util.concurrent.atomic.AtomicInteger;

@Component
public class MyLB implements LoadBalancer{


    private AtomicInteger atomicInteger = new AtomicInteger(0);

    @Override
    public ServiceInstance instances(List<ServiceInstance> serviceInstances) {


        //获取实际调用的服务器的下标
        int index = getAndIncrement() % serviceInstances.size();
        //获取该下标下的服务
        return serviceInstances.get(index);
    }

    //rest接口第几次请求数
    public final int getAndIncrement()
    {


        int current;
        int next;

        do {


            current = this.atomicInteger.get();
            next = current >= 2147483647 ? 0 : current + 1;
        }while(!this.atomicInteger.compareAndSet(current,next));
        System.out.println("*****第几次访问,次数next: "+next);
        return next;
    }
}
(5)编写controller层代码
    @GetMapping(value = "/consumer/payment/lb")
    public String getPaymentLB()
    {


        //获取所有的支付服务
        List<ServiceInstance> instances = discoveryClient.getInstances("CLOUD-PAYMENT-SERVICE");

        if(instances == null || instances.size() <= 0){


            return null;
        }
        //获取要使用的服务
        ServiceInstance serviceInstance = loadBalancer.instances(instances);
        //获取要使用服务的URL
        URI uri = serviceInstance.getUri();
        return restTemplate.getForObject(uri+"/payment/lb",String.class);

    }
测试后,8001和8002服务交替出现,结果符合预期