习惯了使用TP框架调用swoft的RPC微服务,使用hyperf框架时,在其文档和百度都没有找到其他框架调用RPC的数据结构,故只能在hyperf的RPC服务端的请求链路进行日志输入和搭建hyperf的PRC客户端进行数据请求。
主要内容参考hyperf官方文档
1,搭建hyperf的RPC服务端(192.168.1.212)
在app目录下新建Rpc文件夹,先新建一个CalculatorServiceInterface接口文件,文件名CalculatorServiceInterface.php
<?php

namespace App\Rpc;

interface CalculatorServiceInterface
{
    public function add(int $a, int $b): int;
}
基于这个Interface,在该目录下添加一个实现方式的CalculatorService,文件名:CalculatorService.php
<?php

namespace App\Rpc;

use Hyperf\RpcServer\Annotation\RpcService;

/**
 * 注意,如希望通过服务中心来管理服务,需在注解内增加 publishTo 属性
 * @RpcService(name="CalculatorService", protocol="jsonrpc", server="jsonrpc")
 */
class CalculatorService implements CalculatorServiceInterface
{
    public function add(int $a, int $b) : int
    {
        return $a +$b;
    }
}
在这里使用了注解方式提供服务,name是服务名称,protocol指定使用了jsonrpc-http协议
打开config/autoload/server.php,在servers数组下,增加配置
'servers' => [
        [
            'name' => 'http',
            'type' => Server::SERVER_HTTP,
            'host' => '0.0.0.0',
            'port' => 9701,
            'sock_type' => SWOOLE_SOCK_TCP,
            'callbacks' => [
                SwooleEvent::ON_REQUEST => [Hyperf\HttpServer\Server::class, 'onRequest'],
            ],
        ],
        [
            'name' => 'jsonrpc-http',
            'type' => Server::SERVER_HTTP,
            'host' => '0.0.0.0',
            'port' => 9704,
            'sock_type' => SWOOLE_SOCK_TCP,
            'callbacks' => [
                SwooleEvent::ON_REQUEST => [Hyperf\JsonRpc\HttpServer::class, 'onRequest'],
            ],
        ],
        // 这里主要用的是这个
        [
            'name' => 'jsonrpc',
            'type' => Server::SERVER_BASE,
            'host' => '0.0.0.0',
            'port' => 9705,
            'sock_type' => SWOOLE_SOCK_TCP,
            'callbacks' => [
                SwooleEvent::ON_RECEIVE => [\Hyperf\JsonRpc\TcpServer::class, 'onReceive'],
            ],
            'settings' => [
                'open_eof_split' => true,
                'package_eof' => "\r\n",
                'package_max_length' => 1024 * 1024 * 2,
            ],
        ],
    ],
2.搭建hyperf的RPC客户端(192.168.1.45)
同样在app目录下新建Rpc文件夹,先新建一个CalculatorServiceInterface接口文件,文件名CalculatorServiceInterface.php
<?php

namespace App\Rpc;

interface CalculatorServiceInterface
{
    public function add(int $a, int $b): int;
}
修改app/Controllers/IndexController.php
<?php

declare(strict_types=1);
/**
 * This file is part of Hyperf.
 *
 * @link     https://www.hyperf.io
 * @document https://hyperf.wiki
 * @contact  [email protected]
 * @license  https://github.com/hyperf/hyperf/blob/master/LICENSE
 */
namespace App\Controller;

use App\Rpc\CalculatorServiceInterface;

use Hyperf\Utils\Context;
use Hyperf\Utils\Coroutine;
use Hyperf\Utils\Parallel;
use Hyperf\Utils\ApplicationContext;
use Hyperf\Di\Annotation\Inject;
use Hyperf\HttpServer\Annotation\AutoController;

class IndexController extends AbstractController
{

    public function index()
    {
        $user = $this->request->input('user', 'Hyperf');
        $method = $this->request->getMethod();

        return [
            'method' => $method,
            'message' => "Hello22 {$user}.",
        ];
    }

    public function add()
    {
        $client = ApplicationContext::getContainer()->get(CalculatorServiceInterface::class);
        $value = $client->add(10, 20);
        return $value;
    }
}
新增客户端路由,修改config\routes.php,增加/add请求链接
<?php

declare(strict_types=1);
/**
 * This file is part of Hyperf.
 *
 * @link     https://www.hyperf.io
 * @document https://hyperf.wiki
 * @contact  [email protected]
 * @license  https://github.com/hyperf/hyperf/blob/master/LICENSE
 */
use Hyperf\HttpServer\Router\Router;

Router::addRoute(['GET', 'POST', 'HEAD'], '/', 'App\Controller\IndexController@index');
Router::addRoute(['GET', 'POST', 'HEAD'],'/add', 'App\Controller\IndexController@add');
Router::get('/favicon.ico', function () {
    return '';
});
创建客户端请求服务端的配置文件:config\autoload\services.php
<?php

declare(strict_types=1);
/**
 * This file is part of Hyperf.
 *
 * @link     https://www.hyperf.io
 * @document https://hyperf.wiki
 * @contact  [email protected]
 * @license  https://github.com/hyperf/hyperf/blob/master/LICENSE
 */
return [
    'consumers' => [
        [
            // The service name, this name should as same as with the name of service provider.
            'name' => 'CalculatorService',
            // The service registry, if `nodes` is missing below, then you should provide this configs.
            // 服务接口名,可选,默认值等于 name 配置的值,如果 name 直接定义为接口类则可忽略此行配置,如 name 为字符串则需要配置 service 对应到接口类
            'service' => \App\Rpc\CalculatorServiceInterface::class,
            // 服务提供者的服务协议,可选,默认值为 jsonrpc-http
            'protocol' => 'jsonrpc',
            // 负载均衡算法,可选,默认值为 random
            'load_balancer' => 'random',
            // 对应容器对象 ID,可选,默认值等于 service 配置的值,用来定义依赖注入的 key
            'id' => \App\Rpc\CalculatorServiceInterface::class,
            // If `registry` is missing, then you should provide the nodes configs.
            'nodes' => [
                // Provide the host and port of the service provider.
                 ['host' => '192.168.1.212', 'port' => 9705]
            ],
            // 配置项,会影响到 Packer 和 Transporter
            'options' => [
                'connect_timeout' => 5.0,
                'recv_timeout' => 5.0,
                'settings' => [
                    // 根据协议不同,区分配置
                    'open_eof_split' => true,
                    'package_eof' => "\r\n",
                    // 'open_length_check' => true,
                    // 'package_length_type' => 'N',
                    // 'package_length_offset' => 0,
                    // 'package_body_offset' => 4,
                ],
                // 当使用 JsonRpcPoolTransporter 时会用到以下配置
                'pool' => [
                    'min_connections' => 1,
                    'max_connections' => 32,
                    'connect_timeout' => 10.0,
                    'wait_timeout' => 3.0,
                    'heartbeat' => -1,
                    'max_idle_time' => 60.0,
                ],
            ]

        ],
    ],
];
3.启动服务端和客户端
热更新启动
php bin/hyperf.php server:watch
4.请求服务端地址

能输出结构表示没有问题,如果没能正确输出的话,仔细检查配置是否有错误(IP、端口、协议、类名等)
5.对服务端的RPC解析输出打印
vendor\hyperf\json-rpc\src\TcpServer.php
经测试RPC数据对接的方法是buildJsonRpcRequest方法,打印一下数据
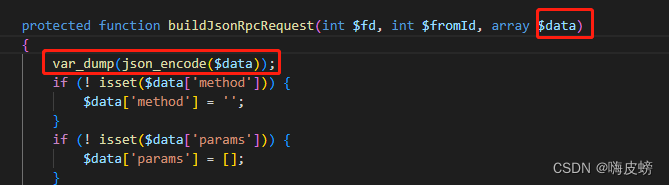
得到数据为:
{"jsonrpc":"2.0","method":"\/calculator\/add","params":[10,20],"id":"62b6e12b05614","context":[]}
6.TP框架接入hyperf的PRC接口
$host = 'tcp://192.168.1.212:9705/';
$fp = stream_socket_client($host, $errno, $errstr);
if (!$fp) {
    log_write("stream_socket_client fail errno={$errno} errstr={$errstr}", 'RPC');
    throw new Exception("stream_socket_client fail errno={$errno} errstr={$errstr}");
}
// hyperf
// {"jsonrpc":"2.0","method":"\/calculator\/add","params":[10,20],"id":"62b6e12b05614","context":[]}
$req = [
    "jsonrpc" => '2.0',
    "method" => '/calculator/add',
    'params' => [10,20],
    'id' => '',
    'context' => $ext,
];
$data = json_encode($req) . RPC_EOL;
fwrite($fp, $data);
$result = '';
while (!feof($fp)) {
    $tmp = stream_socket_recvfrom($fp, 1024);
    if ($pos = strpos($tmp, RPC_EOL)) {
        $result .= substr($tmp, 0, $pos);
        break;
    } else {
        $result .= $tmp;
    }
}
fclose($fp);
dump($result);
RPC服务端成功返回数据

至此,TP框架接入hyperf-PRC-Json就算是完成了,剩下的就是进一步优化请求方式美化代码,代码下载:
TP框架接入hyperf-PRC-Json类-PHP文档类资源-CSDN下载
