文章目录
一、重点内容:
知识要点有哪些?
1、redis是什么
2、redis应用案例
3、redis使用注意事项
二、详细知识点介绍:
1、为什么需要Redis
数据从单表,演进出了分库分表:
MySQL从单机演进出了集群:
数据量增长
读写数据压力的不断增加
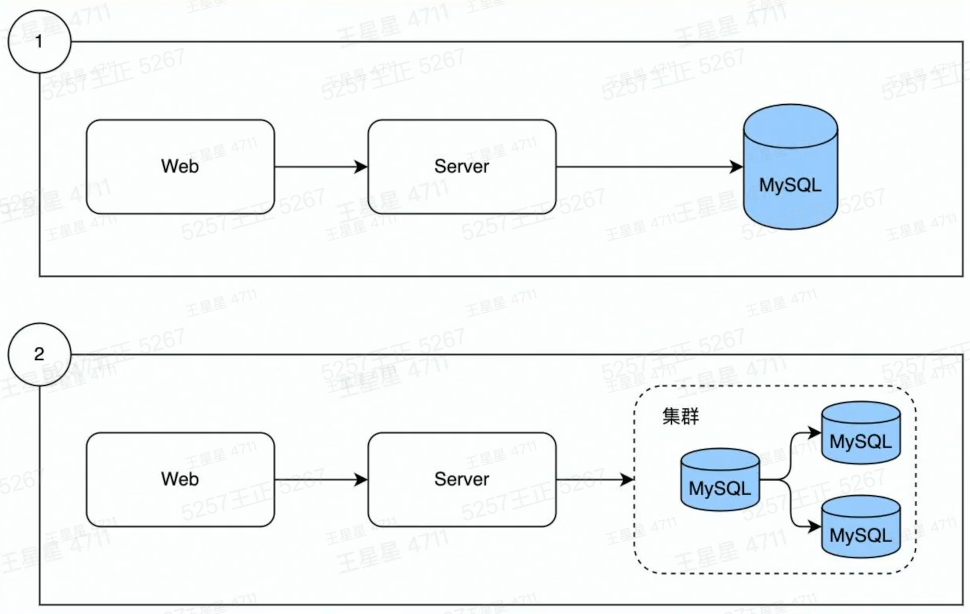
解决问题:
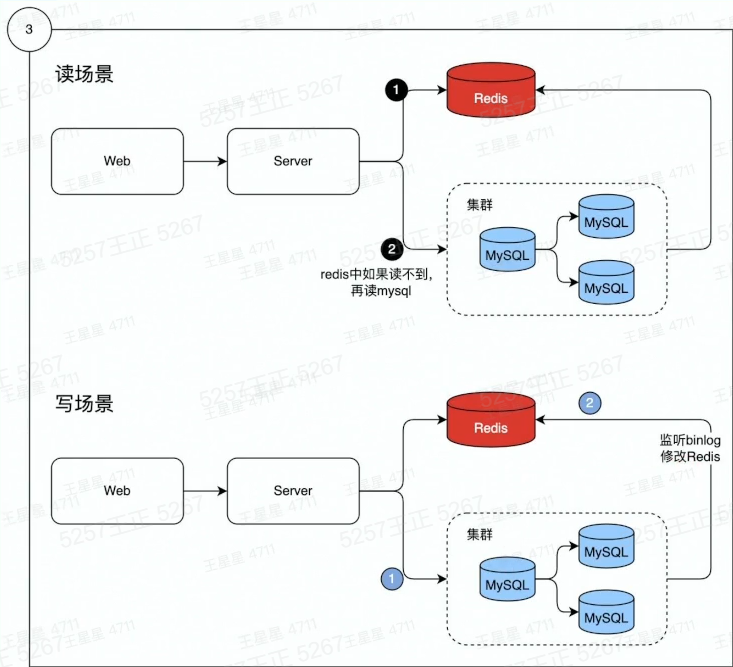
数据分冷热
热数据:经常被访问到的数据
将热数据存储到内存中:
2、redis工作原理
特性:
1、数据从内存中读写
2、数据保存到硬盘上防止重启数据丢失
3、增量数据保存到AOF文件
4、全量数据保存RDB文件
5、单线程处理所有操作命令
图解:
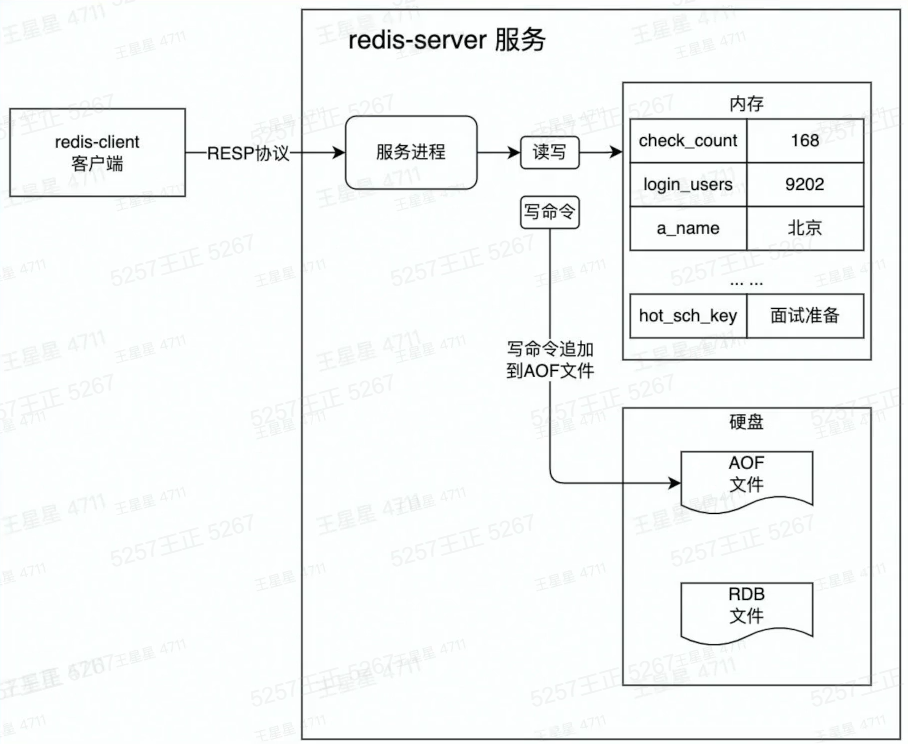
redis启动会首先在硬盘中加载RDB文件、然后加载AOF文件,将数据写入内存中,恢复重启前状态,完成启动。
3、redis安装和配置
安装
熟悉以下命令的操作
- GET/SET/DEL/INCR/SETNX
- HSET/HGET/HINCRBY
- LPUSH/RPOP/LRANGE
- ZADD/ZRANGEBYSCORE/ZREVRANGE/ZINCRBY/ZSCORE
命令使用文档:http://redisdoc.com/
go连接Redis
使用go-redis连接方式:
import (
    "fmt"
    "github.com/go-redis/redis/v8"
)
func ConnRedis() {


    rd := redis.NewClient(&redis.Options{


        Addr: "127.0.0.1:6379", // url
        Password: "",
        DB:0,   // 0号数据库
    })
    result, err := rd.Ping().Result()
    if err != nil {


        fmt.Println("ping err :",err)
        return
    }
    fmt.Println(result)
}
执行后,redis-cli.exe打印了该信息:
1631848109.771606 [0 127.0.0.1:54185] "ping"
4、redis应用案例
注册全局redis:
package example

import (
	"github.com/go-redis/redis/v9"
)

var RedisClient *redis.Client

func init() {


	rdb := redis.NewClient(&redis.Options{


		Addr: "127.0.0.1:6379",
		Password: "XXXXXX",
		DB: 1,
	})
	RedisClient = rdb
}
主函数:
输入对应的案例和参数:EXxx和参数。可以运行对应的案例
package main

import (
	"code.byted.org/wangxingxing.alex/redis_course/example"
	"context"
	"fmt"
	"os"
	"strings"
)

func main() {


	defer example.RedisClient.Close()
	argsProg := os.Args
	var argsWithoutProg []string
	if len(argsProg) > 0 {


		argsWithoutProg = os.Args[1:]
		fmt.Printf("输入参数:\n%s\n----------\n", strings.Join(argsWithoutProg, "\n"))
	}
	ctx := context.Background()
	runExample := argsWithoutProg[0]
	exampleParams := argsWithoutProg[1:]
	switch runExample {


	case "Ex01":
		example.Ex01(ctx, exampleParams)
	case "Ex02":
		example.Ex02(ctx)
	case "Ex03":
		example.Ex03(ctx)
	case "Ex04":
		example.Ex04(ctx)
	case "Ex05":
		example.Ex05(ctx, exampleParams)
	case "Ex06":
		example.Ex06(ctx, exampleParams)
	case "Ex06_2":
		fmt.Printf("%v\n", exampleParams)
		example.Ex06_2(ctx, exampleParams)
	case "Ex07":
		example.Ex07(ctx)
	}
}
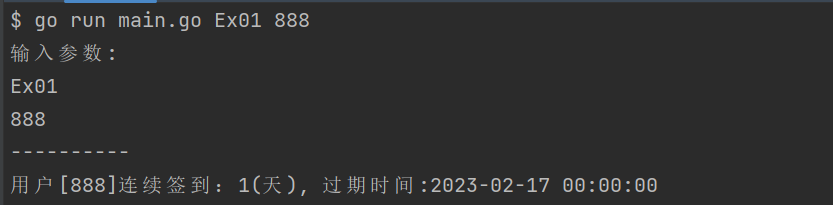
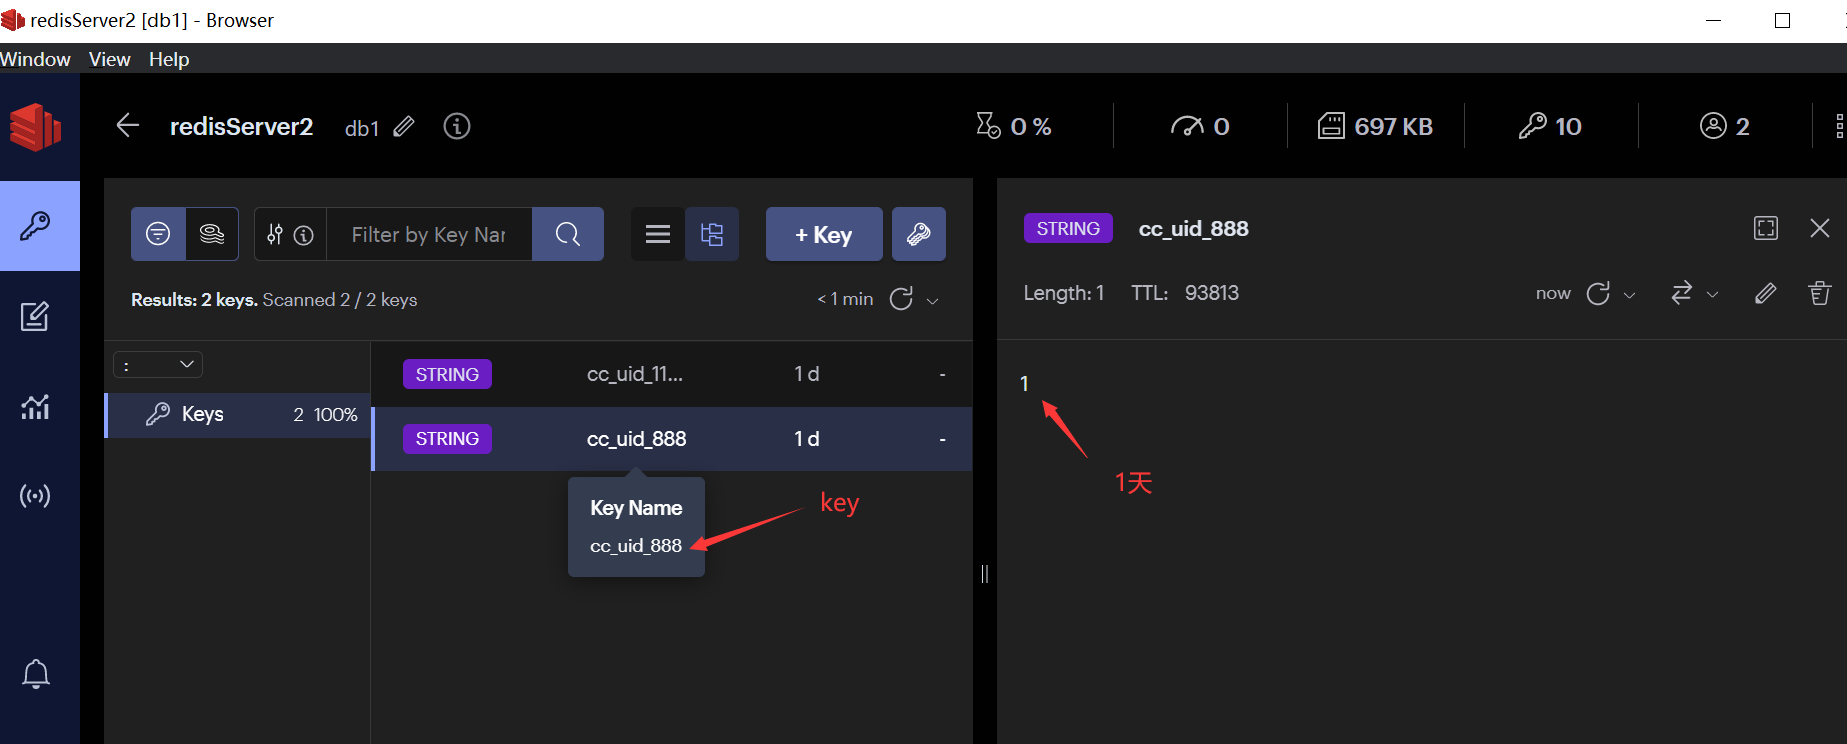
1.连续签到
场景:
掘金每日连续签到
用户每日有一次签到的机会,如果断签,连续签到计数将归0。
连续签到的定义:每天必须在23:59:59前签到

代码:
重点:
1、原有数值加一:
RedisClient.Incr(ctx, key)2、设置过期时间:
RedisClient.ExpireAt(ctx, key, expAt)
package example

import (
   "context"
   "fmt"
   "strconv"
   "time"
)

var ctx = context.Background()

const continuesCheckKey = "cc_uid_%d"

// Ex01 连续签到天数
func Ex01(ctx context.Context, params []string) {


   if userID, err := strconv.ParseInt(params[0], 10, 64); err == nil {


      addContinuesDays(ctx, userID)
   } else {


      fmt.Printf("参数错误, params=%v, error: %v\n", params, err)
   }
}

// addContinuesDays 为用户签到续期
func addContinuesDays(ctx context.Context, userID int64) {


   key := fmt.Sprintf(continuesCheckKey, userID)
   // 1. 连续签到数+1
   err := RedisClient.Incr(ctx, key).Err()
   if err != nil {


      fmt.Errorf("用户[%d]连续签到失败", userID)
   } else {


      expAt := beginningOfDay().Add(48 * time.Hour)
      // 2. 设置签到记录在后天的0点到期
      if err := RedisClient.ExpireAt(ctx, key, expAt).Err(); err != nil {


         panic(err)
      } else {


         // 3. 打印用户续签后的连续签到天数
         day, err := getUserCheckInDays(ctx, userID)
         if err != nil {


            panic(err)
         }
         fmt.Printf("用户[%d]连续签到:%d(天), 过期时间:%s", userID, day, expAt.Format("2006-01-02 15:04:05"))
      }
   }
}

// getUserCheckInDays 获取用户连续签到天数
func getUserCheckInDays(ctx context.Context, userID int64) (int64, error) {


   key := fmt.Sprintf(continuesCheckKey, userID)
   days, err := RedisClient.Get(ctx, key).Result()
   if err != nil {


      return 0, err
   }
   if daysInt, err := strconv.ParseInt(days, 10, 64); err != nil {


      panic(err)
   } else {


      return daysInt, nil
   }
}

// beginningOfDay 获取今天0点时间
func beginningOfDay() time.Time {


   now := time.Now()
   y, m, d := now.Date()
   return time.Date(y, m, d, 0, 0, 0, 0, time.Local)
}
测试:
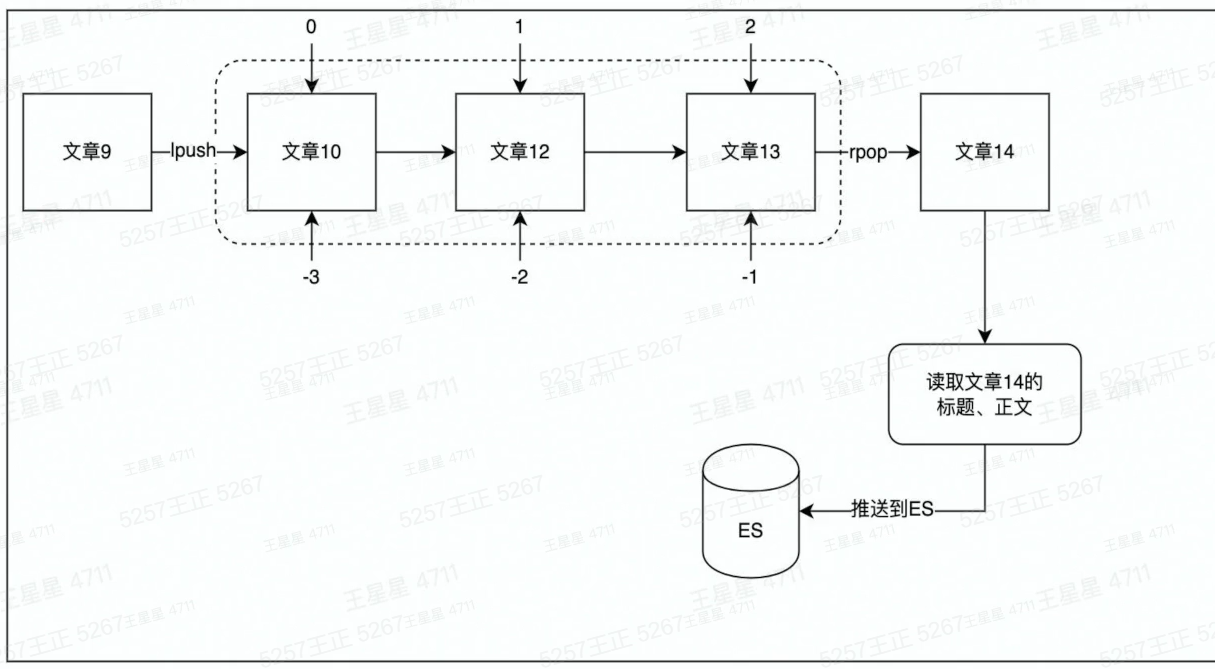
2.消息通知
使用场景:
消息通知。
例如当文章更新时,将更新后的文章推送到ES,用户就能搜索到最新的文章数据。
方案:使用list做消息队列
代码:
package example
import (
"context"
"fmt"
"strings"
"time"
"code.byted.org/wangxingxing.alex/redis_course/example/common"
)
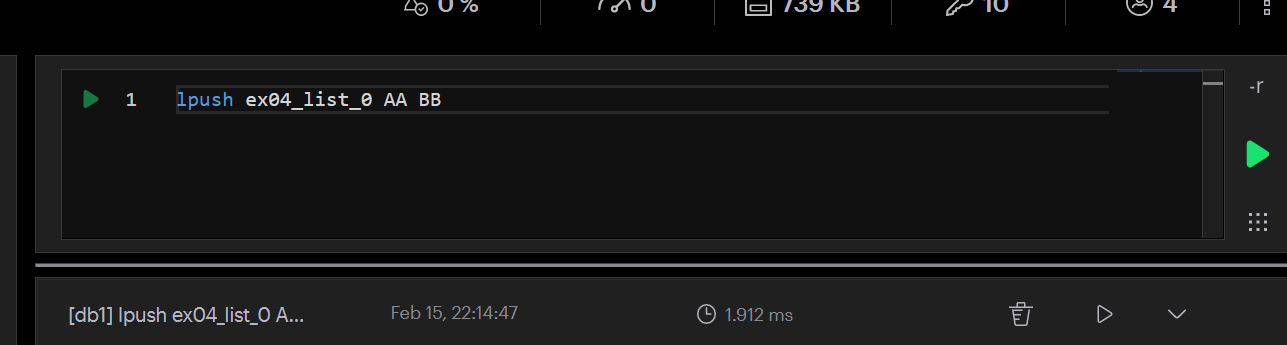
const ex04ListenList = "ex04_list_0" // lpush ex04_list_0 AA BB
// Ex04Params Ex04的自定义函数
type Ex04Params struct {
}
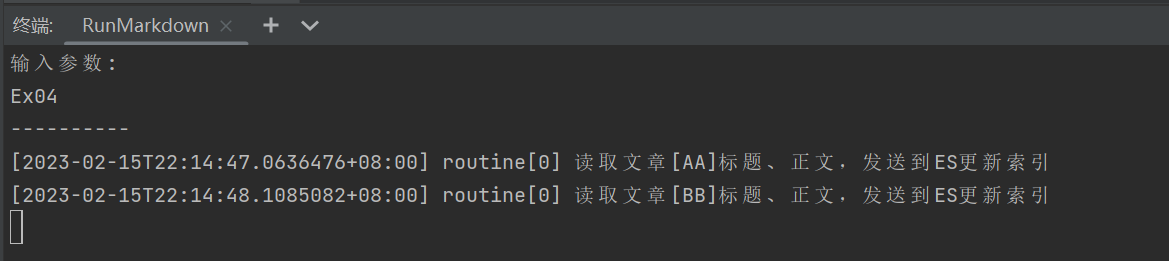
func Ex04(ctx context.Context) {
eventLogger := &common.ConcurrentEventLogger{
}
// new一个并发执行器
// routineNums是消费端的数量,多消费的场景,可以使用ex04ConsumerPop,使用ex04ConsumerRange存在消息重复消费的问题。
cInst := common.NewConcurrentRoutine(1, eventLogger)
// 并发执行用户自定义函数work
cInst.Run(ctx, Ex04Params{
}, ex04ConsumerPop)
// 按日志时间正序打印日志
eventLogger.PrintLogs()
}
// ex04ConsumerPop 使用rpop逐条消费队列中的信息,数据从队列中移除
// 生成端使用:lpush ex04_list_0 AA BB
func ex04ConsumerPop(ctx context.Context, cInstParam common.CInstParams) {
routine := cInstParam.Routine
for {
items, err := RedisClient.BRPop(ctx, 0, ex04ListenList).Result()
if err != nil {
panic(err)
}
fmt.Println(common.LogFormat(routine, "读取文章[%s]标题、正文,发送到ES更新索引", items[1]))
// 将文章内容推送到ES
time.Sleep(1 * time.Second)
}
}
测试:
3.计数
场景:
一个用户有多项计数需求,可通过hash结构存储。
代码:
package example
import (
"context"
"fmt"
"os"
"strconv"
"github.com/go-redis/redis/v9"
)
const Ex05UserCountKey = "ex05_user_count"
// Ex05 hash数据结果的运用(参考掘金应用)
// go run main.go init 初始化用户计数值
// go run main.go get 1556564194374926 // 打印用户(1556564194374926)的所有计数值
// go run main.go incr_like 1556564194374926 // 点赞数+1
// go run main.go incr_collect 1556564194374926 // 点赞数+1
// go run main.go decr_like 1556564194374926 // 点赞数-1
// go run main.go decr_collect 1556564194374926 // 点赞数-1
func Ex05(ctx context.Context, args []string) {
if len(args) == 0 {
fmt.Printf("args can NOT be empty\n")
os.Exit(1)
}
arg1 := args[0]
switch arg1 {
case "init":
Ex06InitUserCounter(ctx)
case "get":
userID, err := strconv.ParseInt(args[1], 10, 64)
if err != nil {
panic(err)
}
GetUserCounter(ctx, userID)
case "incr_like":
userID, err := strconv.ParseInt(args[1], 10, 64)
if err != nil {
panic(err)
}
IncrByUserLike(ctx, userID)
case "incr_collect":
userID, err := strconv.ParseInt(args[1], 10, 64)
if err != nil {
panic(err)
}
IncrByUserCollect(ctx, userID)
case "decr_like":
userID, err := strconv.ParseInt(args[1], 10, 64)
if err != nil {
panic(err)
}
DecrByUserLike(ctx, userID)
case "decr_collect":
userID, err := strconv.ParseInt(args[1], 10, 64)
if err != nil {
panic(err)
}
DecrByUserCollect(ctx, userID)
}
}
func Ex06InitUserCounter(ctx context.Context) {
pipe := RedisClient.Pipeline()
userCounters := []map[string]interface{
}{
{
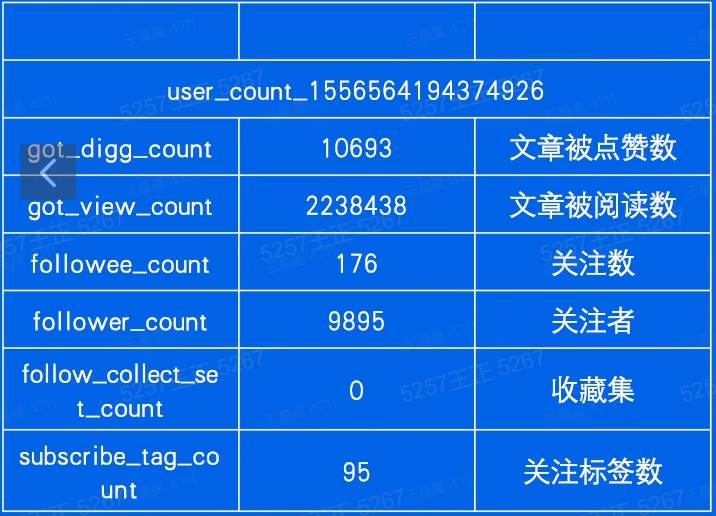
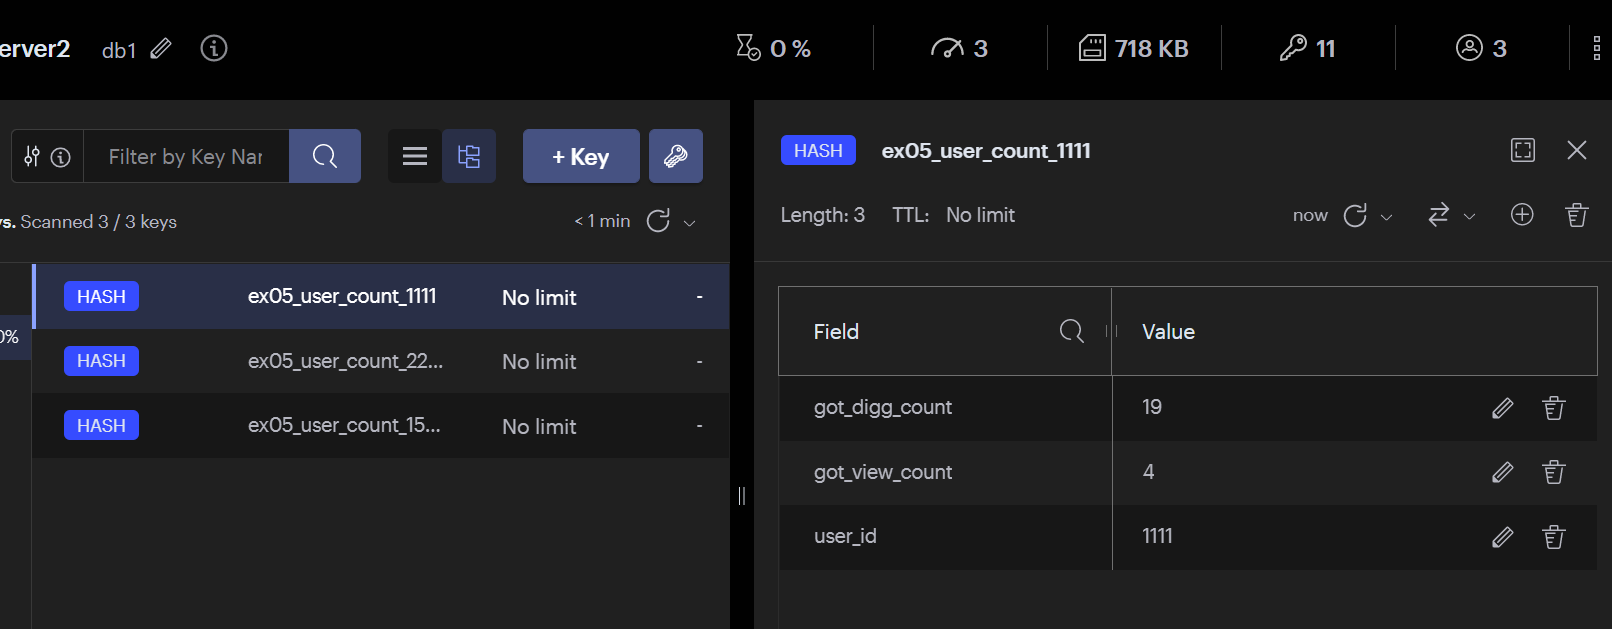
"user_id": "1556564194374926", "got_digg_count": 10693, "got_view_count": 2238438, "followee_count": 176, "follower_count": 9895, "follow_collect_set_count": 0, "subscribe_tag_count": 95},
{
"user_id": "1111", "got_digg_count": 19, "got_view_count": 4},
{
"user_id": "2222", "got_digg_count": 1238, "follower_count": 379},
}
for _, counter := range userCounters {
uid, err := strconv.ParseInt(counter["user_id"].(string), 10, 64)
key := GetUserCounterKey(uid)
rw, err := pipe.Del(ctx, key).Result()
if err != nil {
fmt.Printf("del %s, rw=%d\n", key, rw)
}
_, err = pipe.HMSet(ctx, key, counter).Result()
if err != nil {
panic(err)
}
fmt.Printf("设置 uid=%d, key=%s\n", uid, key)
}
// 批量执行上面for循环设置好的hmset命令
_, err := pipe.Exec(ctx)
if err != nil {
// 报错后进行一次额外尝试
_, err = pipe.Exec(ctx)
if err != nil {
panic(err)
}
}
}
func GetUserCounterKey(userID int64) string {
return fmt.Sprintf("%s_%d", Ex05UserCountKey, userID)
}
func GetUserCounter(ctx context.Context, userID int64) {
pipe := RedisClient.Pipeline()
GetUserCounterKey(userID)
pipe.HGetAll(ctx, GetUserCounterKey(userID))
cmders, err := pipe.Exec(ctx)
if err != nil {
panic(err)
}
for _, cmder := range cmders {
counterMap, err := cmder.(*redis.MapStringStringCmd).Result()
if err != nil {
panic(err)
}
for field, value := range counterMap {
fmt.Printf("%s: %s\n", field, value)
}
}
}
// IncrByUserLike 点赞数+1
func IncrByUserLike(ctx context.Context, userID int64) {
incrByUserField(ctx, userID, "got_digg_count")
}
// IncrByUserCollect 收藏数+1
func IncrByUserCollect(ctx context.Context, userID int64) {
incrByUserField(ctx, userID, "follow_collect_set_count")
}
// DecrByUserLike 点赞数-1
func DecrByUserLike(ctx context.Context, userID int64) {
decrByUserField(ctx, userID, "got_digg_count")
}
// DecrByUserCollect 收藏数-1
func DecrByUserCollect(ctx context.Context, userID int64) {
decrByUserField(ctx, userID, "follow_collect_set_count")
}
func incrByUserField(ctx context.Context, userID int64, field string) {
change(ctx, userID, field, 1)
}
func decrByUserField(ctx context.Context, userID int64, field string) {
change(ctx, userID, field, -1)
}
func change(ctx context.Context, userID int64, field string, incr int64) {
redisKey := GetUserCounterKey(userID)
before, err := RedisClient.HGet(ctx, redisKey, field).Result()
if err != nil {
panic(err)
}
beforeInt, err := strconv.ParseInt(before, 10, 64)
if err != nil {
panic(err)
}
if beforeInt+incr < 0 {
fmt.Printf("禁止变更计数,计数变更后小于0. %d + (%d) = %d\n", beforeInt, incr, beforeInt+incr)
return
}
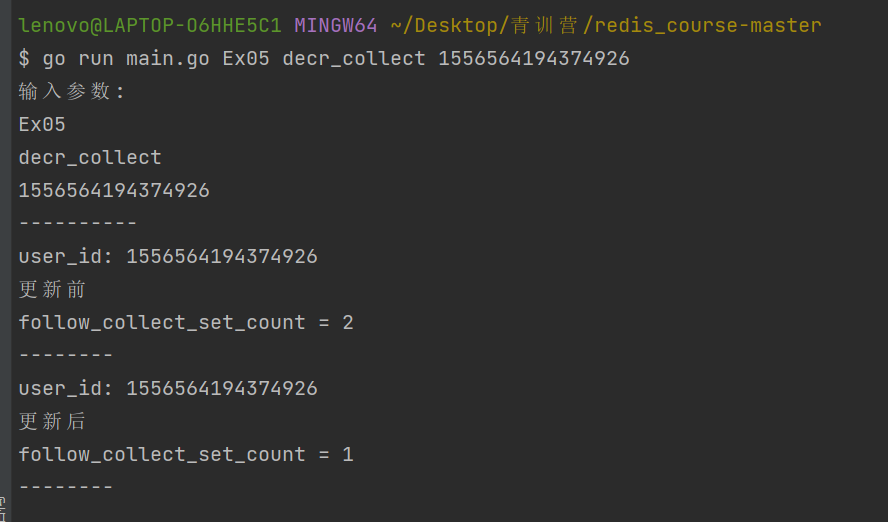
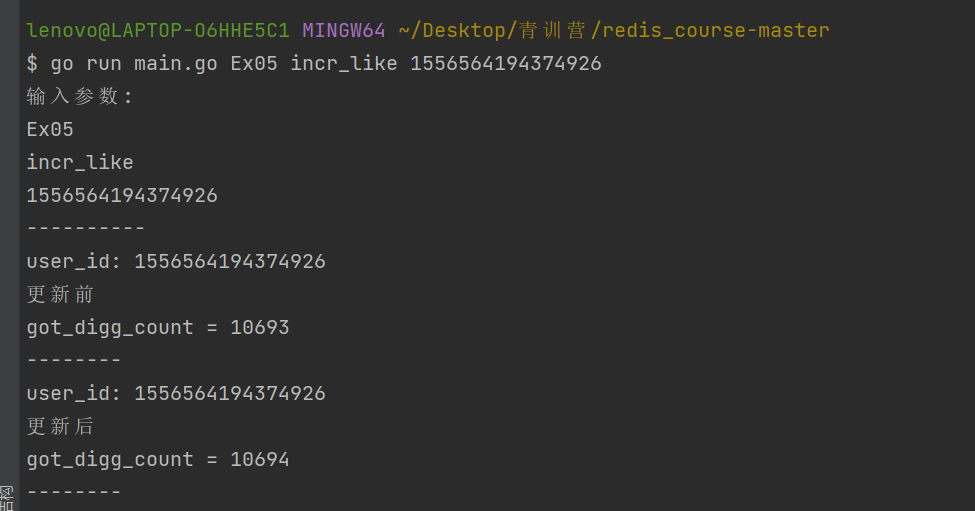
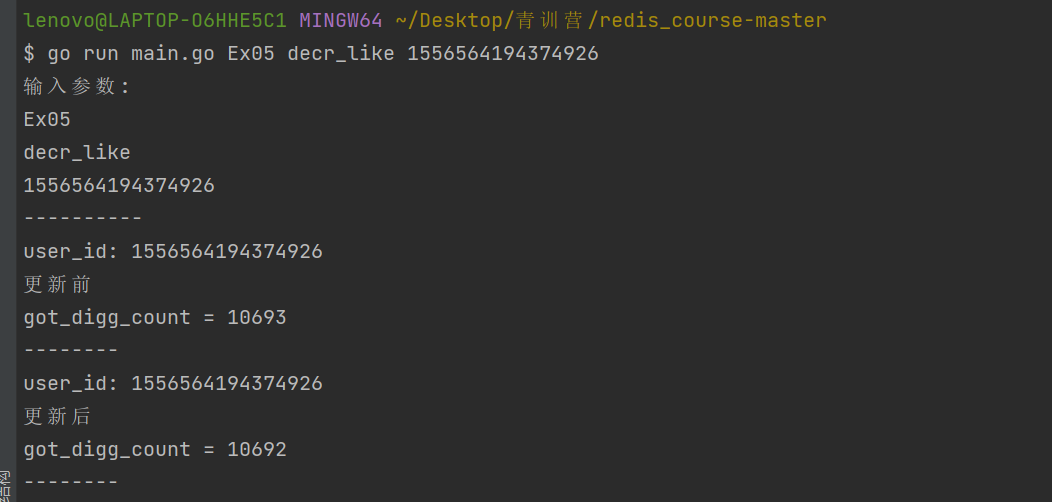
fmt.Printf("user_id: %d\n更新前\n%s = %s\n--------\n", userID, field, before)
_, err = RedisClient.HIncrBy(ctx, redisKey, field, incr).Result()
if err != nil {
panic(err)
}
// fmt.Printf("更新记录[%d]:%d\n", userID, num)
count, err := RedisClient.HGet(ctx, redisKey, field).Result()
if err != nil {
panic(err)
}
fmt.Printf("user_id: %d\n更新后\n%s = %s\n--------\n", userID, field, count)
}
测试:
插入数据:go run main.go Ex05 init
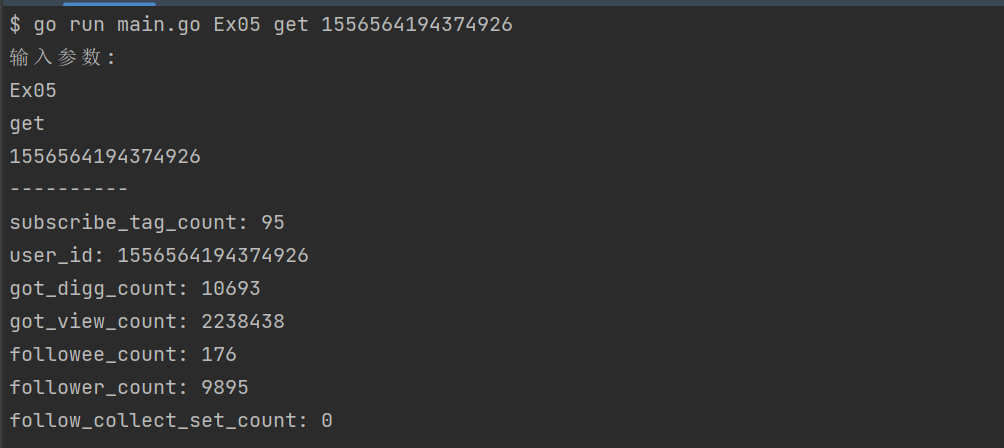
获取数据:go run main.go Ex05 get 1556564194374926
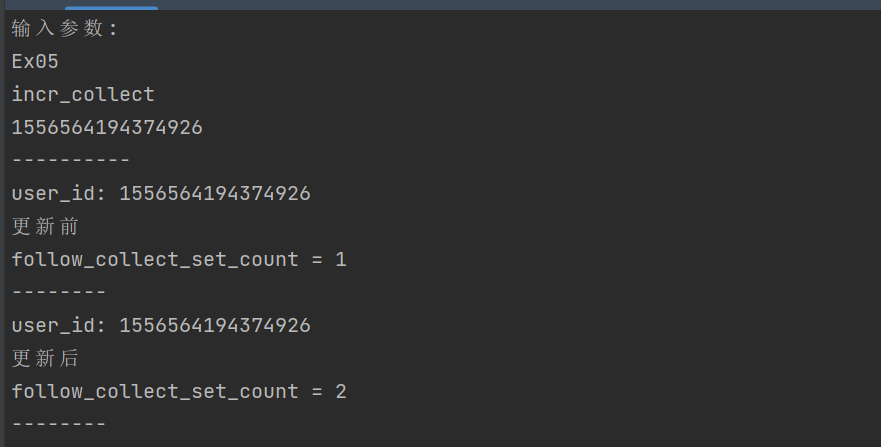
收藏+1:go run main.go Ex05 incr_collect 1556564194374926
取消收藏:go run main.go Ex05 decr_collect 1556564194374926
点赞:go run main.go Ex05 incr_like 1556564194374926
取消点赞:go run main.go Ex05 decr_like 1556564194374926
5、Redis使用注意事项
1、大Key、热Key
大Key的定义:
String类型
大Key标准:value的字节数大于10KB即为大key
Hash/ Set/Zset/list等复杂数据结构类型
大Key标准:元素个数大于5000个或总value字节数大于10MB即为大key
大Key的危害:
1、读取成本高
2、主从复制异常,服务阻塞,无法正常响应请求
3、容易导致慢查询(过期、删除)
4、客户端请求redis超时报错
redis读写过程:

消除大Key
1.拆分
将大key拆分为小key。例如一个String拆分成多个String

2.压缩
将value压缩后写入redis,读取时解压后再使用。
压缩算法可以是gzip、snappy、lz4等。通常情况下,一个压缩算法压缩率高、则解压耗时就长。需要对实际数据进行测试后.选择一个合适的算法。
如果存储的是JSON字符串可以考虑使用MessagePack进行序列化。
3.集合类结构hash、list、set、set
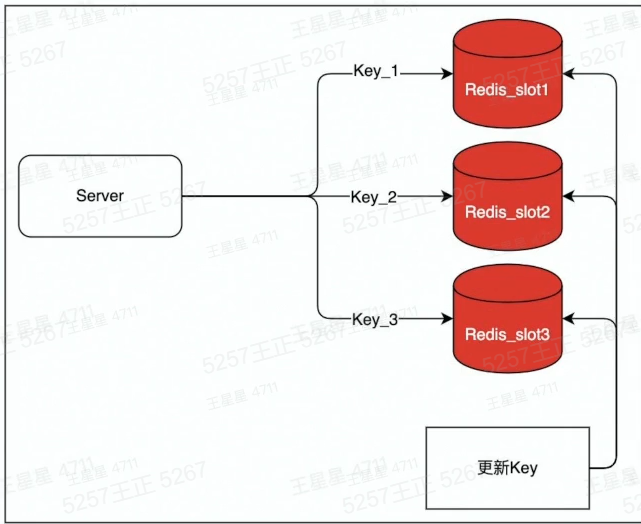
(1)拆分:可以用hash取余、位掩码的方式决定放在哪个key中
(2)区分冷热:如榜单列表场景使用zset,只缓存前10页数据
热Key的定义
用户访问一个Key的QPS特别高,导致Server实例出现CPU负载突增或者不均的情况。热key没有明确的标准,QPS 超过500就有可能被识别为热Key

解决热Key的方法
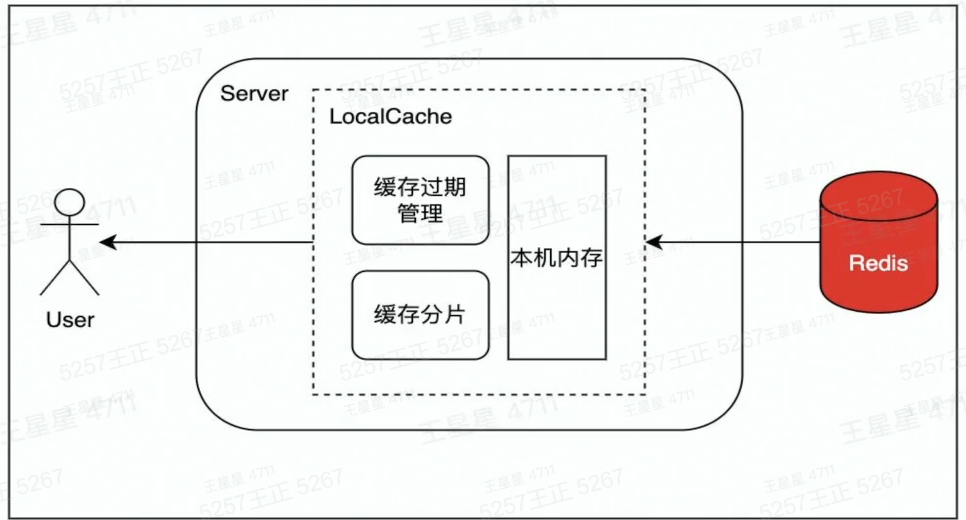
1.设置Localcache
在访问Redis前.在业务服务侧设置Localcache,降低访问Redis的QPS。LocalCache中缓存过期或未命中,则从Redis中将数据更新到LocalCache。Java的Guava、Golang的Bigcache就是这类LocalCache
2.拆分
将key :value这一个热Key复制写入多份,例如key1:value,key2:value,访问的时候访问多个key,但value是同一个以此将qps分散到不同实例上.降低负载。代价是,更新时需要更新多个key.存在数据短暂不一致的风险
2、慢查询场景
容易导致redis慢查询的操作:
⑴批量操作一次性传入过多的key/value,如mset/hmset/sadd/zadd等o(n)操作,建议单批次不要超过100,超过100之后性能下降明显。
(2)zset大部分命令都是o(log(n)),当大小超过5k以上时,简单的zadd/zrem也可能导致慢查询。
(3)操作的单个value过大,超过10KB。也即,避免使用大Key
(4)对大key的delete/ expire操作也可能导致慢查询.Redis4.0之前不支持异步删除unlink,大key删除会阻塞Redis
3、缓存穿透、缓存雪崩
缓存穿透:热点数据查询绕过缓存,直接查询数据库
缓存雪崩:大量缓存同时过期
缓存穿透的危害:
(1)查询一个一定不存在的数据
通常不会缓存不存在的数据,这类查询请求都会直接打到db,如果有系统bug或人为攻击.那么容易导致db响应慢甚至宕机。
⑵)缓存过期时
在高并发场景下,一个热key如果过期,会有大量请求同时击穿至db,容易影响db性能和稳定。同一时间有大量key集中过期时,也会导致大量请求落到db上,导致查询变慢,甚至出现db无法响应新的查询。
如何减少缓存穿透:
(1)缓存空值
如一个不存在的userID。这个id在缓存和数据库中都不存在。则可以缓存一个空值,下次再查缓存直接反空值
(2)布隆过滤器
通过bloom filter算法来存储合法Key,得益于该算法超高的压缩率,只需占用极小的空间就能存储大量key值。
三、课后个人总结:
这些内容基本上是第一天的内容,学的真的很过瘾,毕竟对于我来说是干货,能够深入浅出的从案例分析问题。从解决问题中了解设计原理,总结知识。