- 本文是对B站教程 动脑学院 Android教程 学习过程中所做的笔记。
- 文章分为上下两部分,此文是下部分,上部分链接为:Android基础教程——从入门到精通(上)。
- 源视频教程并没有录制全,本文还补充了 Service 和 网络通信 的内容
- 文章介绍详细,示例代码丰富,相信跟着本教程可以打下很好的Android基础。
六、高级控件
1. 下拉列表
(1)下拉框
Spinner是下拉框控件,它用于从一串列表中选择某项。下拉列表的展示方式有两种,一种是在当前下拉框的正下方弹出列表框,另一种是在页面中部弹出列表对话框,分别对应SpinnerMode属性设置为dropdown或者dialog。
下面分别是这两种下拉框的实例代码:
首先是布局文件 activity_spinner_dropdown.xml :
<?xml version="1.0" encoding="utf-8"?>
<LinearLayout xmlns:android="http://schemas.android.com/apk/res/android"
    xmlns:app="http://schemas.android.com/apk/res-auto"
    xmlns:tools="http://schemas.android.com/tools"
    android:layout_width="match_parent"
    android:layout_height="match_parent"
    tools:context=".SpinnerDropdownActivity"
    android:orientation="vertical">

    <TextView
        android:layout_width="match_parent"
        android:layout_height="wrap_content"
        android:text="下拉模式的列表框"
        android:textSize="17sp"/>

    <Spinner
        android:id="@+id/sp_dropdown"
        android:layout_width="match_parent"
        android:layout_height="wrap_content"
        android:spinnerMode="dropdown"/>

</LinearLayout>
接着是条目布局文件 item_select:用于描绘每个item的布局样式
<?xml version="1.0" encoding="utf-8"?>
<TextView xmlns:android="http://schemas.android.com/apk/res/android"
          android:layout_width="match_parent"
          android:layout_height="50dp"
          xmlns:tools="http://schemas.android.com/tools"
          android:gravity="center"
          android:textColor="#0000ff"
          android:textSize="17sp"
          tools:text="火星">

</TextView>
SpinnerDropdownActivity:
public class SpinnerDropdownActivity extends AppCompatActivity implements AdapterView.OnItemSelectedListener {


    // 定义下拉列表需要显示的文本数组
    private final static String[] starArray = {

    "水星", "金星", "地球", "火星", "木星", "土星"};
    private Spinner sp_dropdown;

    @Override
    protected void onCreate(Bundle savedInstanceState) {


        super.onCreate(savedInstanceState);
        setContentView(R.layout.activity_spinner_dropdown);

        sp_dropdown = findViewById(R.id.sp_dropdown);
        //声明一个数组适配器
        ArrayAdapter<String> starAdapter = new ArrayAdapter<>(this, R.layout.item_select, starArray);
        sp_dropdown.setAdapter(starAdapter);
        //设置默认为第一项
        sp_dropdown.setSelection(0);
        //设置监听器,一旦用户选择了某一项,则触发onItemSelected方法
        sp_dropdown.setOnItemSelectedListener(this);
    }

    //选择后触发
    @Override
    public void onItemSelected(AdapterView<?> parent, View view, int position, long id) {


        Toast.makeText(this, "你选择的是" + starArray[position], Toast.LENGTH_SHORT).show();
    }

    @Override
    public void onNothingSelected(AdapterView<?> parent) {


    }
}
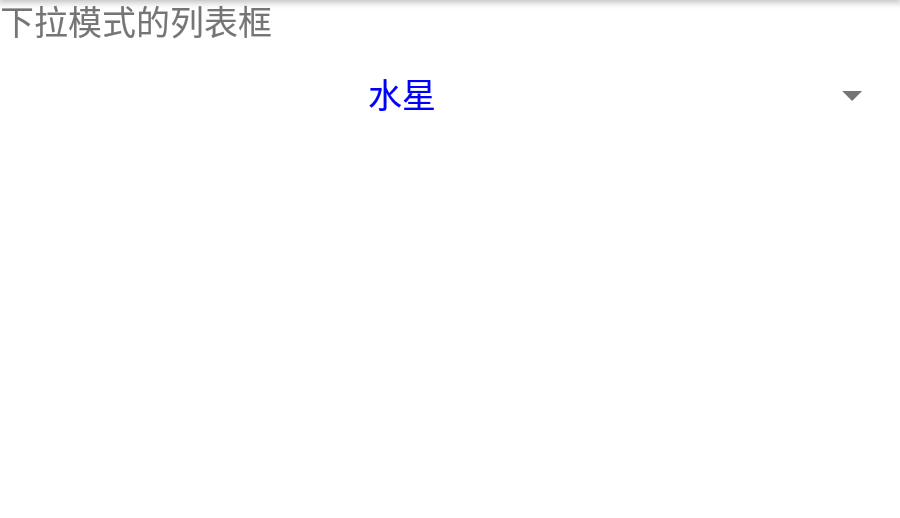
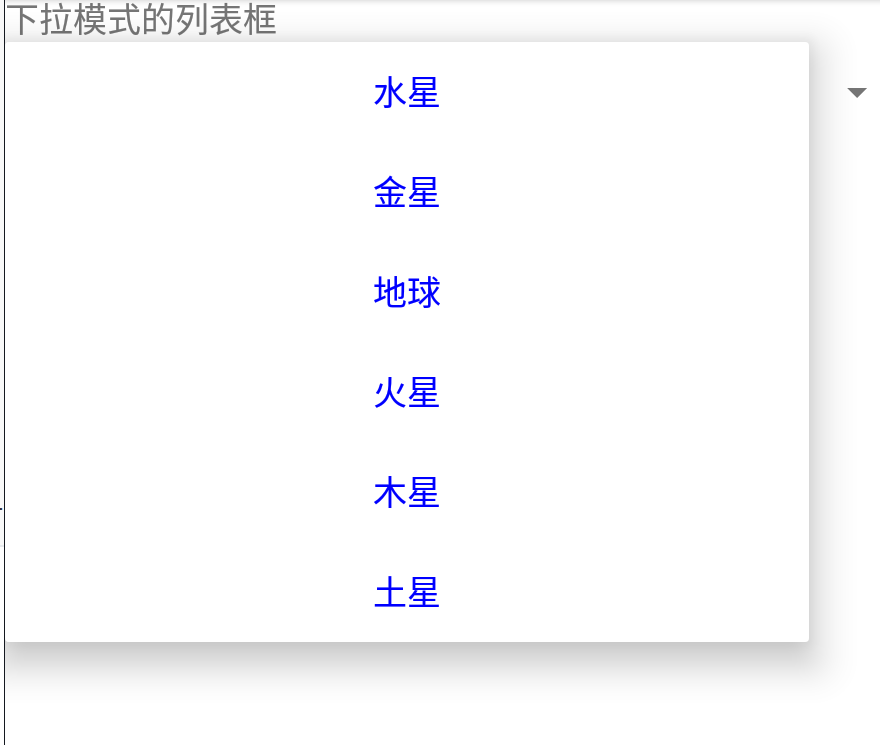
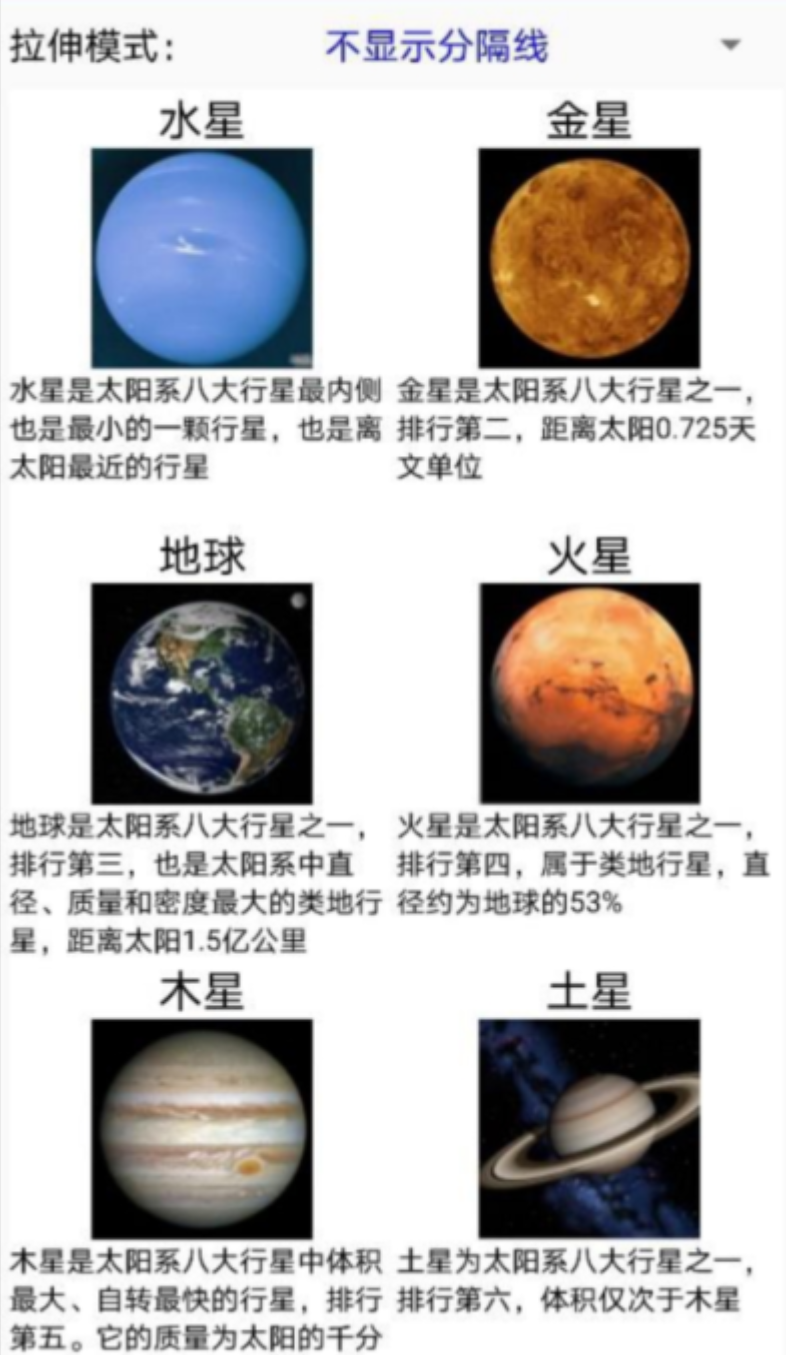
运行结果:
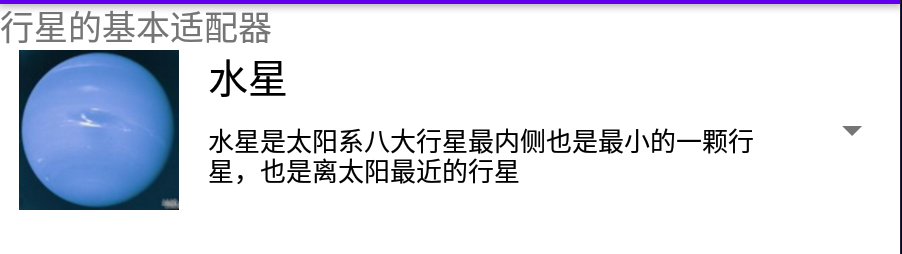
(2)SimpleAdaper
上面用的适配器是ArrayAdapter,数组适配器简单但是只能用于文本列表,如果想要加上图标之类的,则需要用到简单适配器SimpleAdapter了。
以下是示例代码:
首先是布局文件activity_spinner_icon.xml:
<?xml version="1.0" encoding="utf-8"?>
<LinearLayout xmlns:android="http://schemas.android.com/apk/res/android"
    android:layout_width="match_parent"
    android:layout_height="match_parent"
    android:orientation="vertical">

    <TextView
        android:layout_width="match_parent"
        android:layout_height="wrap_content"
        android:text="行星的简单适配器"
        android:textSize="17sp" />

    <Spinner
        android:id="@+id/sp_icon"
        android:layout_width="match_parent"
        android:layout_height="wrap_content"
        android:spinnerMode="dropdown" />

</LinearLayout>
条目布局文件item_simple.xml:
<?xml version="1.0" encoding="utf-8"?>
<LinearLayout xmlns:android="http://schemas.android.com/apk/res/android"
    xmlns:tools="http://schemas.android.com/tools"
    android:layout_width="match_parent"
    android:layout_height="wrap_content"
    android:orientation="horizontal">

    <ImageView
        android:id="@+id/iv_icon"
        android:layout_width="0dp"
        android:layout_height="50dp"
        android:layout_weight="1"
        tools:src="@drawable/diqiu" />

    <TextView
        android:id="@+id/tv_name"
        android:layout_width="0dp"
        android:layout_height="match_parent"
        android:layout_weight="3"
        android:gravity="center"
        android:textColor="#ff0000"
        android:textSize="17sp"
        tools:text="地球" />

</LinearLayout>
SpinnerIconActivity:

public class SpinnerIconActivity extends AppCompatActivity implements AdapterView.OnItemSelectedListener {


    // 定义下拉列表需要显示的行星图标数组
    private static final int[] iconArray = {


            R.drawable.shuixing, R.drawable.jinxing, R.drawable.diqiu,
            R.drawable.huoxing, R.drawable.muxing, R.drawable.tuxing
    };
    // 定义下拉列表需要显示的行星名称数组
    private static final String[] starArray = {

    "水星", "金星", "地球", "火星", "木星", "土星"};


    @Override
    protected void onCreate(Bundle savedInstanceState) {


        super.onCreate(savedInstanceState);
        setContentView(R.layout.activity_spinner_icon);
        // 声明一个映射对象的列表,用于保存行星的图标与名称配对信息
        List<Map<String, Object>> list = new ArrayList<>();
        // iconArray是行星的图标数组,starArray是行星的名称数组
        for (int i = 0; i < iconArray.length; i++) {


            Map<String, Object> item = new HashMap<>();
            item.put("icon", iconArray[i]);
            item.put("name", starArray[i]);
            list.add(item);
        }

        // 声明一个下拉列表的简单适配器,其中指定了图标与文本两组数据
        SimpleAdapter startAdapter = new SimpleAdapter(this, list,
                R.layout.item_simple,
                new String[]{

    "icon", "name"},
                new int[]{

    R.id.iv_icon, R.id.tv_name});

        Spinner sp_icon = findViewById(R.id.sp_icon);
        sp_icon.setAdapter(startAdapter);
        sp_icon.setSelection(0);
        sp_icon.setOnItemSelectedListener(this);
    }

    @Override
    public void onItemSelected(AdapterView<?> parent, View view, int position, long id) {


        Toast.makeText(this, "您选择的是" + starArray[position], Toast.LENGTH_SHORT).show();
    }

    @Override
    public void onNothingSelected(AdapterView<?> parent) {


    }
}
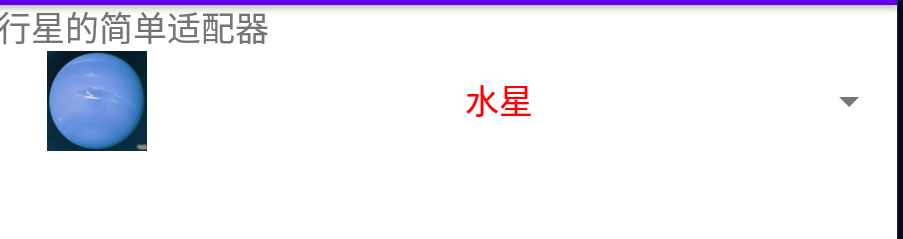
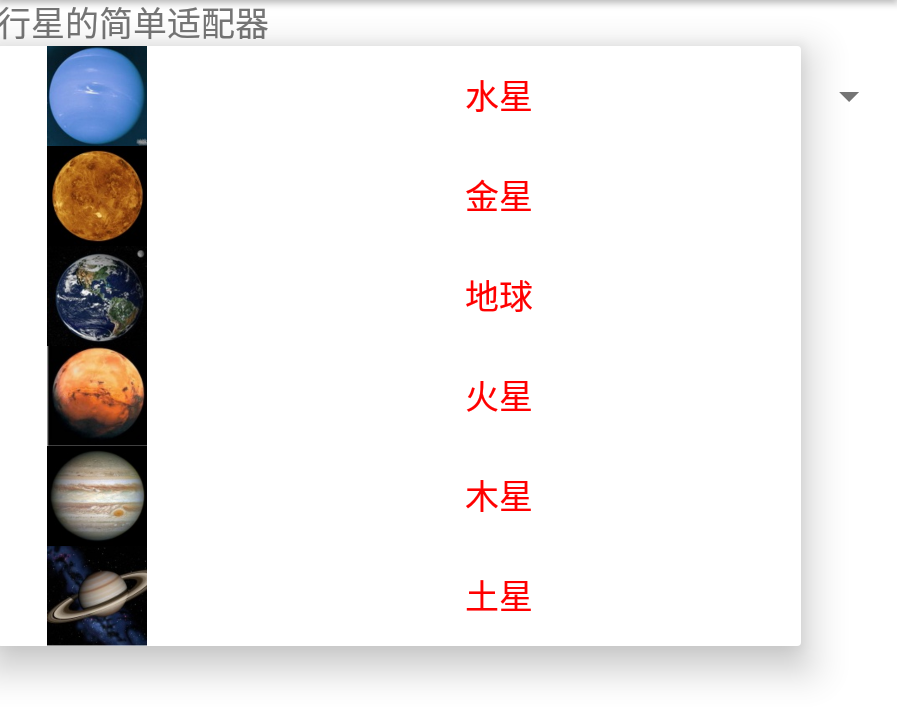
运行结果:
(3)BaseAdapter
Android的Adapter继承结构如下:
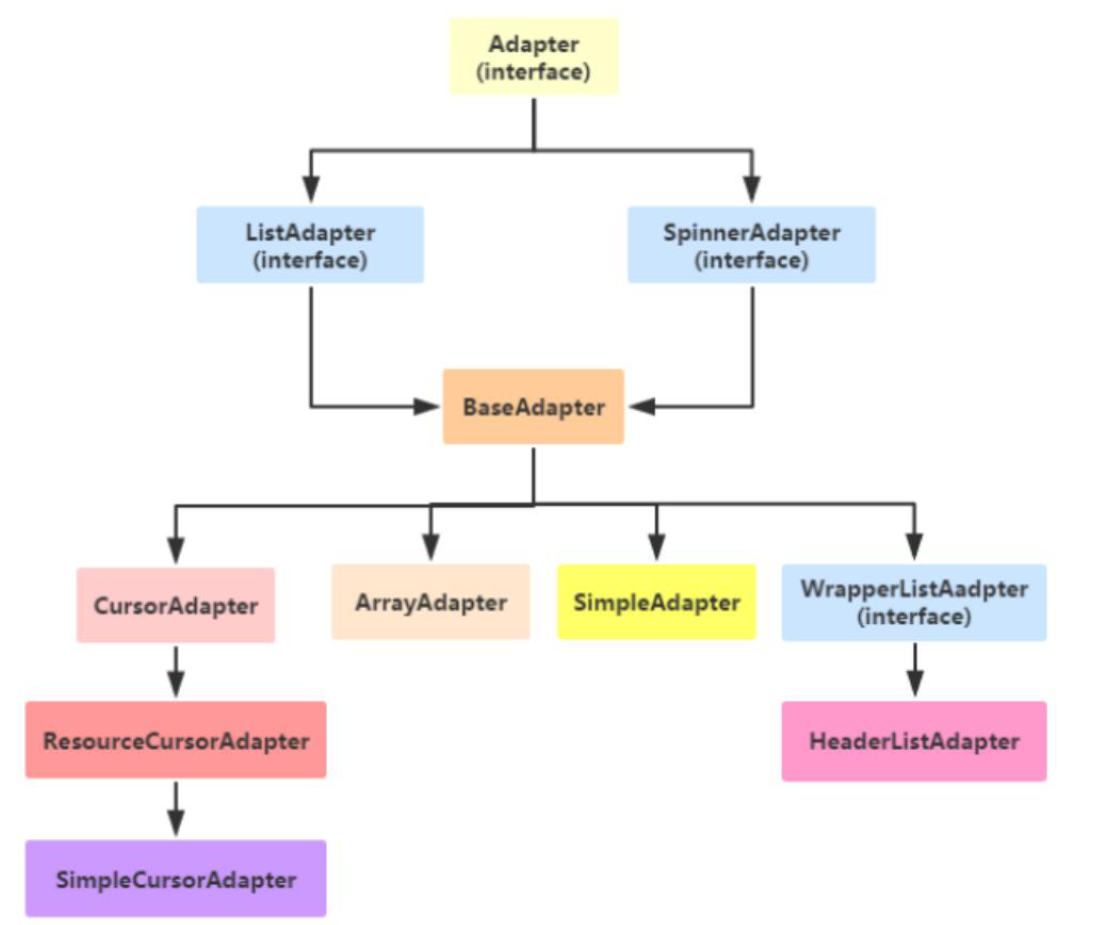
可以看到上面已经提到的ArrayAdapter和SimpleAdapter都是比较具体的实现类,想要有更多的扩展,必然是需要自定义适配器的,我们可以通过继承BaseAdapter,根据业务自定义数据适配器。
示例代码如下:
item_list.xml:
<LinearLayout xmlns:android="http://schemas.android.com/apk/res/android"
    xmlns:tools="http://schemas.android.com/tools"
    android:layout_width="match_parent"
    android:layout_height="wrap_content"
    android:orientation="horizontal">

    <!-- 这是显示行星图片的图像视图 -->
    <ImageView
        android:id="@+id/iv_icon"
        android:layout_width="0dp"
        android:layout_height="80dp"
        android:layout_weight="1"
        android:scaleType="fitCenter"
        tools:src="@drawable/diqiu" />

    <LinearLayout
        android:layout_width="0dp"
        android:layout_height="match_parent"
        android:layout_marginLeft="5dp"
        android:layout_weight="3"
        android:orientation="vertical">

        <!-- 这是显示行星名称的文本视图 -->
        <TextView
            android:id="@+id/tv_name"
            android:layout_width="match_parent"
            android:layout_height="0dp"
            android:layout_weight="1"
            android:gravity="start|center"
            android:textColor="@color/black"
            android:textSize="20sp"
            tools:text="地球" />

        <!-- 这是显示行星描述的文本视图 -->
        <TextView
            android:id="@+id/tv_desc"
            android:layout_width="match_parent"
            android:layout_height="0dp"
            android:layout_weight="2"
            android:gravity="start|center"
            android:textColor="@color/black"
            android:textSize="13sp"
            tools:text="地球是太阳系八大行星之一,排行第三,也是太阳系中直径、质量和密度最大的类地行星,距离太阳1.5亿
                        公里" />
    </LinearLayout>
</LinearLayout>
activity_base_adapter.xml:
<?xml version="1.0" encoding="utf-8"?>
<LinearLayout xmlns:android="http://schemas.android.com/apk/res/android"
    android:layout_width="match_parent"
    android:layout_height="match_parent"
    android:orientation="vertical">

    <TextView
        android:layout_width="match_parent"
        android:layout_height="wrap_content"
        android:text="行星的基本适配器"
        android:textSize="17sp" />

    <Spinner
        android:id="@+id/sp_planet"
        android:layout_width="match_parent"
        android:layout_height="wrap_content"
        android:spinnerMode="dropdown" />

</LinearLayout>
自定义适配器:
public class PlanetBaseAdapter extends BaseAdapter {


    private Context mContext;
    private List<Planet> mPlaneList;

    public PlanetBaseAdapter(Context mContext, List<Planet> mPlaneList) {


        this.mContext = mContext;
        this.mPlaneList = mPlaneList;
    }

    // 获取列表项的个数
    @Override
    public int getCount() {


        return mPlaneList.size();
    }

    @Override
    public Object getItem(int position) {


        return mPlaneList.get(position);
    }

    @Override
    public long getItemId(int position) {


        return position;
    }

    @Override
    public View getView(int position, View convertView, ViewGroup parent) {


        ViewHolder holder;
        if (convertView == null){


            // 根据布局文件item_list.xml生成转换视图对象
            convertView = LayoutInflater.from(mContext).inflate(R.layout.item_list, null);
            holder = new ViewHolder();
            holder.iv_icon = convertView.findViewById(R.id.iv_icon);
            holder.tv_name = convertView.findViewById(R.id.tv_name);
            holder.tv_desc = convertView.findViewById(R.id.tv_desc);
            // 将视图持有者保存到转换视图当中
            convertView.setTag(holder);
        }else{


            holder = (ViewHolder) convertView.getTag();
        }

        // 给控制设置好数据
        Planet planet = mPlaneList.get(position);
        holder.iv_icon.setImageResource(planet.image);
        holder.tv_name.setText(planet.name);
        holder.tv_desc.setText(planet.desc);

        return convertView;
    }

    public final class ViewHolder {


        public ImageView iv_icon;
        public TextView tv_name;
        public TextView tv_desc;
    }
}
封装Planet:
public class Planet {


    public int image; // 行星图标
    public String name; // 行星名称
    public String desc; // 行星描述

    public Planet(int image, String name, String desc) {


        this.image = image;
        this.name = name;
        this.desc = desc;
    }

    private static int[] iconArray = {

    R.drawable.shuixing, R.drawable.jinxing, R.drawable.diqiu,
            R.drawable.huoxing, R.drawable.muxing, R.drawable.tuxing};
    private static String[] nameArray = {

    "水星", "金星", "地球", "火星", "木星", "土星"};
    private static String[] descArray = {


            "水星是太阳系八大行星最内侧也是最小的一颗行星,也是离太阳最近的行星",
            "金星是太阳系八大行星之一,排行第二,距离太阳0.725天文单位",
            "地球是太阳系八大行星之一,排行第三,也是太阳系中直径、质量和密度最大的类地行星,距离太阳1.5亿公里",
            "火星是太阳系八大行星之一,排行第四,属于类地行星,直径约为地球的53%",
            "木星是太阳系八大行星中体积最大、自转最快的行星,排行第五。它的质量为太阳的千分之一,但为太阳系中其它七大行星质量总和的2.5倍",
            "土星为太阳系八大行星之一,排行第六,体积仅次于木星"
    };

    public static List<Planet> getDefaultList() {


        List<Planet> planetList = new ArrayList<Planet>();
        for (int i = 0; i < iconArray.length; i++) {


            planetList.add(new Planet(iconArray[i], nameArray[i], descArray[i]));
        }
        return planetList;
    }
}
BaseAdapterActivity:
public class BaseAdapterActivity extends AppCompatActivity implements AdapterView.OnItemSelectedListener {


    private List<Planet> planetList;

    @Override
    protected void onCreate(Bundle savedInstanceState) {


        super.onCreate(savedInstanceState);
        setContentView(R.layout.activity_base_adapter);
        Spinner sp_planet = findViewById(R.id.sp_planet);
        // 获取默认的行星列表,即水星、金星、地球、火星、木星、土星
        planetList = Planet.getDefaultList();
        // 构建一个行星列表的适配器
        PlanetBaseAdapter adapter = new PlanetBaseAdapter(this, planetList);
        sp_planet.setAdapter(adapter);
        sp_planet.setSelection(0);
        sp_planet.setOnItemSelectedListener(this);
    }

    @Override
    public void onItemSelected(AdapterView<?> parent, View view, int position, long id) {


        Toast.makeText(this, "您选择的是" + planetList.get(position).name, Toast.LENGTH_SHORT).show();
    }

    @Override
    public void onNothingSelected(AdapterView<?> parent) {


    }
运行结果:
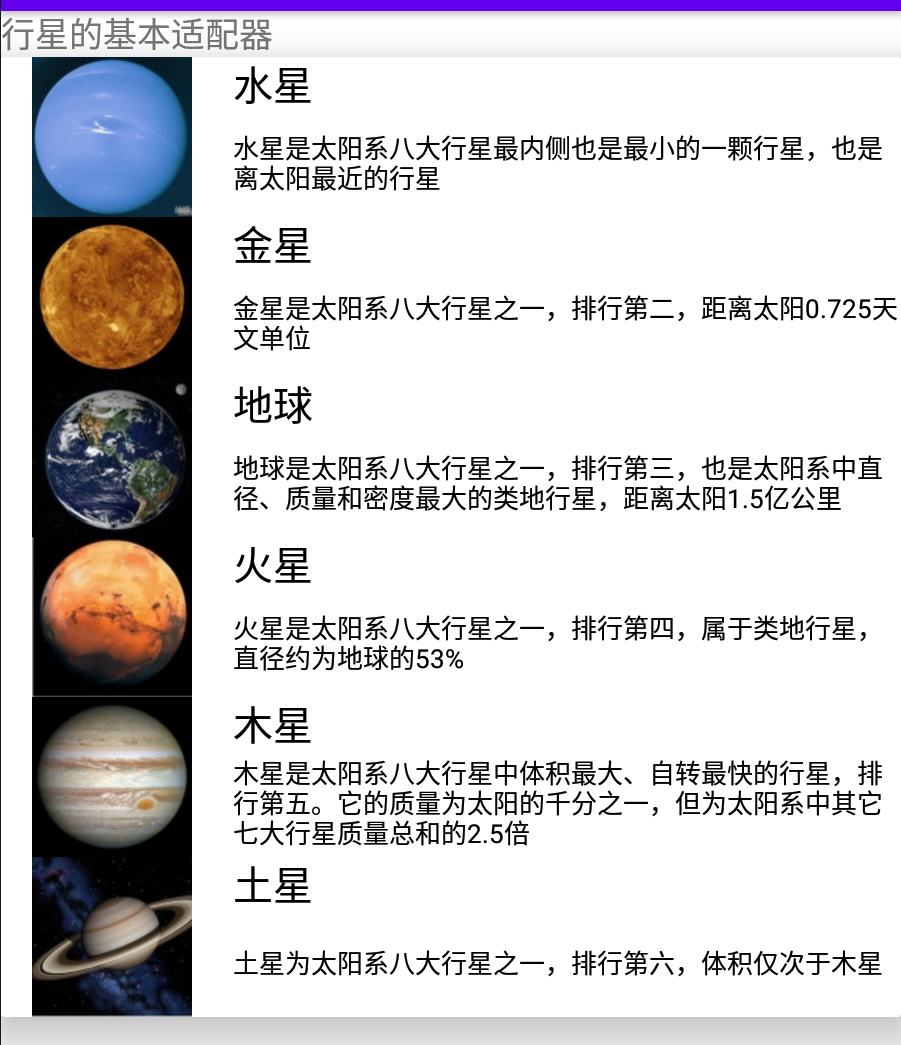
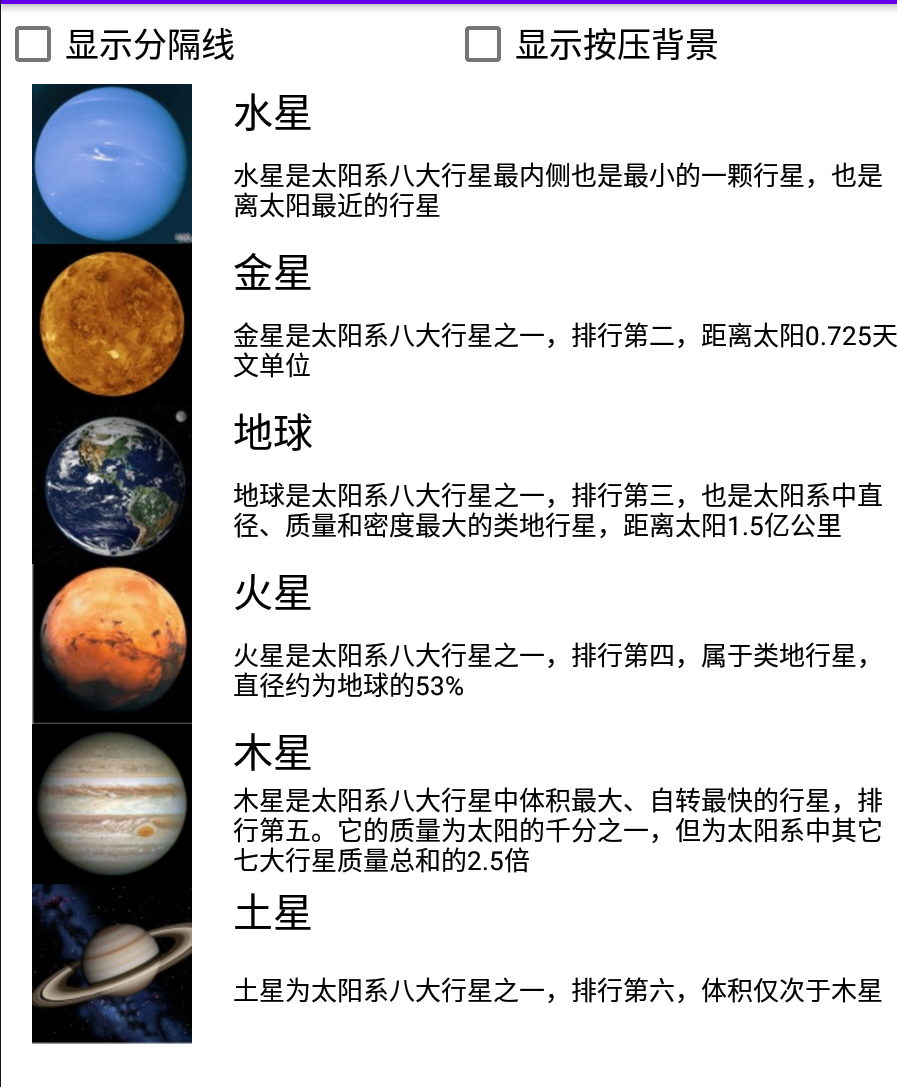
2. 列表类视图
(1)列表视图 ListView
ListView允许在页面上分行展示相似的数据列表,例如新闻列表、商品列表、图书列表等,方便用户浏览与操作。
上面下拉列表都是点击选中之后就会消失,而如果想要实现像购物商城那样排列显示商品的效果,则可以用ListView。
对于上面的代码,数据适配器PlanetBaseAdapter,条目布局item_list.xml,都不需要修改。只需要修改主Activity即可:
<?xml version="1.0" encoding="utf-8"?>
<LinearLayout xmlns:android="http://schemas.android.com/apk/res/android"
    android:layout_width="match_parent"
    android:layout_height="match_parent"
    android:orientation="vertical">

    <LinearLayout
        android:layout_width="match_parent"
        android:layout_height="40dp">

        <CheckBox
            android:id="@+id/ck_divider"
            android:layout_width="0dp"
            android:layout_height="match_parent"
            android:layout_weight="1"
            android:gravity="start|center"
            android:text="显示分隔线"
            android:textSize="17sp"/>

        <CheckBox
            android:id="@+id/ck_selector"
            android:layout_width="0dp"
            android:layout_height="match_parent"
            android:layout_weight="1"
            android:gravity="start|center"
            android:text="显示按压背景"
            android:textSize="17sp"/>

    </LinearLayout>

    <!--只需要添加ListView即可-->
    <ListView
        android:id="@+id/lv_planet"
        android:layout_width="match_parent"
        android:layout_height="wrap_content"
        android:divider="@null"
        android:dividerHeight="0dp"
        android:listSelector="@color/transparent"/>

</LinearLayout>
public class ListViewActivity extends AppCompatActivity implements AdapterView.OnItemClickListener, CompoundButton.OnCheckedChangeListener {


    private List<Planet> planetList;
    private CheckBox ck_diviver;
    private CheckBox ck_selector;
    private ListView lv_planet;

    @Override
    protected void onCreate(Bundle savedInstanceState) {


        super.onCreate(savedInstanceState);
        setContentView(R.layout.activity_list_view);
        lv_planet = findViewById(R.id.lv_planet);
        planetList = Planet.getDefaultList();
        PlanetBaseAdapter adapter = new PlanetBaseAdapter(this, planetList);
        lv_planet.setAdapter(adapter);

        lv_planet.setOnItemClickListener(this);

        ck_diviver = findViewById(R.id.ck_divider);
        ck_diviver.setOnCheckedChangeListener(this);
        ck_selector = findViewById(R.id.ck_selector);
        ck_selector.setOnCheckedChangeListener(this);
    }

    @Override
    public void onItemClick(AdapterView<?> parent, View view, int position, long id) {


        Toast.makeText(this, "您选择的是:" + planetList.get(position).name, Toast.LENGTH_SHORT).show();
    }

    @Override
    public void onCheckedChanged(CompoundButton buttonView, boolean isChecked) {


        switch (buttonView.getId()) {


            case R.id.ck_divider:
                // 显示分隔线
                if (ck_diviver.isChecked()) {


                    // 从资源文件获得图形对象
                    Drawable drawable = getResources().getDrawable(R.color.black, getTheme());
                    lv_planet.setDivider(drawable);
                    // 设置列表视图的分隔线高度
                    lv_planet.setDividerHeight(Utils.dip2px(this, 1));
                } else {


                    lv_planet.setDivider(null);
                    lv_planet.setDividerHeight(0);
                }
                break;

            case R.id.ck_selector:
                // 显示按压背景
                if (ck_selector.isChecked()) {


                    // 设置列表项的按压状态图形
                    lv_planet.setSelector(R.drawable.list_selector);
                } else {


                    Drawable drawable = getResources().getDrawable(R.color.transparent, getTheme());
                    lv_planet.setSelector(drawable);
                }
                break;
        }
    }
}
运行效果如下:
(2)网格视图 GridView
除了列表视图,网格视图GridView也是常见的列表类视图,它用于分行分列显示表格信息,比列表视图更适合展示物品清单。
在XML文件中添加GridView需要指定列的数目,以及空隙的拉伸模式,示例如下:
<GridView
android:id="@+id/gv_planet"
android:layout_width="match_parent"
android:layout_height="wrap_content"
android:numColumns="2"
android:stretchMode="columnWidth" />
网格布局在页面布局上有很多细节,这里就暂不扩展,可以找些相关介绍文章再详细学习。
3. 翻页类视图
(1)翻页视图 ViewPager
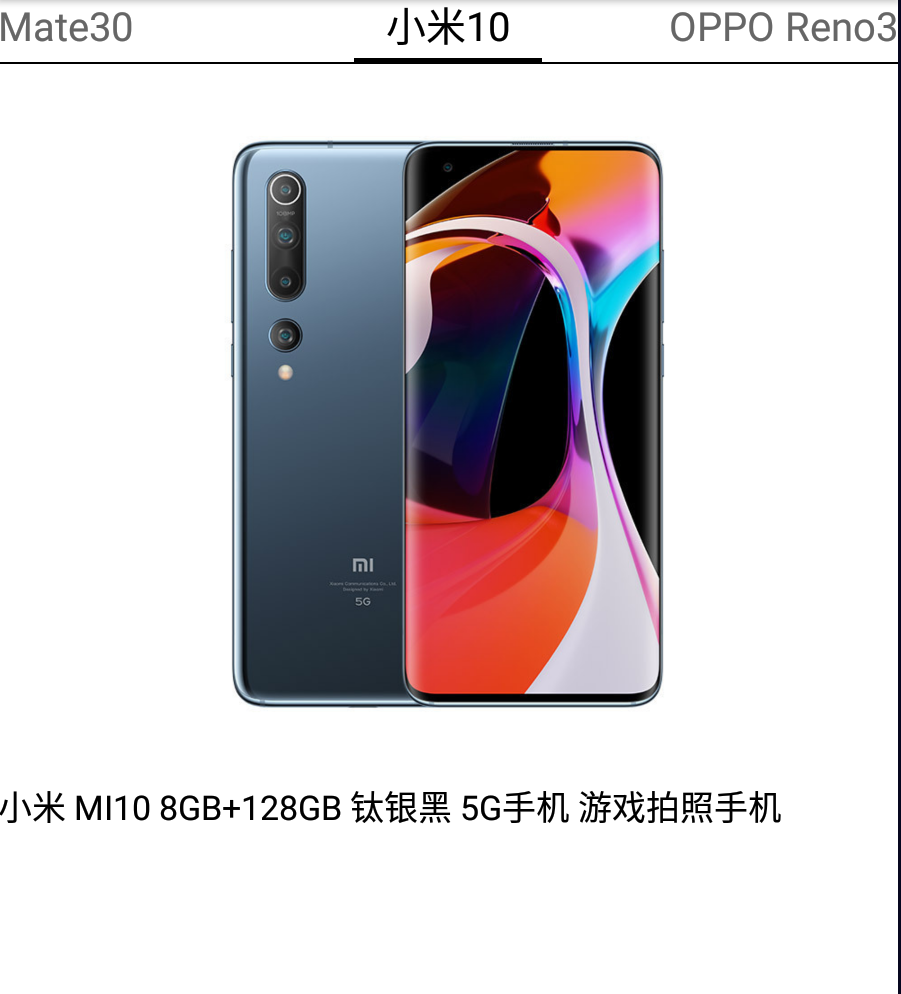
翻页视图的原理类似列表视图和网格视图,它们的用法也很类似。例如,列表视图和网格视图使用基本适配器BaseAdapter,翻页视图则使用翻页适配器PagerAdapter;列表视图和网格视图使用列表项的点击监听器OnItemClickListener,翻页视图则使用页面变更监听器OnPageChangeListener监听页面切换事件。
(2)翻页标签栏 PagerTabStrip
翻页视图的布局文件:
<?xml version="1.0" encoding="utf-8"?>
<LinearLayout xmlns:android="http://schemas.android.com/apk/res/android"
    xmlns:app="http://schemas.android.com/apk/res-auto"
    xmlns:tools="http://schemas.android.com/tools"
    android:layout_width="match_parent"
    android:layout_height="match_parent"
    android:orientation="vertical">

    <!-- 注意翻页视图ViewPager的节点名称要填全路径 -->
    <androidx.viewpager.widget.ViewPager
        android:id="@+id/vp_content"
        android:layout_width="match_parent"
        android:layout_height="400dp">

        <!-- 注意翻页标签栏PagerTabStrip的节点名称要填全路径 -->
        <androidx.viewpager.widget.PagerTabStrip
            android:id="@+id/pts_tab"
            android:layout_width="wrap_content"
            android:layout_height="wrap_content" />

    </androidx.viewpager.widget.ViewPager>

</LinearLayout>
编写适配器:
public class ImagePagerAdapater extends PagerAdapter {


    private final Context mContext;
    private final ArrayList<GoodsInfo> mGoodsList;
    // 声明一个图像视图列表
    private List<ImageView> mViewList = new ArrayList<>();

    public ImagePagerAdapater(Context mContext, ArrayList<GoodsInfo> mGoodsList) {


        this.mContext = mContext;
        this.mGoodsList = mGoodsList;
        // 给每个商品分配一个专用的图像视图
        for (GoodsInfo info : mGoodsList) {


            ImageView view = new ImageView(mContext);
            view.setLayoutParams(new ViewGroup.LayoutParams(
                    ViewGroup.LayoutParams.MATCH_PARENT,
                    ViewGroup.LayoutParams.WRAP_CONTENT
            ));
            view.setImageResource(info.pic);
            mViewList.add(view);
        }
    }

    @Override
    public int getCount() {


        return mViewList.size();
    }

    @Override
    public boolean isViewFromObject(@NonNull View view, @NonNull Object object) {


        return view == object;
    }

    // 实例化指定位置的页面,并将其添加到容器中
    @NonNull
    @Override
    public Object instantiateItem(@NonNull ViewGroup container, int position) {


        // 添加一个view到container中,而后返回一个跟这个view可以关联起来的对象,
        // 这个对象能够是view自身,也能够是其余对象,
        // 关键是在isViewFromObject可以将view和这个object关联起来
        ImageView item = mViewList.get(position);
        container.addView(item);
        return item;
    }

    // 从容器中销毁指定位置的页面
    @Override
    public void destroyItem(@NonNull ViewGroup container, int position, @NonNull Object object) {


        container.removeView(mViewList.get(position));
    }

    @Nullable
    @Override
    public CharSequence getPageTitle(int position) {


        return mGoodsList.get(position).name;
    }
}
Activity:
public class PagerTabActivity extends AppCompatActivity implements ViewPager.OnPageChangeListener {


    private ArrayList<GoodsInfo> mGoodsList;

    @Override
    protected void onCreate(Bundle savedInstanceState) {


        super.onCreate(savedInstanceState);
        setContentView(R.layout.activity_pager_tab);
        initPagerStrip();
        initViewPager();
    }

    // 初始化翻页标签栏
    private void initPagerStrip() {


        PagerTabStrip pts_tab = findViewById(R.id.pts_tab);
        // 设置翻页标签栏的文本大小
        pts_tab.setTextSize(TypedValue.COMPLEX_UNIT_SP, 20);
        pts_tab.setTextColor(Color.BLACK);
    }

    // 初始化翻页视图
    private void initViewPager() {


        ViewPager vp_content = findViewById(R.id.vp_content);
        mGoodsList = GoodsInfo.getDefaultList();
        ImagePagerAdapater adapter = new ImagePagerAdapater(this, mGoodsList);
        vp_content.setAdapter(adapter);
        // 给翻页视图添加页面变更监听器
        vp_content.addOnPageChangeListener(this);
        vp_content.setCurrentItem(3);
    }


    @Override
    public void onPageScrolled(int position, float positionOffset, int positionOffsetPixels) {


    }

    @Override
    public void onPageSelected(int position) {


        ToastUtil.show(this, "您翻到的手机品牌是:" + mGoodsList.get(position).name);
    }

    @Override
    public void onPageScrollStateChanged(int state) {


    }
}
4. Fragment
Fragment(碎片)是一种可以嵌入在Activity中的UI片段,与Activity非常相似,不仅包含布局,同时也具有自己的生命周期。
Fragment 表示应用界面中可重复使用的一部分。Fragment 允许您将界面划分为离散的区块,从而将模块化和可重用性引入 Activity 的界面。
Fragment的布局文件和代码使用起来和Activity基本无异。除了继承自Fragment与入口方法onCreateView两点,其他地
方类似活动页面代码。
Fragment的注册方式有两种:
- 静态注册:在xml中引入
- 动态注册:通过java代码的方式引入
(1)静态注册:
创建一个Frament:
public class StaticFragment extends Fragment {


    @Nullable
    @Override
    public View onCreateView(@NonNull LayoutInflater inflater, @Nullable ViewGroup container, @Nullable Bundle savedInstanceState) {


        return inflater.inflate(R.layout.fragment_static, container, false);
    }
}
Fragment的布局文件:
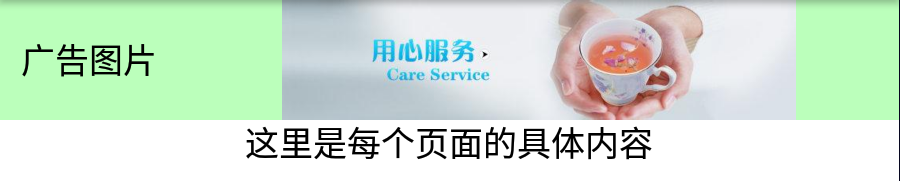
<LinearLayout xmlns:android="http://schemas.android.com/apk/res/android"
    android:layout_width="match_parent"
    android:layout_height="wrap_content"
    android:orientation="horizontal"
    android:background="#bbffbb">

    <TextView
        android:id="@+id/tv_adv"
        android:layout_width="0dp"
        android:layout_height="match_parent"
        android:layout_weight="1"
        android:gravity="center"
        android:text="广告图片"
        android:textColor="#000000"
        android:textSize="17sp" />

    <ImageView
        android:id="@+id/iv_adv"
        android:layout_width="0dp"
        android:layout_height="match_parent"
        android:layout_weight="4"
        android:src="@drawable/adv"
        android:scaleType="fitCenter" />

</LinearLayout>
在Activity的布局文件中静态引入Fragment:
<?xml version="1.0" encoding="utf-8"?>
<LinearLayout xmlns:android="http://schemas.android.com/apk/res/android"
    xmlns:app="http://schemas.android.com/apk/res-auto"
    xmlns:tools="http://schemas.android.com/tools"
    android:layout_width="match_parent"
    android:layout_height="match_parent"
    tools:context=".FragmentStaticActivity"
    android:orientation="vertical">

    <!-- 引入Fragment-->
    <fragment
        android:id="@+id/fragment_static"
        android:name="com.example.gaojikongjian.fragment.StaticFragment"
        android:layout_width="match_parent"
        android:layout_height="60dp"/>

    <TextView
        android:layout_width="match_parent"
        android:layout_height="wrap_content"
        android:gravity="center"
        android:text="这里是每个页面的具体内容"
        android:textColor="#000000"
        android:textSize="17sp"/>
</LinearLayout>
java代码:
public class FragmentStaticActivity extends AppCompatActivity {


    @Override
    protected void onCreate(Bundle savedInstanceState) {


        super.onCreate(savedInstanceState);
        setContentView(R.layout.activity_fragment_static);
    }
}
运行结果:
(2)动态注册:
对上面的翻页标签页进行改进,使用Fragment实现:
创建Fragment:
public class DynamicFragment extends Fragment {


    public static DynamicFragment newInstance(int position, int image_id, String desc) {


        DynamicFragment fragment = new DynamicFragment();
        //把参数打包,传入Fragment中
        Bundle args = new Bundle();
        args.putInt("position", position);
        args.putInt("image_id", image_id);
        args.putString("desc", desc);
        fragment.setArguments(args);
        return fragment;
    }

    @Override
    public View onCreateView(LayoutInflater inflater, ViewGroup container,
                             Bundle savedInstanceState) {


        //根据布局文件生成视图对象
        View view = inflater.inflate(R.layout.fragment_dynamic, container, false);
        Bundle arguments = getArguments();

        if(arguments != null){


            ImageView iv_pic = view.findViewById(R.id.iv_pic);
            TextView tv_desc = view.findViewById(R.id.tv_desc);
            iv_pic.setImageResource(arguments.getInt("image_id", R.drawable.huawei));
            tv_desc.setText(arguments.getString("desc"));
        }

        return view;
    }
}
Fragment的布局文件 fragment_dynamic:
<LinearLayout xmlns:android="http://schemas.android.com/apk/res/android"
    android:layout_width="match_parent"
    android:layout_height="wrap_content"
    android:orientation="vertical">

    <ImageView
        android:id="@+id/iv_pic"
        android:layout_width="match_parent"
        android:layout_height="360dp"
        android:scaleType="fitCenter" />

    <TextView
        android:id="@+id/tv_desc"
        android:layout_width="match_parent"
        android:layout_height="wrap_content"
        android:gravity="left"
        android:textColor="@color/black"
        android:textSize="17sp" />

</LinearLayout>
适配器 MobilePagerAdapter:
public class MobilePagerAdapter extends FragmentPagerAdapter {


    private List<GoodsInfo> mGoodsList;

    public MobilePagerAdapter(@NonNull FragmentManager fm, List<GoodsInfo> goodsList) {


        super(fm, BEHAVIOR_RESUME_ONLY_CURRENT_FRAGMENT);
        this.mGoodsList = goodsList;
    }

    @NonNull
    @Override
    public Fragment getItem(int position) {


        GoodsInfo goodsInfo = mGoodsList.get(position);

        return DynamicFragment.newInstance(position, goodsInfo.pic, goodsInfo.description);
    }

    @Override
    public int getCount() {


        return mGoodsList.size();
    }

    @Nullable
    @Override
    public CharSequence getPageTitle(int position) {


        return mGoodsList.get(position).name;
    }
}
Activity:
public class FragmentDynamicActivity extends AppCompatActivity {


    private ArrayList<GoodsInfo> mGoodsList;

    @Override
    protected void onCreate(Bundle savedInstanceState) {


        super.onCreate(savedInstanceState);
        setContentView(R.layout.activity_fragment_dynamic);

        initPagerStrip();
        initViewPager();
    }

    // 初始化翻页标签栏
    private void initPagerStrip() {


        PagerTabStrip pts_tab = findViewById(R.id.pts_tab);
        // 设置翻页标签栏的文本大小
        pts_tab.setTextSize(TypedValue.COMPLEX_UNIT_SP, 20);
        pts_tab.setTextColor(Color.BLACK);
    }

    // 初始化翻页视图
    private void initViewPager() {


        ViewPager vp_content = findViewById(R.id.vp_content);
        mGoodsList = GoodsInfo.getDefaultList();
        //适配器
        MobilePagerAdapter adapter = new MobilePagerAdapter(getSupportFragmentManager(), mGoodsList);
        vp_content.setAdapter(adapter);
        vp_content.setCurrentItem(3);
    }
}
Activity的布局文件:
<LinearLayout xmlns:android="http://schemas.android.com/apk/res/android"
    xmlns:app="http://schemas.android.com/apk/res-auto"
    xmlns:tools="http://schemas.android.com/tools"
    android:layout_width="match_parent"
    android:layout_height="match_parent"
    android:orientation="vertical">

    <androidx.viewpager.widget.ViewPager
        android:id="@+id/vp_content"
        android:layout_width="match_parent"
        android:layout_height="wrap_content">

        <androidx.viewpager.widget.PagerTabStrip
            android:id="@+id/pts_tab"
            android:layout_width="wrap_content"
            android:layout_height="wrap_content" />

    </androidx.viewpager.widget.ViewPager>

</LinearLayout>
运行结果:
七、广播组件 Broadcast
广播组件 Broadcast 是Android 四大组件之一。
广播有以下特点:
- 活动只能一对一通信;而广播可以一对多,一人发送广播,多人接收处理。
- 对于发送方来说,广播不需要考虑接收方有没有在工作,接收方在工作就接收广播,不在工作就丢弃广播。
- 对于接收方来说,因为可能会收到各式各样的广播,所以接收方要自行过滤符合条件的广播,之后再解包处理
与广播有关的方法主要有以下3个。
- sendBroadcast:发送广播。
- registerReceiver:注册广播的接收器,可在onStart或onResume方法中注册接收器。
- unregisterReceiver:注销广播的接收器,可在onStop或onPause方法中注销接收器。
1. 收发应用广播
(1)标准广播
定义一个广播接收器:
// 定义一个标准广播的接收器
public class StandardReceiver extends BroadcastReceiver {


    public static final String STANDARD_ACTION = "com.example.broadcaststudy.standard";

    // 一旦接收到标准广播,马上触发接收器的onReceive方法
    @Override
    public void onReceive(Context context, Intent intent) {


        if(intent != null && intent.getAction().equals(STANDARD_ACTION)){


            Log.d("hhh", "收到一个标准广播");
        }
    }
}
在Activity中动态注册接收器:
public class BroadcastStandardActivity extends AppCompatActivity {


    private StandardReceiver standardReceiver;


    @Override
    protected void onCreate(Bundle savedInstanceState) {


        super.onCreate(savedInstanceState);
        setContentView(R.layout.activity_broadcast_standard);

        findViewById(R.id.btn_send_standard).setOnClickListener(new View.OnClickListener() {


            @Override
            public void onClick(View v) {


                //发送标准广播
                Intent intent = new Intent(standardReceiver.STANDARD_ACTION);
                sendBroadcast(intent);
            }
        });

    }

    @Override
    protected void onStart() {


        super.onStart();

        standardReceiver = new StandardReceiver();
        // 创建一个意图过滤器,只处理STANDARD_ACTION的广播
        IntentFilter filter = new IntentFilter(StandardReceiver.STANDARD_ACTION);
        // 注册接收器,注册之后才能正常接收广播
        registerReceiver(standardReceiver, filter);
    }


    @Override
    protected void onStop() {


        super.onStop();
        // 注销接收器,注销之后就不再接收广播
        unregisterReceiver(standardReceiver);
    }
}
xml文件:
<LinearLayout xmlns:android="http://schemas.android.com/apk/res/android"
    android:layout_width="match_parent"
    android:layout_height="match_parent"
    android:orientation="vertical"
    android:padding="5dp">

    <Button
        android:id="@+id/btn_send_standard"
        android:layout_width="match_parent"
        android:layout_height="wrap_content"
        android:gravity="center"
        android:text="发送标准广播"
        android:textColor="@color/black"
        android:textSize="17sp" />

</LinearLayout>
(2)有序广播
由于广播没指定唯一的接收者,因此可能存在多个接收器,每个接收器都拥有自己的处理逻辑。这些接收器默认是都能够接受到指定广播并且是之间的顺序按照注册的先后顺序,也可以通过指定优先级来指定顺序。
先收到广播的接收器A,既可以让其他接收器继续收听广播,也可以中断广播不让其他接收器收听。
public class BroadOrderActivity extends AppCompatActivity implements View.OnClickListener {


    public static final String ORDER_ACTION = "com.example.broadcaststudy.order";
    private OrderAReceiver orderAReceiver;
    private OrderBReceiver orderBReceiver;

    @Override
    protected void onCreate(Bundle savedInstanceState) {


        super.onCreate(savedInstanceState);
        setContentView(R.layout.activity_broad_order);
        findViewById(R.id.btn_send_order).setOnClickListener(this);
    }

    @Override
    public void onClick(View v) {


        // 创建一个指定动作的意图
        Intent intent = new Intent(ORDER_ACTION);
        // 发送有序广播
        sendOrderedBroadcast(intent, null);
    }

    @Override
    protected void onStart() {


        super.onStart();
        // 多个接收器处理有序广播的顺序规则为:
        // 1、优先级越大的接收器,越早收到有序广播;
        // 2、优先级相同的时候,越早注册的接收器越早收到有序广播
        orderAReceiver = new OrderAReceiver();
        IntentFilter filterA = new IntentFilter(ORDER_ACTION);
        filterA.setPriority(8);
        registerReceiver(orderAReceiver, filterA);

        orderBReceiver = new OrderBReceiver();
        IntentFilter filterB = new IntentFilter(ORDER_ACTION);
        filterB.setPriority(10);
        registerReceiver(orderBReceiver, filterB);
    }

    @Override
    protected void onStop() {


        super.onStop();
        unregisterReceiver(orderAReceiver);
        unregisterReceiver(orderBReceiver);
    }
}
(3)静态广播
广播也可以通过静态代码的方式来进行注册。广播接收器也能在AndroidManifest.xml注册,并且注册时候的节点名为receiver,一旦接收器在AndroidManifest.xml注册,就无须在代码中注册了。
之所以罕见静态注册,是因为静态注册容易导致安全问题,故而Android 8.0之后废弃了大多数静态注册。
静态广播的实现方式这里暂不介绍,可自行查阅资料。
2. 监听系统广播
除了应用自身的广播,系统也会发出各式各样的广播,通过监听这些系统广播,App能够得知周围环境发生了什么变化,从而按照最新环境调整运行逻辑。
接下来举几个系统广播的例子。
(1)监听分钟到达广播
步骤一,定义一个分钟广播的接收器,并重写接收器的onReceive方法,补充收到广播之后的处理逻辑。
步骤二,重写活动页面的onStart方法,添加广播接收器的注册代码,注意要让接收器过滤分钟到达广播Intent.ACTION_TIME_TICK。
步骤三,重写活动页面的onStop方法,添加广播接收器的注销代码。
public class SystemMinuteActivity extends AppCompatActivity {


    private TextView tv_minute; // 声明一个文本视图对象
    private String desc = "开始侦听分钟广播,请稍等。注意要保持屏幕亮着,才能正常收到广播";
    @Override
    protected void onCreate(Bundle savedInstanceState) {


        super.onCreate(savedInstanceState);
        setContentView(R.layout.activity_system_minute);
        tv_minute = findViewById(R.id.tv_minute);
        tv_minute.setText(desc);
    }
    @Override
    protected void onStart() {


        super.onStart();
        timeReceiver = new TimeReceiver(); // 创建一个分钟变更的广播接收器
        // 创建一个意图过滤器,只处理系统分钟变化的广播
        IntentFilter filter = new IntentFilter(Intent.ACTION_TIME_TICK);
        registerReceiver(timeReceiver, filter); // 注册接收器,注册之后才能正常接收广播
    }
    @Override
    protected void onStop() {


        super.onStop();
        unregisterReceiver(timeReceiver); // 注销接收器,注销之后就不再接收广播
    }
    private TimeReceiver timeReceiver; // 声明一个分钟广播的接收器实例
    // 定义一个分钟广播的接收器
    private class TimeReceiver extends BroadcastReceiver {


        // 一旦接收到分钟变更的广播,马上触发接收器的onReceive方法
        @Override
        public void onReceive(Context context, Intent intent) {


            if (intent != null) {


                desc = String.format("%s\n%s 收到一个分钟到达广播%s", desc,
                                     DateUtil.getNowTime(), intent.getAction());
                tv_minute.setText(desc);
            }
        }
    }
}
(2)监听网络变更广播
// 定义一个网络变更的广播接收器
private class NetworkReceiver extends BroadcastReceiver {


    // 一旦接收到网络变更的广播,马上触发接收器的onReceive方法
    @Override
    public void onReceive(Context context, Intent intent) {


        if (intent != null) {


            NetworkInfo networkInfo = intent.getParcelableExtra("networkInfo");
            String networkClass =
                NetworkUtil.getNetworkClass(networkInfo.getSubtype());
            desc = String.format("%s\n%s 收到一个网络变更广播,网络大类为%s," +
                                 "网络小类为%s,网络制式为%s,网络状态为%s",
                                 desc, DateUtil.getNowTime(),
                                 networkInfo.getTypeName(),
                                 networkInfo.getSubtypeName(), networkClass,
                                 networkInfo.getState().toString());
            tv_network.setText(desc);
        }
    }
}
@Override
protected void onStart() {


    super.onStart();
    networkReceiver = new NetworkReceiver(); // 创建一个网络变更的广播接收器
    // 创建一个意图过滤器,只处理网络状态变化的广播
    IntentFilter filter = new
        IntentFilter("android.net.conn.CONNECTIVITY_CHANGE");
    registerReceiver(networkReceiver, filter); // 注册接收器,注册之后才能正常接收广播
}
@Override
protected void onStop() {


    super.onStop();
    unregisterReceiver(networkReceiver); // 注销接收器,注销之后就不再接收广播
}
此时切换网络,将会有输出提示。
八、服务组件 Service
1. 介绍
可在后台执行长时间运行操作而不提供界面的应用组件。如下载文件、播放音乐
Service有两种方式:
- startService :简单地启动,之后不能进行交互
- bindService:启动并绑定Service之后,可以进行交互
下面通过一个音乐播放器实例来介绍这两种方式
2. startService
首先创建MusicHelper用来播放音频
public class MusicHelper {


    private MediaPlayer mediaPlayer;

    private Context context;

    private final int[] musics = new int[]{

    R.raw.daoxiang, R.raw.qingtian};

    private int musicIndex = 0;

    private boolean prepared = false;

    public MusicHelper(Context context) {


        this.context = context;
        //创建MediaPlayer对象
        createMediaPlayer();
    }

    //创建MediaPlayer对象
    private void createMediaPlayer() {


        this.mediaPlayer = new MediaPlayer();
        mediaPlayer.setAudioStreamType(AudioManager.STREAM_MUSIC);
    }

    //播放
    public void play() {


        if (mediaPlayer.isPlaying()) {


            return;
        }
        if (prepared) {


            mediaPlayer.start();
            Log.d("hhh", "播放音频 play");
            return;
        }
        try {


            //这里路径要注意:android.resource:// + 包名 + R.raw.XXXX
            mediaPlayer.setDataSource(context, Uri.parse("android.resource://" + context.getPackageName() + "/" + musics[musicIndex]));
        } catch (IOException e) {


            e.printStackTrace();
        }
        mediaPlayer.prepareAsync();
        mediaPlayer.setOnPreparedListener(new MediaPlayer.OnPreparedListener() {


            @Override
            public void onPrepared(MediaPlayer mp) {


                mp.start();
                Log.d("hhh", "播放音频 play");
                prepared = true;
            }
        });
    }

    //暂停
    public void pause() {


        if (!mediaPlayer.isPlaying()) {


            return ;
        }
        mediaPlayer.pause();
    }

    //下一首
    public void next(){


        musicIndex = musicIndex + 1;
        musicIndex = musicIndex % musics.length;
        destroy();
        createMediaPlayer();
        play();
    }

    //销毁
    public void destroy(){


        if(mediaPlayer == null){


            return ;
        }
        mediaPlayer.stop();
        mediaPlayer.release();
        mediaPlayer = null;
        prepared = false;
    }
}
实现Service类:
public class MusicService extends Service {


    private MusicHelper musicHelper;

    //在onCreate中创建MusicHelper
    @Override
    public void onCreate() {


        super.onCreate();
        musicHelper = new MusicHelper(this);
    }

    //在onDestroy中销毁MusicHelper
    @Override
    public void onDestroy() {


        super.onDestroy();
        musicHelper.destroy();
        musicHelper = null;
    }

    //播放音频
    @Override
    public int onStartCommand(Intent intent, int flags, int startId) {


        musicHelper.play();
        Log.d("hhh", "播放音频 onStartCommand");
        return super.onStartCommand(intent, flags, startId);
    }

    @Nullable
    @Override
    public IBinder onBind(Intent intent) {


        throw new UnsupportedOperationException("Not yet implemented");
    }
}
在AndroidManifest.xml中注册:
<service
         android:name=".service.MusicService"
         android:enabled="true"
         android:exported="true" />
播放,暂停音乐:
public class StartServicActivity extends AppCompatActivity {


    @Override
    protected void onCreate(Bundle savedInstanceState) {


        super.onCreate(savedInstanceState);
        setContentView(R.layout.activity_start_servic);

        //播放
        findViewById(R.id.btPlay).setOnClickListener(new View.OnClickListener() {


            @Override
            public void onClick(View v) {


                Log.d("hhh", "点击了按钮");
                Intent intent = new Intent(StartServicActivity.this, MusicService.class);
                //这里会自动调用Service的onStartCommand方法
                startService(intent);
            }
        });

        //暂停
        findViewById(R.id.btStop).setOnClickListener(new View.OnClickListener() {


            @Override
            public void onClick(View v) {


                Intent intent = new Intent(StartServicActivity.this, MusicService.class);
                //这里会直接调用Service的onDestroy方法,销毁Service
                stopService(intent);
            }
        });
    }
}
startService只能简单启动和销毁Service,没办法进行交互,也就没办法进行暂停,下一首等功能。
3. bindService
在Service类中添加了Binder类:
public class MusicService2 extends Service {


    private MusicHelper musicHelper;

    //在onCreate中创建MusicHelper
    @Override
    public void onCreate() {


        super.onCreate();
        musicHelper = new MusicHelper(this);
    }

    //在onDestroy中销毁MusicHelper
    @Override
    public void onDestroy() {


        super.onDestroy();
        musicHelper.destroy();
        musicHelper = null;
    }

    //播放音频
    @Override
    public int onStartCommand(Intent intent, int flags, int startId) {


        musicHelper.play();
        Log.d("hhh", "播放音频 onStartCommand");
        return super.onStartCommand(intent, flags, startId);
    }

    public class MyBinder extends Binder {


        private MusicService2 service;

        public MyBinder(MusicService2 service) {


            this.service = service;
        }

        public void play() {


            service.musicHelper.play();
        }

        public void next() {


            service.musicHelper.next();
        }

        public void pause() {


            service.musicHelper.pause();
        }

        public void destroy() {


            service.musicHelper.destroy();
        }
    }

    @Nullable
    @Override
    public IBinder onBind(Intent intent) {


        Log.d("hhh", "onBind");
        return new MyBinder(this);
    }
}
连接类MyConn:
-
调用bindService之后,客户端端连上Service
-
触发MyConn类的onServiceConnected方法,获取Binder对象
-
之后可以Binder对象和Service交互(播放、暂停、下一首)
public class MyConn implements ServiceConnection {


    public MusicService2.MyBinder myBinder = null;

    @Override
    public void onServiceConnected(ComponentName name, IBinder service) {


        myBinder = (MusicService2.MyBinder) service;
    }

    @Override
    public void onServiceDisconnected(ComponentName name) {


    }
}
此时就可以真正实现播放,暂停,下一首等功能了:
public class BindServiceActivity extends AppCompatActivity {


    private MyConn myConn;

    @Override
    protected void onCreate(Bundle savedInstanceState) {


        super.onCreate(savedInstanceState);
        setContentView(R.layout.activity_bind_service);

        //初始化服务
        initService();

        //播放
        findViewById(R.id.btPlay).setOnClickListener(new View.OnClickListener() {


            @Override
            public void onClick(View v) {


                Log.d("hhh", "点击了按钮");
                if(myConn.myBinder == null){


                    return ;
                }
                myConn.myBinder.play();
            }
        });

        //暂停
        findViewById(R.id.btStop).setOnClickListener(new View.OnClickListener() {


            @Override
            public void onClick(View v) {


                if(myConn.myBinder == null){


                    return ;
                }
                myConn.myBinder.pause();
            }
        });

        //下一首
        findViewById(R.id.btNext).setOnClickListener(new View.OnClickListener() {


            @Override
            public void onClick(View v) {


                if(myConn.myBinder == null){


                    return ;
                }
                myConn.myBinder.next();
            }
        });
    }

    //初始化服务
    public void initService(){


        //开启服务
        Intent intent = new Intent(this, MusicService2.class);
        startService(intent);

        //绑定服务
        if(myConn == null){


            myConn = new MyConn();
            intent = new Intent(this, MusicService2.class);
            //这里会自动调用MyConn的onServiceConnected方法
            bindService(intent, myConn, 0);
        }
    }
}
至此,一个简易版音乐播放器完成!!!
九、网络通信
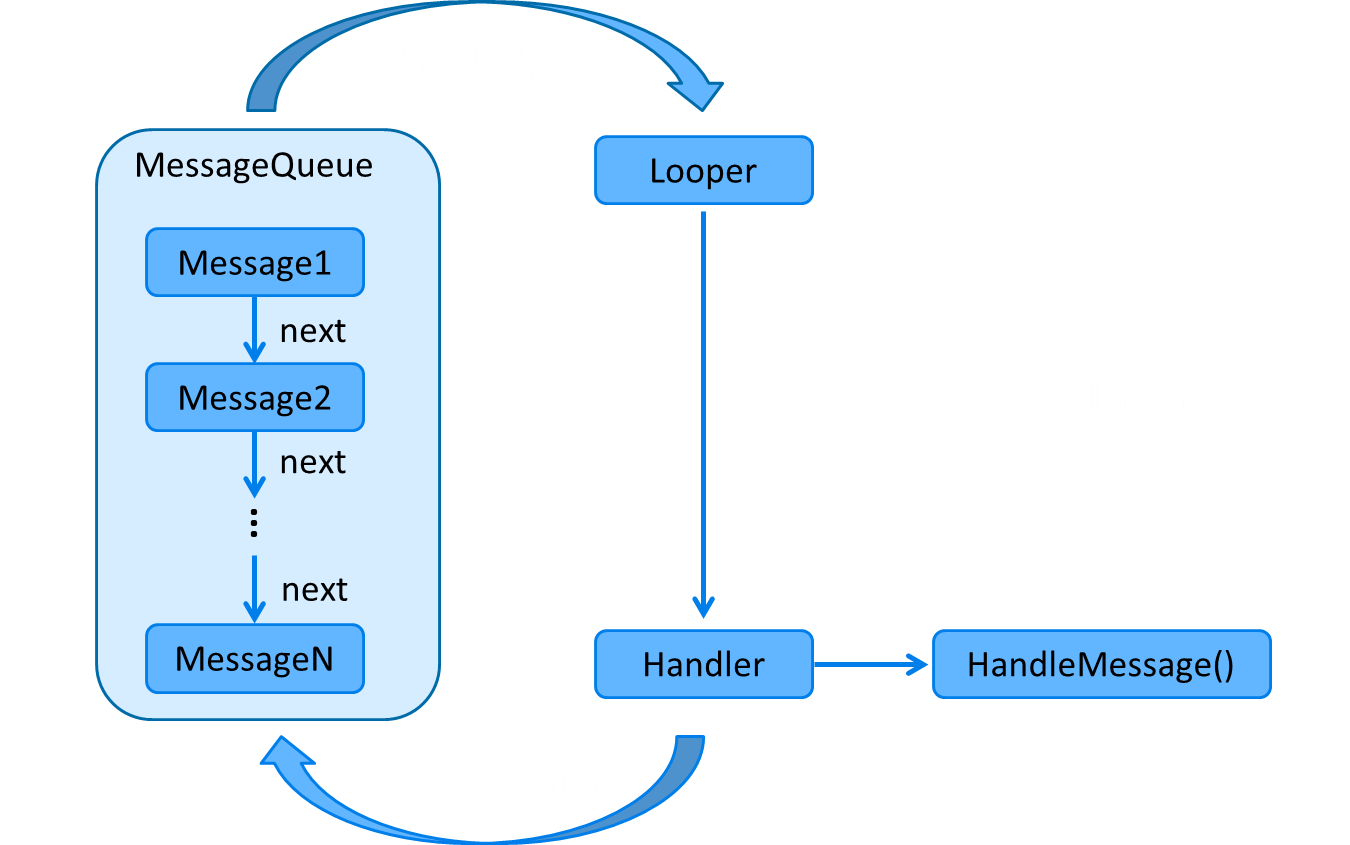
1. Handler消息机制
Handler是一种异步回调机制,主要负责与子线程进行通信。
HTTP请求需要一定时间才能完成,所以不能在主线程中执行。所以一般采用创建一个新线程的方式来执行HTTP,然后再将返回结果发送给主线程。Android提供了Handler来实现这一过程。
Handler机制主要包括四个关键对象:
-
Message:消息。
-
Handler:处理者,主要负责Message的发送以及处理。
-
MessageQueue:消息队列,主要用来存放Handler发送过来的消息。
-
Looper:消息循环,不断的从MessageQueue中抽取Message并执行。
以下通过获取高德天气信息为例,介绍Handler的基本使用
创建获取天气的线程WeatherThread:
public class WeatherThread extends Thread {


    //天气接口
    private String path = "https://restapi.amap.com/v3/weather/weatherInfo?city=440300&key=f15437fa96e40903e41bcb0c0adc8d38";

    //handler
    private Handler handler;

    public WeatherThread(Handler handler) {


        this.handler = handler;
    }

    @Override
    public void run() {


        String weather = getWeather();

        Message message = new Message();
        message.what = 0;
        message.obj = weather;

        handler.sendMessage(message);
    }

    //获取天气信息
    private String getWeather() {


        StringBuilder builder = new StringBuilder();

        HttpsURLConnection conn = null;
        try {


            URL url = new URL(path);
            conn = (HttpsURLConnection) url.openConnection();
            conn.setRequestMethod("GET");
            conn.setConnectTimeout(5000);

            InputStream is = conn.getInputStream();
            BufferedReader reader = new BufferedReader(new InputStreamReader(is));
            String result = reader.readLine();

            return result;

        } catch (Exception e) {


            e.printStackTrace();
        } finally {


            if (conn != null) {


                conn.disconnect();
            }
        }
        return null;
    }

}
WeatherHandler:
public class WeatherHandler extends Handler {


    private HandlerActivity handlerActivity;

    public WeatherHandler(HandlerActivity handlerActivity){


        this.handlerActivity = handlerActivity;
    }

    @Override
    public void handleMessage(@NonNull Message msg) {


        super.handleMessage(msg);

        //接受到消息则把天气结果设置到文本框
        if(msg.what == 0){


            TextView txWeather = handlerActivity.findViewById(R.id.tx_weather);
            txWeather.setText((String) msg.obj);
        }
    }
}
Activity:
public class HandlerActivity extends AppCompatActivity {


    @Override
    protected void onCreate(Bundle savedInstanceState) {


        super.onCreate(savedInstanceState);
        setContentView(R.layout.activity_handler);

        //点击按钮后开启新线程获取天气信息
        findViewById(R.id.bt_weather).setOnClickListener(new View.OnClickListener() {


            @Override
            public void onClick(View v) {


                WeatherHandler handler = new WeatherHandler(HandlerActivity.this);
                new WeatherThread(handler).start();
            }
        });
    }

}
<TextView
          android:id="@+id/tx_weather"
          android:layout_width="match_parent"
          android:layout_height="300dp"
          android:background="@drawable/border"
          android:layout_margin="30dp"/>

<Button
        android:id="@+id/bt_weather"
        android:layout_width="wrap_content"
        android:layout_height="wrap_content"
        android:layout_gravity="center"
        android:text="获取天气信息"
        android:layout_marginTop="40dp"
        android:background="#B4B5AB"/>
2. okhttp
上面用的Java中的HttpURLConnection是比较底层的接口,编写代码工作量大,容易出错。
okhttp是android平台使用最广泛的第三方网络框架,okhttp做了很多网络优化,功能也很强大。
okhttp有同步、异步两种接口
-
同步接口:阻塞方式
-
异步接口:自动创建线程进行网络请求
(1)同步方式
public class WeatherOkHttpThread extends Thread {


    //天气接口
    private String path = "https://restapi.amap.com/v3/weather/weatherInfo?city=440300&key=****";

    //handler
    private Handler handler;

    public WeatherOkHttpThread(Handler handler) {


        this.handler = handler;
    }

    @Override
    public void run() {


        String weather = getWeather();

        Message message = new Message();
        message.what = 0;
        message.obj = weather;

        handler.sendMessage(message);
    }

    //获取天气信息
    private String getWeather() {


        //创建OkHttpClient
        OkHttpClient client = new OkHttpClient();
        //构建请求
        Request request = new Request.Builder().url(path).build();
        String result = "";
        try {


            //同步的方式发送请求
            Response response = client.newCall(request).execute();
            if(response != null){


                result = response.body().string();
            }
        } catch (IOException e) {


            e.printStackTrace();
        }

        return result;
    }

}
(2)异步方式:
异步方式就不需要人为开启子线程了:
//异步方式
public class WeatherOkHttpActivity extends AppCompatActivity {


    //天气接口
    private String path = "https://restapi.amap.com/v3/weather/weatherInfo?city=440300&key=****";

    //handler
    private Handler handler;

    @Override
    protected void onCreate(Bundle savedInstanceState) {


        super.onCreate(savedInstanceState);
        setContentView(R.layout.activity_weather_ok_http);

        //赋值Handler
        handler = new WeatherHandler2(this);

        //点击按钮后,okHttp异步请求获取天气信息
        findViewById(R.id.bt_weather).setOnClickListener(new View.OnClickListener() {


            @Override
            public void onClick(View v) {


                OkHttpClient client = new OkHttpClient();
                Request request = new Request.Builder().url(path).build();

                client.newCall(request).enqueue(new Callback() {


                    //请求失败,打印异常
                    @Override
                    public void onFailure(@NonNull Call call, @NonNull IOException e) {


                        e.printStackTrace();
                    }

                    //响应
                    @Override
                    public void onResponse(@NonNull Call call, @NonNull Response response) throws IOException {


                        if (response != null) {


                            String result = response.body().toString();
                            //回调函数运行在子线程,不能直接操控UI
                            //通过handler把天气信息发送到主线程显示
                            Message message = new Message();
                            message.what = 0;
                            message.obj = result;
                            handler.sendMessage(message);
                        }
                    }
                });
            }
        });
    }
}
WeatherHandler2:和上面的WeatherHandler基本无异,只是变了Activity,为了区分而已
public class WeatherHandler2 extends Handler {


    private WeatherOkHttpActivity activity;

    public WeatherHandler2(WeatherOkHttpActivity activity){


        this.activity = activity;
    }

    @Override
    public void handleMessage(@NonNull Message msg) {


        super.handleMessage(msg);

        //接受到消息则把天气结果设置到文本框
        if(msg.what == 0){


            TextView txWeather = activity.findViewById(R.id.tx_weather);
            txWeather.setText((String) msg.obj);
        }
    }
}
3. retrofit
在Android开发中,Retrofit是当下最热的一个网络请求库。
底层默认使用okhttp封装的,准确来说,网络请求的工作本质上是okhttp完成,而 Retrofit 仅负责网络请求接口的封装。
其作用主要是简化代码、提高可维护性。
另外,最重要的是:okhttp异步请求的回调运行在子线程,而retrofit的异步请求的回调默认运行在主线程。
使用retrofit时,不再需要使用handler机制手工进行线程间通信。
仍然使用天气的例子来介绍基本使用:
//创建一个接口
//指定url(不包含域名和参数),GET请求的参数通过@Query指定
public interface WeatherService {


    //这里偷懒没有定义实体类,而是使用JsonObject代替
    @GET("v3/weather/weatherInfo")
    Call<JsonObject> fetchWeatherResult(@Query("key") String key,
                                        @Query("city") String city);

}
Activity:
public class WeatherRetrofitActivity extends AppCompatActivity {


    @Override
    protected void onCreate(Bundle savedInstanceState) {


        super.onCreate(savedInstanceState);
        setContentView(R.layout.activity_weather_retrofit);

        //点击按钮后,retrofit请求获取天气信息
        findViewById(R.id.bt_weather).setOnClickListener(new View.OnClickListener() {


            @Override
            public void onClick(View v) {


                Retrofit retrofit = new Retrofit.Builder()
                        .baseUrl("https://restapi.amap.com")
                        .addConverterFactory(GsonConverterFactory.create())
                        .build();

                WeatherService weatherService = retrofit.create(WeatherService.class);

                Call<JsonObject> call = weatherService.fetchWeatherResult("***(此处为key)", "440300");
                call.enqueue(new Callback<JsonObject>() {


                    //响应
                    @Override
                    public void onResponse(Call<JsonObject> call, Response<JsonObject> response) {


                        //获得天气结果
                        JsonObject result = response.body();
                        //直接设置到textView,不再需要使用handler手动进行线程间通信
                        TextView textView = findViewById(R.id.tx_weather);
                        textView.setText(result.toString());
                    }

                    //请求失败
                    @Override
                    public void onFailure(Call<JsonObject> call, Throwable t) {


                        t.printStackTrace();
                    }
                });

            }
        });
    }
}