提示:文章写完后,目录可以自动生成,如何生成可参考右边的帮助文档
文章目录
I2S介绍
我这里只是简单介绍下,具体介绍及使用教程可看:https://diyi0t.com/i2s-sound-tutorial-for-esp32/
I2S用于收发音频信号,有三根线组成:
①串行时钟 (SCK)也称为位时钟线 (BCLK):用于在同一周期内获取所有组件。串行时钟的频率定义为:频率 = 采样率 * 每通道位数 * 通道数,例如对一个wav录音文件:
采样率:44.1 kHz
每通道位数:16
通道数:2
则串行时钟的频率为 44.1 kHz * 16 * 2 = 1.411 MHz。
②字选择 (WS)或帧选择 (FS) 线:
如果 WS = 0 → 使用通道 1(左通道)
如果 WS = 1 → 使用通道 2(右通道)
③串行数据 (SD)线:用于传输数据
ESP32有两个I2S接口,并且ESP32内部有两个8位的DAC分别对应GPIO25和GPIO26
(ESP8266没内部DAC,如果要播放录音需要外加MAX98357A)
注:而由于内部DAC方式声音太小,所以本实验优先考虑使用MAX98357A,对于内部DAC输出直接调用第三方库,而不直接对i2s就行配置了(主要原因是我直接配置内部DAC的i2s输出的声音很杂,肯定是哪里没配好,只能用第三方库了,等我搞懂了再更新吧)
一、使用外部DAC即MAX98357A播放录音
1.播放内存的录音数据
提示:主要是参考了https://www.xtronical.com/i2s-ep2/
完整示例可下载:https://www.xtronical.com/wp-content/uploads/2020/08/PlayWav.zip
我这里只是修改了一下i2s_num,以及对一些重要的注释翻译成中文
// Includes
    #include "driver/i2s.h"            // 适用于ESP32的I2S库
    #include "WavData.h"               // 把WAV格式的录音数据的bytes保存到WavData中

//  Global Variables/objects
    static const i2s_port_t i2s_num = I2S_NUM_1;  // i2s port number,注意,如果是用内部DAC必须用I2S_NUM_0
    unsigned const char* TheData;
    uint32_t DataIdx=0;                           // index offset into "TheData" for current  data t send to I2S

    struct WavHeader_Struct
    {


      //   RIFF Section
      char RIFFSectionID[4];      // Letters "RIFF"
      uint32_t Size;              // Size of entire file less 8
      char RiffFormat[4];         // Letters "WAVE"

      //   Format Section
      char FormatSectionID[4];    // letters "fmt"
      uint32_t FormatSize;        // Size of format section less 8
      uint16_t FormatID;          // 1=uncompressed PCM
      uint16_t NumChannels;       // 1=mono,2=stereo
      uint32_t SampleRate;        // 44100, 16000, 8000 etc.
      uint32_t ByteRate;          // =SampleRate * Channels * (BitsPerSample/8)
      uint16_t BlockAlign;        // =Channels * (BitsPerSample/8)
      uint16_t BitsPerSample;     // 8,16,24 or 32

      // Data Section
      char DataSectionID[4];      // The letters "data"
      uint32_t DataSize;          // Size of the data that follows
    }WavHeader;

//------------------------------------------------------------------------------------------------------------------------

//------------------------------------------------------------------------------------------------------------------------
// I2S configuration structures

static const i2s_config_t i2s_config = {


    .mode = (i2s_mode_t)(I2S_MODE_MASTER | I2S_MODE_TX),
    .sample_rate = 44100,    //设置采样率,但由于预先不知道WavData的录音数据的采样率,后面解码后会通过i2s_set_sample_rates修改
    .bits_per_sample = I2S_BITS_PER_SAMPLE_16BIT,
    .channel_format = I2S_CHANNEL_FMT_RIGHT_LEFT,
    .communication_format = (i2s_comm_format_t)(I2S_COMM_FORMAT_I2S | I2S_COMM_FORMAT_I2S_MSB),
    .intr_alloc_flags = ESP_INTR_FLAG_LEVEL1,       // high interrupt priority
    .dma_buf_count = 8,                             // 8 buffers
    .dma_buf_len = 1024,                            // 1K per buffer, so 8K of buffer space
    .use_apll=0,
    .tx_desc_auto_clear= true,
    .fixed_mclk=-1
};

// These are the physical wiring connections to our I2S decoder board/chip from the esp32, there are other connections
// required for the chips mentioned at the top (but not to the ESP32), please visit the page mentioned at the top for
// further information regarding these other connections.

static const i2s_pin_config_t pin_config = {


    .bck_io_num = 27,                     // 时钟口,对应于MAX38357A的BCLK
    .ws_io_num = 26,                      // 用于声道选择,对应于MAX38357A的LRC
    .data_out_num = 25,                   // ESP32的音频输出口, 对应于MAX38357A的DIN
    .data_in_num = I2S_PIN_NO_CHANGE      // ESP32的音频输入接口,本例未用到
};

//------------------------------------------------------------------------------------------------------------------------


void setup() {


    Serial.begin(115200);
    memcpy(&WavHeader,&WavData,44);                     // Copy the header part of the wav data into our structure
    DumpWAVHeader(&WavHeader);                          // Dump the header data to serial, optional!
    if(ValidWavData(&WavHeader))
    {


      i2s_driver_install(i2s_num, &i2s_config, 0, NULL);        // ESP32 will allocated resources to run I2S
      i2s_set_pin(i2s_num, &pin_config);                        // Tell it the pins you will be using
      i2s_set_sample_rates(i2s_num, WavHeader.SampleRate);      //set sample rate
      TheData=WavData;                                          // set to start of data
      TheData+=44;
    }
    else      // end code here
      while(true);
}

void loop()
{


  size_t BytesWritten;                            // Returned by the I2S write routine, we are not interested in it

  // 这里可选择每次发32bit的数据,也就是4 bytes
  i2s_write(i2s_num,TheData+DataIdx,4,&BytesWritten,portMAX_DELAY);
  DataIdx+=4;                                   // increase the data index to next two 16 bit values (4 bytes)
  if(DataIdx>=WavHeader.DataSize)               // If we gone past end of data reset back to beginning
    DataIdx=0;
}

bool ValidWavData(WavHeader_Struct* Wav)
{


  if(memcmp(Wav->RIFFSectionID,"RIFF",4)!=0)
  {


    Serial.print("Invlaid data - Not RIFF format");
    return false;
  }
  if(memcmp(Wav->RiffFormat,"WAVE",4)!=0)
  {


    Serial.print("Invlaid data - Not Wave file");
    return false;
  }
  if(memcmp(Wav->FormatSectionID,"fmt",3)!=0)
  {


    Serial.print("Invlaid data - No format section found");
    return false;
  }
  if(memcmp(Wav->DataSectionID,"data",4)!=0)
  {


    Serial.print("Invlaid data - data section not found");
    return false;
  }
  if(Wav->FormatID!=1)
  {


    Serial.print("Invlaid data - format Id must be 1");
    return false;
  }
  if(Wav->FormatSize!=16)
  {


    Serial.print("Invlaid data - format section size must be 16.");
    return false;
  }
  if((Wav->NumChannels!=1)&(Wav->NumChannels!=2))
  {


    Serial.print("Invlaid data - only mono or stereo permitted.");
    return false;
  }
  if(Wav->SampleRate>48000)
  {


    Serial.print("Invlaid data - Sample rate cannot be greater than 48000");
    return false;
  }
  if((Wav->BitsPerSample!=8)& (Wav->BitsPerSample!=16))
  {


    Serial.print("Invlaid data - Only 8 or 16 bits per sample permitted.");
    return false;
  }
  return true;
}


void DumpWAVHeader(WavHeader_Struct* Wav)
{


  if(memcmp(Wav->RIFFSectionID,"RIFF",4)!=0)
  {


    Serial.print("Not a RIFF format file - ");
    PrintData(Wav->RIFFSectionID,4);
    return;
  }
  if(memcmp(Wav->RiffFormat,"WAVE",4)!=0)
  {


    Serial.print("Not a WAVE file - ");
    PrintData(Wav->RiffFormat,4);
    return;
  }
  if(memcmp(Wav->FormatSectionID,"fmt",3)!=0)
  {


    Serial.print("fmt ID not present - ");
    PrintData(Wav->FormatSectionID,3);
    return;
  }
  if(memcmp(Wav->DataSectionID,"data",4)!=0)
  {


    Serial.print("data ID not present - ");
    PrintData(Wav->DataSectionID,4);
    return;
  }
  // All looks good, dump the data
  Serial.print("Total size :");Serial.println(Wav->Size);
  Serial.print("Format section size :");Serial.println(Wav->FormatSize);
  Serial.print("Wave format :");Serial.println(Wav->FormatID);
  Serial.print("Channels :");Serial.println(Wav->NumChannels);
  Serial.print("Sample Rate :");Serial.println(Wav->SampleRate);
  Serial.print("Byte Rate :");Serial.println(Wav->ByteRate);
  Serial.print("Block Align :");Serial.println(Wav->BlockAlign);
  Serial.print("Bits Per Sample :");Serial.println(Wav->BitsPerSample);
  Serial.print("Data Size :");Serial.println(Wav->DataSize);
}

void PrintData(const char* Data,uint8_t NumBytes)
{


    for(uint8_t i=0;i<NumBytes;i++)
      Serial.print(Data[i]);
      Serial.println();
}
对应的接线方式如图(可在代码的pin_config 中更改):

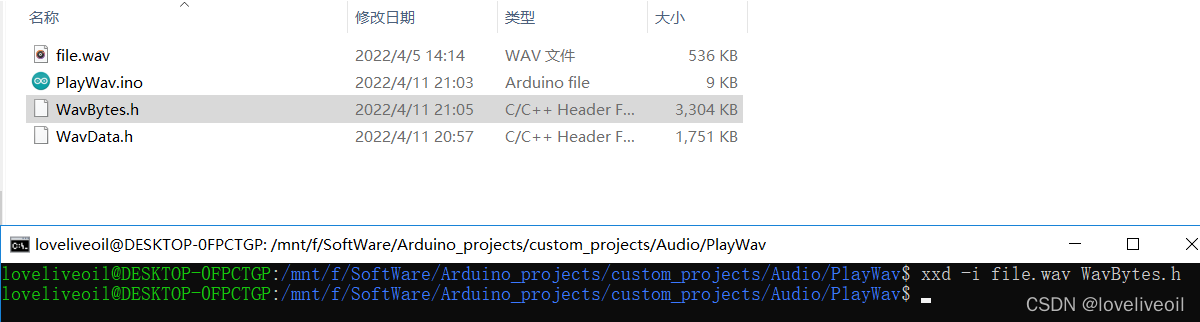
对于如何把后缀名为.wav的录音文件转化为WavData.h,可利用wsl的命令行:xxd -i xxx.wav xxx.h

2.使用第三方库ESP8266Audio
下载地址:https://github.com/earlephilhower/ESP8266Audio
本例基于:https://diyi0t.com/i2s-sound-tutorial-for-esp32/
先下载ESP8266Audio的库zip文件,并在Arduino中安装此第三方库
#include "AudioGeneratorAAC.h"
#include "AudioOutputI2S.h"
#include "AudioFileSourcePROGMEM.h"
#include "sampleaac.h"

AudioFileSourcePROGMEM *in;
AudioGeneratorAAC *aac;
AudioOutputI2S *out;

void setup(){


  Serial.begin(115200);

  in = new AudioFileSourcePROGMEM(sampleaac, sizeof(sampleaac));
  aac = new AudioGeneratorAAC();
  out = new AudioOutputI2S();
  out -> SetGain(0.5);            //设置音量0~1
  out -> SetPinout(27,33,32);     //设置接到MAX98357A的引脚, GPIO27(串行时钟SCK)-->SCLK, GPIO33(字选择WS)-->LRC, GPIO32(串行数据SD)-->DIN
  aac->begin(in, out);
}

void loop(){


  if (aac->isRunning()) {


    aac->loop();
  } else {


    aac -> stop();
    Serial.printf("Sound Generator\n");
    delay(1000);
  }
}
3.用第三方库ESP8266Audio接收网络广播
本例基于ESP8266Audio库的StreamMP3FromHTTPToSPDIF
然后修改一下代码,绑定MAX98357A,添加把广播源换成国内的

#include <Arduino.h>

#ifdef ESP32
    #include <WiFi.h>
#else
    #include <ESP8266WiFi.h>
#endif
#include "AudioFileSourceICYStream.h"
#include "AudioFileSourceBuffer.h"
#include "AudioGeneratorMP3.h"
//#include "AudioOutputI2SNoDAC.h"
#include "AudioOutputI2S.h"

//
// Stream MP3 from HTTP to SPDIF
//

// To run, set your ESP8266 build to 160MHz, update the SSID info, and upload.

// Note:
// If using ESP8266 NodeMCU connect LED to RX pin and GND pin

// Enter your WiFi setup here:
#ifndef STASSID
#define STASSID "你的WiFi"
#define STAPSK  "WiFi密码"
#endif

const char* ssid = STASSID;
const char* password = STAPSK;

// Examples URLs
//const char *URL="http://kvbstreams.dyndns.org:8000/wkvi-am";

// 换成了国内的广播源
const char *URL="http://lhttp.qingting.fm/live/4915/64k.mp3";

// Stream URL of Logitech Media Server, aka LMS, Version: 8.2.0 (August 2021)
// const char *URL="http://192.168.1.121:9000/stream.mp3";

AudioGeneratorMP3 *mp3;
AudioFileSourceICYStream *file;
AudioFileSourceBuffer *buff;

// Output device is SPDIF
AudioOutputI2S *out;


// Called when a metadata event occurs (i.e. an ID3 tag, an ICY block, etc.
void MDCallback(void *cbData, const char *type, bool isUnicode, const char *string)
{


  const char *ptr = reinterpret_cast<const char *>(cbData);
  (void) isUnicode; // Punt this ball for now
  // Note that the type and string may be in PROGMEM, so copy them to RAM for printf
  char s1[32], s2[64];
  strncpy_P(s1, type, sizeof(s1));
  s1[sizeof(s1)-1]=0;
  strncpy_P(s2, string, sizeof(s2));
  s2[sizeof(s2)-1]=0;
  Serial.printf("METADATA(%s) '%s' = '%s'\n", ptr, s1, s2);
  Serial.flush();
}

// Called when there's a warning or error (like a buffer underflow or decode hiccup)
void StatusCallback(void *cbData, int code, const char *string)
{


  const char *ptr = reinterpret_cast<const char *>(cbData);
  // Note that the string may be in PROGMEM, so copy it to RAM for printf
  char s1[64];
  strncpy_P(s1, string, sizeof(s1));
  s1[sizeof(s1)-1]=0;
  Serial.printf("STATUS(%s) '%d' = '%s'\n", ptr, code, s1);
  Serial.flush();
}


void setup()
{


  Serial.begin(115200);
  delay(1000);
  Serial.println("Connecting to WiFi");

  WiFi.disconnect();
  WiFi.softAPdisconnect(true);
  WiFi.mode(WIFI_STA);

  WiFi.begin(ssid, password);

  // Try forever
  while (WiFi.status() != WL_CONNECTED) {


    Serial.println("...Connecting to WiFi");
    delay(1000);
  }
  Serial.println("Connected");

  audioLogger = &Serial;
  file = new AudioFileSourceICYStream(URL);

  // Commented out for performance issues with high rate MP3 stream
  //file->RegisterMetadataCB(MDCallback, (void*)"ICY");

  buff = new AudioFileSourceBuffer(file, 4096);	// Doubled form default 2048

  // Commented out for performance issues with high rate MP3 stream
  //buff->RegisterStatusCB(StatusCallback, (void*)"buffer");

  // Set SPDIF output
  out = new AudioOutputI2S();
  out -> SetGain(0.2);            //设置音量
  out -> SetPinout(27,33,32);     //设置接到MAX98357A的引脚, GPIO27(串行时钟SCK)-->SCLK, GPIO33(字选择WS)-->LRC, GPIO32(串行数据SD)-->DIN
  mp3 = new AudioGeneratorMP3();

  // Commented out for performance issues with high rate MP3 stream
  //mp3->RegisterStatusCB(StatusCallback, (void*)"mp3");

  mp3->begin(buff, out);
}


void loop()
{


  // Commented out
  //static int lastms = 0;

  if (mp3->isRunning()) {


    /* Commented out
    if (millis()-lastms > 1000) {
      lastms = millis();
      Serial.printf("Running for %d ms...\n", lastms);
      Serial.flush();
     }
    */
    if (!mp3->loop()) {


      mp3->stop();
    }
  } else {


    Serial.printf("MP3 done\n");

    // Restart ESP when streaming is done or errored
    delay(10000);

    ESP.restart();
  }
}
不过我测试的时候发现声音总是会出现滴滴声,用这个库来接收直播流的效果并不好,但播放mp3文件的效果就很好,可以把URL换成http://mp3.jiuku.9ku.com/hot/2004/11-18/62878.mp3来试一下。
二、使用内部DAC播放录音
1.使用第三方库XT_DAC_Audio播放内存的录音数据
我尝试配置i2s来输出DAC,但一直有杂音,不知道是哪里的问题,这里就先直接用第三方库XT DAC
从下列链接下载.zip文件后用Arduino导入此第三方库即可
下载地址:https://www.xtronical.com/the-dacaudio-library-download-and-installation/
本例基于:https://www.yiboard.com/thread-1566-1-1.html
然后打开例程PlayWav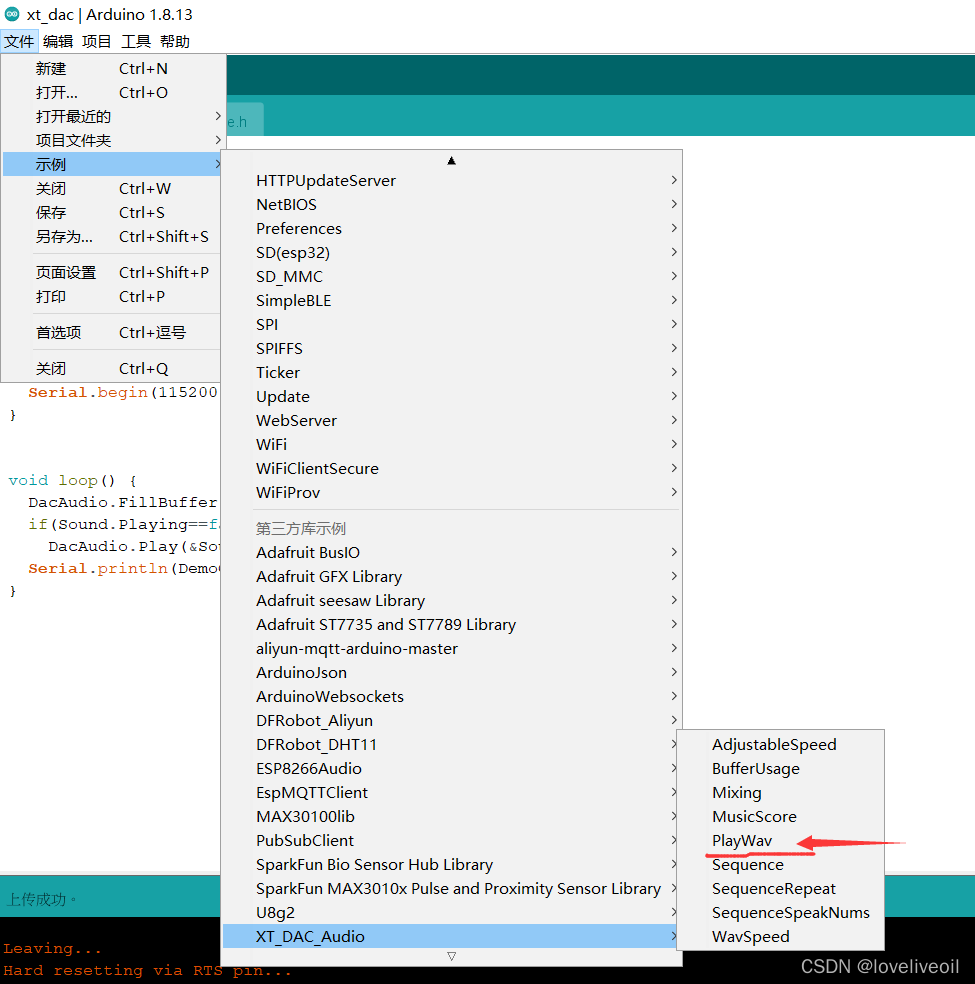
// Playing a digital WAV recording repeatadly using the XTronical DAC Audio library
// prints out to the serial monitor numbers counting up showing that the sound plays
// independently of the main loop
// See www.xtronical.com for write ups on sound, the hardware required and how to make
// the wav files and include them in your code

#include "SoundData.h"
#include "XT_DAC_Audio.h"

XT_Wav_Class ForceWithYou(Force);     // create an object of type XT_Wav_Class that is used by
                                      // the dac audio class (below), passing wav data as parameter.

XT_DAC_Audio_Class DacAudio(25,0);    // Create the main player class object.
                                      // Use GPIO 25, one of the 2 DAC pins and timer 0

uint32_t DemoCounter=0;               // Just a counter to use in the serial monitor
                                      // not essential to playing the sound

void setup() {


  Serial.begin(115200);               // Not needed for sound, just to demo printing to the serial
                                      // Monitor whilst the sound plays, ensure your serial monitor
                                      // speed is set to this speed also.
}

void loop() {


  DacAudio.FillBuffer();                // Fill the sound buffer with data
  if(ForceWithYou.Playing==false)       // if not playing,
    DacAudio.Play(&ForceWithYou);       // play it, this will cause it to repeat and repeat...
  Serial.println(DemoCounter++);        // Showing that the sound will play as well as your code running here.
}
原例默认用GPIO25进行内部DAC输出,改成XT_DAC_Audio_Class DacAudio(26,0);就可以用GPIO26内部DAC输出了
2.使用第三方库ESP8266Audio
下载地址:https://github.com/earlephilhower/ESP8266Audio
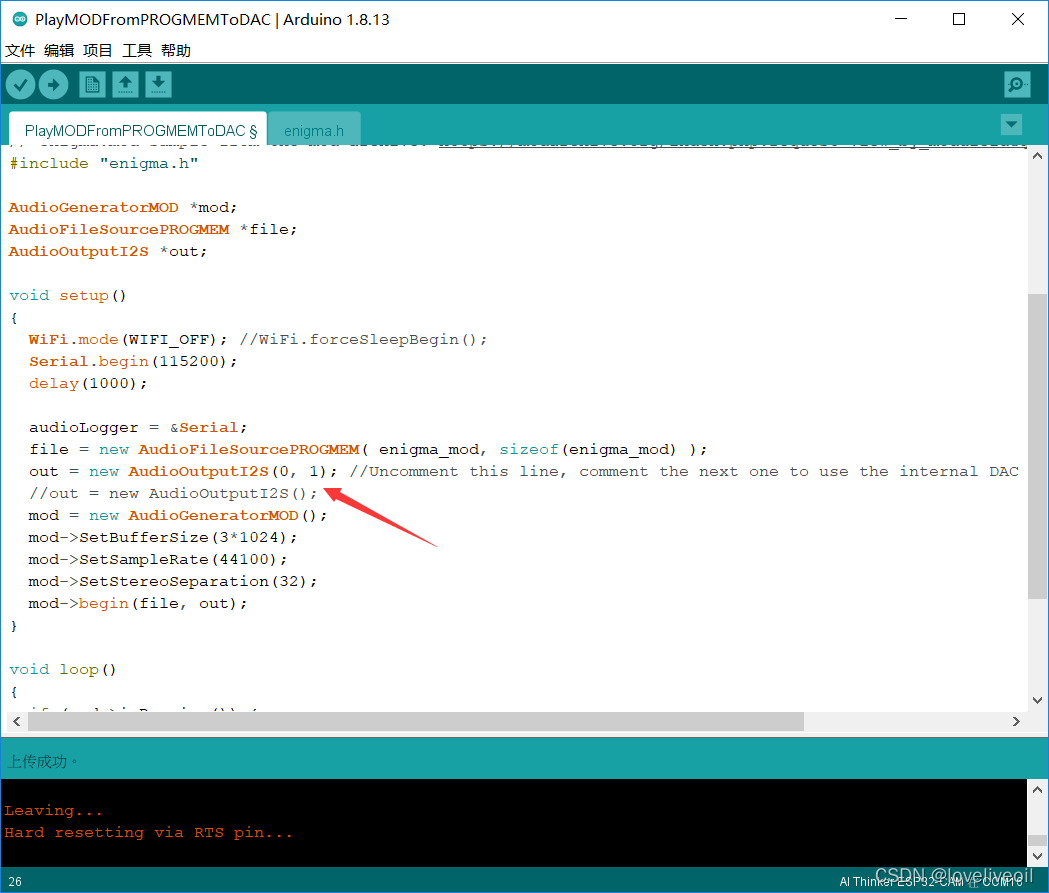
下载.zip文件并在Arduino中安装此第三方库后,打开例程PlayMODFromPROGMEMToDAC:

按照注释说的那样操作,把上一行反注释,下一行注释了由此实现内部DAC输出:
然后GPIO26接到喇叭的其中一根线上,喇叭的令一根线接地就行了
总结及演示
本文记录了ESP32播放音频的例程了,后续会陆续更新通过ESP32-cam传播视频的教程,实现ESP32cam+MAX9814实现视频和音乐播放,以及语音视频通话的功能,下面是esp32播放音乐视频的演示(esp32播放音乐视频)
esp32播放音乐视频