1、下载Godot
官网下载、Github上的Godot、Steam上的Godot
本文下载最新版Godot_v4.0.1-rc2_win64.exe.zip
解压后运行Godot_v4.0.1-rc2_win64.exe即可
2、编写项目
新建项目,修改项目路径,再填写项目名称日期计算器,点击创建并编辑
因为是rc2版,项目列表窗口未响应了,重开一下软件,点击刚建的项目,点击编辑
菜单栏 - 项目 - 项目设置 - 显示 - 窗口,设置窗口尺寸,400x300
最上方选择 2D
左侧点击用户界面,创建一个Control,改名为Main
右上角点击运行,出现提示未定义主场景,点击选择当前,设置当前场景为主场景,保存场景,关闭窗口。
左侧点击加号,添加子节点,VBoxContainer
上方找到圈中带加号图标,在船锚图标旁边,选择整个矩形
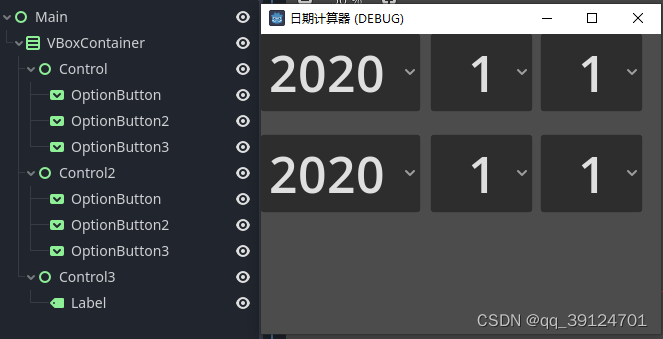
向VBoxContainer添加3个子节点,Control、Control2、Control3
多选3个Control,上方找到虚框中带点图标,垂直对齐,勾选对齐并扩展,点击垂直对齐的填充
向Control、Control2各添加3个OptionButton
修改OptionButton的Items属性,分别为年数字,月数字,日数字
修改Items - Selected,设置为0
修改位置,将它们并排,Layout - Transform X坐标分别为:0,170,280
修改字体大小,Control - Theme Overrides - Font Sizes,设置为50
修改文字对齐,Button - Text Behavior - Alignment,设置为Right
向Control3添加一个Label
修改字体大小为50
3、添加脚本
右键 Main,添加脚本,创建
选择其中一个OptionButton,点击右侧节点,信号,双击item_selected(index: int),连接
挨个给OptionButton添加信号,函数都用这一个就行了(点击Pick就可以选中已有的函数)
extends Control
@onready var label = $VBoxContainer/Control3/Label
@onready var btn11 = $VBoxContainer/Control/OptionButton
@onready var btn12 = $VBoxContainer/Control/OptionButton2
@onready var btn13 = $VBoxContainer/Control/OptionButton3
@onready var btn21 = $VBoxContainer/Control2/OptionButton
@onready var btn22 = $VBoxContainer/Control2/OptionButton2
@onready var btn23 = $VBoxContainer/Control2/OptionButton3
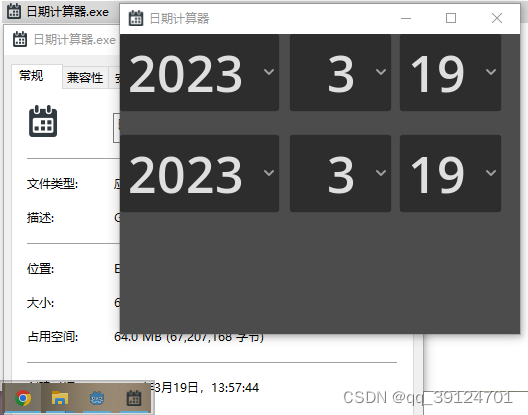
func _ready():
var t = Time.get_date_dict_from_system()
btn11.select(t.year - 2020)
btn21.select(t.year - 2020)
btn12.select(t.month - 1)
btn22.select(t.month - 1)
btn13.select(t.day - 1)
btn23.select(t.day - 1)
func _on_option_button_item_selected(_index):
update_days(0)
update_days(1)
update_both_selected()
calc()
# index是0就是第一行日期,index是1就是第二行日期
func update_days(index:int):
var arr = [[btn11,btn12],[btn21,btn22]]
enable_days(index,[28,29,30,31],true)
if [4,6,9,11].find(arr[index][1].selected+1) != -1:
enable_days(index,[31],false)
elif arr[index][1].selected+1 == 2:
if arr[index][0].selected == 0:
enable_days(index,[30,31],false)
else:
enable_days(index,[29,30,31],false)
# index是0就是第一行日期,index是1就是第二行日期
# arr包含的是真实日期,不是索引
func enable_days(index:int,arr:Array,enable:bool):
for d in arr:
if index == 0:
btn13.set_item_disabled(d-1, not enable)
else:
btn23.set_item_disabled(d-1, not enable)
func update_both_selected():
update_selected(btn13)
update_selected(btn23)
func update_selected(opbtn:OptionButton):
pass
if opbtn.is_item_disabled(opbtn.selected):
var length = opbtn.get_item_count()
var arr = []
for i in length:
arr.append(!opbtn.is_item_disabled(i))
for i in arr.size():
if i < arr.size() - 1:
if arr[i] == true and arr[i+1] == false:
opbtn.selected = i
break
"""
日期查表
2020 1 31 2021 1 31 2022 1 31 2023 1 31
2 29 2 28 2 28 2 28
3 31 3 31 3 31 3 31
4 30 4 30 4 30 4 30
5 31 5 31 5 31 5 31
6 30 6 30 6 30 6 30
7 31 7 31 7 31 7 31
8 31 8 31 8 31 8 31
9 30 9 30 9 30 9 30
10 31 10 31 10 31 10 31
11 30 11 30 11 30 11 30
12 31 12 31 12 31 12 31
"""
# 测试
# 2020年1月1日-2021年12月31日,9个在线网页工具结果是730,本软件是730
# https://rili.160.com/tools/datecalculator.html计算错误,结果为729
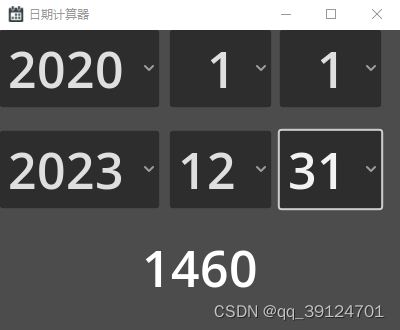
# 2020年1月1日-2023年12月31日,10个在线网页工具结果是1460,本软件是1460
func calc():
var arr = [
31,29,31,30,31,30,31,31,30,31,30,31,
31,28,31,30,31,30,31,31,30,31,30,31,
31,28,31,30,31,30,31,31,30,31,30,31,
31,28,31,30,31,30,31,31,30,31,30,31,
]
var year1 = btn11.selected + 2020
var year2 = btn21.selected + 2020
var month1 = btn12.selected + 1
var month2 = btn22.selected + 1
var day1 = btn13.selected + 1
var day2 = btn23.selected + 1
if year1 > year2 or (year1 <= year2 and month1 > month2) or (year1 <= year2 and month1 <= month2 and day1 > day2):
var res = exchange_date(year1,month1,day1,year2,month2,day2)
year1 = res[0]
year2 = res[3]
month1 = res[1]
month2 = res[4]
day1 = res[2]
day2 = res[5]
var index1 = (year1 - 2020) * 12 + (month1) - 1
var index2 = (year2 - 2020) * 12 + (month2) - 1
#var date1 = arr[index1] - day1
#var date2 = arr[index2] - day2
if index1 > index2:
var i = index1
index1 = index2
index2 = i
var diff1 = 0
for i in arr.size():
if index1 <= i and i < index2:
diff1 += arr[i]
var diff = -day1 + diff1 + day2
print(diff)
label.text = str(diff)
func exchange_date(year1,month1,day1,year2,month2,day2):
var i = year1
year1 = year2
year2 = i
i = month1
month1 = month2
month2 = i
i = day1
day1 = day2
day2 = i
return [year1,month1,day1,year2,month2,day2]
"""
在线日期计算工具排行
第一名
天数计算器 https://m.wannianli.tianqi.com/jisuanqi/tianshu,虽然是手机界面交互,但是界面漂亮
第二名
记事日历 https://www.jishirili.com/riqicha.asp,界面几乎零样式,但是可以计算相差秒数
第三名
日期计算器 https://www.ri7.com.cn/,界面漂亮,但是修改年份时必须重新选择月份和日期
第四名
计算100 https://www.jisuan100.com/riqi.html,直接使用封装好的日期选择控件,操作还行
第五名
sojson https://www.sojson.com/time/jsq.html,下拉框是挺长但是一滚轮就越过了我要点的年份,操作还行
没有数字限制,一个月里写多少天都行,-1天也行
在线工具 https://tool.lu/index.php/datecalc/
北京时间 https://www.beijing-time.org/riqi.htm
喜蜜滋黄历 https://rili.ximizi.com/riqijisuan_1.php?ivk_sa=1024320u
今日工具网 https://www.tolyg.com/tools/riqi/?&rand=1b9af1b8b3da8c8ea7c77f437498617b
最差网站
人生日历网,https://rili.160.com/tools/datecalculator.html,主打日历软件还算不对日期,真是笑掉大牙了
"""
4、修改软件图标
更改 Windows 的应用程序图标 - 官网文档
直接看文档就行了
转换ico要用专用软件,主打编辑ico的软件才行,点两下按钮就解决的事情
GIMP?ImageMagick?PS?都是废物,啥都会就是啥都不会

- godot的文件系统看不着ico文件,忽略这个问题
- godoticon,Godot icon creator/replacer,godoticonplugin,我没试过,你可以试试
- 没有Windows原生图标选项?开启
高级设置就有了
5、下载导出模板
菜单栏 - 项目 - 导出,添加Windows Desktop,管理导出模板,然后下载模板就行
点击三个点复制URL,用IDM下(TuxFamily)(不要用Godot自己下载,CPU占用高还下得慢)
下完了从文件导入
6、设置Rcedit
下载Rcedit
编辑器 → 编辑器设置 → 导出 → Windows,设置Rcedit
7、导出
菜单栏 - 项目 - 导出,选Windows Desktop预设
二进制格式,勾选内嵌 PCK
应用 - 图标,设置图标
导出项目…,取消勾选使用调试导出
8、最终效果
文件图标、软件图标、任务栏图标均正常显示,文件图标不正常的以右键属性为准。
任意切换日期会显示相差的天数。