1、概述
Scrapy是一个为了爬取网站数据,提取结构性数据而编写的开源应用框架,就像Java中的Spring、Mybatis框架一样。 可以应用在包括数据挖掘,信息处理或存储历史数据等一系列的程序中。
Scrapy特点:
- 快速而强大:开发人员只需要关注提取数据的规则,让 Scrapy 完成剩下的工作
- 易于扩展:通过设计可扩展,无需触及核心即可轻松插入新功能
- 使用方便:用 Python 编写,可在 Linux、Windows、Mac 和 BSD 上运行
官网:Scrapy | A Fast and Powerful Scraping and Web Crawling Framework
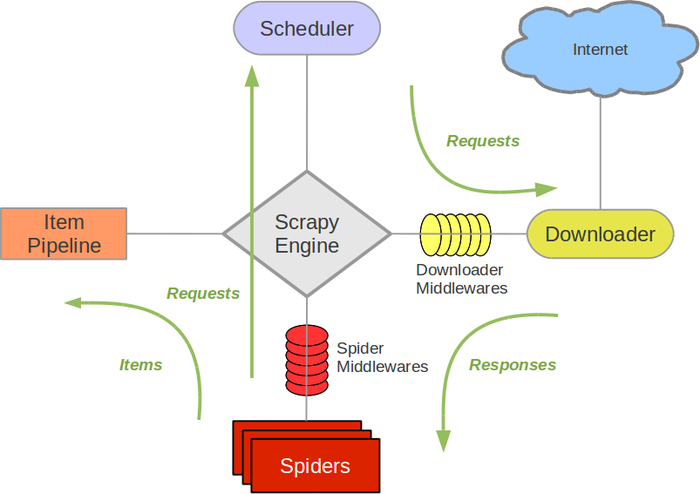
2、架构
-
Scrapy Engine(引擎): 负责Spider、ItemPipeline、Downloader、Scheduler中间的通讯,信号、数据传递等。
-
Scheduler(调度器): 它负责接受引擎发送过来的Request请求,并按照一定的方式进行整理排列,入队,当引擎需要时,交还给引擎。
-
Downloader(下载器):负责下载Scrapy Engine(引擎)发送的所有Requests请求,并将其获取到的Responses交还给Scrapy Engine(引擎),由引擎交给Spider来处理,
-
Spider(爬虫):它负责处理所有Responses,从中分析提取数据,获取Item字段需要的数据,并将需要跟进的URL提交给引擎,再次进入Scheduler(调度器).
-
Item Pipeline(管道):它负责处理Spider中获取到的Item,并进行进行后期处理(详细分析、过滤、存储等)的地方。
-
Downloader Middlewares(下载中间件):你可以当作是一个可以自定义扩展下载功能的组件。
-
Spider Middlewares(Spider中间件):你可以理解为是一个可以自定扩展和操作引擎和Spider中间通信的功能组件(比如进入Spider的Responses;和从Spider出去的Requests)
3、安装指南
支持的 Python 版本:Scrapy 需要 Python 3.7+
通过Python包管理工具安装:
pip install ScrapyScrapy已依赖安装包:
-
lxml,一个高效的 XML 和 HTML 解析器
-
parsel,一个在 lxml 之上编写的 HTML/XML 数据提取库,
-
w3lib,用于处理 URL 和网页编码的多用途助手
-
twisted,一个异步网络框架
-
cryptography and pyOpenSSL,以应对各种网络级安全需求
4、命令行工具
Scrapy是通过scrapy命令行工具来控制的,这里简称为“Scrapy工具”,以区别于我们简称为“命令”或“Scrapy命令”的子命令。
Scrapy 工具提供了多个命令,用于多种用途,每个命令都接受一组不同的参数和选项。
4.1、配置设置
Scrapy 参数配置文件“scrapy.cfg”,分为全局配置和项目级配置
①、全局配置查找路径:/etc/scrapy.cfg或c:\scrapy\scrapy.cfg(系统范围),~/.config/scrapy.cfg( $XDG_CONFIG_HOME) 和~/.scrapy.cfg( $HOME) 用于全局(用户范围)设置。
②、项目级配置文件:scrapy.cfg在 Scrapy 项目的根目录中。
这些文件中的设置按列出的优先顺序合并:用户定义的值比系统范围的默认值具有更高的优先级,并且项目范围的设置将在定义时覆盖所有其他设置。
4.2、Scrapy项目的默认结构
在深入研究命令行工具及其子命令之前,让我们先了解一下 Scrapy 项目的目录结构。
虽然可以修改,但是所有的Scrapy项目默认都有相同的文件结构,类似这样:
scrapy.cfg
scrapy_test/
    __init__.py
    items.py
    middlewares.py
    pipelines.py
    settings.py
    spiders/
        __init__.py
        ...
文件说明:
- scrapy.cfg: 项目的配置文件。
- scrapy_test/: 项目的Python模块,将会从这里引用代码。
- scrapy_test/items.py: 项目的目标文件。
- scrapy_test/pipelines.py: 项目的管道文件。
- scrapy_test/settings.py: 项目的设置文件。
- scrapy_test/spiders/: 存储爬虫代码目录。
scrapy.cfg文件所在的目录称为项目根路径,该文件包含定义项目设置的 python 模块的名称。这是一个例子:
[settings]
default = myproject.settings4.3、多个Scrapy项目共享一个scrapy.cfg配置文件
在同一个根目录下的多个项目,可以共享同一个scrapy.cfg配置文件,每个项目配置自己的设置模块。
在[settings]模块中必须为文件中的这些设置模块定义一个或多个别名scrapy.cfg
[settings]
default = myproject1.settings
project1 = myproject1.settings
project2 = myproject2.settings
scrapy命令默认使用default配置,如果想用其他配置,需要使用环境变量“SCRAPY_PROJECT”设置:
$ scrapy settings --get BOT_NAME
Project 1 Bot
$ export SCRAPY_PROJECT=project2
$ scrapy settings --get BOT_NAME
Project 2 Bot
4.4、使用scrapy工具
用法:
scrapy <命令> [选项] [参数]
4.4.1、创建项目:scrapy_test
命令:
scrapy startproject 项目名称 项目目录
# 在当前目录创建scrapy_test 项目
$ scrapy startproject scrapy_test ./
New Scrapy project 'scrapy_test', using template directory '/Users/liuchao/.pyenv/versions/3.11.1/lib/python3.11/site-packages/scrapy/templates/project', created in:
    /Users/liuchao/java/resources/python/Scrapy

You can start your first spider with:
    cd .
    scrapy genspider example example.com

# 查看创建结果,在当前目录生成配置文件和 scrapy_test项目
$ ls
scrapy.cfg  scrapy_test
4.4.2、制作爬虫
我们以百度首页为例,进入scrapy_test目录下执行命令:scrapy genspider baidu www.baidu.com
执行完以后,咱们发现此目录下的spiders文件夹内多了一个baidu.py文件,这个文件就是咱们的爬虫文件,内容如下:
import scrapy


class BaiduSpider(scrapy.Spider):
    name = "baidu"
    allowed_domains = ["www.baidu.com"]
    start_urls = ["http://www.baidu.com/"]

    def parse(self, response):
        pass

4.4.3、执行爬取
还是在scrapy_test目录下执行命令:scrapy crawl baidu
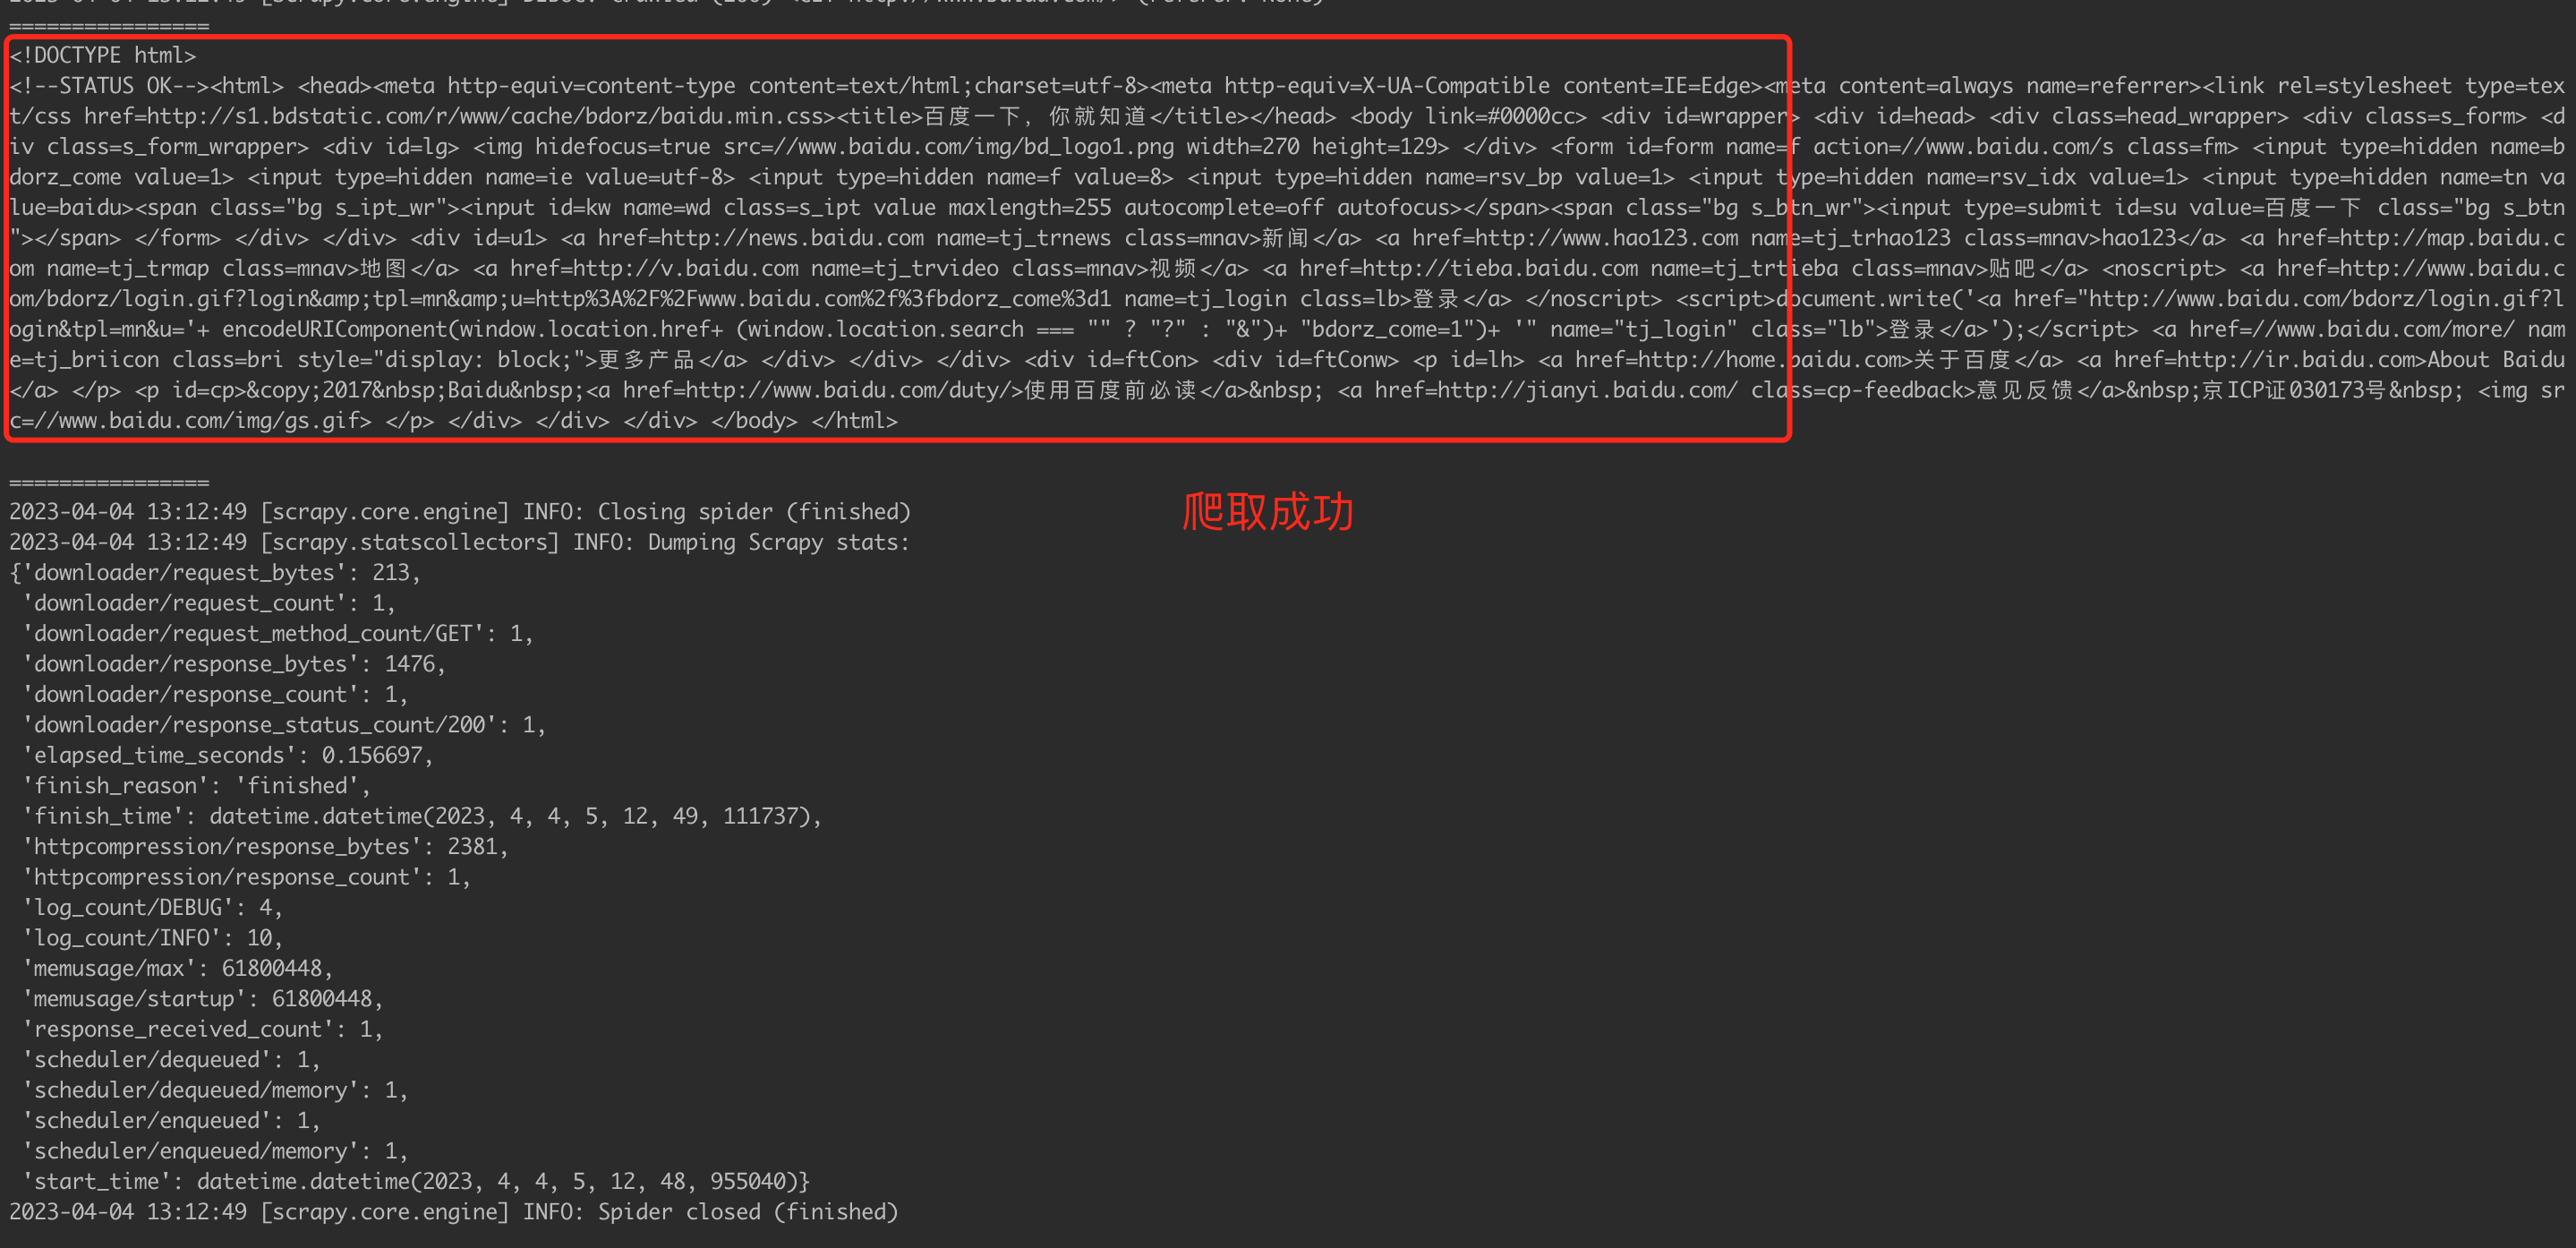
是不是很简单,我们不需要再自己写请求,我们只需要关注要爬取的网站地址即可,这就是框架的好处。
4.5、scrapy命令详解
我们通过scrapy -h 命令即可看到所有涉及到的命令
$ scrapy -h
Scrapy 2.8.0 - active project: scrapy_test

Usage:
  scrapy <command> [options] [args]

Available commands:
  bench         Run quick benchmark test
  check         Check spider contracts
  crawl         Run a spider
  edit          Edit spider
  fetch         Fetch a URL using the Scrapy downloader
  genspider     Generate new spider using pre-defined templates
  list          List available spiders
  parse         Parse URL (using its spider) and print the results
  runspider     Run a self-contained spider (without creating a project)
  settings      Get settings values
  shell         Interactive scraping console
  startproject  Create new project
  version       Print Scrapy version
  view          Open URL in browser, as seen by Scrapy

Use "scrapy <command> -h" to see more info about a command
有两种命令,一种只能在 Scrapy 项目内部工作(项目特定命令),另一种也可以在没有活动 Scrapy 项目的情况下工作(全局命令),尽管在项目内部运行时它们的行为可能略有不同(因为他们会使用项目覆盖设置)。
4.5.1、全局命令:
- startproject:创建项目
语法:scrapy startproject <project_name> [project_dir]
project_name:项目名称
project_dir:项目存放路径。如果project_dir未指定,project_dir将与project_name.
使用示例:
$ scrapy startproject myproject- genspider:使用预定义模板生成新的爬虫
语法:scrapy genspider [-t template] <name> <domain or URL>
[-t template]:指定模板 如果不指定默认是basic模板
<name>:爬虫名称
<domain or URL>:指定爬虫allowed_domains start_urls 参数
使用示例:
# 查看所有可用模板
$ scrapy genspider -l
Available templates:
  basic
  crawl
  csvfeed
  xmlfeed

# 使用默认模板
$ scrapy genspider example example.com
Created spider 'example' using template 'basic'


# 指定使用模板
$ scrapy genspider -t crawl scrapyorg scrapy.org
Created spider 'scrapyorg' using template 'crawl'-
settings:设置
语法:scrapy settings [options]
如果在项目中使用,它将显示项目设置值,否则它将显示该设置的默认 Scrapy 值。
使用示例:
# 获取属性设置值
$ scrapy settings --get BOT_NAME
scrapybot
$ scrapy settings --get DOWNLOAD_DELAY
0-
runspider:运行爬虫文件
语法:scrapy runspider <spider_file.py>
示例:
$ scrapy runspider myspider.py
[ ... spider starts crawling ... ]-
shell
语法:scrapy shell [url]
使用示例:
$ scrapy shell http://www.example.com/some/page.html
[ ... scrapy shell starts ... ]

$ scrapy shell --nolog http://www.example.com/ -c '(response.status, response.url)'
(200, 'http://www.example.com/')

# shell follows HTTP redirects by default
$ scrapy shell --nolog http://httpbin.org/redirect-to?url=http%3A%2F%2Fexample.com%2F -c '(response.status, response.url)'
(200, 'http://example.com/')

# you can disable this with --no-redirect
# (only for the URL passed as command line argument)
$ scrapy shell --no-redirect --nolog http://httpbin.org/redirect-to?url=http%3A%2F%2Fexample.com%2F -c '(response.status, response.url)'
(302, 'http://httpbin.org/redirect-to?url=http%3A%2F%2Fexample.com%2F')-
fetch:使用 Scrapy 下载器下载给定的 URL,并将内容写入标准输出。
这个命令的有趣之处在于它获取页面的方式是蜘蛛下载它的方式。例如,如果蜘蛛有一个USER_AGENT 覆盖用户代理的属性,它将使用那个。
所以这个命令可用于“查看”您的蜘蛛将如何获取特定页面。
语法:scrapy fetch <url>
示例:
$ scrapy fetch --nolog http://www.example.com/some/page.html
[ ... html content here ... ]

$ scrapy fetch --nolog --headers http://www.example.com/
{'Accept-Ranges': ['bytes'],
 'Age': ['1263   '],
 'Connection': ['close     '],
 'Content-Length': ['596'],
 'Content-Type': ['text/html; charset=UTF-8'],
 'Date': ['Wed, 18 Aug 2010 23:59:46 GMT'],
 'Etag': ['"573c1-254-48c9c87349680"'],
 'Last-Modified': ['Fri, 30 Jul 2010 15:30:18 GMT'],
 'Server': ['Apache/2.2.3 (CentOS)']}
-
view:在浏览器中打开给定的 URL
可以用来检查蜘蛛“看到”的内容并确认它是否是你所期望的。
语法:scrapy view <url>
示例:
$ scrapy view http://www.example.com/some/page.html
[ ... browser starts ... ]
-
version
4.5.2、仅限项目的命令
- crawl:执行爬取任务
语法:scrapy crawl <spider>
支持的选项:
-h, --help: 显示帮助信息并退出
-a NAME=VALUE: 设置蜘蛛参数(可以重复)
--output FILE或: 将抓取的项目附加到 FILE 的末尾(使用 - 用于标准输出),以定义格式在输出 URI 的末尾设置一个冒号(即)-o FILE-o FILE:FORMAT
--overwrite-output FILE或: 将抓取的项目转储到 FILE 中,覆盖任何现有文件,以定义格式在输出 URI 的末尾设置一个冒号(即)-O FILE-O FILE:FORMAT
--output-format FORMAT或: 定义用于转储项目的格式的弃用方式,不能与-t FORMAT-O
使用示例:
$ scrapy crawl myspider
[ ... myspider starts crawling ... ]

$ scrapy -o myfile:csv myspider
[ ... myspider starts crawling and appends the result to the file myfile in csv format ... ]

$ scrapy -O myfile:json myspider
[ ... myspider starts crawling and saves the result in myfile in json format overwriting the original content... ]

$ scrapy -o myfile -t csv myspider
[ ... myspider starts crawling and appends the result to the file myfile in csv format ... ]- check:检查项目
语法:scrapy check [-l] <spider>
示例:
$ scrapy check -l
first_spider
  * parse
  * parse_item
second_spider
  * parse
  * parse_item

$ scrapy check
[FAILED] first_spider:parse_item
>>> 'RetailPricex' field is missing

[FAILED] first_spider:parse
>>> Returned 92 requests, expected 0..4- list:查看当前项目包含的所有爬虫
语法:scrapy list
示例:
$ scrapy list
spider1
spider2- edit:编辑爬虫
语法:scrapy edit <spider>
此命令仅作为最常见情况的便捷快捷方式提供,开发人员当然可以自由选择任何工具或 IDE 来编写和调试爬虫。
示例:
scrapy edit spider1- parse:获取给定的 URL 并使用处理它的蜘蛛解析它
语法:scrapy parse <url> [options]
支持的选项:
--spider=SPIDER: 绕过蜘蛛自动检测并强制使用特定的蜘蛛
--a NAME=VALUE: 设置 spider 参数(可以重复)
--callbackor -c: spider 方法用作解析响应的回调
--metaor -m:将传递给回调请求的附加请求元数据。这必须是有效的 json 字符串。示例:–meta='{“foo”:“bar”}'
--cbkwargs: 将传递给回调的附加关键字参数。这必须是有效的 json 字符串。示例:–cbkwargs='{“foo”:“bar”}'
--pipelines:通过管道处理项目
--rules或者-r:使用CrawlSpider 规则来发现用于解析响应的回调(即蜘蛛方法)
--noitems: 不显示刮掉的物品
--nolinks: 不显示提取的链接
--nocolour: 避免使用 pygments 对输出进行着色
--depthor -d: 应该递归遵循请求的深度级别(默认值:1)
--verboseor -v: 显示每个深度级别的信息
--output或-o: 将抓取的项目转储到文件中
示例:
$ scrapy parse http://www.example.com/ -c parse_item
[ ... scrapy log lines crawling example.com spider ... ]

>>> STATUS DEPTH LEVEL 1 <<<
# Scraped Items  ------------------------------------------------------------
[{'name': 'Example item',
 'category': 'Furniture',
 'length': '12 cm'}]

# Requests  -----------------------------------------------------------------
[]- bench:用于基准测试
语法:scrapy bench