react-grid-layout核心功能实现
前言
react-grid-layout是基于react的网格布局系统,支持视图的拖拽和缩放,操作十分灵活。
在线体验。
工作中某个项目模块实现用到了react-grid-layout,就去看了一下核心功能的实现。
实际上,这篇文章也是内部串讲的一部分,有时间会单独分享一下做串讲的经验。
不得不说,作者的思维很巧妙,一阵连环套娃。
今天我们就来看一下这个库的核心功能实现,包括网格布局计算、拖动、缩放。
东西比较多,可选读。
整体结构图和核心功能实现原理如下:


基本使用
可以看到,只需要传递一个带有布局信息的layout数组即可
import React from 'react';
import GridLayout from 'react-grid-layout';
export default class App extends React.PureComponent {


  render() {


    // layout is an array of objects
    // static 表示不可拖动和缩放
    // key是必须的
    const layout = [
      {

     i: 'a', x: 0, y: 1, w: 1, h: 1, static: true },
      {

     i: 'b', x: 1, y: 0, w: 3, h: 2 },
      {

     i: 'c', x: 4, y: 0, w: 1, h: 2 },
    ];
    return (
      <GridLayout layout={

    layout} width={

    1200}>
        <div key="a">a</div>
        <div key="b">b</div>
        <div key="c">c</div>
      </GridLayout>
    );
  }
}
网格布局
接下来进入react-grid-layout最为关键的部分,网格布局生成和计算。
简单来说就是根据用户给定的layout,计算出带有px的具体样式,最终展现在页面上。
我们直接看源码中入口组件ReactGridLayout中的render函数:
render() {


    const {

     className, style, isDroppable, innerRef } = this.props;
    // 合并类名
    const mergedClassName = classNames(layoutClassName, className);
    // 合并style
    const mergedStyle = {


      height: this.containerHeight(),// 计算容器高度
      ...style,
    };
    // 绑定drag和drop事件,其中noop是一个空函数
    // export const noop = () => {};
    return (
      <div
        ref={

    innerRef}
        className={

    mergedClassName}
        style={

    mergedStyle}
        // 拖拽相关的一些回调,如果业务场景不需要,可以不设置
        // 默认isDroppable是false
        onDrop={

    isDroppable ? this.onDrop : noop}
        onDragLeave={

    isDroppable ? this.onDragLeave : noop}
        onDragEnter={

    isDroppable ? this.onDragEnter : noop}
        onDragOver={

    isDroppable ? this.onDragOver : noop}
      >
          // 渲染节点
        {

    React.Children.map(
            this.props.children,
            child => this.processGridItem(child)
        )}

        // 暂且可忽略,默认isDroppable 是false
        {

    isDroppable &&
         this.state.droppingDOMNode &&
         this.processGridItem(this.state.droppingDOMNode, true)}
        // 在拖拽时候展示操纵蒙版
        {

    this.placeholder()}
      </div>
    );
  }
render中做了三件关键的事:
- 合并样式和类名
- 绑定拖拽事件
- 渲染Children
渲染Children
我们先来看渲染Children这部分,函数processGridItem内部用GridItem组件对传入的react元素做了一层包裹后返回。其中GridItem是网格单元的展示组件,它接收布局,拖动,缩放等相关props。关于GridItem更多细节,下面会提到。
processGridItem(
    child: ReactElement<any>,
    isDroppingItem?: boolean
  ): ?ReactElement<any> {


   // 这里也有一个小细节,如果传入的child没有key,会被return掉,不会在页面上展示。
    if (!child || !child.key) return;
    // 布局相关
    const l = getLayoutItem(this.state.layout, String(child.key));
    if (!l) return null;
     // xxx...
    return (
      <GridItem
    //... 布局 拖动 缩放 相关props
      >
        {

    child}
      </GridItem>
    );
  }
接下来,我们看下布局和相关的东西。上述getLayoutItem函数接收一个来自内部state的参数layout。
  state = {


    activeDrag: null,
    layout: synchronizeLayoutWithChildren(
      this.props.layout,// 包含布局信息的数组对象
      this.props.children,// react元素
      this.props.cols,// 布局列数 默认12
      // 控制水平/垂直布局
      compactType(this.props)
    ),
    mounted: false,
    oldDragItem: null,
    oldLayout: null,
    oldResizeItem: null,
    droppingDOMNode: null,
    children: []
  };
state中对layout做了一个处理,涉及到了函数synchronizeLayoutWithChildren。
synchronizeLayoutWithChildren
该函数见名知义,用于同步layout和children,为每个child生成一个网格布局单元。对于已有布局(传入的layout中每项的i和child的key匹配上),直接使用。如果没有layout参数,看child上是否有_grid和data-grid属性,有的话就使用,效果和layout参数一致。如果上述提到的布局相关的参数都没有,会创建一个默认布局,添加到已有布局的下方。
 function synchronizeLayoutWithChildren(
  initialLayout: Layout,
  children: ReactChildren,
  cols: number,
  compactType: CompactType
): Layout {


  initialLayout = initialLayout || [];
  const layout: LayoutItem[] = [];
  React.Children.forEach(children, (child: ReactElement<any>, i: number) => {


    // 已有布局直接复用,其实就是一个find操作
    const exists = getLayoutItem(initialLayout, String(child.key));
    if (exists) {


      layout[i] = cloneLayoutItem(exists);
    } else {


      if (!isProduction && child.props._grid) {


     // _grid的废弃警告,建议使用layout或者data-grid传递布局信息
     // xxx..
      }
      const g = child.props["data-grid"] || child.props._grid;
      // 如果child有data-grid或者_grid属性直接使用
      if (g) {


        if (!isProduction) {


          validateLayout([g], "ReactGridLayout.children");
        }
        layout[i] = cloneLayoutItem({

     ...g, i: child.key });
      } else {


        //创建一个默认布局
        layout[i] = cloneLayoutItem({


          w: 1,
          h: 1,
          x: 0,
          y: bottom(layout),
          i: String(child.key)
        });
      }
    }
  });

  //  边界处理/防堆叠
  const correctedLayout = correctBounds(layout, {

     cols: cols });
  // 空间压缩
  return compact(correctedLayout, compactType, cols);
}
props传递进来的layout,或者人为拖动/缩放的布局,都有可能发生一些小冲突,比如堆叠,越界。
所以在最后需要对布局进行一些额外处理:如越界修正,防堆叠,压缩额外空间使布局紧凑。
correctBounds
边界控制函数,对于给定的布局,确保每一个都在其边界限制内。
如果是右侧越界,新的x坐标=布局列数-列宽。
如果是左侧越界,新的x坐标为0,列宽= 布局列数。
//cols 网格列数 默认12
function correctBounds(layout: Layout, bounds: {

     cols: number }): Layout {


 // 获取静态item ,static =true
  const collidesWith = getStatics(layout);
  for (let i = 0, len = layout.length; i < len; i++) {


    const l = layout[i];
    // 右侧溢出处理
    if (l.x + l.w > bounds.cols) {


      l.x = bounds.cols - l.w;
    }
    // 左侧溢出处理
    if (l.x < 0) {


      l.x = 0;
      l.w = bounds.cols;
    }
    if (!l.static) {


      collidesWith.push(l);
    } else {


   // 如果静态元素碰撞,首项下移,避免堆叠
      while (getFirstCollision(collidesWith, l)) {


        l.y++;
      }
    }
  }
  return layout;
}


function getFirstCollision(
  layout: Layout,
  layoutItem: LayoutItem
): ?LayoutItem {


  for (let i = 0, len = layout.length; i < len; i++) {


    if (collides(layout[i], layoutItem)) return layout[i];
  }
}
碰撞检测函数
function collides(l1, l2){


  if (l1.i === l2.i) return false; // same element
  if (l1.x + l1.w <= l2.x) return false; // l1 is left of l2
  if (l1.x >= l2.x + l2.w) return false; // l1 is right of l2
  if (l1.y + l1.h <= l2.y) return false; // l1 is above l2
  if (l1.y >= l2.y + l2.h) return false; // l1 is below l2
  return true; // boxes overlap
}
compact
该函数用于对布局空间进行压缩,使布局更紧凑。
 function compact(layout, compactType, cols) {


   // 获取静态布局   static =true
  const compareWith = getStatics(layout);
  // 根据传入的压缩方式进行排序
  // 水平或者垂直 'horizontal' | 'vertical';
  const sorted = sortLayoutItems(layout, compactType);
  // 用于放置新布局的数组
  const out = Array(layout.length);
  for (let i = 0, len = sorted.length; i < len; i++) {


    let l = cloneLayoutItem(sorted[i]);
    // 不会移动静态元素
    if (!l.static) {


        // 压缩空间
      l = compactItem(compareWith, l, compactType, cols, sorted);
      compareWith.push(l);
    }
    // Add to output array
    // to make sure they still come out in the right order.
    out[layout.indexOf(sorted[i])] = l;
    // Clear moved flag, if it exists.
    l.moved = false;
  }

  return out;
}


// 压缩处理函数
function compactItem(
  compareWith: Layout,
  l: LayoutItem,
  compactType: CompactType,
  cols: number,
  fullLayout: Layout
): LayoutItem {


  const compactV = compactType === "vertical";
  const compactH = compactType === "horizontal";
  if (compactV) {


     // 垂直方向不发生碰撞情况下 压缩y坐标
    l.y = Math.min(bottom(compareWith), l.y);
    while (l.y > 0 && !getFirstCollision(compareWith, l)) {


      l.y--;
    }
  } else if (compactH) {


    // 水平方向不发生碰撞情况下 压缩x坐标
    while (l.x > 0 && !getFirstCollision(compareWith, l)) {


      l.x--;
    }
  }

  // 发生碰撞就下移或者左移
  let collides;
  while ((collides = getFirstCollision(compareWith, l))) {


    if (compactH) {


      resolveCompactionCollision(fullLayout, l, collides.x + collides.w, "x");
    } else {


      resolveCompactionCollision(fullLayout, l, collides.y + collides.h, "y");
    }
    // 控制水平方向上的无限增长.
    if (compactH && l.x + l.w > cols) {


      l.x = cols - l.w;
      l.y++;
    }
  }

  // 对上述的y--,x--做容错处理,确保没有负值
  l.y = Math.max(l.y, 0);
  l.x = Math.max(l.x, 0);

  return l;
}
经过correntBounds和compact函数处理,就会生成一个紧凑,无溢出,无堆叠效果的网格布局单元。
容器高度计算
说完了布局生成,再来看一下入口组件render函数中对类名和样式的处理。类名合并上没什么特别的,直接使用classnames进行合并。
// classnames 基本使用
var classNames = require('classnames');
classNames('foo', 'bar'); // => 'foo bar'
// react-grid-layout中使用
const {

     className, style, isDroppable, innerRef } = this.props;
// 合并类名
const mergedClassName = classNames(layoutClassName, className);
样式合并涉及到了一个用于计算容器高度的函数containerHeight,这里还是有一些值得说的点。一个容器的高度至少要容纳最高占位布局(高度h和位置y),所以需要从给定的布局中找出h+y最大的那一项,作为容器基准高度。如下图所示,为便于观察,每一个布局项高度h都是1,最大的y轴坐标为2,容器基准高度就是3.

但是完整的高度不仅仅是基准高度,还涉及到grid-item之间的margin,容器纵向padding。
containerHeight() {


    // 默认autoSize是true
    if (!this.props.autoSize) {


      return;
    }
    // 获取底部坐标
    // 这里的layout是经过修正的,不同于this.props.layout
    const nbRow = bottom(this.state.layout);
    const containerPaddingY = this.props.containerPadding
    ? this.props.containerPadding[1]
    : this.props.margin[1];

   // 计算成具体的px
   // rowHeight默认150 margin默认[10,10]
    return `
    ${

      nbRow * this.props.rowHeight +
     (nbRow - 1) * this.props.margin[1] +
     containerPaddingY * 2 }
     px`;
  }

  // 获取布局中y+h的最大值
 function bottom(layout: Layout): number {


  let max = 0;
  let bottomY;
  for (let i = 0, len = layout.length; i < len; i++) {


    bottomY = layout[i].y + layout[i].h;
    if (bottomY > max) {


      max = bottomY;
    }
  }
  return max;
}
上述布局计算结果:30(rowHeight)*3(基准高度)+20(2个margin)+20(上下容器padding)=130px。值得注意的是: 计算容器高度的时候,基准高度指的是经过compact函数压缩后的坐标值。来看一个具体的高度计算案例:
export default class App extends React.PureComponent {


  render() {


    const layout = [
      {

     i: 'a', x: 0, y: 100, w: 1, h: 1 },
    ];
    return (
      <div style={

    {

     width: 600, border: '1px solid #ccc', margin: 10 }}>
        <GridLayout layout={

    layout} width={

    600}>
          <div key="a">a</div>
        </GridLayout>
      </div>
    );
  }
}

在containerHeight内部打印一下,会发现y并不是传入的100,而是被compact压缩后的0。如此一来,容器的基准高度就是 h+y=1+0=1。容器高度= 150(rowHeight)*1(基准高度)+0(margin)+20(上下容器padding)=170px。
GridItem
上述是容器布局计算,网格单元的计算是在GridItem组件组件进行的。
该组件接受的props比较多,大致分为布局,拖动,缩放这三类。
 processGridItem(child: any, isDroppingItem?: boolean): any {


    if (!child || !child.key) {


      return;
    }
    const l = getLayoutItem(this.state.layout, String(child.key));
    if (!l) {


      return null;
    }
const {


  width,// 容器宽度
  cols, // 布局列数 默认12
  margin, // Margin between items [x, y] in px
  containerPadding, // Padding inside the container [x, y] in px
  rowHeight, // 单个grid-item高度
  maxRows,// 最大行数 默认无限 表现为infinite vertical growth
  isDraggable, // 是否可拖动 默认true
  isResizable, // 是否可缩放  默认true
  isBounded,  // 控制是否在容器限制内移动 默认false
  useCSSTransforms,//默认为true,开启后使用transforms替代left/top,绘制性能提高6倍
  transformScale, // 比例系数 默认1 transform: scale(n)
  draggableCancel, // 取消拖动手柄 css类名选择器
  draggableHandle,// 拖动手柄 css类名选择器
  resizeHandles,// 缩放方位 默认se 右下角
  resizeHandle, // 缩放手柄
} = this.props;

const {

     mounted, droppingPosition } = this.state;
// 判断是否可拖动/缩放
const draggable = typeof l.isDraggable === 'boolean' ?
l.isDraggable :
!l.static && isDraggable;
const resizable = typeof l.isResizable === 'boolean' ?
l.isResizable :
!l.static && isResizable;

// 判断缩放方向 默认se
const resizeHandlesOptions = l.resizeHandles || resizeHandles;

// 判断是否限制在容器内移动
const bounded = draggable && isBounded && l.isBounded !== false;

    return (
      <GridItem
        containerWidth={

    width}
        cols={

    cols}
        margin={

    margin}
        containerPadding={

    containerPadding || margin}
        maxRows={

    maxRows}
        rowHeight={

    rowHeight}
        cancel={

    draggableCancel}
        handle={

    draggableHandle}
        onDragStop={

    this.onDragStop}
        onDragStart={

    this.onDragStart}
        onDrag={

    this.onDrag}
        onResizeStart={

    this.onResizeStart}
        onResize={

    this.onResize}
        onResizeStop={

    this.onResizeStop}
        isDraggable={

    draggable}
        isResizable={

    resizable}
        isBounded={

    bounded}
        useCSSTransforms={

    useCSSTransforms && mounted}
        usePercentages={

    !mounted}
        transformScale={

    transformScale}
        w={

    l.w}
        h={

    l.h}
        x={

    l.x}
        y={

    l.y}
        i={

    l.i}
        minH={

    l.minH}
        minW={

    l.minW}
        maxH={

    l.maxH}
        maxW={

    l.maxW}
        static={

    l.static}
        droppingPosition={

    isDroppingItem ? droppingPosition : undefined}
        resizeHandles={

    resizeHandlesOptions}
        resizeHandle={

    resizeHandle}
      >
        {

    child}
      </GridItem>
    );
  }
Render
接下来,我们看一下这个组件的render函数具体做了些什么。
render() {


    const {


    x, y, w, h,
    isDraggable,
    isResizable,
    droppingPosition,
    useCSSTransforms
   } = this.props;
    // 位置计算,触发拖动和缩放时候也会重新计算
    const pos =calcGridItemPosition(
     this.getPositionParams(),
     x, y, w, h,
     this.state
     );
   // 获取 child
    const child= React.Children.only(this.props.children);

    // 修改child的类名和样式
    let newChild = React.cloneElement(child, {


      ref: this.elementRef,
      // 修改类名
      className: classNames(
      'react-grid-item',
       child.props.className,
       this.props.className, {


        static: this.props.static,
        resizing: Boolean(this.state.resizing),
        'react-draggable': isDraggable,
        'react-draggable-dragging': Boolean(this.state.dragging),
        dropping: Boolean(droppingPosition),
        cssTransforms: useCSSTransforms,
      }),
      // 修改样式
      // 真正将网格单元w,h,x,y换成带有px的具体尺寸
      style: {


        ...this.props.style,
        ...child.props.style,
        ...this.createStyle(pos),
      },
    });

    // 添加缩放支持
    newChild = this.mixinResizable(newChild, pos, isResizable);
    // 添加拖动支持
    newChild = this.mixinDraggable(newChild, isDraggable);

    return newChild;
  }


 getPositionParams(props: Props = this.props): PositionParams {


    return {


      cols: props.cols,
      containerPadding: props.containerPadding,
      containerWidth: props.containerWidth,
      margin: props.margin,
      maxRows: props.maxRows,
      rowHeight: props.rowHeight
    };
  }
calcGridItemPosition
该函数接收布局相关参数,经过一系列计算,返回最终的计算结果。
给定参数如下:
{ i: 'a', x: 0, y: 0, w: 2, h: 1, } 容器宽度600,
网格间margin10,
容器paadding10,
列数cols12
计算原理
列宽的计算和之前算高度是类似的,也要考虑网格间的margin和容器的padding(左右)。
列宽colWidth = (containerWidth - margin[0] * (cols - 1) - containerPadding[0] * 2) / cols
以上述布局为例,计算出来的列宽经过四舍五入后是39,但这个是基于布局单元计算的。
如果gridItem正在缩放,就采用缩放时state记录的宽高(width,height)。
如果gridItem正在拖拽,就采用拖拽时state记录的位置(left,top)。
注意:react-grid-layout里margin存储的是[x,y]形式,与css中margin设置两个值时候效果是相反的。
function calcGridItemPosition(
  positionParams,
  x,
  y,
  w,
  h,
  state
){


  const {

     margin, containerPadding, rowHeight } = positionParams;
  // 计算列宽
  const colWidth = calcGridColWidth(positionParams);
  const out = {

    };

  // 如果gridItem正在缩放,就采用缩放时state记录的宽高(width,height)。
  // 通过回调函数获取布局信息
  if (state && state.resizing) {


    out.width = Math.round(state.resizing.width);
    out.height = Math.round(state.resizing.height);
  }
  // 反之,基于网格单元计算
  else {


    out.width = calcGridItemWHPx(w, colWidth, margin[0]);
    out.height = calcGridItemWHPx(h, rowHeight, margin[1]);
  }

  // 如果gridItem正在拖拽,就采用拖拽时state记录的位置(left,top)
  // 通过回调函数获取布局信息
  if (state && state.dragging) {


    out.top = Math.round(state.dragging.top);
    out.left = Math.round(state.dragging.left);
  }
  // 反之,基于网格单元计算
  else {


    out.top = Math.round((rowHeight + margin[1]) * y + containerPadding[1]);
    out.left = Math.round((colWidth + margin[0]) * x + containerPadding[0]);
  }

  return out;
}
// 计算列宽
function calcGridColWidth(positionParams: PositionParams): number {


  const {

     margin, containerPadding, containerWidth, cols } = positionParams;
  return (
    (containerWidth - margin[0] * (cols - 1) - containerPadding[0] * 2) / cols
  );
}
// gridUnits 网格布局基准单元
function calcGridItemWHPx(gridUnits, colOrRowSize, marginPx){


  // 0 * Infinity === NaN, which causes problems with resize contraints
  if (!Number.isFinite(gridUnits)) return gridUnits;
  return Math.round(
  colOrRowSize * gridUnits + Math.max(0, gridUnits - 1) * marginPx);
}
createStyle
说完了布局宽高和位置计算,再来看一下对样式的处理。
gridItem样式合并中用到了函数createStyle,可以将计算好的布局转成带px的css样式。
createStyle(pos) {


    const {

     usePercentages, containerWidth, useCSSTransforms } = this.props;
    let style;
    // 支持 CSS Transforms 默认
    // 直接跳过布局和绘制,且不占用主线程资源,比较快
    if (useCSSTransforms) {


      style = setTransform(pos);
    } else {


      // 使用 top,left 展示,会比较慢
      style = setTopLeft(pos);
      // 服务端渲染相关
      if (usePercentages) {


        style.left = perc(pos.left / containerWidth);
        style.width = perc(pos.width / containerWidth);
      }
    }

    return style;
  }

  // 采用 translate 形式 并添加兼容处理和单位px
  function setTransform({

     top, left, width, height }) {


      const translate = `translate(${

      left}px,${

      top}px)`;
      return {


        transform: translate,
        WebkitTransform: translate,
        MozTransform: translate,
        msTransform: translate,
        OTransform: translate,
        width: `${

      width}px`,
        height: `${

      height}px`,
        position: "absolute"
      };
}

// 采用 left top 形式 并添加单位px
function setTopLeft({

     top, left, width, height } {


  return {


    top: `${

      top}px`,
    left: `${

      left}px`,
    width: `${

      width}px`,
    height: `${

      height}px`,
    position: "absolute"
  };
}
拖拽和缩放
mixinDraggable
mixinDraggable函数为child添加拖动支持,实现上依赖react-draggable。
拖拽原理
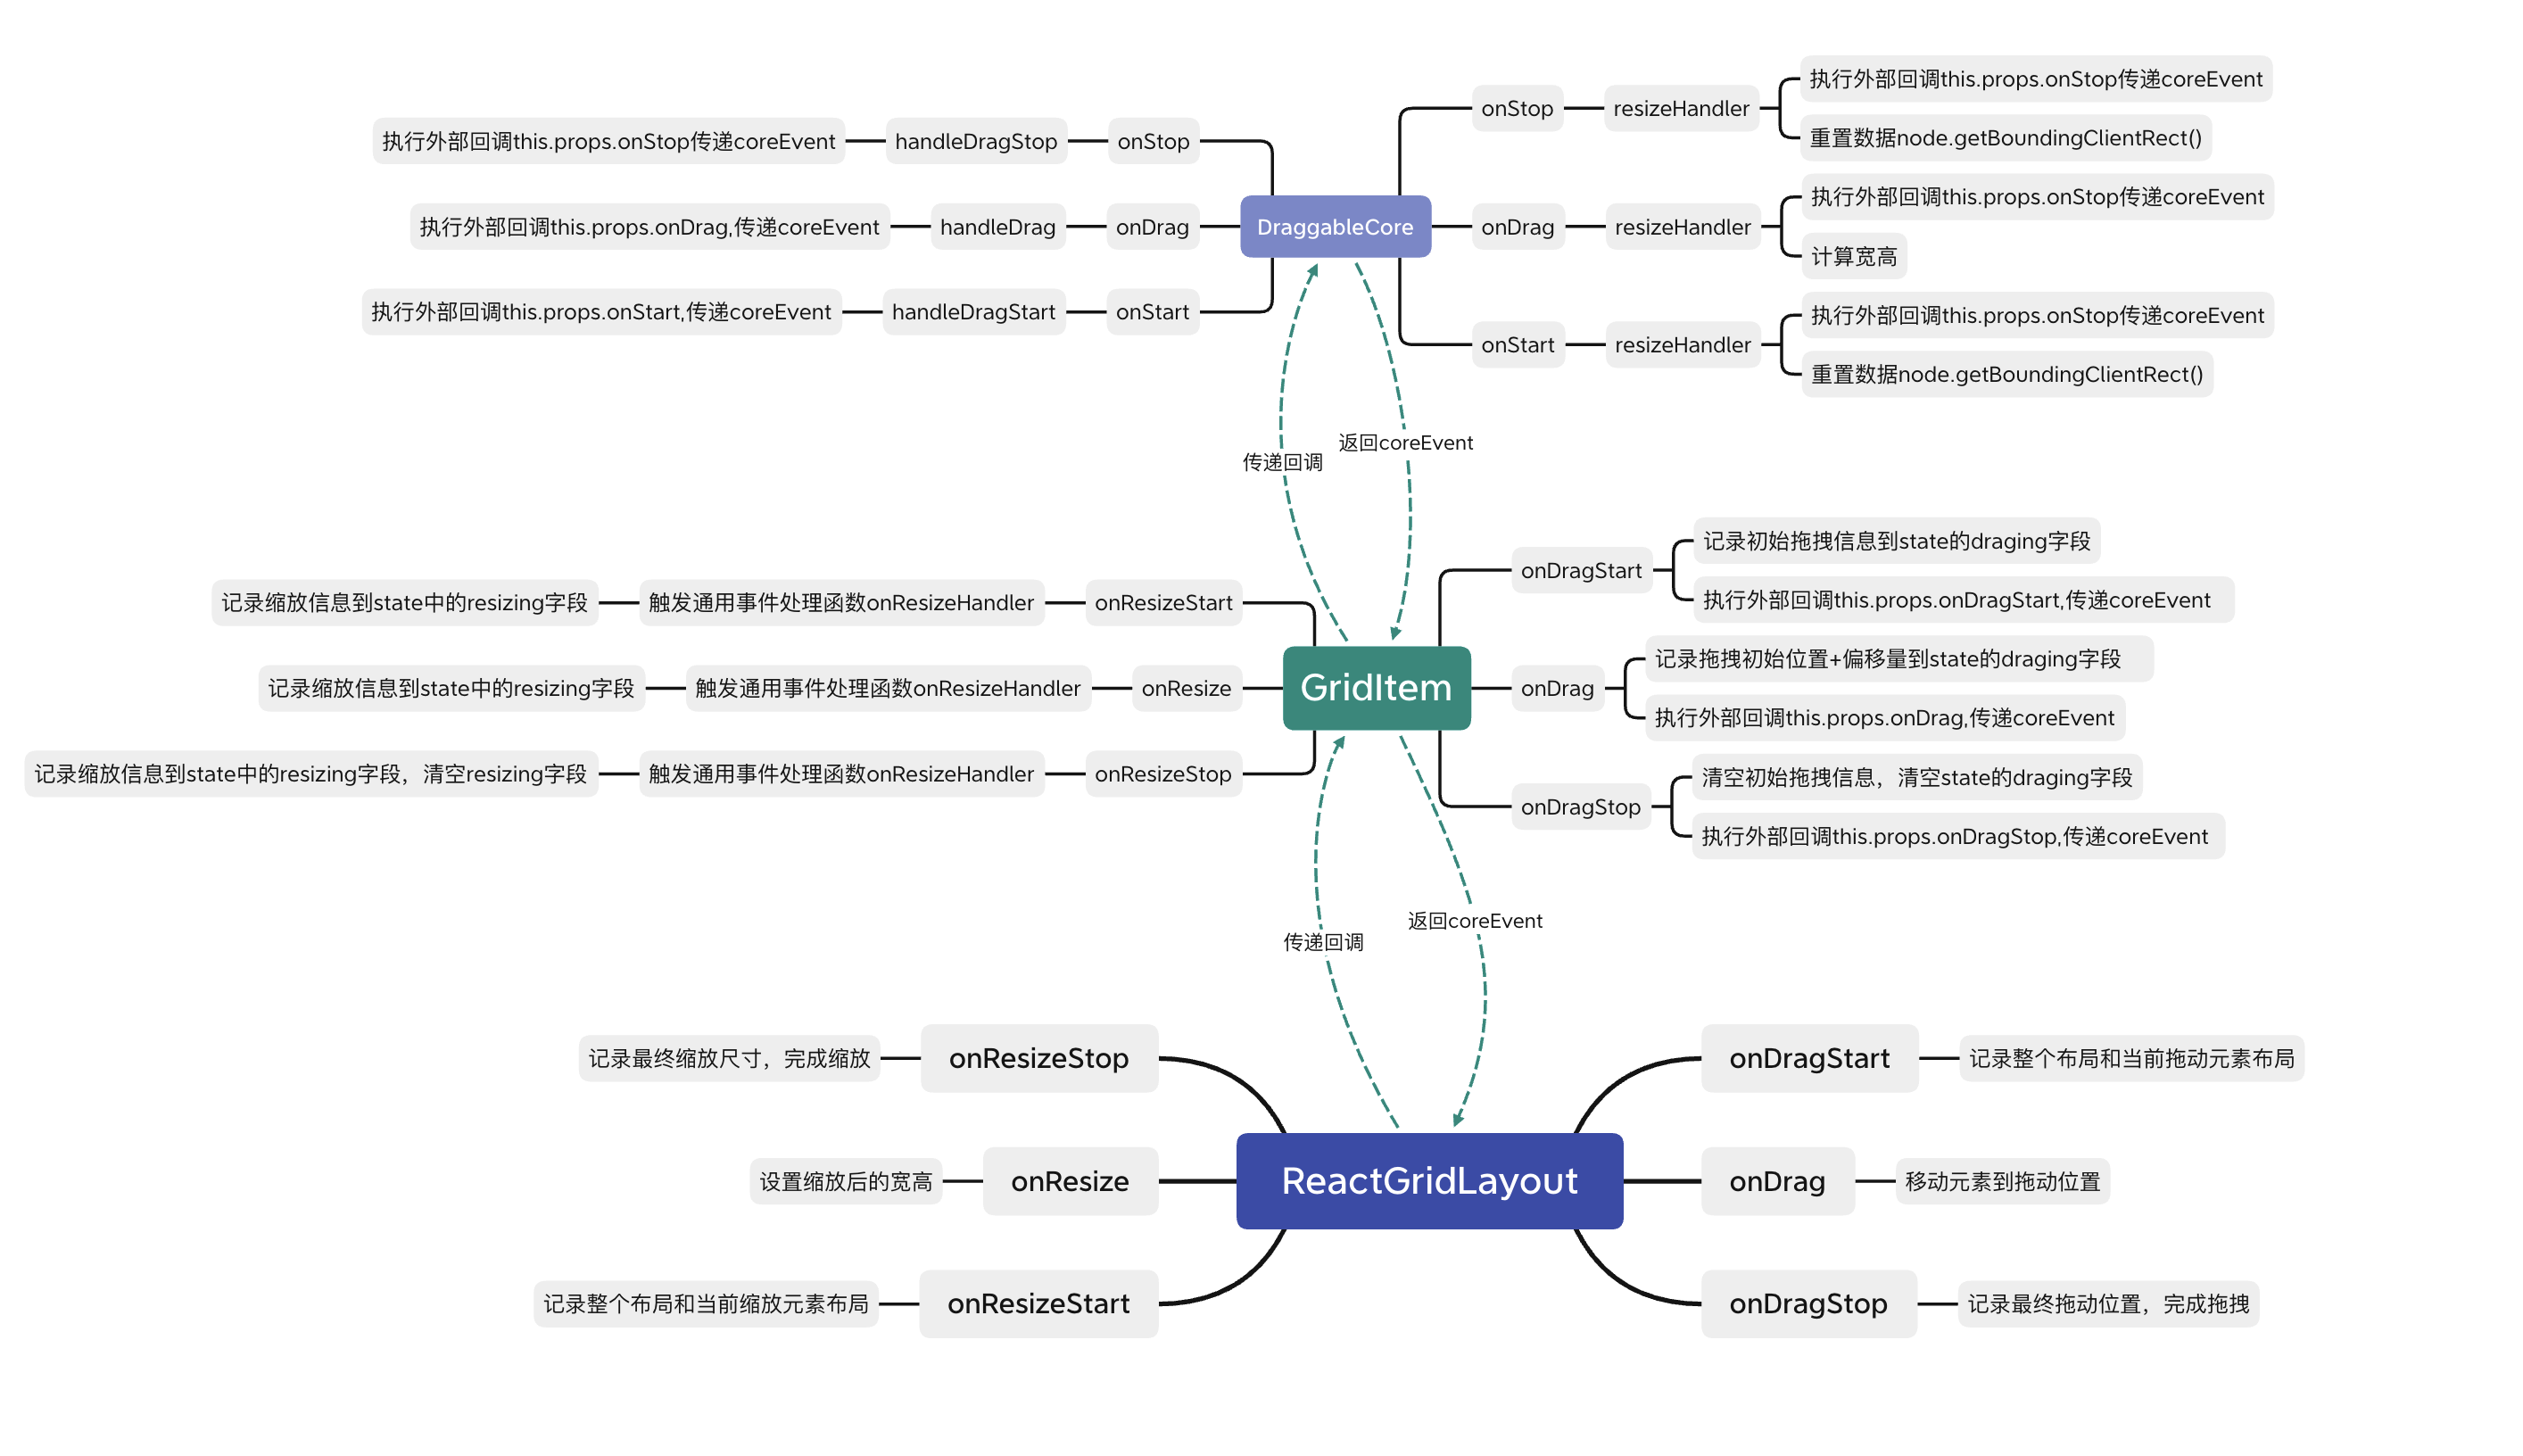
在react-draggable库的DraggableCore组件内部,触发相应拖拽事件时会生成一些有用的信息,比如坐标,当前节点。这个信息会被封装成对象,作为参数传递给外部对应的回调函数。这样一来,外部回调就可以从这个对象中获取有用信息,重新setState,将dragging的值设置为新的{left,top}。然后这个值会经过函数calcGridItemPosition和createStyle处理,作为css样式附加在child上,从而实现拖拽。

 import {

     DraggableCore } from 'react-draggable';
  function mixinDraggable(child, isDraggable) {


  // 下面这些拖拽相关的回调函数用于接收额外的位置信息,计算布局
    return (
      <DraggableCore
        disabled={

    !isDraggable}
        onStart={

    this.onDragStart}
        onDrag={

    this.onDrag}
        onStop={

    this.onDragStop}
        handle={

    this.props.handle}
        cancel={

    `.react-resizable-handle${

       this.props.cancel ?
         `,${

       this.props.cancel}` : ''}`}
        scale={

    this.props.transformScale}
        nodeRef={

    this.elementRef}
      >
        {

    child}
      </DraggableCore>
    );
  }
DraggableCore
在react-grid-layout中,不论是mixinDraggable还是mixinResizable都会依赖组件DraggableCore。这是因为拖动和缩放都会涉及相同的鼠标事件(暂不考虑触摸事件),对此,该组件也封装了相应的事件处理函数函数。在这三个函数内部,会调用props中传入的回调函数onStart,onDrag,onStop。
- handleDragStart 拖拽开始:记录拖拽的初始位置
- handleDrag 拖拽中:监听拖拽的距离和方向,并移动真实 dom
- handleDragStop 拖拽结束:取消拖拽中的事件监听
render() {


    return React.cloneElement(React.Children.only(this.props.children), {


      onMouseDown: this.onMouseDown,
      onMouseUp: this.onMouseUp,
      // xxx..触摸相关事件
    });
  }


 // dragEventFor 是一个用于标识触发事件类型的全局变量 鼠标 or 触摸
 onMouseDown = (e) => {


  // 鼠标相关事件
    dragEventFor ={


         start: 'mousedown',
         move: 'mousemove',
         stop: 'mouseup'
    }
    return this.handleDragStart(e);
 };

handleDragStart(){


//...
this.props.onStart()
}

handleDrag(){


//...
this.props.onDrag()
}

handleDragStop(){


//...
this.props.onStop()
}
接下来我们来逐一看下这几个事件处理函数的内部操作细节。
handleDragStart
  handleDragStart = (e) => {


    // 支持鼠标按下的回调函数
    this.props.onMouseDown(e);

    // Only accept left-clicks.
    //xxx...

    // 确保获取到document
   // https://developer.mozilla.org/zh-CN/docs/Web/API/Node/ownerDocument
    const thisNode = this.findDOMNode();
    if (!thisNode ||
     !thisNode.ownerDocument ||
     !thisNode.ownerDocument.body) {


      throw new Error('<DraggableCore> not mounted on DragStart!');
    }
    const {

    ownerDocument} = thisNode;


if (this.props.disabled ||
  (!(e.target instanceof ownerDocument.defaultView.Node)) ||
  (this.props.handle &&
  !matchesSelectorAndParentsTo(e.target, this.props.handle, thisNode)) ||
  (this.props.cancel &&
  matchesSelectorAndParentsTo(e.target, this.props.cancel, thisNode))) {


  return;
}

/**操作手柄示例
<!--实际上可以没有对应的css样式handle-->
<Draggable handle=".handle">
  <div>
      <div className="handle">Click me to drag</div>
      <div>This is some other content</div>
  </div>
</Draggable>*/


    // 触摸相关操作 ...
    // 非触摸设备,getControlPosition第二个函数为undefined
    // 获取鼠标按下时候的坐标
    const position = getControlPosition(e, undefined, this);
    if (position == null) return;
    const {

    x, y} = position;

   // 包含节点自身,坐标和其他信息的对象
    const coreEvent = createCoreData(this, x, y);
    // 调用props传入的回调 onStart
    const shouldUpdate = this.props.onStart(e, coreEvent);
    if (shouldUpdate === false || this.mounted === false) return;
    // 更新拖拽状态并存储偏移量
    this.setState({


      dragging: true,
      lastX: x,
      lastY: y
    });

   // 将move事件绑定在document上,扩大响应范围
   // 这样即使移出当前griditem 依旧能保证事件得到响应。
   // 可触摸设备和非可触摸设备结束拖拽时候的响应事件不同,这里需要用两个事件
    addEvent(ownerDocument, dragEventFor.move, this.handleDrag);
    addEvent(ownerDocument, dragEventFor.stop, this.handleDragStop);
  };
handleDrag
在看完handleDragStart函数内部细节后,handleDrag和handleDragStop都会好理解些。
handleDrag主要做的事情是在拖动过程中不断更新位置信息。
  handleDrag=(e) => {


    // Get the current drag point from the event. This is used as the offset.
    const position = getControlPosition(e, null, this);
    if (position == null) return;
    let {

    x, y} = position;
    const coreEvent = createCoreData(this, x, y);
    // Call event handler. If it returns explicit false, trigger end.
    const shouldUpdate = this.props.onDrag(e, coreEvent);
    if (shouldUpdate === false || this.mounted === false) {


      try {


        this.handleDragStop(new MouseEvent('mouseup'));
      } catch (err) {


        // Old browsers
        //xxx... 旧浏览器的一些兼容处理
      }
      return;
    }

    this.setState({


      lastX: x,
      lastY: y
    });
  };
handleDropStop
拖拽结束,重置位置信息,删除绑定的事件处理函数。
  handleDragStop= (e) => {


    if (!this.state.dragging) return;

    const position = getControlPosition(e, this.state.touchIdentifier, this);
    if (position == null) return;
    const {

    x, y} = position;
    const coreEvent = createCoreData(this, x, y);

    // Call event handler
    const shouldContinue = this.props.onStop(e, coreEvent);
    if (shouldContinue === false || this.mounted === false) return false;

    const thisNode = this.findDOMNode();
    // Reset the el.
    this.setState({


      dragging: false,
      lastX: NaN,
      lastY: NaN
    });

    if (thisNode) {


      // Remove event handlers
      removeEvent(thisNode.ownerDocument, dragEventFor.move, this.handleDrag);
      removeEvent(thisNode.ownerDocument, dragEventFor.stop, this.handleDragStop);
    }
  };
mixinResizable
mixinResizable函数为child添加缩放支持,实现上依赖react-resizable。
react-resizable的实现又依赖了react-draggable。
缩放原理
缩放和拖拽底层依赖的是同一个库,这就注定了在功能实现上是类似的思路,都是借助回调函数。DraggableCore组件内部将包含位置信息的事件对象传递给外部回调函数,回调中会重新setState,将resizing的值设置为新的{width,height}。最后,获取到的新的width,height会通过css样式作用在grid-item上,从而实现缩放功能。

function mixinResizable(child,position,isResizable) {


    const {


      cols,
      x,
      minW,
      minH,
      maxW,
      maxH,
      transformScale,
      resizeHandles,
      resizeHandle
    } = this.props;
    const positionParams = this.getPositionParams();
    // 最大宽度
    const maxWidth = calcGridItemPosition(positionParams, 0, 0, cols - x, 0)
      .width;

    // 计算最小网格布局和最大网格布局和对应的容器大小
    const mins = calcGridItemPosition(positionParams, 0, 0, minW, minH);
    const maxes = calcGridItemPosition(positionParams, 0, 0, maxW, maxH);
    const minConstraints = [mins.width, mins.height];
    const maxConstraints = [
      Math.min(maxes.width, maxWidth),
      Math.min(maxes.height, Infinity)
    ];
    return (
      <Resizable
        draggableOpts={

    {


          disabled: !isResizable,
        }}
        className={

    isResizable ? undefined : "react-resizable-hide"}
        width={

    position.width}
        height={

    position.height}
        minConstraints={

    minConstraints}
        maxConstraints={

    maxConstraints}
        onResizeStop={

    this.onResizeStop}
        onResizeStart={

    this.onResizeStart}
        onResize={

    this.onResize}
        transformScale={

    transformScale}
        resizeHandles={

    resizeHandles}
        handle={

    resizeHandle}
      >
        {

    child}
      </Resizable>
    );
  }
Resizable
resizable组件主要做了3件事:
- 传递resizable内部回调函数给DraggableCore组件,用于获取事件信息对象。
- 在resizable内部回调函数中将获取到的事件信息对象传递给外部回调,用于最终的样式更新,实际上是套了两层
- 渲染操控手柄
 render() {


    return cloneElement(children, {


      ...p,
      className: `${

      className ? `${

      className} ` : ''}react-resizable`,
      children: [
        ...[].concat(children.props.children),
        // handleAxis 是一个存储操纵方位的数组
        ...resizeHandles.map((handleAxis) => {
          // 挂载一个node节点 用于操控
          const ref = this.handleRefs[handleAxis] ?
           this.handleRefs[handleAxis] : React.createRef();
          return (
            <DraggableCore
              {...draggableOpts}
              nodeRef={ref}
              key={`resizableHandle-${

    handleAxis}`}
              onStop={

    this.resizeHandler('onResizeStop', handleAxis)}
              onStart={

    this.resizeHandler('onResizeStart', handleAxis)}
              onDrag={

    this.resizeHandler('onResize', handleAxis)}
            >
            // 渲染不同方位的操控手柄,默认右下角 se
              {

    this.renderResizeHandle(handleAxis, ref)}
            </DraggableCore>
          );
        })
      ]
    });
  }
通用事件函数封装
缩放的三个事件处理函数在外部只做简单触发,内部共用一套处理逻辑(onResizeHandler)。
  // 停止缩放
  onResizeStop: (Event, {

     node: HTMLElement, size: Position }) => void = (
    e,
    callbackData
  ) => {


    this.onResizeHandler(e, callbackData, "onResizeStop");
  };

// 开始缩放
  onResizeStart: (Event, {

     node: HTMLElement, size: Position }) => void = (
    e,
    callbackData
  ) => {


    this.onResizeHandler(e, callbackData, "onResizeStart");
  };

 // 缩放中
  onResize: (Event, {

     node: HTMLElement, size: Position }) => void = (
    e,
    callbackData
  ) => {


    this.onResizeHandler(e, callbackData, "onResize");
  };
onResizeHandler
该函数用于计算缩放后重新生成的网格单元信息,并将变更后的宽和高存储到state的resizing上。
 onResizeHandler(
    e: Event,
    {

     node, size }: {

     node: HTMLElement, size: Position },
    handlerName: string
  ): void {


   //根据传入的handler名称获取对应的事件处理函数
    const handler = this.props[handlerName];
    if (!handler) return;
    const {

     cols, x, y, i, maxH, minH } = this.props;
    let {

     minW, maxW } = this.props;

    // 根据宽高计算出网格单元w,h
    // 因为缩放是会改变大小的,大小改变对应的网格单元也要变
    let {

     w, h } = calcWH(
      this.getPositionParams(),
      size.width,
      size.height,
      x,
      y
    );

    // 最小应该保持一个单元的布局
    minW = Math.max(minW, 1);
    //最大(cols - x)
    maxW = Math.min(maxW, cols - x);

    // 限制宽高在min max之间,可以等于min max
    w = clamp(w, minW, maxW);
    h = clamp(h, minH, maxH);

    // 更新reszing 的值,和dragging作用类似,用于最终的样式计算
    // 差异是这里边只会存储width/height
    // dragging 中会存储left/top
    this.setState({

     resizing: handlerName === "onResizeStop" ? null : size });

    handler.call(this, i, w, h, {

     e, node, size });
  }


// 限制目标值在上下边界之间
function clamp(
  num: number,
  lowerBound: number,
  upperBound: number
): number {


  return Math.max(Math.min(num, upperBound), lowerBound);
}
resizeHandler
resizaHandle其实是起到一个中转站的作用,先从DraggableCore中获取节点和位置信息对象。
然后根据获取到的对象信息计算出缩放后的宽高,将其作为触发相应的回调的参数。
 resizeHandler(handlerName: 'onResize' | 'onResizeStart' | 'onResizeStop', axis): Function {


    return (e, {

     node, deltaX, deltaY }) => {


      // Reset data in case it was left over somehow (should not be possible)
      if (handlerName === 'onResizeStart') this.resetData();

      // Axis restrictions
      const canDragX = (this.props.axis === 'both' || this.props.axis === 'x') && axis !== 'n' && axis !== 's';
      const canDragY = (this.props.axis === 'both' || this.props.axis === 'y') && axis !== 'e' && axis !== 'w';
      // No dragging possible.
      if (!canDragX && !canDragY) return;

      // Decompose axis for later use
      const axisV = axis[0];
      const axisH = axis[axis.length - 1]; // intentionally not axis[1], so that this catches axis === 'w' for example

      // Track the element being dragged to account for changes in position.
      // If a handle's position is changed between callbacks, we need to factor this in to the next callback.
      // Failure to do so will cause the element to "skip" when resized upwards or leftwards.
      const handleRect = node.getBoundingClientRect();
      if (this.lastHandleRect != null) {


        // If the handle has repositioned on either axis since last render,
        // we need to increase our callback values by this much.
        // Only checking 'n', 'w' since resizing by 's', 'w' won't affect the overall position on page,
        if (axisH === 'w') {


          const deltaLeftSinceLast = handleRect.left - this.lastHandleRect.left;
          deltaX += deltaLeftSinceLast;
        }
        if (axisV === 'n') {


          const deltaTopSinceLast = handleRect.top - this.lastHandleRect.top;
          deltaY += deltaTopSinceLast;
        }
      }
      // Storage of last rect so we know how much it has really moved.
      this.lastHandleRect = handleRect;

      // Reverse delta if using top or left drag handles.
      if (axisH === 'w') deltaX = -deltaX;
      if (axisV === 'n') deltaY = -deltaY;

      // 计算缩放后的宽和高
      let width = this.props.width + (canDragX ? deltaX / this.props.transformScale : 0);
      let height = this.props.height + (canDragY ? deltaY / this.props.transformScale : 0);

      // Run user-provided constraints.
      [width, height] = this.runConstraints(width, height);

      const dimensionsChanged = width !== this.props.width || height !== this.props.height;

      // Call user-supplied callback if present.
      const cb = typeof this.props[handlerName] === 'function' ? this.props[handlerName] : null;
      // Don't call 'onResize' if dimensions haven't changed.
      const shouldSkipCb = handlerName === 'onResize' && !dimensionsChanged;
      if (cb && !shouldSkipCb) {


        e.persist?.();
        cb(e, {

     node, size: {

     width, height }, handle: axis });
      }

      // Reset internal data
      if (handlerName === 'onResizeStop') this.resetData();
    };
  }
再会
情如风雪无常,
却是一动即殇。
感谢你这么好看还来阅读我的文章,
我是冷月心,下期再见。