2022年圣诞节到来啦,很高兴这次我们又能一起度过~
一、前言
提示:使用unity来制作一个拼图游戏,图片便是圣诞树。
二、创意名
圣诞树拼图游戏
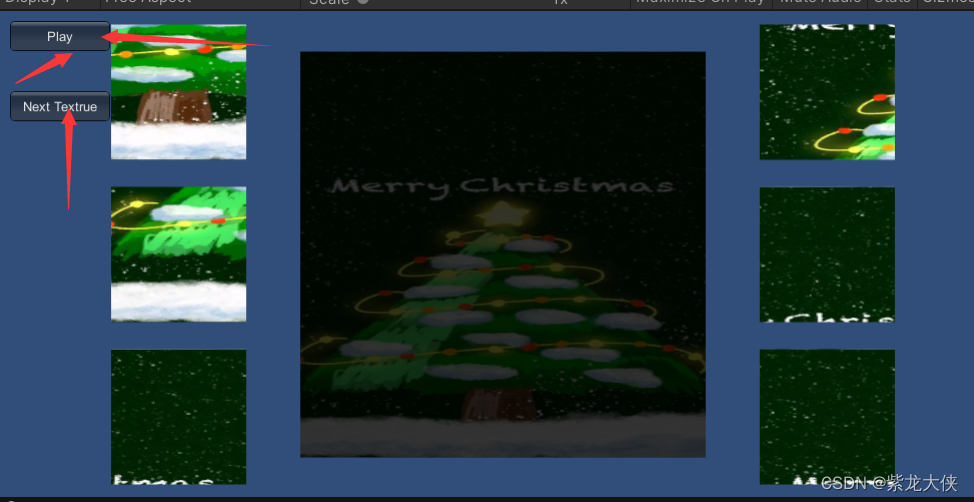
三、效果展示
圣诞树拼图游戏最终效果。
游戏中效果如图:
游戏拼图完成后效果如图:


四、实现步骤
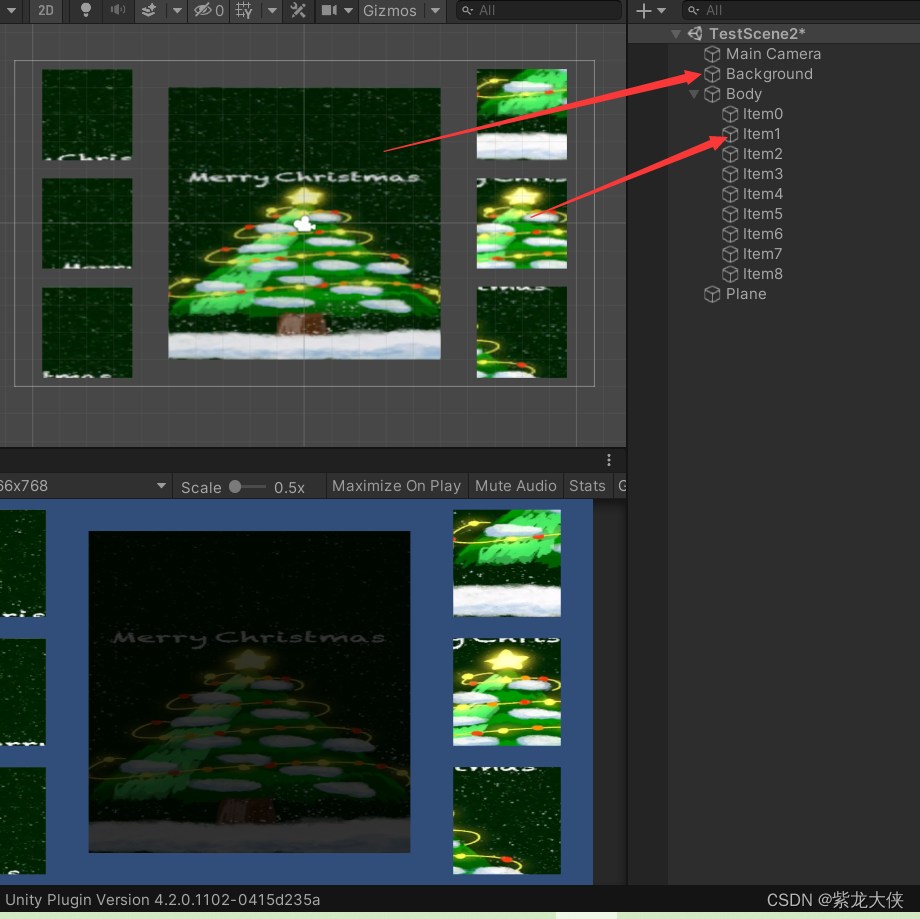
第一步,先新建场景,场景中包含内容如下图:
背景图Background是拼图的最终目标图片。用来为拼图作为参照的。
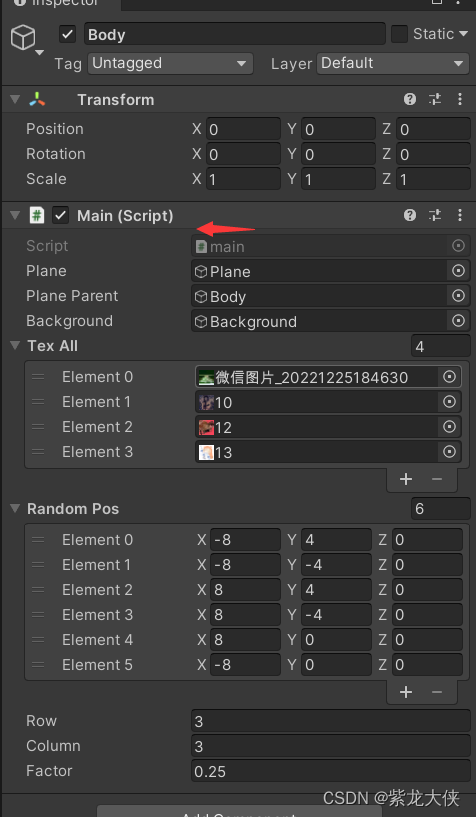
Body上绑定一个脚本main,脚本是用来生成图片拼图碎片的,并且以此为父物体,通过代码生成拼图碎片子物体。
运行后对应场景中的图片是:
第二步代码内容说明:在body这个物体上绑定一个脚本main,在代码中有tex all这个数组,该数组用来放置不同的图片。也就是说游戏不止一个拼图,可以是多个关卡,每个关卡是一张图片。图片可以通过给tex all这个数组赋值来修改。
下面的_RandomPos这个变量是用来设定,生成图片拼图碎片的位置。一张大图片可以随机生成6个区域的小图片。
生成的样式如下图:


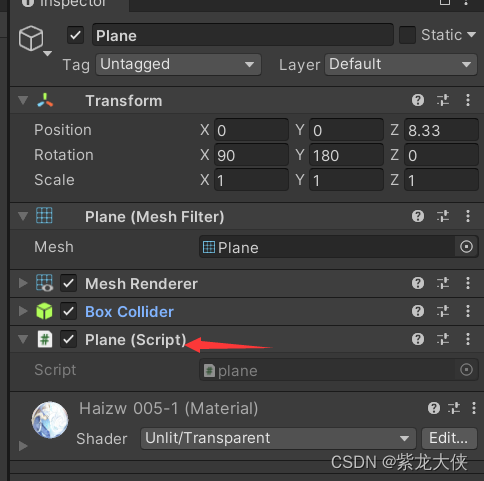
生成的子物体在代码中已经定义好了,名字为:tempObj.name = "Item" + k;。但生成的子物体通过鼠标拖动的还需要一个代码。
子物体就是场景中的物体Plane。该物体添加的脚本如图:
五、编码实现
main脚本详情如下:
using UnityEngine;
using System.Collections;

public class main : MonoBehaviour {

	public GameObject _plane;
	public GameObject _planeParent;
	public GameObject _background;
	public Texture2D[] _texAll;
	public Vector3[] _RandomPos;
	public int row = 3;
	public int column = 3;
	public float factor = 0.25f;

	GameObject[] _tempPlaneAll;

	float sideLength = 0;

	int finishCount = 0;
	int _index = 0;

	Vector2 originPoint;
	Vector2 space;

	void Start()
	{
		sideLength = _background.transform.localScale.x;
		space.x = sideLength / column;
		space.y = sideLength / row;
		originPoint.x = -((column - 1) * space.x) / 2;
		originPoint.y = ((row - 1) * space.y) / 2;
		Vector2 range;
		range.x = space.x * factor * 10f;
		range.y = space.y * factor * 10f;

		_tempPlaneAll = new GameObject[row * column];
		int k = 0;
		for(int i = 0 ; i != row ; ++i)
		{
			for(int j = 0 ; j != column ; ++j)
			{
				GameObject tempObj = (GameObject)Instantiate(_plane);
				tempObj.name = "Item" + k;
				tempObj.transform.parent = _planeParent.transform;
				tempObj.transform.localPosition = new Vector3((originPoint.x + space.x * j) * 10f, (originPoint.y - space.y * i) * 10f, 0);
				tempObj.transform.localScale = new Vector3(space.x, 1f, space.y);
				Vector2 tempPos = new Vector2(originPoint.x + space.x * j, originPoint.y - space.y * i);

				float offset_x = (tempPos.x <= 0 + Mathf.Epsilon) ? (0.5f - Mathf.Abs((tempPos.x - space.x / 2) / sideLength)) : (0.5f + (tempPos.x - space.x / 2) / sideLength);
				float offset_y = (tempPos.y <= 0 + Mathf.Epsilon) ? (0.5f - Mathf.Abs((tempPos.y - space.y / 2) / sideLength)) : (0.5f + (tempPos.y - space.y / 2) / sideLength);

				float scale_x = Mathf.Abs(space.x / sideLength);
				float scale_y = Mathf.Abs(space.y / sideLength);

				tempObj.GetComponent<Renderer>().material.mainTextureOffset = new Vector2(offset_x, offset_y);
				tempObj.GetComponent<Renderer>().material.mainTextureScale = new Vector2(scale_x, scale_y);
				tempObj.SendMessage("SetRange", range);

				_tempPlaneAll[k] = tempObj;
				++k;
			}
		}
	}

	void OnGUI()
	{
		if(GUI.Button(new Rect(10, 10, 100, 30), "Play"))
			StartGame();
		if(GUI.Button(new Rect(10, 80, 100, 30), "Next Textrue"))
			ChangeTex();
	}

	void StartGame()
	{
		for(int i = 0 ; i != _tempPlaneAll.Length ; ++i)
		{
			int tempRank = Random.Range(0, _RandomPos.Length);
			_tempPlaneAll[i].transform.localPosition = new Vector3(_RandomPos[tempRank].x, _RandomPos[tempRank].y, 0f);
		}
		gameObject.BroadcastMessage("Play");
	}

	void SetIsMoveFale()
	{
		gameObject.BroadcastMessage("IsMoveFalse");
	}

	void IsFinish()
	{
		++finishCount;
		if(finishCount == row * column)
			Debug.Log("Finish!");
	}

	void ChangeTex()
	{
		_background.GetComponent<Renderer>().material.mainTexture = _texAll[_index];
		gameObject.BroadcastMessage("SetTexture", _texAll[_index++]);
		if(_index > _texAll.Length - 1)
			_index = 0;
	}

}
脚本plane详细如下:
using UnityEngine;
using System.Collections;

public class plane : MonoBehaviour {

	Transform mTransform;

	Vector3 offsetPos;
	Vector3 finishPos = Vector3.zero;

	Vector2 range;

	float z = 0;

	bool isPlay = false;
	bool isMove = false;

	void Start()
	{
		mTransform = transform;
		finishPos = mTransform.localPosition;
	}

	void Update()
	{
		if(!isPlay)
			return ;

		Vector3 tempMousePos = Camera.main.ScreenToWorldPoint(Input.mousePosition);
		if(Input.GetMouseButtonDown(0) && tempMousePos.x > GetComponent<Collider>().bounds.min.x && tempMousePos.x < GetComponent<Collider>().bounds.max.x
			&& tempMousePos.y > GetComponent<Collider>().bounds.min.y && tempMousePos.y < GetComponent<Collider>().bounds.max.y)
		{
			mTransform.parent.SendMessage("SetIsMoveFale");
			offsetPos = mTransform.position - tempMousePos;
			z = mTransform.position.z;
			isMove = true;
		}

		if(isMove && Input.GetMouseButton(0))
		{
			tempMousePos = Camera.main.ScreenToWorldPoint(Input.mousePosition);
			mTransform.position = new Vector3(tempMousePos.x + offsetPos.x, tempMousePos.y + offsetPos.y, z - 0.1f);
		}

		if(Input.GetMouseButtonUp(0))
		{
			mTransform.position = new Vector3(mTransform.position.x, mTransform.position.y, z);
			isMove = false;
		}

		IsFinish();
	}

	void IsFinish()
	{
		if(mTransform.localPosition.x > finishPos.x - range.x && mTransform.localPosition.x < finishPos.x + range.x
			&& mTransform.localPosition.y > finishPos.y - range.y && mTransform.localPosition.y < finishPos.y + range.y)
		{
			isPlay = false;
			mTransform.localPosition = finishPos;
			mTransform.parent.SendMessage("IsFinish");
		}
	}

	void Play()
	{
		isPlay = true;
	}

	void IsMoveFalse()
	{
		isMove = false;
	}

	void SetRange(Vector2 _range)
	{
		range = _range;
	}

	void SetTexture(Texture2D _tex)
	{
		mTransform.GetComponent<Renderer>().material.mainTexture = _tex;
	}
}
在脚本main中用GUI写了两个按钮,一个是开始玩游戏的play按钮,另一个是切换到下一张图片的按钮。如图: