从Spring2开始引入注解,Spring3已经可以纯注解开发,以避免使用复杂的配置文件
1. IOC/DI注解开发
1.1 Component注解
@Component
-
在对应类上添加Component注解

-
在applicationContext.xml指定要扫描的路径
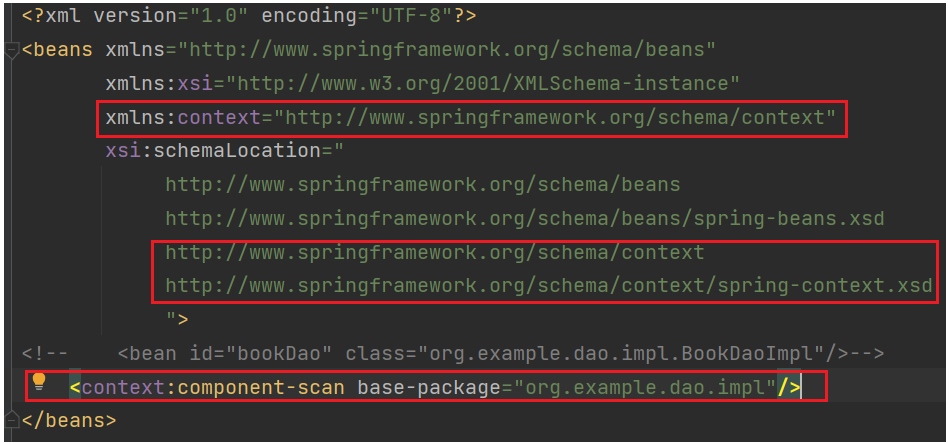
注意:这里首先创建了context命名空间,然后使用了
component-scan和base-package,之后就可以正常获取bean了- 扫描的范围是 base-package 指定的范围
-
测试BookService
//BookServiceImpl.java
@Component
//可以不添加名称,之后按类型获取
//applicationContext.xml <context:component-scan base-package="org.example"/>//App.java BookService bookService = ctx.getBean(BookService.class); bookService.save();
@Controller @Service @Repository
这三个注解是Component的衍生注解,作用和Component相同,只是为了区分某个类是属于表现层、业务层还是数据层的类

- Controller注解:表现层,例如BooServlet.java
- Service注解:业务层,例如BookServiceImpl.java
- Repository注解:数据层,例如BookDaoImpl.java(代表mybatis里面的mapper部分)
1.2 纯注解开发模式
不再写applicationContext.xml配置文件,而是用Config类替代
-
创建Config类

@Configuration//表示这是个配置类,相当于applicationContext.xml默认部分,如命令空间xmlns那一块内容
@ComponentScan("org.example.dao")//相当于设置了<bean>标签
public class SpringConfig {


}
之前的applicationContext.xml已经可以删除了
-
@Configuration:设置该类为spring配置类
-
@ComponentScan:设置spring配置类扫描路径,此注解只能添加一次,多个数据用{}格式,如
@ComponentScan({

        "org.example.dao", "org.example.service"})
-
-
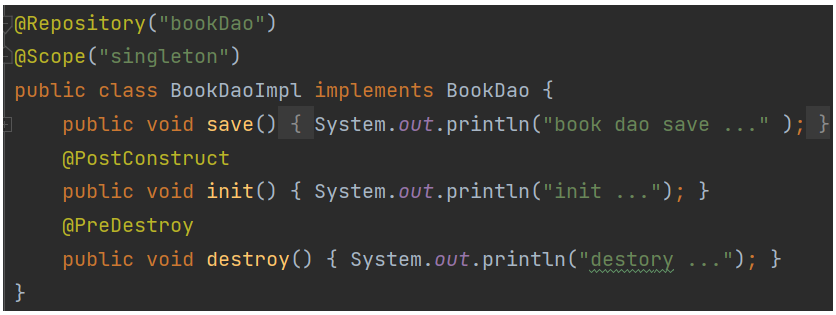
BookDaoImpl.java
package org.example.dao.impl; @Repository("bookDao") public class BookDaoImpl implements BookDao { public void save() { System.out.println("book dao save ..."); } } -
使用SpringConfig:AnnotationConfigApplicationContext
public class APP {


    public static void main(String[] args) {


        ApplicationContext ctx = new AnnotationConfigApplicationContext(SpringConfig.class);
        BookDao bookDao = (BookDao) ctx.getBean("bookDao");
        System.out.println(bookDao);
        BookService bookService = ctx.getBean(BookService.class);
        System.out.println(bookService);
    }
}
1.3 注解开发bean管理
@Scope
设置是否为单例模式

@PostConstruct @PreDestroy
管理生命周期 init() 和 destroy()
AnnotationConfigApplicationContext ctx = new AnnotationConfigApplicationContext(SpringConfig.class);
BookDao bookDao = (BookDao) ctx.getBean("bookDao");
System.out.println(bookDao);
ctx.close();//关闭容器,从而可以看到destroy()的信息
1.4 注解开发依赖注入
@Autowired @Qualifier
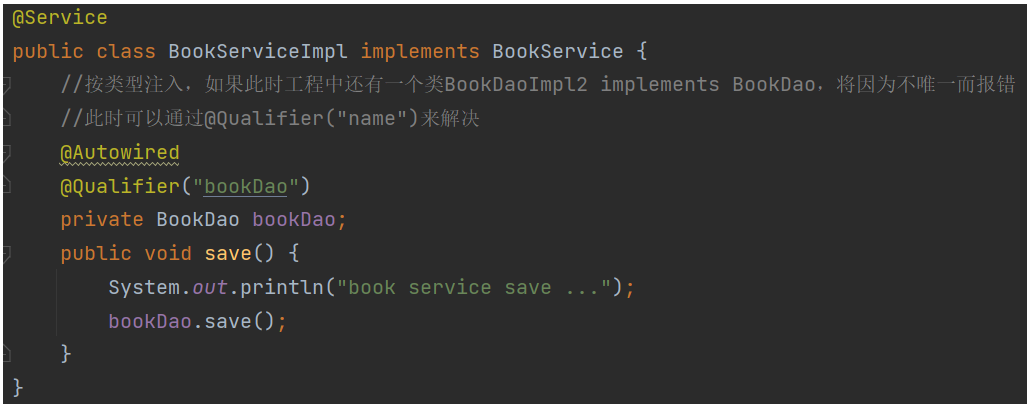
如果只有一个实现类implements BookDao时,仅需@Autowired即可自动注入
如果只有多个实现类implements BookDao时,还需@Qualifier(“name”)指定哪一个实现类
使用@Autowired可以省略setter方法
@Value
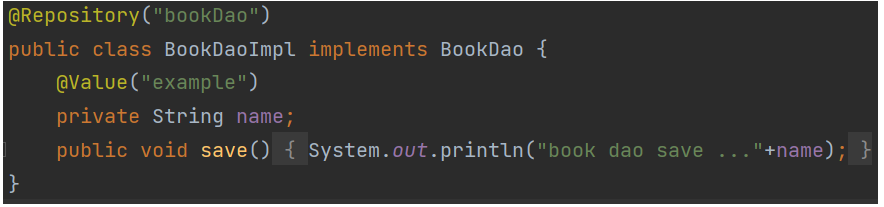
name变量被注入了值 “example”
这样单纯使用@Value是没有意义的,注解主要是为了加载properties文件,使得变量值可更改
@PropertySource
读取Properties配置文件
-
新建jdbc.properties
name=example -
配置Config类
package org.example.config; @Configuration @ComponentScan({ "org.example.dao", "org.example.service"}) @PropertySource("classpath:jdbc.properties") public class SpringConfig { } -
注入
package org.example.dao.impl;

@Repository("bookDao")
public class BookDaoImpl implements BookDao {


    @Value("${name}")
    private String name;
    public void save() {


        System.out.println("book dao save ..."+name);
    }
}
注意事项:(1)多个properties配置文件同样使用{}格式;(2)不支持通配符
1.5 第三方bean管理
@Bean
-
导入依赖
<dependency> <groupId>com.alibaba</groupId> <artifactId>druid</artifactId> <version>1.1.16</version> </dependency> -
配置Config文件
@Configuration public class SpringConfig { //1. 定义一个方法获得要管理的对象 //2. 添加@Bean,表示当前方法的返回值是一个bean @Bean public DataSource dataSource(){ DruidDataSource ds = new DruidDataSource(); ds.setDriverClassName("com.mysql.jdbc.Driver"); ds.setUrl("jdbc:mysql://localhost:3306/spring_db"); ds.setUsername("root"); ds.setPassword("root"); return ds; } } -
获取Bean并运行
ApplicationContext ctx = new AnnotationConfigApplicationContext(SpringConfig.class);
DataSource dataSource = ctx.getBean(DataSource.class);
System.out.println(dataSource);
@import(多个Config类)
像是上面的dataSource()这类的通常会专门创建一个Config类,如JdbcConfig,现在需要使其生效

方法一(不推荐)
-
JdbcConfig.java
@Configuration public class JdbcConfig { @Bean public DataSource dataSource(){ DruidDataSource ds = new DruidDataSource(); ds.setDriverClassName("com.mysql.jdbc.Driver"); ds.setUrl("jdbc:mysql://localhost:3306/spring_db"); ds.setUsername("root"); ds.setPassword("root"); return ds; } } -
还需要配置SpringConfig.java
@Configuration
@ComponentScan("org.example.config")
public class SpringConfig {


}
方法二(推荐)
-
JdbcConfig.java
public class JdbcConfig { //注意,没再使用@Configuration @Bean public DataSource dataSource(){ DruidDataSource ds = new DruidDataSource(); ds.setDriverClassName("com.mysql.jdbc.Driver"); ds.setUrl("jdbc:mysql://localhost:3306/spring_db"); ds.setUsername("root"); ds.setPassword("root"); return ds; } } -
配置SpringConfig.java
@Configuration
@Import(JdbcConfig.class)
public class SpringConfig {


}
练习:使用@Value和properties文件修改上述代码
引用类型的注入
-
BookDaoImpl.java
@Repository public class BookDaoImpl implements BookDao { public void save() { System.out.println("book dao save ..."); } } -
SpringConfig.java
@Configuration @ComponentScan("org.example.dao")//关联到BookDaoImpl @Import(JdbcConfig.class) public class SpringConfig { } -
JdbcConfig.java
@PropertySource("classpath:jdbc.properties") public class JdbcConfig { @Value("${jdbc.driver}") private String driver; @Value("${jdbc.url}") private String url; @Value("${jdbc.username}") private String username; @Value("${jdbc.password}") private String password; @Bean public DataSource dataSource(BookDao bookDao){ System.out.println(bookDao); DruidDataSource ds = new DruidDataSource(); ds.setDriverClassName(driver); ds.setUrl(url); ds.setUsername(username); ds.setPassword(password); return ds; } } -
自动装配
上面仅提供了一个形参bookDao,即可自动注入
这是因为@Bean使其认为形参应当被自动提供,于是将自动寻找相应的类,并注入到形参中
总结
- 1.第三方Bean管理
- @Bean
- 2.第三方依赖注入
- 引用类型:方法形参
- 简单类型:成员变量
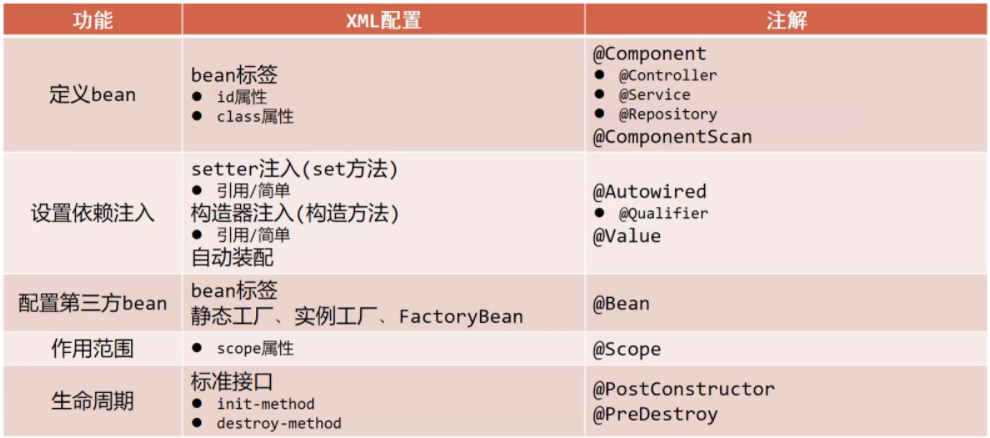
1.6 XML配置和注解配置对比
2. Spring整合MyBatis
2.1 mybatis写法回顾
-
创建javaweb项目,在pom.xml添加
<packaging>war</packaging> -
配置pom.xml依赖和插件
<dependencies> <!-- mysql --> <dependency> <groupId>mysql</groupId> <artifactId>mysql-connector-java</artifactId> <version>5.1.46</version> </dependency> <!-- mybatis --> <dependency> <groupId>org.mybatis</groupId> <artifactId>mybatis</artifactId> <version>3.5.5</version> </dependency> </dependencies> <build> <plugins> <!--Tomcat插件,非必要 --> <plugin> <groupId>org.apache.tomcat.maven</groupId> <artifactId>tomcat7-maven-plugin</artifactId> <version>2.2</version> </plugin> </plugins> </build> -
编写mybatis-config.xml配置文件
<?xml version="1.0" encoding="UTF-8" ?>
<!DOCTYPE configuration
        PUBLIC "-//mybatis.org//DTD Config 3.0//EN"
        "http://mybatis.org/dtd/mybatis-3-config.dtd">
<configuration>
    <properties resource="jdbc.properties"/>
    <environments default="development">
        <environment id="development">
            <transactionManager type="JDBC"/>
            <dataSource type="POOLED">
                <!--数据库连接信息-->
                <property name="driver" value="${jdbc.driver}"/>
                <property name="url" value="${jdbc.url}"/>
                <property name="username" value="${jdbc.username}"/>
                <property name="password" value="${jdbc.password}"/>
            </dataSource>
        </environment>
    </environments>
    <mappers>
    	<package name="org.example.mapper"/>
	</mappers>
</configuration>
jdbc.properties
jdbc.driver=com.mysql.jdbc.Driver jdbc.url=jdbc:mysql:///spring_db?useSSL=false&useServerPrepStmts=true jdbc.username=root jdbc.password=123456 -
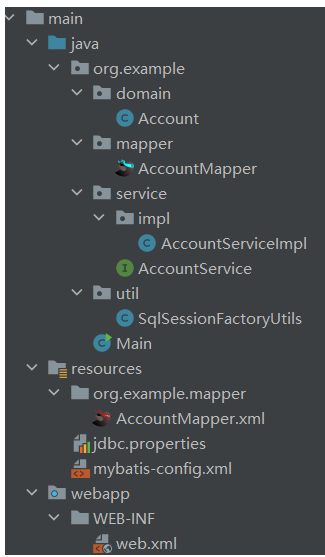
创建AcccountMapper.xml和AccontMapper接口
AccountMapper.xml<?xml version="1.0" encoding="UTF-8" ?> <!DOCTYPE mapper PUBLIC "-//mybatis.org//DTD Mapper 3.0//EN" "http://mybatis.org/dtd/mybatis-3-mapper.dtd"> <mapper namespace="org.example.mapper.AccountMapper"> </mapper>AccontMapper接口
package org.example.mapper;

public interface AccountMapper {


    @Insert("insert into tbl_account(name,money)values(#{name},#{money})")
    void save(Account account);

    @Delete("delete from tbl_account where id = #{id} ")
    void delete(Integer id);

    @Update("update tbl_account set name = #{name} , money = #{money} where id = #{id} ")
    void update(Account account);

    @Select("select * from tbl_account")
    List<Account> findAll();

    @Select("select * from tbl_account where id = #{id} ")
    Account findById(Integer id);
}
在这一部分定义sql语句
-
编写service方法负责业务逻辑层,主要是调用数据库
准备工具类:SqlSessionFactoryUtilspackage org.example.util; public class SqlSessionFactoryUtils { private static SqlSessionFactory sqlSessionFactory; static{ try { String resource = "mybatis-config.xml"; InputStream inputStream = Resources.getResourceAsStream(resource); sqlSessionFactory = new SqlSessionFactoryBuilder().build(inputStream); } catch (IOException e) { e.printStackTrace(); } } public static SqlSessionFactory getSqlSessionFactory(){ return sqlSessionFactory; } }编写AccountService接口
public interface AccountService {


    List<Account> findAll();
}
AccountService.java
package org.example.service.impl; public class AccountServiceImpl implements AccountService { private SqlSessionFactory factory = SqlSessionFactoryUtils.getSqlSessionFactory(); @Override public List<Account> findAll() { SqlSession session = factory.openSession(); AccountMapper mapper = session.getMapper(AccountMapper.class); List<Account> accounts = mapper.findAll(); session.close(); return accounts; } } -
接下来应该是在servlet类里面调用service方法,这里写在main函数里面
package org.example;

public class Main {


    public static void main(String[] args) {


        AccountService service = new AccountServiceImpl();
        List<Account> accounts = service.findAll();
        System.out.println(accounts);
    }
}
即可成功获取到数据库数据
当Spring需要整合mybatis时,真正需要交给Spring管理的是SqlSessionFactory
2.2 整合:导入依赖:pom.xml
<dependencies>
    <!-- spring-context -->
    <dependency>
        <groupId>org.springframework</groupId>
        <artifactId>spring-context</artifactId>
        <version>5.2.10.RELEASE</version>
    </dependency>
    <!-- druid -->
    <dependency>
        <groupId>com.alibaba</groupId>
        <artifactId>druid</artifactId>
        <version>1.1.16</version>
    </dependency>
    <!-- mybatis -->
    <dependency>
        <groupId>org.mybatis</groupId>
        <artifactId>mybatis</artifactId>
        <version>3.5.5</version>
    </dependency>
    <!-- mysql -->
    <dependency>
        <groupId>mysql</groupId>
        <artifactId>mysql-connector-java</artifactId>
        <version>5.1.46</version>
    </dependency>
    <!-- spring-jdbc -->
    <dependency>
        <groupId>org.springframework</groupId>
        <artifactId>spring-jdbc</artifactId>
        <version>5.2.10.RELEASE</version>
    </dependency>
    <!-- mybatis-spring -->
    <dependency>
        <groupId>org.mybatis</groupId>
        <artifactId>mybatis-spring</artifactId>
        <version>1.3.0</version>
    </dependency>
</dependencies>
2.3 整合:环境准备
步骤1:准备数据库表
create database spring_db character set utf8;
use spring_db;
create table tbl_account(
    id int primary key auto_increment,
    name varchar(35),
    money double
);
insert into tbl_account values (null, 'zhangsan', 1999.10);
insert into tbl_account values (null, '张三', 32.43);
步骤2:创建基础文件

Account.java
package org.example.domain;

public class Account{


    private Integer id;
    private String name;
    private Double money;
}
//省略getter, setter, toString
AccountDao接口
这里的AccountDao就是AccountMapper的作用,需要加上注解
package org.example.dao;

@Repository("accountDao")
public interface AccountDao {


    @Insert("insert into tbl_account(name,money)values(#{name},#{money})")
    void save(Account account);

    @Delete("delete from tbl_account where id = #{id} ")
    void delete(Integer id);

    @Update("update tbl_account set name = #{name} , money = #{money} where id = #{id} ")
    void update(Account account);

    @Select("select * from tbl_account")
    List<Account> findAll();

    @Select("select * from tbl_account where id = #{id} ")
    Account findById(Integer id);
}
Service接口和实现类
接口是没有变化的
package org.example.service;

public interface AccountService {


    void save(Account account);
    void delete(Integer id);
    void update(Account account);
    List<Account> findAll();
    Account findById(Integer id);
}
实现类变化很大,和之前相比,spring会接管SqlSessionFactory对象的创建,因此这次不需要创建了
重点:@Service和自动注入
package org.example.service.impl;

@Service
public class AccountServiceImpl implements AccountService {


    @Autowired//自动注入
    @Qualifier("accountDao")
    private AccountDao accountDao;
    public void save(Account account) {


        accountDao.save(account);
    }
    public void update(Account account){


        accountDao.update(account);
    }
    public void delete(Integer id) {


        accountDao.delete(id);
    }
    public Account findById(Integer id) {


        return accountDao.findById(id);
    }
    public List<Account> findAll() {


        return accountDao.findAll();
    }
}
jdbc.properties
resources目录下添加,用于配置数据库连接四要素
jdbc.driver=com.mysql.jdbc.Driver
jdbc.url=jdbc:mysql://localhost:3306/spring_db?useSSL=false
jdbc.username=root
jdbc.password=123456
useSSL:关闭MySQL的SSL连接
2.4 整合:Spring核心配置文件
在没有整合之前,mybatis的service类里面会创建SqlSessionFactory对象,来与数据库互通
在整合后,可以看到新的service类里面不再具备这样的功能
spring核心配置文件就是用来设置配置信息的,用以替代mybatis-config.xml等配置文件 ,并管理bean之间的依赖关系
SpringConfig.java
主配置类,推荐在这个配置类里面import其他配置类
package org.example.config;

@Configuration//说明这是一个配置类
@ComponentScan("org.example")//定义扫描路径
@PropertySource("classpath:jdbc.properties")//引入连接信息资源文件
@Import({

    JdbcConfig.class, MybatisConfig.class})//要么这里导入,要么在 JdbcConfig 前面加 @Configuration
public class SpringConfig {


}
JdbcConfig.java
package org.example.config;

//定义数据源
//本来是需要引入jdbc.properties的,但这里选择将所有文件都放在SpringConfig里面引入
public class JdbcConfig {


    @Value("${jdbc.driver}")//自动注入
    private String driver;
    @Value("${jdbc.url}")
    private String url;
    @Value("${jdbc.username}")
    private String username;
    @Value("${jdbc.password}")
    private String password;
    @Bean
    public DataSource dataSource(BookDao bookDao){


        DruidDataSource ds = new DruidDataSource();
        ds.setDriverClassName(driver);
        ds.setUrl(url);
        ds.setUsername(username);
        ds.setPassword(password);
        return ds;
    }
}
MybatisConfig.java
SqlSessionFactoryBean来源于org.mybatis.spring,可以直接获取SqlSessionFactory
package org.example.config;

import org.mybatis.spring.SqlSessionFactoryBean;
import org.mybatis.spring.mapper.MapperScannerConfigurer;
import org.springframework.context.annotation.Bean;

import javax.sql.DataSource;

public class MybatisConfig {


    //sqlSessionFactoryBean完成了mybatis-config里面的<environment>部分
    @Bean
    public SqlSessionFactoryBean sqlSessionFactory(DataSource dataSource){


        //dataSource也是一个Bean,所以这里能够自动注入
        SqlSessionFactoryBean ssfb = new SqlSessionFactoryBean();
        ssfb.setTypeAliasesPackage("org.example.domain");//取别名,domain是实体类包,相当于之前的pojo包
        ssfb.setDataSource(dataSource);//设置数据源,即连接相关信息
        return ssfb;
    }
    //mapperScannerConfigurer完成了mybatis-config里面的<mappers>部分
    @Bean
    public MapperScannerConfigurer mapperScannerConfigurer(){


        MapperScannerConfigurer msc = new MapperScannerConfigurer();
        msc.setBasePackage("org.example.dao");//这里的dao包实际上就是之前学mybatis里面的mapper包
        return msc;
    }
}
2.5 运行和说明
App.java
package org.example;

public class App {


    public static void main(String[] args){


        ApplicationContext ctx = new AnnotationConfigApplicationContext(SpringConfig.class);
        AccountService accountService = ctx.getBean(AccountService.class);//@Service标注会自动生成bean
        Account account = accountService.findById(1);//即使后面AccountServiceImpl修改,也不影响这里的代码
        System.out.println(account);
    }
}
说明
-
运行流程
- 程序启动时候检测使用了@Configuration注解的配置类SpringConfig - SpringConfig中引入了MybatisConfig和JdbcConfig,相当于这三个文件都成为一个配置文件 - MybatisConfig通过JdbcConfig获取到了dataSource,里面带有配置数据库连接的信息,从而成功创建 SqlSessionFactory - 由于AccountServiceImpl.java上使用了注解@Service,且配置类SpringConfig定义了扫描路径"org.example",于是它将被纳入bean管理 - 执行ctx.getBean(AccountService.class),这里实际上是以接口类去接实现类,类似于Father father = new Son(); - 调用实现类的findById方法 -
关于Spring注入的是接口还是实现类?
参考:https://blog.csdn.net/m0_51697147/article/details/126802648-
在配置文件模式中,配置bean
<bean id="bookService" class="org.example.service.BookServiceImpl">
    <property name="bookDao" ref="bookDao"/>
</bean>
获取bean
BookService bookService = ctx.getBean(BookService.class); -
在注解开发模式中,配置bean
@Service
public class AccountServiceImpl implements AccountService {


    @Autowired
    @Qualifier("accountDao")
    private AccountDao accountDao;
    ...
}
获取bean
AccountService accountService = ctx.getBean(AccountService.class);
从spring容器中获取一个类,如果这个类实现了一个接口并且该类存在一个AOP的切入点方法,那么通过
getBean()获取到的bean类型只能是这个类的接口类型,不能是具体实现getBean()必须面向接口,这是因为底层实现用了代理,并由Proxy的内部实现决定
优点:如果之后实现类发生改变,例如修改为AccountServiceImpl2.java,那么App.java里面的内容不必修改
思考:如果有多个实现类继承了AccountService,这也写将会报错,那么如何处理?
-
3. Spring整合JUnit
1.导入依赖
<!-- junit -->
<dependency>
    <groupId>junit</groupId>
    <artifactId>junit</artifactId>
    <version>4.12</version>
    <scope>test</scope>
</dependency>
<!-- spring test -->
<dependency>
    <groupId>org.springframework</groupId>
    <artifactId>spring-test</artifactId>
    <version>5.2.10.RELEASE</version>
</dependency>
2.编写测试类
package org.example.service;

@RunWith(SpringJUnit4ClassRunner.class)//设定类运行器
@ContextConfiguration(classes = SpringConfig.class)//加载配置类
//@ContextConfiguration(locations={"classpath:applicationContext.xml"})//加载配置文件
public class AccountServiceTest {


    //支持自动装配注入bean
    @Autowired
    private  AccountService accountService;

    @Test
    public void testFindById(){


        System.out.println(accountService.findById(2));
    }

    @Test
    public void testFindAll(){


        System.out.println(accountService.findAll());
    }
}
要测试哪个方法,就在哪个方法那里点击执行
- 单元测试,如果测试的是注解配置类,则使用
@ContextConfiguration(classes = 配置类.class) - 单元测试,如果测试的是配置文件,则使用
@ContextConfiguration(locations={配置文件名,...}) - Junit运行后是基于Spring环境运行的,所以Spring提供了一个专用的类运行器,这个务必要设置,这个类运行器就在Spring的测试专用包中提供的,导入的坐标就是这个东西
SpringJUnit4ClassRunner - 上面两个配置都是固定格式,当需要测试哪个bean时,使用自动装配加载对应的对象
知识点1:@RunWith
| 名称 | @RunWith |
|---|---|
| 类型 | 测试类注解 |
| 位置 | 测试类定义上方 |
| 作用 | 设置JUnit运行器 |
| 属性 | value(默认):运行所使用的运行期 |
知识点2:@ContextConfiguration
| 名称 | @ContextConfiguration |
|---|---|
| 类型 | 测试类注解 |
| 位置 | 测试类定义上方 |
| 作用 | 设置JUnit加载的Spring核心配置 |
| 属性 | classes:核心配置类,可以使用数组的格式设定加载多个配置类 locations:配置文件,可以使用数组的格式设定加载多个配置文件名称 |
4. AOP
AOP(Aspect Oriented Programming)面向切面编程,一种编程范式,指导开发者如何组织程序结构
OOP(Object Oriented Programming)面向对象编程
Spring有两个核心的概念,一个是IOC/DI,一个是AOP
作用:AOP是在不改原有代码的前提下对其进行增强
Spring理念:无入侵时/无侵入式
4.1 AOP核心概念
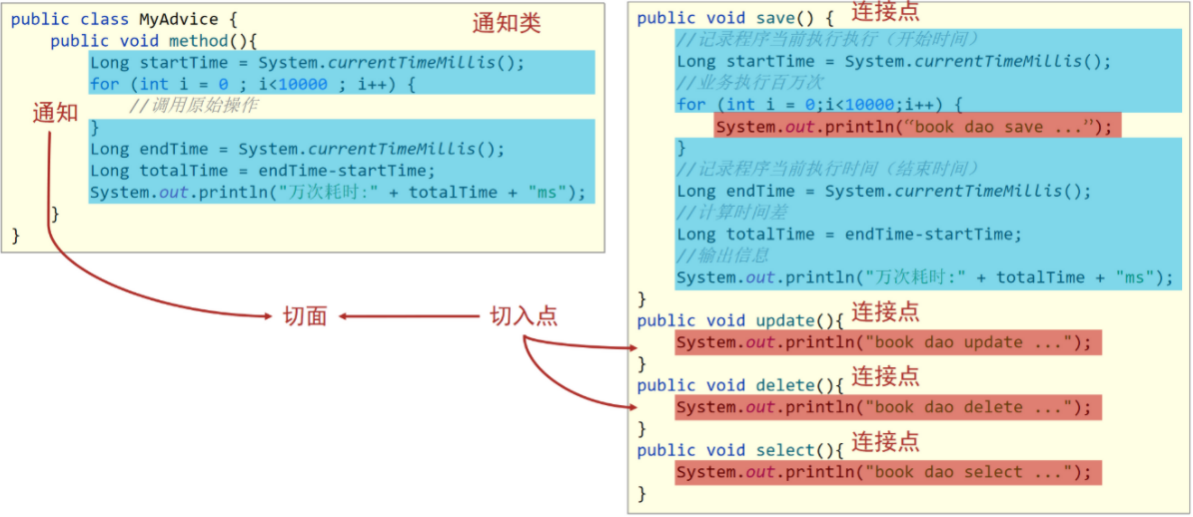
package org.example.dao.impl;

import org.example.dao.BookDao;
import org.springframework.stereotype.Repository;

@Repository
public class BookDaoImpl implements BookDao {


    public void save() {


        //记录程序当前执行执行(开始时间)
        Long startTime = System.currentTimeMillis();
        //业务执行万次
        for (int i = 0;i<10000;i++) {


            System.out.println("book Dao");
        }
        //记录程序当前执行时间(结束时间)
        Long endTime = System.currentTimeMillis();
        //计算时间差
        Long totalTime = endTime-startTime;
        //输出信息
        System.out.println("执行万次消耗时间:" + totalTime + "ms");
    }
    public void update(){


        System.out.println("book dao update ...");
    }
    public void delete(){


        System.out.println("book dao delete ...");
    }
    public void select(){


        System.out.println("book dao select ...");
    }
}
需求:希望对update、delete函数执行和save一样的流程,即执行10000次,然后打印时间差
AOP中的核心概念
-
连接点(JoinPoint):程序执行过程中的任意位置,粒度为执行方法、抛出异常、设置变量等
- 在SpringAOP中,理解为方法的执行
- AOP将每一个方法调用,即连接点作为编程的入口,针对方法调用进行编程
-
切入点(Pointcut):匹配连接点的式子
- 指需要被增强的方法
- 切入点是连接点,但连接点不一定是切入点
-
通知(Advice):在切入点处执行的操作,也就是共性功能
- 如上面的计算万次执行消耗时间作为共性功能,被抽取到一个方法中,这个方法就是通知
- 在SpringAOP中,功能最终以方法的形式呈现
-
通知类:定义通知的类
-
切面(Aspect):描述通知与切入点的对应关系。
- 通知是要增强的内容,会有多个,切入点是需要被增强的方法,也会有多个,通知与切入点的对应关系叫切面
4.2 AOP入门案例
需求:在方法执行前输出当前系统时间。
开发模式:XML 和 注解
步骤:
-
导入坐标(pom.xml)
<!-- spring-context里面包含了aop --> <dependency> <groupId>org.springframework</groupId> <artifactId>spring-context</artifactId> <version>5.2.10.RELEASE</version> </dependency> <!-- aspectjweaver --> <dependency> <groupId>org.aspectj</groupId> <artifactId>aspectjweaver</artifactId> <version>1.9.4</version> </dependency> -
制作连接点(原始操作,Dao接口与实现类)
package org.example.dao;

public interface BookDao {


    public void save();
    public void update();
}
package org.example.dao.impl; @Repository public class BookDaoImpl implements BookDao { public void save(){ System.out.println(System.currentTimeMillis()); System.out.println("book dao save ..."); } public void update(){ System.out.println("book dao update ..."); } } -
制作共性功能(通知类与通知)
新建包aop,新建MyAdvice通知类,printTime即为通知方法
-
定义切入点
切入点即 pt() ,需要注解
@Pointcut注明哪些方法需要被增强 -
绑定切入点与通知关系(切面)
@Before说明切入点与通知的关系 -
配置Spring环境
package org.example.aop;

//6. 配置Spring环境
@Component//需要将其交给Spring管理
@Aspect//告诉Spring当作AOP处理,而非Bean
public class MyAdvice {


    //4. 定义切入点
    @Pointcut("execution(void org.example.dao.BookDao.update())")
    private void pt(){

      }
    //5. 绑定切入点与通知关系(切面)
    @Before("pt()")//在pt()方法前执行
    //3. 制作共性功能(通知类与通知)
    public void printTime(){


        System.out.println(System.currentTimeMillis());
    }
}
package org.example.config; @Configuration @ComponentScan("org.example") @EnableAspectJAutoProxy//开启Spring对AOP注解驱动支持 public class SpringConfig { } -
运行
ApplicationContext ctx = new AnnotationConfigApplicationContext(SpringConfig.class);
BookDao bookDao = ctx.getBean(BookDao.class);
bookDao.update();
@EnableAspectJAutoProxy @Aspect @Pointcut @Before
| 名称 | @EnableAspectJAutoProxy |
|---|---|
| 类型 | 配置类注解 |
| 位置 | 配置类定义上方 |
| 作用 | 开启注解格式AOP功能 |
| 名称 | @Aspect |
|---|---|
| 类型 | 类注解 |
| 位置 | 切面类定义上方 |
| 作用 | 设置当前类为AOP切面类 |
| 名称 | @Pointcut |
|---|---|
| 类型 | 方法注解 |
| 位置 | 切入点方法定义上方 |
| 作用 | 设置切入点方法 |
| 属性 | value(默认):切入点表达式 |
| 名称 | @Before |
|---|---|
| 类型 | 方法注解 |
| 位置 | 通知方法定义上方 |
| 作用 | 设置当前通知方法与切入点之间的绑定关系,当前通知方法在原始切入点方法前运行 |
4.3 AOP原理
AOP工作流程
由于AOP是基于Spring容器管理的bean做的增强,所以整个工作过程需要从Spring加载bean说起
工作流程
-
流程1:Spring容器启动
容器启动就需要去加载bean,带有@Component,@Service ,@Controller 的类都是spring 要创建的bean对象
- 需要被增强的类BookDaoImpl,通知类MyAdvice
- 注意此时bean对象还没有创建成功
-
流程2:读取所有切面配置中的切入点
@Component
@Aspect
public class MyAdvice {


    @Pointcut("execution(void org.example.dao.BookDao.save())")
    private void ptx(){

      }

    @Pointcut("execution(void org.example.dao.BookDao.update())")
    private void pt(){

      }

    @Before("pt()")
    public void printTime(){


        System.out.println(System.currentTimeMillis());
    }
}
有两个切入点,其中切入点
ptx()并没有被使用,所以不会被读取 -
流程3:初始化bean
在容器启动的时候,bean对象还没有被创建成功
在创建bean对象时,需要判定bean对应的类中的方法是否匹配到任意切入点,以BookDao为例- 匹配失败,创建原始对象,即BookDao本身的对象
- 匹配失败,即该类中没有一个方法能匹配上切入点,说明不需要增强,直接调用原始对象的方法即可
- 匹配成功,创建原始对象(
目标对象)的代理对象- 匹配成功说明需要对其进行增强
- 对哪个类做增强,这个类对应的对象就叫做目标对象
- 因为要对目标对象进行功能增强,而采用的技术是
动态代理,所以会为其创建一个代理对象 - 最终运行的是代理对象的方法,在该方法中会对原始方法进行功能增强
- 匹配失败,创建原始对象,即BookDao本身的对象
-
流程4:获取bean并执行方法
- 获取的bean是原始对象时,调用方法并执行,完成操作
- 获取的bean是代理对象时,根据代理对象的运行模式运行原始方法与增强的内容,完成操作
验证代理
System.out.println(bookDao);
System.out.println(bookDao.getClass());
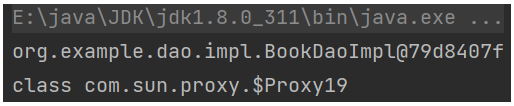
打印bookDao时,由于代理里面重写了toString,所以看到的是BookDaoImpl
打印Class就可以看到,最终生成的是目标对象的代理对象
AOP核心概念 - 代理
- 目标对象(Target):原始功能去掉共性功能对应的类产生的对象,这种对象是无法直接完成最终工作的
- 代理(Proxy):目标对象无法直接完成工作,需要对其进行功能回填,通过原始对象的代理对象实现
SpringAOP是在不改变原有设计(代码)的前提下对其进行增强的,它的底层采用的是代理模式实现的,所以要对原始对象进行增强,就需要对原始对象创建代理对象,在代理对象中的方法把通知[如:MyAdvice中的method方法]内容加进去,就实现了增强,这就是我们所说的代理(Proxy)。
SpringAOP的本质或者可以说底层实现是通过代理模式
4.4 AOP切入点表达式
切入点:要进行增强的方法
切入点表达式:要进行增强的方法的描述方式
-
接口描述
execution(void org.example.dao.BookDao.update()) -
实现类描述
execution(void org.example.dao.impl.BookDaoImpl.update())
因为调用接口方法的时候最终运行的还是其实现类的方法,所以上面两种描述方式都是可以的
切入点表达式标准格式
动作关键字(访问修饰符 返回值 包名.类/接口名.方法名(参数) 异常名)
execution(public User org.example.service.UserService.findById(int))
切入点通配符
-
*:单个独立的任意符号,可以独立出现,也可以作为前缀或者后缀的匹配符出现execution(public * org.example.*.UserService.find*(*))匹配org.example包下的任意包中的UserService类或接口中所有find开头的带有一个参数的方法
-
..:多个连续的任意符号,可以独立出现,常用于简化包名与参数的书写execution(public User org..UserService.findById(..))匹配org包下的任意包中的UserService类或接口中所有名称为findById的方法
-
+:专用于匹配子类类型execution(* *..*Service+.*(..))很少使用。*Service+,表示所有以Service结尾的接口的子类。
切入点表达式练习
//匹配接口,能匹配到
execution(void org.example.dao.BookDao.update())
//匹配实现类,能匹配到
execution(void org.example.dao.impl.BookDaoImpl.update())
//返回值任意,能匹配到
execution(* org.example.dao.impl.BookDaoImpl.update())
//返回值任意,但是update方法必须要有一个参数,无法匹配,要想匹配需要在update接口和实现类添加参数
execution(* org.example.dao.impl.BookDaoImpl.update(*))
//返回值为void,org包下的任意包三层包下的任意类的update方法,匹配到的是实现类,能匹配
execution(void org.*.*.*.*.update())
//返回值为void,org包下的任意两层包下的任意类的update方法,匹配到的是接口,能匹配
execution(void org.*.*.*.update())
//返回值为void,方法名是update的任意包下的任意类,能匹配
execution(void *..update())
//匹配项目中任意类的任意方法,能匹配,但是不建议使用这种方式,影响范围广
execution(* *..*(..))
//匹配项目中任意包任意类下只要以u开头的方法,update方法能满足,能匹配
execution(* *..u*(..))
//匹配项目中任意包任意类下只要以e结尾的方法,update和save方法能满足,能匹配
execution(* *..*e(..))
//返回值为void,org包下的任意包任意类任意方法,能匹配,*代表的是方法(这个代表方法的*不能省略)
execution(void org..*())
//将项目中所有业务层方法的以find开头的方法匹配
execution(* org.example.*.*Service.find*(..))
//将项目中所有业务层方法的以save开头的方法匹配
execution(* org.example.*.*Service.save*(..))
书写技巧
- 所有代码按照标准规范开发
- 描述切入点
通常描述接口,而不描述实现类,如果描述到实现类,就出现紧耦合了 - 访问控制修饰符针对
接口开发均采用public描述(可省略访问控制修饰符描述) - 返回值类型对于
增删改类使用精准类型加速匹配,对于查询类使用*通配快速描述 包名书写尽量不使用..匹配,效率过低,常用*做单个包描述匹配,或精准匹配接口名/类名书写名称与模块相关的采用*匹配,例如UserService书写成*Service,绑定业务层接口名方法名书写以动词进行精准匹配,名词采用*匹配,例如getById书写成getBy*,selectAll书写成selectAll- 参数规则较为复杂,根据业务方法灵活调整
- 通常
不使用异常作为匹配规则
4.5 AOP通知类型
5种通知类型
-
前置通知
@Before("pt()") -
后置通知
@After("pt()") -
环绕通知(重点)
package org.example.aop;

@Component
@Aspect
public class MyAdvice {


    @Pointcut("execution(void org.example.dao.BookDao.update())")
    private void pt(){

      }

    @Around("pt()")
    public void aroundSelect(ProceedingJoinPoint pjp) throws Throwable {


        //前置
        System.out.println("before advice");
        //原始操作
        pjp.proceed();
        //后置
        System.out.println("after advice");
    }
}
有返回值的情况
package org.example.aop; @Component @Aspect public class MyAdvice { @Pointcut("execution(int org.example.dao.BookDao.select())") private void pt(){ } @Around("pt()") public Object aroundUpdate(ProceedingJoinPoint pjp) throws Throwable { //前置 System.out.println("before advice"); //原始操作 Object ret = pjp.proceed(); //后置 System.out.println("after advice"); return ret; } } -
返回后通知(了解)
@AfterReturning("pt()")返回后通知是需要在原始方法
select正常执行后才会被执行,如果过程中出现了异常,那么返回后通知是不会被执行
后置通知是不管原始方法有没有抛出异常都会被执行 -
抛出异常后通知(了解)
@AfterThrowing("pt()")如果有异常才会执行
注意事项
- 环绕通知必须依赖形参
ProceedingJoinPoint才能实现对原始方法的调用 - 对原始方法的调用可以不接收返回值,通知方法设置成void即可,如果接收
返回值,最好设定为Object类型 - 由于无法预知原始方法运行后是否会抛出异常,因此环绕通知方法必须要处理
Throwable异常
4.6 案例:业务层接口执行效率
需求:任意业务层接口执行均可显示其执行效率(执行时长)
环境准备:使用前面整合MyBatis和Junit之后的项目
-
添加pom.xml依赖
<!-- spring-context --> <dependency> <groupId>org.springframework</groupId> <artifactId>spring-context</artifactId> <version>5.2.10.RELEASE</version> </dependency> <!-- aspectjweaver --> <dependency> <groupId>org.aspectj</groupId> <artifactId>aspectjweaver</artifactId> <version>1.9.4</version> </dependency> -
配置SpringConfig环境
package org.example.config; @Configuration @ComponentScan("org.example") @PropertySource("classpath:jdbc.properties") @Import({ JdbcConfig.class, MybatisConfig.class}) @EnableAspectJAutoProxy public class SpringConfig { } -
创建通知类 org.example.aop.ProjectAdvice
-
编写通知方法
package org.example.aop; @Component @Aspect public class ProjectAdvice { //1. 切入点:匹配业务层的所有方法 @Pointcut("execution(* org.example.service.*Service.*(..))") private void servicePt(){ } //2. 环绕方法 @Around("ProjectAdvice.servicePt()") public void runSpeed(ProceedingJoinPoint pjp) throws Throwable{ //ProceedingJoinPoint:连接点,携带原始方法信息 Signature signature = pjp.getSignature(); String className = signature.getDeclaringTypeName(); String methodName = signature.getName(); //前置:获取开始时间 long start = System.currentTimeMillis(); for(int i=0; i<10000; ++i){ //调用原始方法 Object ret = pjp.proceed(); } //后置:获取结束时间 long end = System.currentTimeMillis(); System.out.println("万次执行:"+className+"."+methodName+" 时间为:"+(end-start)+"ms"); } } -
测试类
package org.example.service;

@RunWith(SpringJUnit4ClassRunner.class)//设定类运行器
@ContextConfiguration(classes = SpringConfig.class)
public class AccountServiceTest {


    @Autowired
    private  AccountService accountService;

    @Test
    public void testFindById(){


        accountService.findById(2);
    }

    @Test
    public void testFindAll(){


        accountService.findAll();
    }
}
4.7 AOP通知获取数据
- 获取切入点方法的
参数,所有的通知类型都可以获取参数- JoinPoint:适用于前置、后置、返回后、抛出异常后通知
- ProceedingJoinPoint:适用于环绕通知
- 获取切入点方法
返回值,前置和抛出异常后通知是没有返回值,后置通知可有可无,所以不做研究- 返回后通知
- 环绕通知
- 获取切入点方法运行
异常信息,前置和返回后通知是不会有,后置通知可有可无,所以不做研究- 抛出异常后通知
- 环绕通知
获取参数
package org.example.aop;

@Component
@Aspect
public class MyAdvice {


    @Pointcut("execution(* org.example.dao.BookDao.findName(..))")
    private void pt(){

    }

    @Before("pt()")
    public void before(JoinPoint jp){


        Object[] args = jp.getArgs();
    }
    @After("pt()")
    public void after(JoinPoint jp){


        Object[] args = jp.getArgs();
    }

    @Around("pt()")
    public Object around(ProceedingJoinPoint pjp) throws Throwable{


        Object[] args = pjp.getArgs();
        args[0] = 666;//可以中途修改参数
        Object ret = pjp.proceed(args);
        return ret;
    }
}
环绕方法可以修改传递过来的参数,有时可以用作对参数清洗
返回值
@AfterReturning(value = "pt()", returning = "ret")
public void afterReturning(JoinPoint jp, Object ret){

    //注意如果有JoinPoint参数,它必须得在第一位
    System.out.println("afterReturning advice ..."+ret);//ret即为返回值
}
获取异常
@AfterThrowing(value = "pt()", throwing = "t")
public void afterThrowing(Throwable t){


    System.out.println("afterThrowing advice .."+t);
}
5. AOP事务管理
5.1 Spring事务简介
- 事务作用:在数据层保障一系列的数据库操作同成功同失败
- Spring事务作用:在数据层或业务层保障一系列的数据库操作同成功同失败
Spring为了管理事务,提供了一个平台事务管理器PlatformTransactionManager

commit是用来提交事务,rollback是用来回滚事务
PlatformTransactionManager只是一个接口,Spring还为其提供了一个具体的实现

只需要给它一个DataSource对象,它就可以帮你去在业务层管理事务。其内部采用的是JDBC的事务
所以如果你持久层采用的是JDBC相关的技术,就可以采用这个事务管理器来管理事务。而Mybatis内部采用的就是JDBC的事务,所以后期Spring整合Mybatis就采用的这个DataSourceTransactionManager事务管理器。
5.2 Spring事务案例
无事务管理情况
需求: 实现任意两个账户间转账操作,A账户减钱和B账户加钱必须是同成功或同失败
准备工作:第2节中整合MyBatis中的spring-mybatis项目
步骤1:准备数据库表
含有 id name money 三个属性的数据库表
步骤2:创建项目导入jar包
步骤3:根据表创建模型类
即Account类
步骤4:创建Dao接口
在AccountDao.java中加入
@Update("update tbl_account set money = money + #{money} where name = #{name}")
void inMoney(@Param("name") String name, @Param("money") Double money);

@Update("update tbl_account set money = money - #{money} where name = #{name}")
void outMoney(@Param("name") String name, @Param("money") Double money);
步骤5:编写Service接口和实现类
package org.example.service;

public interface AccountService {


    /**
     * 转账
     * @param out:转出账户
     * @param in:转入账户
     * @param money:转账金额
     */
    public void transfer(String out, String in, Double money);
}
package org.example.service.impl;

@Service
public class AccountServiceImpl implements AccountService {


    //自动注入accountDao
    @Autowired
    @Qualifier("accountDao")
    private AccountDao accountDao;

    @Override
    public void transfer(String out, String in, Double money) {


        accountDao.outMoney(out, money);
        accountDao.inMoney(in, money);
    }
}
步骤6:编写配置类
SpringConfig,JdbcConfig,MybatisConfig,jdbc.properties
步骤7:编写测试类
package org.example.service;

@RunWith(SpringJUnit4ClassRunner.class)
@ContextConfiguration(classes = SpringConfig.class)
public class AccountServiceTest {


    @Autowired
    private  AccountService accountService;

    @Test
    public void testTransfer() throws IOException{


        accountService.transfer("zhangsan", "lisi", 100D);
    }
}
问题
当增加和修改两个操作中间出现异常时,会出现一个账户减少了,而另一个账户却没增加的错误!,如:
public void transfer(String out, String in, Double money) {


    accountDao.outMoney(out, money);
    int i = 1/0;
    accountDao.inMoney(in, money);
}
开启事务处理
步骤1:添加@Transactional注解
可以写在接口类上、接口方法上、实现类上和实现类方法上
- 写在接口类上,该接口的所有实现类的所有方法都会有事务
- 写在接口方法上,该接口的所有实现类的该方法都会有事务
- 写在实现类上,该类中的所有方法都会有事务
- 写在实现类方法上,该方法上有事务
- 常写在方法前
package org.example.service;

public interface AccountService {


    @Transactional
    public void transfer(String out, String in, Double money);
}
步骤2:在JdbcConfig类中配置事务管理器
package org.example.config;

public class JdbcConfig {


    @Value("${jdbc.driver}")//自动注入
    private String driver;
    @Value("${jdbc.url}")
    private String url;
    @Value("${jdbc.username}")
    private String username;
    @Value("${jdbc.password}")
    private String password;

    @Bean
    public DataSource dataSource(){


        DruidDataSource ds = new DruidDataSource();
        ds.setDriverClassName(driver);
        ds.setUrl(url);
        ds.setUsername(username);
        ds.setPassword(password);
        return ds;
    }

    @Bean
    public PlatformTransactionManager transactionManager(DataSource dataSource){

    //自动注入dataSource
        DataSourceTransactionManager transactionManager = new DataSourceTransactionManager();
        transactionManager.setDataSource(dataSource);
        return transactionManager;
    }
}
事务管理器要根据使用技术进行选择,Mybatis框架使用的是JDBC事务,可以直接使用DataSourceTransactionManager
步骤3:在SpringConfig中开启事务注解
package org.example.config;

import org.springframework.context.annotation.*;
import org.springframework.transaction.annotation.EnableTransactionManagement;

@Configuration
@ComponentScan("org.example")
@PropertySource("classpath:jdbc.properties")
@Import({

    JdbcConfig.class, MybatisConfig.class})
//开启注解式事务驱动
@EnableTransactionManagement
public class SpringConfig {


}
至此即可实现transfer函数的同成功或同失败
5.3 Spring事务角色
-
事务管理员:发起事务方,在Spring中通常指代业务层开启事务的方法,如
transfer() -
事务协调员:加入事务方,在Spring中通常指代数据层方法,也可以是业务层方法,如
outMoney()和inMoney
- 未开启Spring事务之前
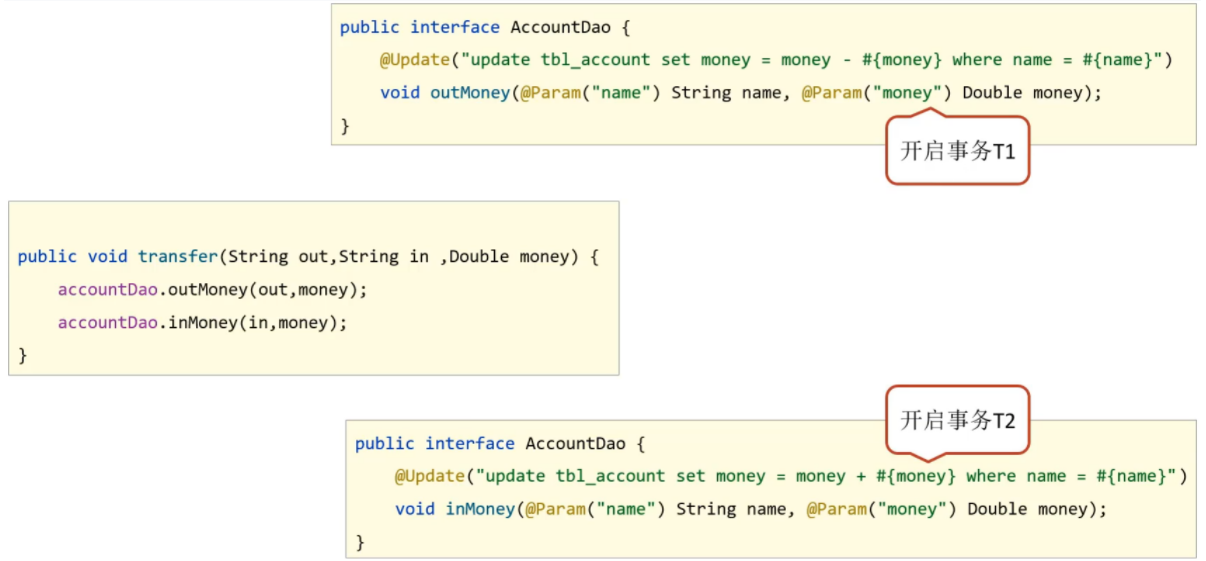
- AccountDao的outMoney因为是修改操作,会开启一个事务T1
- AccountDao的inMoney因为是修改操作,会开启一个事务T2
- AccountService的transfer没有事务,
- 运行过程中如果没有抛出异常,则T1和T2都正常提交,数据正确
- 如果在两个方法中间抛出异常,T1因为执行成功提交事务,T2因为抛异常不会被执行
- 就会导致数据出现错误
- 开启Spring的事务管理后
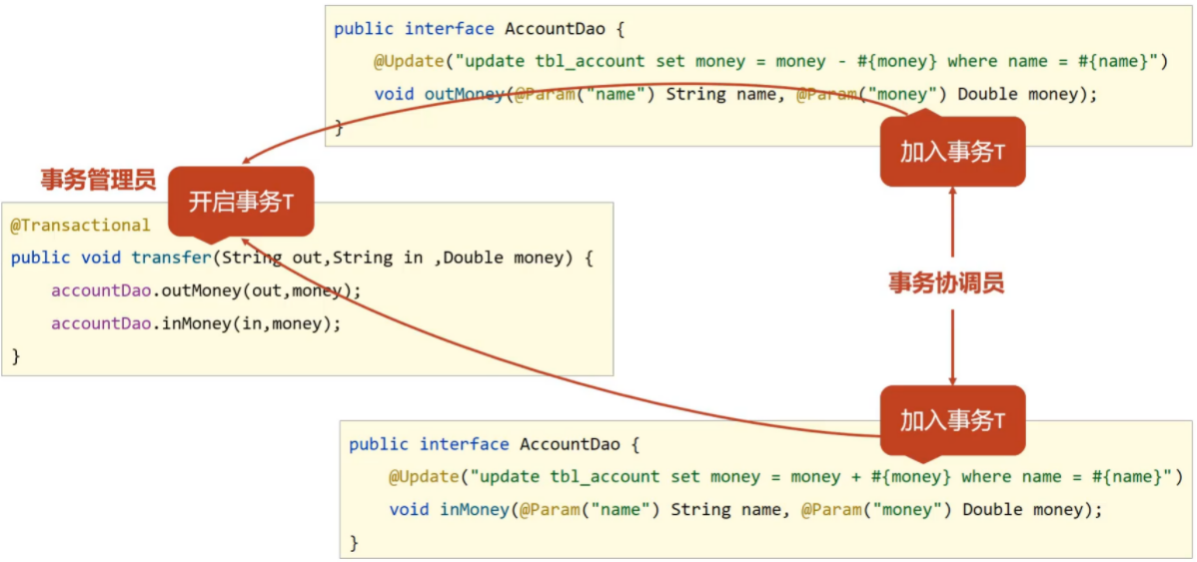
- transfer上添加了@Transactional注解,在该方法上就会有一个事务T
- AccountDao的outMoney方法的事务T1加入到transfer的事务T中
- AccountDao的inMoney方法的事务T2加入到transfer的事务T中
- 这样就保证他们在同一个事务中,当业务层中出现异常,整个事务就会回滚,保证数据的准确性。
目前的事务管理是基于DataSourceTransactionManager和SqlSessionFactoryBean使用的是同一个数据源
5.4 Spring事务属性
事务配置

@Transactional(readOnly = true, timeout = -1)
-
rollbackFor(重点)
当transfer()的代码如下时,先前的事务管理失效,仍然导致一方改变了,而另一方未改变
@Override
public void transfer(String out, String in, Double money) throws IOException {


    accountDao.outMoney(out, money);
    if(true) throw new IOException();
    accountDao.inMoney(in, money);
}
原因:Spring的事务只会对
Error异常和RuntimeException异常及其子类进行事务回滚,其他的异常类型是不会回滚的,对应IOException不符合上述条件所以不回滚修改:设置
rollbackFor@Transactional(rollbackFor = { IOException.class}) public void transfer(String out, String in, Double money) throws IOException; -
readOnly:true只读事务,false读写事务,增删改要设为false,查询设为true。
-
timeout:设置超时时间单位秒,在多长时间之内事务没有提交成功就自动回滚,-1表示不设置超时时间。
-
noRollbackFor:当出现指定异常不进行事务回滚
-
rollbackForClassName:等同于rollbackFor,只不过属性为异常的类全名字符串
-
noRollbackForClassName:等同于noRollbackFor,只不过属性为异常的类全名字符串
-
isolation设置事务的隔离级别(见MySQL数据库相关知识)
- DEFAULT:默认隔离级别, 会采用数据库的隔离级别
- READ_UNCOMMITTED : 读未提交
- READ_COMMITTED : 读已提交
- REPEATABLE_READ : 重复读取
- SERIALIZABLE: 串行化
案例:转账业务追加案例
需求:无论转账操作是否成功,均进行转账操作的日志留痕
准备工作:基于前面5.2节的案例
步骤1:添加数据库表
create table tbl_log(
   id int primary key auto_increment,
   info varchar(255),
   createDate datetime
)
步骤2:添加LogDao接口
package org.example.dao;

@Repository
public interface LogDao {


    @Insert("insert into tbl_log (info, createDate) values (#{info}, now())")
    void log(String info);
}
步骤3:添加LogService接口与实现类
package org.example.service;

public interface LogService {


    @Transactional
    public void log(String out, String in, Double money);
}
package org.example.service.impl;

@Service
public class LogServiceImpl implements LogService {


    @Autowired
    private LogDao logDao;
    @Override
    public void log(String out, String in, Double money) {


        logDao.log("转账操作由"+out+"到"+in+",金额:"+money);
    }
}
步骤4:在转账的业务中添加记录日志
package org.example.service;

public interface AccountService {


    @Transactional
    public void transfer(String out, String in, Double money);
}
package org.example.service.impl;

@Service
public class AccountServiceImpl implements AccountService {


    @Autowired
    @Qualifier("accountDao")
    private AccountDao accountDao;
    @Autowired
    private LogService logService;

    @Override
    public void transfer(String out, String in, Double money) {


        try {


            accountDao.outMoney(out, money);
            int i = 1/0;
            accountDao.inMoney(in, money);
        } finally {


            logService.log(out, in, money);
        }
    }
}
注意:结果如果报异常,记录不会被写入tbl_log表中去,
因为此时日志记录和转账操作隶属于一个事务,同成功同失败,那么转账被回滚了失败了,日志记录自然也失败了
但是需求是:无论转账是否成功,都记录日志
此时需要:转账的两个操作inMoney和outMoney加入到transfer事务中,但记录日志的log操作单独启动一个事务
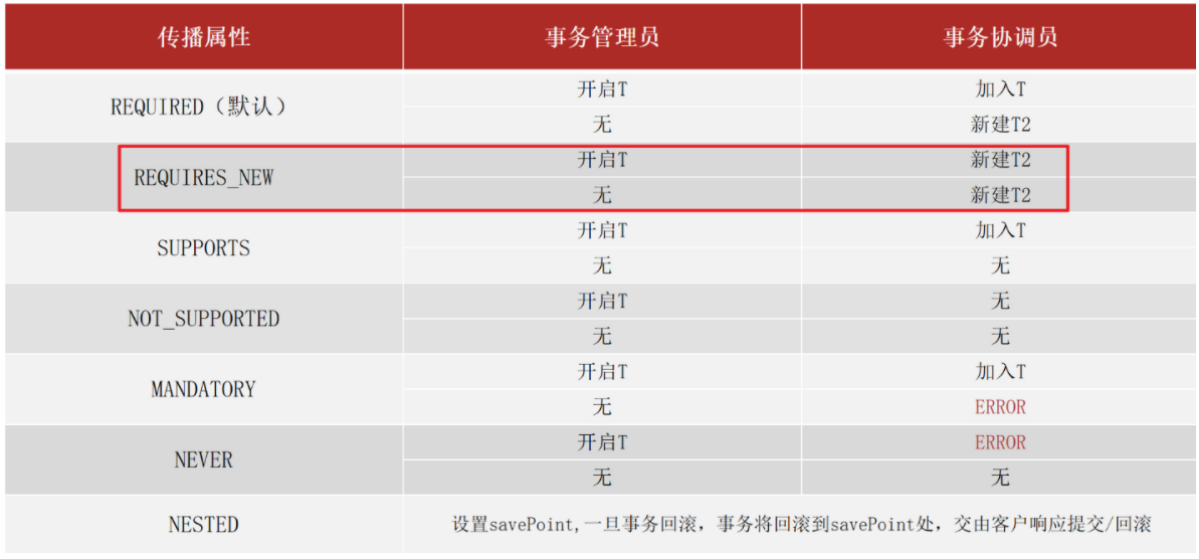
事务传播行为
修改日志的事务属性:propagation
package org.example.service;

public interface LogService {


    @Transactional(propagation = Propagation.REQUIRES_NEW)//开启新事物
    public void log(String out, String in, Double money);
}
package org.example.service.impl;

@Service
public class LogServiceImpl implements LogService {


    @Autowired
    private LogDao logDao;

    @Override
    public void log(String out, String in, Double money) {


        logDao.log("转账操作由"+out+"到"+in+",金额:"+money);
    }
}
此时即可实现失败转账操作回滚,但日志仍被记录