布局是一个App非常关键的一部分,布局性能的好坏可直接影响到用户的体验;试想下如果一个
RecyclerView滑动时异常卡顿,那用户估计也没有心情去住下滑了,可能就直接强制杀掉App了去,然后回过头去应用商店给个差评 “卡的不要不要的”
虽然现在手机内存、CPU等各项性能都上来了看起来很强,实际上还是卡的不行,所以我们还是要多学习下这方面的知识

布局优化
减少布局层级
● 布局层级越高越复杂消耗性能就越大,所以在设计布局时尽量缩小布局层级数
viewgroup性能
● 常用的像LinearLayout、FrameLayout、RelativeLayout等,其中RelativeLayout消耗性能最多,所以这里能使用LinearLayout或FrameLayout的时候尽量使用这两种
● 如果2种都需要同时使用,则RelativeLayout性能会好于两种结合的布局形式
总结起来就是:
● LinearLayout = FrameLayout < RelativeLayout
● LinearLayout + FrameLayout > RelativeLayout
标签用法
● 在xml布局中,可以使用标签也可以优化布局,比如,, 以及viewstub的使用等
为什么要进行布局优化?
如果布局嵌套过深,或者其他原因导致布局渲染性能不佳,可能会导致应用卡顿
绘制优化
ondraw方法避免耗时
● 在ondraw方法中不要使用new等创建对象操作,ondraw方法会执行多次,因此会导致多次重复创建对象,占用系统资源
● 在ondraw中不要进行耗时操作,如ondraw方法名,此方法用于绘制,其他耗时操作可在其他方法中进行
PS:流畅的绘制为60fps,也就是在ondraw方法中每帧绘制不超过大概16ms左右
Android绘制原理
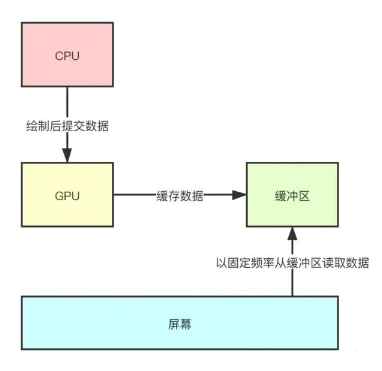
Android的屏幕刷新中涉及到最重要的三个概念
● CPU: 执行应用层的measure、layout、draw等操作,绘制完成后将数据提交给GPU
● GPU: 进一步处理数据,并将数据缓存起来
● 屏幕: 由一个个像素点组成,以固定的频率(16.6ms,即1秒60帧)从缓冲区中取出数据来填充像素点
总结一句话就是:CPU 绘制后提交数据、GPU 进一步处理和缓存数据、最后屏幕从缓冲区中读取数据并显示
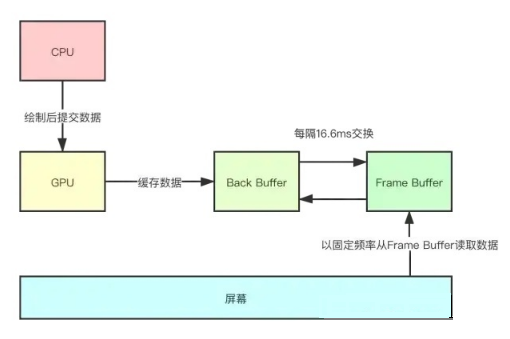
双缓冲机制
看完上面的流程图,我们很容易想到一个问题,屏幕是以16.6ms的固定频率进行刷新的,但是我们应用层触发绘制的时机是完全随机的(比如我们随时都可以触摸屏幕触发绘制)
如果在GPU向缓冲区写入数据的同时,屏幕也在向缓冲区读取数据,会发生什么情况呢?
● 有可能屏幕上就会出现一部分是前一帧的画面,一部分是另一帧的画面,这显然是无法接受的,那怎么解决这个问题呢?
● 所以,在屏幕刷新中,Android系统引入了双缓冲机制
GPU只向Back Buffer中写入绘制数据,且GPU会定期交换Back Buffer和Frame Buffer,交换的频率也是60次/秒,这就与屏幕的刷新频率保持了同步
虽然我们引入了双缓冲机制,但是我们知道,当布局比较复杂,或设备性能较差的时候,CPU并不能保证在16.6ms内就完成绘制数据的计算,所以这里系统又做了一个处理
● 当你的应用正在往Back Buffer中填充数据时,系统会将Back Buffer锁定
● 如果到了GPU交换两个Buffer的时间点,你的应用还在往Back Buffer中填充数据,GPU会发现Back Buffer被锁定了,它会放弃这次交换
这样做的后果就是手机屏幕仍然显示原先的图像,这就是我们常常说的掉帧
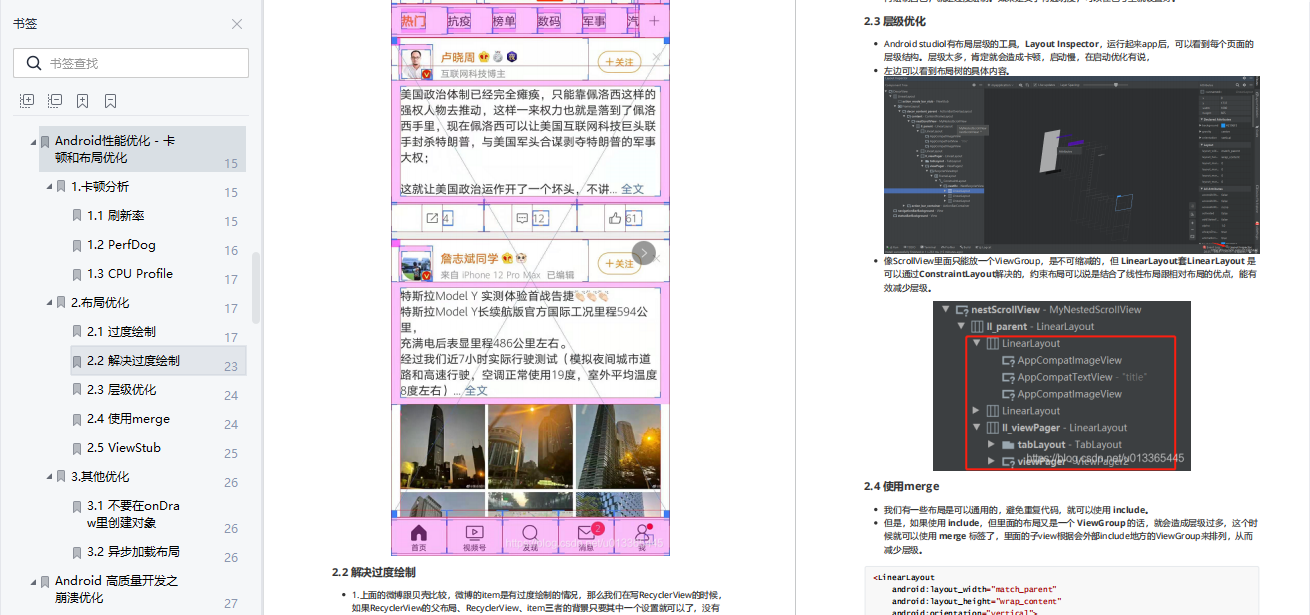
布局层级优化方式
使用ConstraintLayout减少布局嵌套,层级不要太深,使用merge标签等
减少主线程布局创建时间的方式:
● 使用AsynclayoutInflater异步创建布局,这种方式是把耗时操作放到了子线程,但是会缺少TextView -> AppCompatTextView等兼容效果
● 使用纯代码的方式编写布局,new View(context),复杂、繁琐,不好维护
● 使用第三方库如X2C等,使用xml编写布局,在编译时转成Java代码,这种方式同样缺少TextView -> AppCompatTextView等兼容效果,且有些xml属性不支持
● 使用Jetpack Compose,声明式UI,应该是未来的趋势了
● 减少过度绘制
● 减少不必要的背景设置,减少复杂shape等
自定义View的时候,使用Canvas的clipRect方法避免绘制被遮盖的内容
布局加载原理
由上面可知,导致掉帧的原因是CPU无法在16.6ms内完成绘制数据的计算;而之所以布局加载可能会导致掉帧,正是因为它在主线程上进行了耗时操作,可能导致CPU无法按时完成数据计算
布局加载主要通过setContentView来实现
● 在setContentView中主要有两个耗时操作
● 解析xml,获取XmlResourceParser,这是IO过程
● 通过createViewFromTag,创建View对象,用到了反射
以上两点就是布局加载可能导致卡顿的原因,也是布局的性能瓶颈
获取布局文件加载耗时的方法
我们如果需要优化布局卡顿问题,首先最重要的就是:确定定量标准 所以我们首先介绍几种获取布局文件加载耗时的方法
布局加载慢的主要原因有两个,一个是IO,一个是反射 所以我们的优化思路一般有两个
● 侧面缓解(异步加载)
● 根本解决(不需要IO,反射过程,如X2C,Anko,Compose等)
方案实操
AsyncLayoutInflater方案
AsyncLayoutInflater 是来帮助做异步加载 layout 的,inflate(int, ViewGroup, OnInflateFinishedListener) 方法运行结束之后 OnInflateFinishedListener 会在主线程回调返回 View;这样做旨在 UI 的懒加载或者对用户操作的高响应
● 简单的说我们知道默认情况下 setContentView 函数是在 UI 线程执行的,其中有一系列的耗时动作:Xml的解析、View的反射创建等过程同样是在UI线程执行的
● AsyncLayoutInflater 就是来帮我们把这些过程以异步的方式执行,保持UI线程的高响应
使用如下:
<pre spellcheck="false" class="md-fences md-end-block ty-contain-cm modeLoaded" lang="" cid="n381" mdtype="fences" style="box-sizing: border-box; overflow: visible; font-family: var(--monospace); font-size: 0.9em; display: block; break-inside: avoid; text-align: left; white-space: normal; background-image: inherit; background-position: inherit; background-size: inherit; background-repeat: inherit; background-attachment: inherit; background-origin: inherit; background-clip: inherit; background-color: rgb(248, 248, 248); position: relative !important; border: 1px solid rgb(231, 234, 237); border-radius: 3px; padding: 8px 4px 6px; margin-bottom: 15px; margin-top: 15px; width: inherit; color: rgb(51, 51, 51); font-style: normal; font-variant-ligatures: normal; font-variant-caps: normal; font-weight: 400; letter-spacing: normal; orphans: 2; text-indent: 0px; text-transform: none; widows: 2; word-spacing: 0px; -webkit-text-stroke-width: 0px; text-decoration-style: initial; text-decoration-color: initial;">@Override
protected void onCreate(@Nullable Bundle savedInstanceState) {


 super.onCreate(savedInstanceState);
 new AsyncLayoutInflater(AsyncLayoutActivity.this)
 .inflate(R.layout.async_layout, null, new AsyncLayoutInflater.OnInflateFinishedListener() {


 @Override
 public void onInflateFinished(View view, int resid, ViewGroup parent) {


 setContentView(view);
 }
 });
 // 别的操作
}</pre>
这样做的优点在于将UI加载过程迁移到了子线程,保证了UI线程的高响应 缺点在于牺牲了易用性,同时如果在初始化过程中调用了UI可能会导致崩溃
X2C方案
X2C是掌阅开源的一套布局加载框架 它的主要是思路是在编译期,将需要翻译的layout翻译生成对应的java文件,这样对于开发人员来说写布局还是写原来的xml,但对于程序来说,运行时加载的是对应的java文件;这就将运行时的开销转移到了编译时;如下所示
原始xml文件:
<pre spellcheck="false" class="md-fences md-end-block ty-contain-cm modeLoaded" lang="" cid="n386" mdtype="fences" style="box-sizing: border-box; overflow: visible; font-family: var(--monospace); font-size: 0.9em; display: block; break-inside: avoid; text-align: left; white-space: normal; background-image: inherit; background-position: inherit; background-size: inherit; background-repeat: inherit; background-attachment: inherit; background-origin: inherit; background-clip: inherit; background-color: rgb(248, 248, 248); position: relative !important; border: 1px solid rgb(231, 234, 237); border-radius: 3px; padding: 8px 4px 6px; margin-bottom: 15px; margin-top: 15px; width: inherit; color: rgb(51, 51, 51); font-style: normal; font-variant-ligatures: normal; font-variant-caps: normal; font-weight: 400; letter-spacing: normal; orphans: 2; text-indent: 0px; text-transform: none; widows: 2; word-spacing: 0px; -webkit-text-stroke-width: 0px; text-decoration-style: initial; text-decoration-color: initial;"><?xml version="1.0" encoding="utf-8"?>
<RelativeLayout xmlns:android="http://schemas.android.com/apk/res/android"
 xmlns:app="http://schemas.android.com/apk/res-auto"
 xmlns:tools="http://schemas.android.com/tools"
 android:layout_width="match_parent"
 android:layout_height="match_parent"
 android:paddingLeft="10dp">

 <include
 android:id="@+id/head"
 layout="@layout/head"
 android:layout_width="wrap_content"
 android:layout_height="wrap_content"
 android:layout_centerHorizontal="true" />

 <ImageView
 android:id="@+id/ccc"
 style="@style/bb"
 android:layout_below="@id/head" />
</RelativeLayout>

</pre>
X2C 生成的 Java 文件
<pre spellcheck="false" class="md-fences md-end-block ty-contain-cm modeLoaded" lang="" cid="n388" mdtype="fences" style="box-sizing: border-box; overflow: visible; font-family: var(--monospace); font-size: 0.9em; display: block; break-inside: avoid; text-align: left; white-space: normal; background-image: inherit; background-position: inherit; background-size: inherit; background-repeat: inherit; background-attachment: inherit; background-origin: inherit; background-clip: inherit; background-color: rgb(248, 248, 248); position: relative !important; border: 1px solid rgb(231, 234, 237); border-radius: 3px; padding: 8px 4px 6px; margin-bottom: 15px; margin-top: 15px; width: inherit; color: rgb(51, 51, 51); font-style: normal; font-variant-ligatures: normal; font-variant-caps: normal; font-weight: 400; letter-spacing: normal; orphans: 2; text-indent: 0px; text-transform: none; widows: 2; word-spacing: 0px; -webkit-text-stroke-width: 0px; text-decoration-style: initial; text-decoration-color: initial;">public class X2C_2131296281_Activity_Main implements IViewCreator {


 @Override
 public View createView(Context ctx, int layoutId) {


 Resources res = ctx.getResources();

 RelativeLayout relativeLayout0 = new RelativeLayout(ctx);
 relativeLayout0.setPadding((int)(TypedValue.applyDimension(TypedValue.COMPLEX_UNIT_DIP,10,res.getDisplayMetrics())),0,0,0);

 View view1 =(View) new X2C_2131296283_Head().createView(ctx,0);
 RelativeLayout.LayoutParams layoutParam1 = new RelativeLayout.LayoutParams(ViewGroup.LayoutParams.WRAP_CONTENT,ViewGroup.LayoutParams.WRAP_CONTENT);
 view1.setLayoutParams(layoutParam1);
 relativeLayout0.addView(view1);
 view1.setId(R.id.head);
 layoutParam1.addRule(RelativeLayout.CENTER_HORIZONTAL,RelativeLayout.TRUE);

 ImageView imageView2 = new ImageView(ctx);
 RelativeLayout.LayoutParams layoutParam2 = new RelativeLayout.LayoutParams(ViewGroup.LayoutParams.MATCH_PARENT,(int)(TypedValue.applyDimension(TypedValue.COMPLEX_UNIT_DIP,1,res.getDisplayMetrics())));
 imageView2.setLayoutParams(layoutParam2);
 relativeLayout0.addView(imageView2);
 imageView2.setId(R.id.ccc);
 layoutParam2.addRule(RelativeLayout.BELOW,R.id.head);

 return relativeLayout0;
 }
}

</pre>
使用时如下所示,使用X2C.setContentView替代原始的setContentView即可
<pre spellcheck="false" class="md-fences md-end-block ty-contain-cm modeLoaded" lang="" cid="n390" mdtype="fences" style="box-sizing: border-box; overflow: visible; font-family: var(--monospace); font-size: 0.9em; display: block; break-inside: avoid; text-align: left; white-space: normal; background-image: inherit; background-position: inherit; background-size: inherit; background-repeat: inherit; background-attachment: inherit; background-origin: inherit; background-clip: inherit; background-color: rgb(248, 248, 248); position: relative !important; border: 1px solid rgb(231, 234, 237); border-radius: 3px; padding: 8px 4px 6px; margin-bottom: 15px; margin-top: 15px; width: inherit; color: rgb(51, 51, 51); font-style: normal; font-variant-ligatures: normal; font-variant-caps: normal; font-weight: 400; letter-spacing: normal; orphans: 2; text-indent: 0px; text-transform: none; widows: 2; word-spacing: 0px; -webkit-text-stroke-width: 0px; text-decoration-style: initial; text-decoration-color: initial;">// this.setContentView(R.layout.activity_main);
X2C.setContentView(this, R.layout.activity_main);
</pre>
X2C优点
● 在保留xml的同时,又解决了它带来的性能问题
● 据X2C统计,加载耗时可以缩小到原来的1/3
X2C问题
● 部分属性不能通过代码设置,Java不兼容
● 将加载时间转移到了编译期,增加了编译期耗时
● 不支持kotlin-android-extensions插件,牺牲了部分易用性
尾述
如果你对于性能问题不能由点及面逆向分析,最终找到瓶颈点和优化方法,那么必须要跟着正确的路线学习!
所以在这里分享一张由大佬收集整理的 Android 性能优化学习思维导图
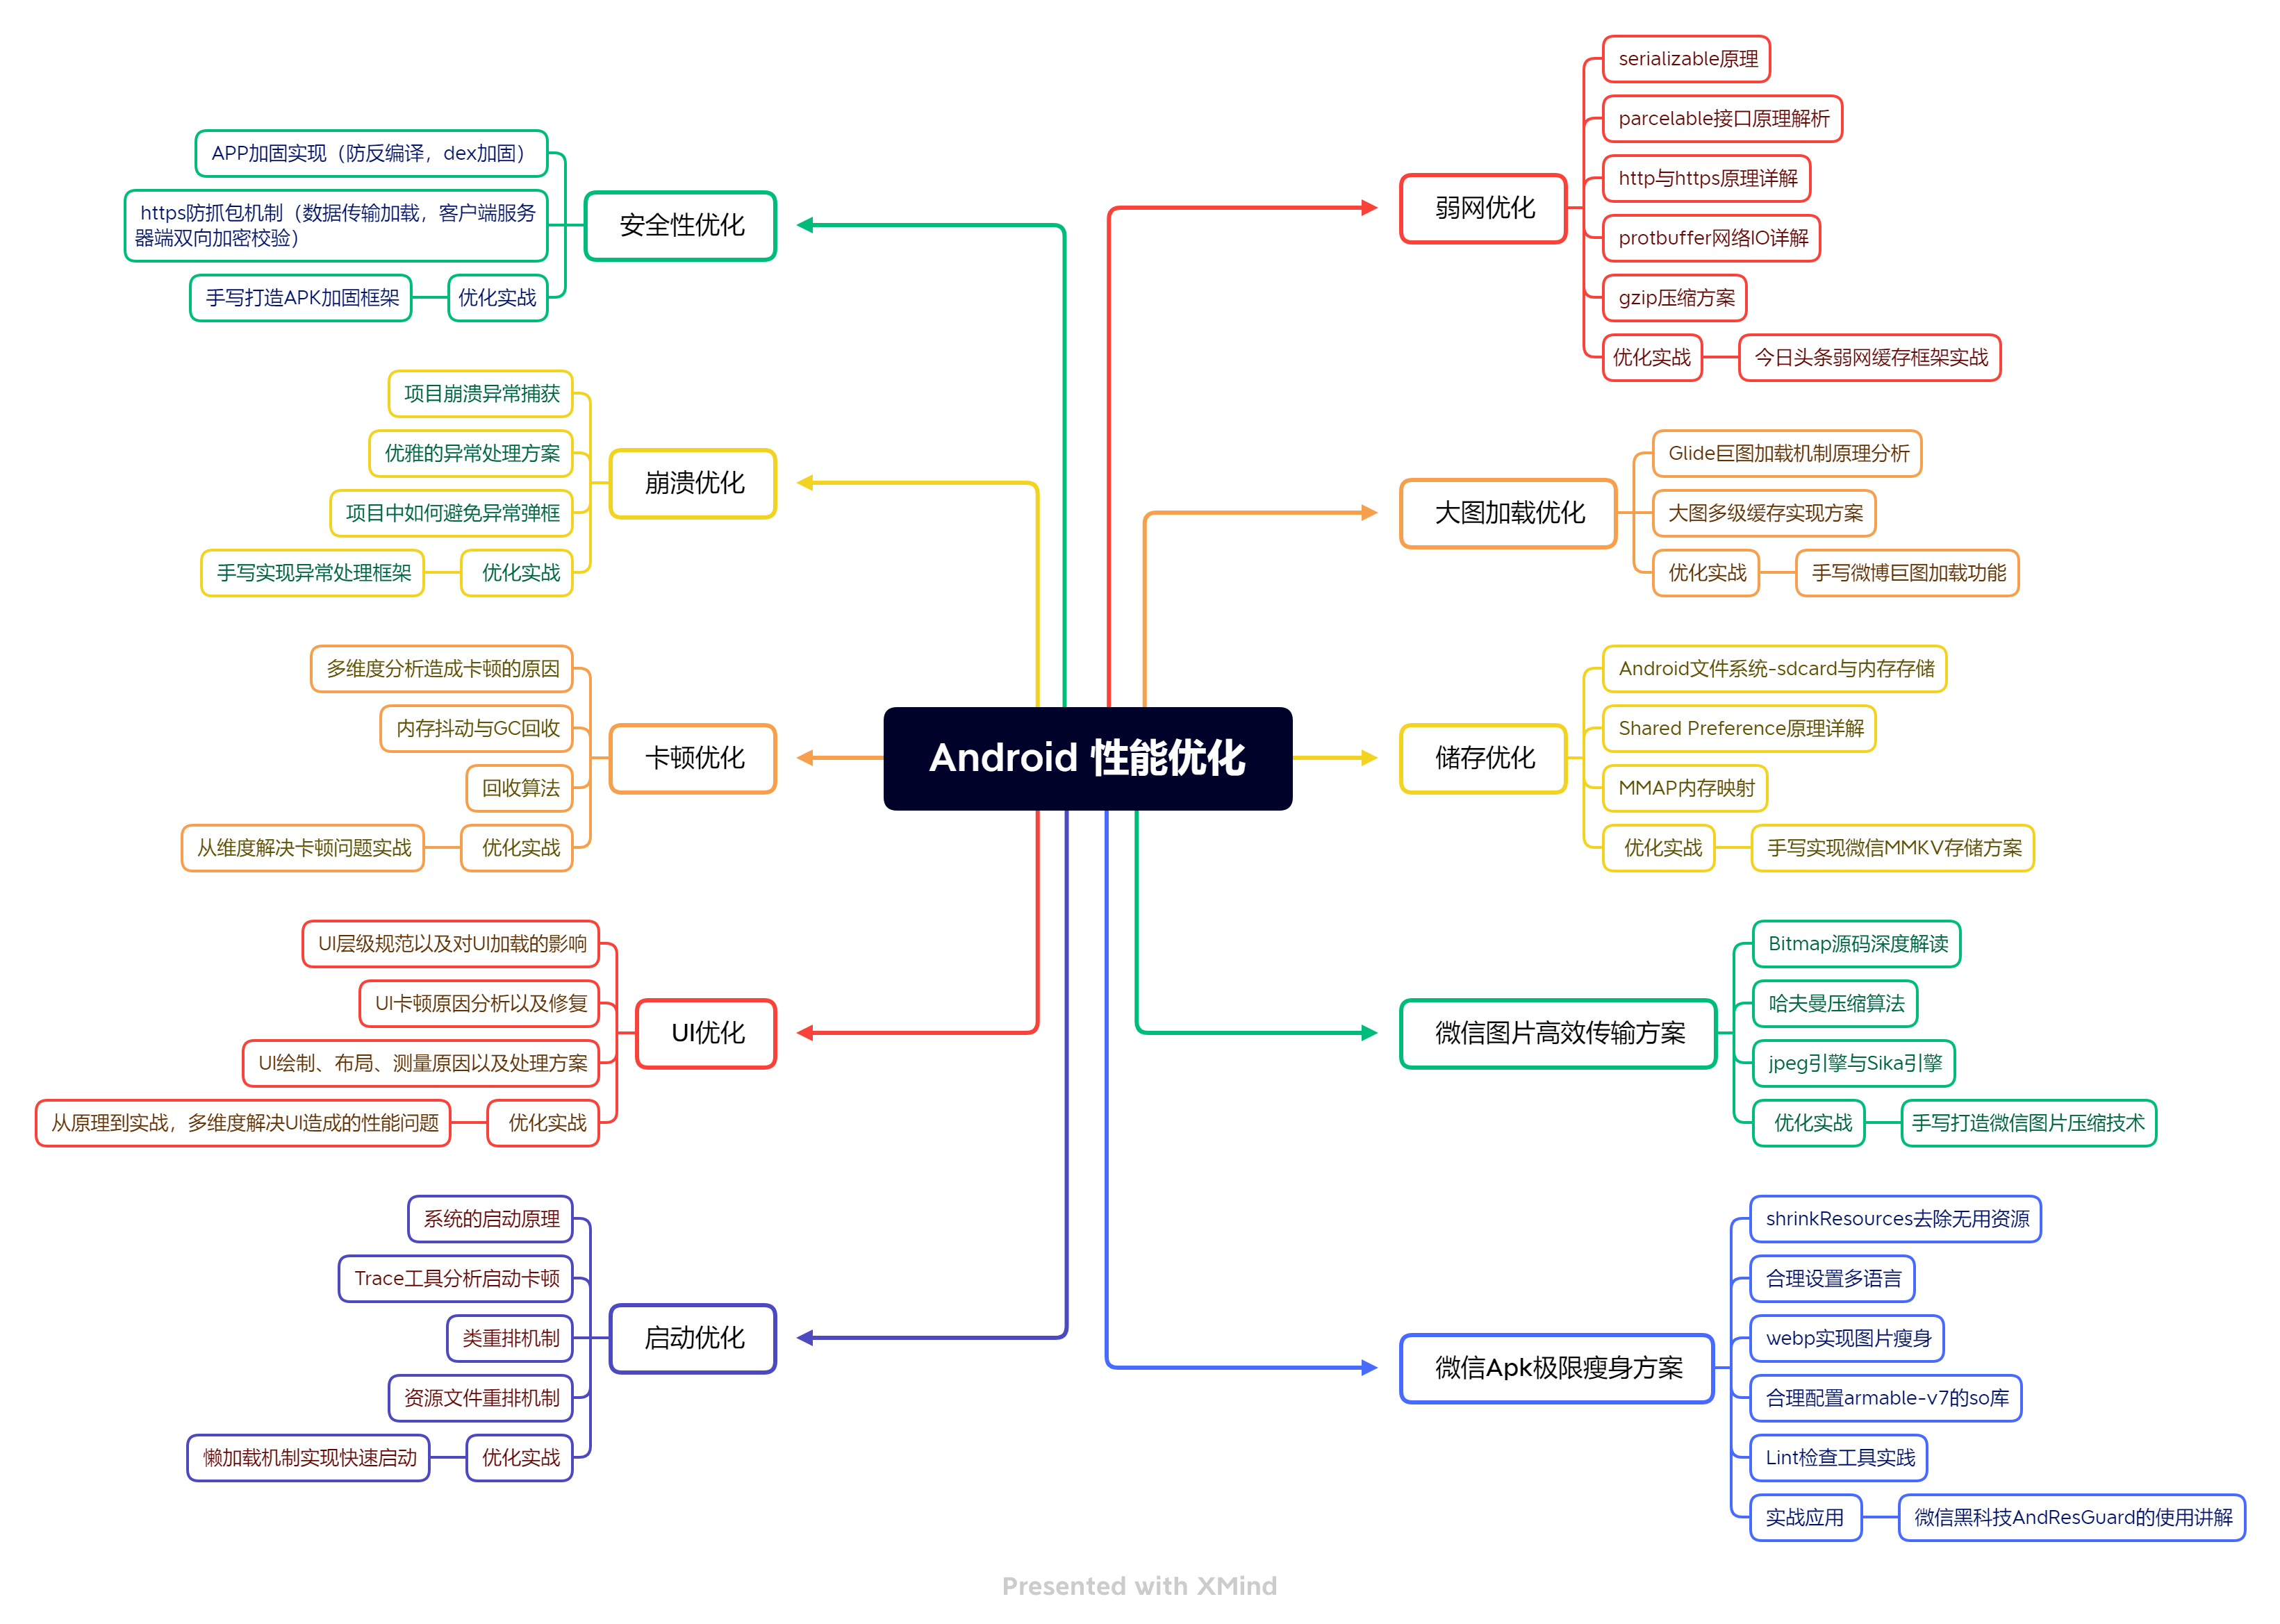
并且通过这张思维导图,融合了这些年的工作经历及对网上的资料查询和整理,最终将其整合成了一份 Android 性能优化的学习手册文档 ;有需要这份 思维导图及学习手册文档的朋友:可在评论区下方留言,或者私信发送 “脑图” 或 “进阶” 即可 免费获取
希望大家通过这个思维导图和学习手册,能够提供一个好的学习方向,查漏补缺,完善自身的不足之处;早日攻克性能优化这一难题
手册内容展示如下:
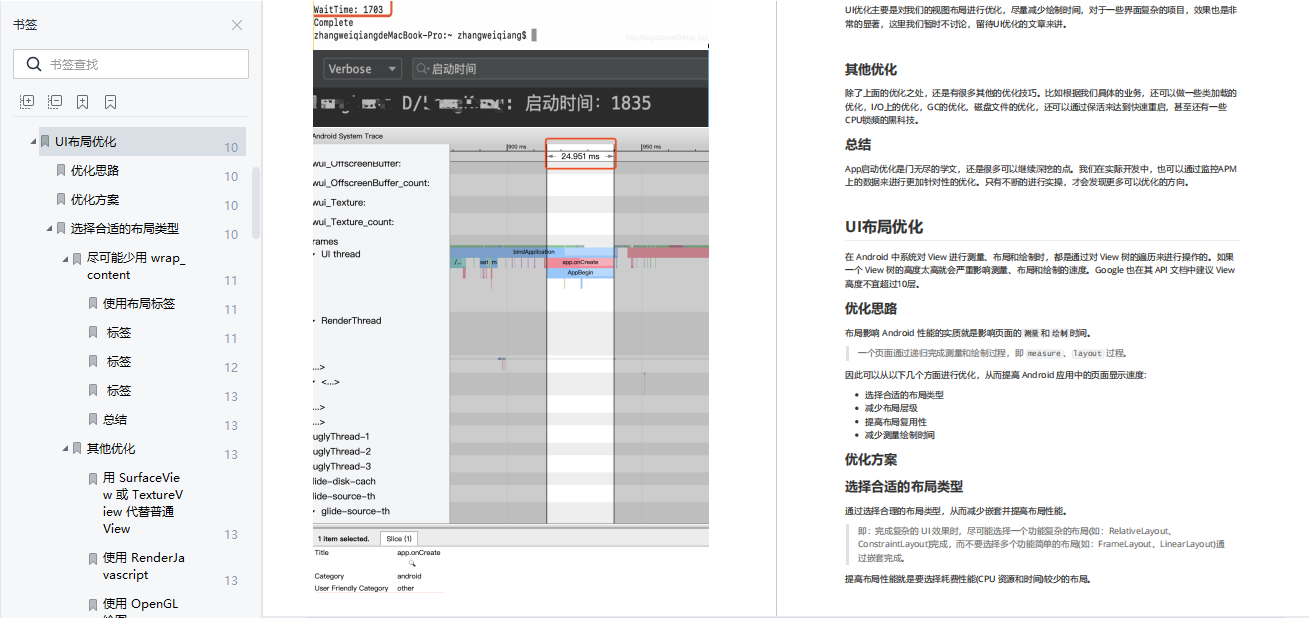
App 性能优化-启动优化
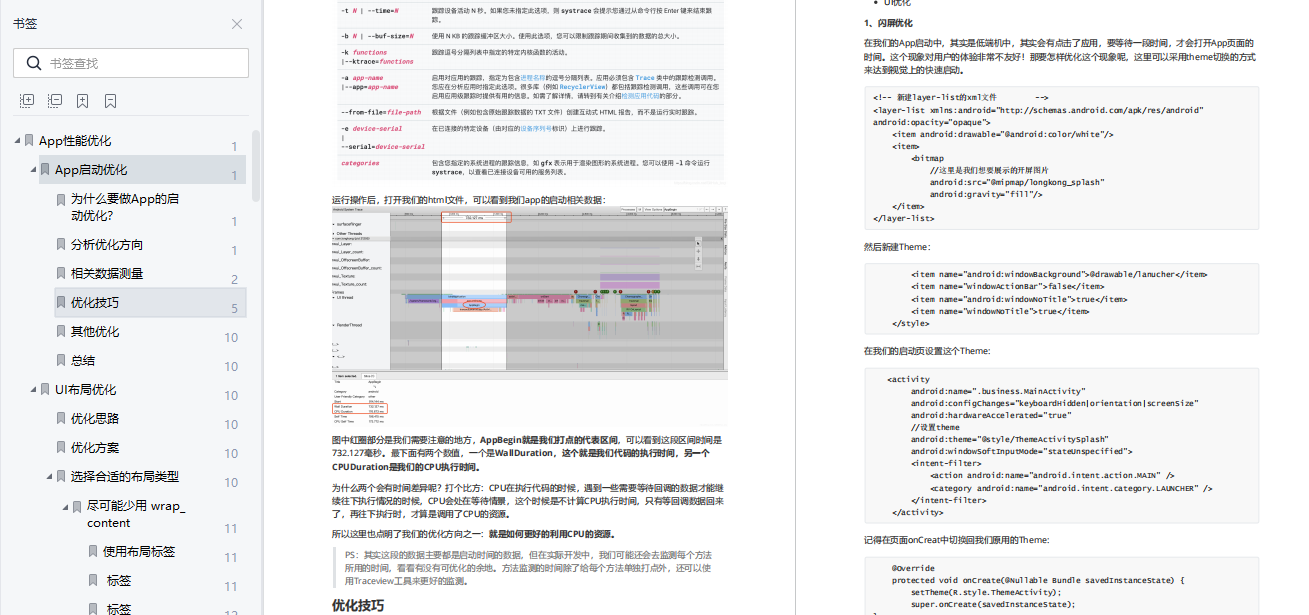
App 性能优化-UI 布局优化
Android 性能优化-卡顿优化和布局优化
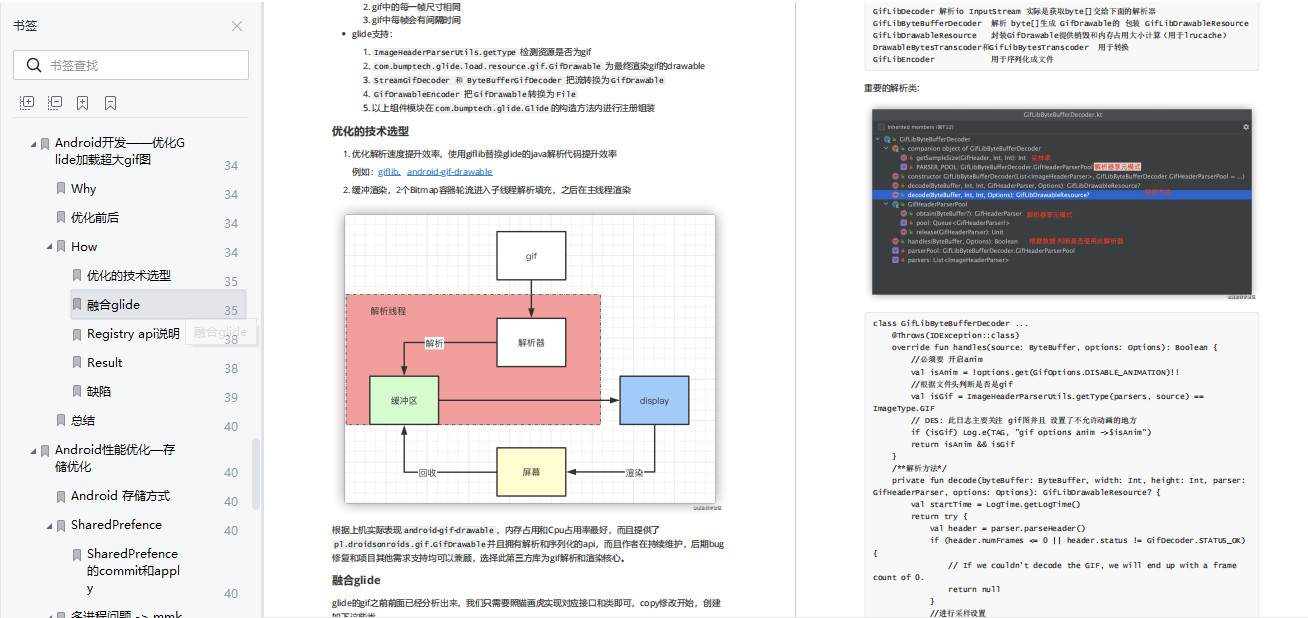
Android 开发-优化 Glidel 加载超大 gif 图
以上的知识点文档都是免费获取的,有兴趣的小伙伴:可在评论区下方留言,或者私信发送 “脑图” 或 “进阶” 即可 免费获取;觉得手册内容有用的话,大家可以点赞分享一下
PS:有问题欢迎指正,可以在评论区留下你的建议和感受; 欢迎大家点赞评论,觉得内容可以的话,可以转发分享一下