之前,资源都定义好了,现在就是去申请资源了。

申请这些资源就需要使用terraform的命令行了,开始初始化后端,相当于terraform的后端存储,后端是有存储文件的,默认情况下是在本地存储的,然后会多一些文件。之后还要下载插件 (下载插件,注意初始化的时候要在terraform的目录下面)
初始化后端,相当于tf的数据存储,然后就是provider插件的下载。

这里生成了.terraform的目录
stat文件是状态文件,第一次tf创建了资源,会将当前的状态记录下来,第二次再定义的时候会去拿这个状态和我的期望状态做对比,有哪些差异,然后去变更这些差异。
现在是放在本地进行存储,后面为了安全可以放到远端的存储里面。

PS C:\Users\W10\Desktop\terraform> terraform init

Initializing the backend...

Initializing provider plugins...
- Finding aliyun/alicloud versions matching "1.188.0"...
- Installing aliyun/alicloud v1.188.0...
- Installed aliyun/alicloud v1.188.0 (signed by a HashiCorp partner, key ID 47422B4AA9FA381B)

Partner and community providers are signed by their developers.
If you'd like to know more about provider signing, you can read about it here:
https://www.terraform.io/docs/cli/plugins/signing.html

Terraform has created a lock file .terraform.lock.hcl to record the provider
selections it made above. Include this file in your version control repository
so that Terraform can guarantee to make the same selections by default when
you run "terraform init" in the future.

Terraform has been successfully initialized!

You may now begin working with Terraform. Try running "terraform plan" to see
any changes that are required for your infrastructure. All Terraform commands
should now work.

If you ever set or change modules or backend configuration for Terraform,
rerun this command to reinitialize your working directory. If you forget, other
commands will detect it and remind you to do so if necessary.
初始化也需要注意,当你将provider版本,模块或者其他配置做了变更,那么你就重新再运行下初始化,不然到时候找不到了。
遵循幂等性,多运行几次是没有影响的。

对代码进行格式化,tf也是有样式要求的,通过ft可以自动的进行语法的检查和修正,那些被格式化的文件在这里被列出来了。

在配置流水线的时候,可以对它进行基本的校验,真正要集成的时候还是输出为json格式,比如和jenkins做集成的时候,可以看看有没有失败的地方,错误的有多少个,通过json解析拿到数据。
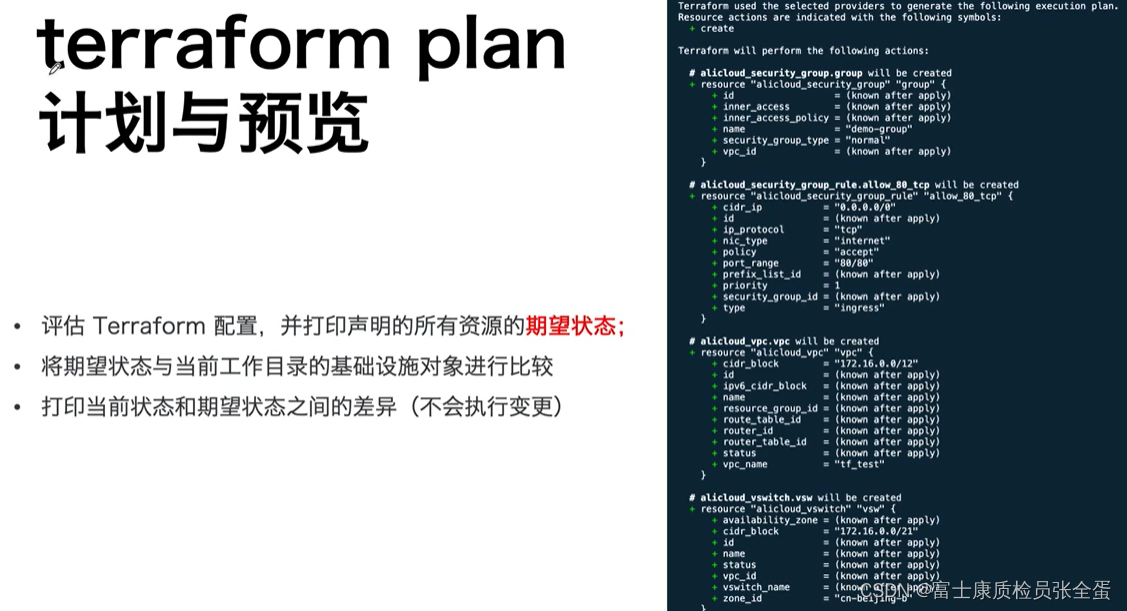
计划和预览,打印要申请哪些资源列举出来。
PS C:\Users\W10\Desktop\terraform> terraform plan

Terraform used the selected providers to generate the following execution plan. Resource actions are
indicated with the following symbols:
  + create

Terraform will perform the following actions:

  # alicloud_security_group.group will be created
  + resource "alicloud_security_group" "group" {
      + id                  = (known after apply)
      + inner_access        = (known after apply)
      + inner_access_policy = (known after apply)
      + name                = "new-group"
      + security_group_type = "normal"
      + vpc_id              = (known after apply)
    }

  # alicloud_security_group_rule.allow_80_tcp will be created
  + resource "alicloud_security_group_rule" "allow_80_tcp" {
      + cidr_ip           = "0.0.0.0/0"
      + id                = (known after apply)
      + ip_protocol       = "tcp"
      + nic_type          = "intranet"
      + policy            = "accept"
      + port_range        = "80/80"
      + prefix_list_id    = (known after apply)
      + priority          = 1
      + security_group_id = (known after apply)
      + type              = "ingress"
    }

  # alicloud_vpc.vpc will be created
  + resource "alicloud_vpc" "vpc" {
      + cidr_block            = "172.16.0.0/12"
      + id                    = (known after apply)
      + ipv6_cidr_block       = (known after apply)
      + name                  = (known after apply)
      + resource_group_id     = (known after apply)
      + route_table_id        = (known after apply)
      + router_id             = (known after apply)
      + router_table_id       = (known after apply)
      + secondary_cidr_blocks = (known after apply)
      + status                = (known after apply)
      + vpc_name              = "tf_test_foo"
    }

  # alicloud_vswitch.vsw will be created
  + resource "alicloud_vswitch" "vsw" {
      + availability_zone = (known after apply)
      + cidr_block        = "172.16.0.0/21"
      + id                = (known after apply)
      + name              = (known after apply)
      + status            = (known after apply)
      + vpc_id            = (known after apply)
      + vswitch_name      = (known after apply)
      + zone_id           = "cn-hangzhou-b"
    }

Plan: 4 to add, 0 to change, 0 to destroy.
首先创建了安全组,然后创建了安全组的规则....................这个计划就是方便我们去预览。
直接去申请资源其实你也不知道资源的状态,直接申请会出问题,所以plan去预览一下。
注意资源的顺序是tf自动帮你去处理的,无须我们去定义的。
alicloud_vpc.vpc: Creating...
alicloud_vpc.vpc: Creation complete after 6s [id=vpc-bp10cbf0gj65vrx953gge]
alicloud_security_group.group: Creating...
alicloud_vswitch.vsw: Creating...
alicloud_security_group.group: Creation complete after 2s [id=sg-bp1efisqbwav93v64dki]
alicloud_security_group_rule.allow_80_tcp: Creating...
alicloud_security_group_rule.allow_80_tcp: Creation complete after 0s [id=sg-bp1efisqbwav93v64dki:ingress:tcp:80/80:intranet:0.0.0.0/0:accept:1]
alicloud_vswitch.vsw: Creation complete after 6s [id=vsw-bp164q3dx49ljj50bh53m]

Apply complete! Resources: 4 added, 0 changed, 0 destroyed.

可以看到VPC ID,网段信息,region信息,用户网段,创建时间,状态。

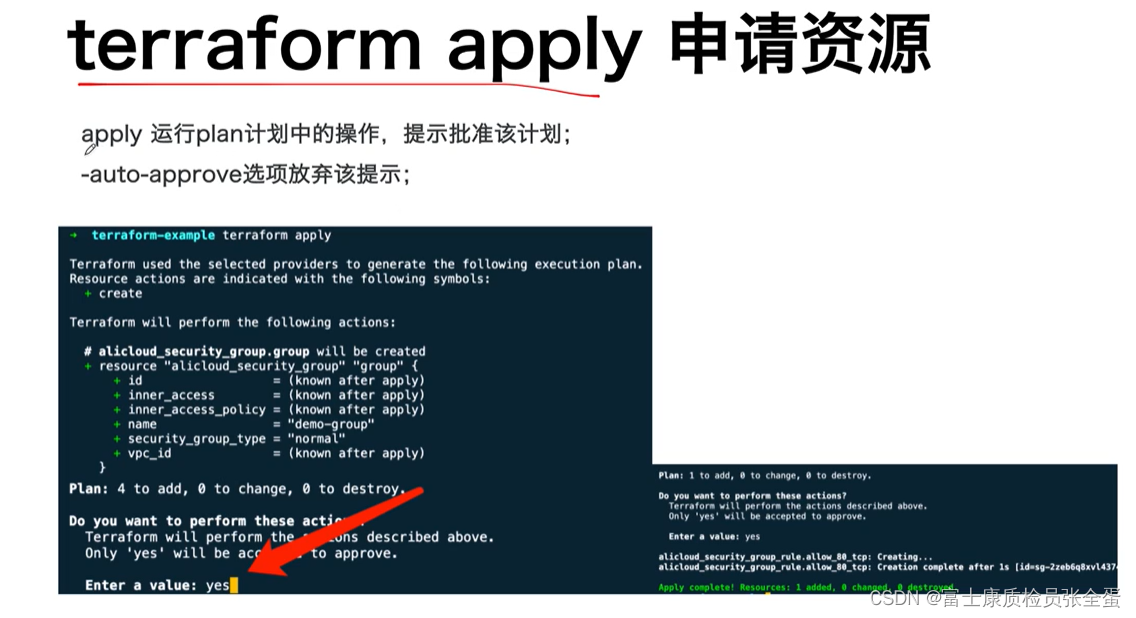
上面都是交互需要输入yes,如果你确定没有问题了,那么加上自动的选项,-auto-approve,就不会输出信息了,就直接申请就行了。

如果做集成的话,使用show还是加上json格式输出。
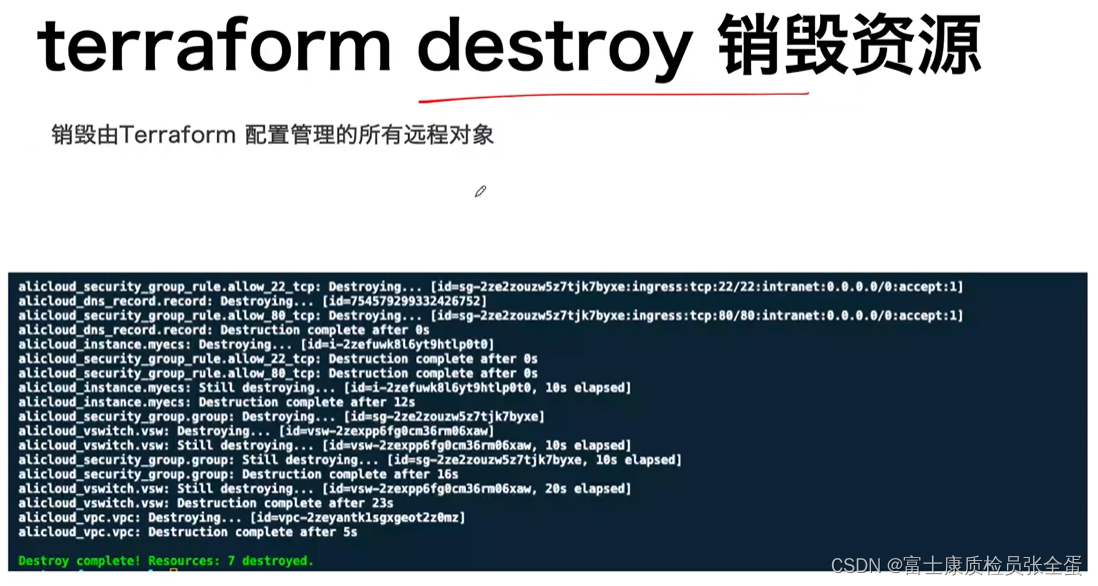
这个是快速部署一套环境,然后在环境上快速测试,最后销毁节约成本。这条命令在生产环境是不建议执行的。