Android 12.0蓝牙适配
前言
本身已经写过一篇关于蓝牙适配的文章了,不过因为是Kotlin,很多读者看不懂,对此我深感无奈,一开始也没有想过再写Java版本的,但是后面发现看不懂的越来越多了,我意识到不对劲了,因此我觉得再写一个Java版本的。

正文
在Android系统版本中,蓝牙的变化有,但是不多,这里简要说明一下。
一、Android版本中蓝牙简介
- Android1.5 中增加了蓝牙功能,立体声 Bluetooth 支持:A2DP [Advanced Audio Distribution Profile]、AVCRP [Audio/Video Remote Control Profile],自动配对。
- Android2.0 中支持Bluetooth2.1协议。
- Android3.0 中能让应用查询已经连接上 Bluetooth 设备的 Bluetooth Profile、音频状态等,然后通知用户。
- Android3.1 中系统可以通过 Bluetooth HID 方式同时接入一到多款输入设备。
- Android4.0 中新增支持连接 Bluetooth HDP [Health Device Profile)] 设备,通过第三方应用的支持,用户可以连接到医院、健身中心或者家庭等场合中的无线医疗设备和传感器。
- Android4.2 中引入了一种新的针对 Android 设备优化的 Bluetooth 协议栈 BlueDroid,从而取代 BlueZ 协议栈。Bluedroid 协议栈由 Google 和 Broadcom 公司共同开发,相对于 BlueZ 协议栈,BlueDroid 提升了兼容性和可靠性。
- Android4.3 中增加了对低功耗蓝牙的支持,内置支持 Bluetooth AVRCP 1.3,基于 Google 和 Broadcom 公司功能研发的针对于 Android 设备优化的新的蓝牙协议栈 BlueDroid。
- Android4.4 中新增两种新 Proifle 支持:HID [Human Interface Device]、MAP [Message Access Profile]
- Android5.0 中支持Bluetooth4.1协议。
- Android6.0 中扫描蓝牙需要动态获取定位才行。
- Android7.0 中支持Bluetooth4.2协议。
- Android8.0 中支持Bluetooth5.0协议,强化了蓝牙音频的表现。比如编码/传输格式可选SBC、AAC、aptX/aptX HD、LDAC等四种,音质依次提高。
- Android10.0 中支持Bluetooth5.1协议,在5.0的基础上,增加了侧向功能和厘米级定位服务,大幅度提高了定位精度。使室内定位更精准。
- Android11.0 中支持Bluetooth5.2协议,增强版ATT协议,LE功耗控制和信号同步,连接更快,更稳定,抗干扰性更好。
- Android12.0 中支持Bluetooth5.3协议,增强了经典蓝牙BR/EDR(基础速率和增强速率)的安全性。蓝牙5.3的延迟更低、抗干扰性更强、提升了电池续航时间。系统引入了新的运行时权限 BLUETOOTH_SCAN、BLUETOOTH_ADVERTISE 和 BLUETOOTH_CONNECT权限,用于更好地管理应用于附近蓝牙设备的连接。
二、新建项目
在Android12.0中新增加了三个运行时权限,我们依次来说明一下,这里我们依然创建一个项目来说明,新建一个Android12Bluetooth-Java项目,如下图所示:
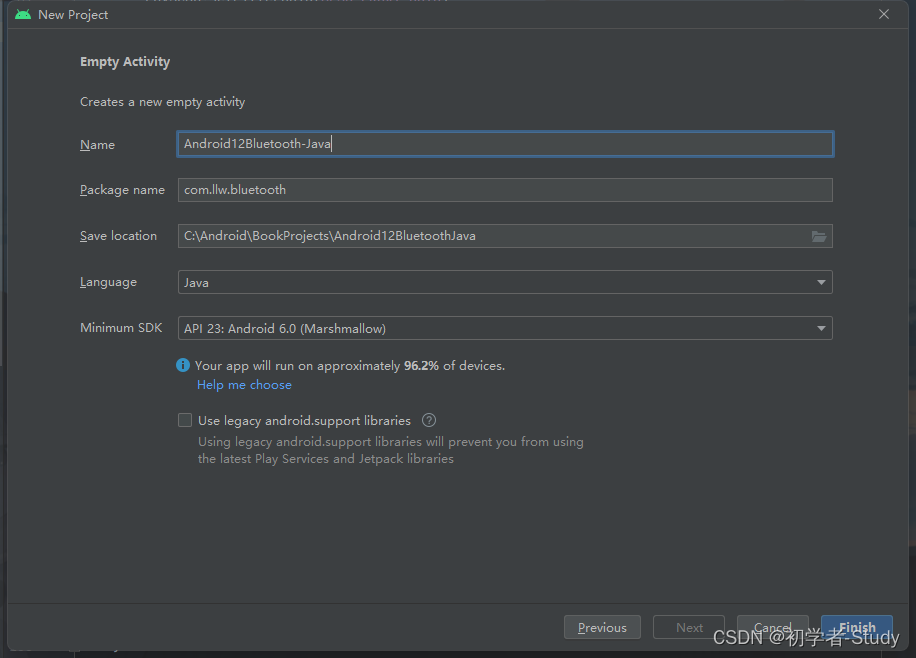
点击Finish,完成项目的创建。
① 配置build.gradle
然后来配置一下项目的依赖库,在app的build.gradle中增加
	buildFeatures {


        viewBinding true
        dataBinding true
    }
增加位置如下图所示:

注意是在android{}闭包下,然后Sync Now。
② 配置AndroidManifest.xml
下面配置AndroidMainfest.xml,权限如下所示:
    <uses-permission android:name="android.permission.BLUETOOTH"/>
    <uses-permission android:name="android.permission.BLUETOOTH_ADMIN"/>
    <!--Android12 的蓝牙权限 如果您的应用与已配对的蓝牙设备通信或者获取当前手机蓝牙是否打开-->
    <uses-permission android:name="android.permission.BLUETOOTH_CONNECT"/>
    <!--Android12 的蓝牙权限 如果您的应用查找蓝牙设备(如蓝牙低功耗 (BLE) 外围设备)-->
    <uses-permission android:name="android.permission.BLUETOOTH_SCAN"/>
    <!--Android12 的蓝牙权限 如果您的应用使当前设备可被其他蓝牙设备检测到-->
    <uses-permission android:name="android.permission.BLUETOOTH_ADVERTISE"/>
    <!--Android 6-11 定位权限-->
    <uses-permission android:name="android.permission.ACCESS_FINE_LOCATION" />
    <uses-permission android:name="android.permission.ACCESS_COARSE_LOCATION" />
增加位置如下图所示:
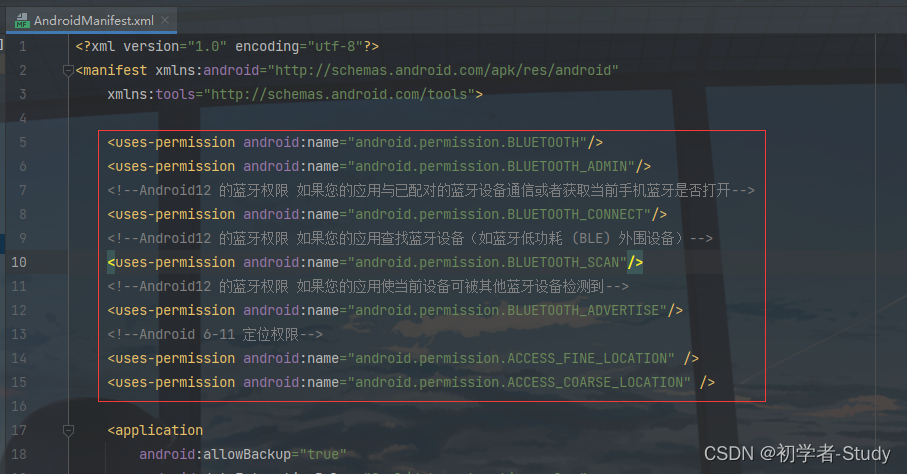
这里我们需要蓝牙的权限,还有定位的权限,在Android 12及以上版本使用蓝牙相关权限,Android 12以下版本使用定位相关权限。
三、打开蓝牙
下面我们构建一下activity_main.xml中的代码:
<?xml version="1.0" encoding="utf-8"?>
<androidx.constraintlayout.widget.ConstraintLayout xmlns:android="http://schemas.android.com/apk/res/android"
    xmlns:app="http://schemas.android.com/apk/res-auto"
    xmlns:tools="http://schemas.android.com/tools"
    android:layout_width="match_parent"
    android:layout_height="match_parent"
    tools:context=".MainActivity">


    <Button
        android:id="@+id/btn_open_bluetooth"
        android:layout_width="0dp"
        android:layout_height="wrap_content"
        android:layout_marginStart="10dp"
        android:layout_marginTop="20dp"
        android:layout_marginEnd="10dp"
        android:insetTop="0dp"
        android:insetBottom="0dp"
        android:text="打开蓝牙"
        app:layout_constraintEnd_toEndOf="parent"
        app:layout_constraintStart_toStartOf="parent"
        app:layout_constraintTop_toTopOf="parent" />

</androidx.constraintlayout.widget.ConstraintLayout>
这里就是写一个按钮,用来点击打开系统蓝牙的开关的。在Android12.0之前打开蓝牙的之前需要先判断蓝牙是否打开,我们可以这样来写,在MainActivity中增加如下代码:
    private boolean isOpenBluetooth() {


        BluetoothManager manager = (BluetoothManager) getSystemService(BLUETOOTH_SERVICE);
        BluetoothAdapter adapter = manager.getAdapter();
        if (adapter == null) {


            return false;
        }
        return adapter.isEnabled();
    }
同样我们还需要一个方法判断当前是否为Android12及以上版本。
    private boolean isAndroid12() {


        return Build.VERSION.SDK_INT >= Build.VERSION_CODES.S;
    }
同样还有一个检查此权限是否授予的方法和一个显示Toast的方法:
    private boolean hasPermission(String permission) {


        return checkSelfPermission(permission) == PackageManager.PERMISSION_GRANTED;
    }

    private void showMsg(CharSequence msg) {


        Toast.makeText(this, msg, Toast.LENGTH_SHORT).show();
    }
① 打开蓝牙意图
在MainActivity中新增如下代码:
	private ActivityResultLauncher<Intent> enableBluetooth;         //打开蓝牙意图

    private void registerIntent() {


	    //打开蓝牙意图
        enableBluetooth = registerForActivityResult(new ActivityResultContracts.StartActivityForResult(), result -> {


            if (result.getResultCode() == Activity.RESULT_OK) {


                showMsg(isOpenBluetooth() ? "蓝牙已打开" : "蓝牙未打开");
            }
        });
    }
这里声明了一个变量,然后在方法中对变量进行赋值,此方法就替代了之前的startActivityForResult,现在我们使用registerForActivityResult。在返回中可以得知当前是否打开了蓝牙,因为是在Java中使用,因此我们写了一个registerIntent()方法,我们需要在onCreate之前调用这个方法,如图所示:

② 请求BLUETOOTH_CONNECT权限意图
registerForActivityResult不光能用于页面获取值,也能用于请求权限,先在MainActivity中声明变量,代码如下:
private ActivityResultLauncher<String> requestBluetoothConnect; //请求蓝牙连接权限意图
然后在registerIntent()方法中,增加如下代码:
		//请求BLUETOOTH_CONNECT权限意图
        requestBluetoothConnect = registerForActivityResult(new ActivityResultContracts.RequestPermission(), result -> {


            if (result) {


                enableBluetooth.launch(new Intent(BluetoothAdapter.ACTION_REQUEST_ENABLE));
            } else {


                showMsg("Android12中未获取此权限,无法打开蓝牙。");
            }
        });
请求权限返回无非就是同意不同意,如果同意了我们就调用。
enableBluetooth.launch(new Intent(BluetoothAdapter.ACTION_REQUEST_ENABLE));
去打开系统蓝牙,不同意就提示一下。下面再用ViewBinding来配置一下:

下面我们再写一个initView()方法,在这个函数中我们对按钮的点击事件进行操作,新增initView()方法,代码如下:
    private void initView() {


        binding.btnOpenBluetooth.setOnClickListener(v -> {


            //蓝牙是否已打开
            if (isOpenBluetooth()) {


                showMsg("蓝牙已打开");
                return;
            }
            //是Android12
            if (isAndroid12()) {


                //检查是否有BLUETOOTH_CONNECT权限
                if (hasPermission(Manifest.permission.BLUETOOTH_CONNECT)) {


                    //打开蓝牙
                    enableBluetooth.launch(new Intent(BluetoothAdapter.ACTION_REQUEST_ENABLE));
                } else {


                    //请求权限
                    requestBluetoothConnect.launch(Manifest.permission.BLUETOOTH_CONNECT);
                }
                return;
            }
            //不是Android12 直接打开蓝牙
            enableBluetooth.launch(new Intent(BluetoothAdapter.ACTION_REQUEST_ENABLE));
        });
    }
这里的代码就比较好理解,首先判断蓝牙是否已经打开了,打开了就不往下执行,没打开,再判断当前是否为Android12,不是就直接打开系统蓝牙,是Android12,再去检查是否授予BLUETOOTH_CONNECT权限,授予了就打开系统蓝牙,没有授予就去请求此权限,不要忘记在onCreate()方法中调用它。

下面我们运行一下:

四、蓝牙扫描
在Android6.0 - Android11.0之间,扫描蓝牙都是需要打开定位权限的,而在Android12中则不需要了,换成了BLUETOOTH_SCAN权限,那么我们下面来看看,怎么操作的。
这里扫描蓝牙就以低功耗蓝牙为例子。
① 扫描者
在MainActivity中定义如下变量
    private final String TAG = MainActivity.class.getSimpleName();
    //获取系统蓝牙适配器
    private BluetoothAdapter mBluetoothAdapter;
    //扫描者
    private BluetoothLeScanner scanner;
    //是否正在扫描
    boolean isScanning = false;
获取系统蓝牙适配器,要在initView方法中增加代码,如下图所示:

② 扫描回调
扫描设备时会有扫描的结果,在MainActivity中增加如下代码:
	//扫描结果回调
    private final ScanCallback scanCallback = new ScanCallback() {


        @Override
        public void onScanResult(int callbackType, ScanResult result) {


            BluetoothDevice device = result.getDevice();
            Log.d(TAG, "name: " + device.getName() + ", address: " + device.getAddress());
        }
    };
这里可能你的device.name下面会有一个红线,这是因为AS会检查你这里需要一个BLUETOOTH_CONNECT权限,而这个权限我们在打开蓝牙时已经请求过了,那么为了避免麻烦,我们在当前MainActivity上面增加如下注解。
@SuppressLint("MissingPermission")
如下图所示:

这个注解加上去之后你需要小心蓝牙权限的问题。
③ 扫描方法
下面我们写一个开始扫描和停止扫描的方法,首先有一个地方触发扫描和停止扫描,修改activity_main.xml,代码如下:
<?xml version="1.0" encoding="utf-8"?>
<androidx.constraintlayout.widget.ConstraintLayout xmlns:android="http://schemas.android.com/apk/res/android"
    xmlns:app="http://schemas.android.com/apk/res-auto"
    xmlns:tools="http://schemas.android.com/tools"
    android:layout_width="match_parent"
    android:layout_height="match_parent"
    tools:context=".MainActivity">

    <Button
        android:id="@+id/btn_open_bluetooth"
        android:layout_width="0dp"
        android:layout_height="wrap_content"
        android:layout_marginStart="10dp"
        android:layout_marginTop="20dp"
        android:layout_marginEnd="10dp"
        android:insetTop="0dp"
        android:insetBottom="0dp"
        android:text="打开蓝牙"
        app:layout_constraintEnd_toEndOf="parent"
        app:layout_constraintStart_toStartOf="parent"
        app:layout_constraintTop_toTopOf="parent" />

    <Button
        android:id="@+id/btn_scan_bluetooth"
        android:layout_width="0dp"
        android:layout_height="wrap_content"
        android:layout_marginStart="10dp"
        android:layout_marginTop="20dp"
        android:layout_marginEnd="10dp"
        android:insetTop="0dp"
        android:insetBottom="0dp"
        android:text="扫描蓝牙"
        app:layout_constraintEnd_toEndOf="parent"
        app:layout_constraintHorizontal_bias="0.0"
        app:layout_constraintStart_toStartOf="parent"
        app:layout_constraintTop_toBottomOf="@+id/btn_open_bluetooth" />

</androidx.constraintlayout.widget.ConstraintLayout>
然后回到MainActivity中,写扫描和停止扫描的方法。
    private void startScan() {


        if (!isScanning) {


            scanner.startScan(scanCallback);
            isScanning = true;
            binding.btnScanBluetooth.setText("停止扫描");
        }
    }

    private void stopScan() {


        if (isScanning) {


            scanner.stopScan(scanCallback);
            isScanning = false;
            binding.btnScanBluetooth.setText("扫描蓝牙");
        }
    }
扫描和停止扫描时修改一下变量值并且改动按钮的文字以表示当前是否正在扫描中。
④ 执行扫描
执行扫描就很简单了,首先我们需要在MainActivity中声明变量:
private ActivityResultLauncher<String> requestBluetoothScan; //请求蓝牙扫描权限意图
然后在registerIntent()方法中进行赋值,代码如下所示:
        //请求BLUETOOTH_SCAN权限意图
        requestBluetoothScan = registerForActivityResult(new ActivityResultContracts.RequestPermission(), result -> {


            if (result) {


                //进行扫描
                startScan();
            } else {


                showMsg("Android12中未获取此权限,则无法扫描蓝牙。");
            }
        });
这个意图我们将在点击扫描按钮的时候会用到,下面我们在initView()中增加扫描按钮点击的代码:
        //扫描蓝牙按钮点击事件
        binding.btnScanBluetooth.setOnClickListener(v -> {


            if (isAndroid12()) {


     			if (!hasPermission(Manifest.permission.BLUETOOTH_CONNECT)) {


                    requestBluetoothConnect.launch(Manifest.permission.BLUETOOTH_CONNECT);
                    return;
                }
                if (hasPermission(Manifest.permission.BLUETOOTH_SCAN)) {


                    //扫描或者停止扫描
                    if (isScanning) stopScan();
                    else startScan();
                } else {


                    //请求权限
                    requestBluetoothScan.launch(Manifest.permission.BLUETOOTH_SCAN);
                }
            }
        });
相对来说还是比较的简洁,其实还可以更简洁。我在扫描回调中打印了日志,如果有扫描到设备的话,就会有日志,下面我们扫描一下看看:

扫描启动了,但是没有设备被扫描到,可我附近明明有蓝牙设备正在广播,这是为什么呢?
⑤ 应用不推导物理位置
这个说起来就和之前的Android 6.0 至 Android 11.0中需要定位权限才能扫描有关系了,就是因为这个推导物理位置,手机是可以通过扫描到的设备知道设备的具体位置的,所以之前需要定位权限,那么现在我没有定位权限了,你扫不到设备就很离谱,怎么解决呢?
如果您的应用不推导物理位置,那么您可以坚定地断言您的应用绝不会使用蓝牙权限来推导物理位置。为此,请完成以下步骤:
将 android:usesPermissionFlags 属性添加到 BLUETOOTH_SCAN 权限声明,并将此属性的值设为 neverForLocation。
注意:如果 android:usesPermissionFlags 中包含 neverForLocation,则会从扫描结果中过滤出某些 BLE 信标。
这是官方的说明,操作起来很简单,如下图所示:

意思很明显,就是说你如果不需要推导物理地址,那么就设置一下这个权限的标识即可。下面我们再来运行一下:
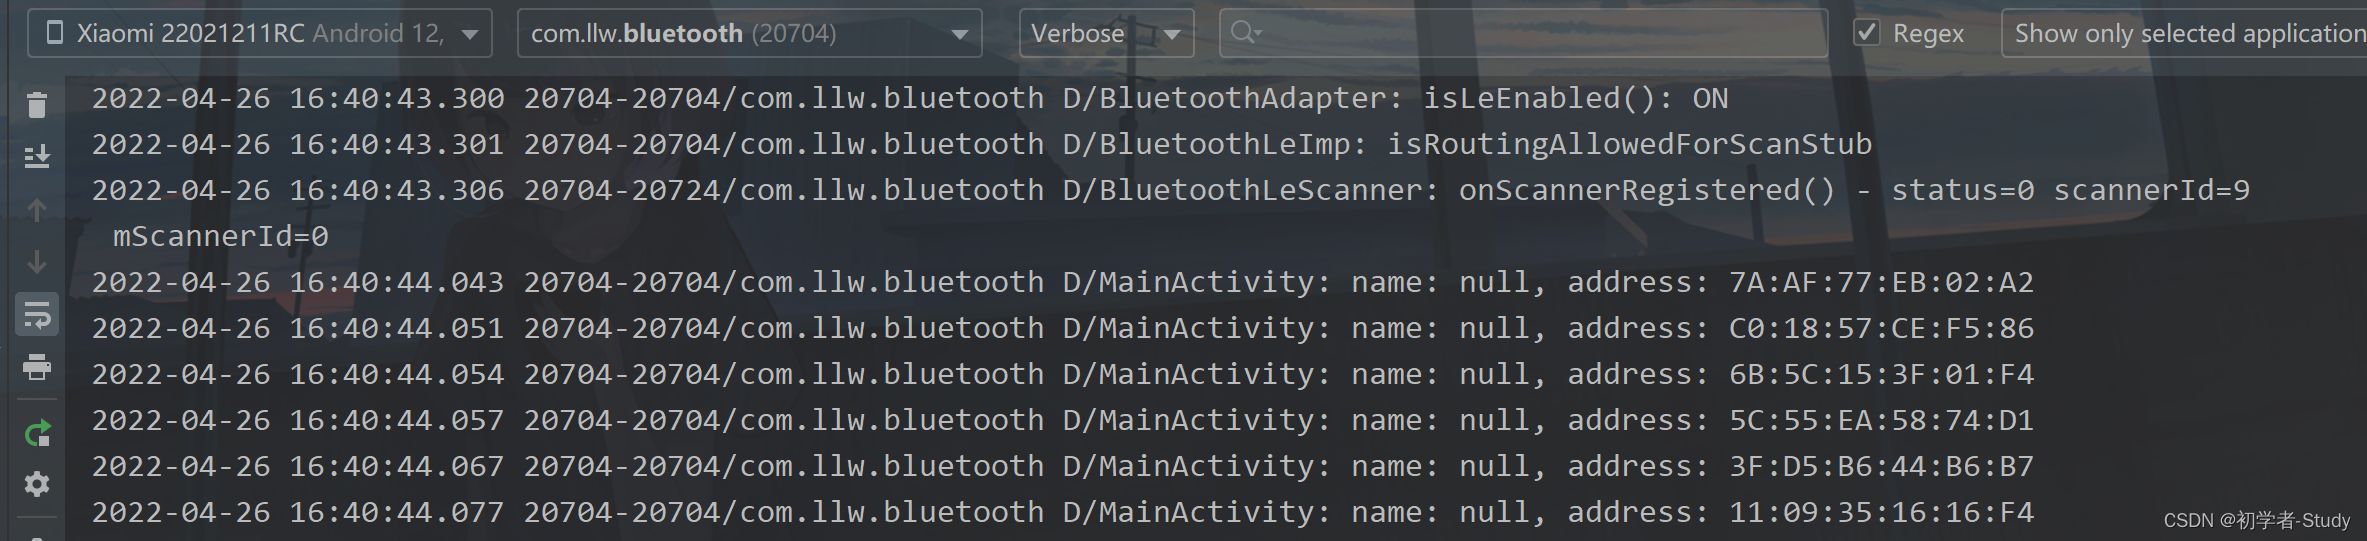
设备就扫描到了,可以看到这里有设备的Mac地址,再点一下就可以停止扫描了。
不过我们这里是控制台显示了设备,并没有在页面显示设备,下面我们完成这一步。
五、页面显示扫描设备
显示蓝牙设备首先我们需要修改一下activity_main.xml布局,代码如下:
<?xml version="1.0" encoding="utf-8"?>
<androidx.constraintlayout.widget.ConstraintLayout xmlns:android="http://schemas.android.com/apk/res/android"
    xmlns:app="http://schemas.android.com/apk/res-auto"
    xmlns:tools="http://schemas.android.com/tools"
    android:layout_width="match_parent"
    android:layout_height="match_parent"
    tools:context=".MainActivity">

    <Button
        android:id="@+id/btn_open_bluetooth"
        android:layout_width="0dp"
        android:layout_height="wrap_content"
        android:layout_marginStart="10dp"
        android:layout_marginTop="20dp"
        android:layout_marginEnd="10dp"
        android:insetTop="0dp"
        android:insetBottom="0dp"
        android:text="打开蓝牙"
        app:layout_constraintEnd_toEndOf="parent"
        app:layout_constraintStart_toStartOf="parent"
        app:layout_constraintTop_toTopOf="parent" />

    <Button
        android:id="@+id/btn_scan_bluetooth"
        android:layout_width="0dp"
        android:layout_height="wrap_content"
        android:layout_marginStart="10dp"
        android:layout_marginTop="20dp"
        android:layout_marginEnd="10dp"
        android:insetTop="0dp"
        android:insetBottom="0dp"
        android:text="扫描蓝牙"
        app:layout_constraintEnd_toEndOf="parent"
        app:layout_constraintHorizontal_bias="0.0"
        app:layout_constraintStart_toStartOf="parent"
        app:layout_constraintTop_toBottomOf="@+id/btn_open_bluetooth" />

    <androidx.recyclerview.widget.RecyclerView
        android:id="@+id/rv_device"
        android:layout_width="0dp"
        android:layout_height="0dp"
        android:layout_marginTop="20dp"
        android:overScrollMode="never"
        app:layout_constraintBottom_toBottomOf="parent"
        app:layout_constraintEnd_toEndOf="parent"
        app:layout_constraintStart_toStartOf="parent"
        app:layout_constraintTop_toBottomOf="@+id/btn_scan_bluetooth" />

</androidx.constraintlayout.widget.ConstraintLayout>
① 蓝牙设备适配器
这个里的适配器使我们自己去写的,需要显示数据的,首先我们需要创建一个蓝牙图标,在drawable包下新建一个icon_bluetooth.xml,里面的代码如下:
<?xml version="1.0" encoding="UTF-8" standalone="no"?>
<vector xmlns:android="http://schemas.android.com/apk/res/android"
    android:width="48dp"
    android:height="48dp"
    android:autoMirrored="true"
    android:tint="#000000"
    android:viewportWidth="24.0"
    android:viewportHeight="24.0">

    <path
        android:fillColor="@android:color/white"
        android:pathData="M14.24,12.01l2.32,2.32c0.28,-0.72 0.44,-1.51 0.44,-2.33 0,-0.82 -0.16,-1.59 -0.43,-2.31l-2.33,2.32zM19.53,6.71l-1.26,1.26c0.63,1.21 0.98,2.57 0.98,4.02s-0.36,2.82 -0.98,4.02l1.2,1.2c0.97,-1.54 1.54,-3.36 1.54,-5.31 -0.01,-1.89 -0.55,-3.67 -1.48,-5.19zM15.71,7.71L10,2L9,2v7.59L4.41,5 3,6.41 8.59,12 3,17.59 4.41,19 9,14.41L9,22h1l5.71,-5.71 -4.3,-4.29 4.3,-4.29zM11,5.83l1.88,1.88L11,9.59L11,5.83zM12.88,16.29L11,18.17v-3.76l1.88,1.88z" />

</vector>
因为我们的设备需要显示信号强度,那么我们创建一个数据类,在com.llw.bluetooth包下新建一个MyDevice类,代码如下:
public class MyDevice {


    private BluetoothDevice device;
    private int rssi;

    public BluetoothDevice getDevice() {


        return device;
    }

    public void setDevice(BluetoothDevice device) {


        this.device = device;
    }

    public int getRssi() {


        return rssi;
    }

    public void setRssi(int rssi) {


        this.rssi = rssi;
    }

    public MyDevice(BluetoothDevice device, int rssi) {


        this.device = device;
        this.rssi = rssi;
    }
}
然后我们构建适配器的item布局,在layout包下新建一个item_device.xml,代码如下:
<?xml version="1.0" encoding="utf-8"?>
<layout xmlns:android="http://schemas.android.com/apk/res/android"
    xmlns:app="http://schemas.android.com/apk/res-auto"
    xmlns:tools="http://schemas.android.com/tools">

    <data>

        <variable
            name="device"
            type="com.llw.bluetooth.MyDevice" />
    </data>

    <androidx.constraintlayout.widget.ConstraintLayout
        android:layout_width="match_parent"
        android:layout_height="70dp">

        <ImageView
            android:id="@+id/imageView"
            android:layout_width="50dp"
            android:layout_height="50dp"
            android:layout_marginStart="10dp"
            android:layout_marginTop="10dp"
            android:padding="8dp"
            app:layout_constraintStart_toStartOf="parent"
            app:layout_constraintTop_toTopOf="parent"
            app:srcCompat="@drawable/icon_bluetooth" />

        <TextView
            android:id="@+id/tv_name"
            android:layout_width="0dp"
            android:layout_height="wrap_content"
            android:layout_marginStart="10dp"
            android:layout_marginTop="4dp"
            android:layout_marginEnd="10dp"
            android:text="@{device.device.name ?? `Unknown` }"
            android:textColor="@color/black"
            android:textSize="14sp"
            android:textStyle="bold"
            app:layout_constraintEnd_toStartOf="@+id/tv_rssi"
            app:layout_constraintStart_toEndOf="@+id/imageView"
            app:layout_constraintTop_toTopOf="@+id/imageView" />

        <TextView
            android:id="@+id/tv_address"
            android:layout_width="0dp"
            android:layout_height="wrap_content"
            android:layout_marginStart="10dp"
            android:layout_marginEnd="10dp"
            android:layout_marginBottom="4dp"
            android:text="@{device.device.address}"
            android:textSize="12sp"
            app:layout_constraintBottom_toBottomOf="@+id/imageView"
            app:layout_constraintEnd_toStartOf="@+id/tv_rssi"
            app:layout_constraintStart_toEndOf="@+id/imageView" />

        <TextView
            android:id="@+id/tv_rssi"
            android:layout_width="wrap_content"
            android:layout_height="wrap_content"
            android:layout_marginEnd="10dp"
            android:text="@{device.rssi+`dBm`}"
            app:layout_constraintBottom_toBottomOf="parent"
            app:layout_constraintEnd_toEndOf="parent"
            app:layout_constraintTop_toTopOf="parent" />
    </androidx.constraintlayout.widget.ConstraintLayout>
</layout>
这里的布局数据采用了DataBinding。下面我们去写适配器,在com.llw.bluetooth包新建一个MyDeviceAdapter类,里面的代码如下:
public class MyDeviceAdapter extends RecyclerView.Adapter<MyDeviceAdapter.ViewHolder> {


    private final List<MyDevice> lists;

    public MyDeviceAdapter(List<MyDevice> lists) {


        this.lists = lists;
    }

    @NonNull
    @Override
    public ViewHolder onCreateViewHolder(@NonNull ViewGroup parent, int viewType) {


        ItemDeviceBinding binding = ItemDeviceBinding.inflate(LayoutInflater.from(parent.getContext()),parent, false);
        return new ViewHolder(binding);
    }

    @Override
    public void onBindViewHolder(@NonNull ViewHolder holder, int position) {


        ItemDeviceBinding binding = DataBindingUtil.getBinding(holder.binding.getRoot());
        if (binding != null) {


            binding.setDevice(lists.get(position));
            binding.executePendingBindings();
        }
    }

    @Override
    public int getItemCount() {


        return lists.size();
    }

    public static class ViewHolder extends RecyclerView.ViewHolder {


        public ItemDeviceBinding binding;

        public ViewHolder(@NonNull ItemDeviceBinding itemTextDataRvBinding) {


            super(itemTextDataRvBinding.getRoot());
            binding = itemTextDataRvBinding;
        }
    }
}
这里使用原生的方式,下面我们回到MainActivity中。
② 显示列表设备
在MainActivity中创建两个变量:
    //设备列表
    private final List<MyDevice> deviceList = new ArrayList<>();
    //适配器
    private MyDeviceAdapter myDeviceAdapter;
这里我们需要思考一个问题,那就是列表设备的唯一性,因为蓝牙设备是一直广播的,所以我们扫描到的结果会有重复的设备,重复的设备有信号强度上的差异,这个地方我们要做的就是判断当前列表中是否有此设备,有就更新rssi,没有就添加,我们新增一个findDeviceIndex()函数,代码如下:
    private int findDeviceIndex(MyDevice scanDevice, List<MyDevice> deviceList) {


        int index = 0;
        for (MyDevice myDevice : deviceList) {


            if (myDevice.getDevice().getAddress().equals(scanDevice.getDevice().getAddress())) return index;
            index += 1;
        }
        return -1;
    }
下面我们再新增一个addDeviceList()函数,代码如下:
    private void addDeviceList(MyDevice device) {


        int index = findDeviceIndex(device, deviceList);
        if (index == -1) {


            deviceList.add(device);
            myDeviceAdapter.notifyDataSetChanged();
        } else {


            deviceList.get(index).setRssi(device.getRssi());
            myDeviceAdapter.notifyItemChanged(index);
        }
    }
最后我们在扫描回调中调用此方法:

最后别忘记了我们的适配器和列表都需要初始化的,我写在initView()函数中,如下图所示:

现在就可以运行了。
六、适配Android12.0以下设备
当前的代码我们在Android12上是没有问题了,但是Android12以下 Android6.0以上 还是扫描不到设备,然后我们回到MainActivity中,增加一个变量:
private ActivityResultLauncher<String> requestLocation; //请求定位权限
然后在registerIntent()方法中进行赋值,代码如下所示:
        //请求定位权限
        requestLocation = registerForActivityResult(new ActivityResultContracts.RequestPermission(), result -> {


            if (result) {


                //扫描蓝牙
                startScan();
            } else {


                showMsg("Android12以下,6及以上需要定位权限才能扫描设备");
            }
        });
然后我们回到扫描按钮的点击事件,修改代码如下所示:
        //扫描蓝牙按钮点击事件
        binding.btnScanBluetooth.setOnClickListener(v -> {


            if (isAndroid12()) {


                if (!hasPermission(Manifest.permission.BLUETOOTH_CONNECT)) {


                    requestBluetoothConnect.launch(Manifest.permission.BLUETOOTH_CONNECT);
                    return;
                }
                if (hasPermission(Manifest.permission.BLUETOOTH_SCAN)) {


                    //扫描或者停止扫描
                    if (isScanning) stopScan();
                    else startScan();
                } else {


                    //请求权限
                    requestBluetoothScan.launch(Manifest.permission.BLUETOOTH_SCAN);
                }
            } else {


                if (hasPermission(Manifest.permission.ACCESS_FINE_LOCATION)) {


                    //扫描或者停止扫描
                    if (isScanning) stopScan();
                    else startScan();
                } else {


                    requestLocation.launch(Manifest.permission.ACCESS_FINE_LOCATION);
                }
            }
        });
下面我们在Android10.0上运行一下:

七、源码
如果你觉得代码对你有帮助的话,不妨Fork或者Star一下~
GitHub:Android12Bluetooth-Java