1、什么是 http 模块
http 模块是 Node.js 官方提供的、用来创建 web 服务器的模块。通过 http 模块提供的http.createServer() 方法,就能方便的把一台普通的电脑,变成一台 Web 服务器,从而对外提供Web 资源服务。
如果要希望使用 http 模块创建 Web 服务器,则需要先导入它:
const http = require('http')
2、创建最基本的 web 服务器
2.1、创建 web 服务器的基本步骤
- 导入 http 模块
- 创建 web 服务器实例
- 为服务器实例绑定 request 事件,监听客户端的请求
- 启动服务器
2.2、创建过程
(1)导入 http 模块
如果希望在自己的电脑上创建一个 web 服务器,从而对外提供 web 服务,则需要导入 http 模块:
const http = require('http')(2)创建 web 服务器实例
调用 http.createServer() 方法,即可快速创建一个 web 服务器实例:
const server = http.createServer()(3)为服务器实例绑定 request 事件
为服务器实例绑定 request 事件,即可监听客户端发送过来的网络请求:
// 使用服务器实例的 .on() 方法,为服务器绑定一个 request 事件
server.on('request', function (req, res) {
  // 只要有客户端来请求我们自己的服务器,就会触发 request 事件,从而调用这个事件处理函数
  console.log('Someone visit our web server.')
})
(4)启动服务器
扫描二维码关注公众号,回复:
14546239 查看本文章


调用服务器实例的 .listen() 方法,即可启动当前的 web 服务器实例:
// 调用 server.listen(端口号, callback回调方法),即可启动 web 服务器
server.listen(8080, function () {
  console.log('server running at http://127.0.0.1:8080')
})
(5)完整代码
// 1. 导入 http 模块
const http = require('http')
// 2. 创建 web 服务器实例
const server = http.createServer()
// 3. 为服务器实例绑定 request 事件,监听客户端的请求
server.on('request', function (req, res) {
  console.log('Someone visit our web server.')
})
// 4. 启动服务器
server.listen(8080, function () {
  console.log('server running at http://127.0.0.1:8080')
})
2.3、req 请求对象
只要服务器接收到了客户端的请求,就会调用通过 server.on() 为服务器绑定的 request 事件处理函数。如果想在事件处理函数中,访问与客户端相关的数据或属性,可以使用如下的方式:
server.on('request', (req, res) => {
   // req 是请求对象,它包含了与客户端相关的数据和属性,例如:
  // req.url 是客户端请求的 URL 地址
  const url = req.url
  // req.method 是客户端请求的 method 类型
  const method = req.method
  const str = `Your request url is ${url}, and request method is ${method}`
  console.log(str)
})
2.4、res 响应对象
在服务器的 request 事件处理函数中,如果想访问与服务器相关的数据或属性,可以使用如下的方式:
server.on('request', (req, res) => {
  // res 是响应对象,它包含了与服务器相关的数据和属性,例如:
  // 要发送到客户端的字符串
  const str = `Your request url is ${req.url}, and request method is ${req.method}`
  console.log(str)
  // res.end() 方法的作用:
  // 向客户端发送指定的内容,并结束这次请求的处理过程
  res.end(str)
})
2.5、完整示例:
const http = require('http')
const server = http.createServer()
// req 是请求对象,包含了与客户端相关的数据和属性
server.on('request', (req, res) => {
  // req.url 是客户端请求的 URL 地址
  const url = req.url
  // req.method 是客户端请求的 method 类型
  const method = req.method
  const str = `Your request url is ${url}, and request method is ${method}`
  console.log(str)
  // 调用 res.end() 方法,向客户端响应一些内容
  res.end(str)
})
server.listen(80, () => {
  console.log('server running at http://127.0.0.1')
})
2.6、解决中文乱码问题
当调用 res.end() 方法,向客户端发送中文内容的时候,会出现乱码问题,此时,需要手动设置内容的编码格式:
const http = require('http')
const server = http.createServer()

server.on('request', (req, res) => {
  // 定义一个字符串,包含中文的内容
  const str = `您请求的 URL 地址是 ${req.url},请求的 method 类型为 ${req.method}`
  // 调用 res.setHeader() 方法,设置 Content-Type 响应头,解决中文乱码的问题
  res.setHeader('Content-Type', 'text/html; charset=utf-8')
  // res.end() 将内容响应给客户端
  res.end(str)
})

server.listen(80, () => {
  console.log('server running at http://127.0.0.1')
})
3、根据不同的 url 响应不同的 html 内容
核心实现步骤
- 获取请求的 url 地址
- 设置默认的响应内容为 404 Not found
- 判断用户请求的是否为 / 或 /index.html 首页
- 判断用户请求的是否为 /about.html 关于页面
- 设置 Content-Type 响应头,防止中文乱码
- 使用 res.end() 把内容响应给客户端
const http = require('http')
const server = http.createServer()

server.on('request', (req, res) => {
  // 1. 获取请求的 url 地址
  const url = req.url
  // 2. 设置默认的响应内容为 404 Not found
  let content = '<h1>404 Not found!</h1>'
  // 3. 判断用户请求的是否为 / 或 /index.html 首页
  // 4. 判断用户请求的是否为 /about.html 关于页面
  if (url === '/' || url === '/index.html') {
    content = '<h1>首页</h1>'
  } else if (url === '/about.html') {
    content = '<h1>关于页面</h1>'
  }
  // 5. 设置 Content-Type 响应头,防止中文乱码
  res.setHeader('Content-Type', 'text/html; charset=utf-8')
  // 6. 使用 res.end() 把内容响应给客户端
  res.end(content)
})

server.listen(80, () => {
  console.log('server running at http://127.0.0.1')
})
4、案例 - 实现 clock 时钟的 web 服务器
4.1、核心思路
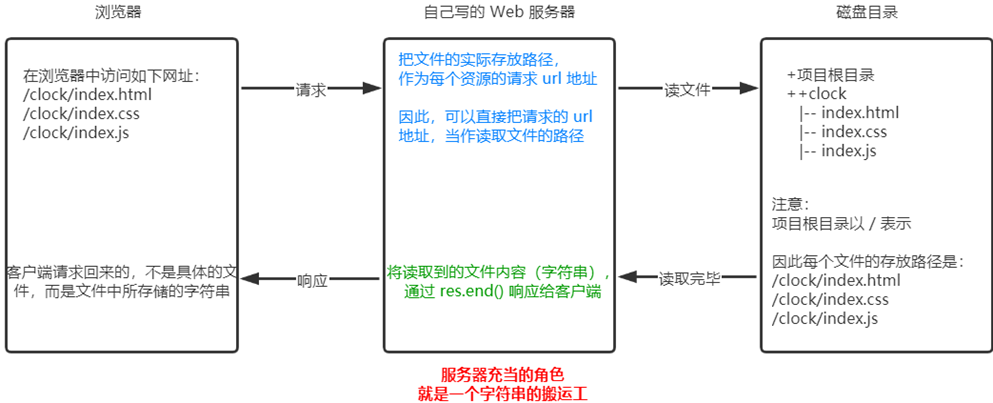
把文件的实际存放路径,作为每个资源的请求 url 地址。

4.2、资源

index.css
    html,
    body {
      margin: 0;
      padding: 0;
      height: 100%;
      background-image: linear-gradient(to bottom right, red, gold);
    }

    .box {
      width: 400px;
      height: 250px;
      background-color: rgba(255, 255, 255, 0.6);
      border-radius: 6px;
      position: absolute;
      left: 50%;
      top: 40%;
      transform: translate(-50%, -50%);
      box-shadow: 1px 1px 10px #fff;
      text-shadow: 0px 1px 30px white;

      display: flex;
      justify-content: space-around;
      align-items: center;
      font-size: 70px;
      user-select: none;
      padding: 0 20px;

      /* 盒子投影 */
      -webkit-box-reflect: below 0px -webkit-gradient(linear, left top, left bottom, from(transparent), color-stop(0%, transparent), to(rgba(250, 250, 250, .2)));
    }
index.html
<!DOCTYPE html>
<html lang="en">

<head>
  <meta charset="UTF-8">
  <meta name="viewport" content="width=device-width, initial-scale=1.0">
  <meta http-equiv="X-UA-Compatible" content="ie=edge">
  <title>index首页</title>
  <link rel="stylesheet" href="./index.css" />
</head>

<body>
  <div class="box">
    <div id="HH">00</div>
    <div>:</div>
    <div id="mm">00</div>
    <div>:</div>
    <div id="ss">00</div>
  </div>

  <script src="./index.js"></script>
</body>

</html>
index.js
    window.onload = function () {
      // 定时器,每隔 1 秒执行 1 次
      setInterval(() => {
        var dt = new Date()
        var HH = dt.getHours()
        var mm = dt.getMinutes()
        var ss = dt.getSeconds()

        // 为页面上的元素赋值
        document.querySelector('#HH').innerHTML = padZero(HH)
        document.querySelector('#mm').innerHTML = padZero(mm)
        document.querySelector('#ss').innerHTML = padZero(ss)
      }, 1000)
    }

    // 补零函数
    function padZero(n) {
      return n > 9 ? n : '0' + n
    }
4.3、实现步骤
- 导入需要的模块
- 创建基本的 web 服务器
- 将资源的请求 url 地址映射为文件的存放路径
- 读取文件内容并响应给客户端
- 优化资源的请求路径
4.4、示例代码
// 1.1 导入 http 模块
const http = require('http')
// 1.2 导入 fs 模块
const fs = require('fs')
// 1.3 导入 path 模块
const path = require('path')

// 2.1 创建 web 服务器
const server = http.createServer()
// 2.2 监听 web 服务器的 request 事件
server.on('request', (req, res) => {
  // 3.1 获取到客户端请求的 URL 地址
  //     /clock/index.html
  //     /clock/index.css
  //     /clock/index.js
  const url = req.url
  // 3.2 把请求的 URL 地址映射为具体文件的存放路径
  // const fpath = path.join(__dirname, url)
  // 5.1 预定义一个空白的文件存放路径
  let fpath = ''
  if (url === '/') {
    fpath = path.join(__dirname, './clock/index.html')
  } else {
    //     /index.html
    //     /index.css
    //     /index.js
    fpath = path.join(__dirname, '/clock', url)
  }

  // 4.1 根据“映射”过来的文件路径读取文件的内容
  fs.readFile(fpath, 'utf8', (err, dataStr) => {
    // 4.2 读取失败,向客户端响应固定的“错误消息”
    if (err) return res.end('404 Not found.')
    // 4.3 读取成功,将读取成功的内容,响应给客户端
    res.end(dataStr)
  })
})
// 2.3 启动服务器
server.listen(80, () => {
  console.log('server running at http://127.0.0.1')
})