FloatingActionButton可以说是Material Design 的标志之一了,但是却有很多人并不是很喜欢它,其中一条主要的原因就是FAB的存在挡住了要显示的内容,从而影响体验。
本文主要介绍对FAB两方面的优化,一方面是点击FAB弹出子菜单的特效,一方面是在滑动时自动隐藏FAB。最终的实现效果见下图:

弹出特效的实现
这里用到一个第三方FAB库,主要实现步骤如下。
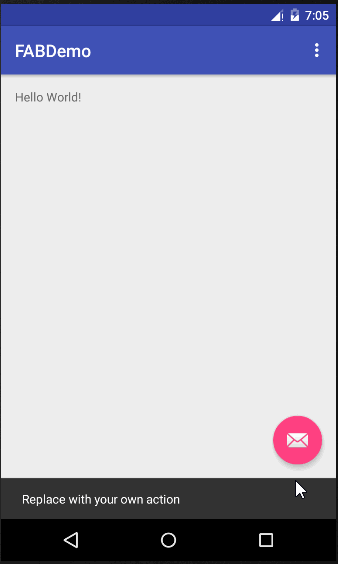
先用Android Studio 新建一个Blank的Activity,我们发现默认情况下该Activity自带一个FAB,如图所示:
compile 'com.getbase:floatingactionbutton:1.10.1'
然后点击"Sync Now" AS就会自动完成对依赖的下载,不需要我们再去GitHub上下载。
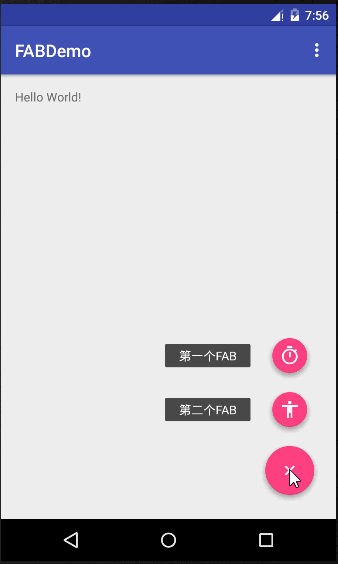
接下来使用该第三方库的FloatingActionsMenu来代替之前布局文件中的FloatingActionButton。FloatingActionsMenu可以说是一个FAB集合,其本身包含一个add按钮,点击该按钮后便展开子菜单,从而实现弹出特效。布局文件activity_main.xml如下:
<?xml version="1.0" encoding="utf-8"?>
<android.support.design.widget.CoordinatorLayout
    xmlns:android="http://schemas.android.com/apk/res/android"
    xmlns:app="http://schemas.android.com/apk/res-auto"
    xmlns:tools="http://schemas.android.com/tools"
    xmlns:fab="http://schemas.android.com/apk/res-auto"
    android:layout_width="match_parent"
    android:layout_height="match_parent"
    android:fitsSystemWindows="true"
    tools:context="com.android.wangkang.fabdemo.MainActivity">

    <android.support.design.widget.AppBarLayout
        android:layout_width="match_parent"
        android:layout_height="wrap_content"
        android:theme="@style/AppTheme.AppBarOverlay">

        <android.support.v7.widget.Toolbar
            android:id="@+id/toolbar"
            android:layout_width="match_parent"
            android:layout_height="?attr/actionBarSize"
            android:background="?attr/colorPrimary"
            app:popupTheme="@style/AppTheme.PopupOverlay"/>

    </android.support.design.widget.AppBarLayout>

    <include layout="@layout/content_main"/>

    <com.getbase.floatingactionbutton.FloatingActionsMenu
        android:id="@+id/fab_menu"
        android:layout_width="wrap_content"
        android:layout_height="wrap_content"
        android:layout_gravity="bottom|end"
        android:layout_margin="@dimen/fab_margin"
        fab:fab_addButtonColorNormal="@color/colorAccent"
        fab:fab_icon="@drawable/ic_add_24dp"
        fab:fab_labelStyle="@style/menu_labels_style"
        fab:fab_labelsPosition="left">

        <com.getbase.floatingactionbutton.FloatingActionButton
            android:layout_width="wrap_content"
            android:layout_height="wrap_content"
            android:id="@+id/fab_1"
            fab:fab_colorNormal="@color/colorAccent"
            fab:fab_size="mini"
            fab:fab_icon="@drawable/ic_timer_24dp"
            fab:fab_title="第一个FAB"/>
        <com.getbase.floatingactionbutton.FloatingActionButton
            android:layout_width="wrap_content"
            android:layout_height="wrap_content"
            android:id="@+id/fab_2"
            fab:fab_colorNormal="@color/colorAccent"
            fab:fab_size="mini"
            fab:fab_icon="@drawable/ic_accessibility_24dp"
            fab:fab_title="第二个FAB"/>
    </com.getbase.floatingactionbutton.FloatingActionsMenu>

</android.support.design.widget.CoordinatorLayout>
这里别忘了添加命名空间
xmlns:fab="http://schemas.android.com/apk/res-auto"我们需要自己设置labelStyle,首先在colors.xml中加入以下两个颜色:
<color name="black_semi_transparent">#B2000000</color>
<color name="text">#FFFFFF</color>
在styles中加入如下代码:
<style name="menu_labels_style">
    <item name="android:background">@drawable/fab_label_background</item>
    <item name="android:textColor">@color/text</item>
</style>
上面的fab_label_background可以自己在drawable文件夹中定义一个,参考如下:
<?xml version="1.0" encoding="utf-8"?>
<shape xmlns:android="http://schemas.android.com/apk/res/android">
    <solid android:color="@color/black_semi_transparent"/>
    <padding
        android:left="16dp"
        android:top="4dp"
        android:right="16dp"
        android:bottom="4dp"/>
    <corners
        android:radius="2dp"/>
</shape>
布局文件中的ic_add_24dp、ic_timer_24dp和ic_accessibility_24dp都可以通过右键drawable文件夹--New--Vector asset来选择,在material icon下点choose即可进行图标的挑选。
将MainActivity中关于FloatingActionButton的代码删掉,然后运行应用就能得到如下效果:
滚动隐藏的实现
<include layout="@layout/content_main"/><FrameLayout
app:layout_behavior="@string/appbar_scrolling_view_behavior"
android:layout_width="match_parent"
android:layout_height="match_parent"
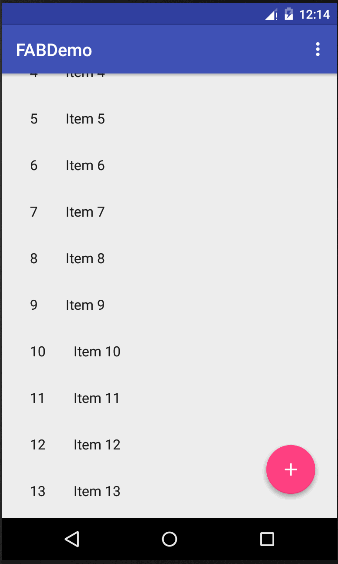
android:id="@+id/fragmentContainer"/>在MainActivity中的onCreate()方法中添加含有 RecyclerView的Fragment:
@Override
protected void onCreate(Bundle savedInstanceState) {
    super.onCreate(savedInstanceState);
    setContentView(R.layout.activity_main);
    Toolbar toolbar = (Toolbar) findViewById(R.id.toolbar);
    setSupportActionBar(toolbar);

    FragmentManager fm=getSupportFragmentManager();
    Fragment mFragment=fm.findFragmentById(R.id.fragmentContainer);

    if (mFragment==null){
        mFragment=new ItemFragment();
        fm.beginTransaction().add(R.id.fragmentContainer,mFragment).commit();
    }
}
因为默认生成的ItemFragment有一个监听接口,我们需要在MainActivity中实现该接口并且覆盖接口中的方法,可以选择什么都不做或者加入你需要的点击事件:
public class MainActivity extends AppCompatActivity implements ItemFragment.OnListFragmentInteractionListener {
    @Override
    public void onListFragmentInteraction(DummyContent.DummyItem item) {

    }
然后新建一个ScrollAwareFABBehavior类,继承自CoordinatorLayout.Behavior<FloatingActionsMenu>,代码如下:
public class ScrollAwareFABBehavior extends CoordinatorLayout.Behavior<FloatingActionsMenu> {

    private static final android.view.animation.Interpolator INTERPOLATOR=new FastOutSlowInInterpolator();
    private boolean mIsAnimatingOut=false;

    public ScrollAwareFABBehavior(Context context, AttributeSet attrs){
        super();
    }
    @Override
    public boolean onStartNestedScroll(CoordinatorLayout coordinatorLayout, FloatingActionsMenu child, View directTargetChild, View target, int nestedScrollAxes) {
        //处理垂直方向上的滚动事件
        return nestedScrollAxes== ViewCompat.SCROLL_AXIS_VERTICAL|| super.onStartNestedScroll(coordinatorLayout, child, directTargetChild, target, nestedScrollAxes);
    }

    @Override
    public void onNestedScroll(CoordinatorLayout coordinatorLayout, FloatingActionsMenu child, View target, int dxConsumed, int dyConsumed, int dxUnconsumed, int dyUnconsumed) {
        super.onNestedScroll(coordinatorLayout, child, target, dxConsumed, dyConsumed, dxUnconsumed, dyUnconsumed);
        //向上滚动进入,向下滚动隐藏
        if (dyConsumed>0&&!this.mIsAnimatingOut && child.getVisibility()==View.VISIBLE){
            //如果是展开的话就先收回去
            if (child.isExpanded()){
                child.collapse();
            }
            //animateOut()和animateIn()都是私有方法,需要重新实现
            animateOut(child);
        } else if (dyConsumed<0 && child.getVisibility()!=View.VISIBLE){
            animateIn(child);
        }
    }

    private void animateOut(final FloatingActionsMenu button){
            ViewCompat.animate(button).translationY(500)
                .setInterpolator(INTERPOLATOR).withLayer()
                    .setListener(new ViewPropertyAnimatorListener() {
                        @Override
                        public void onAnimationStart(View view) {
                            ScrollAwareFABBehavior.this.mIsAnimatingOut=true;
                        }

                        @Override
                        public void onAnimationEnd(View view) {
                            ScrollAwareFABBehavior.this.mIsAnimatingOut=false;
                            view.setVisibility(View.GONE);
                        }

                        @Override
                        public void onAnimationCancel(View view) {
                            ScrollAwareFABBehavior.this.mIsAnimatingOut=false;

                        }
                    }).start();
        }

    private void animateIn(FloatingActionsMenu button){
        button.setVisibility(View.VISIBLE);
            ViewCompat.animate(button).translationY(0)
                    .setInterpolator(INTERPOLATOR).withLayer().setListener(null)
                    .start();
        }
}
最后在布局文件的FloatingActionsMenu中添加下面的属性(记得把包名改为自己的):
app:layout_behavior="com.android.wangkang.fabdemo.ScrollAwareFABBehavior"
运行应用,就可得到自动隐藏效果,并且在隐藏前展开的菜单会先收回:
Demo的源码:https://github.com/w-kahn/FABDemo