提示:文章写完后,目录可以自动生成,如何生成可参考右边的帮助文档
1.设置视图宽高
设置视图的宽高
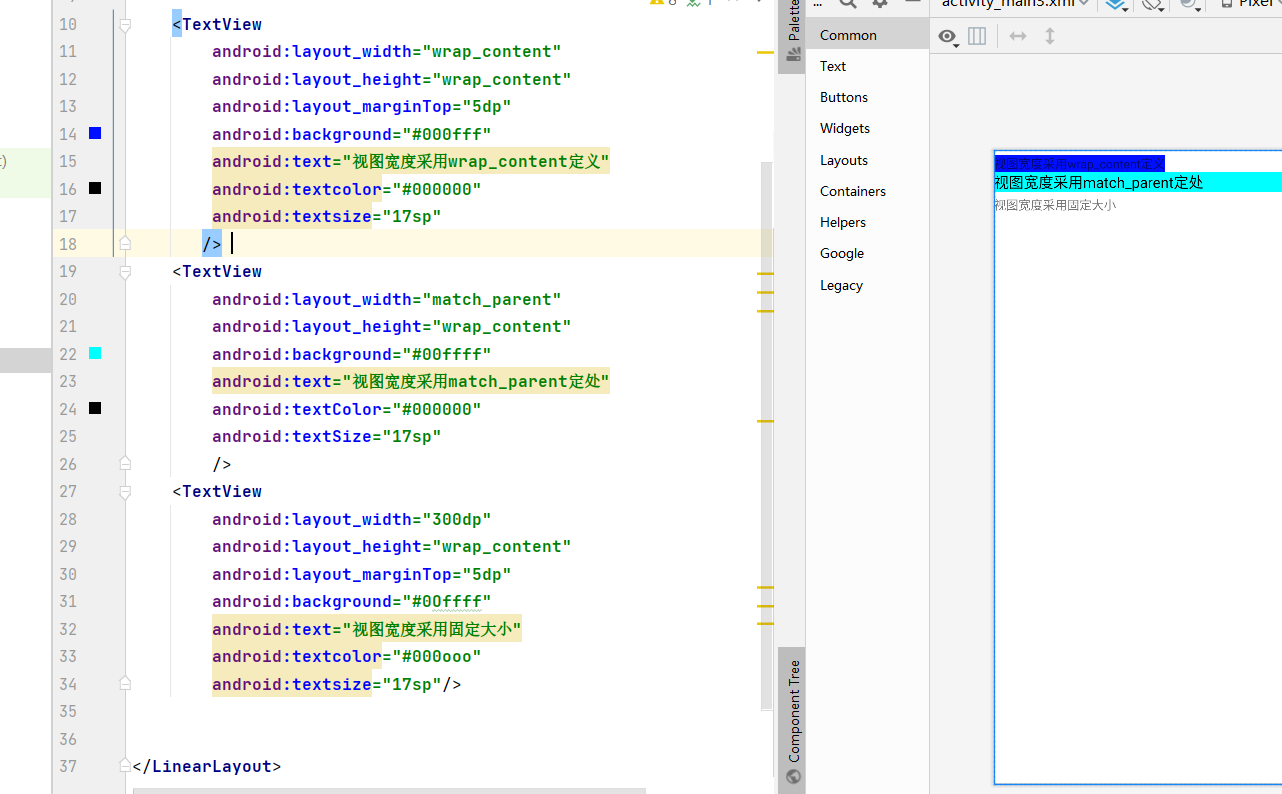
视图宽度通过属性android:layout_width表达,视图高度通过属性android:layout_height表达,宽高的取值主要有下列三种:
⭕️match_parent:表示与上级视图保持一致。
⭕️wrap_content:表示与内容自适应。
⭕️以dp为单位的具体尺寸。
1.1 xml 中设置
1.2 在代码中设置视图宽高
它首先确保XML中的宽高属性值为wrap_content,接着打开该页面对应的Java代码,依序执行以下三个步骤:
1️⃣调用控件对象的getLayoutParams方法,获取该控件的布局参数。
2️⃣布局参数的width属性表示宽度,height属性表示高度,修改这两个属性值
3️⃣调用控件对象的setLayoutParams方法,填入修改后的布局参数使之生效。
public class ViewBorderActivity extends AppCompatActivity {


override
protected void onCreate (Bundle savedInstancestate){


super.onCreate (savedInstancestate) ;
setContentview (R. layout.activity_view_border) ;Textview tv_code = findviewById (R.id.tv_code) ;
//获取tv_code的布局参数(含宽度和高度>
ViewGroup. LayoutParams params = tv_code. getLayoutParams ( ) ;
//修改布局参数中的宽度数值,注意默认px单位,需要把dp数值转成px数值
params.width = 0;
//设置tv_code的布局参数
tv_code.setLayoutParams (params) ;
2.设置视图间距
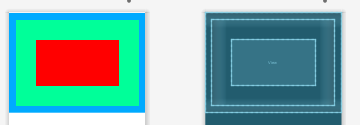
设置视图的间距有两种方式:
⭕️采用layout_margin属性,它指定了当前视图与周围平级视图之间的距离。
包括layout_margin、layout_marginLeft、 layout_marginTop、layout_marginRight、⭕️layout_marginBottom采用padding属性,它指定了当前视图与内部下级视图之间的距离。
包括padding.paddingLeft、paddingTop、 paddingRight、paddingBottom
<?xml version="1.0" encoding="utf-8"?>
<LinearLayout xmlns:android="http://schemas.android.com/apk/res/android"
    android:layout_width="match_parent"
    android:layout_height="300dp"
    android:orientation="vertical"
    android:background="#00AAFF"
    >

    <LinearLayout
        android:layout_width="match_parent"
        android:layout_height="match_parent"
        android:background="#00FF99"
        android:padding="60dp"
        android:layout_margin="20dp"
        >
        <View
            android:layout_width="match_parent"
            android:layout_height="match_parent"
            android:background="#FF0000"/>
    </LinearLayout>


</LinearLayout>
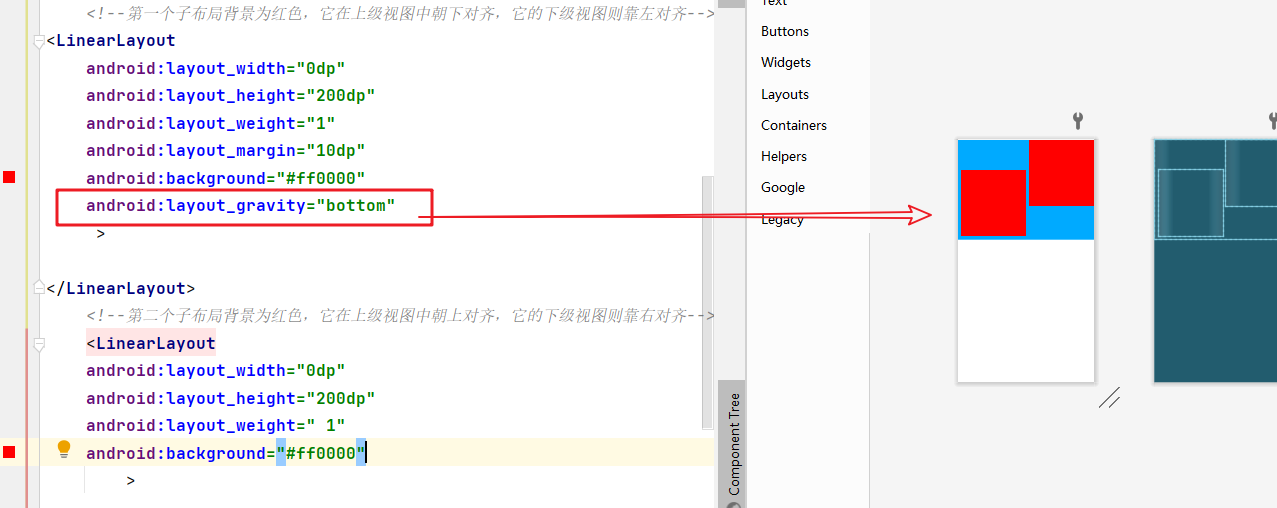
3. 设置视图的对齐方式layout_gravity
设置视图的对齐方式有两种途径:
1️⃣采用layout_gravity属性,它指定了当前视图相对于上级视图的对齐方式。采用gravity属性,它指定了下级视图相对于当前视图的对齐方式。
2️⃣layout_gravity与gravity的取值包括: left、top、right、bottom,还可以用竖线连接各取值,例如“left]top”表示即靠左又靠上,也就是朝左上角对齐。
<?xml version="1.0" encoding="utf-8"?>
<LinearLayout xmlns:android="http://schemas.android.com/apk/res/android"
    xmlns:tools="http://schemas.android.com/tools"
    android:layout_width="match_parent"
    android:layout_height="300dp"
    android:orientation="horizontal"
    android:background="#00AAFF"
    >

<!--    <LinearLayout-->
<!--        android:layout_width="match_parent"-->
<!--        android:layout_height="match_parent"-->
<!--        android:background="#00FF99"-->
<!--        android:padding="60dp"-->
<!--        android:layout_margin="20dp"-->
<!--        >-->
<!--        <View-->
<!--            android:layout_width="match_parent"-->
<!--            android:layout_height="match_parent"-->
<!--            android:background="#FF0000"/>-->


<!--    </LinearLayout>-->
    <!--第一个子布局背景为红色,它在上级视图中朝下对齐,它的下级视图则靠左对齐-->
<LinearLayout
    android:layout_width="0dp"
    android:layout_height="200dp"
    android:layout_weight="1"
    android:layout_margin="10dp"
    android:background="#ff0000"
    android:layout_gravity="bottom"
     >

</LinearLayout>
    <!--第二个子布局背景为红色,它在上级视图中朝上对齐,它的下级视图则靠右对齐-->
    <LinearLayout
    android:layout_width="0dp"
    android:layout_height="200dp"
    android:layout_weight=" 1"
    android:background="#ff0000" >

    </LinearLayout>
</LinearLayout>
总结
以上内容主要就是包含视图宽高在xml和Java代码中的设置,
和视图间距,以及视图的对齐方式。更多内容持续更新。