一、文章前言
此文主要在小程序内实现打卡功能,可根据用户位置与公司设定的打卡范围实时判断打卡场景。

二、开发流程及准备
2.1、注册微信公众平台账号。
2.2、准备腾讯地图用户Key。
三、开发步骤
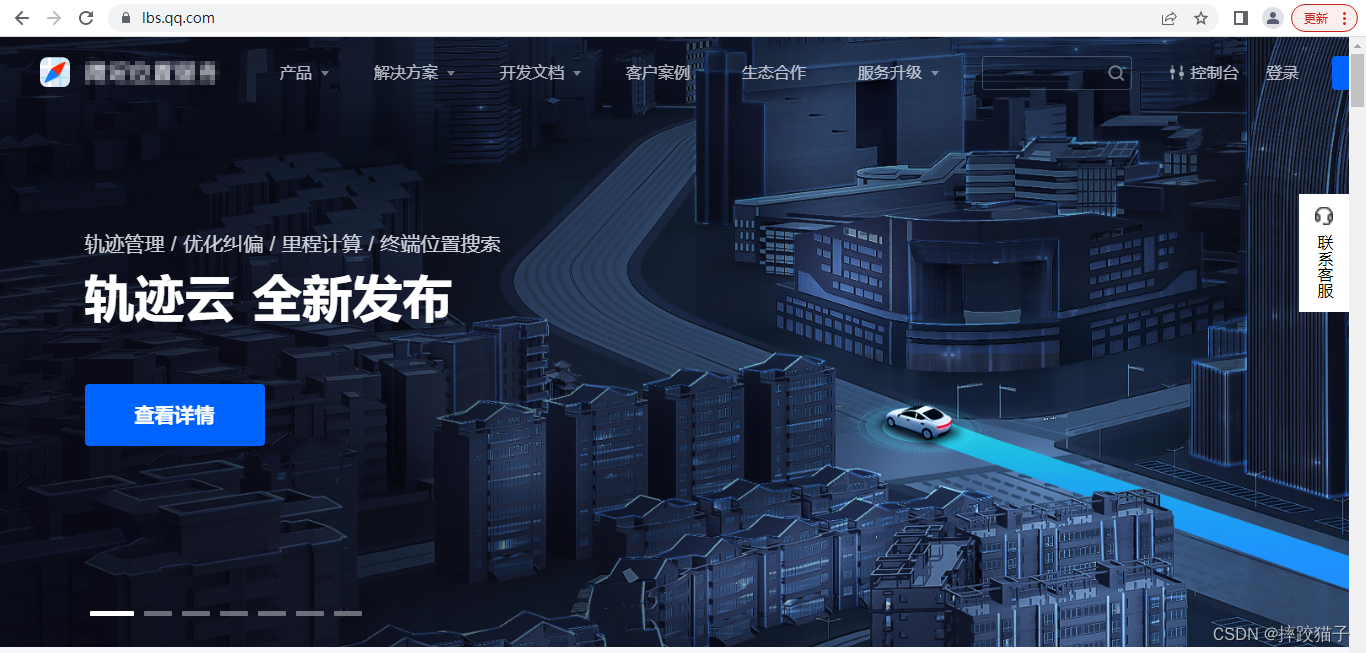
3.1、访问腾讯位置服务,申请腾讯地图用户Key,因为在后面我们需要将用户的经纬度解析成地址,所以这个步骤是必不可少的。
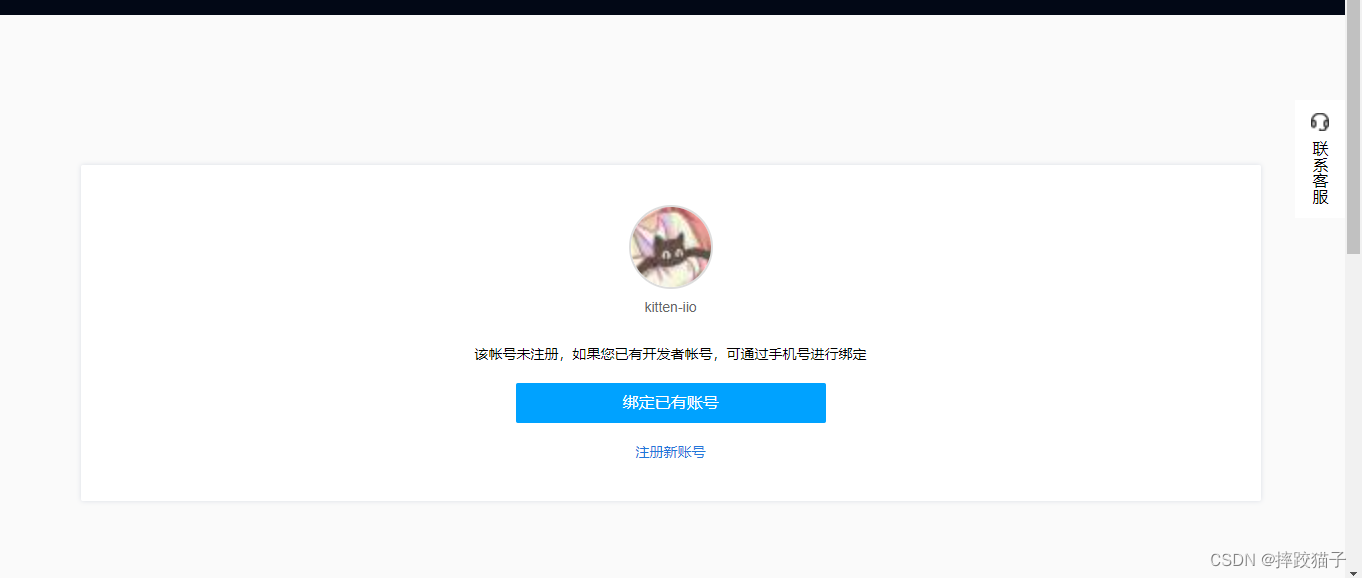
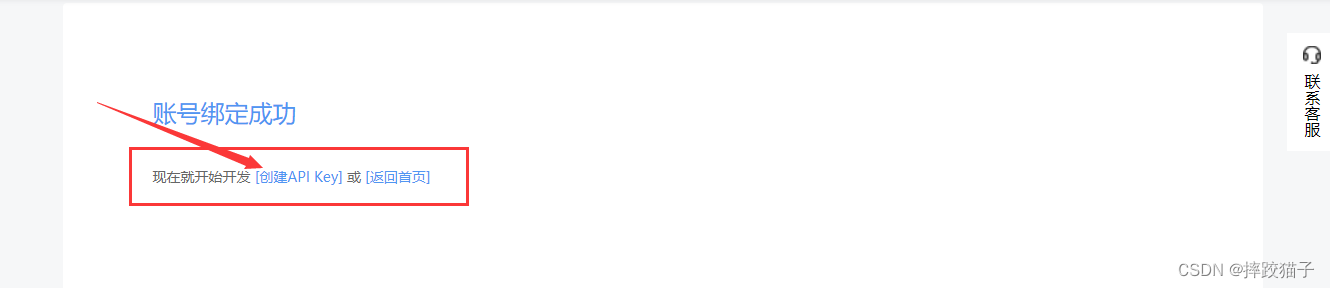
3.2、点击右上角的登陆,选择注册或绑定现有账号。
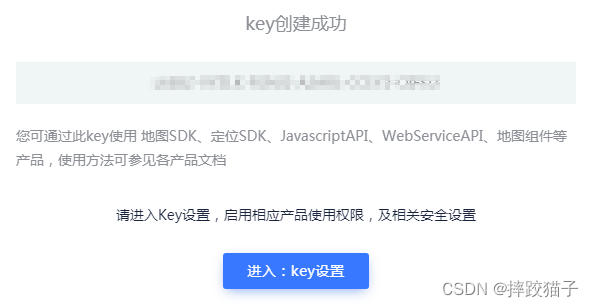
3.3、绑定完毕后,选择创建API Key。
3.4、将表单信息填写完成后,点击确定将所创建的API Key保存下来。
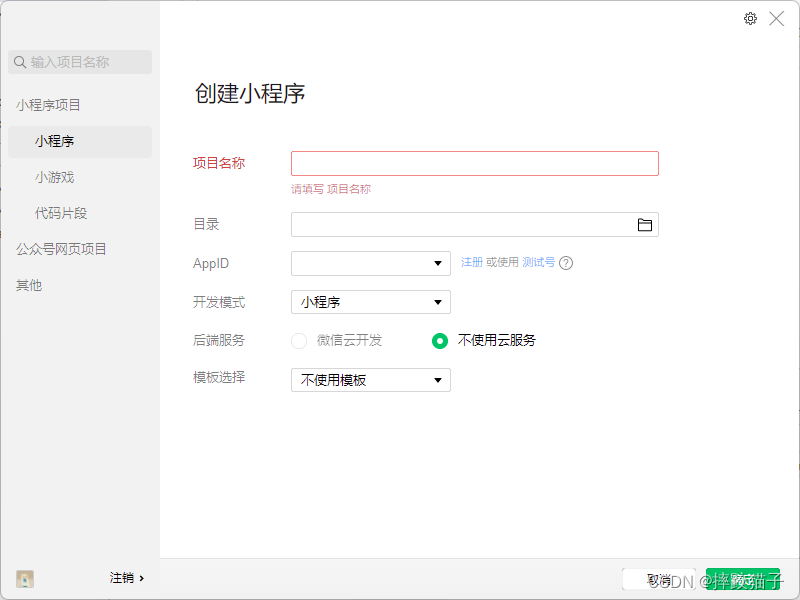
3.5、账号跟Key准备好后,我们就可以开始小程序的开发了,打开微信开发者工具,新建项目,选择不使用模板、不使用云服务。
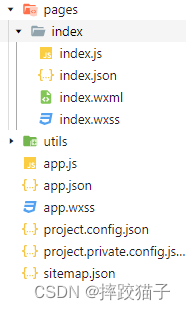
3.6、在pages文件夹下面创建一个文件夹并新建对应的page文件。
3.7、在index.js中引入utils文件夹下面的引入腾讯地图SDK核心类。
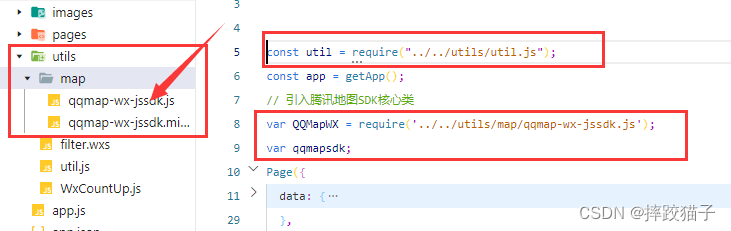
const util = require("../../utils/util.js");
const app = getApp();
// 引入腾讯地图SDK核心类
var QQMapWX = require('../../utils/map/qqmap-wx-jssdk.js');
var qqmapsdk;
3.8、在onLoad事件中我们将其进行实例化,这时就要用到我们所申请的key了。
    qqmapsdk = new QQMapWX({
      key: '刚刚所申请的key填到这里'
    });
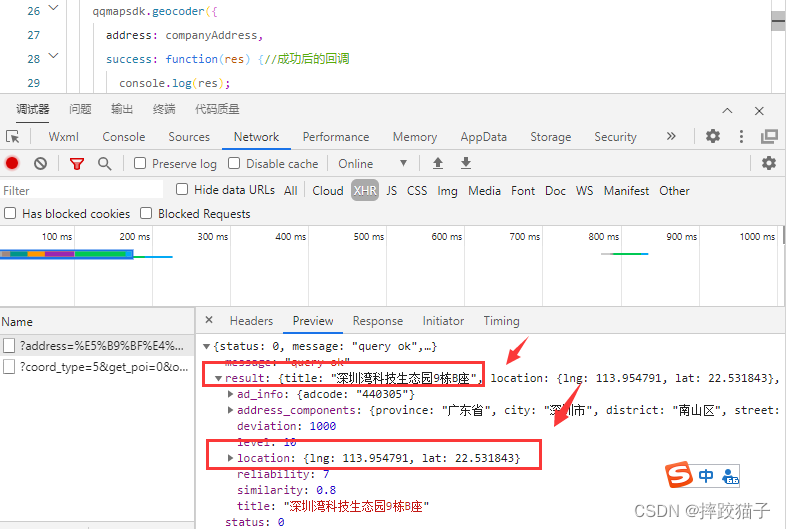
3.9、准备工作做好后,我们尝试一下这个SDK是否有效。将公司设定的打卡地址作为参数进行解析,然后将结果进行输出。
qqmapsdk.geocoder({
    address: '广东省深圳市南山区粤海街道深圳湾科技生态园9栋B座',
    success: function(res) {//成功后的回调
     	console.log(res);
    }
});
3.10、可以看到,我们所需要的经纬度等信息都顺利的解析出来了。
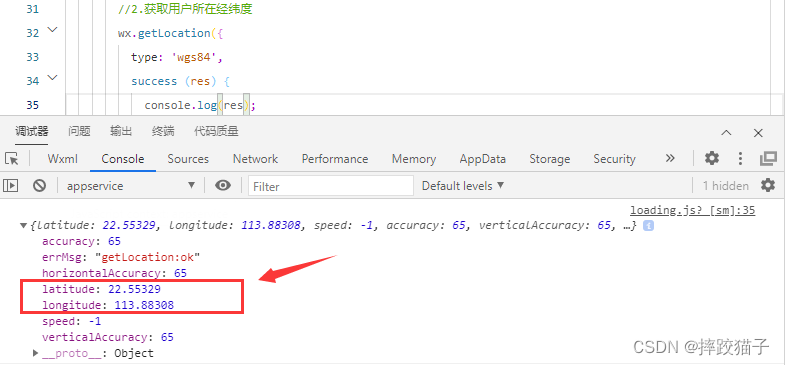
3.11、公司地址解析出来后,我们就需要获取用户实时地址信息了,这里需要调用wx.getLocation函数将结果进行打印输出。
  wx.getLocation({
  	  type: 'wgs84',
      success (res) {
        console.log(res);
      }
  });
3.12、longitude和latitude就是我们所需要的用户经纬度字段了,现在我们需要将用户经纬度逆转析为省市区地址将其显示在界面上。
 //将用户经纬度转换为地址
qqmapsdk.reverseGeocoder({//地址解析
	location: {
	  longitude: userlng,
	  latitude: userlat,
	},
	success: function (res) {
  		console.log(res);
	}
});

  that.setData({
     userAddress:res.result.address
   });
<text class="addressText">{

   {userAddress}}</text>
3.13、接下来封装两个函数,用于获取两个经纬度之间的距离。
function rad(d) {
	return d * Math.PI / 180.0;
}
function distanceOf(p1, p2) {
		var radLng1 = rad(p1.x);
		var radLng2 = rad(p2.x);
		var mdifference = radLng1 - radLng2;//	两点纬度之差
		var difference = rad(p1.y) - rad(p2.y);//	经度之差
		 //	计算两点距离的公式
		var distance = 2 * Math.asin(Math.sqrt(Math.pow(Math.sin(difference / 2), 2)
				+ Math.cos(radLng1) * Math.cos(radLng2) * Math.pow(Math.sin(mdifference / 2), 2)));
		//	弧长等于弧度乘地球半径(半径为米)
		distance = distance * 6378.137;
		//	精确距离的数值
		distance = Math.abs(Math.round(distance * 10000) / 10);
		return distance;
}
3.14、将公司地址所解析的经纬度以及用户的经纬度进行拼接作为参数传递给我们所封装的函数。这个dis就是两个经纬度之间的距离,单位是米。
//var dis = distanceOf({"x":113.954791,"y":22.531843},{"x":113.952385,"y":22.53091});
//comoanylng:公司经度,comoanylat:公司纬度,userlng:用户经度,userlat:用户纬度
 var dis = distanceOf({"x":comoanylng,"y":comoanylat},{"x":userlng,"y":userlat});
3.15、js任务完成后需要实现对应的wxml及css样式。
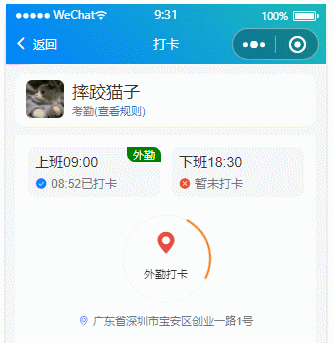
<view class="userInfo">
  <view>
    <image src="../../../images/cat.jpg"></image>
  </view>
  <view class="name">
    <view class="uName">摔跤猫子</view>
    <view>
      <text style="color:#7D8082;">考勤</text>
      <text style="color:#207CD0;">(查看规则)</text>
    </view>
  </view>
</view>
<view class="content1">
  <view class="contentBox1">
    <view class="time">
      <view class="uptime">上班09:00</view>
      <view class="cu-item cuitemText">
        <text class="cuIcon-roundcheckfill lg text-blue"></text>
        <text style="color:#74787E;margin-left:10rpx;">08:52已打卡</text>
      </view>
      <view class="iconText">外勤</view>
    </view>
    <view class="time">
      <view class="uptime">下班18:30</view>
      <view class="cu-item cuitemText">
        <text class="cuIcon-roundclosefill lg text-red"></text>
        <text style="color:#74787E;margin-left:10rpx;">暂未打卡</text>
      </view>
    </view>
  </view>
  <view class='cu-load load-modal' style="box-shadow: 0 0 0 0 white;">
  <view class="cu-item">
    <text class="cuIcon-locationfill lg  {

   {normal?'text-green':'text-red'}}"></text>
  </view>
  <view class='gray-text'>{

   {normal?'正常打卡':'外勤打卡'}}</view>
</view>
<view class="cu-item cuitemAddress">
  <text class="cuIcon-location lg text-blue"></text>
  <text class="addressText">{

   {userAddress}}</text>
</view>
</view>
/* pages/basics/load/load.wxss */
page {
  background: #F4F5F7;
}

.userInfo {
  width: 702rpx;
  height: 120rpx;
  margin-left: 24rpx;
  margin-top: 24rpx;
  background: white;
  border-radius: 25rpx;
  display: flex;
}

.userInfo image {
  width: 90rpx;
  height: 90rpx;
  margin-top: 15rpx;
  margin-left: 24rpx;
  border-radius: 15rpx;
}

.name {
  margin-left: 20rpx;
  height: 90rpx;
  margin-top: 15rpx;
}

.uName {
  font-size: 40rpx;
}

.content1 {
  height: 1000rpx;
  background: white;
  margin-top: 24rpx;
  width: 702rpx;
  margin-left: 24rpx;
  border-radius: 25rpx;
}

.contentBox1 {
  width: 702rpx;
  border: 1rpx solid white;
  display: flex;
}

.time {
  background: #F4F5F7;
  width: 315rpx;
  height: 120rpx;
  margin-top: 24rpx;
  margin-left: 24rpx;
  border-radius: 20rpx;
}

.uptime {
  margin-top: 15rpx;
  font-size: 35rpx;
  margin-left: 20rpx;
}

.cuitemText {
  font-size: 30rpx;
  margin-top: 10rpx;
  margin-left: 20rpx;
}

.cuitemAddress {
  margin-top: 270rpx;
  text-align: center;
}

.addressText {
  color: #74787E;
  margin-left: 10rpx;
}

.iconText {
  position: absolute;
  margin-top: -105rpx;
  margin-left: 235rpx;
  width: 80rpx;
  background: green;
  color: white;
  border-top-right-radius: 20rpx;
  border-bottom-left-radius: 20rpx;
  text-align: center;
}
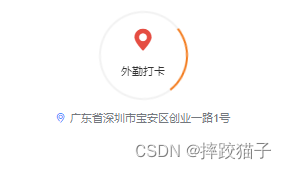
3.16、我们在调用计算距离的函数时定义一个变量用于判断当前用户所处位置是否在公司规定的打卡范围内。假设公司规定的打卡范围是200米,那么当距离超出时便给false,页面上也根据对应的值赋予不同的class样式。
  that.setData({
    	normal:dis<=200?true:false
  });
 <view class="cu-item">
    <text class="cuIcon-locationfill lg  {

   {normal?'text-green':'text-red'}}"></text>
  </view>
  <view class='gray-text'>{

   {normal?'正常打卡':'外勤打卡'}}</view>
3.17、为了优化用户体验可以在事件中加上setInterval事件,设置时间间隔,每隔多久请求一次用户地址,因为用户在打卡的时候可能正在往公司路上赶,是一个高速移动的过程。
setInterval(function () {
//每隔一秒请求一次,中间放需要请求的函数
}, 1000);
这里采用的一个比较简单的方式实现的小程序打卡定位功能,围绕公司考勤或其他业务场景设计,有兴趣的小伙伴可以往里面补充进其他的想法,让它变得更齐全好用。