六、BroadCast 广播
广播用于在Android系统内实现通知,概念较为简单

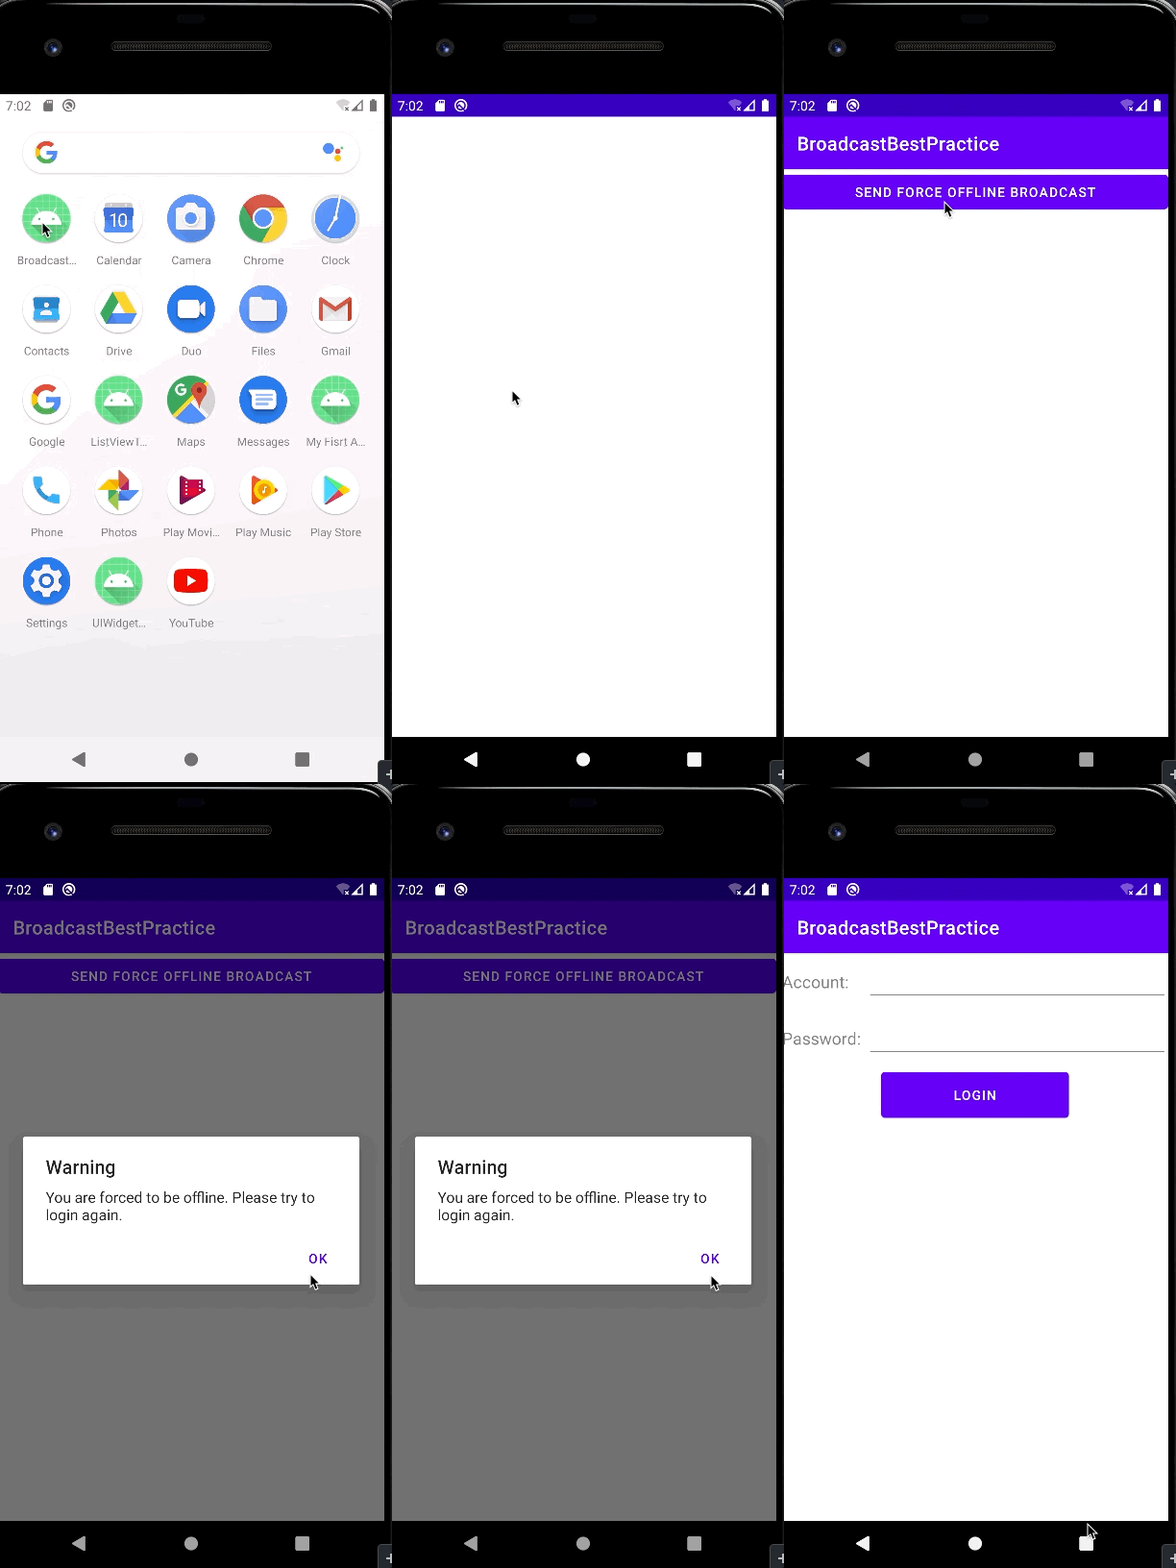
为了实现上述效果, 代码如下
- 基础类如下, 定义了
receiver, 当收到消息时, 触发receiver逻辑(弹窗, 关闭所有activities, 跳转到loginActivity)
其中注册和反注册BroadcastReceiver, 是写在onResume和onPause内, 而不是onCreate和onDestroy, 是因为我们希望只有栈顶的activity才可收到强制下线的广播, 其他非栈顶的activity不应该且没必要收此广播, 即当一个activity失去栈顶位置时自动取消BraodcastReceiver的注册
package com.example.broadcastbestpractice

import android.content.BroadcastReceiver
import android.content.Context
import android.content.Intent
import android.content.IntentFilter
import androidx.appcompat.app.AppCompatActivity
import android.os.Bundle
import androidx.appcompat.app.AlertDialog

open class BaseActivity : AppCompatActivity() {


    lateinit var receiver: ForceOfflineReceiver
    override fun onCreate(savedInstanceState: Bundle?) {


        super.onCreate(savedInstanceState)
        ActivityCollector.addActivity(this)
    }

    override fun onResume() {


        super.onResume()
        val intentFilter = IntentFilter()
        intentFilter.addAction("com.example.broadcastbestpractice.FORCE_OFFLINE")
        receiver = ForceOfflineReceiver()
        registerReceiver(receiver, intentFilter)
    }

    override fun onPause() {


        super.onPause()
        unregisterReceiver(receiver)
    }

    override fun onDestroy() {


        super.onDestroy()
        ActivityCollector.removeActivity(this)
    }

    inner class ForceOfflineReceiver : BroadcastReceiver() {


        override fun onReceive(context: Context, intent: Intent) {


            AlertDialog.Builder(context).apply {


                setTitle("Warning")
                setMessage("You are forced to be offline. Please try to login again.")
                setCancelable(false)
                setPositiveButton("OK") {

     _, _ ->
                    ActivityCollector.finishAll() // 销毁所有Activity
                    val i = Intent(context, LoginActivity::class.java)
                    context.startActivity(i) // 重新启动LoginActivity
                }
                show()
            }
        }
    }
}
MainActivity类, 继承BaseActivity类, 当点击button时发出broadcast消息, 触发后续逻辑
package com.example.broadcastbestpractice

import android.app.Activity
import android.content.Intent
import androidx.appcompat.app.AppCompatActivity
import android.os.Bundle
import kotlinx.android.synthetic.main.activity_main.*

object ActivityCollector {


    private val activities = ArrayList<Activity>()
    fun addActivity(activity: Activity) {


        activities.add(activity)
    }
    fun removeActivity(activity: Activity) {


        activities.remove(activity)
    }
    fun finishAll() {


        for (activity in activities) {


            if (!activity.isFinishing) {


                activity.finish()
            }
        }
        activities.clear()
    }
}

class MainActivity : BaseActivity() {


    override fun onCreate(savedInstanceState: Bundle?) {


        super.onCreate(savedInstanceState)
        setContentView(R.layout.activity_main)
        forceOffline.setOnClickListener {


            val intent = Intent("com.example.broadcastbestpractice.FORCE_OFFLINE")
            sendBroadcast(intent)
        }
    }
}
loginActivity, 当用户名密码输入正确是跳转到MainActivity, 否则弹出Toast
package com.example.broadcastbestpractice

import android.content.Intent
import android.os.Bundle
import android.widget.Toast
import kotlinx.android.synthetic.main.activity_login.*

class LoginActivity : BaseActivity() {


    override fun onCreate(savedInstanceState: Bundle?) {


        super.onCreate(savedInstanceState)
        setContentView(R.layout.activity_login)
        login.setOnClickListener {


            val account = accountEdit.text.toString()
            val password = passwordEdit.text.toString()
            // 如果账号是admin且密码是123456,就认为登录成功
            if (account == "admin" && password == "123456") {


                val intent = Intent(this, MainActivity::class.java)
                startActivity(intent)
                finish()
            } else {


                Toast.makeText(
                    this, "account or password is invalid",
                    Toast.LENGTH_SHORT
                ).show()
            }
        }
    }
}
- 通过在
AndroidManifest.xml中指定主activity, 可以从登录页开始
<?xml version="1.0" encoding="utf-8"?>
<manifest xmlns:android="http://schemas.android.com/apk/res/android"
    xmlns:tools="http://schemas.android.com/tools"
    package="com.example.broadcastbestpractice">

    <application
        android:allowBackup="true"
        android:dataExtractionRules="@xml/data_extraction_rules"
        android:fullBackupContent="@xml/backup_rules"
        android:icon="@mipmap/ic_launcher"
        android:label="@string/app_name"
        android:roundIcon="@mipmap/ic_launcher_round"
        android:supportsRtl="true"
        android:theme="@style/Theme.BroadcastBestPractice"
        tools:targetApi="31">
        <activity
            android:name=".BaseActivity"
            android:exported="false" />
        <activity
            android:name=".LoginActivity"
            android:exported="true">
            <intent-filter>
                <action android:name="android.intent.action.MAIN" />
                <category android:name="android.intent.category.LAUNCHER" />
            </intent-filter>
        </activity>
        <activity
            android:name=".MainActivity"
            android:exported="true" />
    </application>

</manifest>
七、Kotlin 语法
7.1 高阶函数
7.1.1 简化 SharedPreferences 的用法
通常我们若需向SharedPreferences存储数据, 需3个步骤
- 调SharedPreferences.edit()方法获取SharedPreferences.Editor对象
- 向SharedPreferences.Editor对象, 添加数据
- 调apply()方法提交数据, 完成数据存储
代码如下
val editor = getSharedPreferences("data", Context.MODE_PRIVATE).edit()
editor.putString("name", "Tom")
editor.putInt("age", 28)
editor.putBoolean("married", false)
editor.apply()
然而可通过高阶函数简化, 具体方式如下
通过新建一个SharedPreferences.kt文件, 加入如下代码, 其实是为SharedPreferences类添加了open函数, 其中open函数是高阶函数, 其参数为block函数
其中block是我们添加数据的业务逻辑,这个open函数做了一些模板工作, 它会帮我们拿到editor对象, 调我们的block()业务逻辑, 最终通过apply提交数据
fun SharedPreferences.open(block: SharedPreferences.Editor.() -> Unit) {


    val editor = edit()
    editor.block()
    editor.apply()
}
定义之后, 我们可按如下使用, 其中向open函数内传的block()函数就是如下3行业务逻辑
getSharedPreferences("data", Context.MODE_PRIVATE).open {


    putString("name", "Tom")
    putInt("age", 28)
    putBoolean("married", false)
}
其实AndroidStudioIDE在初始化项目时即自动引入了ktx库, 此库就会为我们做这些工作, 只不过将open函数名换成了edit函数名, 调用方式如下
getSharedPreferences("data", Context.MODE_PRIVATE).edit {


    putString("name", "Tom")
    putInt("age", 28)
    putBoolean("married", false)
}
7.1.2 简化 ContentValues 的用法
通常的用法是如下
val values = ContentValues()
values.put("name", "Game of Thrones")
values.put("author", "George Martin")
values.put("pages", 720)
values.put("price", 20.85)
db.insert("Book", null, values)
为了简化, 我们可定义一个ContentValues.kt文件, 在其中定义cvOf()方法
fun cvOf(vararg pairs: Pair<String, Any?>): ContentValues {


    val cv = ContentValues()
    for (pair in pairs) {


        val key = pair.first
        val value = pair.second
        when (value) {


            is Int -> cv.put(key, value)
            is Long -> cv.put(key, value)
            is Short -> cv.put(key, value)
            is Float -> cv.put(key, value)
            is Double -> cv.put(key, value)
            is Boolean -> cv.put(key, value)
            is String -> cv.put(key, value)
            is Byte -> cv.put(key, value)
            is ByteArray -> cv.put(key, value)
            null -> cv.putNull(key)
        }
    }
    return cv
}
调用的时候, 就很简化了, 通过cvOf一次性就可以输入一堆数据
val values = cvOf(
    "name" to "Game of Thrones", "author" to "George Martin",
    "pages" to 720, "price" to 20.85
)
db.insert("Book", null, values)
其实AndroidStudioIDE自动引入的ktx库, 也有contentValuesOf方法, 我们可以直接使用, 它的调用方法如下
val values = contentValuesOf("name" to "Game of Thrones", "author" to "George Martin",
 "pages" to 720, "price" to 20.85)
db.insert("Book", null, values)
7.2 泛型
通过<T>声明一个泛型类型, 使同时支持多种数据类型, 以复用代码
- 泛型类
class MyClass<T> {


    fun method (param: T): T {


        return param
    }
}

fun main() {


    val myClass = MyClass<Int>()
    val result = myClass.method(123)
}
- 泛型方法
class MyClass {


    fun <T> method (param: T): T {


        return param
    }
}
fun main() {


    val myClass = MyClass()
    val result = myClass.method(123)
}
- 为泛型增加高阶函数
// 为泛型T 增加高阶函数
// 即手动实现了kotlin中的apply()函数
fun <T> T.build(block: T.()->Unit):T {


    block()
    return this
}

// 调用高阶函数, query()拿到数据后, 调用build()函数处理数据
contentResolver.query(uri, null, null, null, null)?.build {


	while (moveToNext()) {


	    ...
	}
	close()
}
7.3 委托
委托是一种设计模式, 其理念为: 操作对象自己不会处理某逻辑, 而是委托给某辅助对象去处理. C#语言也有此语法概念.
7.3.1 类委托
一个类的具体实现, 委托给另一个类去完成
例如Set是一个接口, 使用时需用其具体的实现类(如HashSet), 而借住委托, 我们可轻松定制自己的实现类
// 定制MySet类, 实现Set接口
// 在MySet类, 接受了HashSet辅助对象的参数, MySet的实现方法其实都是通过HashSet辅助对象完成的, 这就是委托
class MySet<T>(val helperSet: HashSet<T>) : Set<T> {


	override val size: Int
	get() = helperSet.size
	override fun contains(element: T) = helperSet.contains(element)
	override fun containsAll(elements: Collection<T>) = helperSet.containsAll(elements)
	override fun isEmpty() = helperSet.isEmpty()
	override fun iterator() = helperSet.iterator()
}

// kotlin还提供了语法糖, 下文是上段代码的简写形式, 即通过by关键词
// 重写了isEmpty方法, 增加了helloWorld方法
class MySet<T>(val helperSet: HashSet<T>) : Set<T> by helperSet {


	fun helloWorld() = println("Hello World")
	override fun isEmpty() = false
}
7.3.2 属性委托
把一个属性(字段)的具体实现, 委托给另一个类去完成
class MyClass {


	// 当调p属性时, 会调Delegate类的getValue()方法
	// 当给p属性赋值时, 会调Delegate类的setValue()方法
	var p by Delegate()
}

class Delegate {


	var propValue: Any? = null
		operator fun getValue(myClass: MyClass, prop: KProperty<*>): Any? {


		return propValue
	}
	operator fun setValue(myClass: MyClass, prop: KProperty<*>, value: Any?) {


		propValue = value
	}
}
getValue()方法要接收两个参数:
- 第一个参数用于声明该Delegate类的委托功能可以在什么类中使用,这里写成MyClass表示仅可在MyClass类中使用;
- 第二个参数
KProperty<*>是 Kotlin中的一个属性操作类,可用于获取各种属性相关的值,在当前场景下用不着,但是必须在方法参数上进行声明。 - 另外,
<*>这种泛型的写法表示你不知道或者不关心泛型的具体类型,只是为了通过语法编译而已,有点类似于Java中<?>的写法。 - 至于返回值可以声明成任何类型,根据具体的实现逻辑去写就行了,上述代码只是一种示例写法。
还存在一种情况可以不用在Delegate类中实现setValue()方法,那就是MyClass中的p属性是使用val关键字声明的。
- 这一点也很好理解,如果p属性是使用val关键字声明的,那么就意味着p属性是无法在初始化之后被重新赋值的
- 因此也就没有必要实现setValue()方法,只需要实现getValue()方法就可以了
7.3.3 实现一个自己的 lazy 函数
我们希望实现和kotlin内置的by lazy语法类似的功能, 实现懒加载, 当第一次调用时才初始化变量
我们定义了Later类, 并封装了later顶层函数
package com.example.atest

import kotlin.reflect.KProperty

fun <T> later(block: () -> T) = Later(block)

class Later<T> (val block:() -> T) {


    var value: Any? = null
    operator fun getValue(any: Any?, prop: KProperty<*>):T {


        if (value == null) {


            value = block()
        }
        return value as T
    }
}
调用方式如下
val uriMatcher by later {


	val matcher = UriMatcher(UriMatcher.NO_MATCH)
	matcher.addURI(authority, "book", bookDir)
	matcher.addURI(authority, "book/#", bookItem)
	matcher.addURI(authority, "category", categoryDir)
	matcher.addURI(authority, "category/#", categoryItem)
	matcher
}