vuex状态管理(一)原理以及使用注意事项_无围之解的博客-CSDN博客
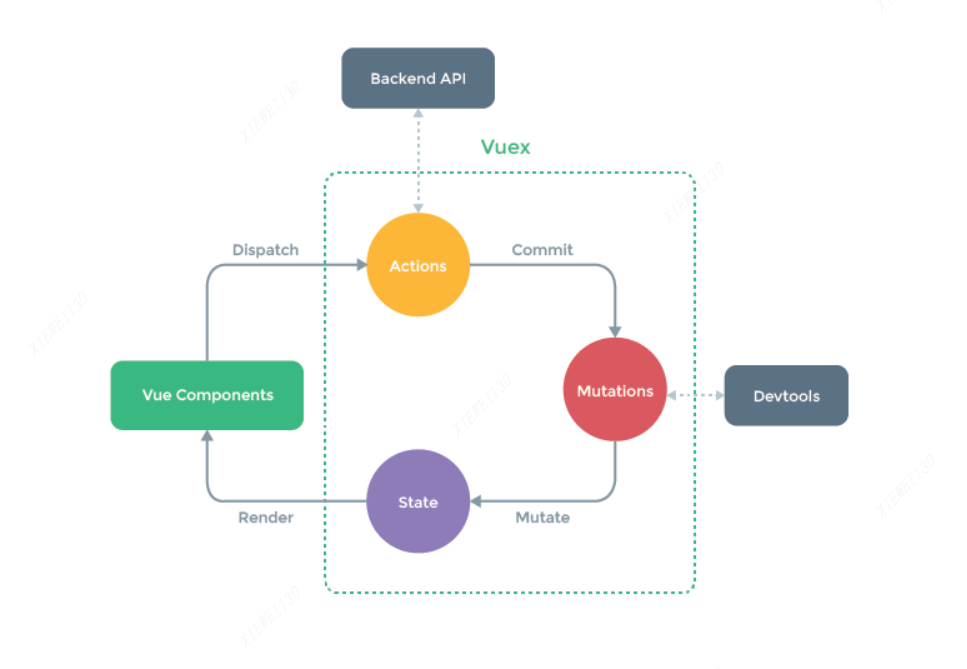
原理上一篇文章已经写了
1 本文默认首先项目已经安装了vuex,没有安装的参考官网安装一下
2 先看看正常的结构
import Vue from 'vue'
import Vuex from 'vuex'
Vue.use(Vuex)
export default new Vuex.Store({
  //定义数据
  state: {

  },
  //同步操作
  mutations: {

  },
  //异步操作
  actions: {

  },
  modules: {}
})
3 这几个主要的名词解释
3.1 state中主要是定义公共使用的数据,对象或这单个字符串,数组等等。
3.2 mutations 主要是数据的更改状态提交提交。只有这一种方式提交修改的数据才能追踪。
当你修改数据时,就需要通过commit提交, mutations会记录它的修改动作,便于跟踪管理。
3.3 actions主要时异步操作获取更改数据,但是也要最后通过dispatch就行数据提交,最终还是要通过mutations才能提交数据
3.4 mapState, mapMutations, mapActions 这些辅助函数,写法简单,用起来方便
3.5 页面获取数据 $store.state.obj1
4 下面看实例
4.1先在state中写2个数据
state: {
    //直接使用
    obj1: {
      name: "张三儿1",
      id: "obj1"
    },
    //辅助函数
    obj2: {
      name: "张三儿2",
      id: "obj2"
    }
  },
4.2然后mutations中写两个修改数据的方法
state.obj1.name = name + state.obj1.name
state.obj1.name就可以拿到state中的要操作的数据,同时可以传递一个参数name(或者多个参数)
mutations: {
//普通函数方法写
setobjName(state, name) {
state.obj1.name = name + state.obj1.name
},
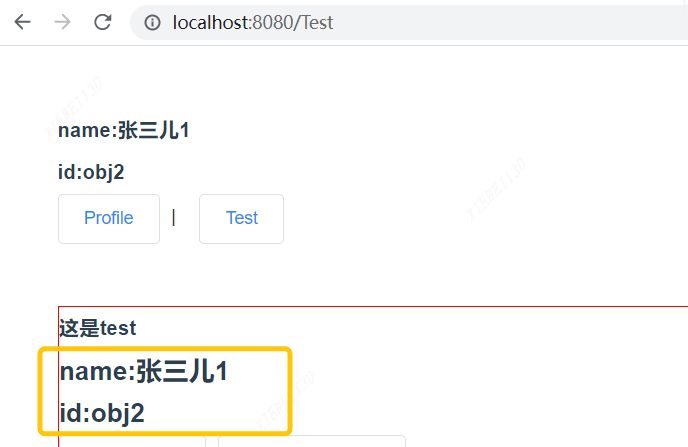
},4.3 然后去页面修改 app.vue, test.vue, profile.vue页面 分别获取obj1.name,和obj2的属性id 看下图页面渲染效果
 <h2>
      <div>name:{

   { $store.state.obj1.name }}</div>
      <div>id:{

   { $store.state.obj2.id }}</div>
    </h2>
我们看test.vue页面
4.4此时 我们在test.vue写一个button按钮改变修改数据
<el-button @click="changeName"><h3>改变name</h3></el-button>然后我们写方法调用 this.$store.commit("AAAA", BBBB);
AAAA就是mutations中要用的方法名,BBBB是参数

export default {
data() {
return {
name: "new",
};
},
methods: {
changeName() {
this.$store.commit("setobjName", this.name);
},
},
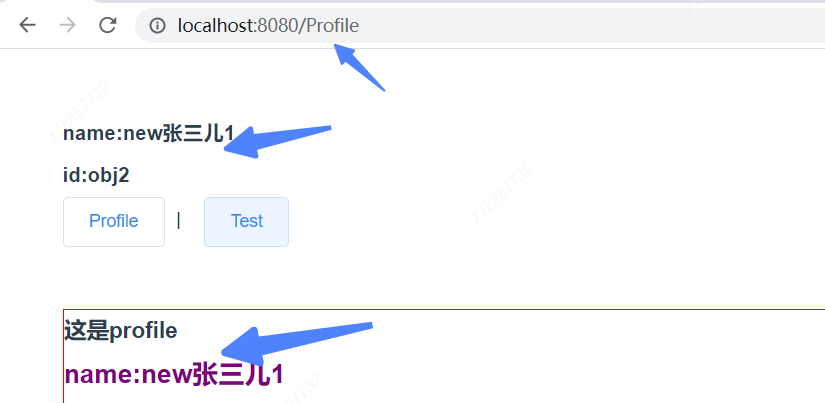
};点击一下,看效果 会发现app.vue, test.vue, profile.vue 三个页面的都改变了,成了new张三儿1,是不是很神奇
4.5 同样可以使用辅助函数写。我们在profile.vue页面写一个按钮
<el-button @click="changeIdFun"><h3>改变id</h3></el-button>此时我们页面引入辅助函数
import { mapState, mapMutations} from "vuex";然后计算属性获取
 computed: {
    ...mapState(["obj2"]),
  },
我们页面获取数据可以写成这样
<h2>

      使用辅助函数
      <div>id:{

   { obj2.id }}</div>
    </h2>
<script>
//辅助函数
import { mapState, mapMutations} from "vuex";
export default {
name: "Table",
computed: {
...mapState(["obj2"]),
},
data() {
return {
id: "new",
};
},
methods: {
//方法2 使用辅助函数提交 和下面注释的效果一样
...mapMutations(["setobjId"]),
changeIdFun() {
this.setobjId(this.id);
},
},
};
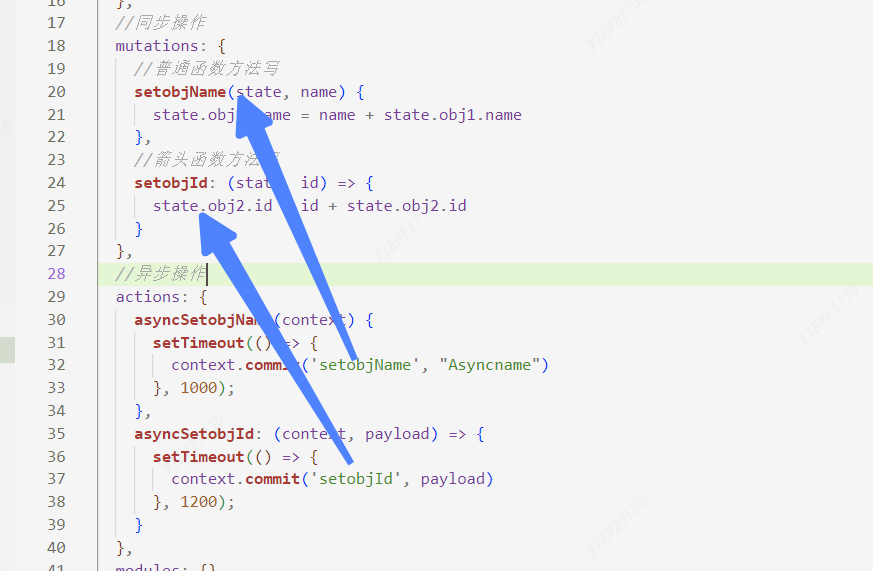
</script>5 同样异步操作经常是调用接口获取数据需要耗时,我们需要等待,追踪状态
方法asyncSetobjName,隔1秒再修改数据,传递参数Asyncname
方法asyncSetobjId 隔1.2秒再修改数据,传递动态参数
  //异步操作
  actions: {
    asyncSetobjName(context) {
      setTimeout(() => {
        context.commit('setobjName', "Asyncname")
      }, 1000);
    },
    asyncSetobjId: (context, payload) => {
      setTimeout(() => {
        context.commit('setobjId', payload)
      }, 1200);
    }
  },
会发现 context.commit('setobjName', "Asyncname")时候的方法还是mutations里面的同步方法!
同样页面提交时候 this.$store.dispatch("XXXX");
test.vue页面

 changeNameAsync() {
      this.$store.dispatch("asyncSetobjName");
    },
也可以使用辅助函数操
使用的详细教程文档结构
使用的详细教程文档结构
使用的详细教程文档结构

1 store.js文档的结构
import Vue from 'vue'
import Vuex from 'vuex'
Vue.use(Vuex)
export default new Vuex.Store({
  state: {
    //直接使用
    obj1: {
      name: "张三儿1",
      id: "obj1"
    },
    //辅助函数
    obj2: {
      name: "张三儿2",
      id: "obj2"
    }
  },
  //同步操作
  mutations: {
    //普通函数方法写
    setobjName(state, name) {
      state.obj1.name = name + state.obj1.name
    },
    //箭头函数方法写
    setobjId: (state, id) => {
      state.obj2.id = id + state.obj2.id
    }
  },
  //异步操作
  actions: {
    asyncSetobjName(context) {
      setTimeout(() => {
        context.commit('setobjName', "Asyncname")
      }, 1000);
    },
    asyncSetobjId: (context, payload) => {
      setTimeout(() => {
        context.commit('setobjId', payload)
      }, 1200);
    }
  },
  modules: {}
})
2 路由里面核心代码组件 Home, Test,Profile三个组件页面(也可以不用一下代码。自己写三个路由组件)

import Vue from 'vue'
import VueRouter from 'vue-router'
import Home from '../views/Home.vue'
import Login from '../views/login.vue'
import Footer from '../views/footer.vue'
Vue.use(VueRouter)
const VueRouterPush = VueRouter.prototype.push
VueRouter.prototype.push = function push(to) {
  return VueRouterPush.call(this, to).catch(err => err)
}
const routes = [{
    path: '/',
    name: 'Home',
    components: {
      default: Home,
      footerName: Footer
    }
  },
  {
    path: '/Login',
    name: 'Login',
    components: {
      default: Login,
    }
  },
  {
    path: '/Test',
    name: 'Test',
    meta: {
      title: "是否有权限",
      transition: "abcd"
    },
    components: {
      default: () => import('../views/Test.vue'),
      footerName: Footer
    },
    props: {
      default: route => {
        return route.query.search
      },
      footerName: {
        footerdata: "正版"
      }
    },
    beforeEnter: (to, from, next) => {
      if (to.meta.title) {
        console.log('meta后执行', to.meta.title)
      }
      next()
    }
  }, {
    path: '/Profile',
    name: 'Profile',
    components: {
      default: () => import('../views/profile.vue'),
      footerName: Footer
    },
    props: {
      default: true,
      footerName: {
        footerdata: "正版"
      }
    }
  },
  {
    path: '/:all',
    name: 'Router404',
    component: () => import('../views/Router404.vue')
  }
]
const router = new VueRouter({
  mode: 'history',
  base: process.env.BASE_URL,
  routes
})
let flag = false;
let pathName = '';
router.beforeEach((to, from, next) => {
  if (to.meta.title) {
    console.log('meta先执行')
  }
  flag = localStorage.getItem('userToken') ? true : false
  if (flag) {
    if (to.name === 'Login') {
      next('/')
    } else if (to.name === 'Home' && pathName) {
      next(pathName)
    } else {
      next()
    }
  } else {
    if (to.name === 'Login') {
      next()
    } else {
      if (to.path === '/Profile') {
        pathName = to.path
      }
      next('/Login')
    }
  }
})
export default router
3 App.vue
<template>
<div id="app" style="margin: 50px; line-height: 34px; width: 800px">
<h3>
<div>name:{
{ $store.state.obj1.name }}</div>
<div>id:{
{ $store.state.obj2.id }}</div>
</h3>
<el-button> <router-link to="/Profile">Profile</router-link></el-button> 丨
<el-button> <router-link to="/Test">Test</router-link></el-button>
<router-view v-slot="{ Component }">
<transition :name="route.meta.transition || 'fade'">
<component :is="Component" />
</transition>
</router-view>
<router-view name="footerName"></router-view>
</div>
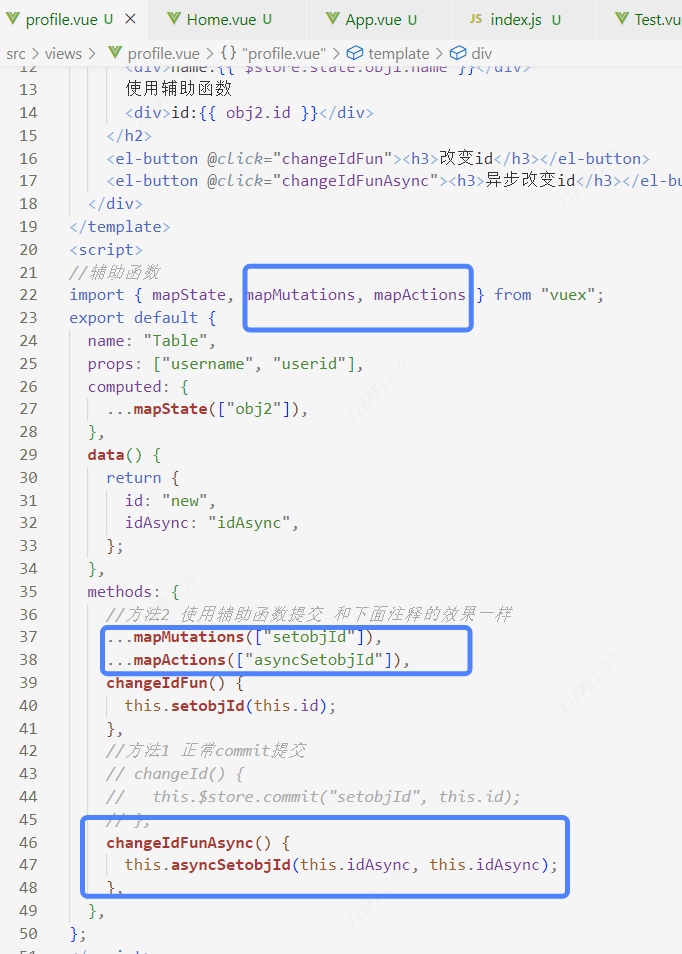
</template>4 profile.vue
<template>
  <div
    style="
      margin-top: 50px;
      line-height: 34px;
      width: 800px;
      border: 1px solid red;
    "
  >
    <h3>这是profile</h3>
    <h2>
      <div>name:{

   { $store.state.obj1.name }}</div>
      使用辅助函数
      <div>id:{

   { obj2.id }}</div>
    </h2>
    <el-button @click="changeIdFun"><h3>改变id</h3></el-button>
    <el-button @click="changeIdFunAsync"><h3>异步改变id</h3></el-button>
  </div>
</template>
<script>
//辅助函数
import { mapState, mapMutations, mapActions } from "vuex";
export default {
  name: "Table",
  props: ["username", "userid"],
  computed: {
    ...mapState(["obj2"]),
  },
  data() {
    return {
      id: "new",
      idAsync: "idAsync",
    };
  },
  methods: {
    //方法2 使用辅助函数提交 和下面注释的效果一样
    ...mapMutations(["setobjId"]),
    ...mapActions(["asyncSetobjId"]),
    changeIdFun() {
      this.setobjId(this.id);
    },
    //方法1 正常commit提交
    // changeId() {
    //   this.$store.commit("setobjId", this.id);
    // },
    changeIdFunAsync() {
      this.asyncSetobjId(this.idAsync, this.idAsync);
    },
  },
};
</script>
<style scoped lang="scss">
h2 {
  color: purple;
  margin-bottom: 10px;
}
h3 {
  font-size: 18px;
}
</style>
5 test.vue
<template>
  <div
    id="app"
    style="
      margin-top: 50px;
      line-height: 34px;
      width: 800px;
      border: 1px solid red;
    "
  >
    <h3>这是test</h3>
    <h2>
      <div>name:{

   { $store.state.obj1.name }}</div>
      <div>id:{

   { $store.state.obj2.id }}</div>
    </h2>
    <el-button @click="changeName"><h3>改变name</h3></el-button>
    <el-button @click="changeNameAsync"><h3>异步改变name</h3></el-button>
  </div>
</template>
<script>
export default {
  name: "test",
  props: ["search"],
  data() {
    return {
      index: 1,
      name: "new",
    };
  },
  methods: {
    changeName() {
      this.$store.commit("setobjName", this.name);
    },
    changeNameAsync() {
      this.$store.dispatch("asyncSetobjName");
    },
  },
};
</script>
下一篇讲解模块化处理,module高级用法
看到这里的给个赞哦 ,码字不容易,半小时多,感谢各位