1,效果展示
为此,我专门还去查了查,怎么将视频转化为gif图,不知不觉中,我又多学会了一项技能。
OK!cool,效果很不错,今天需要搭配一些文件,都是可以从官网里找到的,那么我为了方便,专门去学习怎么在GitHub上托管项目,还下载了VScode和Git,我太难受了,如果不是要写博客,我绝对懒得去找教程。谢谢自己!
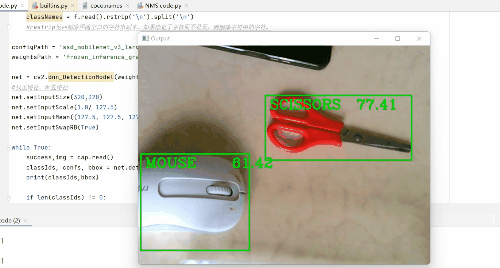
那么在此gif图像中,我检测了水瓶(截图时间不够了),鼠标,剪刀,书,手机,牙刷,键盘,电脑等。
2,项目准备
-
文件搭建
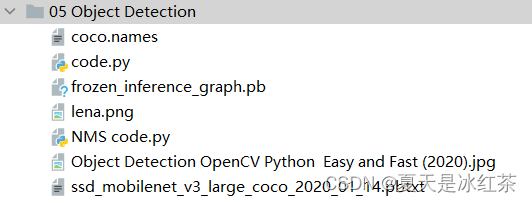
我会在结尾处,提供相关的资源,我们先在项目下新建一个目录,其中包含的文件,如图所示:
3,代码的讲解与展示
import cv2

thres = 0.45 # Threshold to detect object

cap = cv2.VideoCapture(1)
cap.set(3,640)
cap.set(4,480)
cap.set(10,70)

classNames= []
classFile = 'coco.names'
with open(classFile,'rt') as f:
    classNames = f.read().rstrip('\n').split('\n')
    #restrip返回删除尾随空白的字符串副本。如果给定了字符而不是无,则删除字符中的字符。

configPath = 'ssd_mobilenet_v3_large_coco_2020_01_14.pbtxt'
weightsPath = 'frozen_inference_graph.pb'

net = cv2.dnn_DetectionModel(weightsPath,configPath)
net.setInputSize(320,320)
net.setInputScale(1.0/ 127.5)
net.setInputMean((127.5, 127.5, 127.5))
net.setInputSwapRB(True)

while True:
    success,img = cap.read()
    classIds, confs, bbox = net.detect(img,confThreshold=thres)
    print(classIds,bbox)

    if len(classIds) != 0:
        for classId, confidence,box in zip(classIds.flatten(),confs.flatten(),bbox):
            cv2.rectangle(img,box,color=(0,255,0),thickness=2)
            cv2.putText(img,classNames[classId-1].upper(),(box[0]+10,box[1]+30),
                        cv2.FONT_HERSHEY_COMPLEX,1,(0,255,0),2)
            cv2.putText(img,str(round(confidence*100,2)),(box[0]+200,box[1]+30),
                        cv2.FONT_HERSHEY_COMPLEX,1,(0,255,0),2)

    cv2.imshow("Output", img)
    if cv2.waitKey(1) & 0xFF == 27:
        break
    #对于物体的检测
今天的重点在于讲解代码的思路。
- 首先,打开我们的外部摄像头,并且设置窗口的宽,长,亮度,注意不要将窗口的大小超出我们外部摄像头的大小,不然你得到的图像可能就是黑屏。
- 其次,在我们的coco.names文件当中,它是每个名词单独一行,所以通过文件操作,将其内容放入一个空列表当中,我们用到了read(),rstrip(),split()函数,不清楚的地方,可以去W3school上查询。
- 接着,我们看看在包含了net的代码,它用到了DNN算法,其余的函数都可以在dnn.py文件里面查找到。
(1) setInputSize(weight,height)weight新输入宽度,height新输入宽度。 (2) setInputScale(1.0/ 127.5)设置帧的缩放因子值,帧值的比例乘数。 (3) setInputMean((127.5, 127.5, 127.5))简要设置帧的平均值。 (4) setInputSwapRB(True)将帧的标志设置为True。
- 然后,又要用到一个detect()函数,它是属于class DetectionModel(Model)下的函数,在这里confThreshold用于根据置信度筛选框的阈值,我们将其阈值放在了较前面的位置,方便更改,它会返回ClassID结果检测中的类索引,一组对应的置信度,一组边界框。
- 除此之外,我们用len(classIds) != 0来代表检测到了物体,然而我们有三个需要遍历的变量或信息,所以我们用到了zip函数,避免了写三个循环,而flatten()函数可以将其中的信息展开,再然后画框,放置文本,在这里需要提两句,在coco.name文件里面,每个名词是从1开始的,而classNames列表是从0开始的,故要在索引处-1,使用round()函数是因为confidence是小数,会与之前的classNmaes的东西叠加在一起,故此将其看作是百分数,并保留了两位小数。
- 最后就是,imshow的展示窗口,以及点击Esc键推出。
4,项目优化
我已经将注释写在了代码当中,如有不清楚的地方,可以将其打印出来,进行观察。
其优化效果——有效的优化了之前检测框闪烁和重叠的现象。
import cv2
import numpy as np

thres = 0.45 # Threshold to detect object
#使用nms,不会像先前那样检测框有重叠和闪烁
nms_threshold = 0.2  #0.2 已经是较大的抑制效果
#若设置成1,将没有效果
cap = cv2.VideoCapture(1)
cap.set(3,1280)
cap.set(4,720)
cap.set(10,150)

classNames= []
classFile = 'coco.names'
with open(classFile,'rt') as f:
    classNames = f.read().rstrip('\n').split('\n')

#print(classNames)
configPath = 'ssd_mobilenet_v3_large_coco_2020_01_14.pbtxt'
weightsPath = 'frozen_inference_graph.pb'

net = cv2.dnn_DetectionModel(weightsPath,configPath)
net.setInputSize(320,320)
net.setInputScale(1.0/ 127.5)
net.setInputMean((127.5, 127.5, 127.5))
net.setInputSwapRB(True)

while True:
    success,img = cap.read()
    classIds, confs, bbox = net.detect(img,confThreshold=thres)
    bbox = list(bbox)
    #bbox本身得到的是numpy的数组,将其改为list
    confs = list(np.array(confs).reshape(1,-1)[0])
    #将其内容转化为只有一个列表,使用np.array()是因为元组是不能reshape
    confs = list(map(float,confs))
    #原本的confs是float32的形式,使用map()函数将float映射在confs上
    #print(type(confs[0]))
    #print(confs)
    indices = cv2.dnn.NMSBoxes(bbox,confs,thres,nms_threshold)
    #print(indices)
    for i in indices:
        i = i[0]
        #打印(indices)的内容是[[0]]
        box = bbox[i]
        x,y,w,h = box[0],box[1],box[2],box[3]
        cv2.rectangle(img, (x,y),(x+w,h+y), color=(0, 255, 0), thickness=2)
        cv2.putText(img,classNames[classIds[i][0]-1].upper(),(box[0]+10,box[1]+30),
                    cv2.FONT_HERSHEY_COMPLEX,1,(0,255,0),2)
        #此处需要一个classIds的特殊索引,它就是i,而且已经有了一个[],所以是[i][0]

    cv2.imshow("Output",img)
    cv2.waitKey(1)
5,项目资源
免费转化为Gif图网站:踢踢零工具 - tt0.top![]() https://tt0.top/
https://tt0.top/
6,项目总结与评价
其中的很多算法我也不是很明白,只是使用的思路学会到了,后面将会有人脸检测的项目,应该会用到YOYO算法。希望有人能在这个项目中玩的开心,感谢您的关注与支持!!!