文章目录
git代码地址:https://gitee.com/it-sherlock/java-project-template。
1. Eureka 之 Eureka 基础知识
Eureka用来作为服务注册与发现功能的服务器。
Eureka已经被其他服务取代,但是仍然有老项目会存在使用Eureka的场景。
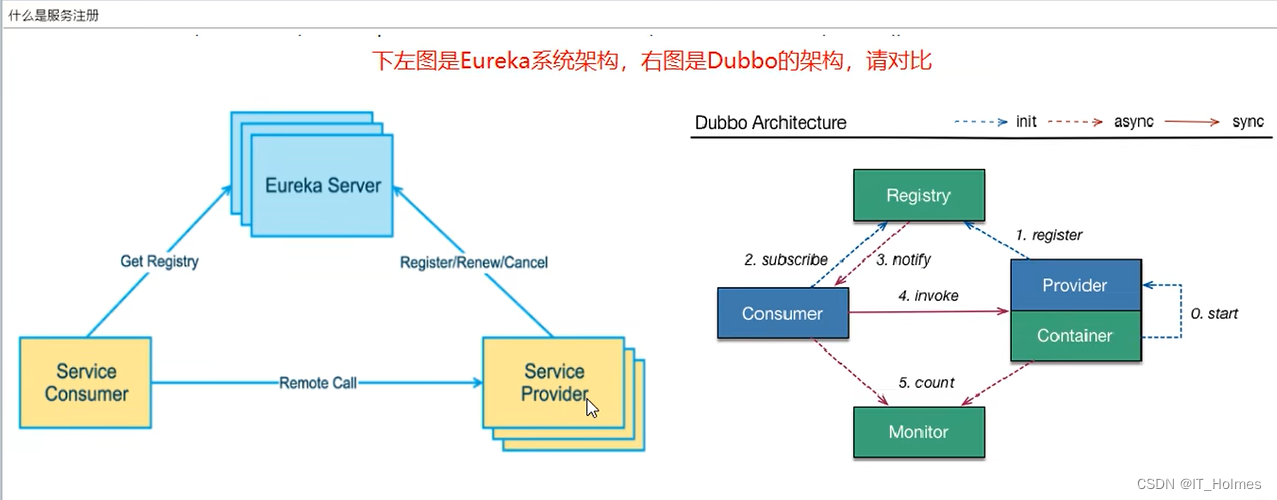
Eureka和Dubbo的架构对比图:
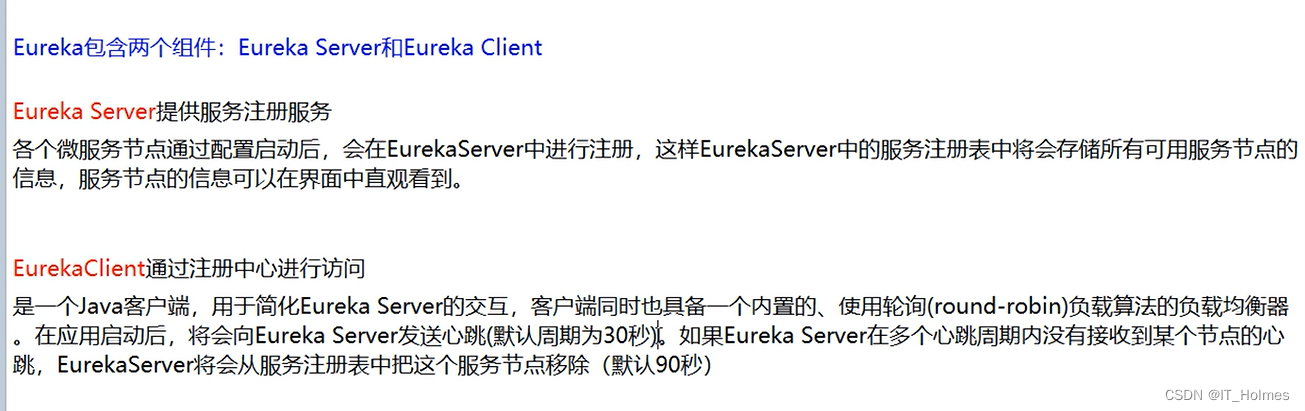
Eureka的两个组件:Eureka Server 和 Eureka Client。
2. Eureka 之 Eureka Server服务端安装
搭建好下图红色部分:
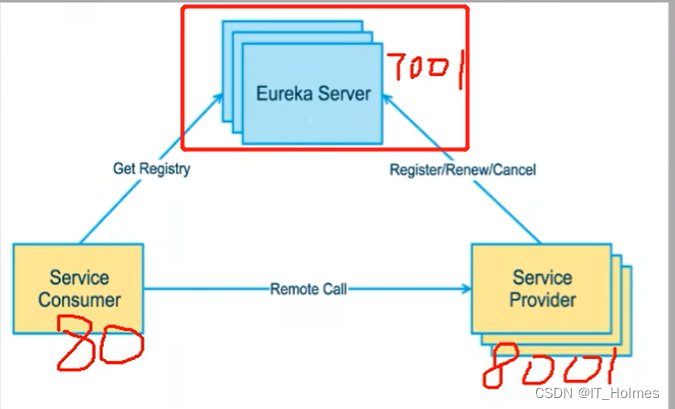
第一步:创建一个springboot项目作为Eureka Server服务端,cloud-eureka-server7001项目导入eureka-server服务端jar包。
 <!--导入eureka-server服务端的jar包-->
<dependency>
    <groupId>org.springframework.cloud</groupId>
    <artifactId>spring-cloud-starter-netflix-eureka-server</artifactId>
</dependency>
第二步:配置application.yaml,配置对应的eureka-server的相关信息。
server:
  port: 7001

eureka:
  instance:
    hostname: localhost # eureka服务端的实例名称
  client:
    # false表示不向注册中心注册自己(本身这个项目就是注册中心,没必要注册自己)
    register-with-eureka: false
    # false表示自己端就是注册中心,该项目的职责就是维护服务实例,并不需要检索服务。
    fetch-registry: false
    service-url:
      # 设置与Eureka Server交互的地址查询服务和注册服务都需要依赖这个地址。
      defaultZone: http://${

    eureka.instance.hostname}:${

    server.port}/eureka/
第三步:@EnableEurekaServer注解表示启动EurekaServer服务。
package com.itholmes.springcloud;

import org.springframework.boot.SpringApplication;
import org.springframework.boot.autoconfigure.SpringBootApplication;
import org.springframework.cloud.netflix.eureka.server.EnableEurekaServer;

@SpringBootApplication
@EnableEurekaServer
public class EurekaMain7001 {


    public static void main(String[] args) {


        SpringApplication.run(EurekaMain7001.class,args);
    }
}
第四步:测试Eurake Server,启动该项目,访问对应路径,能查看到Eurake Server的web页面表示成功!

3. Eureka 之 将别的项目入驻进Eureka Server
配置好了Eureka Server服务器后,那么对于其他项目就相当于Eureka Client客户端。
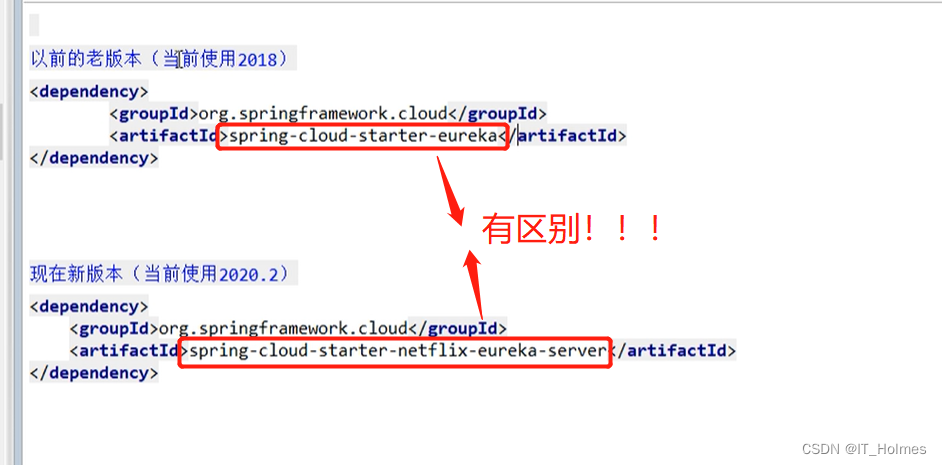
第一步:添加netflix-eureka-client的依赖包(注意这里有很多不同版本eureka,导入的包最好对应!)。
 <dependency>
    <groupId>org.springframework.cloud</groupId>
    <artifactId>spring-cloud-starter-netflix-eureka-client</artifactId>
</dependency>
第二步:给SpringBoot启动类添加上@EnableEurekaClient注解。
第三步:修改application.yml配置。
server:
port: 8001
spring:
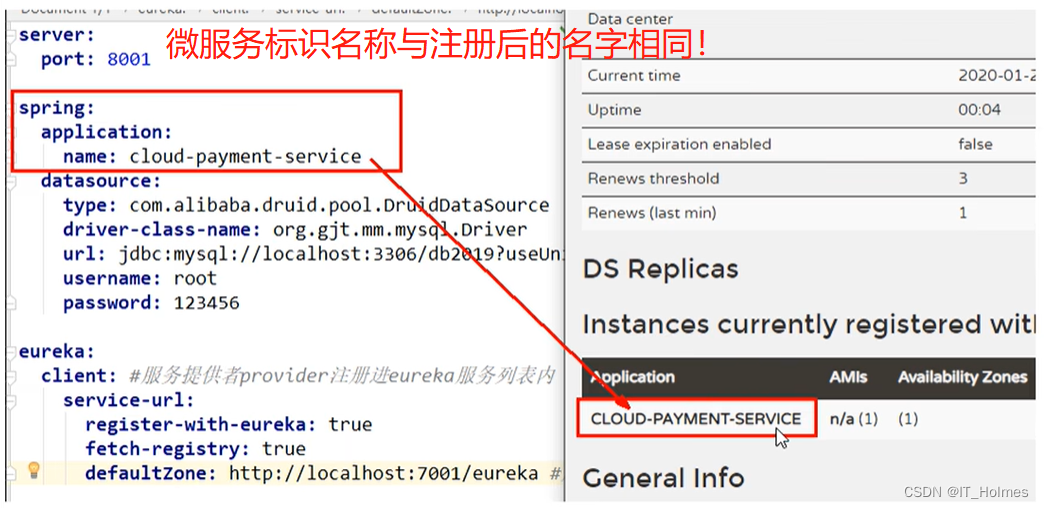
application:
# 微服务的注册名称,这个与注册中心有关系!
name: cloud-payment-service
eureka:
client:
# 表示是否将自己注册进EurekaServer默认为true
register-with-eureka: true
# 是否从eurekaServer抓取已有的注册信息,默认为true。单节点无所谓,集群必须设置为true才能配合ribbon使用负载均衡
fetch-registry: true
# 入驻地址是哪个
service-url:
defaultZone: http://localhost:7001/eureka
mybatis:
mapper-locations: classpath:mapper/*.xml
type-aliases-package: com.itholmes.springcloud.entities # 所有Entity别名类所在包
第四步:启动测试。启动时,先启动eureka Server,在启动client!
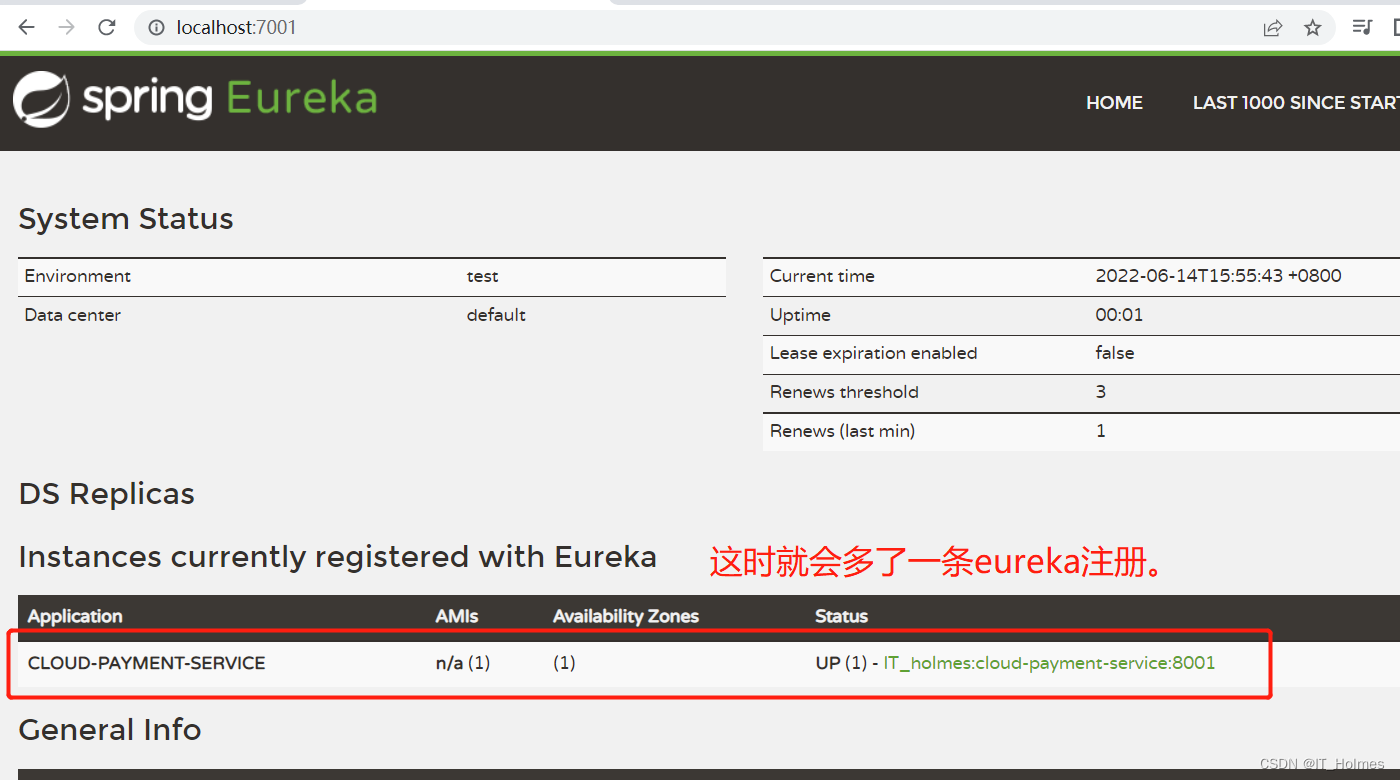
由上图可见,实际上Eureka Server存储的就是key-value形式,key是微服务应用名称(服务别名),value就是对应的地址。
以下代码的作用:
spring:
  application:
    name: cloud-payment-service
如果你是微服务的话,它起到了唯一标识的作用,(不然你怎么让注册中心知道你注册的这个服务实例,逻辑上是属于哪个服务的)
yml格式缩进错误注意!!!
4. Eureka 之 搭建Eureka 集群
通过搭建Eureka注册中心集群,实现负载均衡和故障容错!
这个时候就需要多个eureka server项目。
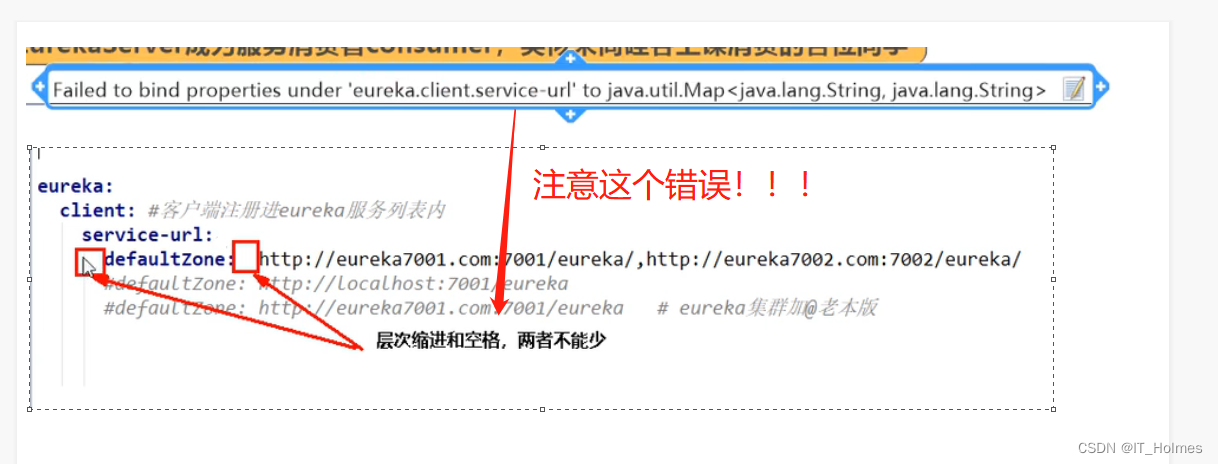
配置多个eureka server项目。集群的原理就是:相互注册,相互守望。
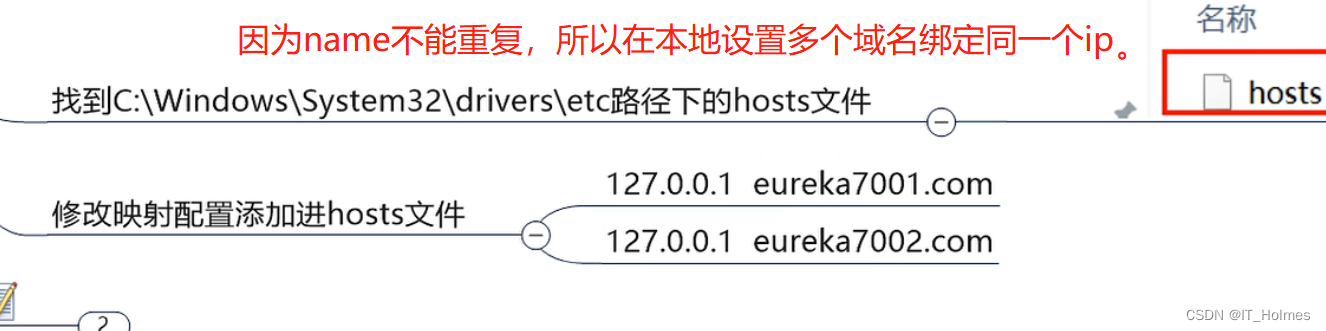
第一步:相互注册,相互守望就是每个EurekaServer之间进行相互配置!
- 下面的defaultZone: xxx 配置其他EurekaServer的地址。
server:
  port: 7002 # 这里是7002端口的eureka 下面就要注册上eureka7001的eureka地址。

eureka:
  instance:
    hostname: eureka7002.com # eureka服务端的实例名称
  client:
    # false表示不向注册中心注册自己(本身这个项目就是注册中心,没必要注册自己)
    register-with-eureka: false
    # false表示自己端就是注册中心,该项目的职责就是维护服务实例,并不需要检索服务。
    fetch-registry: false
    service-url:
      # 设置与Eureka Server交互的地址查询服务和注册服务都需要依赖这个地址。
      defaultZone: http://eureka7001.com:7001/eureka/
第二步:将每个微服务注册到Eureke集群中。
- 下面只写了两台。
eureka:
  client:
    # 表示是否将自己注册进EurekaServer默认为true
    register-with-eureka: true
    # 是否从eurekaServer抓取已有的注册信息,默认为true。单节点无所谓,集群必须设置为true才能配合ribbon使用负载均衡
    fetch-registry: true
    # 入驻地址是哪个
    service-url:
      # defaultZone: http://localhost:7001/eureka # 单机
      defaultZone: http://eureka7001.com:7001/eureka,http://eureka7002.com:7002/eureka # 集群配置
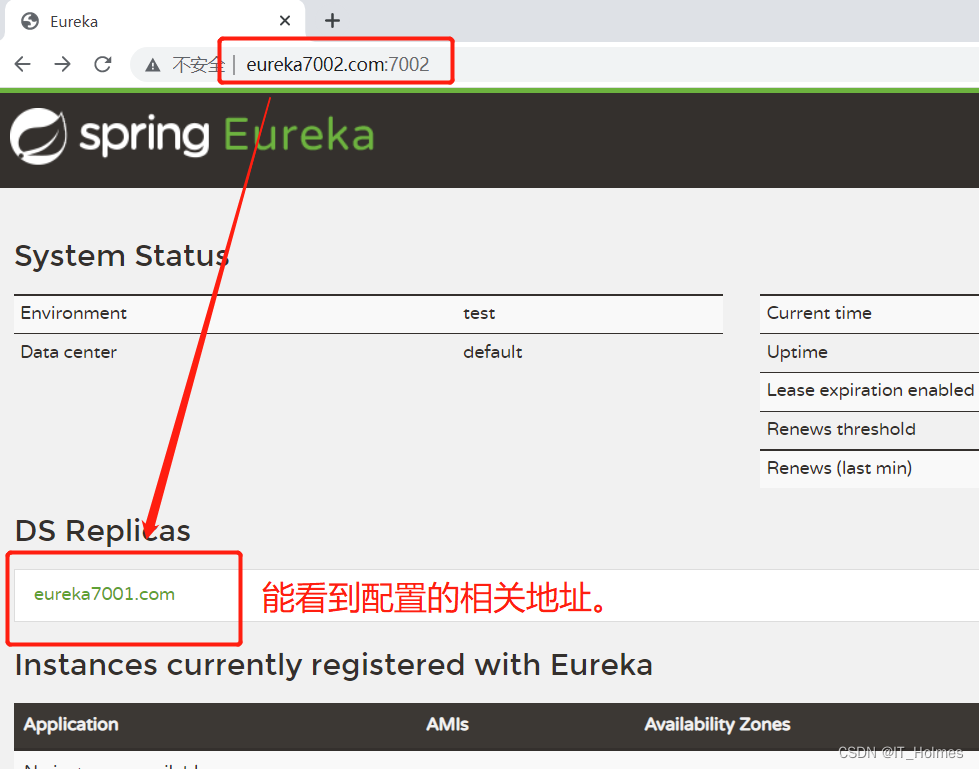
第三步:测试,启动。
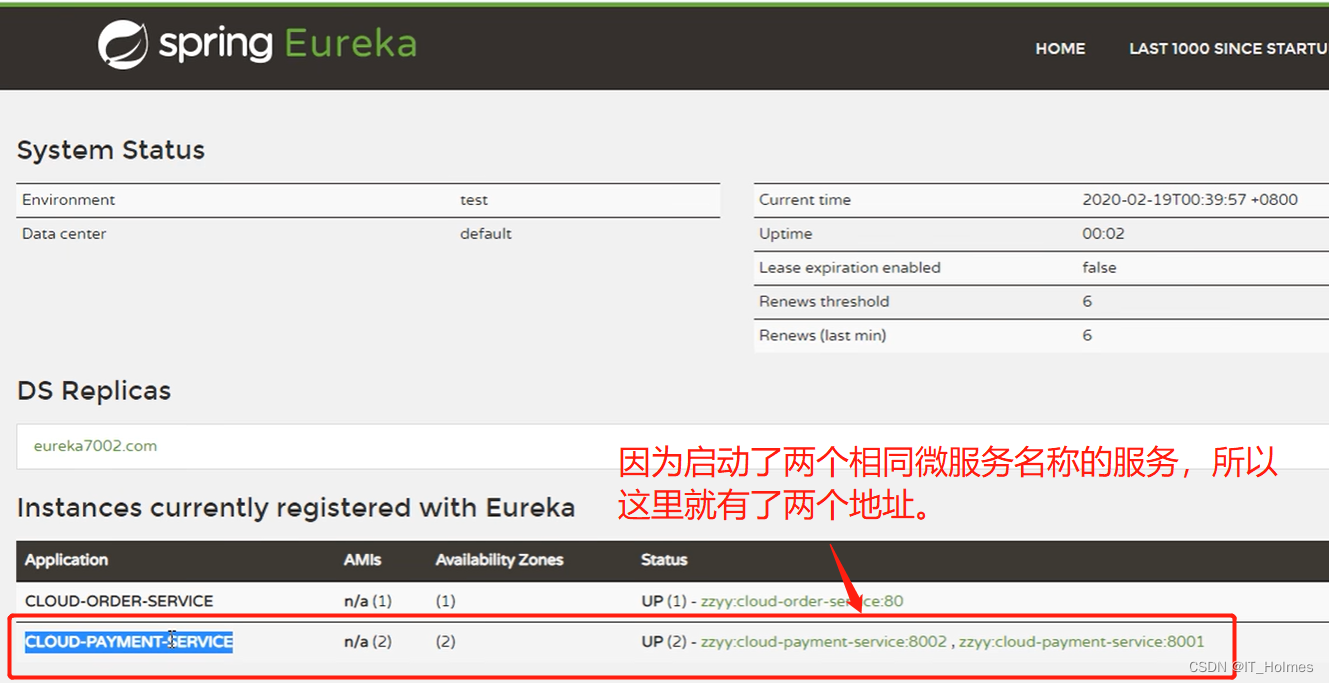
5. Eureka 之 搭建 业务逻辑集群
创建两个相同的业务逻辑的springboot微服务项目,要注意他们端口号不同,但是微服务名称(spring.application.name相同!)。

同时它们都注册到了eureka server服务器中,这样我们进入eureka的web页面就可以看到对应的微服务应用名称下面就有了两个注册地址:
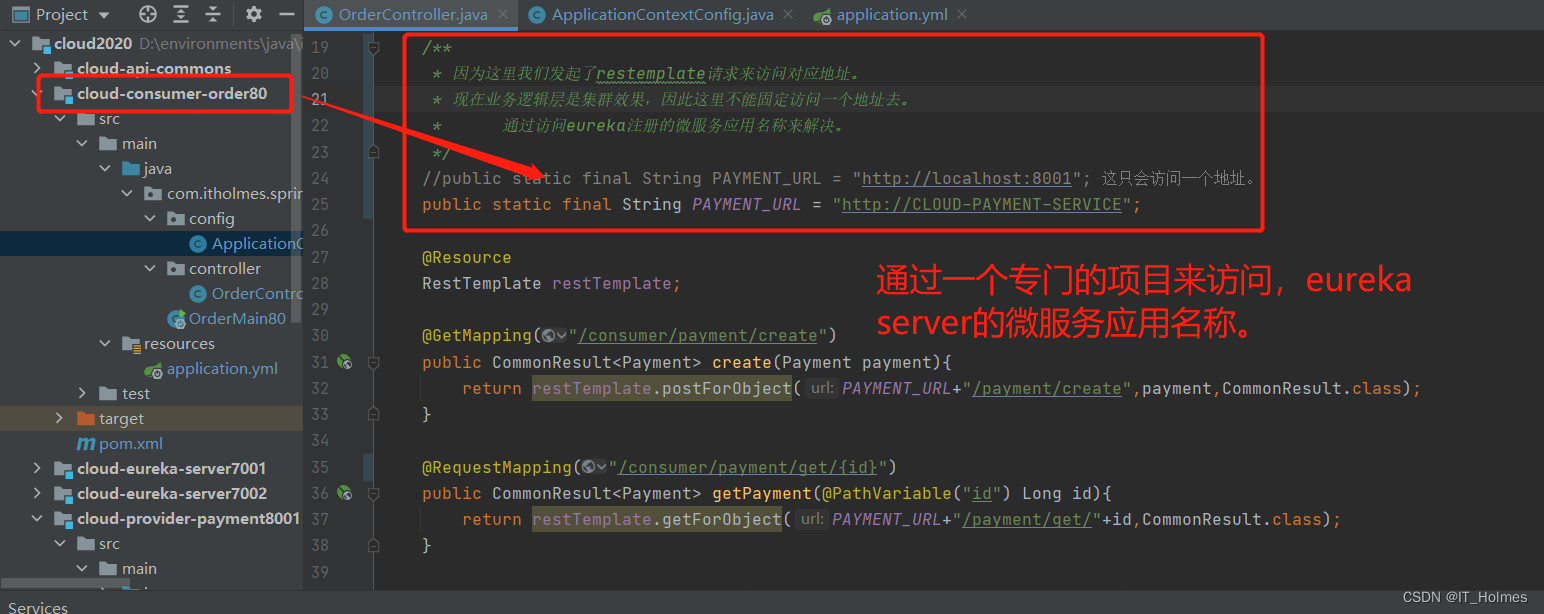
这样我们可以写一个专门的项目来让其关联eureka server,并且担当一个发送请求的过度者:
这是consumer-order80项目,通过该项目访问其他项目,这样就可以通过在eureka server注册的微服务应用名称,通过微服务名称来访问业务逻辑集群的服务器。
代码如下:
package com.itholmes.springcloud.controller;

import com.itholmes.springcloud.entities.CommonResult;
import com.itholmes.springcloud.entities.Payment;
import lombok.extern.slf4j.Slf4j;
import org.springframework.beans.factory.annotation.Autowired;
import org.springframework.web.bind.annotation.GetMapping;
import org.springframework.web.bind.annotation.PathVariable;
import org.springframework.web.bind.annotation.RequestMapping;
import org.springframework.web.bind.annotation.RestController;
import org.springframework.web.client.RestTemplate;

import javax.annotation.Resource;

@RestController
@Slf4j
public class OrderController {


    /**
     * 因为这里我们发起了restemplate请求来访问对应地址。
     * 现在业务逻辑层是集群效果,因此这里不能固定访问一个地址去。
     *      通过访问eureka注册的微服务应用名称来解决。
     */
    //public static final String PAYMENT_URL = "http://localhost:8001"; 这只会访问一个地址。
    public static final String PAYMENT_URL = "http://CLOUD-PAYMENT-SERVICE";

    @Resource
    RestTemplate restTemplate;

    @GetMapping("/consumer/payment/create")
    public CommonResult<Payment> create(Payment payment){


        return restTemplate.postForObject(PAYMENT_URL+"/payment/create",payment,CommonResult.class);
    }

    @RequestMapping("/consumer/payment/get/{id}")
    public CommonResult<Payment> getPayment(@PathVariable("id") Long id){


        return restTemplate.getForObject(PAYMENT_URL+"/payment/get/"+id,CommonResult.class);
    }

}
此外,我们还需要给ioc容器里面的RestTemplate对象加载一个注解@LoadBalanced :
- 使用@LoadBalanced注解赋予RestTemplate负载均衡的能力(RestTemplate就具有了客户端负载均衡能力)。
package com.itholmes.springcloud.config;

import org.springframework.cloud.client.loadbalancer.LoadBalanced;
import org.springframework.context.annotation.Bean;
import org.springframework.context.annotation.Configuration;
import org.springframework.web.client.RestTemplate;

//给ioc容器添加restTemplate对象。
@Configuration
public class ApplicationContextConfig {


    @Bean
    @LoadBalanced //使用@LoadBalanced注解赋予RestTemplate负载均衡的能力
    public RestTemplate getRestTemplate(){


        return new RestTemplate();
    }
}
这里搭建eureka的时候,我本地账户的主机名是IT_holmes,因为有了’ _ '符号导致域名报错不能访问,一定注意!

解决办法:
- 可以修改instance-id,名称。
- 详细地址:https://blog.csdn.net/mango5208/article/details/107208637。
eureka:
  client:
    # 表示是否将自己注册进EurekaServer默认为true
    register-with-eureka: true
    # 是否从eurekaServer抓取已有的注册信息,默认为true。单节点无所谓,集群必须设置为true才能配合ribbon使用负载均衡
    fetch-registry: true
    # 入驻地址是哪个
    service-url:
      # defaultZone: http://localhost:7001/eureka # 单机
      defaultZone: http://eureka7001.com:7001/eureka,http://eureka7002.com:7002/eureka # 集群配置

  # 这里不配置默认是主机的名字,如果主机名有下划线_符号可能就不会访问!!!
  instance:
    instance-id: ITholmes:cloud-provider-payment:8002
    # 访问路径可以显示IP地址
    prefer-ip-address: true
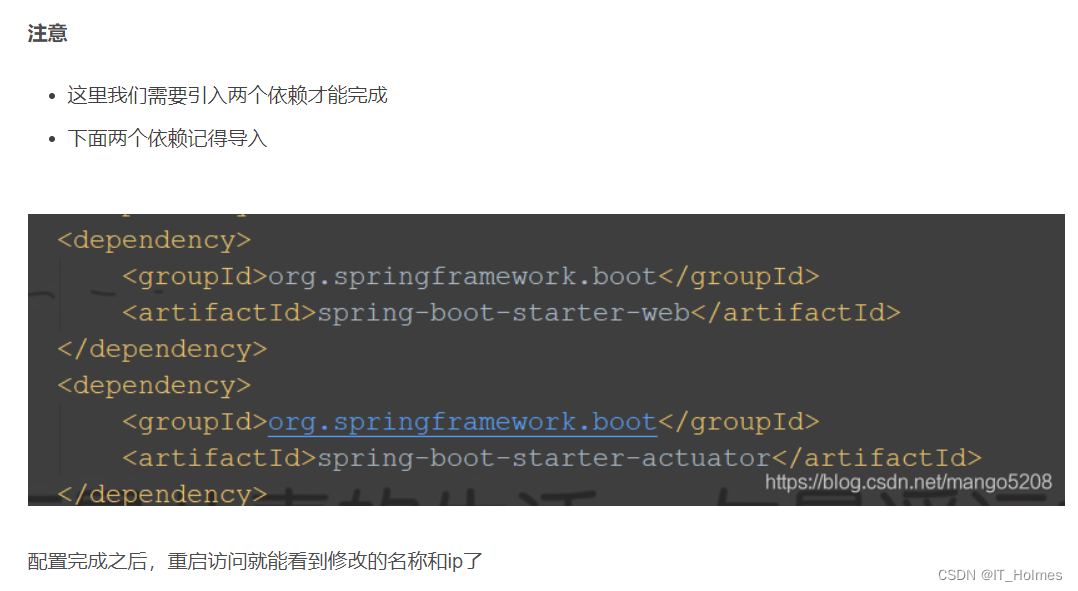
6. Eureka 之 actuator 微服务信息完善
这里就少不了spring-boot-starter-web和spring-boot-starter-actuator这两个依赖!
<dependency>
    <groupId>org.springframework.boot</groupId>
    <artifactId>spring-boot-starter-web</artifactId>
</dependency>

<dependency>
    <groupId>org.springframework.boot</groupId>
    <artifactId>spring-boot-starter-actuator</artifactId>
</dependency>
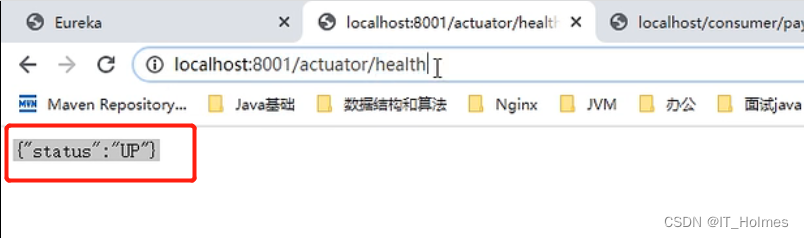
Actuator是Springboot提供的用来对应用系统进行自省和监控的功能模块,借助于Actuator开发者可以很方便地对应用系统某些监控指标进行查看、统计等。
/actuator/health,actuator的健康检查:
instance-id 修改配置主机名称:
eureka:
  client:
    # 表示是否将自己注册进EurekaServer默认为true
    register-with-eureka: true
    # 是否从eurekaServer抓取已有的注册信息,默认为true。单节点无所谓,集群必须设置为true才能配合ribbon使用负载均衡
    fetch-registry: true
    # 入驻地址是哪个
    service-url:
      #设置与eureka server交互的地址查询服务和注册服务都需要依赖这个地址
      #defaultZone: http://localhost:7001/eureka #单机版
      defaultZone: http://eureka7001.com:7001/eureka,http://eureka7002.com:7002/eureka  #集群版

  # 这里不配置默认是主机的名字,如果主机有下划线_符号可能就不会访问!!!
  instance:
    instance-id: ITholmes:cloud-order-service:80
    # 访问路径可以显示IP地址
    prefer-ip-address: true
prefer-ip-address: true ,可以访问时,可以显示IP地址:

7. SpringCloud 之 服务发现Discovery (重点)
对于注册进eureka里面的微服务,可以通过服务发现来获得该服务的信息:
第一步:添加@EnableDiscoveryClient //开启服务发现客户端注解在业务逻辑启动类里面。
package com.itholmes.springcloud;

import org.springframework.boot.SpringApplication;
import org.springframework.boot.autoconfigure.SpringBootApplication;
import org.springframework.cloud.client.discovery.EnableDiscoveryClient;
import org.springframework.cloud.netflix.eureka.EnableEurekaClient;

@SpringBootApplication
@EnableEurekaClient
@EnableDiscoveryClient //开启服务发现客户端
public class PaymentMain8001 {


    public static void main(String[] args) {


        SpringApplication.run(PaymentMain8001.class,args);
    }
}
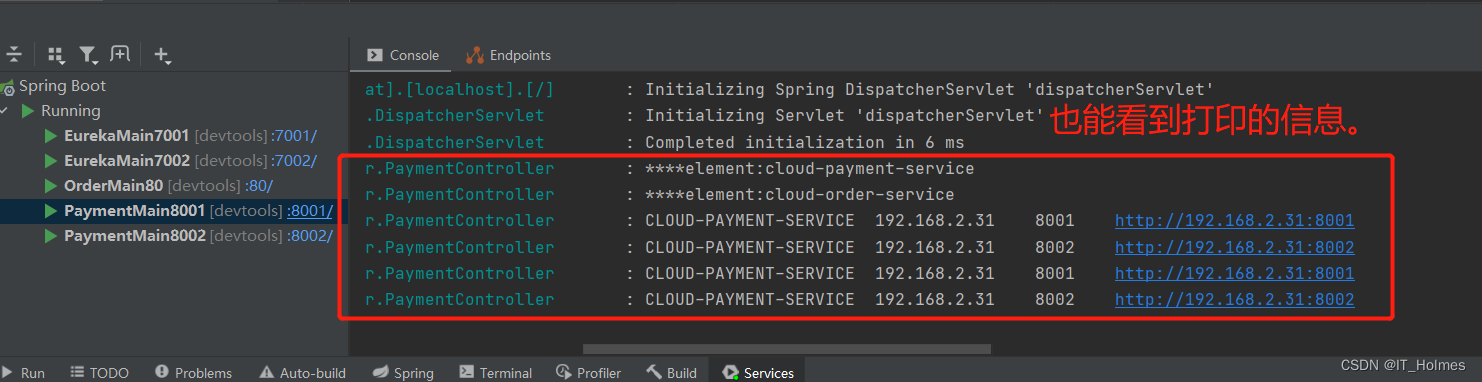
在对应的controller层下面,导入相应的DiscoveryClient:
import org.springframework.cloud.client.discovery.DiscoveryClient;

@Resource
private DiscoveryClient discoveryClient;

@GetMapping(value = "/payment/discovery")
public Object discovery(){


    //获取eureka 服务列表的service信息,就是注册在eureka的全部微服务应用名称。
    List<String> services = discoveryClient.getServices();
    for (String element : services) {


        log.info("****element:"+element);
    }

    //获取eureka对应一个微服务应用名下面的全部个体实例。
    List<ServiceInstance> instances = discoveryClient.getInstances("CLOUD-PAYMENT-SERVICE");
    for (ServiceInstance instance : instances) {


        log.info(instance.getServiceId()+"\t"+instance.getHost()+"\t"+instance.getPort()+"\t"+instance.getUri());
    }

    return this.discoveryClient;
}

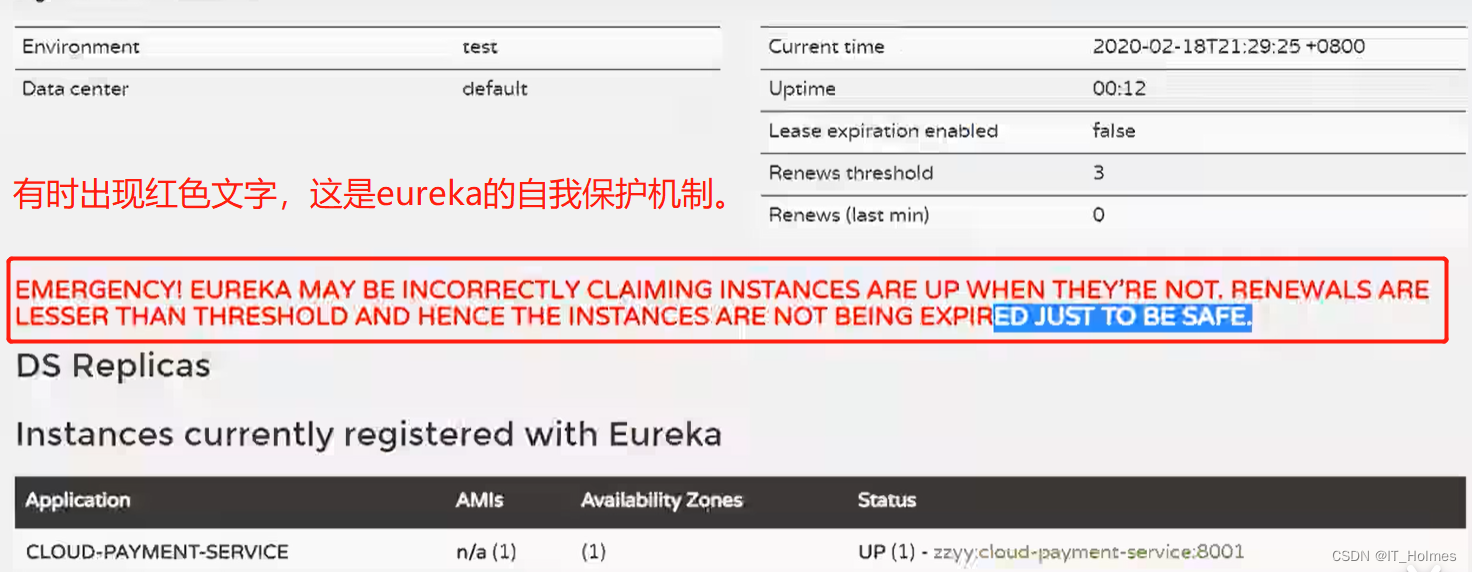
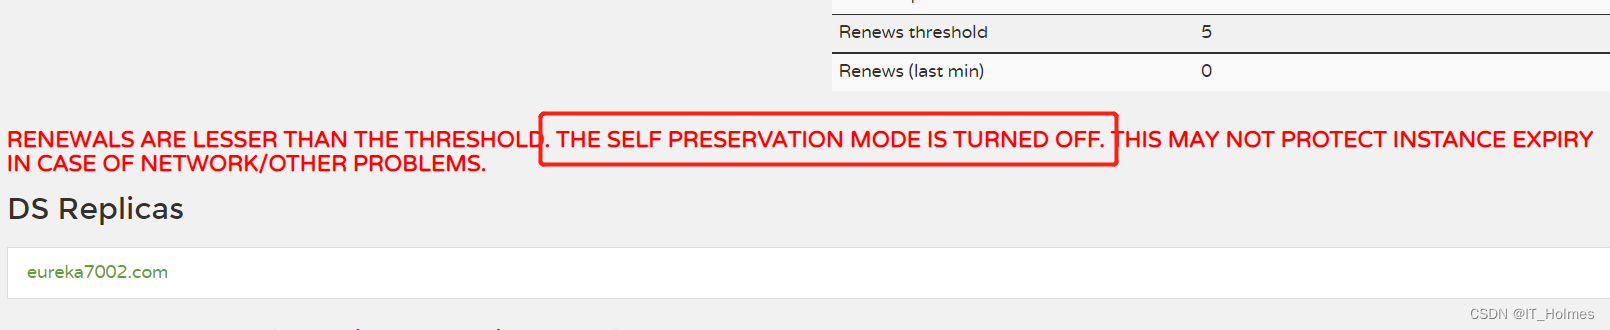
8. Eureka 之 自我保护

就是某时刻一个微服务不可用了,Eureka不会立刻清理,依旧会对该微服务的信息进行保存。
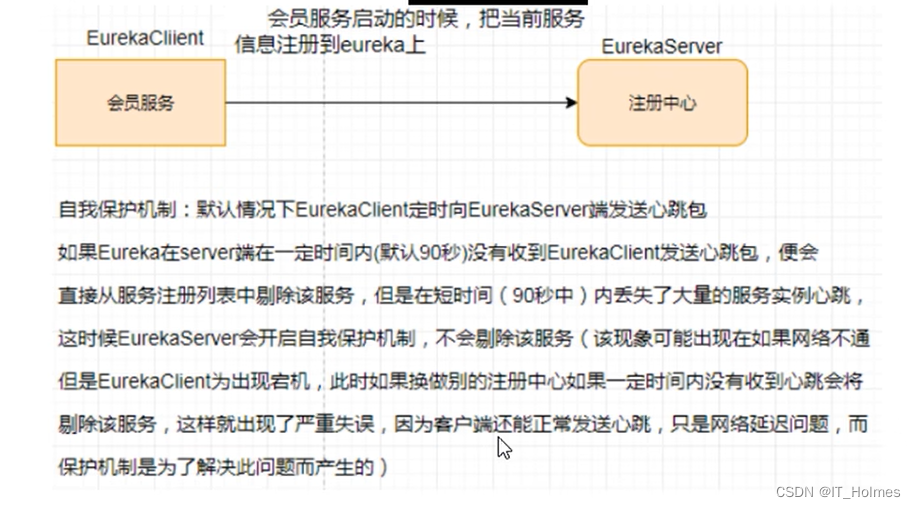

这里有一个CAP里面的AP分支思想。
怎么禁止Eureka的自我保护?
- Eureka默认就是开启自我保护。
Eureka server服务端配置如下:
- 使用server.enable-self-preservation:false来关闭自我保护。
server:
  port: 7001

eureka:
  instance:
    hostname: eureka7001.com # eureka服务端的实例名称
  client:
    # false表示不向注册中心注册自己(本身这个项目就是注册中心,没必要注册自己)
    register-with-eureka: false
    # false表示自己端就是注册中心,该项目的职责就是维护服务实例,并不需要检索服务。
    fetch-registry: false
    service-url:
      # 设置与Eureka Server交互的地址查询服务和注册服务都需要依赖这个地址。
      defaultZone: http://eureka7002.com:7002/eureka/

  # 关闭自我保护机制,保证不可用服务被即使剔除。
  server:
    enable-self-preservation: false
eureka客户端配置如下:
- lease-renewal-interval-in-seconds: 1 # Eureka客户端向服务端发送心跳的时间间隔,单位为秒(默认是30秒)。
- lease-expiration-duration-in-seconds: 2 # Eureka服务端在收到最后一次心跳后等待时间上限,单位为秒(默认是90秒) 超时剔除服务。
server:
  port: 8001

spring:
  application:
    # eureka注册后的名字
    name: cloud-payment-service
  datasource:
    type: com.alibaba.druid.pool.DruidDataSource
    driver-class-name: com.mysql.cj.jdbc.Driver
    url: jdbc:mysql://rm-bp168t05xk88zzbv7ro.mysql.rds.aliyuncs.com/db2019?serverTimezone=Asia/Shanghai&useUnicode=true&characterEncoding=utf8&useSSL=true
    username: root
    password: XuYanBo0818

eureka:
  client:
    # 表示是否将自己注册进EurekaServer默认为true
    register-with-eureka: true
    # 是否从eurekaServer抓取已有的注册信息,默认为true。单节点无所谓,集群必须设置为true才能配合ribbon使用负载均衡
    fetch-registry: true
    # 入驻地址是哪个
    service-url:
      # defaultZone: http://localhost:7001/eureka # 单机
      defaultZone: http://eureka7001.com:7001/eureka,http://eureka7002.com:7002/eureka # 集群配置

  # 这里不配置默认是主机的名字,如果主机有下划线_符号可能就不会访问!!!
  instance:
    instance-id: payment8001
    # 访问路径可以显示IP地址
    prefer-ip-address: true

    # Eureka客户端向服务端发送心跳的时间间隔,单位为秒(默认是30秒)
    lease-renewal-interval-in-seconds: 1
    # Eureka服务端在收到最后一次心跳后等待时间上限,单位为秒(默认是90秒) 超时剔除服务
    lease-expiration-duration-in-seconds: 2

mybatis:
  mapper-locations: classpath:mapper/*.xml
  type-aliases-package: com.itholmes.springcloud.entities # 所有Entity别名类所在包
这样一旦eureka 服务里面的微服务,一旦发生宕机在配置时间过后,就会立刻剔除掉该服务。
9. Eureka 之 停更说明
https://github.com/Netflix/eureka Eureka官方。
eureka server已经停止更新。