课程平台:51CTO
课程讲师:大头娃
课程介绍:从零开始讲解了联盟链的搭建和链码的操作。让大家真正掌握联盟链的搭建与链码部署、调用流程。
一、Hyperledger Fabric联盟链介绍
1.1使用场景
区块链的数据是公开的,但是在有些行业例如:银行、医疗。这些私人数据不能完全公开,或者建立权限机制进行有选择性的公开。默认在区块链中所有的节点都需要维护账本,并审核与其他成员的交易进展,这个过程低效而昂贵。Hyperledger则不同,采用超级节点来完成记账功能。
1.2产生背景
公有链缺点:
1.数据完全公开
2.所有节点参与运算成本大
3.不支持私下机密交易
根据以上缺点,Hyperledger的设计以产业应用为重点,解决现有缺点,扩展了行业先行原有的功能。
Hyperledger对传统区块链模型进行了革新,其中包括管理参与者的访问许可权.换句话说: Hyperledger是有权限的共享账本.Hyperledger为身份识别、审核、即隐私提供了一个安全,健康的模型.从而缩短运算周期.实现有效扩展.应对行业内各种要求.
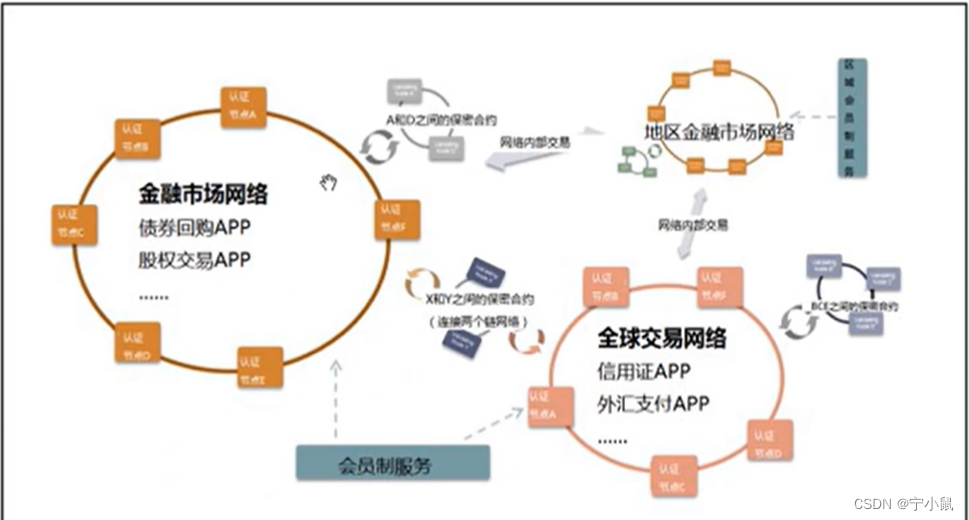
一个覆盖众多网络的世界
我们希望能够出现众多的区块链网络,使得每个网络账本都能执行不同的业务,基于这一期望值,而出现了Hyperledger,现在单一普遍的通用网络已经出现.
但是网络与网络之间的通信还尚未有实例.会员就是在个个网络中的通,Hyperledger,除了能够实现这种网络独立运行之外.
还有寻址系统.能够通过一个账本的交易.发现并利用另一个本中正当的交易与智能合约
1.3联盟链优缺点
优点:
(1)可控制性强
与公有链相比,其由于节点一般都是海量的,一旦形成区块链,那么区块数据将不可篡改,比如比特币节点太多,想要篡改区块数据几乎是不可能的;而联盟链中只要联盟内的所有机构中的大部分达成共识,即可将区块数据进行更改。
(2)半中心化
联盟链在某种程度上只属于联盟内部的成员所有,因其节点数量是有限的,所以很容易达成共识。
(3)交易速度快
从本质上讲联盟链还是私有链,但因为它节点数量限制,达成共识容易,因此交易时速度也是非常快的。
(4)数据不会默认公开
与公有链不同,联盟链的数据只限于联盟内部机构及其用户才有权限进行访问。
缺点:
(1)由于联盟链半中心化结构的原因,它很容易被恶意玩家所攻击。可能出现多个参与者合谋的情况。
(2)缺少行业统一标准,在解决方案上免不了会有各种障碍,但是目前整个生态距离联盟链的统一框架还是很遥远。
(3)对于大型的综合性企业,由于他们在应用场景方面灵活性差。要想启动一个新的联盟,必须要经过所有成员的协议批准,然而,大型企业流程多,约束条件繁杂,因此多个大型企业之间建立这种通用网络非常缓慢。
1.4联盟链基本架构
Fabric系统是通过组织来划分的,每个组织内都包含承担不同功能的Peer节点,每个Peer节点又可以担任多种角色。所有的组织共用一个统一的Orderer集群。
1.Endorser Peer(背书结点)︰每个链码在实例化的时候都会设置背书策略(Endorsement policy),指定哪些节点对交易背书才有效。
2.Leader Peer (主节点)∶主节点负责和Orderer排序服务节点通信,从排序服务节点处获取最新的区块并在组织内部同步。
3.Committer Peer(记账节点)︰负责验证从排序服务节点接收的区块里的交易,然后将块提交(写入/追加)到其通道账本的副本。
4.Anchor Peer(锚节点)︰在一个通道( channel )上可以被所有其他peer发现的peer5.Order Peer(排序节点)︰排序服务节点接收包含背书签名的交易,对未打包的交易进行排序生成区块,广播给Peer主节点。
1.5 基本要求
(1)网络权限的需求
发行机关根据网络的目的来确定适当的访问权限,而这种权限需要进行身份识别,然后才能在网络进行交易。网络公开运行,且容易融入到移动应用中。它能够私有运行,只有通过权限验证才能熟悉其情况。而且可以根据需求来设置不同级别的权限。
(2)隐私及机密的重要性
我们相信任何区块链架构有一个基本要求,那就是网络上任何一方的身份及行为模式,都不允许未经授权的人通过账本来打探情况。我们也希望能够保证区块链用户的业务逻辑和其它交易参数的机密性。做到除了合约涉及的利益相关方,没有其它人能够访问这些数据。
1.6 Hyperledger专业名词介绍
chainCode-链码
实际上就是公有链中的智能合约,链码是一个运行在账本上的软件,它可以对资产进行编码,其中的交易指令(或者业务逻辑),也可以用来修改资产。
Channel-通道
通道构建在Fabric网络上的私有区块链。实现了数据的隔离保密,通道指定的账本在通道中是与所有对等节点共享的,并且交易方必须通过该通道的正确验证才能与账本进行交互,通道是由一个"配置块"来定义的。
Gengsis Block -创世区块
Genesis Block是初始化区块链网络或者channel的配置区块.也是区块链上的第一个区块
Fabric-ca证书
Fabric-ca是默认的证书管理组件,它向网络成员及其用户颁发基于PKl的证书。
客户端(App)
客户端应用使用SDK来跟Fabric网络打交道。首先,客户端从CA获取合法的身份证书来加入到网络内的应用通道。超级账本Fabric已经拥有了多种语言的SDK。这些SDK封装了对底层gRPC接口的调用,可以提供更完善的客户端和开发支持,包括Node.Js、Python、Java、Go等多种实现。
Invoke -调用
用于调用chainCode内的函数,ChainCode invoke就是一个交易,Proposal,然后执行模块化的流程(背书、共识、验证、提交)。invoke的结构就是一个函数和一个参数数组。
Ledger-账本
Ledger是一个channel的chain,和由channel中每个peer维护的数据库。
二、Go语言基础语法
老师说也可以参考菜鸟教程。
第2章02 Go代码体系介绍
//定义了包名,此文件属于哪个包,每个o程序都包含一个名为main的包
package main
// go编译器当前程序需要引用那些包(系统包,第三方包,用户自定义)
import "fmt"
//main函数,go语言的入口必须在main包
func main(){


	/*Println:面数主要用于输出内容
	2:go基于面数式编程
	*/
	fmt.Println( "Hello, world! ")
	fmt.Print("Hello,world!")
	fmt.Printf("%s d","Hello,world", 2018)
}
问题1:如果运行出错“go: cannot find GOROOT directory: c: \go
”,需要配置GOROOT根目录。配完之后需要重启。
第2章03数组、循环
第2章04函数
第2章05指针
第2章06结构体
第2章07接口、new使用
第2章08自定义包
go语言总结
package mainimport(
"fmt"
"reflect"
)
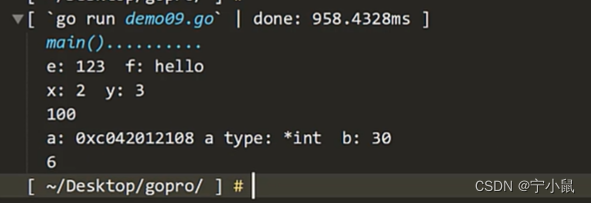
func main(){
fmt.Println( "main().. ........")
// go根据赋的值判断变量类型
var e,f = 123,"hello"
fmt.Println("e: ", e," f:",f)
//隐式声明(一旦赋值成功,则变量类型将确定)
x,y := fn01()
fmt.Print1n("x: ", x," y:", y)
fmt.Println(fn02())
a, b := fn03(10,20)
fmt.Println("a: ", a, "a type:", reflect.Typeof(a), " b:", b)
fno4(1,2,3)
}
func fno1()(int, int) {
return 2,3
}
//定义号返回的变量(理解为函数局部变量)
func fn02()(sum int) {
//var sum int
//已经声明不需要重复声明
sum = 100
return
}
//支持返回指针类型
func fno3(×, y int)(*int,int){
sum :=x+y
//返回变量地址,返回变量的值
return &sum,sum
}
//可变参数
func fno4(nums ...int){
total := 0
//可变参数就是数组(返回元素的索引和索引对应的值)
for _, num := range nums {
//fmt.Println("i: ",i)
total += num
}
fmt.Println(total)
}
运行结果:

三、Shell快速入门
在菜鸟教程搜索:shell教程,跟着教程学一点基础
3.1 第一个shell 脚本
linux常见目录结构:
/bin目录存放可执行的文件, root和一般账号都可用
/boot这个目录存放开机使用的文件,例如: linux内核和系统启动文件.. ldev存放所有设备文件.包括硬盘、分区、鼠标、键盘、USB等
/etc存放系统所有配置文件,
/home:用户主目录的,当你创建一个用户时,默认的用户文件夹就在该目录下
/mnt*如果需要挂载某些设备,一般建议存放到此目录中
/root: root用户的目录
/usr:注意usr并不是user的缩写,而是Unix Software Resource的缩写,即"“Unix操作系统软件资源"放在该目录,而不是用户的数据
第一个脚本文件
mkdir test
cd test
sudo vim demo01.sh
#首先在vim打开文件界面后,按一次字母“i” vim模式转为 INSERT,处于可编辑状态
#写入文件demo01.sh的内容如下两行:其中#! 是一个约定的标记,它告诉系统这个脚本需要什么解释器来执行,即使用哪一种 Shell
#!/bin/bash
echo "Hello World !"
#写完之后,按“ESC”退出插入模式回到命令模式,然后按“:wq”保存退出
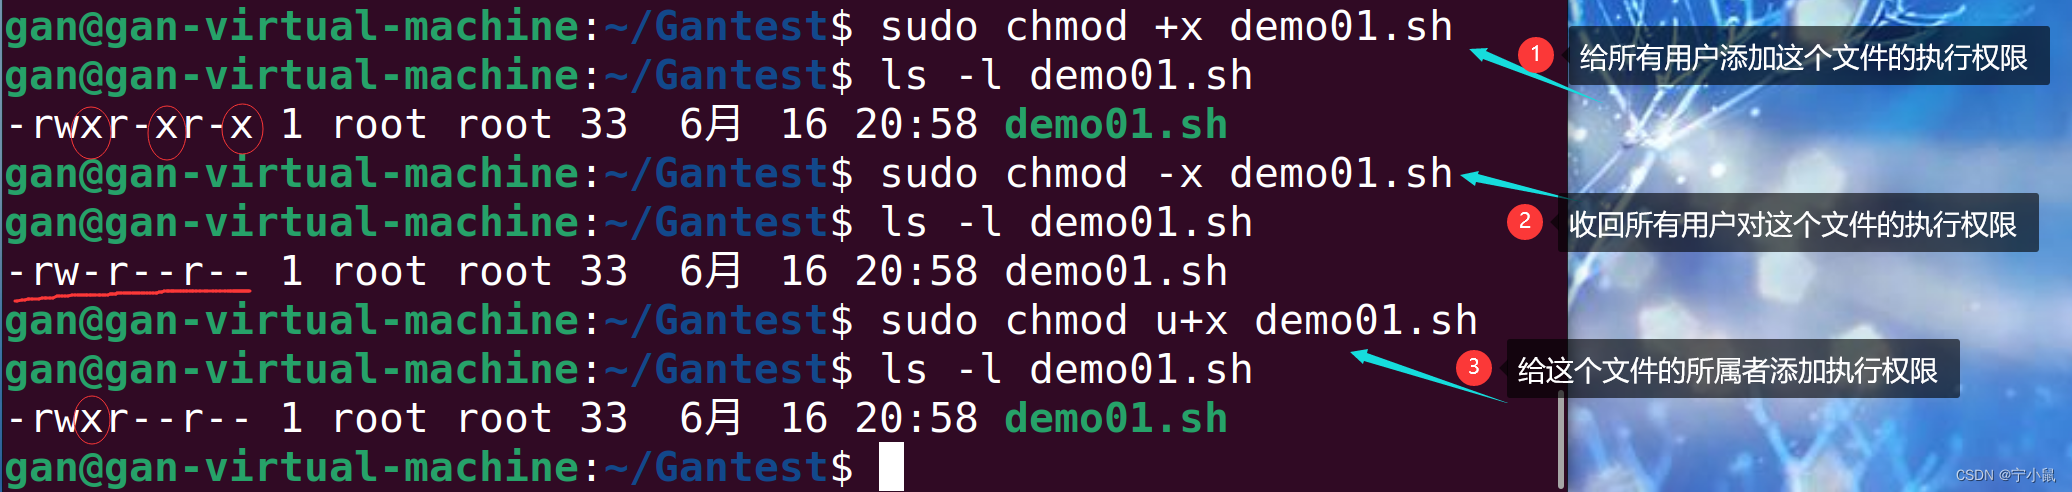
#给脚本文件添加执行权限
sudo chmod +x demo01.sh
#执行脚本文件
./demo01.sh
#输出结果为:Hello World !
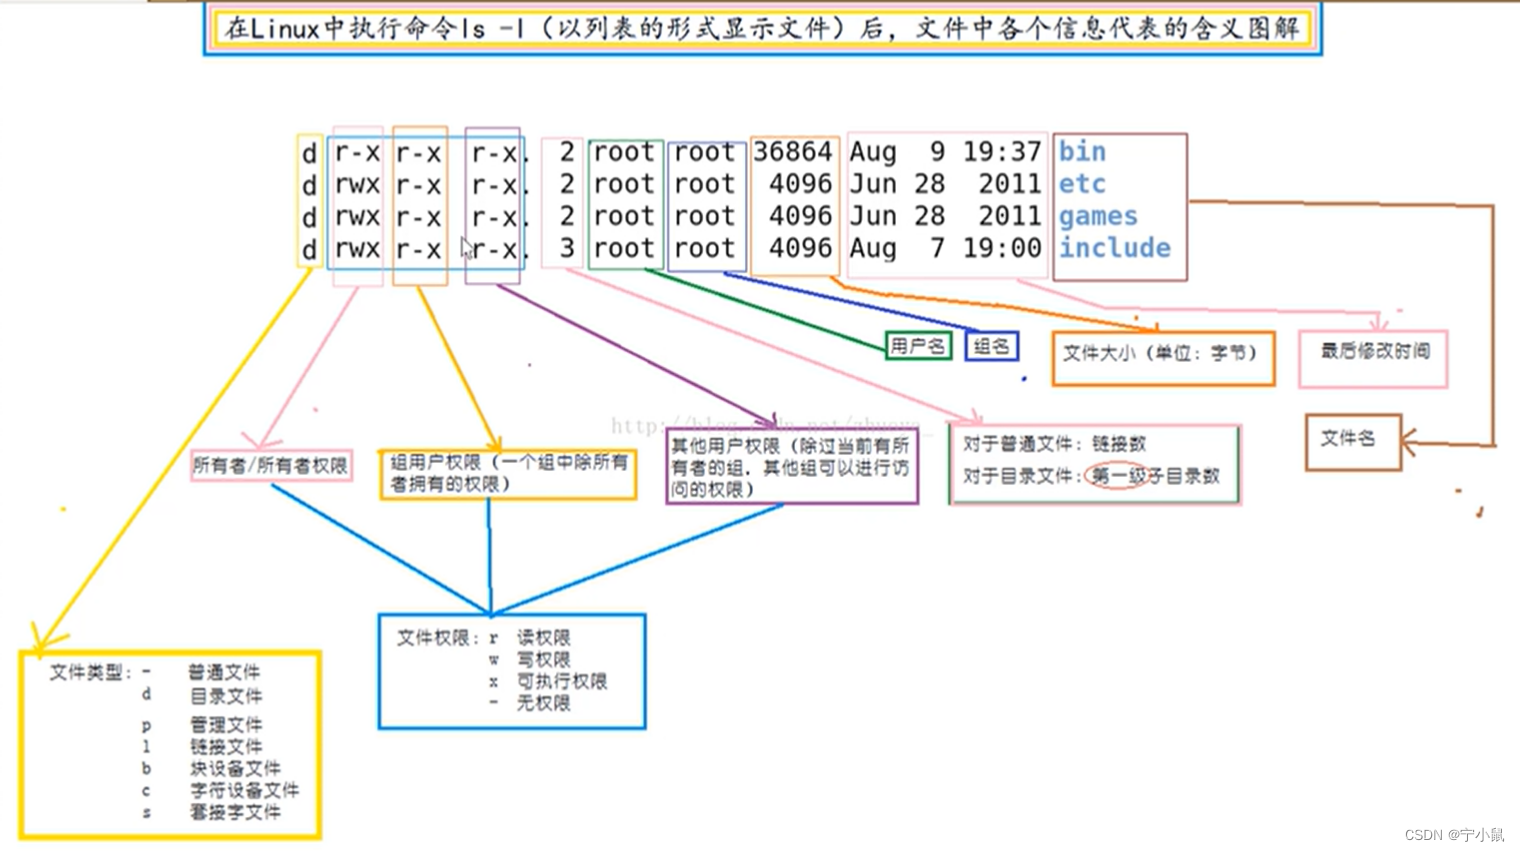
文件权限解析
3.2 变量与参数传递
注意,变量名和等号之间不能有空格,这可能和你熟悉的所有编程语言都不一样。同时,变量名的命名须遵循如下规则:
命名只能使用英文字母,数字和下划线,首个字符不能以数字开头。
中间不能有空格,可以使用下划线 _。
不能使用标点符号。
不能使用bash里的关键字(可用help命令查看保留关键字)。
用vi demo01.sh可以对脚本文件进行编辑,内容如下:
#!/bin/bash
echo "Hello World !"
url="http: // www.163.com"
echo ${
url}
str="url is \n ${url}"
echo $str
str='url is \n ${url}'
echo $str
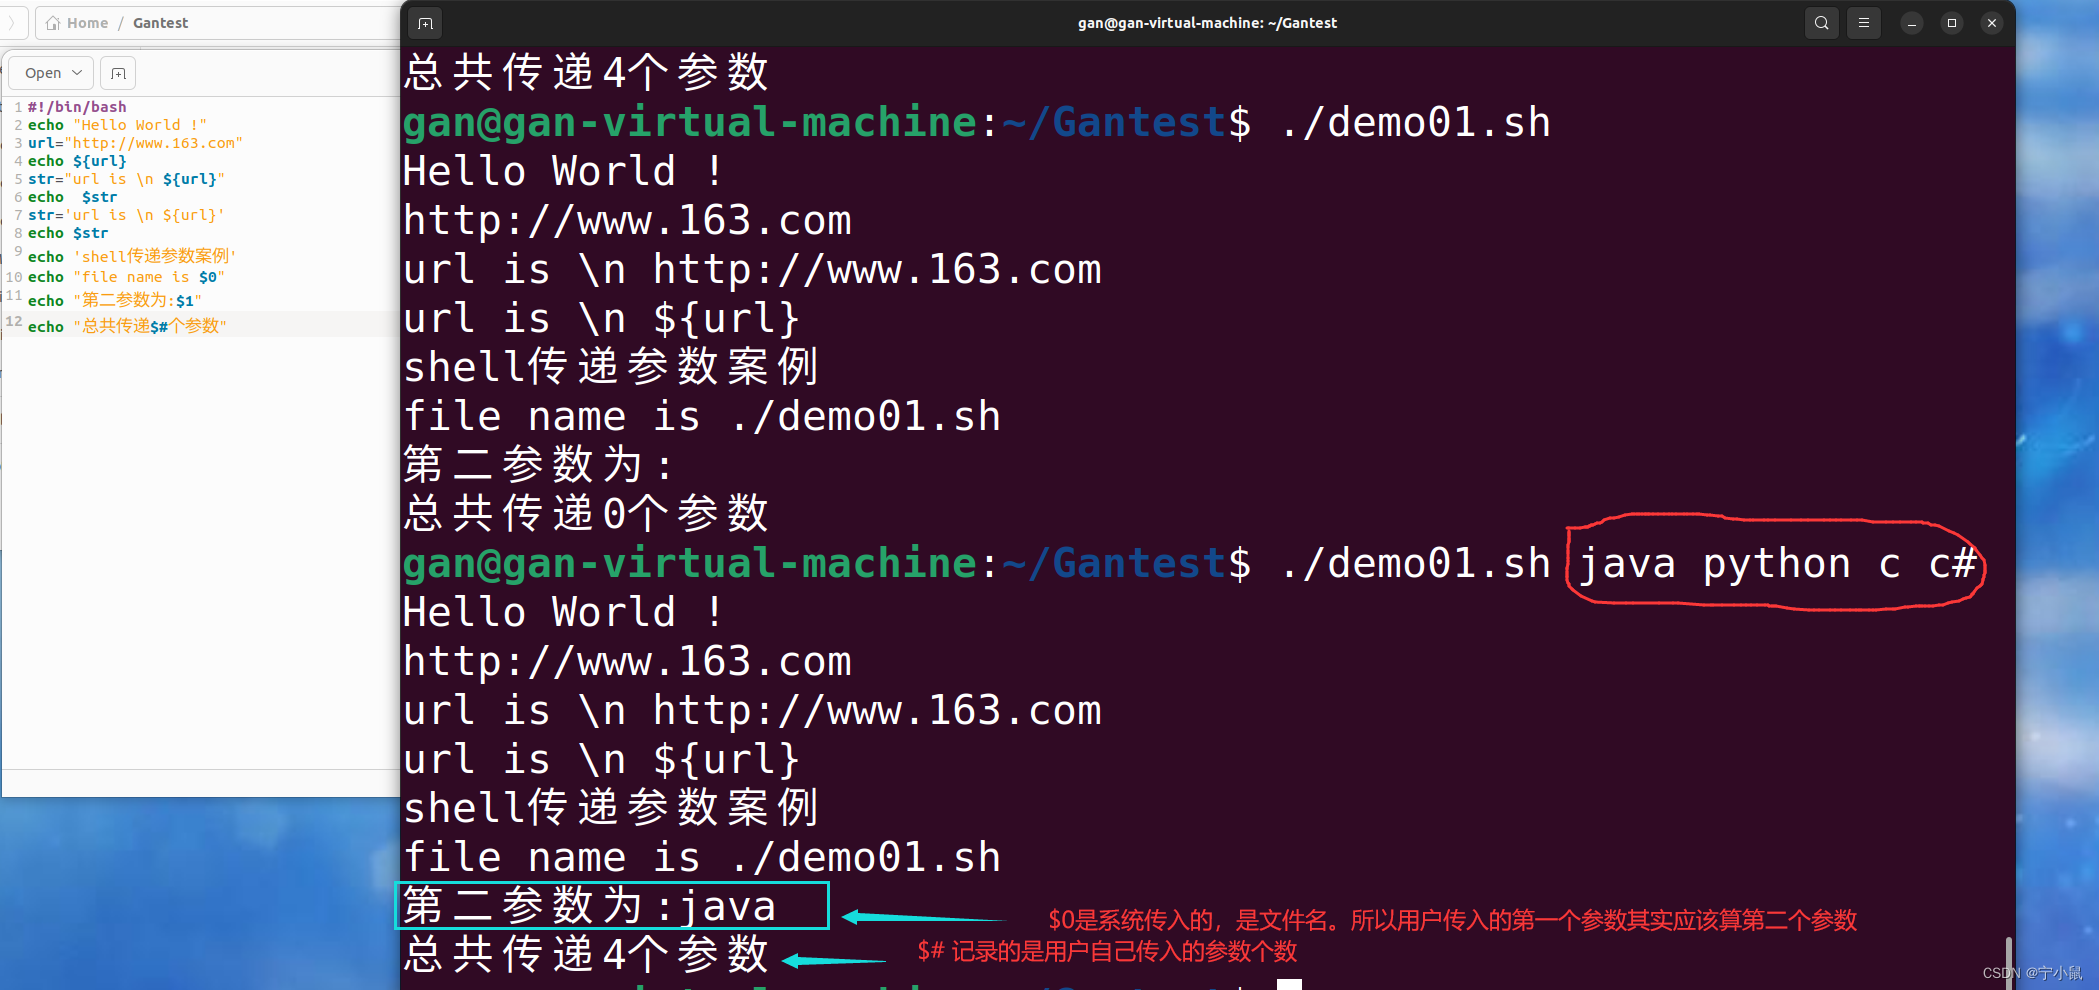
echo 'shell传递参数案例'
echo "file name is $0"
echo"第二参数为:$1"
echo "总共传递 $# 个参数"
#执行结果说明,双引号内支持变量和转义符,而单引号不支持
3.3 数组、for循环
数组中可以存放多个值。Bash Shell 只支持一维数组(不支持多维数组),初始化时不需要定义数组大小(与 PHP 类似)。
与大部分编程语言类似,数组元素的下标由 0 开始。
Shell 数组用括号来表示,元素用"空格"符号分割开,语法格式:array_name=(value1 value2 … valuen)
#!/bin/bash
arr=('A' 'Bug' 3.14 100)
#显示数组
echo "第1个元素为${arr[0]}"
echo "第2个元素为${arr[1]} ,长度为${#arr[1]}"
echo "数组成员为: ${arr[*]},数组的长度为${#arr[*]}"
for loop in ${

    arr[*]}
do
    echo "this value is ${loop}"
done

if [ $1 == $2 ]
then
  echo "a==b"
else
  echo "a!=b"
fi

3.4 函数文件包含
(1)函数
#!/bin/bash

funWithReturn(){


    echo "这个函数会对输入的两个数字进行相加运算..."
    echo "输入第一个数字: "
    read aNum
    echo "输入第二个数字: "
    read anotherNum
    echo "两个数字分别为 $aNum 和 $anotherNum !"
    #注意,加法外面是两层小括号
    return $(($aNum+$anotherNum))
}
funWithReturn
echo "输入的两个数字之和为 $? !"

(2)文件包含
和其他语言一样,Shell 也可以包含外部脚本。这样可以很方便的封装一些公用的代码作为一个独立的文件。
Shell 文件包含的语法格式如下:

. filename   # 注意点号(.)和文件名中间有一空格
或
source filename
注:被包含的文件不需要拥有执行权限
#文件fn.sh,这个即为被包含文件,不用为其赋予执行权限
#!/bin/bash
funcDemo(){


  echo "参数1为:$1"
  echo "参数2为:$2"
  echo "请输入一个数值:"
  read num
  return $(($1 +$2 + ${

    num}))
}


#文件callfn.sh
!/bin/bash
#引入同目录的sh文件
source ./fn.sh
funcDemo 1 2
echo "result: $?"


#终端执行
gan@gan-virtual-machine:~/Gantest$ vi fn.sh
gan@gan-virtual-machine:~/Gantest$ vi callfn.sh
gan@gan-virtual-machine:~/Gantest$ chmod u+x callfn.sh
gan@gan-virtual-machine:~/Gantest$ ./callfn.sh
参数1为:1
参数2为:2
请输入一个数值:
3
result: 6
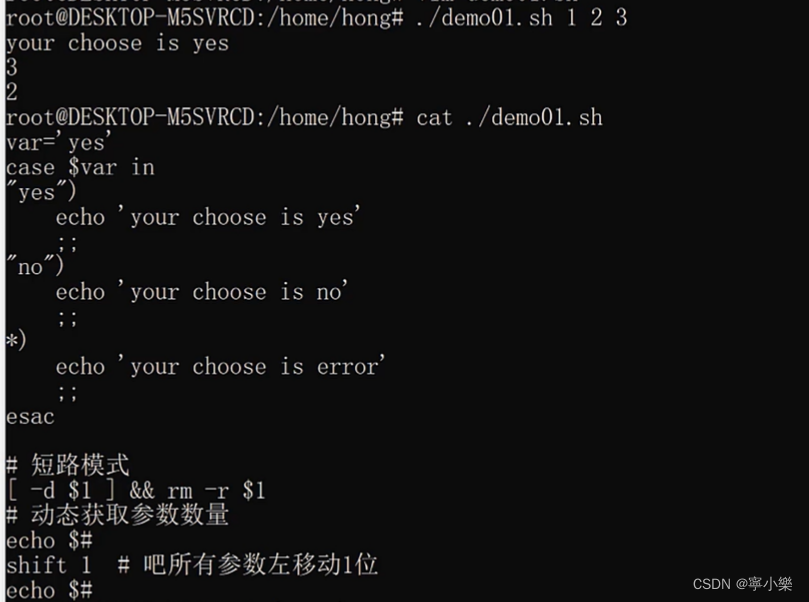
3.5 case
var='yes'
case $var in
"yes")
echo 'your choose is yes'
;;
"no")
echo'your choose is no'
;;
*)
echo 'your choose is error'
;;
esac
#短路模式
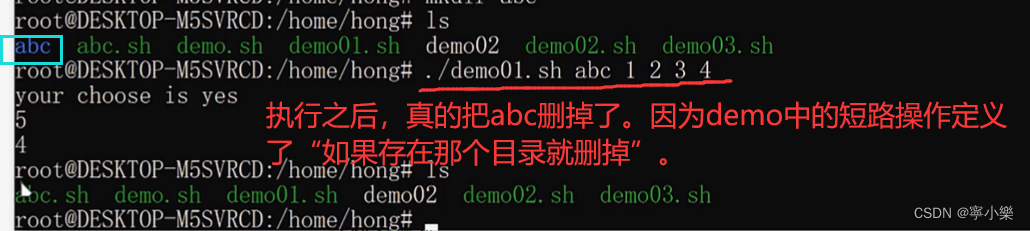
[ -d $1 ] && rm -r $1
#动态获取当前参数数量
echo $#
#吧所有参数左移动1位
shift 1
echo $#
四、fabric安装
4.1 Ubuntu安装
VMWare版本:VMware® Workstation 16 Pro 16.2.3 build-19376536
Ubuntu版本:Ubuntu 22.04 LTS【好像是发行版,我就是想装最新的,哈哈哈。大头娃老师用的是20.04版本】
当然要先安装VMWare啦,然后新建虚拟机==》按照提示步骤,一步步安装就好啦~22.04版本的Ubuntu可好看了,而且VMtools都自己就装好了。
下载安装自行百度啦~
4.2 Ubuntu基础命令与配置
1、更换下载源
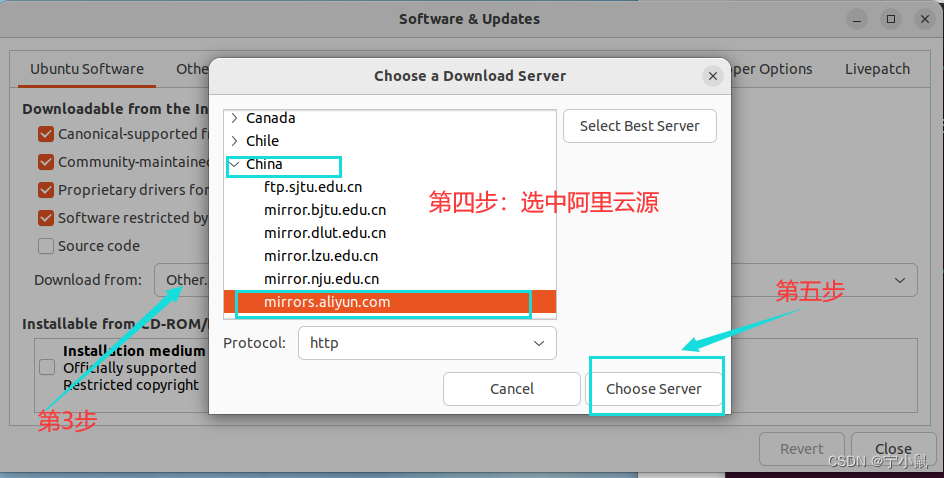
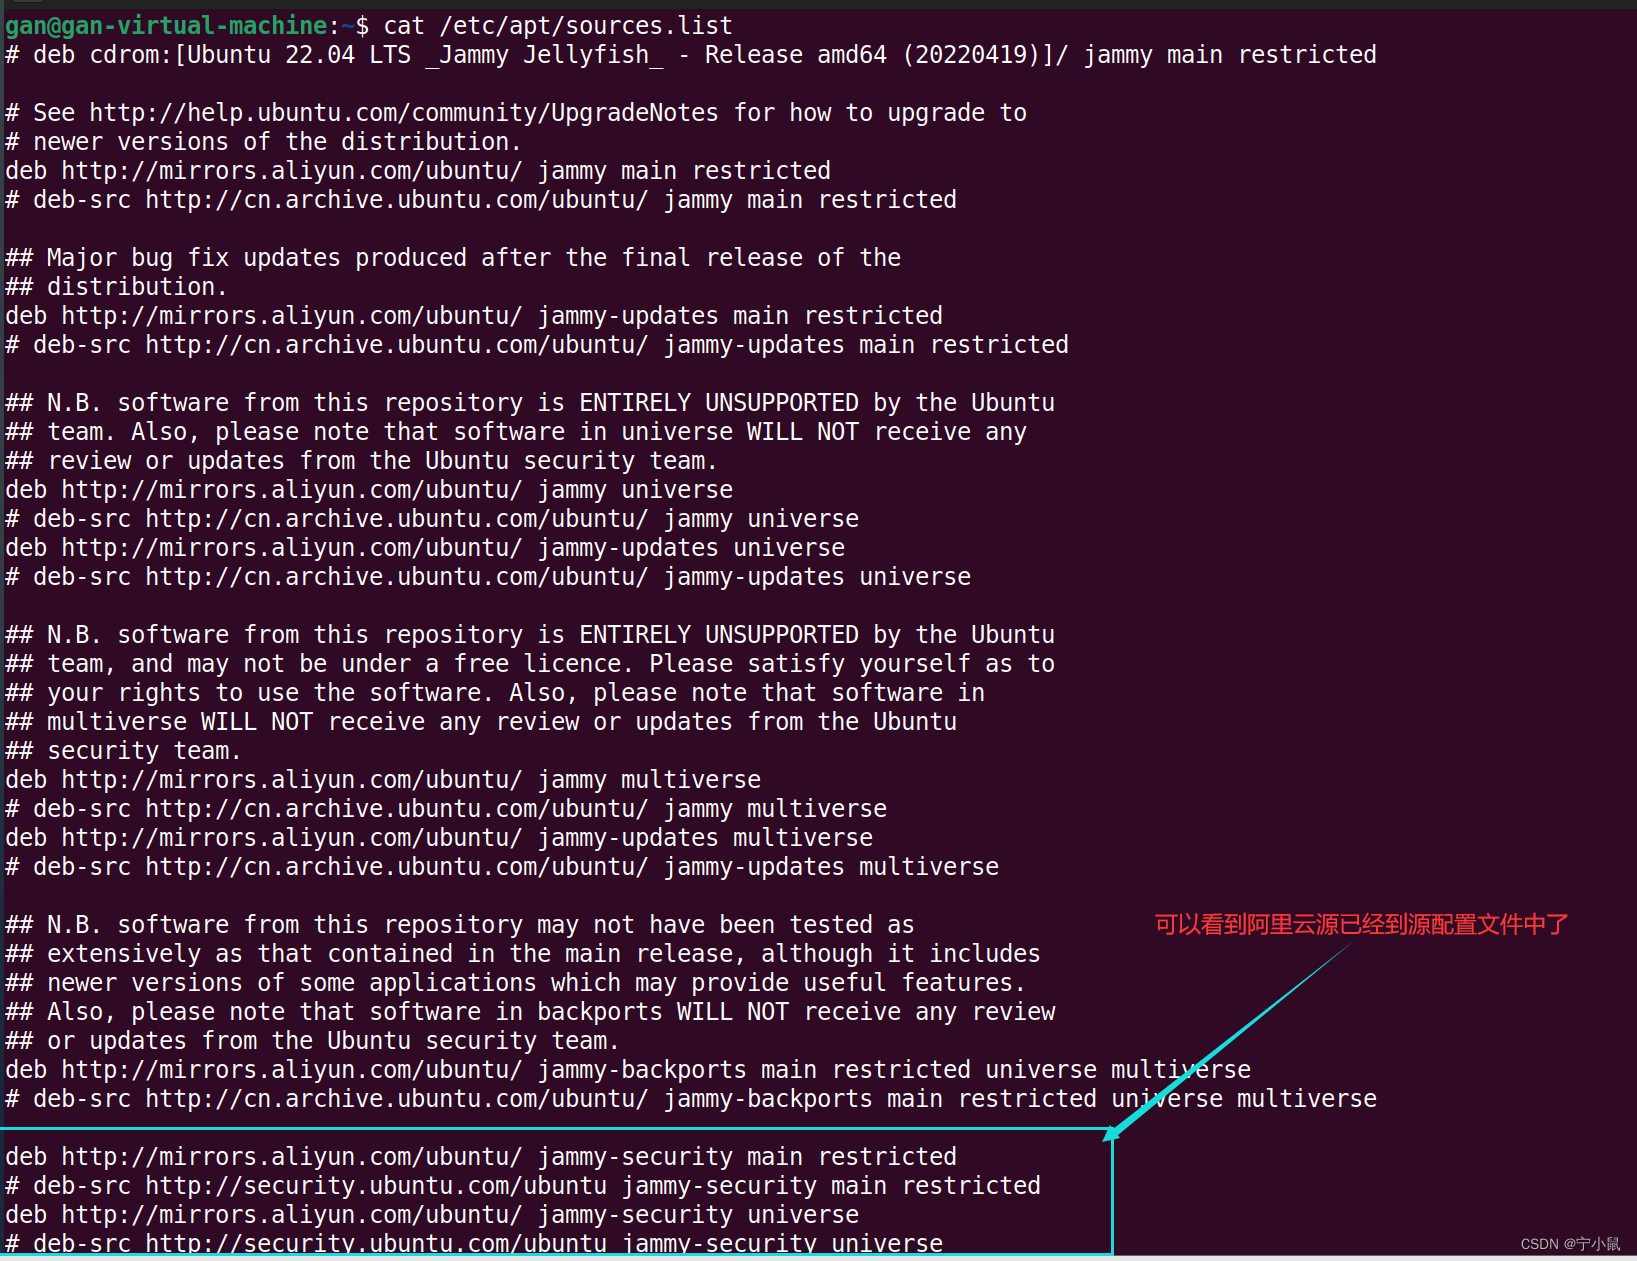
点击左下角九个点进入搜索界面->在搜索框输入“software”->点击出现的“Software & Updates”,进入更换下载源的界面->点击download对应的框->找到阿里云源(老师说这个比较稳定)->choose server->输入密码认证->close->reload。

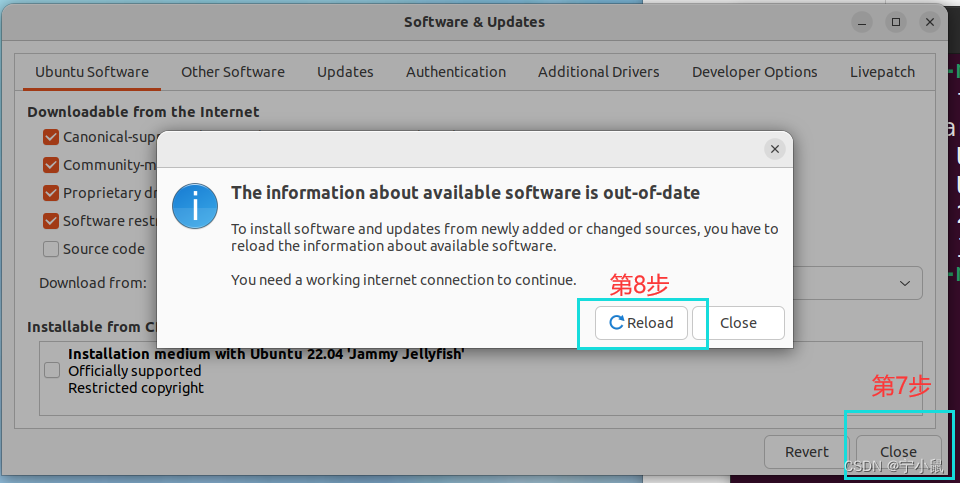
等它加载完成后,可通过命令查看下载源是否更换成功:
cat /etc/apt/sources.list
2、Linux基本命令
创建文件 touch 文件名.文件后缀
删除文件 rm 文件名.文件后缀
创建目录 mkdir 目录名
删除目录 rmdir 目录名
删除带文件的目录 rm -r 目录名/
移动文件 mv 文件当前绝对路径  想要移动到的目录的绝对路径
		mv /home/hong/abc.txt  ../    #将abc.txt移动到上一级目录
移动文件并重命名 mv 当前文件名 目标文件名
root@ubuntu:/home# ls
abc.txt hong
root@ubuntu:/home# mv abc.txt aaa.txt
root@ubuntu:/home# ls
aaa.txt hong

#解压zip、tar压缩文件
root@ubuntu:/home/hong/Desktop# ls
fabric-2.1.1.zip fabric-2.3.0.tar.gz
root@ubuntu:/home/hong/Desktop# tar xzf fabric-2.3.0.tar.gz -C .
root@ubuntu:/home/hong/Desktop# tar xzf fabric-2.3.0.tar.gz -C ../
root@ubuntu: /home/ hong/Desktop# cd ..
root@ubuntu:/ home/hong# ls
Desktop Downloads fabric-2.3.0 Pictures  emplates Documents examples.desktop Music Public Videos
root@ubuntu :/home/hong#rm -r fabric-2.3.0/
root@ubuntu:/home/ hong# ls
Desktop Downloads Music Public Videos Documents examples.desktop Pictures Templates
root@ubuntu :/home/hong# cd Desktop/
root@ubuntu :/home/hong/Desktop# ls
fabric-2.1.1.zip fabric-2.3.0 fabric-2.3.0.tar.gz

root@ubuntu: /home/hong/Desktop# unzip fabric-2.1.1.zip -d .
#这种-d方式会覆盖原来有的文件,如果这个目录下有重名文件,解压出来直接覆盖
root@ubuntu: / home/ hong/Desktop# ls
fabric-2.1.1 fabric-2.1.1.zip fabric-2.3.0 fabric-2.3.0.tar.gz
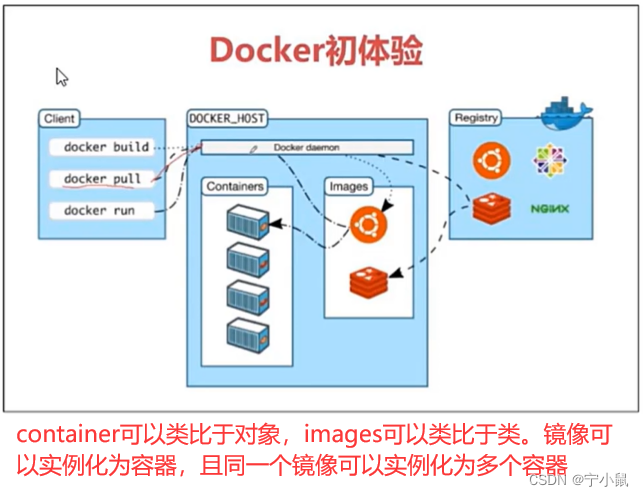
4.3 Docker介绍与安装
1、docker简单介绍
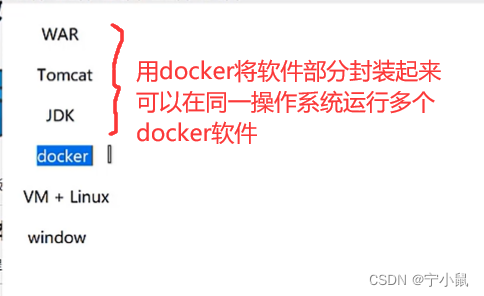
Fabric不是直接在Linux上的,是基于Docker容器的搭建的。
docker仓库:在这个仓库中有很多组件、环境,我们要用的fabric的组件就在上面。
菜鸟教程上有简单介绍:Docker 是一个开源的应用容器引擎,基于 Go 语言 并遵从 Apache2.0 协议开源。Docker 可以让开发者打包他们的应用以及依赖包到一个轻量级、可移植的容器中,然后发布到任何流行的 Linux 机器上,也可以实现虚拟化。容器是完全使用沙箱机制,相互之间不会有任何接口(类似 iPhone 的 app),更重要的是容器性能开销极低。
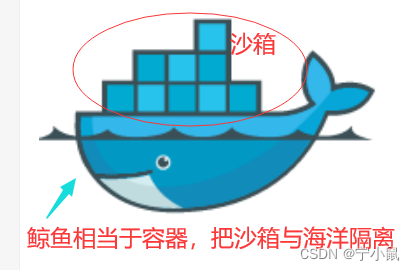
我们可以在鲸鱼内部对沙箱进行任意的测试、调试,而不会影响海洋其他内容。当调试完成之后,我们可以将鲸鱼沙箱整体拷贝移植,移植到不同操作系统,无需重新配置测试。docker容器就相当于鲸鱼。
联盟链的不同超级节点配置其实是一样的,所以可以借助docker容器完成,先在docker中测试完成,其他节点就拷贝移植就好啦~
docker与VM的区别:
VM
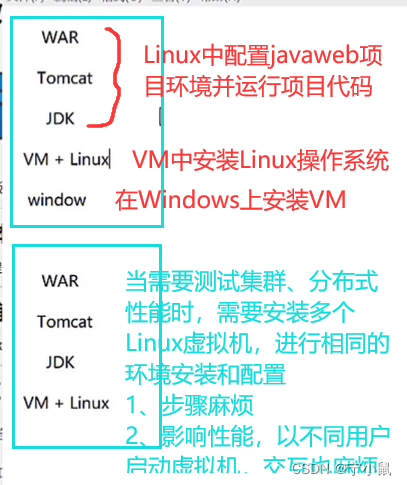
引入docker
综上:
docker是软件层面的虚拟化,比较轻量级,用于软件环境的复制移植和测试。
VM是操作系统层面的虚拟化,比较笨重,用于操作系统层面的测试。
2、docker 安装
(1)安装docker与查看docker版本
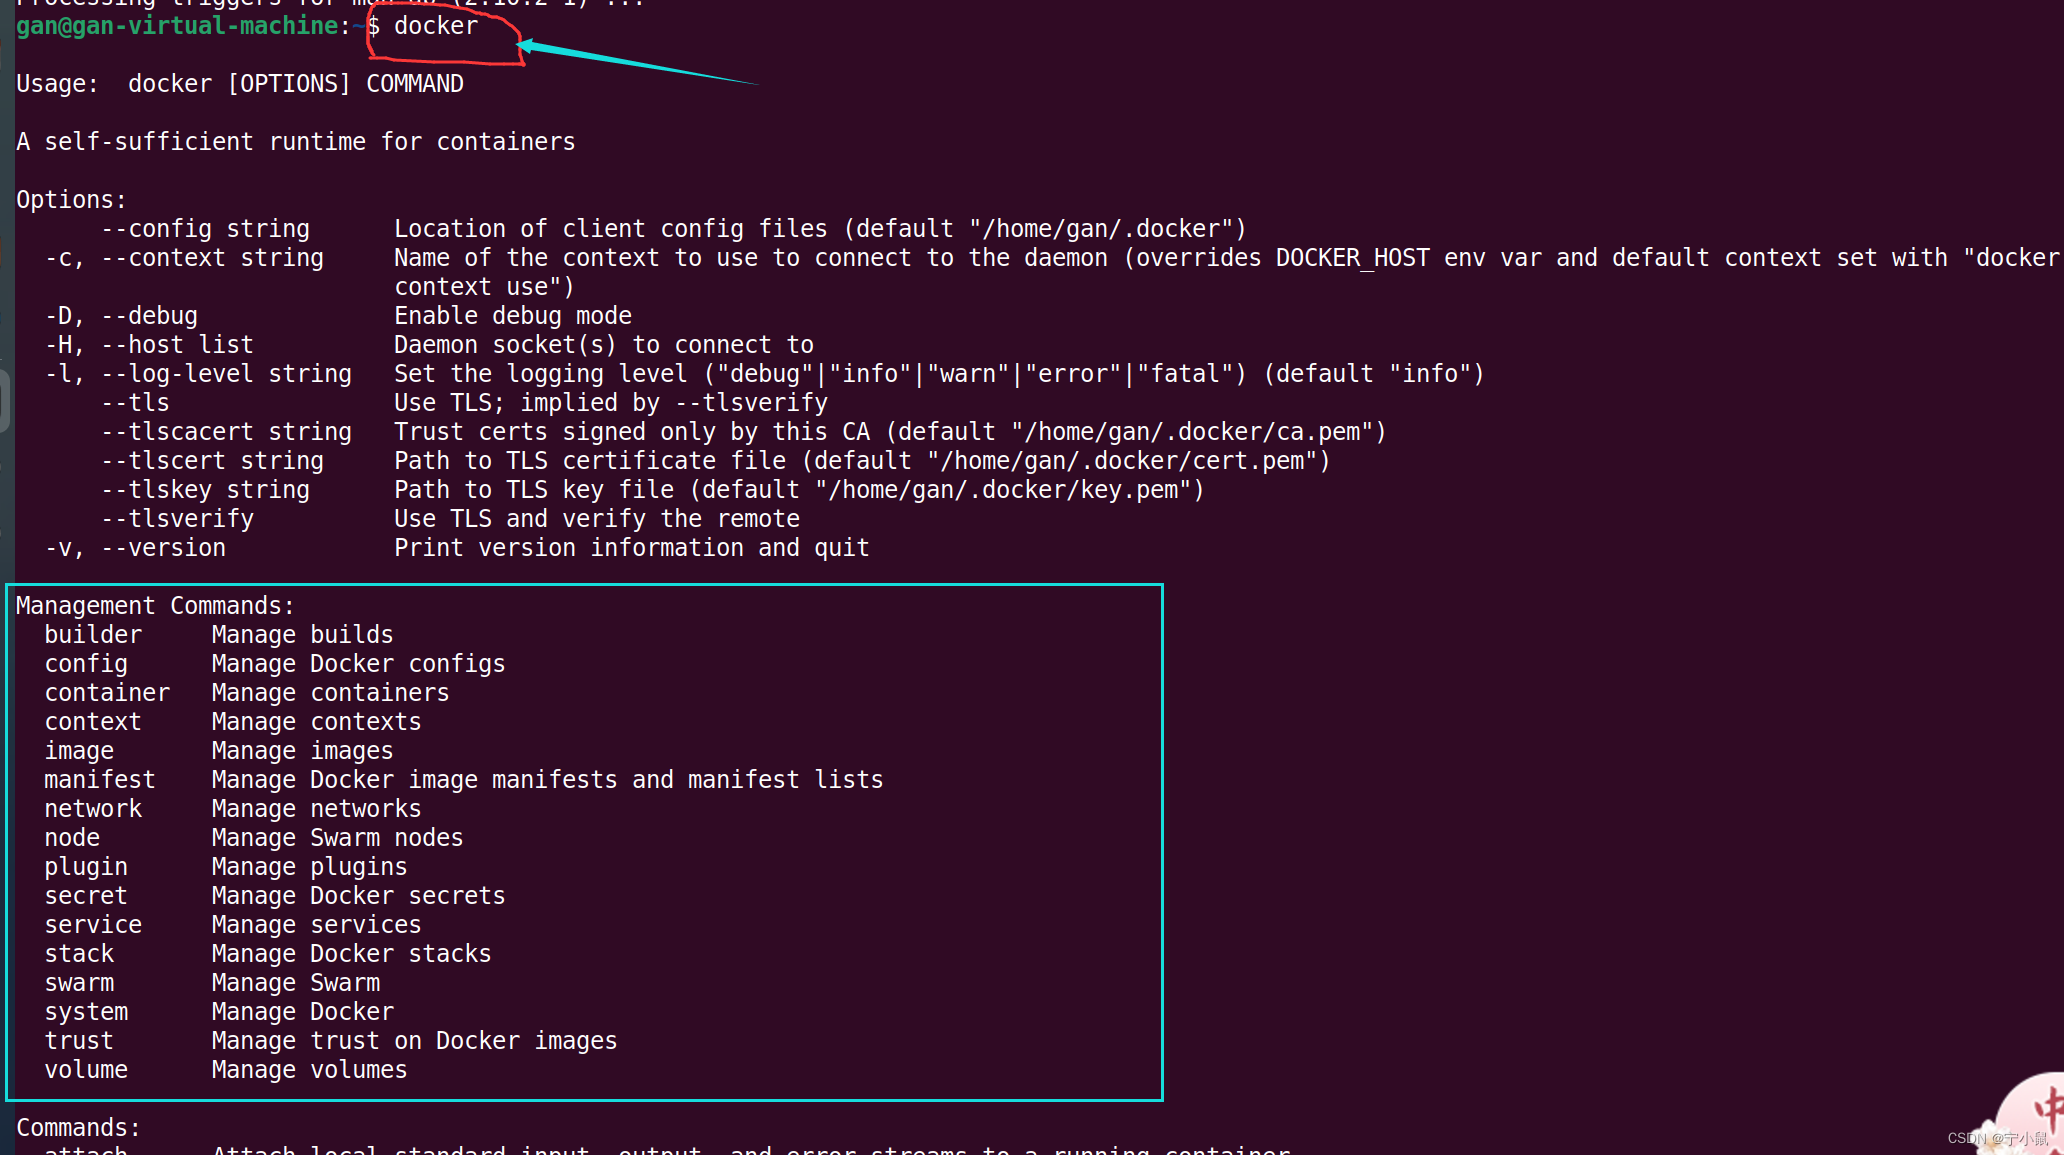
sudo apt install docker.io
可用docker命令查看,docker安装成功会有子命令介绍。
查看docker版本
gan@gan-virtual-machine:~$ sudo docker version
Client:
 Version:           20.10.12
 API version:       1.41
 Go version:        go1.17.3
 Git commit:        20.10.12-0ubuntu4
 Built:             Mon Mar  7 17:10:06 2022
 OS/Arch:           linux/amd64
 Context:           default
 Experimental:      true

Server:
 Engine:
  Version:          20.10.12
  API version:      1.41 (minimum version 1.12)
  Go version:       go1.17.3
  Git commit:       20.10.12-0ubuntu4
  Built:            Mon Mar  7 15:57:50 2022
  OS/Arch:          linux/amd64
  Experimental:     false
 containerd:
  Version:          1.5.9-0ubuntu3
  GitCommit:
 runc:
  Version:          1.1.0-0ubuntu1
  GitCommit:
 docker-init:
  Version:          0.19.0
  GitCommit:
(2)docker配置
A、镜像拉取与删除演示——以hello-world为例
#拉取hello-world镜像,这样子是默认拉取最新版,如果想选特定版本就在后面加上版本号即可
sudo docker pull hello-world
#用docker images命令可以看到,我们拉取镜像成功啦,执行结果如下
sudo docker images
#REPOSITORY    TAG       IMAGE ID       CREATED        SIZE
#hello-world   latest    feb5d9fea6a5   8 months ago   13.3kB
#删除镜像  后面跟的是镜像ID,因为同一个名字的镜像有不同版本,你可以装多个版本,所以会有多个同名的镜像,只有镜像ID才能唯一标识镜像
sudo docker rmi feb5d9fea6a5
#Untagged: hello-world:latest
#Untagged: hello-world@sha256:13e367d31ae85359f42d637adf6da428f76d75dc9afeb3c21faea0d976f5c651
#Deleted: sha256:feb5d9fea6a5e9606aa995e879d862b825965ba48de054caab5ef356dc6b3412
#Deleted: sha256:e07ee1baac5fae6a26f30cabfe54a36d3402f96afda318fe0a96cec4ca393359
#再次查看,发现镜像删除成功啦
sudo docker images
#REPOSITORY   TAG       IMAGE ID   CREATED   SIZE
B、配置docker加速器
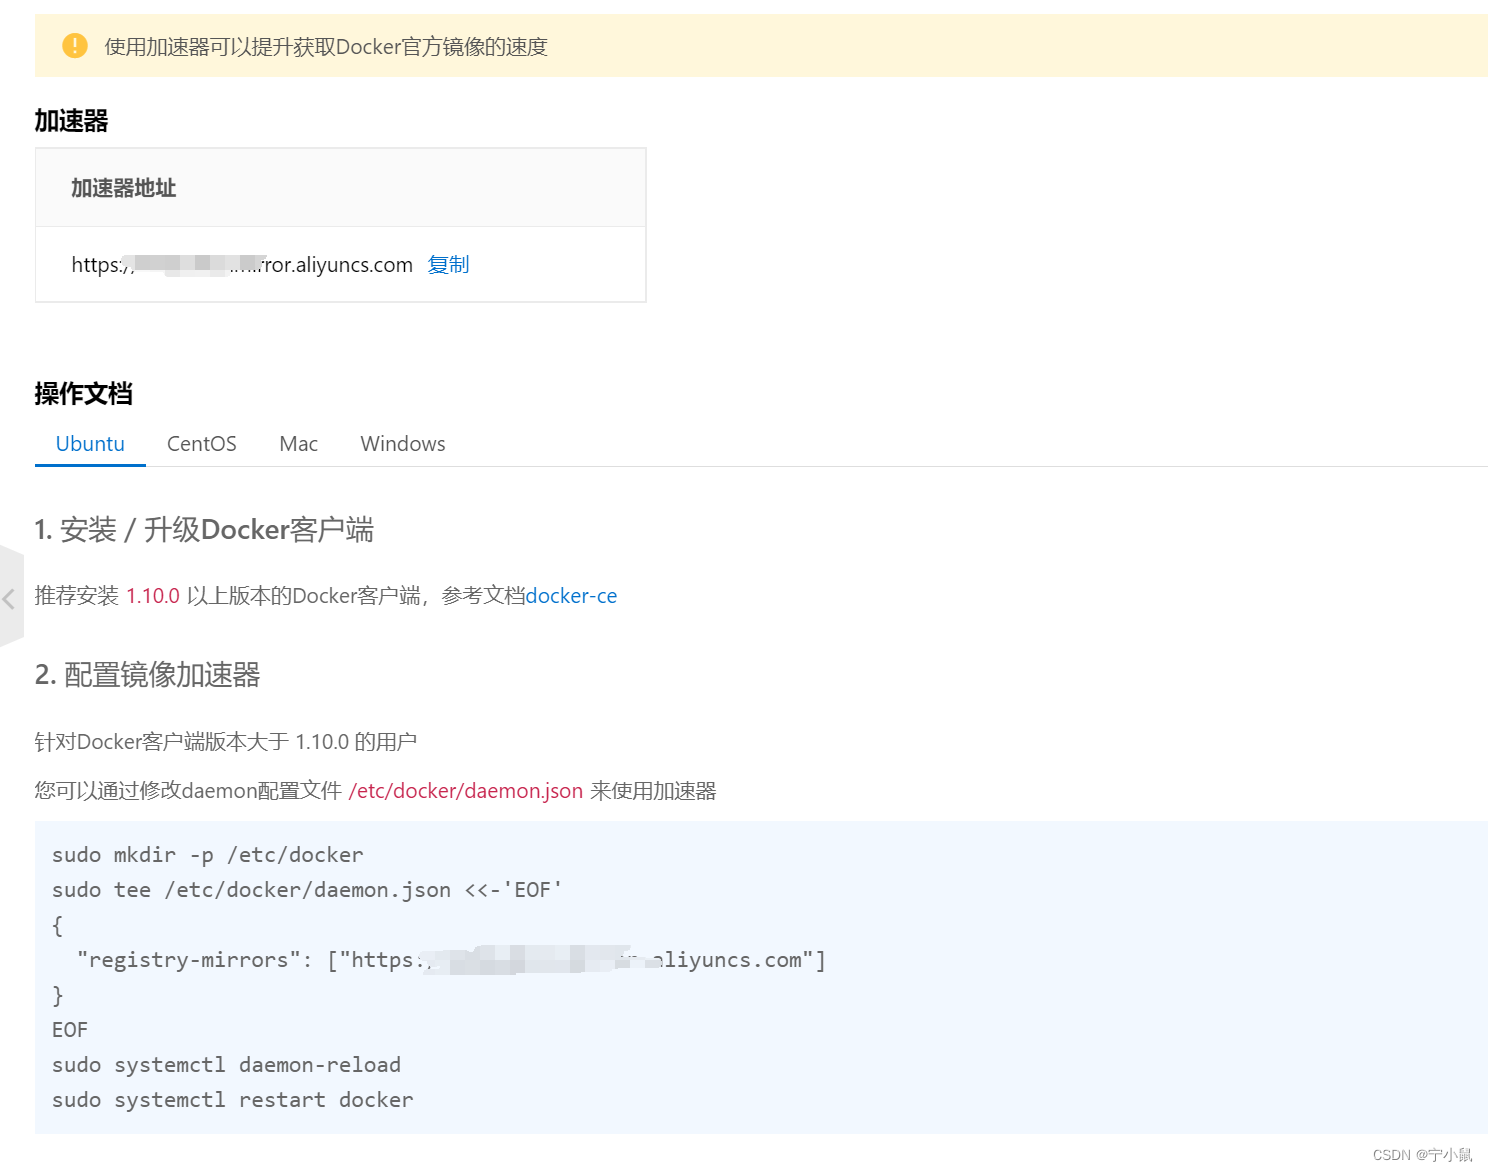
在网页输入“https://cr.console.aliyun.com/cn-hangzhou/instances/mirrors”,用支付宝或者淘宝扫一扫打开阿里云,确认登陆。然后就有加速器网址啦,也有加速器配置指导。
gan@gan-virtual-machine:~$ cd /etc/docker
gan@gan-virtual-machine:/etc/docker$ ls
key.json
#发现etc/docker目录下没有daemon.json这个文件,所以我们需要新建一个
没事,我们跟着阿里云界面提示的,Ubuntu安装命令来,直接复制那一段粘贴到Ubuntu命令终端。
gan@gan-virtual-machine:/etc/docker$ sudo mkdir -p /etc/docker
sudo tee /etc/docker/daemon.json <<-'EOF'
{


  "registry-mirrors": ["https://m6juudzz.mirror.aliyuncs.com"]
}
EOF
sudo systemctl daemon-reload
sudo systemctl restart docker
[sudo] password for gan:
{


  "registry-mirrors": ["https://m6juudzz.mirror.aliyuncs.com"]
}
gan@gan-virtual-machine:/etc/docker$ ls
daemon.json  key.json
gan@gan-virtual-machine:/etc/docker$ cat daemon.json
{


  "registry-mirrors": ["https://m6juudzz.mirror.aliyuncs.com"]
}
配置好加速器后,需要重启docker,然后我们再次拉取镜像试一下加速器是否配置成功
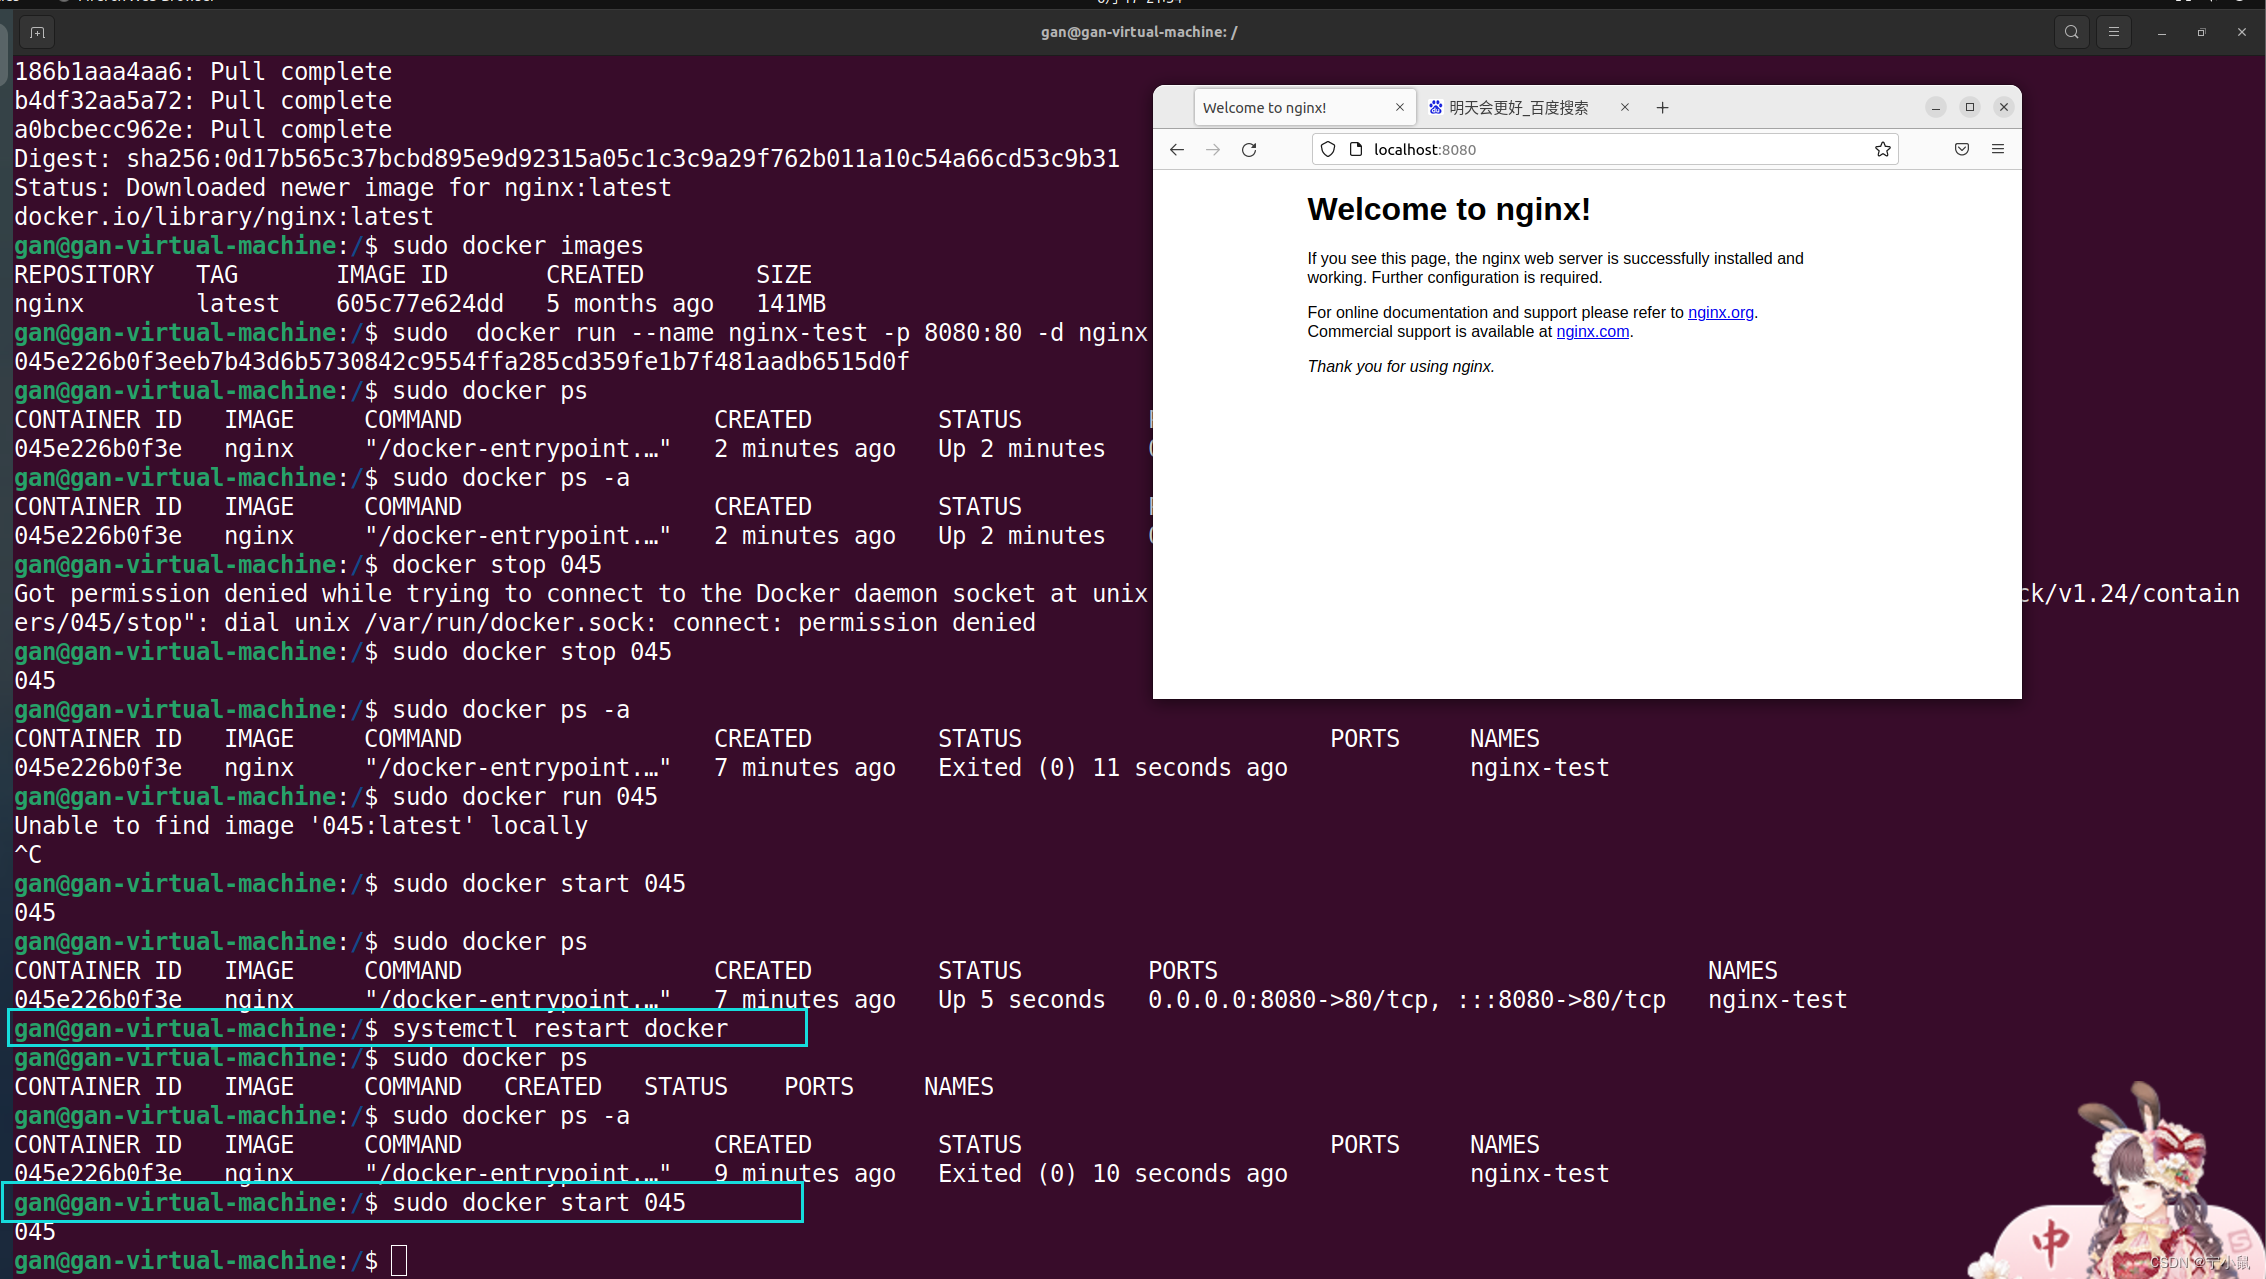
#先查看docker当前状态:active (running)  运行中
gan@gan-virtual-machine:/etc/docker$ service docker status
#关闭docker
gan@gan-virtual-machine:/etc/docker$ service docker stop
#再次查看docker当前状态:inactive (dead) 关闭
gan@gan-virtual-machine:/etc/docker$ service docker status
#此时再重新启动
gan@gan-virtual-machine:/etc/docker$ service docker start
#再次查看docker状态就又变成运行中啦


#然后重新拉取hello-world镜像,如果成功,说明加速器配置应该没问题
gan@gan-virtual-machine:/etc/docker$ sudo docker pull hello-world
#Using default tag: latest
#latest: Pulling from library/hello-world
#2db29710123e: Pull complete
#Digest: sha256:2498fce14358aa50ead0cc6c19990fc6ff866ce72aeb5546e1d59caac3d0d60f
#Status: Downloaded newer image for hello-world:latest
#docker.io/library/hello-world:latest
4.4 docker常用命令
1:查看版本: docker version
2:查看系统信息: docker info显示 Docker系统信息,包括镜像和容器数。
3: docker images //显示镜像列表
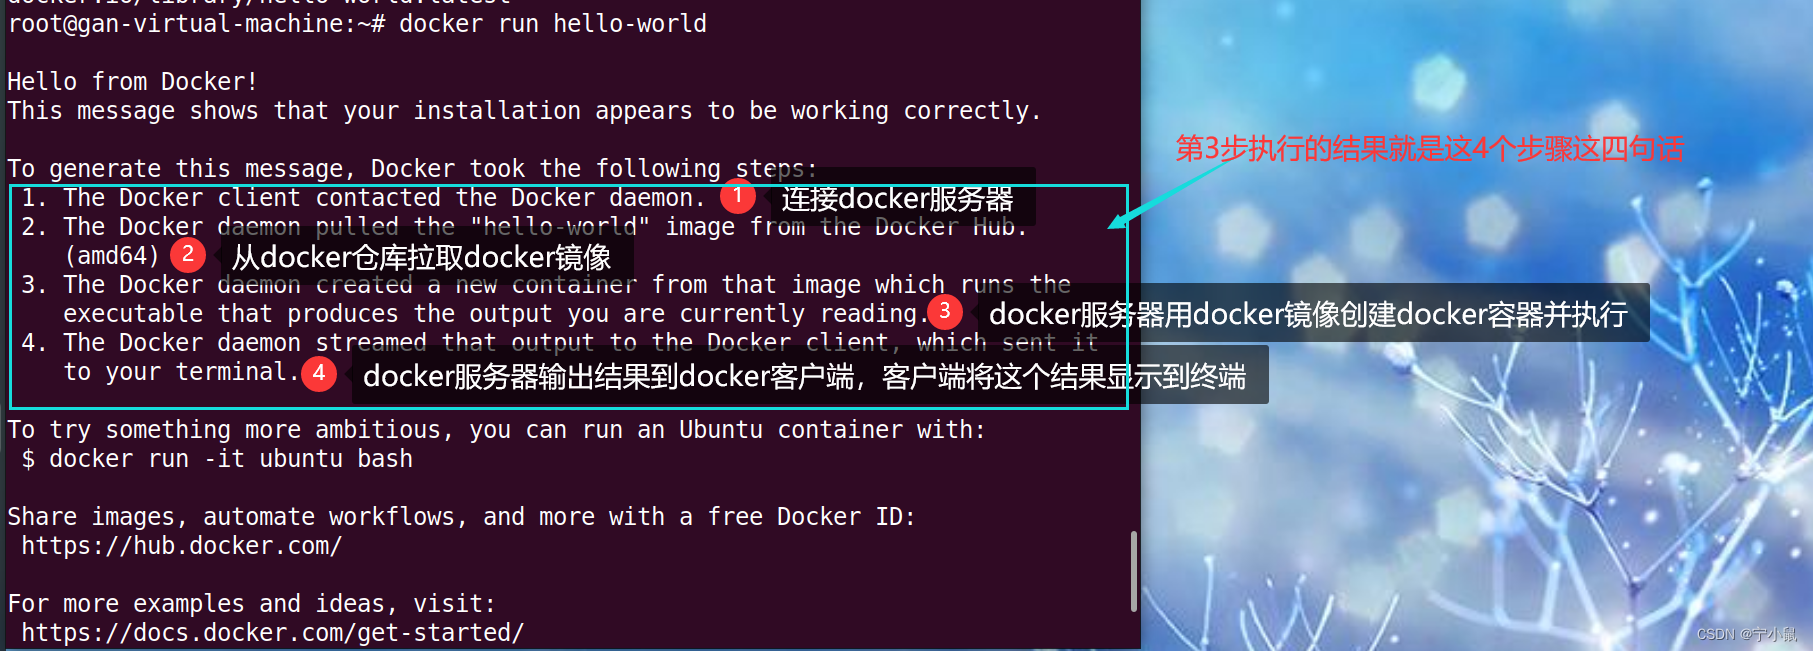
4: docker run hello-world(图文讲解)
//1∶客户端首先要连接Docker服务器。2:从Docker服务器中pull镜像。3:从lmage中创建容器,一个镜像可以创建多个容器。4: Docker守护进程将输出流式传输到Docker客户端,后者将其发送到您的终端。
5: docker rmi hello-world ===> docker images
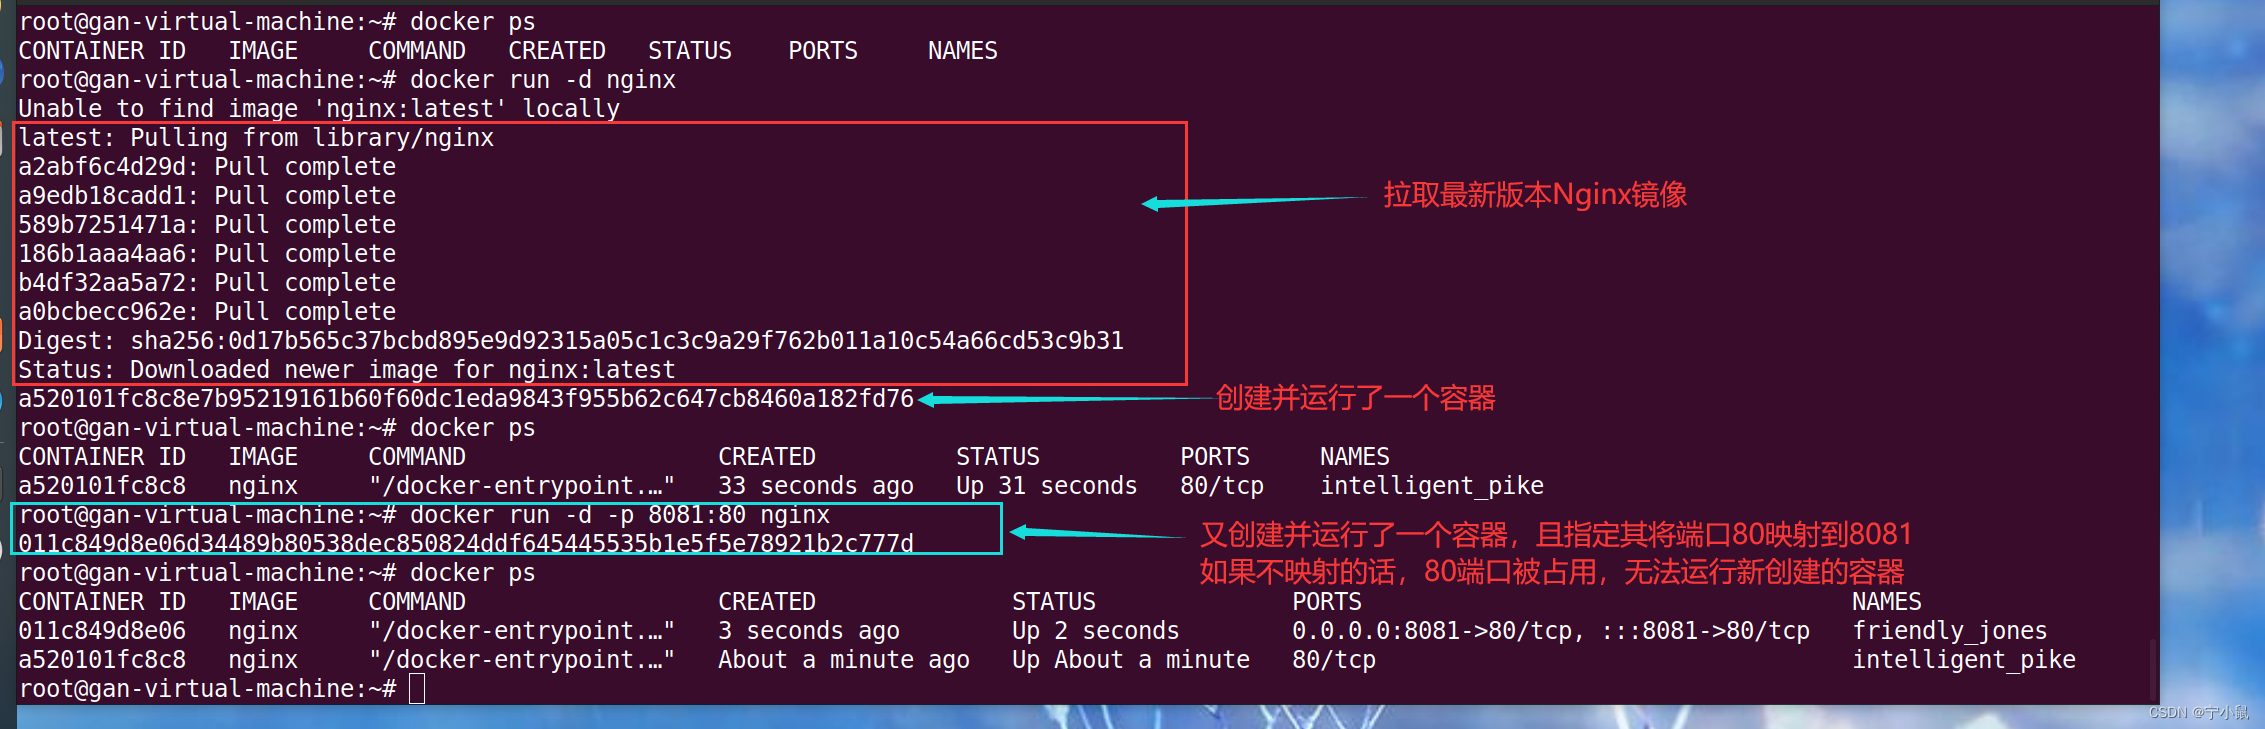
6: docker pull nginx:1.18.0 //通过官网下载指定版本
7: docker run [-d] nginx //后台运行镜像
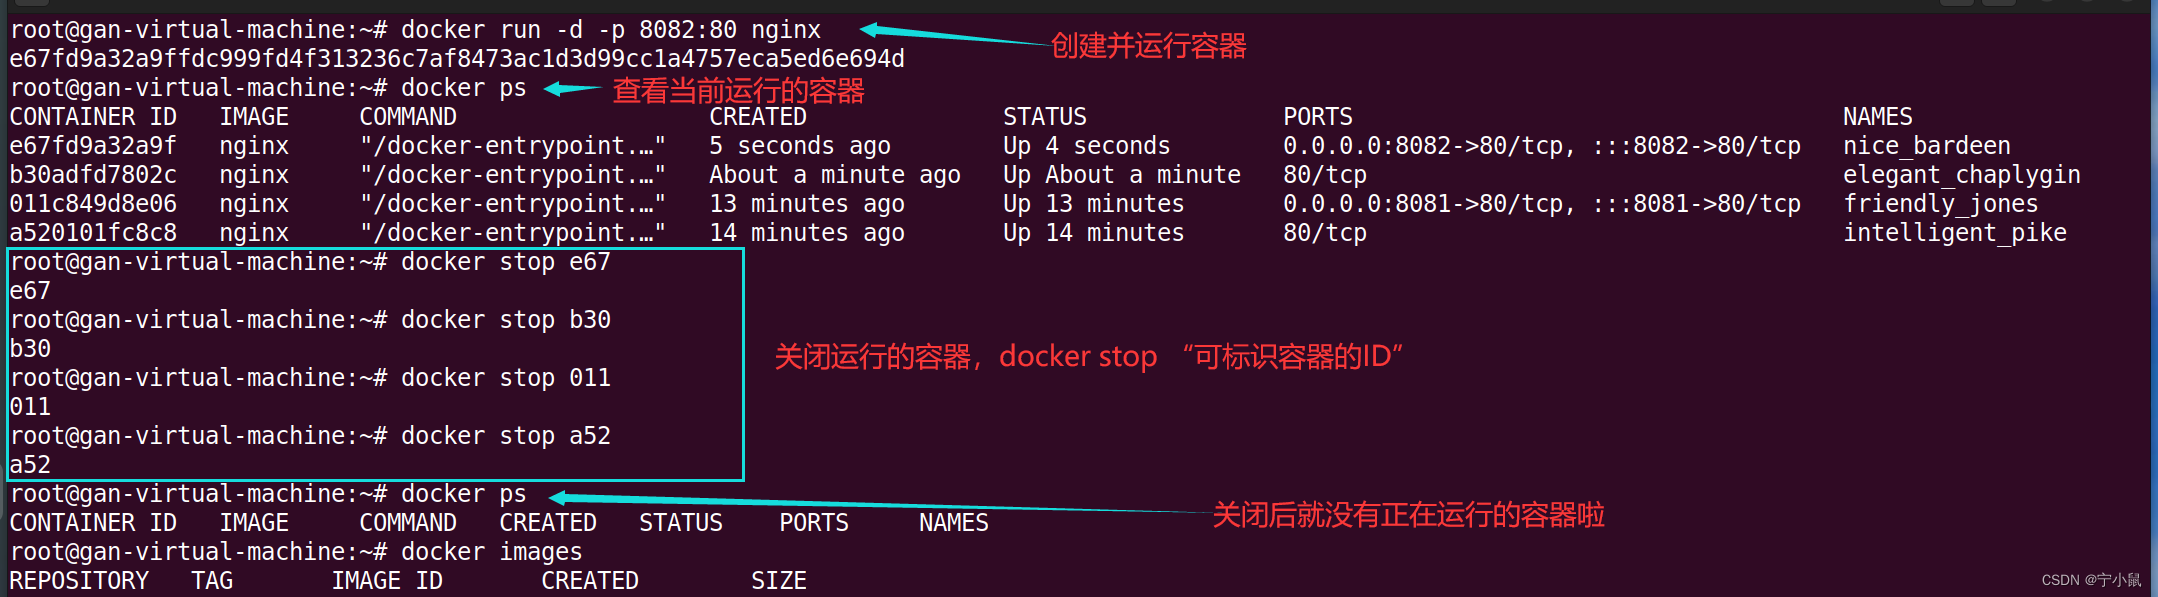
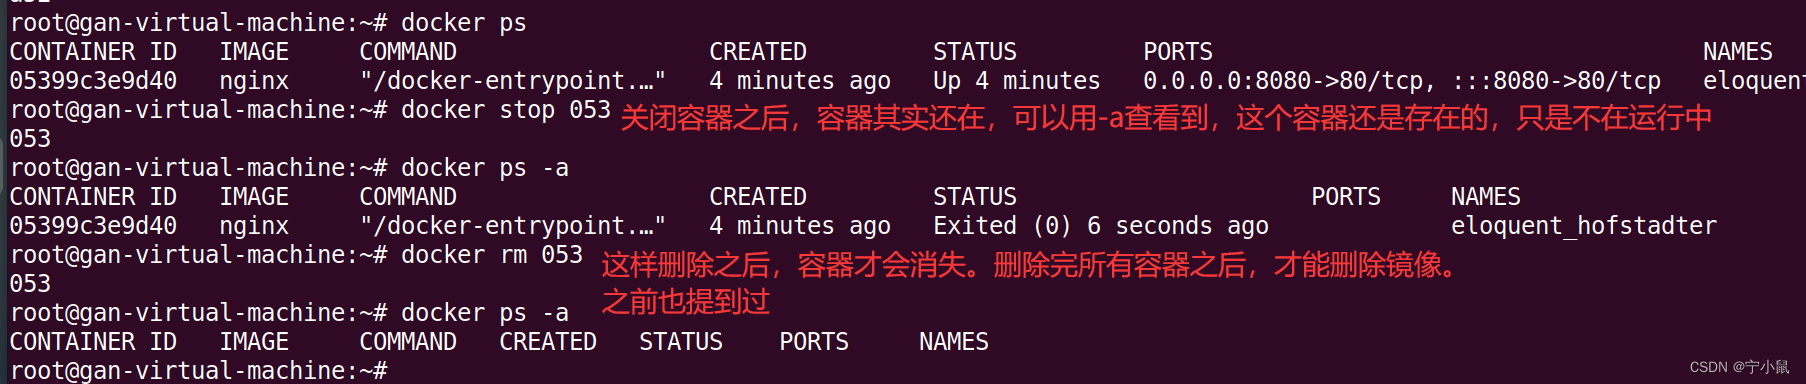
8: docker ps //l查看已运行镜像列表-a列表所有的容器,-f过滤,-q只列表容器的id。
9: docker run -d -p 8080:80 nginx //启动时候配置端口映射
10: docker stop containerID //只要能识别ID一位数也行-r尽量先删除容器在删除镜像2.1 docker rmi nginx:1.18.0 #删除已下载的镜像rm是删除容器(镜像运行的称为容器)
11:启动、关闭服务service docker status|start|stop
(1)镜像与容器
#拉取镜像
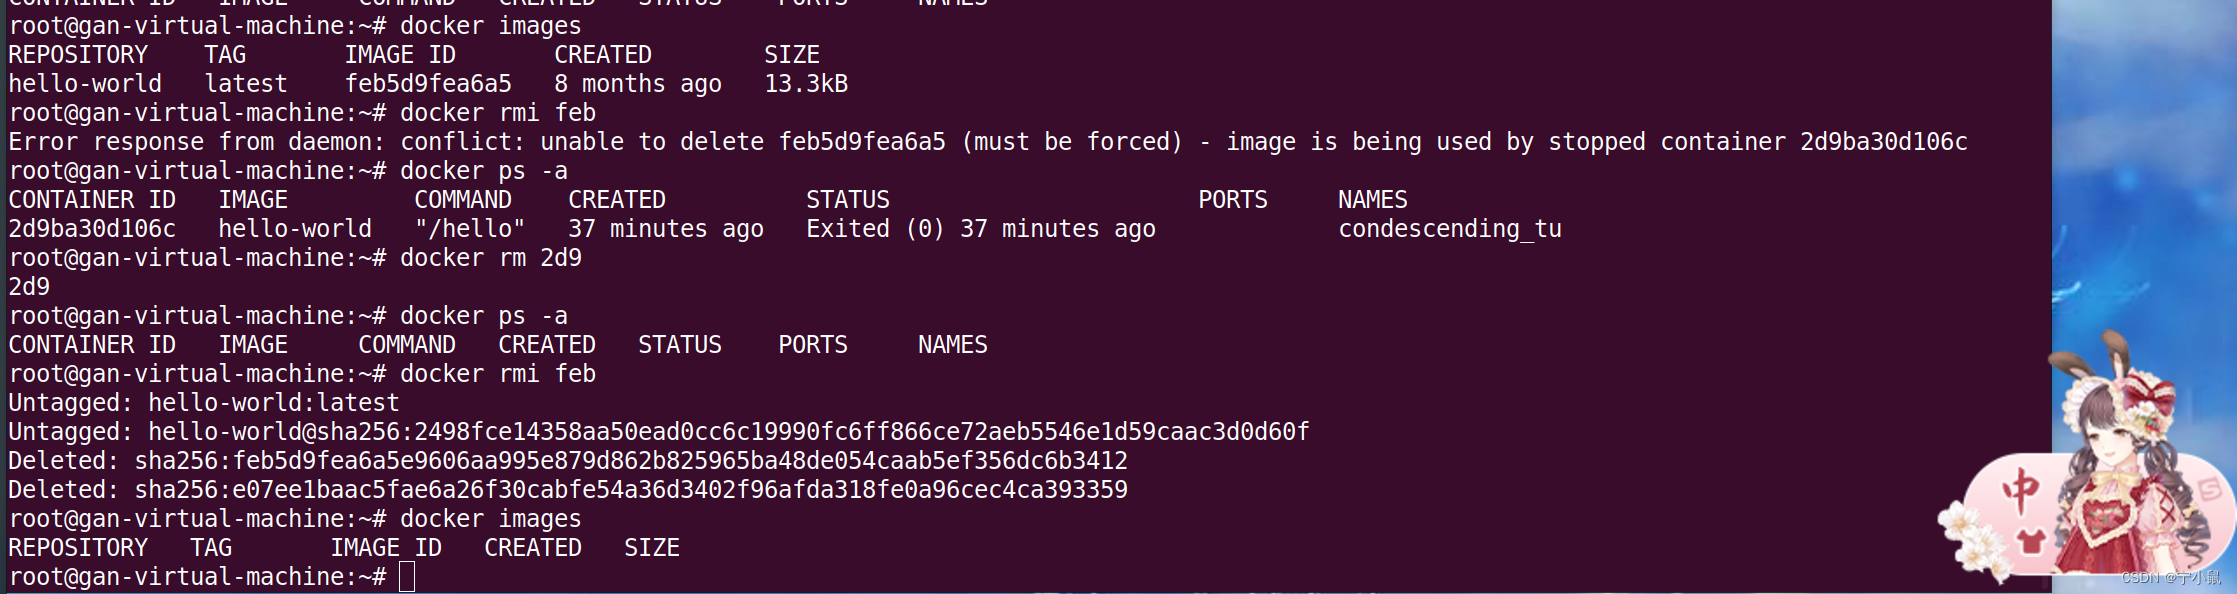
root@gan-virtual-machine:~# docker pull hello-world
#运行容器
root@gan-virtual-machine:~# docker run hello-world
#查看当前正在运行的容器,发现没有,因为hello-world就是下图中所示,打印几个步骤出来,执行完成后自动关闭容器。
root@gan-virtual-machine:~# docker ps
CONTAINER ID IMAGE COMMAND CREATED STATUS PORTS NAMES
#删除docker镜像失败
root@gan-virtual-machine:~# docker rmi feb
Error response from daemon: conflict: unable to delete feb5d9fea6a5 (must be forced) - image is being used by stopped container 2d9ba30d106c

#查看所有镜像,包括未处于运行状态的容器
root@gan-virtual-machine:~# docker ps -a
CONTAINER ID   IMAGE         COMMAND    CREATED          STATUS                      PORTS     NAMES
2d9ba30d106c   hello-world   "/hello"   37 minutes ago   Exited (0) 37 minutes ago             condescending_tu
#想要删除镜像需要先删除其对应的容器,和删除类之前要删掉对应的对象一个道理。
#删除容器2d9ba30d106c。后面接的容器ID,只要能够区分就行,不用写完整的ID,如果第一位就能区分,打一个字母也是可以的
root@gan-virtual-machine:~# docker rm 2d9
#查看容器
root@gan-virtual-machine:~# docker ps -a
#CONTAINER ID   IMAGE     COMMAND   CREATED   STATUS    PORTS     NAMES
#容器已经删掉了,此时删除镜像
root@gan-virtual-machine:~# docker rmi feb
#查看镜像,确保删除成功
root@gan-virtual-machine:~# docker images
(2)Nginx部署
在docker仓库可以查看版本
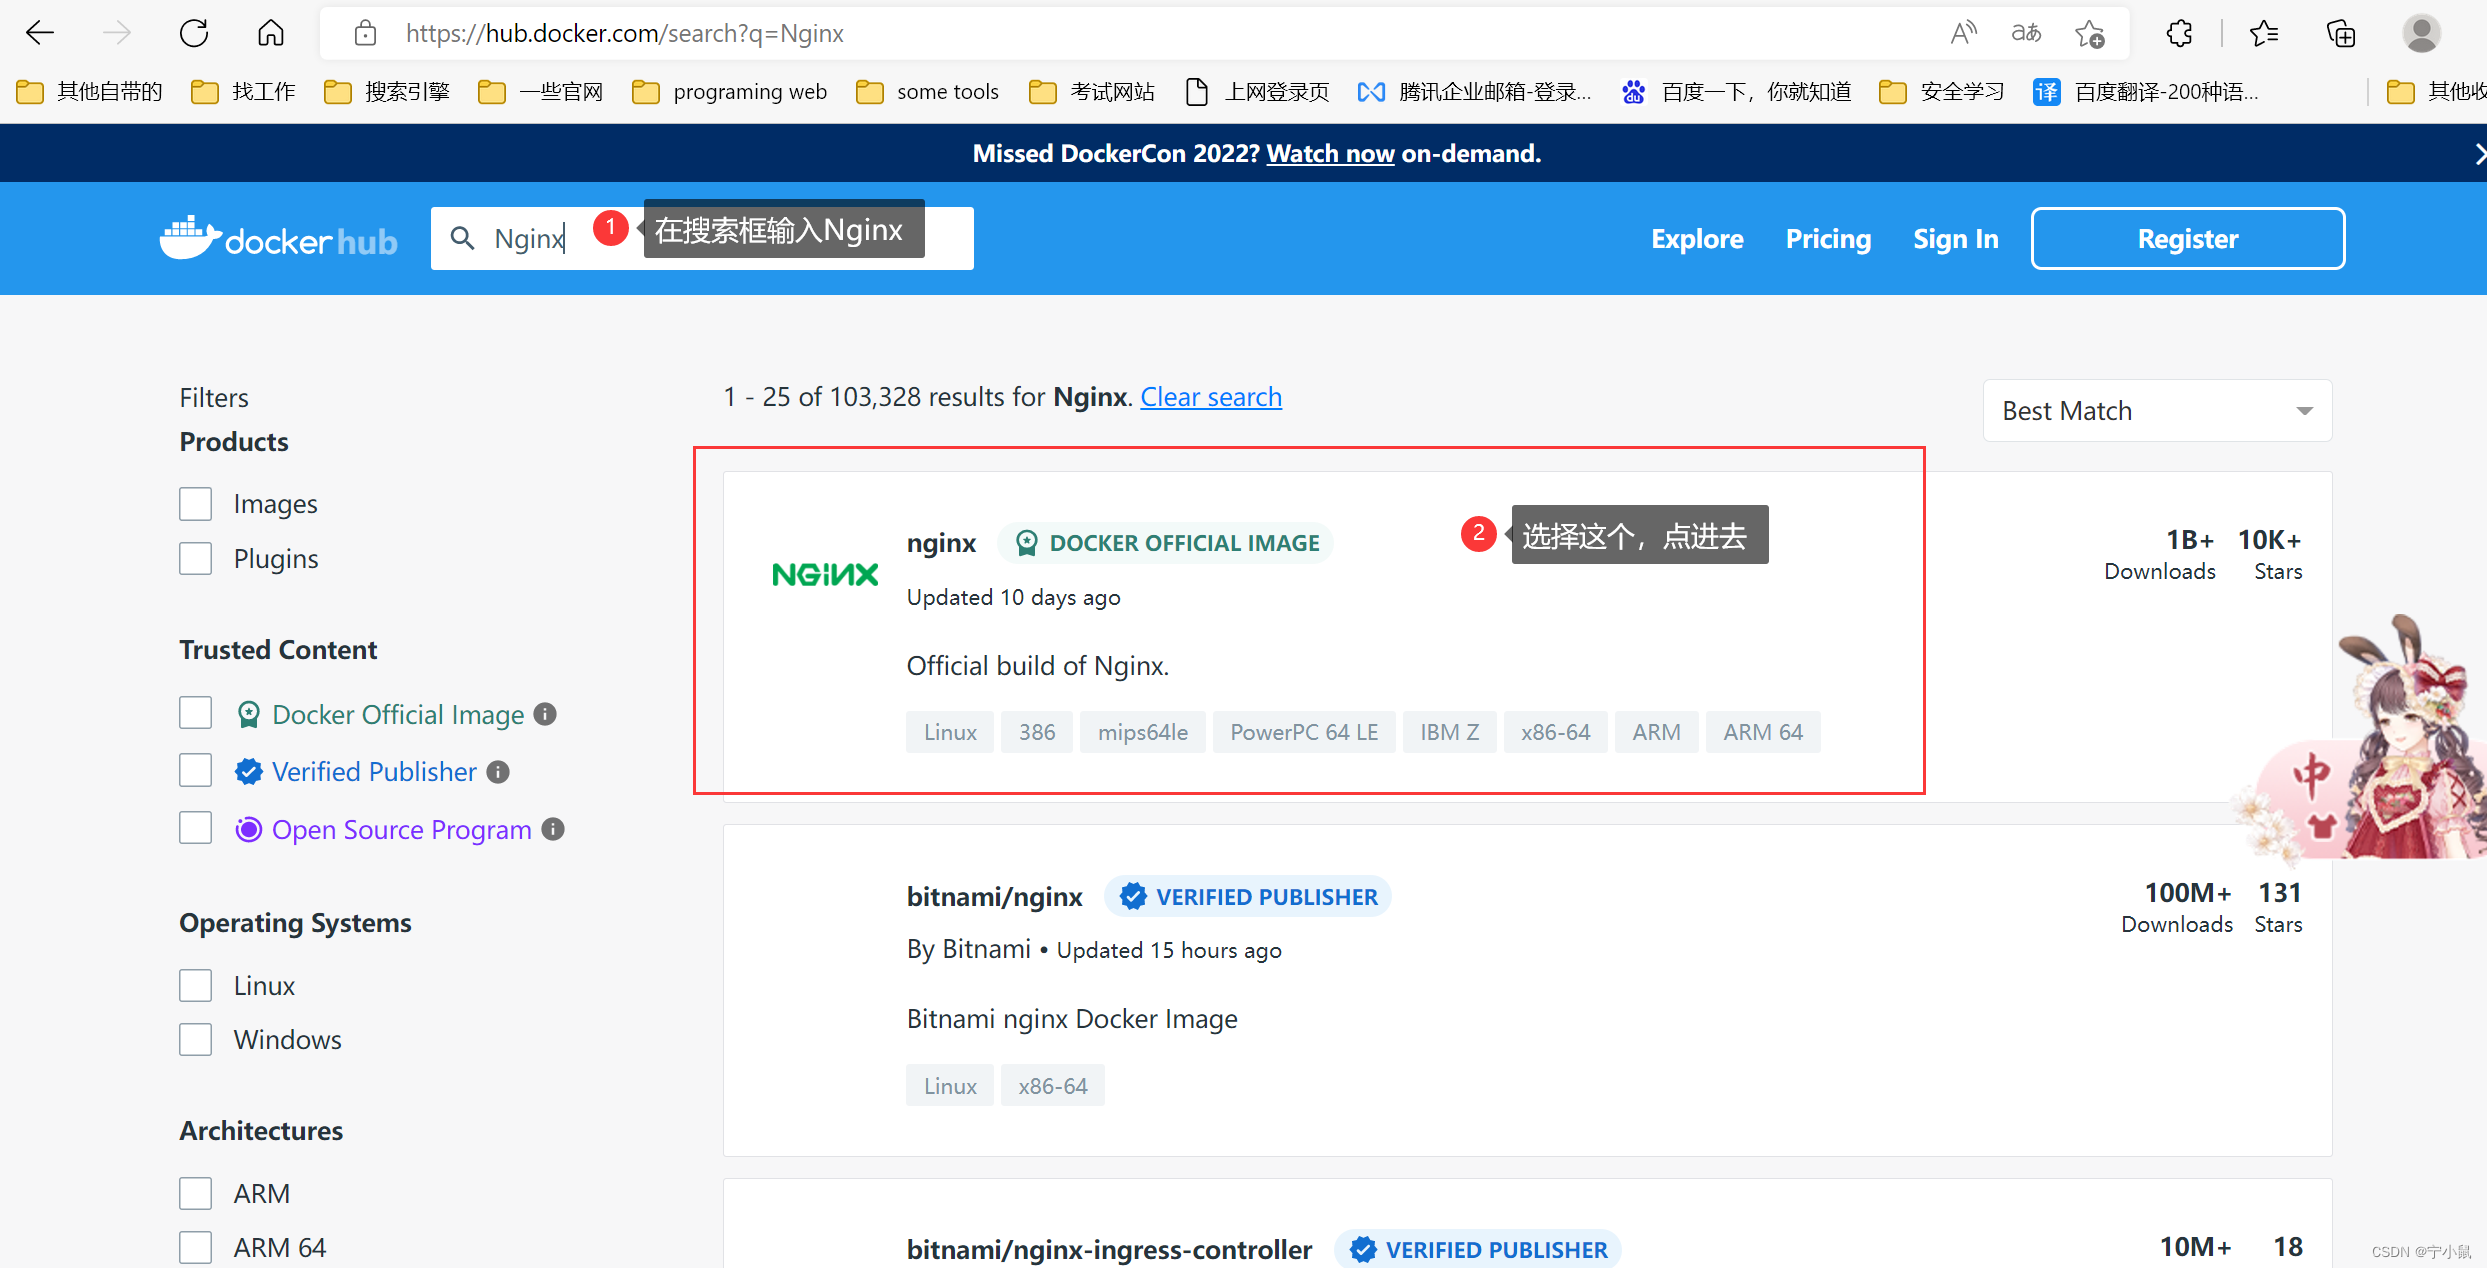
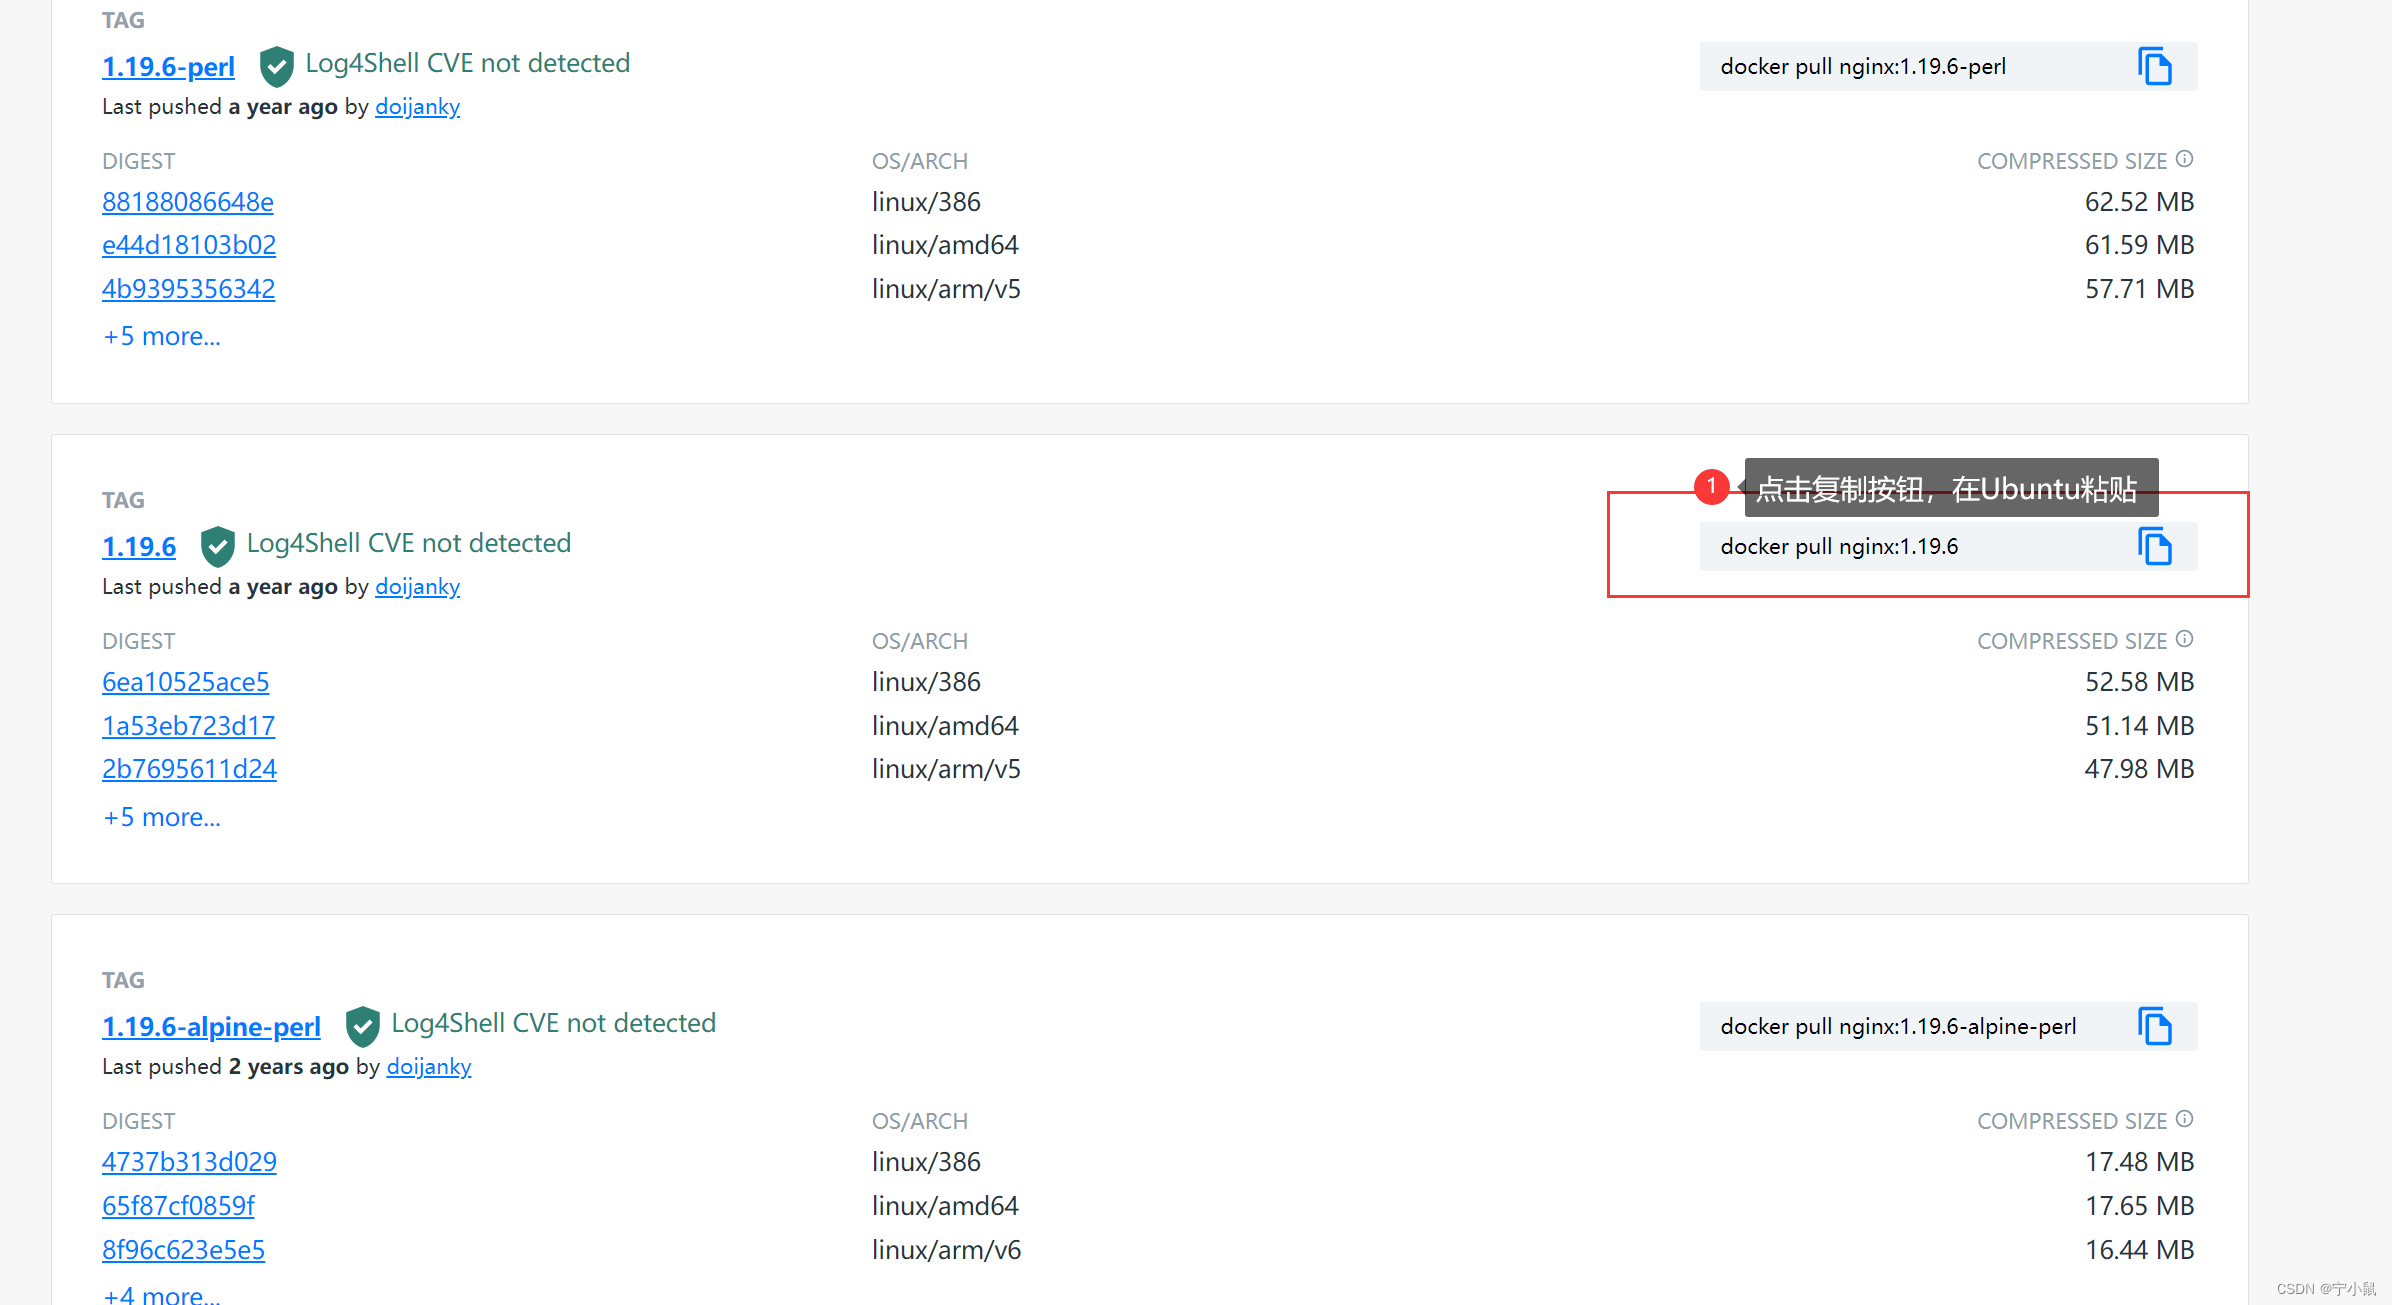
#找到1.19.6版本【因为老师用的这个版本啦~】,复制镜像拉取命令
#不加版本号的话,会默认拉取最新的版本,其实装最新版也是可以哒~
docker pull nginx:1.19.6
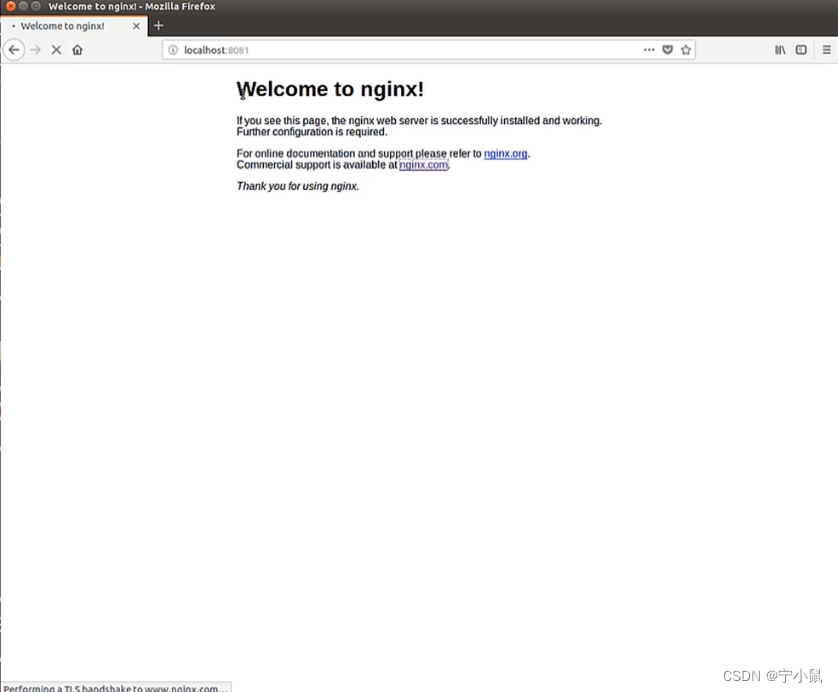
可以通过localhost:端口号,访问Nginx,其实就类似于Tomcat那种,服务器的界面。
但是我的是这样的:【小白的崩溃就在和老师不一样的一瞬间】
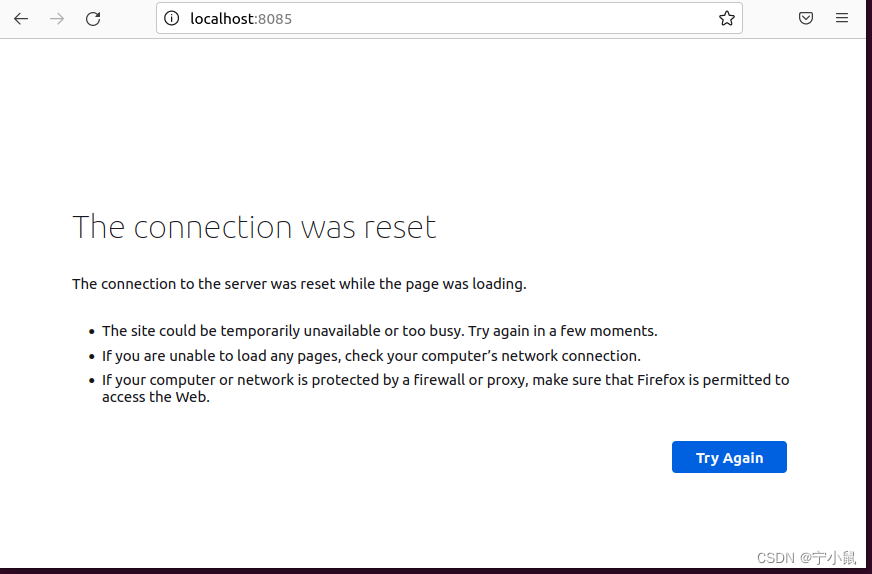
(3)小插曲
因为我访问Nginx页面访问不了,所以我搜了一下问题,发现我还是访问不了,我就回过头看,只有这一步和老师不一样。
用su命令切换管理员
我没有成功,v_v。
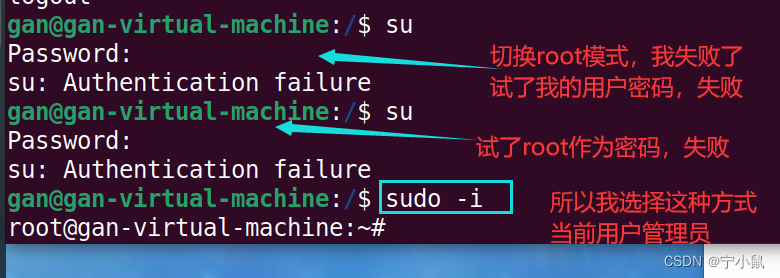
然后我就百度,
ubuntu初始root密码
安装完Ubuntu后可能没有设置root密码,不知道密码自然就无法进入根用户下。
到网上搜了一下,原来是这么回事:
Ubuntu的默认root密码是随机的,即每次开机都有一个新的root密码。
解决方法:
我们可以在终端输入命令“sudo passwd”,然后输入当前用户的密码后"Enter"。
终端会提示我们输入新的密码并确认,此时的密码就是root新密码。
修改成功后,输入命令 su root,再输入新的密码就ok了。
反正最后发现,不是因为管理员的问题。重启docker客户端,重启容器就行~
4.5 fabric组件下载
1、浓缩版:fabric组件下载拉取命令
先切换到管理员身份,再运行下述命令哦~
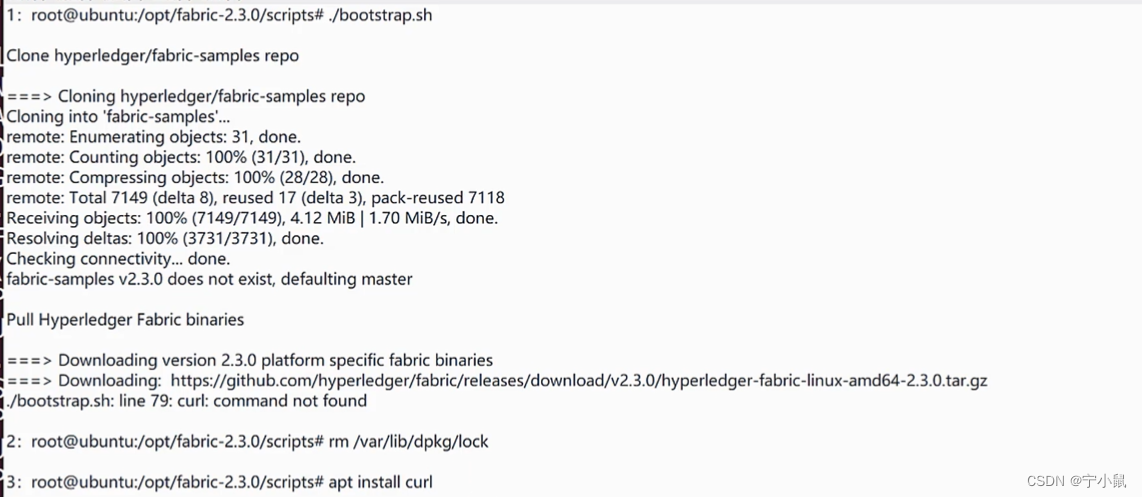
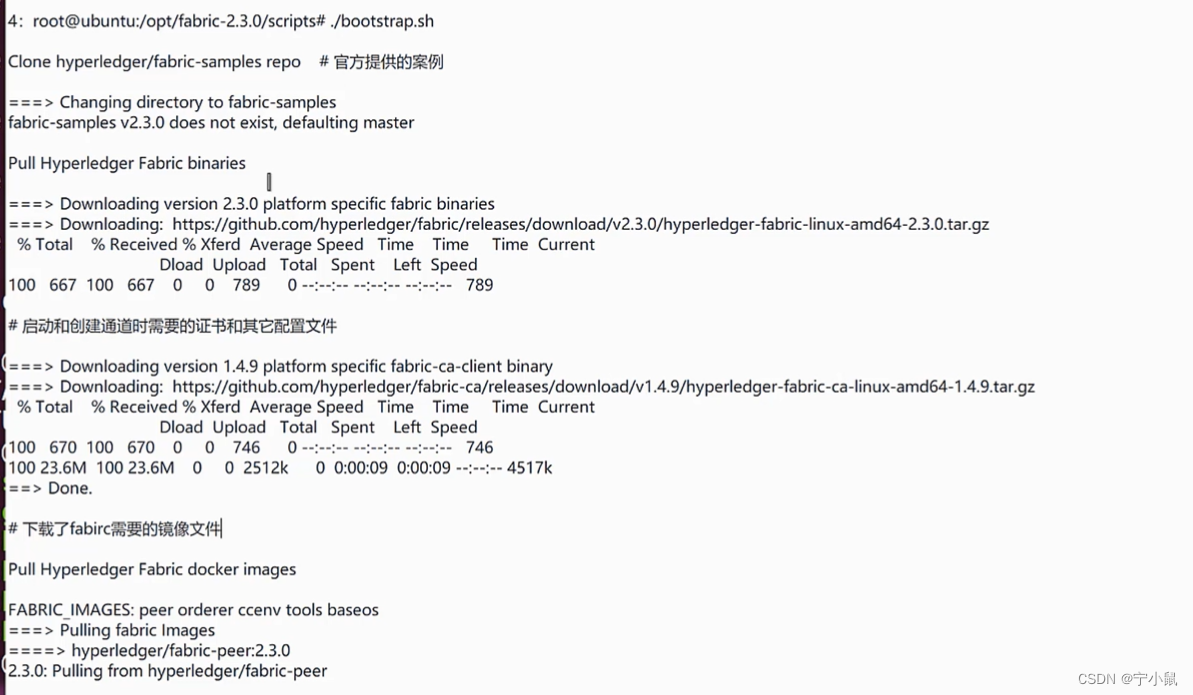
//在GitHub下载fabric2.3.0的tar.gz文件后,拖到Ubuntu中,并且解压到/opt目录下,进入解压后的目录
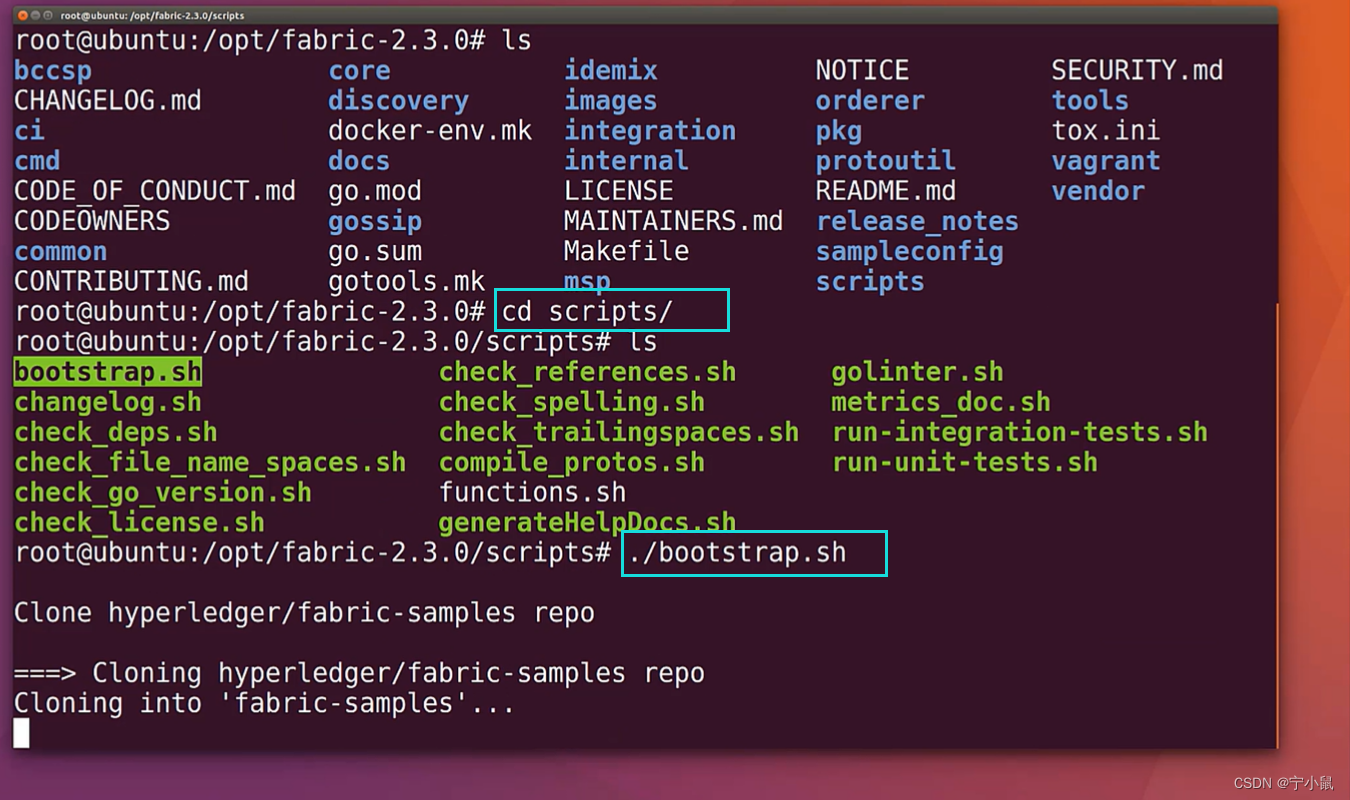
root@ubuntu:/home/hong/Desktop# tar xzf fabric-2.3.0.tar.gz -C /opt
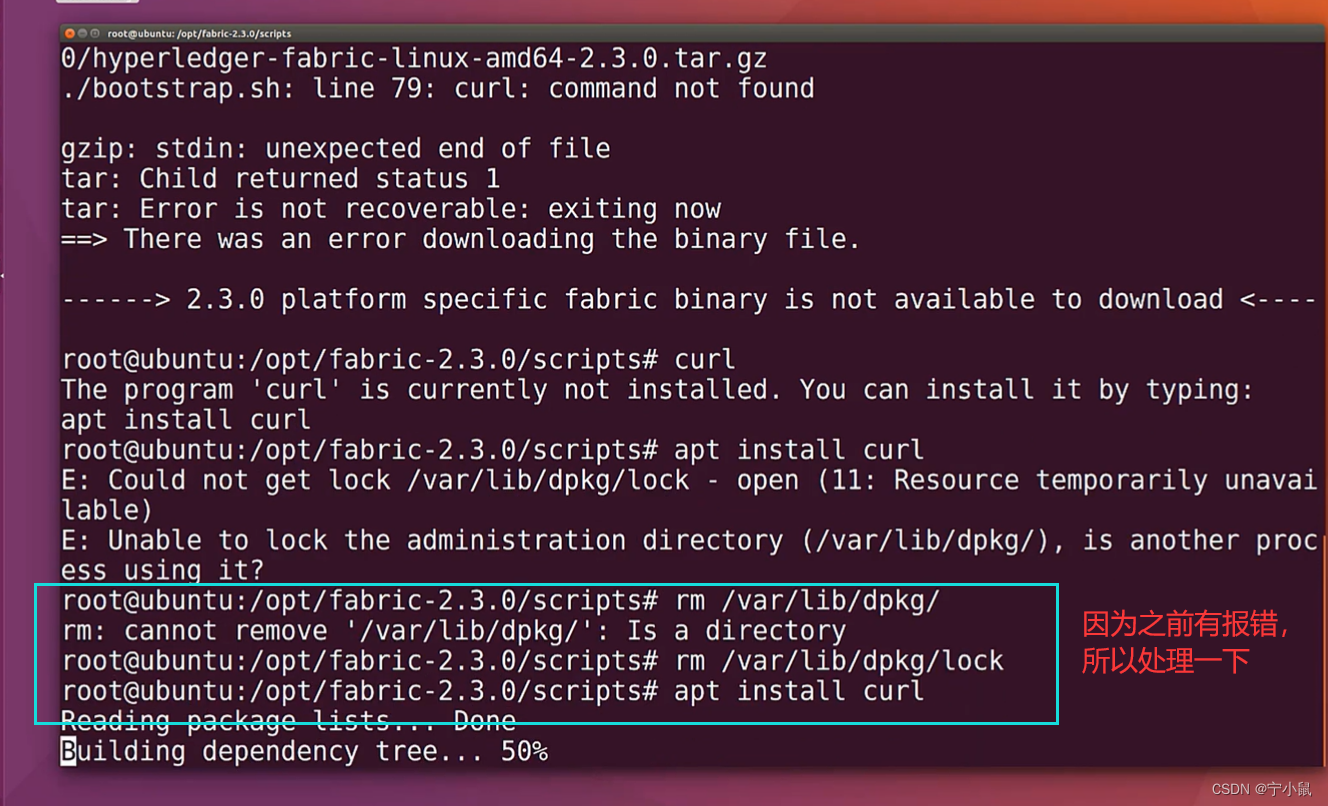
root@ubuntu:/opt/fabric-2.3.0/scripts# apt install curl
//如果有报错“E: Could not get lock /var/lib/dpkg/lock - open (11: Resource temporarily unavailable)”的话,可以不用移除/var/lib/dpkg/lock这个目录,然后重新安装apt install curl,如果没有报错,跳过下面这条语句
root@ubuntu:/opt/fabric-2.3.0/scripts# rm /var/lib/dpkg/lock
//安装,拉取下载组件,获得bin、config、test-等目录
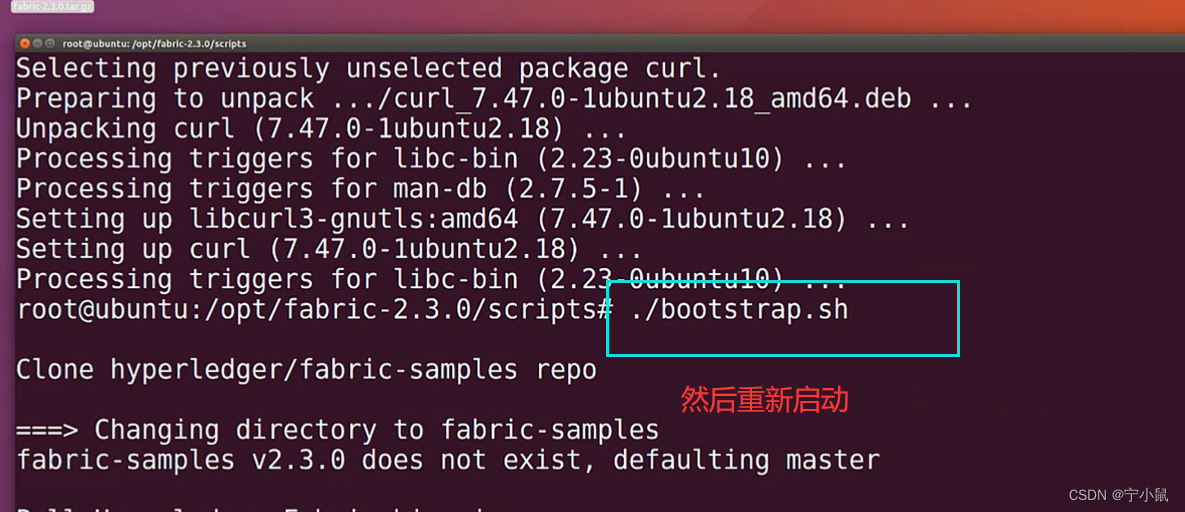
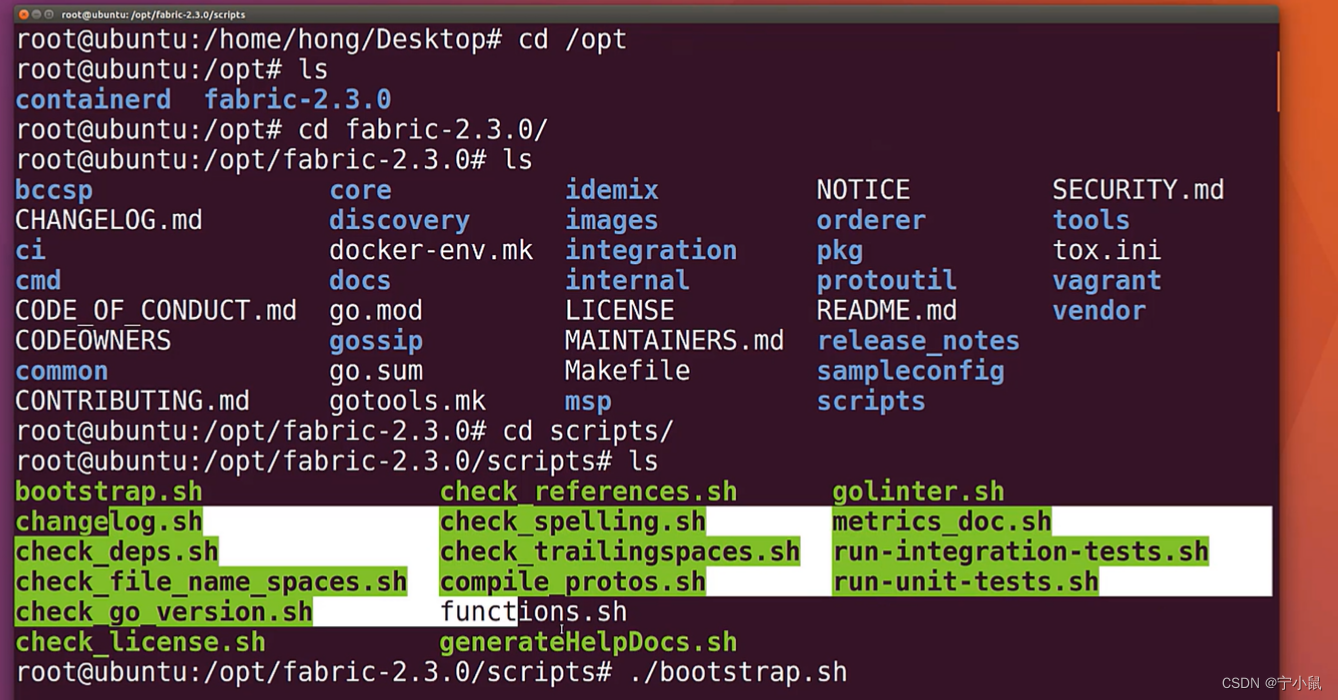
root@ubuntu:/opt/fabric-2.3.0/scripts# ./bootstrap.sh
//安装docker-compose
root@ubuntu/opt/fabric-2.3.0/scripts# :apt install docker-compose
//启动Fabric服务
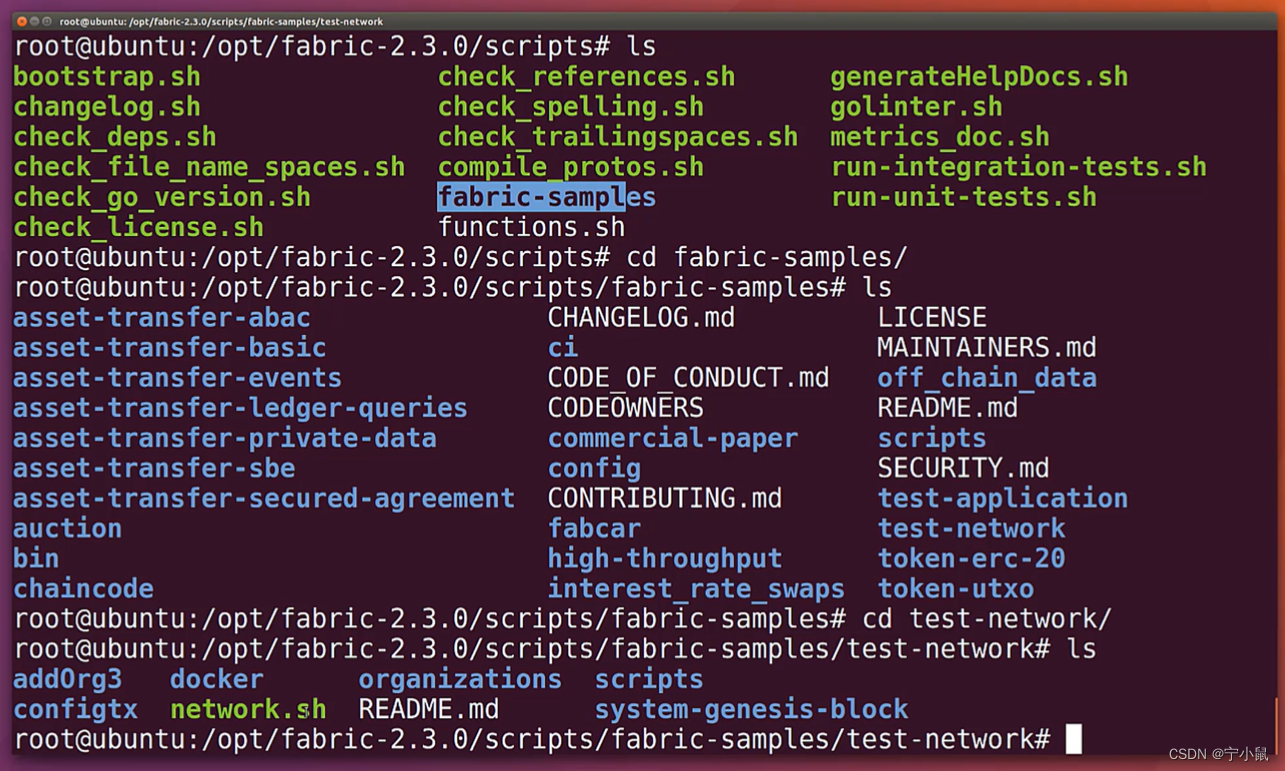
root@ubuntu:/opt/fabric-2.3.0/scripts/fabric-samples/test-network# ./network.sh up
//可以看下,现在在运行的docker容器
root@ubuntu:/opt/fabric-2.3.0/scripts/fabric-samples/test-network# docker ps -a
//然后试一下终止网络命令——>本质就是销毁之前启动的docker容器的过程
root@ubuntu:/opt/fabric-2.3.0/scripts/fabric-samples/test-network# ./network.sh down
//组件下载这部分就完成啦

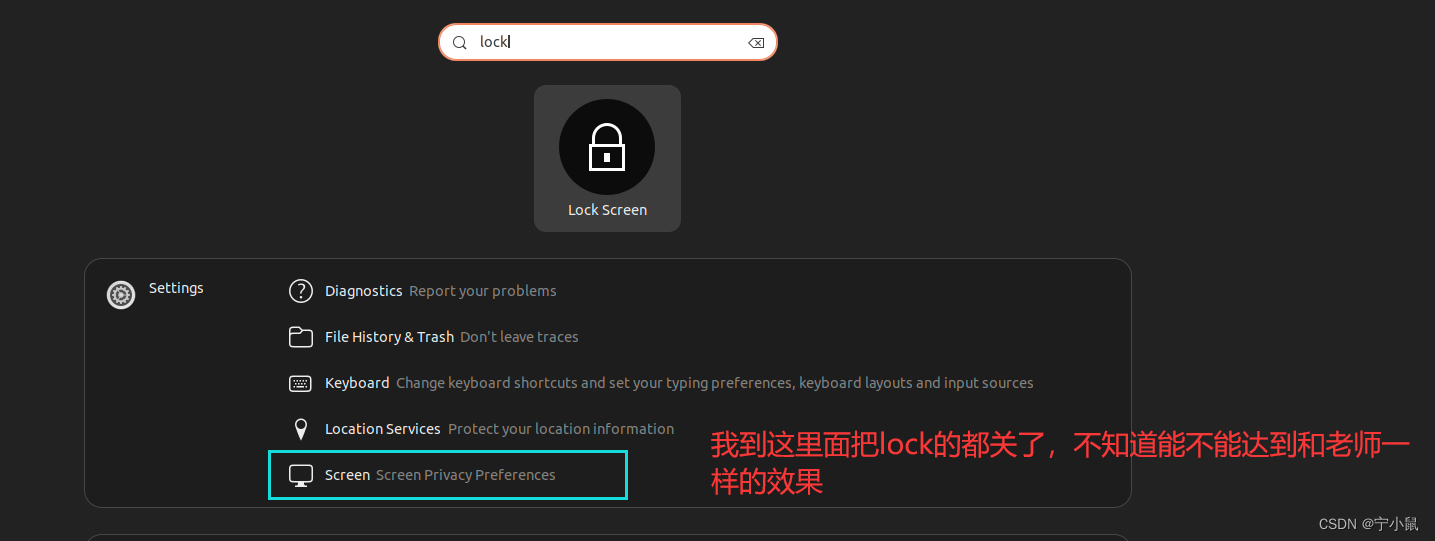
补充一个小技巧
关闭自动锁屏,这样在下载资源的时候不会因为长时间不在Ubuntu界面而锁屏导致暂停下载
这是20.04版本的Ubuntu需要关闭那个Lock
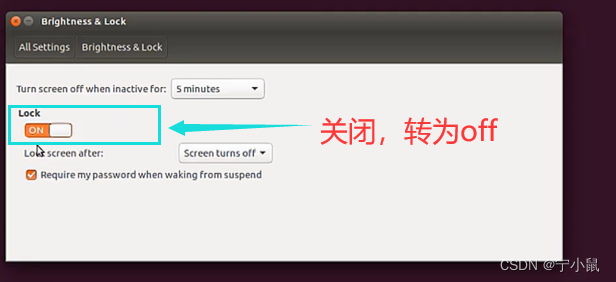
我装的新版本,没有这个选项好像,如果有的话可能设置的位置变化了。
2、下载组件流程截屏【老师的步骤截屏记录,可跳过不看】
老师说下节课再讲fabric源码压缩包下载

安装好之后,启动网络试试:

发现缺少docker依赖这个组件。docker-compose其实是docker命令行工具,docker多个镜像之前要相互调用相互依赖,所以需要docker-compose来完成。安装一下就好啦~

装好之后可以发现,刚开始没有samples
操作完之后就有了
这时候再启动网络看看:
3、ca组件下载失败的问题
问题1 CA组件下载失败:“------> 1.4.9 fabric-ca-client binary is not available to download (Available from 1.1.0-rc1) <----”
本来初次安装的时候我没管的,以为没啥影响,后面启动网络它有提示,我想了一下还是回来检查一下,还是把它补全比较好。
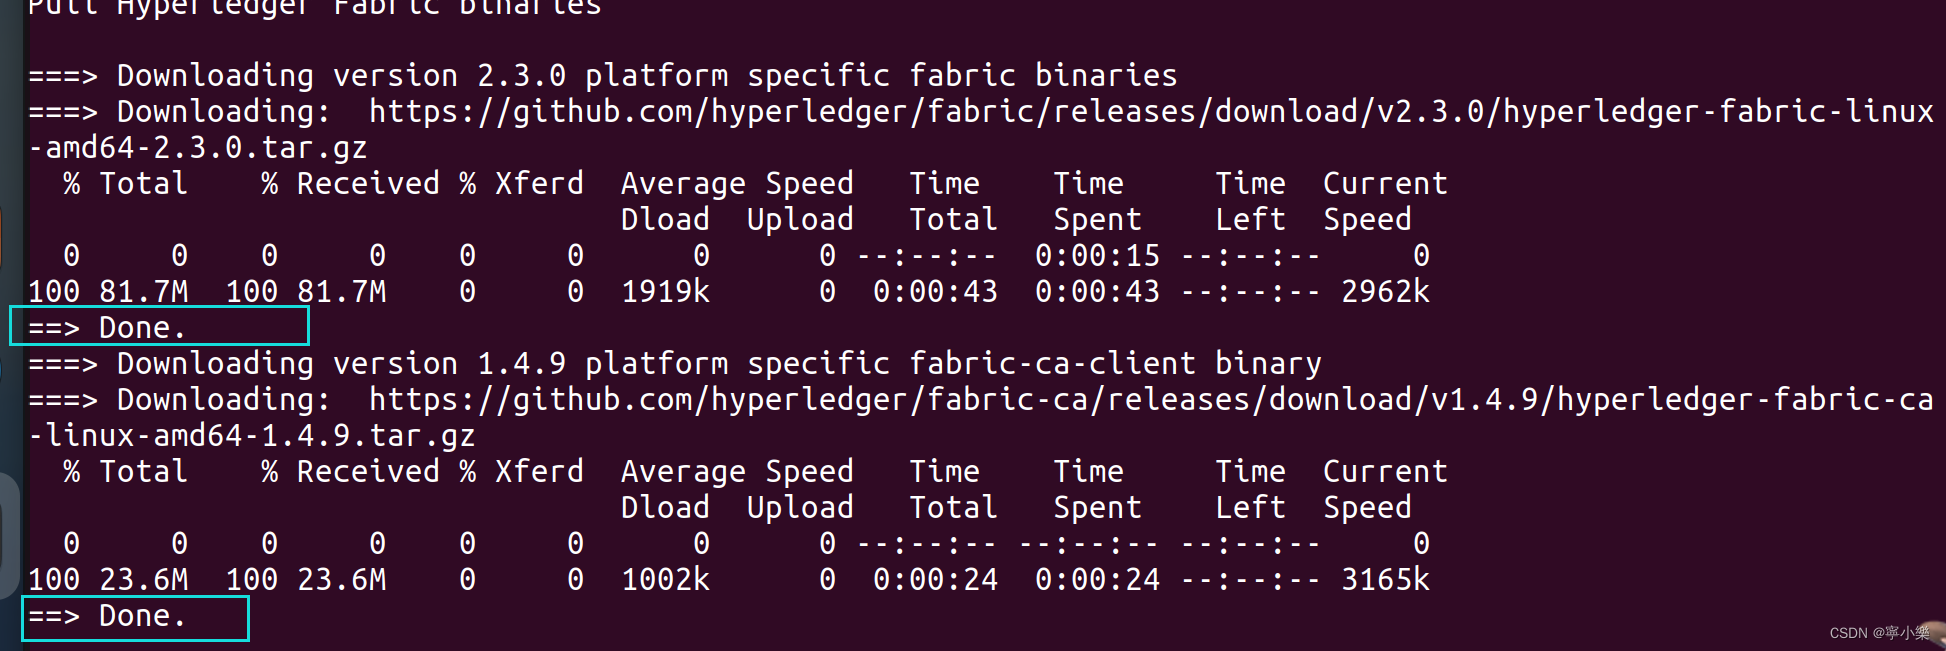
===> Downloading version 1.4.9 platform specific fabric-ca-client binary
===> Downloading:  https://github.com/hyperledger/fabric-ca/releases/download/v1.4.9/hyperledger-fabric-ca-linux-amd64-1.4.9.tar.gz
  % Total    % Received % Xferd  Average Speed   Time    Time     Time  Current
                                 Dload  Upload   Total   Spent    Left  Speed
  0     0    0     0    0     0      0      0 --:--:--  0:00:21 --:--:--     0
curl: (7) Failed to connect to github.com port 443 after 21048 ms: Connection refused

gzip: stdin: unexpected end of file
tar: Child returned status 1
tar: Error is not recoverable: exiting now
==> There was an error downloading the binary file.

------> 1.4.9 fabric-ca-client binary is not available to download  (Available from 1.1.0-rc1) <----
然后我在主机上下载,并把下载的tar.gz文件复制进去,解压发现就是bin里面的两个文件,
两天后补充——我重新装的时候我发现,网络好的时候它是可以完成下载的~
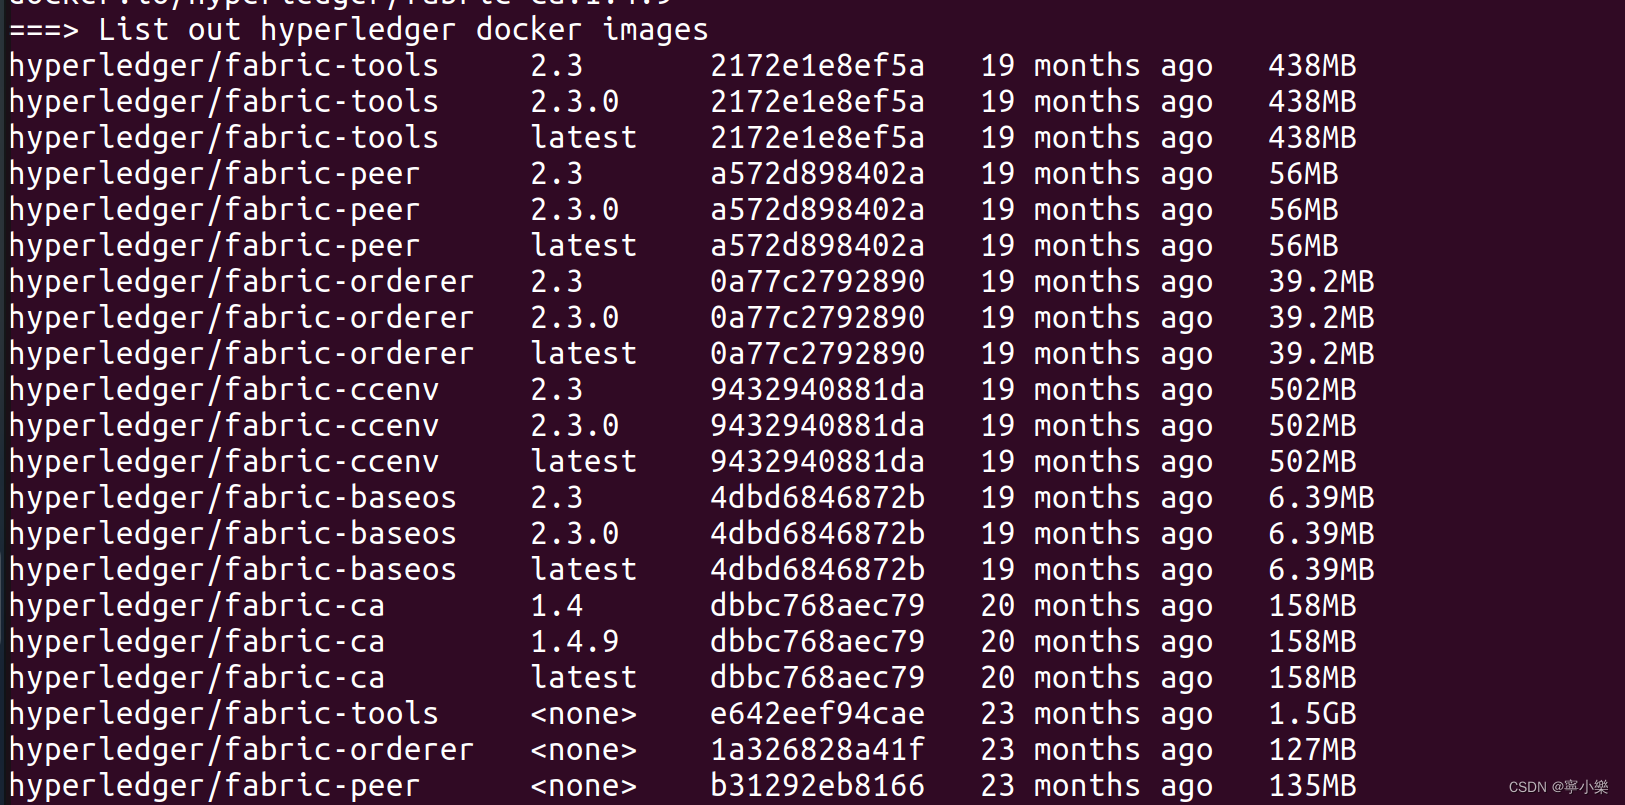
**问题2 docker镜像没有拉取成功:**导致后面启动服务的时候,会有提示语句“Local fabric binaries and docker images are out of sync. This may cause problems.”
第一次安装的时候,由于CA组件下载失败,所以就停在了下载CA组件失败的地方就退出了,所以没有进行docker镜像的拉取。

后面第二次安装的时候,一切顺利,它就有docker镜像啦~
4.6 fabric下载组件流程分析
1、fabric源码下载
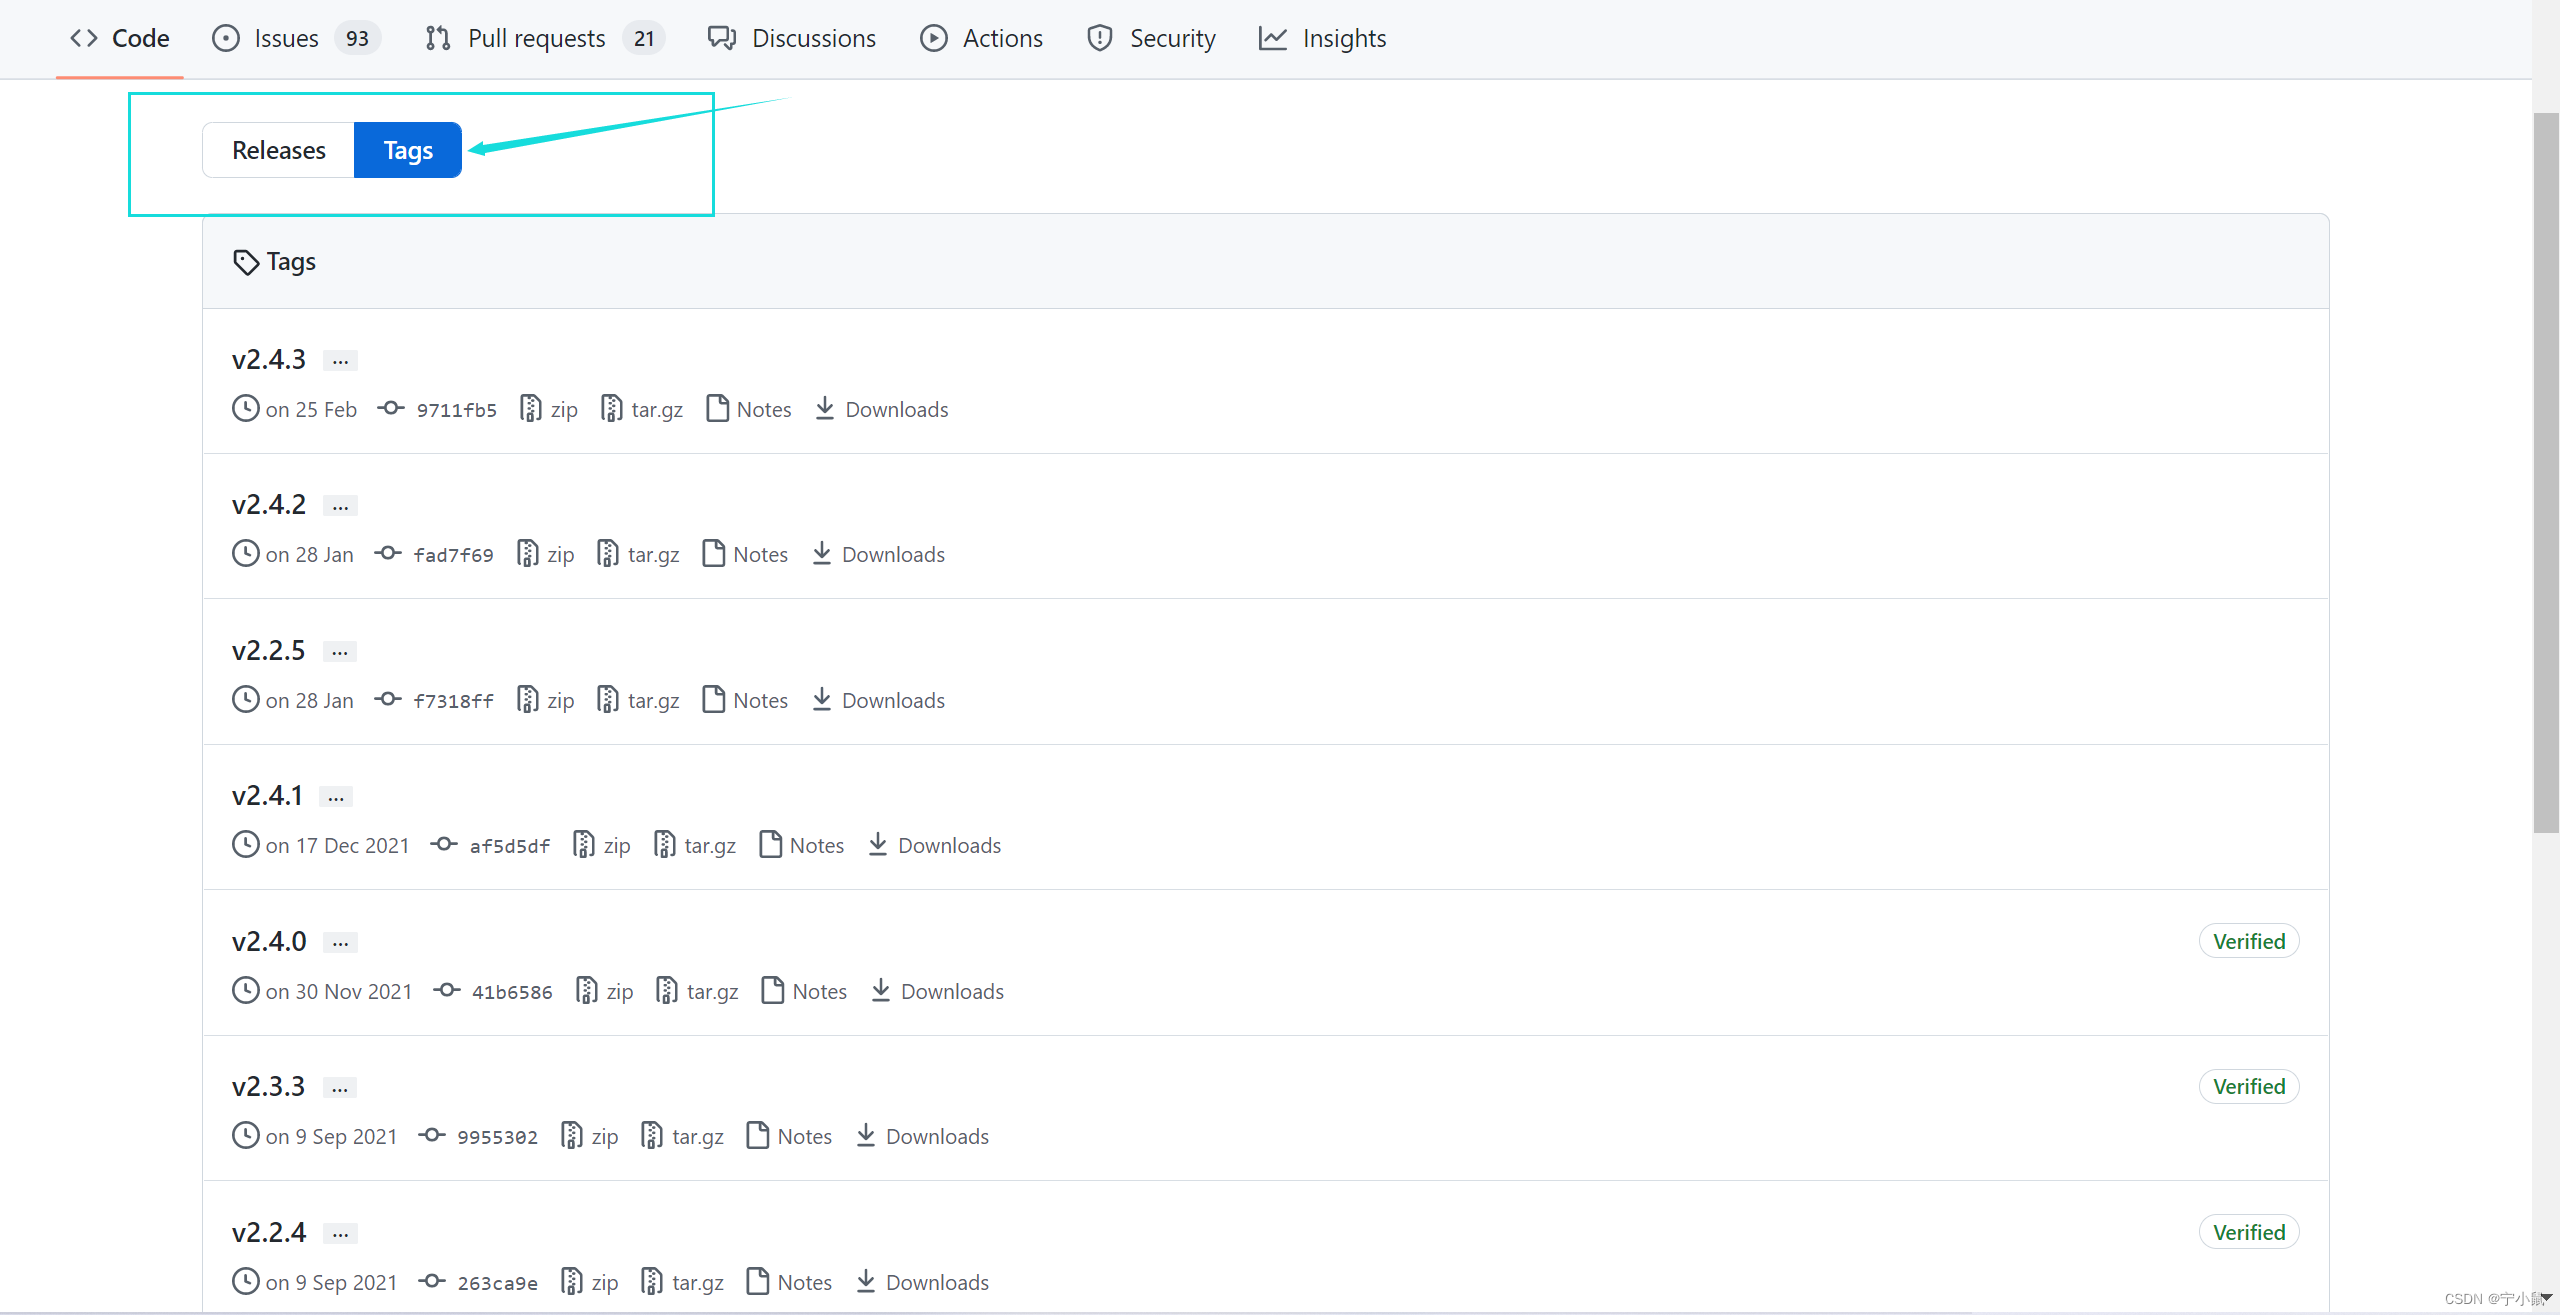
资源链接
打开上面这个GitHub网站,然后下拉并且注意看右侧部分“Releases 45 v2.4.3 Latest”,点击Releases进入新界面,点击Tags,可以看到不同版本,我们找到2.3.0,选择tar.gz。然后就下载成功啦!

下载好源码之后,要复制到Ubuntu中,我直接拖不行,虽然我安装了VMtools的,但就是不能把这个源码文件拖进去,然后,我就用U盘拷贝进去啦,哈哈哈,我可真聪明~
【问题编号202206181158】遇到了一个奇怪的问题:可以从主机复制单个文件到ubuntu,但不能复制压缩文件和文件夹到Ubuntu。报错如下:

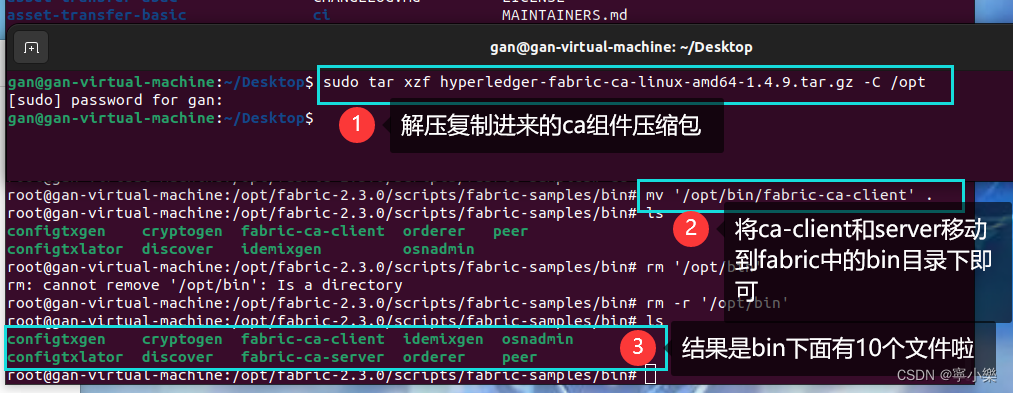
2、组件安装解析
老师根据目录手动搭建了fabric服务。他说:“其实网不太好的话,可以下载需要的安装包,然后手动搭建fabric服务”。他想通过这种手动搭建的方式,让我们更加清晰重要组件及其结构。
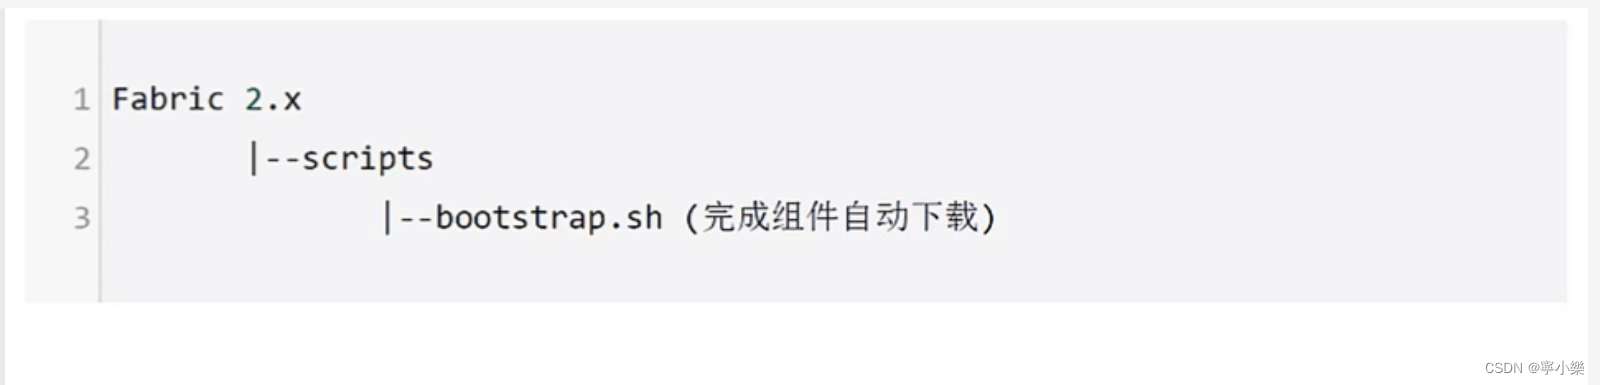
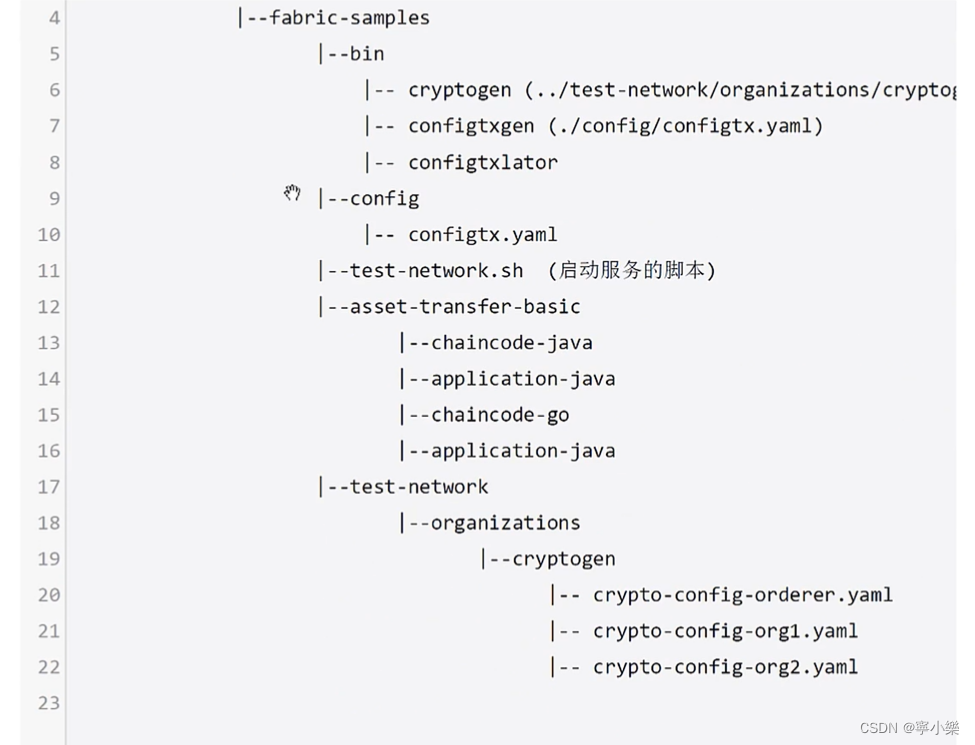
//目录结构
fabric-2.3.0【项目主目录】
|—— scripts【加载组件第一级子目录】
|—— bootstrap.sh【启动文件,可以用这个文件拉取并下载后面几个需要的重要文件】
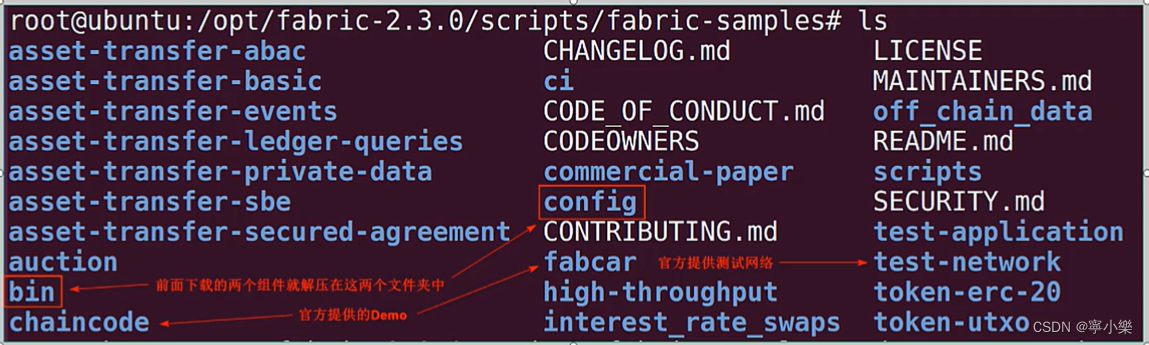
|—— fabric-samples【官方实例目录】
|—— bin【这个bin目录下有十个文件:configtxgen,cryptogen ,fabric-ca-client,idemixgen,osnadmincon,figtxlator,discover,fabric-ca-server,orderer,peer。都是很重要的组件,包括节点、证书服务端、证书客户端等】
|—— config【配置文件目录,内含三个配置文件:configtx.yaml, core.yaml,orderer.yaml】
|—— test-network【网络测试目录,其下有一个控制网络服务启动、关闭等相关命令的文件】
|—— network.sh【控制网络启动、关闭的文件】

五、源码分析
5.1 Bootstrap源码分析
#!/bin/bash
#
# Copyright IBM Corp. All Rights Reserved.
#
# SPDX-License-Identifier: Apache-2.0
#

# if version not passed in, default to latest released version
#设置fabric版本
VERSION=2.3.0
# if ca version not passed in, default to latest released version
#很多时候fabric有最新版,但是组件没有对应更新位相应版本,这个ca版本是1.4.9
CA_VERSION=1.4.9
ARCH=$(echo "$(uname -s|tr '[:upper:]' '[:lower:]'|sed 's/mingw64_nt.*/windows/')-$(uname -m | sed 's/x86_64/amd64/g')")
MARCH=$(uname -m)
#接下来是6个函数的定义,我们可以先跳过这些函数内容,先看后面的具体调用部分
printHelp() {

    #打印输出,描述性的
    echo "Usage: bootstrap.sh [version [ca_version]] [options]"
    echo
    echo "options:"
    echo "-h : this help"
    echo "-d : bypass docker image download"
    echo "-s : bypass fabric-samples repo clone"
    echo "-b : bypass download of platform-specific binaries"
    echo
    echo "e.g. bootstrap.sh 2.3.0 1.4.9 -s"
    echo "will download docker images and binaries for Fabric v2.3.0 and Fabric CA v1.4.9"
}

# dockerPull() pulls docker images from fabric and chaincode repositories
# note, if a docker image doesn't exist for a requested release, it will simply
# be skipped, since this script doesn't terminate upon errors.

dockerPull() {


    #three_digit_image_tag is passed in, e.g. "1.4.7"
    #传过来的第一个参数,FABRIC_TAG
    three_digit_image_tag=$1
    #所有参数向前移动一位,相当与FABRIC_TAG删掉啦,移动之后,第一个参数$1就变成了数组的第一个元素啦
    shift
    #two_digit_image_tag is derived, e.g. "1.4", especially useful as a local tag for two digit references to most recent baseos, ccenv, javaenv, nodeenv patch releases
    #切割版本号,把最后一位切掉
    two_digit_image_tag=$(echo "$three_digit_image_tag" | cut -d'.' -f1,2)
    #“$#”是动态获取当前参数数量,gt是“>”符号,即当前参数数量大于0
    while [[ $# -gt 0 ]]
    do
    	#获取第一个要拉取的镜像名称
        image_name="$1"
        #“$three_digit_image_tag”即版本号
        echo "====> hyperledger/fabric-$image_name:$three_digit_image_tag"
        #拉取镜像,通过镜像名称和版本号拉取
        docker pull "hyperledger/fabric-$image_name:$three_digit_image_tag"
        docker tag "hyperledger/fabric-$image_name:$three_digit_image_tag" "hyperledger/fabric-$image_name"
        docker tag "hyperledger/fabric-$image_name:$three_digit_image_tag" "hyperledger/fabric-$image_name:$two_digit_image_tag"
        #所有参数向前移动一位,下载完一个就往左移动一个,即当前$1变成第二个要获取的镜像名字啦
        shift
    #直到当前参数个数为0,即拉取下载完所有镜像之后,推出循环,函数执行结束
    done
}

cloneSamplesRepo() {


    # clone (if needed) hyperledger/fabric-samples and checkout corresponding
    # version to the binaries and docker images to be downloaded
    #if [ -d first-network ]用于判断当前这个目录是否存在
    if [ -d first-network ]; then #first-network在1.4好像就改了,把这个目录改成fabric-samples了,所以这条语句不重要
        # if we are in the fabric-samples repo, checkout corresponding version
        echo "==> Already in fabric-samples repo"
    elif [ -d fabric-samples ]; then #这个语句,如果fabric-samples目录存在,说明已经有东西啦,不用下载,直接进目录就行。所以这个条件下的操作为:打印“Changing directory to fabric-samples”并进入fabric-samples
        # if fabric-samples repo already cloned and in current directory,
        # cd fabric-samples
        echo "===> Changing directory to fabric-samples"
        cd fabric-samples
    else  #这时候,说明fabric-samples目录不存在,所以我们要下载。所以执行的操作为:打印“Cloning hyperledger/fabric-samples repo”,并通过git获取fabric-samples目录及其对应文件并且进入那个目录。
        echo "===> Cloning hyperledger/fabric-samples repo"
        git clone -b master https://github.com/hyperledger/fabric-samples.git && cd fabric-samples
         #这里值得多说一点,&& 与运算,两个都为真才执行,其实隐含了前一个命令执行成功才会执行后一个命令。所以在Linux里面,&&可以连接任何命令,不一定是条件表达式。这就是“短路操作”。与或非运算都有短路操作。
    	#command1 && command2 。&&左边的命令(命令1)返回真(即返回0,成功被执行)后,&&右边的命令(命令2)才能够被执行;换句话说,“如果这个命令执行成功&&那么执行这个命令”语法格式:commandl && command2 && command3 ...
		#1.命令之间使用&&连接,实现逻辑与的功能。2.只有在&&左边的命令返回真(命令返回值$? == 0),&&右边的命令才会被执行。3.只要有一个命令返回假(命令返回值 $?== 1),后面的命令就不会被执行。4.示例1[root@open ~]# cp anaconda-ks.cfg/data/ && rm -f anaconda-ks.cfg && echo "SUCCESS"中,cp命令首先从root的y家目录复制文件文件anaconda-ks.cfgi到 /data目录下;执行成功后,使用rm 命令删除源文件;如果删除成功则输出提示信息"SUCCESS"。
    fi

	#判断版本
    if GIT_DIR=.git git rev-parse v${

    VERSION} >/dev/null 2>&1; then
        echo "===> Checking out v${VERSION} of hyperledger/fabric-samples"
        git checkout -q v${

    VERSION}
    else
        echo "fabric-samples v${VERSION} does not exist, defaulting master"
        git checkout -q master
    fi
}

# This will download the .tar.gz
download() {


    local BINARY_FILE=$1
    local URL=$2
    echo "===> Downloading: " "${URL}"
    #设置重连的次数(5),每次重连延迟3秒
    #文件下载成功之后,直接调用tar解压操作
    #rc=$?表示获取函数执行的结果,即解压是否成功的结果
    curl -L --retry 5 --retry-delay 3 "${URL}" | tar xz || rc=$?
    #补充
    #|运算符:管道符号,是unix—个很强大的功能,符号为一条竖线:"|"。用法:command 1 | command 2,他的功能是把第一个命令command 1执行的结果作为command2的输入传给command 2。
    if [ -n "$rc" ]; then #rc不为空,说明解压出现问题。返回22,并打印“There was an error downloading the binary file”
        echo "==> There was an error downloading the binary file."
        return 22
    else #如果解压成功,打印"==> Done."
        echo "==> Done."
    fi
}

pullBinaries() {

    #通过两个下载,实现bin和config目录的生成
	#打印,并且通过传入两个参数(文件名和GitHub下载地址)调用download函数。
    echo "===> Downloading version ${FABRIC_TAG} platform specific fabric binaries"
    download "${BINARY_FILE}" "https://github.com/hyperledger/fabric/releases/download/v${VERSION}/${BINARY_FILE}"
    if [ $? -eq 22 ]; then #获取download调用执行结果,如果为22说明download执行失败,所以打印"------> ${FABRIC_TAG} platform specific fabric binary is not available to download <----"。然后退出执行。后面下载ca也是同理的
        echo
        echo "------> ${FABRIC_TAG} platform specific fabric binary is not available to download <----"
        echo
        exit
    fi
	#同理,下载fabric-ca。打印,并且通过传入两个参数(文件名和GitHub下载地址)调用download函数。
    echo "===> Downloading version ${CA_TAG} platform specific fabric-ca-client binary"
    download "${CA_BINARY_FILE}" "https://github.com/hyperledger/fabric-ca/releases/download/v${CA_VERSION}/${CA_BINARY_FILE}"
    if [ $? -eq 22 ]; then
        echo
        echo "------> ${CA_TAG} fabric-ca-client binary is not available to download  (Available from 1.1.0-rc1) <----"
        echo
        exit
    fi
}

pullDockerImages() {


	#command命令:无条件调用系统提供的函数。这个是为了确保即使用户自己定义了一个叫docker的函数,执行当前函数时调用的也是系统提供的docker函数。
    command -v docker >& /dev/null
    #用于接收上一条命令的执行结果,如果为0,则说明系统docker函数存在
    NODOCKER=$?
    if [ "${NODOCKER}" == 0 ]; then
    	#系统docker存在,则创建一个数组,数组里面存储待下载镜像名称
        FABRIC_IMAGES=(peer orderer ccenv tools)
        case "$VERSION" in
        #如果当前是fabric2.x版本,则组件添加baseos
        2.*)
            FABRIC_IMAGES+=(baseos)
            shift
            ;;
        esac
        echo "FABRIC_IMAGES:" "${FABRIC_IMAGES[@]}"
        echo "===> Pulling fabric Images"
        #调用函数dockerPull ,且传入两个参数:第一个参数是下载Fabric版本FABRIC_TAG,第二个是数组FABRIC_IMAGES的所有元素
        dockerPull "${FABRIC_TAG}" "${FABRIC_IMAGES[@]}"
        echo "===> Pulling fabric ca Image"
        #创建数组,其中只有一个元素:ca
        CA_IMAGE=(ca)
        #调用函数dockerPull ,且传入两个参数:第一个参数是下载ca版本CA_TAG,第二个是数组CA_IMAGE的所有元素
        dockerPull "${CA_TAG}" "${CA_IMAGE[@]}"
        echo "===> List out hyperledger docker images"
        #如果下载成功,则用docker images查看镜像。grep是正则表达式,也就是在所以docker images中选择和hyperledger相关的镜像打印输出。
        docker images | grep hyperledger
    else
        echo "========================================================="
        echo "Docker not installed, bypassing download of Fabric images"
        echo "========================================================="
    fi
}

#从这里开始~首先定义了三个变量,将它们都赋值为true
DOCKER=true
SAMPLES=true
BINARIES=true

# Parse commandline args pull out
# version and/or ca-version strings first
if [ -n "$1" ] && [ "${1:0:1}" != "-" ]; then
    VERSION=$1;shift  #一会儿下载时,读取输入的第一个参数,如果其不为“-”,则赋值给VERSION;否则前面采用默认的VERSION=2.3.0。一般是不会执行这几句的,但是加上的话逻辑更完整。
    if [ -n "$1" ]  && [ "${1:0:1}" != "-" ]; then
        CA_VERSION=$1;shift  #同理,,读取输入的第一个参数,如果不为“-”,则赋值给CA_VERSION;否则前面的采用CA_VERSION=1.4.9
        if [ -n  "$1" ] && [ "${1:0:1}" != "-" ]; then
            THIRDPARTY_IMAGE_VERSION=$1;shift #同理,读取第一个参数,如果版本号不为“-”,则赋值给THIRDPARTY_IMAGE_VERSION
        fi
    fi
fi

# prior to 1.2.0 architecture was determined by uname -m
#拼接要下载的文件下载链接,此处代码不重要
#后面打印输出的时候要用“=> Downloading version 2.3.0 platform specific fabric binaries=> Downloadinq: https://github.com/hyperledger/fabric/releases/download/v2.3.0/hyperledger-fabric-linux-amd64-2.3.0.tar.gz”以及“=> Downloading version 1.4.9 platform specific fabric-ca-client binary =>Downloading: https://github.com/hyperledger/fabric-ca/releases/download/vl.4.9/hyperledger-fabric-ca-linux-amd64-1.4.9.tar.gz”
if [[ $VERSION =~ ^1\.[0-1]\.* ]]; then
    export FABRIC_TAG=${

    MARCH}-${

    VERSION}
    export CA_TAG=${

    MARCH}-${

    CA_VERSION}
    export THIRDPARTY_TAG=${

    MARCH}-${

    THIRDPARTY_IMAGE_VERSION}
else
    # starting with 1.2.0, multi-arch images will be default
    : "${CA_TAG:="$CA_VERSION"}"
    : "${FABRIC_TAG:="$VERSION"}"
    : "${THIRDPARTY_TAG:="$THIRDPARTY_IMAGE_VERSION"}"
fi

BINARY_FILE=hyperledger-fabric-${

    ARCH}-${

    VERSION}.tar.gz
CA_BINARY_FILE=hyperledger-fabric-ca-${

    ARCH}-${

    CA_VERSION}.tar.gz

#这部分才是核心逻辑,指明了其实boostrap.sh总共就完成了三件事情
#如果SAMPLES变量为True,则调用cloneSamplesRepo,下载hyperledger/fabric-samples
#如果BINARIES变量为True,则调用pullBinaries,拉取Hyperledger Fabric binaries
#如果DOCKER变量为True,则调用pullDockerImages,拉取Hyperledger Fabric docker images
# then parse opts
while getopts "h?dsb" opt; do
    case "$opt" in
        h|\?)
            printHelp
            exit 0
            ;;
        d)  DOCKER=false
            ;;
        s)  SAMPLES=false
            ;;
        b)  BINARIES=false
            ;;
    esac
done

if [ "$SAMPLES" == "true" ]; then
    echo
    echo "Clone hyperledger/fabric-samples repo"
    echo
    cloneSamplesRepo
fi
if [ "$BINARIES" == "true" ]; then
    echo
    echo "Pull Hyperledger Fabric binaries"
    echo
    pullBinaries
fi
if [ "$DOCKER" == "true" ]; then
    echo
    echo "Pull Hyperledger Fabric docker images"
    echo
    pullDockerImages
fi
5.2 通道、组织、证书概念介绍
1、链码
在fabric中,智能合约称为chaincode,它有6个状态:
. install (代码上链)
. instantate(初始化)
. invocable (调用链码)
. upgrade(由于合约有多个副本,因此每个合约都有版本号,版本升级时就是upgrade)
. Deinstantiate (合约销毁)
. Uninstall(卸载链码)
2、通道
channel:私有的子网络,事实上是为了隔离不同的应用,一个channel可含有一批chaincode。
在同一个通道的组织(公司),才可以共享相同区块数据和执行相关链码操作。
3、证书与加密
之前部署的CA模块就是为了给节点分发公私钥,有了公私钥就能实现加密和签名。
非对称加密:公钥加密的消息仅私钥才可以解密;同理,私钥签名的消息仅仅公钥才可以验证。
数字证书:联盟链采用的非对称加密技术来事项身份验证和数据加密,本质就是SSl技术
CA(Certificate Authority):提供数字证书包括公钥(服务使用者)和私钥(服务者)
还提供一个CRL:证书吊销列表
举个例子:
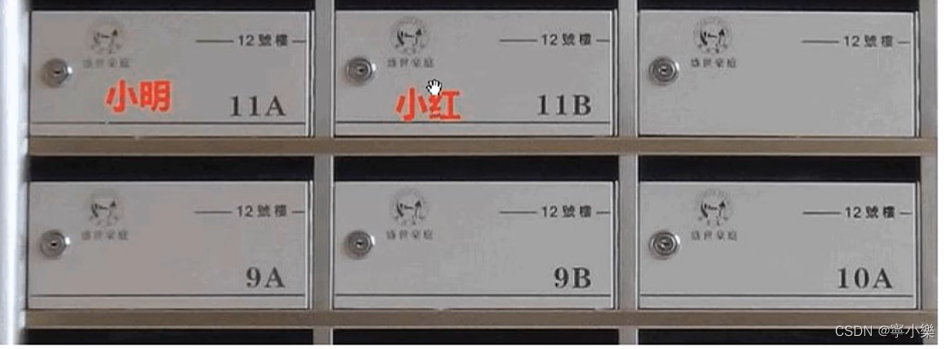
小明的信箱编号是11A,小红的信箱编号是11B。这些都是大家知道的,类似于11A,11B这样的就叫公钥。小明想给小红传送信件,只需要把写好的信件投到小红的信箱里面。被信箱保护的信件,就好比加密的信息。只有小红用她的钥匙才能打开。而小红的钥匙就是她的私钥。
(1)这就是公开密钥,每个人都有一对密钥,一个公开,一个保密
(2)A要给B发送信息,就用B的公钥加密信息然后发送给B
(3)B得到了加密信息,用自己的密钥解开加密信息,得到明文信息
4、联盟链体系结构
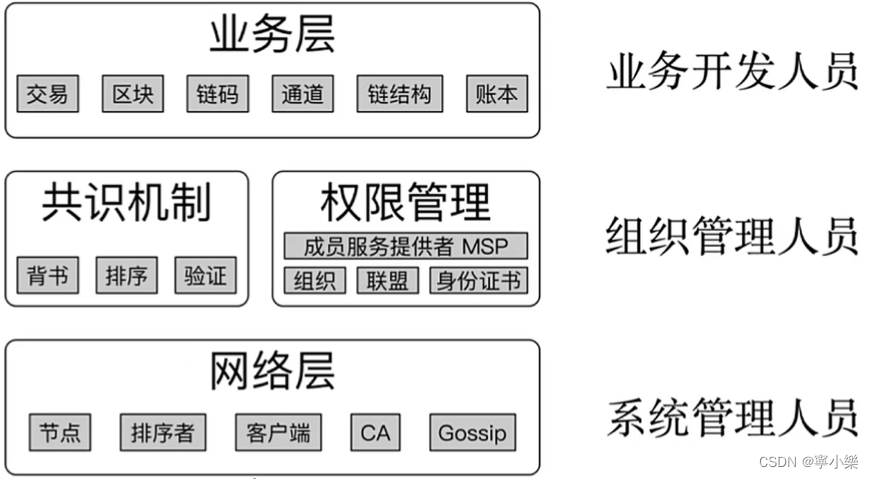
fabric联盟链的开发人员主要分为三类:
底层是系统运维,负责系统的部署与维护;
其次是组织管理人员,负责证书、MSP权限管理、共识机制等;
最后是业务开发人员,他们负责编写chaincode、创建维护channel、执行transaction交易等
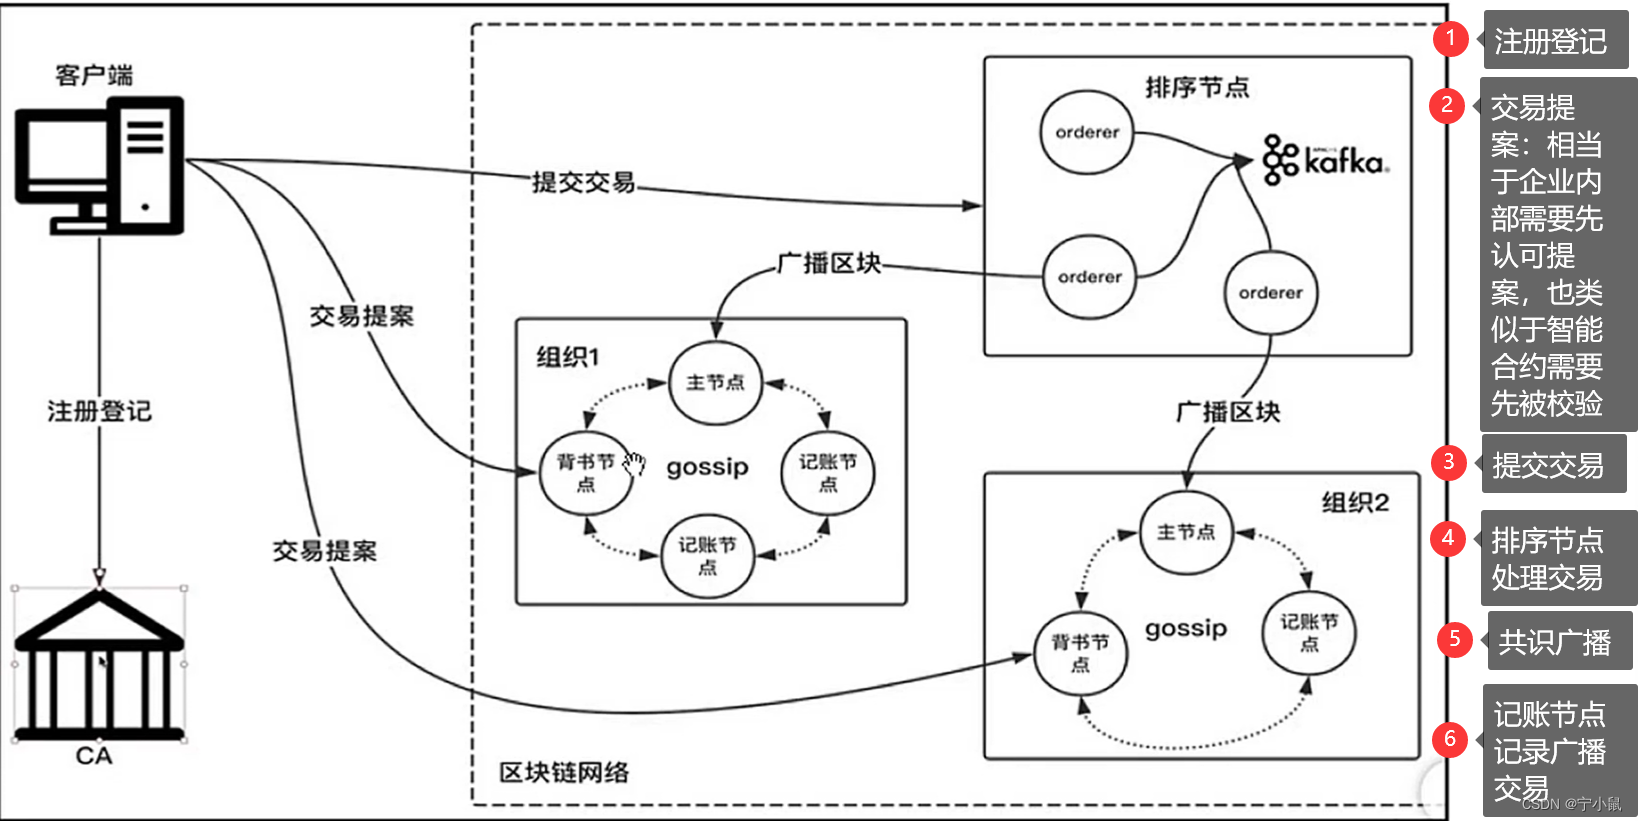
5、fabric执行流程
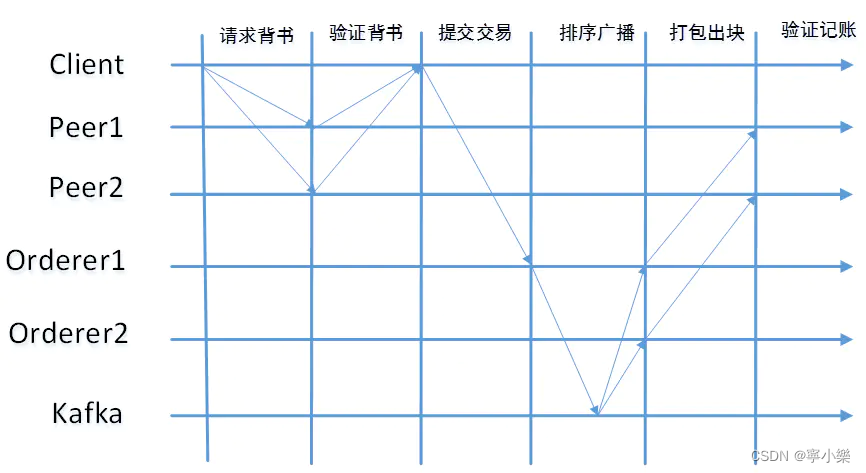
前面“1.4联盟链基本架构”中提到过fabric流程,这里简单介绍节点共识与交互。这部分内容来源于简书:fabric 共识模式深度解析
fabric共识模式采用的 Endorse+Kafka+Commit 的模式,包含以下几个步骤:
(1)请求背书:客户端用自己的私钥对交易进行签名后,按照指定格式将交易和签名信息进行打包,然后将打包后的数据发给背书节点请求背书。

(2)验证背书:背书节点收到背书请求后,验证交易的签名是否正确并调用智能合约验证交易内容是否合法。验证通过的话,背书节点用自己的私钥对背书结果进行签名并按照指定格式打包,然后将打包后的数据发给客户端。

(3)提交交易:客户端收到背书结果后,验证背书结果的签名是否正确。验证通过后,对交易请求和背书结果签名并打包。然后,把打包后的数据发送给orderer节点提交交易。

(4)排序广播:orderer节点收到交易后,验证数据的客户端签名[bJ1] 是否正确。验证通过后,将交易发给kafka集群对应的topic。由于orderer中的对于每个通道都在kafka上监听对应的消息,因此,kafka将消息存放到对应topic上之后,会将消息广播给通道上的所有orderer。因为各个orderer的消息都是由kafka按照相同顺序发送的,因此,这个过程也实现了消息的排序。

(5)打包出块:orderer节点接收到从kafka推送的消息(kafka节点见同步消息不需要验证),当满足出块策略[bJ2] :缓存交易个数达到区块最大交易数或者时间达到出快时间,则将交易进行打包、对数据签名,然后出块,并将区块分发给peer节点。

(6)验证记账:peer节点接收到区块后,验证交易是否有效即验证区块的交易是否满足背书策略以及区块中交易的读写集版本是否正确[bJ3] 。验证通过的话,执行此交易的内容更改状态数据库。验证失败的话,对此条交易不做任何处理。当区块中的交易全部处理完成后,将区块记录在本地数据库。
通信交互流程图:
数据流转流程图:

5.3 test-network启动分析
chaincode:智能合约,上文已提到。每个chaincode可提供多个不同的调用命令。 transaction:交易,每条指令都是一次交易。
world state: 对同一个key的多次交易形成的最终value,就是世界状态。
endorse:背书。金融上的意义为:指持票人为将票据权利转让给他人或者将一定的票据权利授予他人行使,而在票据背面或者粘单上记载有关事项并签章的行为。通常我们引申为对某个事情负责。在我们的共识机制的投票环节里,背书意味着参与投票。
endorsement policy:背书策略。由智能合约chaincode选择哪些peer节点参与到背书环节来。 peer:存放区块链数据的结点,同时还有endorse和commit功能。
channel:私有的子网络,事实上是为了隔离不同的应用,一个channel可含有一批chaincode,
PKI: Public Key Infrastructure,一种遵循标准的利用公钥加密技术为电子商务的开展提供一套安全基础平台的技术和规范。
MSP: Membership Service Provider,联盟链成员的证书管理,它定义了哪些RCA以及ICA在链里是可信任的,包括定义了cHlannel上的合作者。
org: orginazation,管理一系列合作企业的组织。
root@gan-virtual-machine:/# cd /opt/fabric-2.3.0/scripts/fabric-samples/test-network/
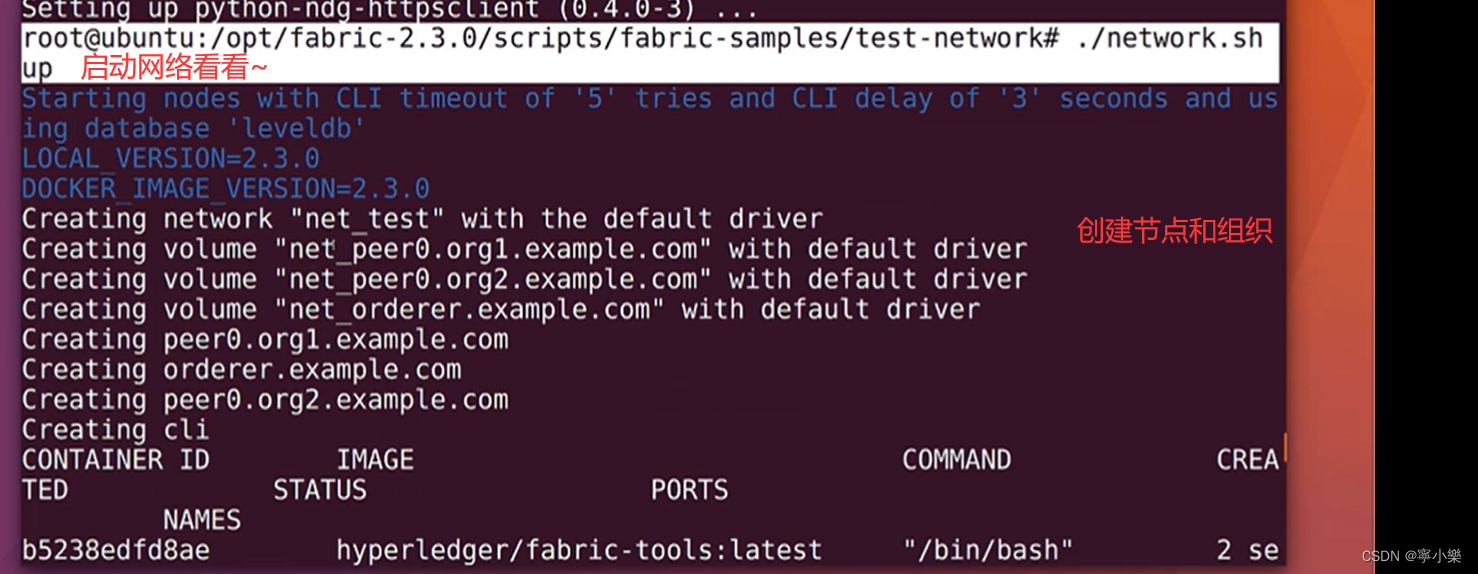
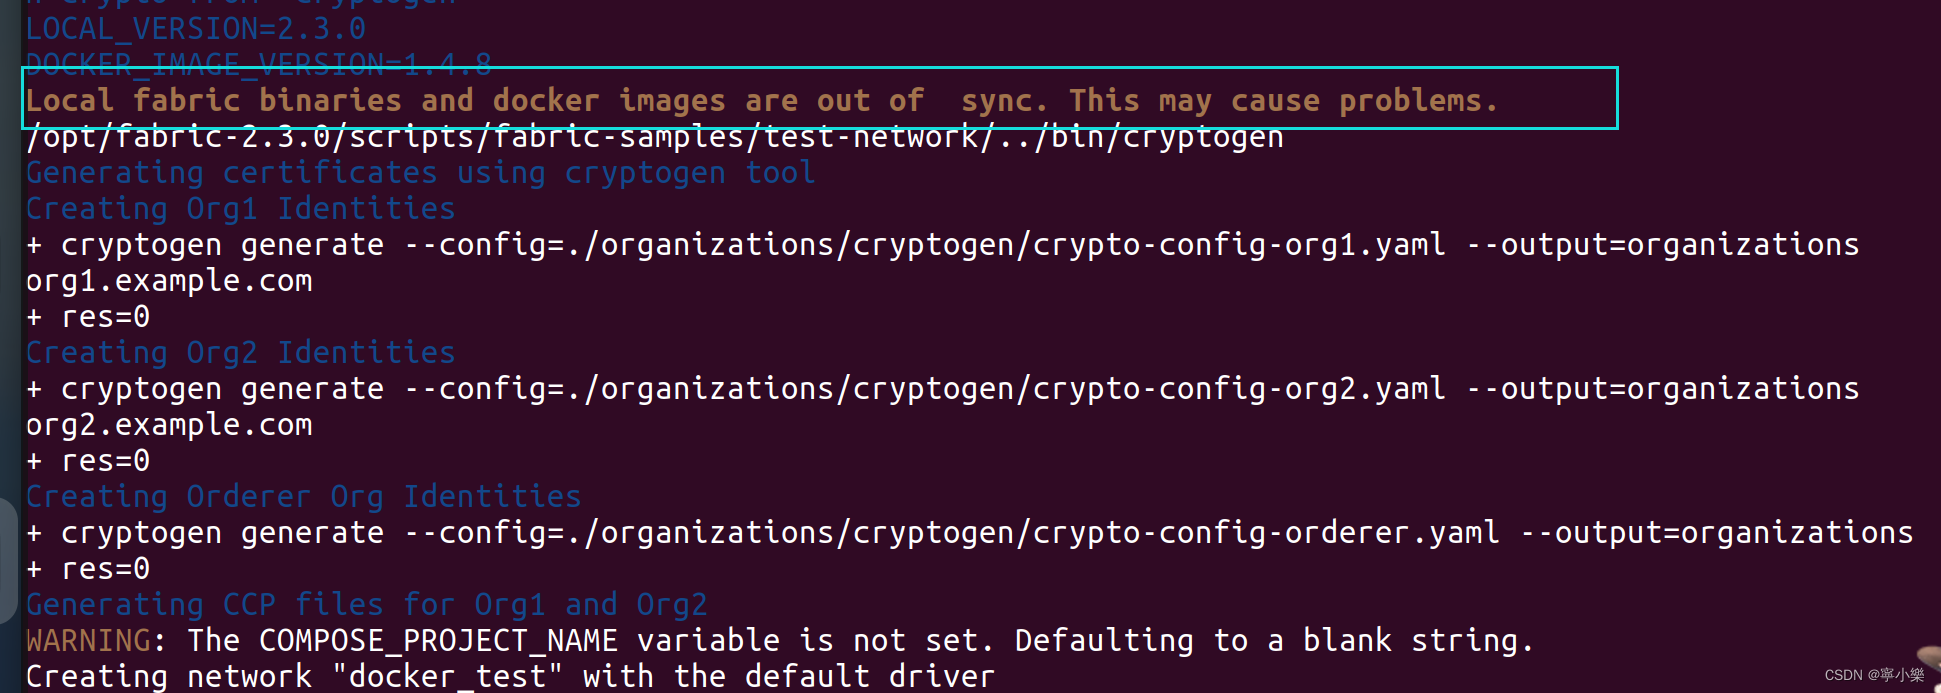
root@gan-virtual-machine:/opt/fabric-2.3.0/scripts/fabric-samples/test-network# ./network.sh up
#fabric采用了leveldb数据库,key-value形式,且支持海量存储。用于存储交易状态
Starting nodes with CLI timeout of '5' tries and CLI delay of '3' seconds and using database 'leveldb' with crypto from 'cryptogen'
LOCAL_VERSION=2.3.0
DOCKER_IMAGE_VERSION=1.4.8
Local fabric binaries and docker images are out of sync. This may cause problems.#不知道为啥会报这个错,老师的没有报这个错诶
#这个是很重要的,用于创建证书的脚本
/opt/fabric-2.3.0/scripts/fabric-samples/test-network/../bin/cryptogen
#用上述那个文件的工具创建证书
Generating certificates using cryptogen tool
#创建组织1,其配置文件为./organizations/cryptogen/crypto-config-org1.yaml,可采用yaml验证工具验证,发现其实是json格式的内容。
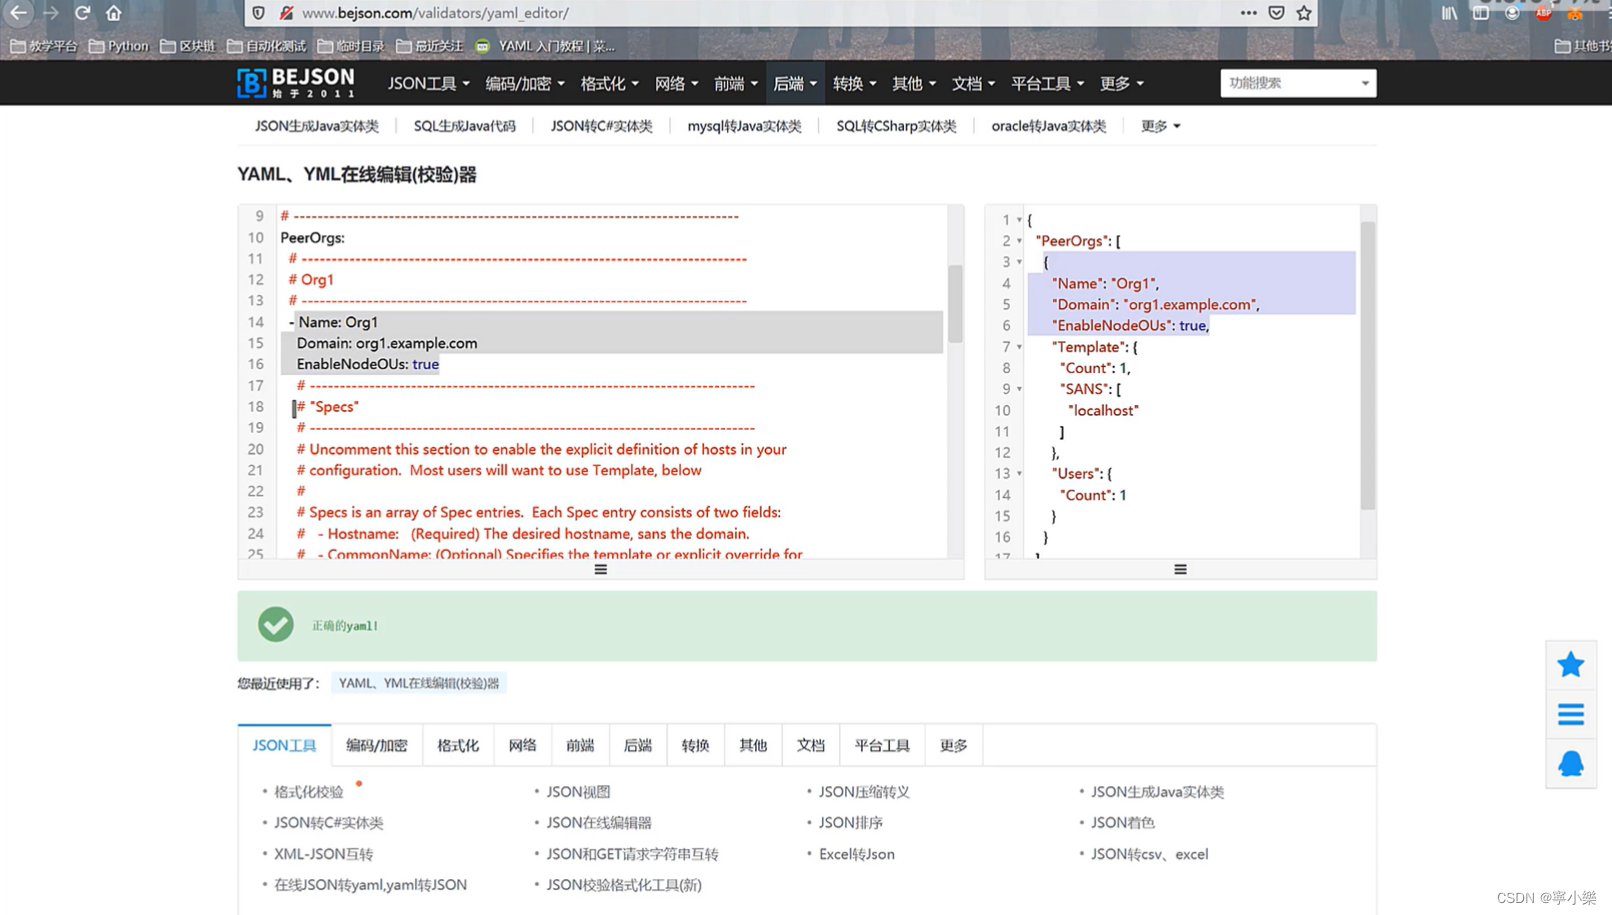
#在这个配置文件中,Name: Org1 表示组织名称;Domain: org1.example.com 表示组织的域名;EnableNodeOUs: true 表示会在msp目录会生成config.yaml配置文件;另外,Users: 换行 Count: 1。修改这个Count的值,可以改变启动网络时创建的节点数,其实Count=1的话,会有一个管理员admin和一个普通用户,相当于两个节点。同理,Count=2相当于有三个节点。
Creating Org1 Identities
+ cryptogen generate --config=./organizations/cryptogen/crypto-config-org1.yaml --output=organizations
org1.example.com
+ res=0
+ #创建组织1
Creating Org2 Identities
+ cryptogen generate --config=./organizations/cryptogen/crypto-config-org2.yaml --output=organizations
org2.example.com
+ res=0
+ #创建order节点
Creating Orderer Org Identities
+ cryptogen generate --config=./organizations/cryptogen/crypto-config-orderer.yaml --output=organizations
+ res=0
Generating CCP files for Org1 and Org2
WARNING: The COMPOSE_PROJECT_NAME variable is not set. Defaulting to a blank string.
Creating network "docker_test" with the default driver
Creating volume "docker_orderer.example.com" with default driver
Creating volume "docker_peer0.org1.example.com" with default driver
Creating volume "docker_peer0.org2.example.com" with default driver
Creating peer0.org2.example.com ... done
Creating peer0.org1.example.com ... done
Creating orderer.example.com ... done
Creating cli ... done
CONTAINER ID IMAGE COMMAND CREATED STATUS PORTS NAMES
ddde72be9f06 hyperledger/fabric-tools:latest "/bin/bash" 1 second ago Up Less than a second cli
af8a3cbd19a4 hyperledger/fabric-orderer:latest "orderer" 2 seconds ago Up 1 second 0.0.0.0:7050->7050/tcp, :::7050->7050/tcp, 0.0.0.0:7053->7053/tcp, :::7053->7053/tcp orderer.example.com
27cb1ca1c1b2 hyperledger/fabric-peer:latest "peer node start" 2 seconds ago Up Less than a second 0.0.0.0:7051->7051/tcp, :::7051->7051/tcp peer0.org1.example.com
6fcc31ed3930 hyperledger/fabric-peer:latest "peer node start" 2 seconds ago Up 1 second 0.0.0.0:9051->9051/tcp, :::9051->9051/tcp peer0.org2.example.com
补充————yaml文件验证工具: http://www.bejson.com/validators/yaml_editor
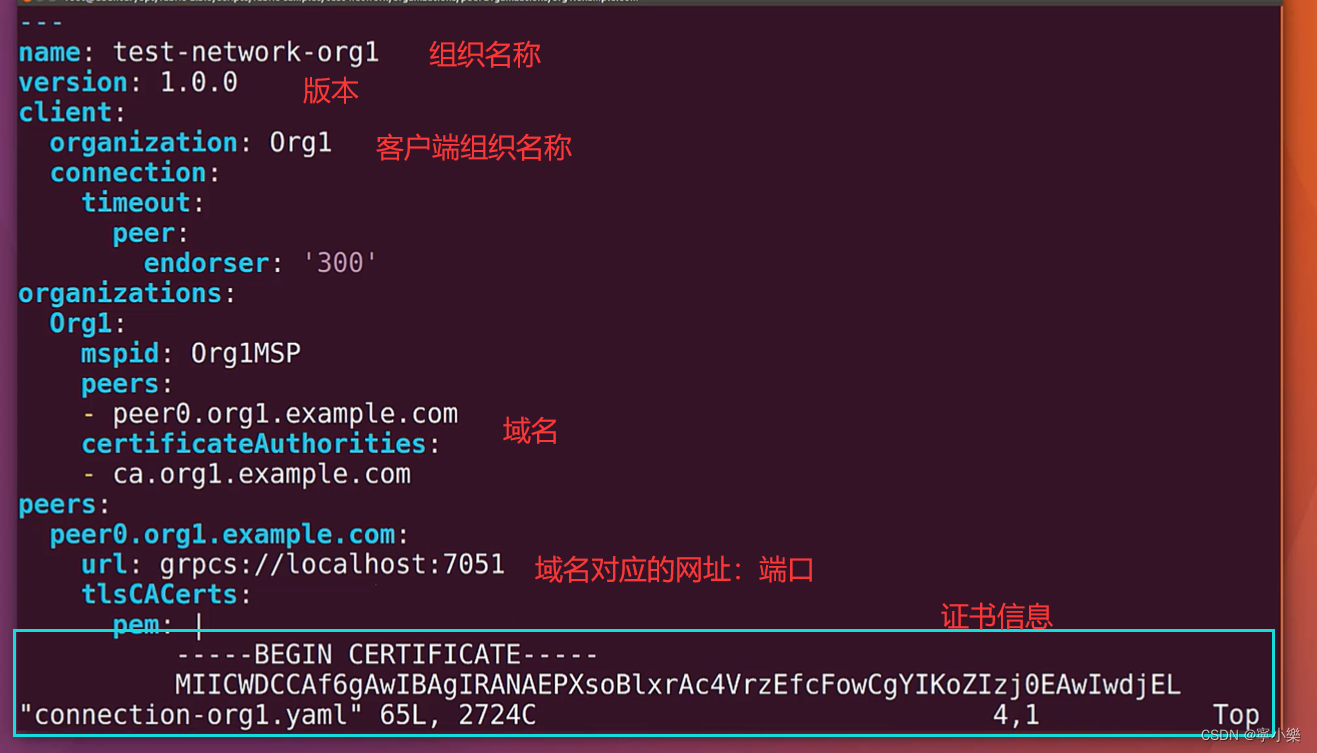
通过“vim connection-org1.yaml”可以查看证书信息。
老师将connection-org1.yaml中的Count=1改成了Count=3,重新./network.sh up网络,会发现组织1中多出两个用户

5.4 通道创建与链码部署
创建通道
	创建区块信息
	组织	加入通道
部署链码
	部署deploycc
	查看各种版本链码
	部署go版本链码
	apt、wget、curl对比
	Linux程序存储结构介绍
	wget下载的配置Go
	配置GOProxy代理
1、创建通道
//通过别名定义命令,这是“临时性”的,下一次打开Ubuntu就需要重新定义了
root@gan-virtual-machine:~#  alias ss='cd /opt/fabric-2.3.0/scripts/fabric-samples/test-network/'
root@gan-virtual-machine:~#  ss
//进入目录,启动网络
root@gan-virtual-machine :/opt/fabric-2.3.0/scripts/fabric-samples/test-network# ./network.sh up
//创建通道,可以后接-C指定通道别名,不指定通道名字的话,默认通道名为“mychannel”
root@gan-virtual-machine:/opt/fabric-2.3.0/scripts/fabric-samples/test-network# ./network.sh createChannel
//创建通道时在终端显示的日志信息:主要包括两大部分内容——**创建区块信息和****组织加入通道**
2、部署链码
(1)链码部署命令解析
./network.sh deployCC -ccn basic -ccp ../asset-transfer-basic/chaincode-go -ccl go
1.-ccn 代表要部署目录简称
2.-ccp代表部署的路径
3.-ccl代表链码语言版本
(2)查看各种版本链码

(3)部署go版本链码
./network.sh deployCC-ccn basic -ccp ../asset-transfer-basic/chaincode-go -ccl go
执行链码部署命令之后,会有报错提示
#通过executable file not found in $PATH异常可以发现缺少go命令,但是如果通过apt安装默认go的版本比较低,而Fabric2.3需要配套的go版本为>go1.15,因此我们直接采用wget或者官网下载新版本
(4)apt、wget、curl对比
1. apt用于Debian系列(社区组织维护的发行版本)的linux系统,代表是Ubuntu,之前低版本是apt-get,下载与安装一气呵成!
2. wget:(World Wide Web get): 通过FTP或HTTP协议抓取的文件,默认下载到当前目录,可以通过**wget -O savePath** 要下载文件的url路径,来指定保存路径
3. curl:对应 TP, FTPS,HTTP, HTTPS, GOPHER,TELNET等协议的lib
(5)Linux程序存储结构介绍
1./usr:系统级的目录,可以理解为C:/Windowsl。/usr/lib理解为c:/Windows/System32。
2./usr/local:用户级的程序目录,可以理解为C:/Progrem Filesl。用户自己编译的软件默认会安装到这个目录下。
3. /opt:用户级的程序目录,可以理解为D:.Software,opt有可选的意思,这里可以用于放置第三方大型软件(或游戏),当你不需要时,直接rm -rf掉即可。
源码放哪里
1./usr/src:系统级的源码目录。
2./usr/local/src:用户级的源码目录
(6)安装go
因为我们想要运行go版的demo,所以要安装go语言环境。
方法1
#可以用apt,但是不推荐。因为如果部署新版本fabric的时候,很有可能阿里云源这边没有更新对应的go语言高版本
#但其实我试了一下,因为今年已经2022年啦~所以apt安装的已经是1.18版本了,够用于fabric2.3.0的了。但是我还是用了老师说的另一种方法
root@gan-virtual-machine:/opt/fabric-2.3.0/scripts/fabric-samples/test-network# apt install golang-go
#如果go版本太低,部署链码会报错“go: unknown subcommand "mod"
#要卸载掉低版本的go,apt方式安装之后的卸载命令
root@gan-virtual-machine:/opt/fabric-2.3.0/scripts/fabric-samples/test-network# apt remove golang-go
方法2
#下载go源码。我看现在go版本已经到1.18.3了,所以我把连接替换了https://studygolang.com/dl/golang/go1.18.3.linux-amd64.tar.gz
# 如果前面那个连接不上的话,用这个网址 https://golang.google.cn/dl/go1.18.3.linux-amd64.tar.gz
wget https://studygolang.com/dl/golang/go1.15.4.linux-amd64.tar.gz
#解压文件到/usr/local中
tar xfz go1.15.4.linux-amd64.tar.gz -C /usr/local
#修改~/.bashrc
vim ~/.bashrc
#配置GOROOT,添加Gopath路径。如果不配GOROOT的话之后运行go version时会提示warning warning: GOPATH set to GOROOT (/usr/local/go) has no effectgo version go1.13.4 linux / amd64

export GOROOT=/usr/local/go
export GOPATH=/home/go
export PATH=$GOPATH/bin:$GOROOT/bin:$PATH


#激活配置bachrc相当于当前用户环境变量配置  root@gan-virtual-machine:~# source ~/.bashrc  注意所在目录
source ~/.bashrc
go version #验证go是否安装成功,go version go1.18.3 linux/amd64
(7)配置GOProxy代理
当上面已经下载了GO的指定版本,并且配置了GOPATH与GOROOT环境变量后,按找流程就可以从github中下载链码相关的依赖包,但是还是抛出了最后一个异常,从异常信息可以看出来访问github.com超时,此时需要配置一个代理去下载Github的资源.
#可以直接利用命令添加
go env -w GOPROXY=https://goproxy.cn/
#也可以像之前配置GOROOT那样去/.barshrc文件中添加
export GOPROXY=https://goproxy.cn/
(8)重新部署go版本链码
root@gan-virtual-machine:/opt/fabric-2.3.0/scripts/fabric-samples/test-network# ./network.sh deployCC -ccn basic -ccp ../asset-transfer-basic/chaincode-go -ccl go
5.5 补充说明
1、Fabric联盟链生态介绍
Fabric项目的目标是实现一个通用的权限区块链(Permissioned Chain)的底层基础框架,为了适用于不同的场合,采用模块化架构提供可切换和可扩展的组件,包括共识算法、加密安全、数字资产、智能合约和身份识别等服务。

1.Fabric CALIPER:性能测试组件
2.Fabric Explorer:查看区块链信息组件
3. Fabric Composer:包含了开发构架,和工具的开源项目
4.Fabric Cello:支持定制(例如,大小,一致〉区块链请求、在裸机,虚拟云(例如,虚拟机,云数据云),容器集群方便部署自己联盟链
2、重要命令回顾
- cryptogen:生成组织结构和身份文件(证书)
- configtxgen:生成配置区块和配置交易
- configtxlator:读取配置信息
3、补充:创建通道提示日志
创建通道时在终端显示的日志信息:主要包括三大部分内容——创建区块信息和、组织加入通道和同步节点信息。
另外补充Fabric命令手册:http://cw.hubwiz.com/card/c/fabric-command-manual/1/1/10/
Protobuf详细说明: https://www.jianshu.com/p/a24c88c0526a
root@gan-virtual-machine:/opt/fabric-2.3.0/scripts/fabric-samples/test-network# ./network.sh createChannel Creating channel 'mychannel'.

If network is not up, starting nodes with CLI timeout of '5' tries and CLI delay of '3' seconds and using database 'leveldb'
#创建了一个区块mychannel.block,存储目录为“./channel-artifacts/mychannel.block ”
Generating channel genesis block 'mychannel.block'
/opt/fabric-2.3.0/scripts/fabric-samples/test-network/../bin/configtxgen
#以“+”开头的语句是fabric命令,可以到Fabric命令手册网址去看对应命令的含义
+ configtxgen -profile TwoOrgsApplicationGenesis -outputBlock ./channel-artifacts/mychannel.block -channelID mychannel
2022-06-19 10:44:45.834 CST [common.tools.configtxgen] main -> INFO 001 Loading configuration
2022-06-19 10:44:45.844 CST [common.tools.configtxgen.localconfig] completeInitialization -> INFO 002 orderer type: etcdraft
2022-06-19 10:44:45.844 CST [common.tools.configtxgen.localconfig] completeInitialization -> INFO 003 Orderer.EtcdRaft.Options unset, setting to tick_interval:"500ms" election_tick:10 heartbeat_tick:1 max_inflight_blocks:5 snapshot_interval_size:16777216
2022-06-19 10:44:45.845 CST [common.tools.configtxgen.localconfig] Load -> INFO 004 Loaded configuration: /opt/fabric-2.3.0/scripts/fabric-samples/test-network/configtx/configtx.yaml
2022-06-19 10:44:45.847 CST [common.tools.configtxgen] doOutputBlock -> INFO 005 Generating genesis block
2022-06-19 10:44:45.847 CST [common.tools.configtxgen] doOutputBlock -> INFO 006 Creating application channel genesis block
2022-06-19 10:44:45.848 CST [common.tools.configtxgen] doOutputBlock -> INFO 007 Writing genesis block
+ res=0
Creating channel mychannel
#区块创建完成之后,就调用组织,将组织1和组织2添加到通道中去。联盟链中,不通的通道是隔离开的,不通的组织必须在同一个通道里面才能相互访问并执行通道中的链码。
#下面是其加入的一些信息,包括组织的基本信息、验证、状态等。
Using organization 1
+ osnadmin channel join --channel-id mychannel --config-block ./channel-artifacts/mychannel.block -o localhost:7053 --ca-file /opt/fabric-2.3.0/scripts/fabric-samples/test-network/organizations/ordererOrganizations/example.com/orderers/orderer.example.com/msp/tlscacerts/tlsca.example.com-cert.pem --client-cert /opt/fabric-2.3.0/scripts/fabric-samples/test-network/organizations/ordererOrganizations/example.com/orderers/orderer.example.com/tls/server.crt --client-key /opt/fabric-2.3.0/scripts/fabric-samples/test-network/organizations/ordererOrganizations/example.com/orderers/orderer.example.com/tls/server.key
+ res=0
#20开头的状态表示成功
Status: 201
{


	"name": "mychannel",
	"url": "/participation/v1/channels/mychannel",
	"consensusRelation": "consenter",
	"status": "active",
	"height": 1
}

Channel 'mychannel' created
#将组织1加入通道
Joining org1 peer to the channel...
Using organization 1
+ peer channel join -b ./channel-artifacts/mychannel.block
+ res=0
2022-06-19 10:44:52.033 CST [channelCmd] InitCmdFactory -> INFO 001 Endorser and orderer connections initialized
2022-06-19 10:44:52.071 CST [channelCmd] executeJoin -> INFO 002 Successfully submitted proposal to join channel
#将组织2加入通道
Joining org2 peer to the channel...
Using organization 2
+ peer channel join -b ./channel-artifacts/mychannel.block
+ res=0
2022-06-19 10:44:55.142 CST [channelCmd] InitCmdFactory -> INFO 001 Endorser and orderer connections initialized
2022-06-19 10:44:55.180 CST [channelCmd] executeJoin -> INFO 002 Successfully submitted proposal to join channel
#添加锚节点到通道,通过锚节点可以实现节点同步
Setting anchor peer for org1...
Using organization 1
Fetching channel config for channel mychannel
Using organization 1
Fetching the most recent configuration block for the channel
+ peer channel fetch config config_block.pb -o orderer.example.com:7050 --ordererTLSHostnameOverride orderer.example.com -c mychannel --tls --cafile /opt/gopath/src/github.com/hyperledger/fabric/peer/organizations/ordererOrganizations/example.com/orderers/orderer.example.com/msp/tlscacerts/tlsca.example.com-cert.pem
2022-06-19 02:44:55.425 UTC [channelCmd] InitCmdFactory -> INFO 001 Endorser and orderer connections initialized
2022-06-19 02:44:55.429 UTC [cli.common] readBlock -> INFO 002 Received block: 0
2022-06-19 02:44:55.430 UTC [channelCmd] fetch -> INFO 003 Retrieving last config block: 0
2022-06-19 02:44:55.433 UTC [cli.common] readBlock -> INFO 004 Received block: 0
Decoding config block to JSON and isolating config to Org1MSPconfig.json
+ configtxlator proto_decode --input config_block.pb --type common.Block
+ jq '.data.data[0].payload.data.config'
+ jq '.channel_group.groups.Application.groups.Org1MSP.values += {"AnchorPeers":{"mod_policy": "Admins","value":{"anchor_peers": [{"host": "peer0.org1.example.com","port": 7051}]},"version": "0"}}' Org1MSPconfig.json
Generating anchor peer update transaction for Org1 on channel mychannel
+ configtxlator proto_encode --input Org1MSPconfig.json --type common.Config
+ configtxlator proto_encode --input Org1MSPmodified_config.json --type common.Config
+ configtxlator compute_update --channel_id mychannel --original original_config.pb --updated modified_config.pb
+ configtxlator proto_decode --input config_update.pb --type common.ConfigUpdate
+ jq .
++ cat config_update.json
+ echo '{"payload":{"header":{"channel_header":{"channel_id":"mychannel", "type":2}},"data":{"config_update":{' '"channel_id":' '"mychannel",' '"isolated_data":' '{},' '"read_set":' '{' '"groups":' '{' '"Application":' '{' '"groups":' '{' '"Org1MSP":' '{' '"groups":' '{},' '"mod_policy":' '"",' '"policies":' '{' '"Admins":' '{' '"mod_policy":' '"",' '"policy":' null, '"version":' '"0"' '},' '"Endorsement":' '{' '"mod_policy":' '"",' '"policy":' null, '"version":' '"0"' '},' '"Readers":' '{' '"mod_policy":' '"",' '"policy":' null, '"version":' '"0"' '},' '"Writers":' '{' '"mod_policy":' '"",' '"policy":' null, '"version":' '"0"' '}' '},' '"values":' '{' '"MSP":' '{' '"mod_policy":' '"",' '"value":' null, '"version":' '"0"' '}' '},' '"version":' '"0"' '}' '},' '"mod_policy":' '"",' '"policies":' '{},' '"values":' '{},' '"version":' '"0"' '}' '},' '"mod_policy":' '"",' '"policies":' '{},' '"values":' '{},' '"version":' '"0"' '},' '"write_set":' '{' '"groups":' '{' '"Application":' '{' '"groups":' '{' '"Org1MSP":' '{' '"groups":' '{},' '"mod_policy":' '"Admins",' '"policies":' '{' '"Admins":' '{' '"mod_policy":' '"",' '"policy":' null, '"version":' '"0"' '},' '"Endorsement":' '{' '"mod_policy":' '"",' '"policy":' null, '"version":' '"0"' '},' '"Readers":' '{' '"mod_policy":' '"",' '"policy":' null, '"version":' '"0"' '},' '"Writers":' '{' '"mod_policy":' '"",' '"policy":' null, '"version":' '"0"' '}' '},' '"values":' '{' '"AnchorPeers":' '{' '"mod_policy":' '"Admins",' '"value":' '{' '"anchor_peers":' '[' '{' '"host":' '"peer0.org1.example.com",' '"port":' 7051 '}' ']' '},' '"version":' '"0"' '},' '"MSP":' '{' '"mod_policy":' '"",' '"value":' null, '"version":' '"0"' '}' '},' '"version":' '"1"' '}' '},' '"mod_policy":' '"",' '"policies":' '{},' '"values":' '{},' '"version":' '"0"' '}' '},' '"mod_policy":' '"",' '"policies":' '{},' '"values":' '{},' '"version":' '"0"' '}' '}}}}'
+ configtxlator proto_encode --input config_update_in_envelope.json --type common.Envelope
2022-06-19 02:44:55.758 UTC [channelCmd] InitCmdFactory -> INFO 001 Endorser and orderer connections initialized
2022-06-19 02:44:55.781 UTC [channelCmd] update -> INFO 002 Successfully submitted channel update
Anchor peer set for org 'Org1MSP' on channel 'mychannel'

Setting anchor peer for org2...
Using organization 2
Fetching channel config for channel mychannel
Using organization 2
Fetching the most recent configuration block for the channel
+ peer channel fetch config config_block.pb -o orderer.example.com:7050 --ordererTLSHostnameOverride orderer.example.com -c mychannel --tls --cafile /opt/gopath/src/github.com/hyperledger/fabric/peer/organizations/ordererOrganizations/example.com/orderers/orderer.example.com/msp/tlscacerts/tlsca.example.com-cert.pem
2022-06-19 02:44:56.166 UTC [channelCmd] InitCmdFactory -> INFO 001 Endorser and orderer connections initialized
2022-06-19 02:44:56.172 UTC [cli.common] readBlock -> INFO 002 Received block: 1
2022-06-19 02:44:56.173 UTC [channelCmd] fetch -> INFO 003 Retrieving last config block: 1
2022-06-19 02:44:56.175 UTC [cli.common] readBlock -> INFO 004 Received block: 1
Decoding config block to JSON and isolating config to Org2MSPconfig.json
+ configtxlator proto_decode --input config_block.pb --type common.Block
+ jq '.data.data[0].payload.data.config'
Generating anchor peer update transaction for Org2 on channel mychannel
+ jq '.channel_group.groups.Application.groups.Org2MSP.values += {"AnchorPeers":{"mod_policy": "Admins","value":{"anchor_peers": [{"host": "peer0.org2.example.com","port": 9051}]},"version": "0"}}' Org2MSPconfig.json
#configtxlator命令用来将fabric的数据结构在protobuf和JSON 之间进行转换,也可以用来创建配置更新。该命令可以启动一个REST 服务来通过HTTP暴露服务接口,也可以直接在命令行使用。
+ configtxlator proto_encode --input Org2MSPconfig.json --type common.Config
+ configtxlator proto_encode --input Org2MSPmodified_config.json --type common.Config
+ configtxlator compute_update --channel_id mychannel --original original_config.pb --updated modified_config.pb
+ configtxlator proto_decode --input config_update.pb --type common.ConfigUpdate
+ jq .
++ cat config_update.json
+ echo '{"payload":{"header":{"channel_header":{"channel_id":"mychannel", "type":2}},"data":{"config_update":{' '"channel_id":' '"mychannel",' '"isolated_data":' '{},' '"read_set":' '{' '"groups":' '{' '"Application":' '{' '"groups":' '{' '"Org2MSP":' '{' '"groups":' '{},' '"mod_policy":' '"",' '"policies":' '{' '"Admins":' '{' '"mod_policy":' '"",' '"policy":' null, '"version":' '"0"' '},' '"Endorsement":' '{' '"mod_policy":' '"",' '"policy":' null, '"version":' '"0"' '},' '"Readers":' '{' '"mod_policy":' '"",' '"policy":' null, '"version":' '"0"' '},' '"Writers":' '{' '"mod_policy":' '"",' '"policy":' null, '"version":' '"0"' '}' '},' '"values":' '{' '"MSP":' '{' '"mod_policy":' '"",' '"value":' null, '"version":' '"0"' '}' '},' '"version":' '"0"' '}' '},' '"mod_policy":' '"",' '"policies":' '{},' '"values":' '{},' '"version":' '"0"' '}' '},' '"mod_policy":' '"",' '"policies":' '{},' '"values":' '{},' '"version":' '"0"' '},' '"write_set":' '{' '"groups":' '{' '"Application":' '{' '"groups":' '{' '"Org2MSP":' '{' '"groups":' '{},' '"mod_policy":' '"Admins",' '"policies":' '{' '"Admins":' '{' '"mod_policy":' '"",' '"policy":' null, '"version":' '"0"' '},' '"Endorsement":' '{' '"mod_policy":' '"",' '"policy":' null, '"version":' '"0"' '},' '"Readers":' '{' '"mod_policy":' '"",' '"policy":' null, '"version":' '"0"' '},' '"Writers":' '{' '"mod_policy":' '"",' '"policy":' null, '"version":' '"0"' '}' '},' '"values":' '{' '"AnchorPeers":' '{' '"mod_policy":' '"Admins",' '"value":' '{' '"anchor_peers":' '[' '{' '"host":' '"peer0.org2.example.com",' '"port":' 9051 '}' ']' '},' '"version":' '"0"' '},' '"MSP":' '{' '"mod_policy":' '"",' '"value":' null, '"version":' '"0"' '}' '},' '"version":' '"1"' '}' '},' '"mod_policy":' '"",' '"policies":' '{},' '"values":' '{},' '"version":' '"0"' '}' '},' '"mod_policy":' '"",' '"policies":' '{},' '"values":' '{},' '"version":' '"0"' '}' '}}}}'
+ configtxlator proto_encode --input config_update_in_envelope.json --type common.Envelope
2022-06-19 02:44:56.504 UTC [channelCmd] InitCmdFactory -> INFO 001 Endorser and orderer connections initialized
2022-06-19 02:44:56.531 UTC [channelCmd] update -> INFO 002 Successfully submitted channel update
Anchor peer set for org 'Org2MSP' on channel 'mychannel'
#提示:通道'mychannel'创建成功
Channel 'mychannel' joined
4、补充:部署链码提示日志
部署链码时在终端显示的日志信息:主要包括下载链码、解压链码、部署安装链码到通道、提交链码到背书节点、背书成功才能提交到排序节点。
root@gan-virtual-machine:/opt/fabric-2.3.0/scripts/fabric-samples/test-network# ./network.sh deployCC -ccn basic -ccp ../asset-transfer-basic/chaincode-go -ccl go
deploying chaincode on channel 'mychannel'
executing with the following
- CHANNEL_NAME: mychannel
- CC_NAME: basic
- CC_SRC_PATH: ../asset-transfer-basic/chaincode-go
- CC_SRC_LANGUAGE: go
- CC_VERSION: 1.0
- CC_SEQUENCE: 1
- CC_END_POLICY: NA
- CC_COLL_CONFIG: NA
- CC_INIT_FCN: NA
- DELAY: 3
- MAX_RETRY: 5
- VERBOSE: false
Vendoring Go dependencies at ../asset-transfer-basic/chaincode-go
/opt/fabric-2.3.0/scripts/fabric-samples/asset-transfer-basic/chaincode-go /opt/fabric-2.3.0/scripts/fabric-samples/test-network
go: downloading github.com/hyperledger/fabric-contract-api-go v1.1.0
go: downloading github.com/hyperledger/fabric-chaincode-go v0.0.0-20200424173110-d7076418f212
go: downloading github.com/hyperledger/fabric-protos-go v0.0.0-20200424173316-dd554ba3746e
go: downloading github.com/stretchr/testify v1.5.1
go: downloading github.com/golang/protobuf v1.3.2
go: downloading google.golang.org/grpc v1.23.0
go: downloading github.com/xeipuuv/gojsonschema v1.2.0
go: downloading github.com/go-openapi/spec v0.19.4
go: downloading github.com/gobuffalo/packr v1.30.1
go: downloading github.com/davecgh/go-spew v1.1.1
go: downloading github.com/pmezard/go-difflib v1.0.0
go: downloading gopkg.in/yaml.v2 v2.2.8
go: downloading google.golang.org/genproto v0.0.0-20180831171423-11092d34479b
go: downloading golang.org/x/net v0.0.0-20190827160401-ba9fcec4b297
go: downloading github.com/go-openapi/jsonpointer v0.19.3
go: downloading github.com/go-openapi/jsonreference v0.19.2
go: downloading github.com/go-openapi/swag v0.19.5
go: downloading github.com/xeipuuv/gojsonreference v0.0.0-20180127040603-bd5ef7bd5415
go: downloading github.com/gobuffalo/envy v1.7.0
go: downloading github.com/gobuffalo/packd v0.3.0
go: downloading golang.org/x/sys v0.0.0-20190710143415-6ec70d6a5542
go: downloading github.com/PuerkitoBio/purell v1.1.1
go: downloading github.com/mailru/easyjson v0.0.0-20190626092158-b2ccc519800e
go: downloading github.com/xeipuuv/gojsonpointer v0.0.0-20180127040702-4e3ac2762d5f
go: downloading github.com/joho/godotenv v1.3.0
go: downloading github.com/rogpeppe/go-internal v1.3.0
go: downloading github.com/PuerkitoBio/urlesc v0.0.0-20170810143723-de5bf2ad4578
go: downloading golang.org/x/text v0.3.2
/opt/fabric-2.3.0/scripts/fabric-samples/test-network
#链码下载已完成
Finished vendoring Go dependencies
#打包链码并生成打包文件
+ peer lifecycle chaincode package basic.tar.gz --path ../asset-transfer-basic/chaincode-go --lang golang --label basic_1.0
+ res=0
Chaincode is packaged
#给组织1,2安装链码
Installing chaincode on peer0.org1...
Using organization 1
#在指定peer节点上安装链码
+ peer lifecycle chaincode install basic.tar.gz
+ res=0
2022-06-19 13:57:09.511 CST [cli.lifecycle.chaincode] submitInstallProposal -> INFO 001 Installed remotely: response:<status:200 payload:"\nJbasic_1.0:4ec191e793b27e953ff2ede5a8bcc63152cecb1e4c3f301a26e22692c61967ad\022\tbasic_1.0" >
2022-06-19 13:57:09.511 CST [cli.lifecycle.chaincode] submitInstallProposal -> INFO 002 Chaincode code package identifier: basic_1.0:4ec191e793b27e953ff2ede5a8bcc63152cecb1e4c3f301a26e22692c61967ad
Chaincode is installed on peer0.org1

Install chaincode on peer0.org2...
Using organization 2
+ peer lifecycle chaincode install basic.tar.gz
+ res=0
2022-06-19 13:57:24.197 CST [cli.lifecycle.chaincode] submitInstallProposal -> INFO 001 Installed remotely: response:<status:200 payload:"\nJbasic_1.0:4ec191e793b27e953ff2ede5a8bcc63152cecb1e4c3f301a26e22692c61967ad\022\tbasic_1.0" >
2022-06-19 13:57:24.197 CST [cli.lifecycle.chaincode] submitInstallProposal -> INFO 002 Chaincode code package identifier: basic_1.0:4ec191e793b27e953ff2ede5a8bcc63152cecb1e4c3f301a26e22692c61967ad
Chaincode is installed on peer0.org2


Using organization 1
#查询指定peer节点上已经安装的链码
+ peer lifecycle chaincode queryinstalled
+ res=0
Installed chaincodes on peer:
Package ID: basic_1.0:4ec191e793b27e953ff2ede5a8bcc63152cecb1e4c3f301a26e22692c61967ad, Label: basic_1.0
Query installed successful on peer0.org1 on channel
Using organization 1
#机构审批链码,即提交链码到背书节点,背书机构进行审批。其中“--tls --cafile”参数后面跟着证书,指明审批机构要具有相应资质,即指明证书文件。
+ peer lifecycle chaincode approveformyorg -o localhost:7050 --ordererTLSHostnameOverride orderer.example.com --tls --cafile /opt/fabric-2.3.0/scripts/fabric-samples/test-network/organizations/ordererOrganizations/example.com/orderers/orderer.example.com/msp/tlscacerts/tlsca.example.com-cert.pem --channelID mychannel --name basic --version 1.0 --package-id basic_1.0:4ec191e793b27e953ff2ede5a8bcc63152cecb1e4c3f301a26e22692c61967ad --sequence 1
+ res=0
2022-06-19 13:57:26.409 CST [chaincodeCmd] ClientWait -> INFO 001 txid [790e1b59b00f895df8b49474d836a5636ddfe1138aff24923b5509869bd8eb26] committed with status (VALID) at localhost:7051
#提示:链码在组织1节点1审批通过
Chaincode definition approved on peer0.org1 on channel 'mychannel'
Using organization 1
Checking the commit readiness of the chaincode definition on peer0.org1 on channel 'mychannel'...
Attempting to check the commit readiness of the chaincode definition on peer0.org1, Retry after 3 seconds.
#检查指定的链码是否可以向通道提交。
+ peer lifecycle chaincode checkcommitreadiness --channelID mychannel --name basic --version 1.0 --sequence 1 --output json
+ res=0
{


	"approvals": {


		"Org1MSP": true,#表示链码审批在组织1通过
		"Org2MSP": false#表示链码审批在组织2还没通过
	}
}
Checking the commit readiness of the chaincode definition successful on peer0.org1 on channel 'mychannel'
Using organization 2
Checking the commit readiness of the chaincode definition on peer0.org2 on channel 'mychannel'...
Attempting to check the commit readiness of the chaincode definition on peer0.org2, Retry after 3 seconds.
#检查指定的链码是否可以向通道提交。
+ peer lifecycle chaincode checkcommitreadiness --channelID mychannel --name basic --version 1.0 --sequence 1 --output json
+ res=0
{


	"approvals": {

    #这时候组织2还没执行审批操作,所以和签名的结果一样,组织1通过链码审批,而组织2还没有
		"Org1MSP": true,
		"Org2MSP": false
	}
}
Checking the commit readiness of the chaincode definition successful on peer0.org2 on channel 'mychannel'
Using organization 2
#向组织2提交链码的审核操作,和向组织1提交的步骤是类似的
+ peer lifecycle chaincode approveformyorg -o localhost:7050 --ordererTLSHostnameOverride orderer.example.com --tls --cafile /opt/fabric-2.3.0/scripts/fabric-samples/test-network/organizations/ordererOrganizations/example.com/orderers/orderer.example.com/msp/tlscacerts/tlsca.example.com-cert.pem --channelID mychannel --name basic --version 1.0 --package-id basic_1.0:4ec191e793b27e953ff2ede5a8bcc63152cecb1e4c3f301a26e22692c61967ad --sequence 1
+ res=0
2022-06-19 13:57:34.732 CST [chaincodeCmd] ClientWait -> INFO 001 txid [a3959f8b65cdf8dff719c9e5c12a0a713d116ddb4f4d5f56d295af2b62478fb2] committed with status (VALID) at localhost:9051
#链码在组织2审批通过
Chaincode definition approved on peer0.org2 on channel 'mychannel'
Using organization 1
Checking the commit readiness of the chaincode definition on peer0.org1 on channel 'mychannel'...
Attempting to check the commit readiness of the chaincode definition on peer0.org1, Retry after 3 seconds.
#这时候再检查一下指定的链码是否可以向通道提交。
+ peer lifecycle chaincode checkcommitreadiness --channelID mychannel --name basic --version 1.0 --sequence 1 --output json
+ res=0
{


	"approvals": {

    #这时候组织1和组织2都通过了链码审批
		"Org1MSP": true,
		"Org2MSP": true
	}
}
Checking the commit readiness of the chaincode definition successful on peer0.org1 on channel 'mychannel'
Using organization 2
Checking the commit readiness of the chaincode definition on peer0.org2 on channel 'mychannel'...
Attempting to check the commit readiness of the chaincode definition on peer0.org2, Retry after 3 seconds.
#同样,在组织2也再检查一下指定的链码是否可以向通道提交。
+ peer lifecycle chaincode checkcommitreadiness --channelID mychannel --name basic --version 1.0 --sequence 1 --output json
+ res=0
{


	"approvals": {

    #结果也是:组织1和组织2都通过了链码审批
		"Org1MSP": true,
		"Org2MSP": true
	}
}
Checking the commit readiness of the chaincode definition successful on peer0.org2 on channel 'mychannel'

#在上面,组织1和2都完成了对链码的审批操作并且通过之后

Using organization 1
Using organization 2
# 向指定通道提交链码,提交给order(排序节点)
+ peer lifecycle chaincode commit -o localhost:7050 --ordererTLSHostnameOverride orderer.example.com --tls --cafile /opt/fabric-2.3.0/scripts/fabric-samples/test-network/organizations/ordererOrganizations/example.com/orderers/orderer.example.com/msp/tlscacerts/tlsca.example.com-cert.pem --channelID mychannel --name basic --peerAddresses localhost:7051 --tlsRootCertFiles /opt/fabric-2.3.0/scripts/fabric-samples/test-network/organizations/peerOrganizations/org1.example.com/peers/peer0.org1.example.com/tls/ca.crt --peerAddresses localhost:9051 --tlsRootCertFiles /opt/fabric-2.3.0/scripts/fabric-samples/test-network/organizations/peerOrganizations/org2.example.com/peers/peer0.org2.example.com/tls/ca.crt --version 1.0 --sequence 1
+ res=0
2022-06-19 13:57:43.304 CST [chaincodeCmd] ClientWait -> INFO 001 txid [8f5eafd1b019ffc861a890af9944f5ce74b6ac13795301f5d531a610fdc21c13] committed with status (VALID) at localhost:9051
2022-06-19 13:57:43.330 CST [chaincodeCmd] ClientWait -> INFO 002 txid [8f5eafd1b019ffc861a890af9944f5ce74b6ac13795301f5d531a610fdc21c13] committed with status (VALID) at localhost:7051
#这时候提示,提交到排序节点的操作已经成功啦
Chaincode definition committed on channel 'mychannel'


Using organization 1
Querying chaincode definition on peer0.org1 on channel 'mychannel'...
Attempting to Query committed status on peer0.org1, Retry after 3 seconds.
#在组织1这边查询指定通道上已经提交的链码
+ peer lifecycle chaincode querycommitted --channelID mychannel --name basic
+ res=0
Committed chaincode definition for chaincode 'basic' on channel 'mychannel':
Version: 1.0, Sequence: 1, Endorsement Plugin: escc, Validation Plugin: vscc, Approvals: [Org1MSP: true, Org2MSP: true]
#查询结果是,链码已经在组织1上定义成功
Query chaincode definition successful on peer0.org1 on channel 'mychannel'
Using organization 2
Querying chaincode definition on peer0.org2 on channel 'mychannel'...
Attempting to Query committed status on peer0.org2, Retry after 3 seconds.
#同理,在组织2这边查询指定通道上已经提交的链码
+ peer lifecycle chaincode querycommitted --channelID mychannel --name basic
+ res=0
Committed chaincode definition for chaincode 'basic' on channel 'mychannel':
Version: 1.0, Sequence: 1, Endorsement Plugin: escc, Validation Plugin: vscc, Approvals: [Org1MSP: true, Org2MSP: true]
#查询结果是,链码已经在组织2上也定义成功
Query chaincode definition successful on peer0.org2 on channel 'mychannel'
Chaincode initialization is not required
5、手动搭建peer环境
在命令行直接运行peer命令是会抛出异常的,原因好理解所有操作都需要制定在哪个通道使用哪个组织节点,而且这些节点必须要有合法权限。


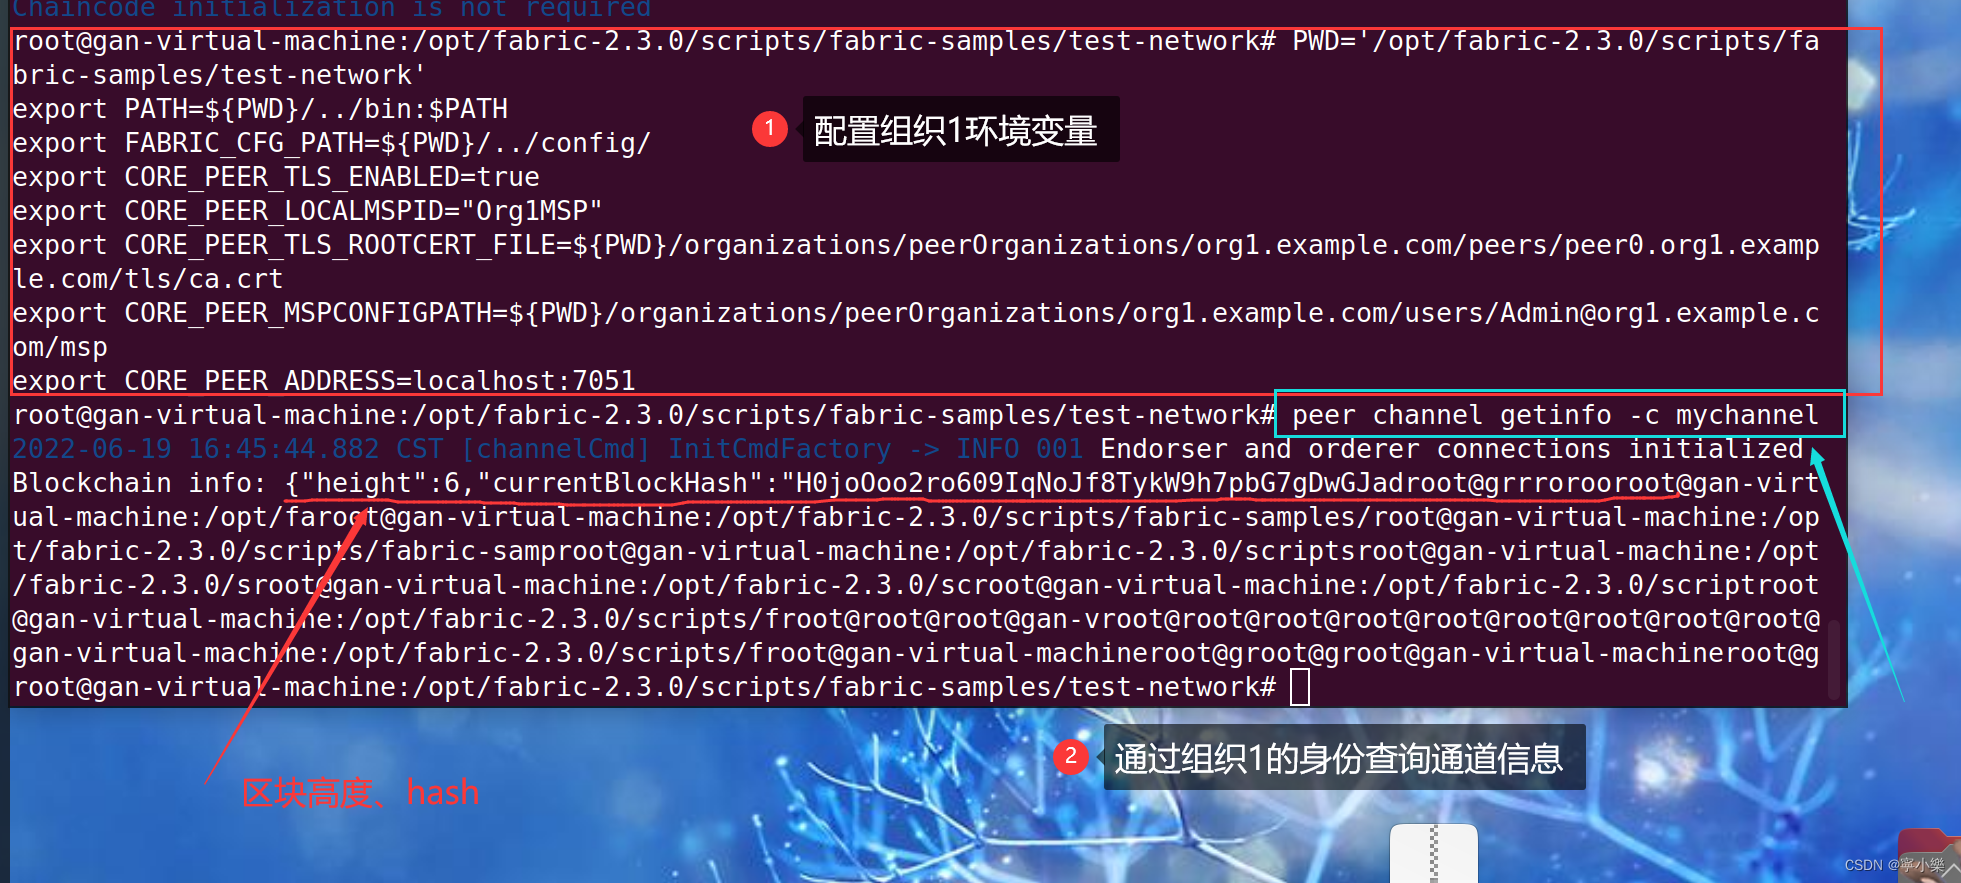
//首先确保自己在test-network目录下,并且进行的如下环境变量的配置(这次为了方便采用临时变量的配置)
//临时变量的配置:通过这种方式配置的环境变量是临时的,下一次启动会消失。这次只是为了方便学员了解配置流程。
PWD='/opt/fabric-2.3.0/scripts/fabric-samples/test-network'
export PATH=${

    PWD}/../bin:$PATH    #这时候,在终端输入peer,已经有用法提示了,但是现在还不能正常使用,继续配置。还有配置组织、证书等相关信息配置文件
export FABRIC_CFG_PATH=${

    PWD}/../config/
export CORE_PEER_TLS_ENABLED=true
#启用对服务端的TLS身份验证
export CORE_PEER_LOCALMSPID="Org1MSP"
#两行指明了org1的加密所用的信息
export CORE_PEER_TLS_ROOTCERT_FILE=${

    PWD}/organizations/peerOrganizations/org1.example.com/peers/peer0.org1.example.com/tls/ca.crt
 open /opt/fabric-2.3.0/scripts/fabric-samples/config/tls/ca.crt: no such file or directory

export CORE_PEER_MSPCONFIGPATH=${

    PWD}/organizations/peerOrganizations/org1.example.com/users/Admin@org1.example.com/msp
#当前组织节点IP与端口
export CORE_PEER_ADDRESS=localhost:7051
#注意:这里的端口配置也要区分节点的哟——排序节点7050,第一个组织节点7051,第二个组织节点9051

#补充————fabric环境变量手册:http://cw.hubwiz.com/card/c/fabric-env-manual/1/6/1/


PWD='/opt/fabric-2.3.0/scripts/fabric-samples/test-network'
export PATH=${

    PWD}/../bin:$PATH
export FABRIC_CFG_PATH=${

    PWD}/../config/
export CORE_PEER_TLS_ENABLED=true
export CORE_PEER_LOCALMSPID="Org1MSP"
export CORE_PEER_TLS_ROOTCERT_FILE=${

    PWD}/organizations/peerOrganizations/org1.example.com/peers/peer0.org1.example.com/tls/ca.crt
export CORE_PEER_MSPCONFIGPATH=${

    PWD}/organizations/peerOrganizations/org1.example.com/users/Admin@org1.example.com/msp
export CORE_PEER_ADDRESS=localhost:7051
上面就配置好了组织1节点的环境变量。接下来可以用组织1节点的身份进行peer命令验证:
peer channel list
peer lifecycle chaincode queryinstalled
peer channel getinfo -c mychannel

六、fabcar官方案例部署实现
6.1 fabcar项目获取与安装
fabcar链码获与安装合约Fabcar项目结构分析
fabcar是一个关于car (汽车)交易的去中心化链码,项目支持单部汽车查询,新增、查询新增、更新新增、删除等操作。实现了一般链码的增、删、查、改的功能。

go.mod依赖浅析
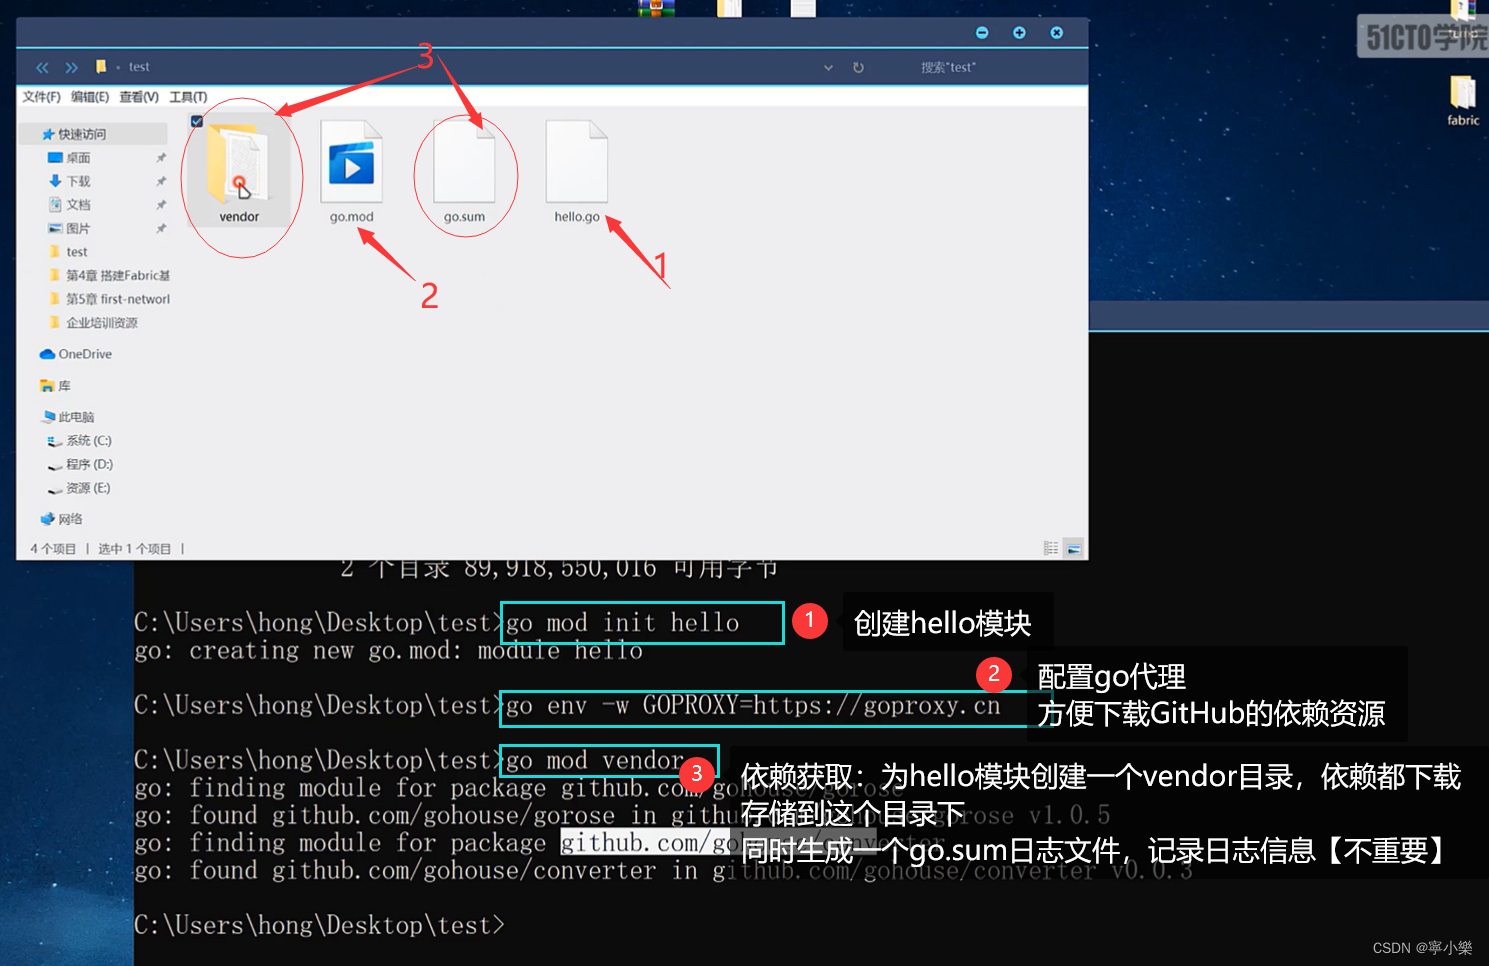
(1)获取fabcar依赖包
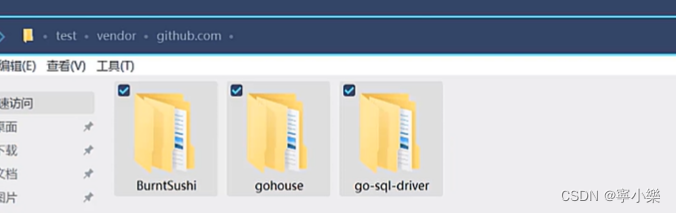
执行完毕后,当前文件夹下多出vendor,这个就是放智能合约依赖包的文件夹
#配置go代理。然后已经配置可以跳过
root@gan-virtual-machine:/opt/fabric-2.3.0/scripts/fabric-samples/fabcar/go# go env -w GOPROXY=https://goproxy.cn
#刚开始执行的时候,遇到报错“missing go.sum entry; to add it:”。通过执行命令:“go mod tidy”后再执行“go mod vendor”
root@gan-virtual-machine:/opt/fabric-2.3.0/scripts/fabric-samples/fabcar/go# go mod vendor
(2)添加host记录
/etc/hosts,主机名和ip配置文件,在局城网或者是NTERNET上,每台主机都由一个P地址,它区分每台主机,并可以根拒ip进行通讯。但P她世不方便记亿,所有又有了域名。在一个局域网中,每台相器都有一个主机名,用于区分主机,便于相互访问。
#我们当前配置都是在本地的,如果以后大项目部署之后,不同的节点对应不同的ip地址,道理都是一样的,在/etc/hosts中配置其映射关系即可。
#这个项目,我们就把下面三条语句加入/etc/hosts文件中即可
127.0.0.1 orderer.example.com
127.0.0.1 peer0.org1.example.com
127.0.0.1 peer0.org2.example.com

root@gan-virtual-machine:/opt/fabric-2.3.0/scripts/fabric-samples/test-network# vim /etc/hosts

ORG1链码审核与提交操作
(3)配置环境变量与组织认证信息
就是5.5节中第5点:手动搭建peer环境中所配置的环境变量。内容一模一样~
#后续很多地方会用到test-network目录,因此把它赋值到PwD变量中
PWD='/opt/fabric-2.3.0/scripts/fabric-samples/test-network'
#把${PwD}/ ../bin临时注册到环境变量中, peer命令可以执行
export PATH=${

    PWD}/../bin:$PATH
#还需要设置FABRIc_CF6_PATH路径指向fabric-samples中的core.yaml文件路径
export FABRIC_CFG_PATH=${

    PWD}/../config/
#下载是配置组织的证书和相关信息
# http:/ / cw.hgbwiz.com/card/c/fabric-env-manual/1/3/12/
#启用对服务端的TLs身份验证(TLS 由ssL发展而来)是一种身份验证机制
export CORE_PEER_TLS_ENABLED=true
#组织1的MSP的标识ID
export CORE_PEER_LOCALMSPID="Org1MSP"
#获取组织节点证书的位置
export CORE_PEER_TLS_ROOTCERT_FILE=${

    PWD}/organizations/peerOrganizations/org1.example.com/peers/peer0.org1.example.com/tls/ca.crt
#获取访问账户的msp证书
export CORE_PEER_MSPCONFIGPATH=${

    PWD}/organizations/peerOrganizations/org1.example.com/users/Admin@org1.example.com/msp
#同一机构中其他Peer节点要连接此节点需指定的P2P连接地址
export CORE_PEER_ADDRESS=localhost:7051
#注意:这里的端口配置也要区分节点的哟——排序节点7050,第一个组织节点7051,第二个组织节点9051


#下面是方便复制粘贴到终端命令行直接执行的版本
PWD='/opt/fabric-2.3.0/scripts/fabric-samples/test-network'
export PATH=${

    PWD}/../bin:$PATH
export FABRIC_CFG_PATH=${

    PWD}/../config/
export CORE_PEER_TLS_ENABLED=true
export CORE_PEER_LOCALMSPID="Org1MSP"
export CORE_PEER_TLS_ROOTCERT_FILE=${

    PWD}/organizations/peerOrganizations/org1.example.com/peers/peer0.org1.example.com/tls/ca.crt
export CORE_PEER_MSPCONFIGPATH=${

    PWD}/organizations/peerOrganizations/org1.example.com/users/Admin@org1.example.com/msp
export CORE_PEER_ADDRESS=localhost:7051
(4)打包链码合约
#前提:fabric网络启动且通道创建完成  可以只使用一个命令./network.sh up createChannel
root@gan-virtual-machine:/opt/fabric-2.3.0/scripts/fabric-samples/test-network# ./network.sh up
root@gan-virtual-machine:/opt/fabric-2.3.0/scripts/fabric-samples/test-network# ./network.sh createChannel

root@ubuntu:/opt/fabric-2.3.0/scripts/fabric-samples/test-network#
#参数介绍:
#(1)package outputfile #打包输出文件名
#(2)path string #链码源代码路径
#(3)lang string # 链码开发语言,默认:golang
#(4)label string #链码标识,相当于链码的名字


root@ubuntu:/opt/fabric-2.3. /scripts /fabric-samples /fabcar/go# peer lifecycle chaincode package fabcar.tar.gz --path /opt/fabric-2.3.0/scripts/fabric-samples/fabcar/go --label fabcar_1
#1s查看当前目录,发现有了一个fabcar.tar.gz文件
root@ubuntu:/opt/fabric-2.3.0/scripts/fabric-samples/fabcar/go# ls
#上一条语句执行结果:fabcar.go fabcar.tar.gz go.mod go.sum runfabcar.sh vendor
(5) 安装链码
#安装智能合约(时间会比较久,耐心稍等)
peer lifecycle chaincode install fabcar.tar.gz
#2022-06-19 18:44:00.603 CST [cli.lifecycle.chaincode] submitInstallProposal -> INFO 001 Installed remotely: response:<status:200 payload:"\nIfabcar_1:4e7996bf4058869807f239b859a97dc609ed19e2fcfd10f1bf86540f6dd3cf5b\022\010fabcar_1" >
#2022-06-19 18:44:00.603 CST [cli.lifecycle.chaincode] submitInstallProposal -> INFO 002 Chaincode code package identifier: fabcar_1:4e7996bf4058869807f239b859a97dc609ed19e2fcfd10f1bf86540f6dd3cf5b
#这个hash值很重要,下面的步骤要用===》   fabcar_1:4e7996bf4058869807f239b859a97dc609ed19e2fcfd10f1bf86540f6dd3cf5b

这时候可以查询已经安装的链码——组织1已经完成了链码的安装操作(组织2还没有),安装完成上面会生成一个唯一的hash值来标识此链码。此时我们也可以通过下面命令查看目前节点上已经安装的链码文件。
root@gan-virtual-machine:/opt/fabric-2.3.0/scripts/fabric-samples/test-network# peer lifecycle chaincode queryinstalled
Installed chaincodes on peer:
Package ID: fabcar_1:4e7996bf4058869807f239b859a97dc609ed19e2fcfd10f1bf86540f6dd3cf5b, Label: fabcar_1
#peer lifecycle chaincode queryinstalled:如果出现两个链码名字,其中第一个basic_1.0是上一章节官方自动安装的deployCC案例,而fabcar_1是本章节手动安装的案例。我把上一章节自动安装的删掉了,所以我查询结果只有一个~
如果没有删掉之前安装的basic链码,查询结果应该如下:

(6)ORG1链码审核与提交操作
一旦链码包在peer节点上安装后,就可以让背书节点审批链码定义,只有通过所有的背书节点或者绝大部分背书节点(不同的背书策略对通过的数量有要求)审核通过后后续的链码才可以进行实例化与调用。
root@gan-virtual-machine:/opt/fabric-2.3.0/scripts/fabric-samples/fabcar/go# peer lifecycle chaincode approveformyorg -o localhost:7050 --ordererTLSHostnameOverride orderer.example.com --tls --cafile /opt/fabric-2.3.0/scripts/fabric-samples/test-network/organizations/ordererOrganizations/example.com/orderers/orderer.example.com/msp/tlscacerts/tlsca.example.com-cert.pem --channelID mychannel --name fabcar --version 1.0 --package-id fabcar_1:4e7996bf4058869807f239b859a97dc609ed19e2fcfd10f1bf86540f6dd3cf5b --sequence 1

#1.-o localhost:7050#排序节点地址
#2.--tls #排序节点启动时是否启动tls
#3. --ordererTLSHostnameOverride orderer.example.com #验证TLS连接时使用的排序节点主机名
#4. --cafile PEM编码的CA证书文件路径
#5.--channellD mychannel# 通道ID
#6. --name fabcar#链码名称
#7. --version 1.0#链码版本
#8.--package-id fabcar_1:4e7996bf4058869807f239b859a97dc609ed19e2fcfd10f1bf86540f6dd3cf5b  #链码安装包标识ID
#9. --sequence 1#通道链码定义序列号,默认值:1


#运行结果
#2022-06-19 19:08:44.426 CST [chaincodeCmd] ClientWait -> INFO 001 txid [5a9ae2ad8e9dcc9d03201df1cad3dd11664eb2ec3eb041b19b98fcb78ba6148c] committed with status (VALID) at localhost:7051
#解释:链码审核的过程本身也是一次交易


#如果已经安装上basic链码demo,再装这个fabcar的话,记得修改链码ID为“fabcar_1:1146b4b491871bf18b23dd67dd8cc058655b36cc0e2274f165ed06b796a8f276 ”。反正注意--package-id 后面跟的内容要替换成自己安装成功之后日志显示中出现的hash~
#peer lifecycle chaincode approveformyorg -o localhost:7050 --ordererTLSHostnameOverride orderer.example.com --tls --cafile /opt/fabric-2.3.0/scripts/fabric-samples/test-network/organizations/ordererOrganizations/example.com/orderers/orderer.example.com/msp/tlscacerts/tlsca.example.com-cert.pem --channelID mychannel --name fabcar --version 1.0 --package-id fabcar_1:1146b4b491871bf18b23dd67dd8cc058655b36cc0e2274f165ed06b796a8f276  --sequence 1
ORG1查询看链码审核状态并尝试向通道提交链码
【这一步是不需要的,老师为了给我们讲需要所有组织同意之后才能提交成功,所以现在尝试提交只是为了让我们更加清楚看到现在无法提交成功。】
由于目前组织2还未通过fabcar审核,因此待会组织1提交时会失败而告终,也可以通过下面的命令来查看目前链码被审核通过的组织有哪些。
 root@gan-virtual-machine:/opt/fabric-2.3.0/scripts/fabric-samples/fabcar/go# peer lifecycle chaincode checkcommitreadiness --channelID mychannel --name fabcar --version 1.0 --sequence 1 --output json

#1. --channellID通道ID
#2.--name链码名称
#3. --version链码版本
#4. --output结果输出格式

#执行结果:组织1已经对链码审核且通过。组织2这边还没通过。
{


	"approvals": {


		"Org1MSP": true,
		"Org2MSP": false
	}
}
没有经过组织2审核通过的链码,我们提交试一下
peer lifecycle chaincode commit -o localhost:7050 --ordererTLSHostnameOverride orderer.example.com --tls --cafile /opt/fabric-2.3.0/scripts/fabric-samples/test-network/organizations/ordererOrganizations/example.com/orderers/orderer.example.com/msp/tlscacerts/tlsca.example.com-cert.pem --channelID mychannel --name fabcar --peerAddresses localhost:7051 --tlsRootCertFiles /opt/fabric-2.3.0/scripts/fabric-samples/test-network/organizations/peerOrganizations/org1.example.com/peers/peer0.org1.example.com/tls/ca.crt --peerAddresses localhost:9051 --tlsRootCertFiles /opt/fabric-2.3.0/scripts/fabric-samples/test-network/organizations/peerOrganizations/org2.example.com/peers/peer0.org2.example.com/tls/ca.crt --version 1.0 --sequence 1
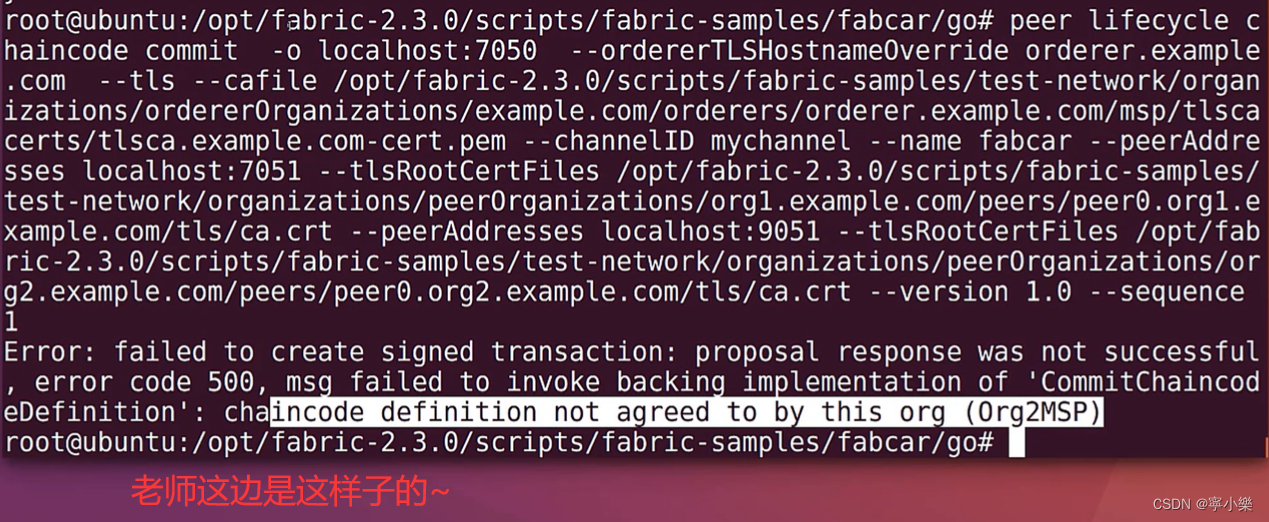
后来我知道为什么了,因为我把组织2的证书位置和组织1的证书位置粘贴错了~我还看了好久,我天哪,找个错误可真不容易。
ORG2链码审核与提交操作
之前ORG1的配置信息都是在shell余令行临时配置,退出命令行就会消失,因此ORG2信息我们可以配置在~/.bashrc文件中,,此文件当前用户每次启动命令行时都会自动加载。
其实组织2这边的操作,出来配置信息不同之外,和组织1的命令是一样的。
(7)配置ORG2组织信息
通过vim ~/.bashrc进入编辑模式,并且把ORG2的信息附加到最后,保存退出,关闭命令行重启打开,如果还能够识别变量则说明配置成功。
PWD='/opt/fabric-2.3.0/scripts/fabric-samples/test-network'
#把$(PMD}/ ../bin临时注册到环境变量中, peer命令可以执行
export PATH=${

    PWD}/../bin:$PATH
#还需要设置FABRIc_CF6_PATH路径指向fabric-samples中的core.yaml文件路径
export FABRIC_CFG_PATH=${

    PWD}/../config/
#下载是配置组织的证书和相关信息
# http://cw.hubwiz.com/card/c/fabric-env-manual/1/3/12/
#启用对服务端的TLS身份验证(TLS 由 ssL发展而来)是一种身份验证机制
export CORE_PEER_TLS_ENABLED=true
#组织1的NSP的标识ID
export CORE_PEER_LOCALMSPID="Org2MSP"
#获取组织节点证书的位置
export CORE_PEER_TLS_ROOTCERT_FILE=${

    PWD}/organizations/peerOrganizations/org2.example.com/peers/peer0.org2.example.com/tls/ca.crt
export CORE_PEER_MSPCONFIGPATH=${

    PWD}/organizations/peerOrganizations/org2.example.com/users/Admin@org2.example.com/msp
#同一机构中其他Peer节点要连接此节点需指定的P2P连接地址
export CORE_PEER_ADDRESS=localhost:9051


#下面是方便复制粘贴到终端命令行直接执行的版本
PWD='/opt/fabric-2.3.0/scripts/fabric-samples/test-network'
export PATH=${

    PWD}/../bin:$PATH
export FABRIC_CFG_PATH=${

    PWD}/../config/
export CORE_PEER_TLS_ENABLED=true
export CORE_PEER_LOCALMSPID="Org2MSP"
export CORE_PEER_TLS_ROOTCERT_FILE=${

    PWD}/organizations/peerOrganizations/org2.example.com/peers/peer0.org2.example.com/tls/ca.crt
export CORE_PEER_MSPCONFIGPATH=${

    PWD}/organizations/peerOrganizations/org2.example.com/users/Admin@org2.example.com/msp
export CORE_PEER_ADDRESS=localhost:9051
(8)ORG2安装链码
#进入........fabcar/go,发现有了一个fabcar.tar.gz文件,表明链码已经打包好了
root@gan-virtual-machine:/opt/fabric-2.3.0/scripts/fabric-samples/fabcar/go# ls
fabcar.go  fabcar.tar.gz  go.mod  go.sum  runfabcar.sh  vendor
#安装链码,结果中链码名字及其hash值与组织1安装之后的结果一样。
root@gan-virtual-machine:/opt/fabric-2.3.0/scripts/fabric-samples/fabcar/go# peer lifecycle chaincode install fabcar.tar.gz
#运行结果
#2022-06-19 21:07:18.548 CST [cli.lifecycle.chaincode] submitInstallProposal -> INFO 001 Installed remotely: response:<status:200 payload:"\nIfabcar_1:4e7996bf4058869807f239b859a97dc609ed19e2fcfd10f1bf86540f6dd3cf5b\022\010fabcar_1" >
#2022-06-19 21:07:18.548 CST [cli.lifecycle.chaincode] submitInstallProposal -> INFO 002 Chaincode code package identifier: fabcar_1:4e7996bf4058869807f239b859a97dc609ed19e2fcfd10f1bf86540f6dd3cf5b
(9)链码的审核
一旦链码包在peer节点上安装后,就可以让背书节点审批链码定义,只有通过所有的背书节点或者绝大部分背书节点不同的背书策缩对通过的数量有要求审核通过后后球的链码才可以进行实例化与调用,由于链码申核配置的是排序节点的的相关信息,因此此代码与ORG1完全相同。
root@gan-virtual-machine:/opt/fabric-2.3.0/scripts/fabric-samples/fabcar/go# peer lifecycle chaincode approveformyorg -o localhost:7050 --ordererTLSHostnameOverride orderer.example.com --tls --cafile /opt/fabric-2.3.0/scripts/fabric-samples/test-network/organizations/ordererOrganizations/example.com/orderers/orderer.example.com/msp/tlscacerts/tlsca.example.com-cert.pem --channelID mychannel --name fabcar --version 1.0 --package-id fabcar_1:4e7996bf4058869807f239b859a97dc609ed19e2fcfd10f1bf86540f6dd3cf5b,Label: fabcar_1 --sequence 1

#运行结果
#2022-06-19 21:09:43.517 CST [chaincodeCmd] ClientWait -> INFO 001 txid [39a98e0f41600cb2dce82fc05b70e50ea3aa28025c2d134860d725864865eacb] committed with status (VALID) at localhost:9051
(10)查看链码审核状态并提交链码
ORG2查看链码审核状态并提交链码。这时候ORG1,ORG2已经同时通过审核,这次链码可以最终提交
#查看链码审核状态
root@gan-virtual-machine:/opt/fabric-2.3.0/scripts/fabric-samples/fabcar/go# peer lifecycle chaincode checkcommitreadiness --channelID mychannel --name fabcar --version 1.0 --sequence 1 --output json
#运行结果
{


	"approvals": {


		"Org1MSP": true,
		"Org2MSP": true
	}
}
最终把链码提交给组织节点
代码与ORG1相同,只是之前ORG2未通过审核,导致链码第一次提交失败。
peer lifecycle chaincode commit -o localhost:7050 --ordererTLSHostnameOverride orderer.example.com --tls --cafile /opt/fabric-2.3.0/scripts/fabric-samples/test-network/organizations/ordererOrganizations/example.com/orderers/orderer.example.com/msp/tlscacerts/tlsca.example.com-cert.pem --channelID mychannel --name fabcar --peerAddresses localhost:7051 --tlsRootCertFiles /opt/fabric-2.3.0/scripts/fabric-samples/test-network/organizations/peerOrganizations/org1.example.com/peers/peer0.org1.example.com/tls/ca.crt --peerAddresses localhost:9051 --tlsRootCertFiles /opt/fabric-2.3.0/scripts/fabric-samples/test-network/organizations/peerOrganizations/org2.example.com/peers/peer0.org2.example.com/tls/ca.crt --version 1.0 --sequence 1
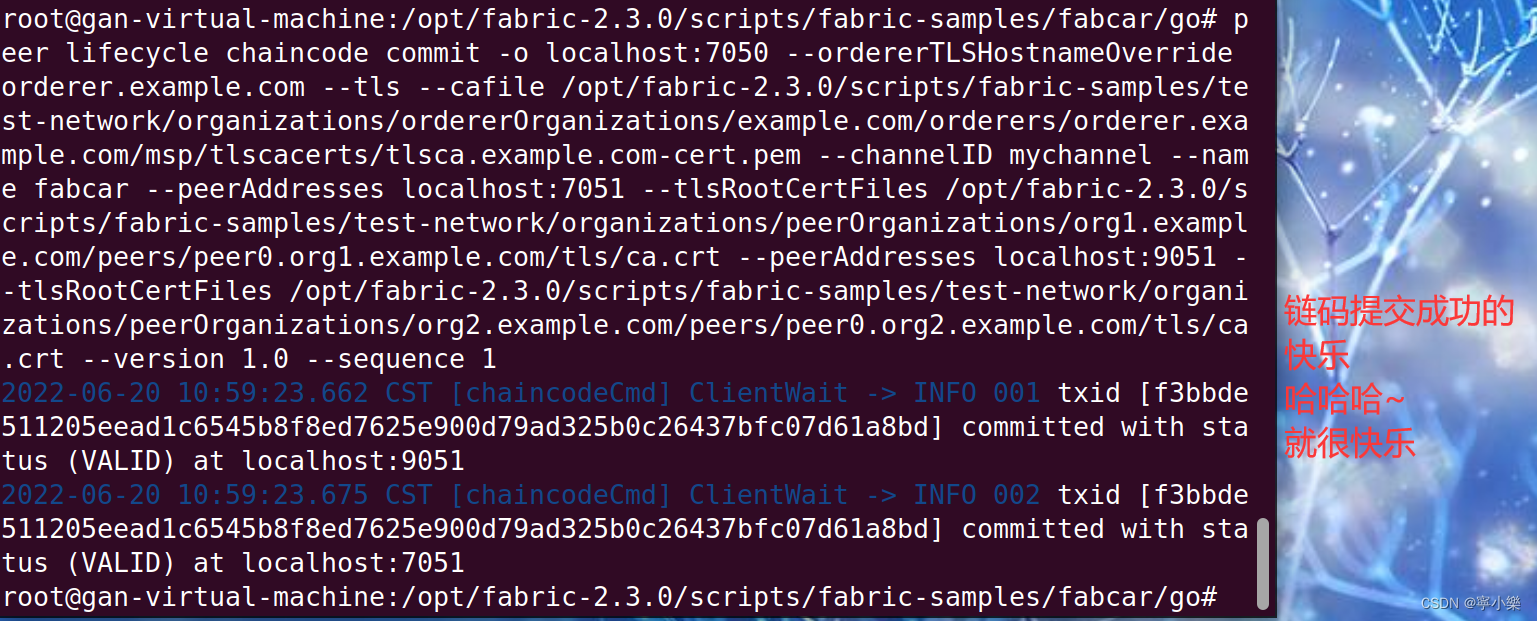
#返回的结果如下,如图可以看出链码已经提交成功,由于已经同时通过了ORG1,ORG2的审核,因此链码可以提交给排序节点
# 2022-06-19 21:57:01.524 CST [chaincodeCmd] ClientWait -> INFO 001 txid [26be9ccdddf6de2c5994406ac2411a5e478112d6f8d005a17be293939be11c89] committed with status (VALID) at localhost:7051
#2022-06-19 21:57:01.527 CST [chaincodeCmd] ClientWait -> INFO 002 txid [26be9ccdddf6de2c5994406ac2411a5e478112d6f8d005a17be293939be11c89] committed with status (VALID) at localhost:9051
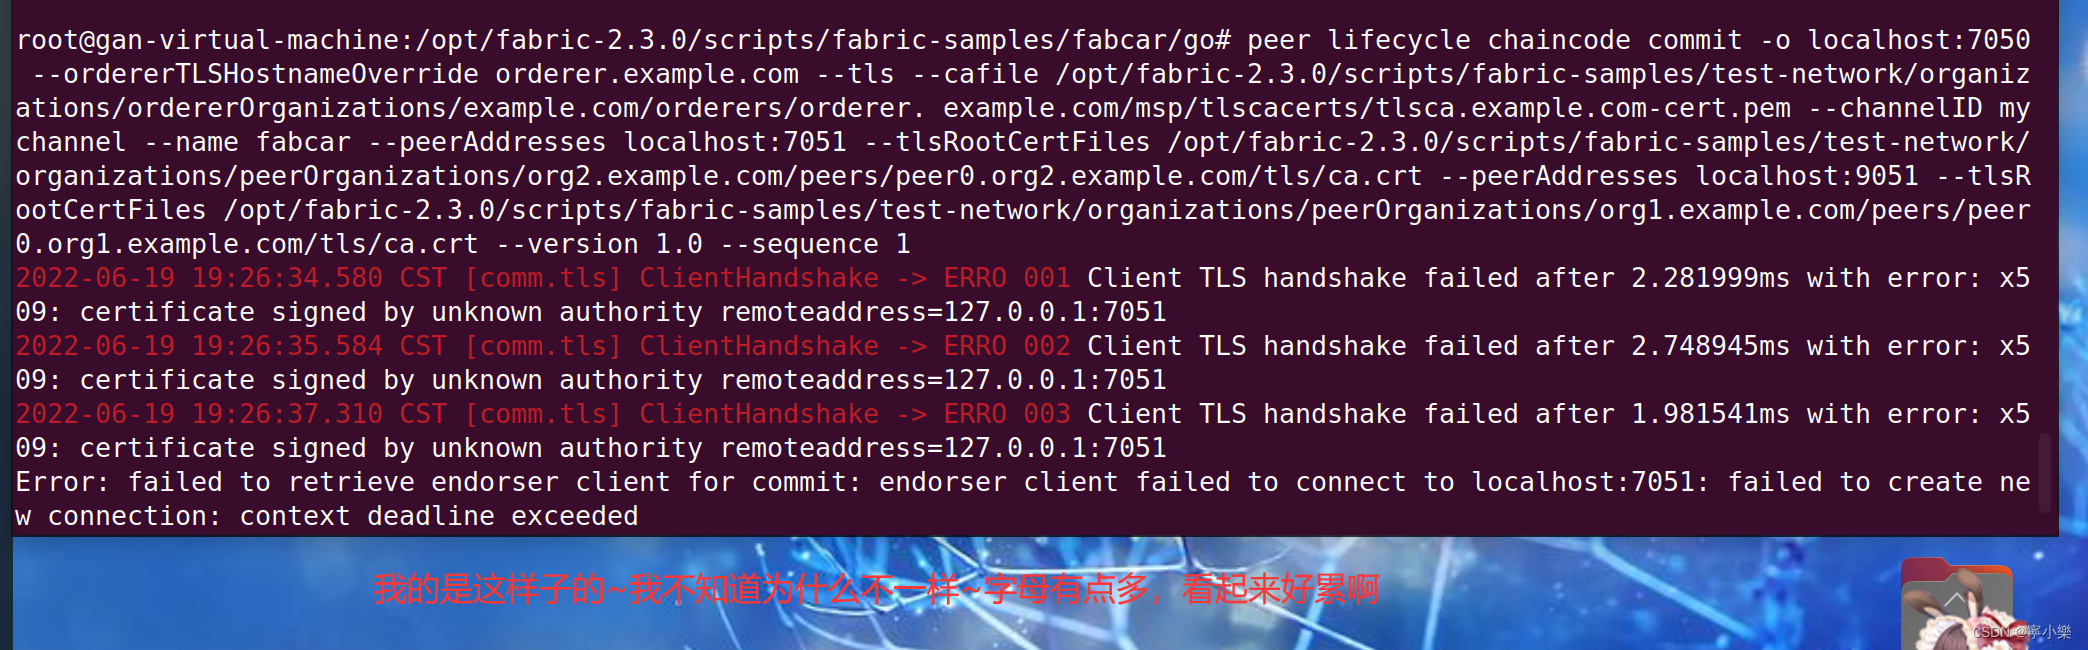
#这样子是没起来的,要这些容器的状态都变成Up才行~
#可以看到后面的invoke我就执行不了,本质原因就是链码容器没启起来~
root@gan-virtual-machine:/opt/fabric-2.3.0/scripts/fabric-samples/test-network# docker ps -a
CONTAINER ID   IMAGE                                                                                                                                                                    COMMAND                  CREATED         STATUS         PORTS                                                                                  NAMES
7af1a01a5b75   dev-peer0.org2.example.com-basic_1.0-4ec191e793b27e953ff2ede5a8bcc63152cecb1e4c3f301a26e22692c61967ad-6c0d5b0755cb92ed5555bd2e8a8765a6f425d1ed5ed9a90e625e01939e2113be   "chaincode -peer.add…"   6 minutes ago   Created                                                                                               dev-peer0.org2.example.com-basic_1.0-4ec191e793b27e953ff2ede5a8bcc63152cecb1e4c3f301a26e22692c61967ad
dc3cc5f8e9ad   dev-peer0.org1.example.com-basic_1.0-4ec191e793b27e953ff2ede5a8bcc63152cecb1e4c3f301a26e22692c61967ad-42f57faac8360472e47cbbbf3940e81bba83439702d085878d148089a1b213ca   "chaincode -peer.add…"   6 minutes ago   Created                                                                                               dev-peer0.org1.example.com-basic_1.0-4ec191e793b27e953ff2ede5a8bcc63152cecb1e4c3f301a26e22692c61967ad
9d7a9f992eae   hyperledger/fabric-tools:latest                                                                                                                                          "/bin/bash"              9 minutes ago   Up 9 minutes                                                                                          cli
b474ffa6a73e   hyperledger/fabric-peer:latest                                                                                                                                           "peer node start"        9 minutes ago   Up 9 minutes   7051/tcp, 0.0.0.0:9051->9051/tcp, :::9051->9051/tcp                                    peer0.org2.example.com
e6a08f02b506   hyperledger/fabric-peer:latest                                                                                                                                           "peer node start"        9 minutes ago   Up 9 minutes   0.0.0.0:7051->7051/tcp, :::7051->7051/tcp                                              peer0.org1.example.com
8adfb840488c   hyperledger/fabric-orderer:latest                                                                                                                                        "orderer"                9 minutes ago   Up 9 minutes   0.0.0.0:7050->7050/tcp, :::7050->7050/tcp, 0.0.0.0:7053->7053/tcp, :::7053->7053/tcp   orderer.example.com
链码的增删改查
前提:上一章节提交成功的步骤还在,或者自己重新安装上一章节的内容再搞一遍~配置环境变量和组织认证信息、打包链码、组织节点审核链码、所有组织节点通过审核后提交链码,这时候链码就背书成功啦。
接下来我们尝试增删改查等方法的调用:
(11)初始化
#采用invoke,调用链码的InitLedger方法初始化数据
peer chaincode invoke -o orderer.example.com:7050 --tls true --cafile $cafile -C mychannel -n fabcar --peerAddresses peer0.org1.example.com:7051 --tlsRootCertFiles $org1_CertFiles --peerAddresses peer0.org2.example.com:9051 --tlsRootCertFiles $org2_CertFiles -c '{"Args":["InitLedger"]}'
#参数解释
#-o 排序服务器节点
#--cafile排序节点的PEM证书文件路径
#-C通道名称
#-n链码名称
#-peerAddresses锚节点的地址
#--tlsRootCertFiles前面peerAddresses的TLS证书路径
#-c链码的方法和调用方法的参数


#备注,其中
$cafile = /opt/fabric-2.2.5/scripts/fabric-samples/test-network/organizations/ordererOrganizations/example.com/orderers/orderer.example.com/msp/tlscacerts/tlsca.example.com-cert.pem
$org1_CertFiles=/opt/fabric-2.2.5/scripts/fabric-samples/test-network/organizations/peerOrganizations/org1.example.com/peers/peer0.org1.example.com/tls/ca.crt
$org2_CertFiles=/opt/fabric-2.2.5/scripts/fabric-samples/test-network/organizations/peerOrganizations/org2.example.com/peers/peer0.org2.example.com/tls/ca.crt
报错了~我感觉我每个字母都核对了一遍,应该没问题啊!可为什么报错呢
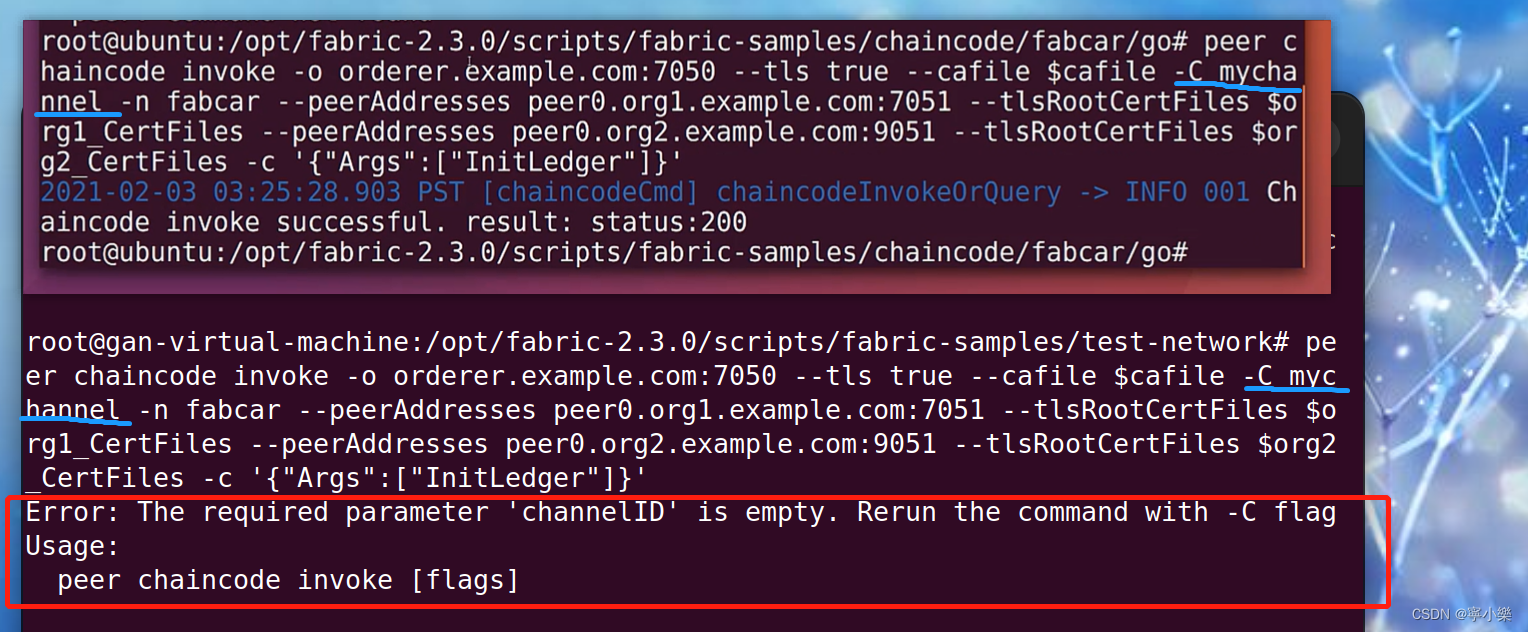
查了一下,通道是存在的呀

这个解决方案不行,没有解决问题~
#搜到一个解决方案,试一下不知道能不能成功
docker stop $(docker ps -aq)
docker rm $(docker ps -aq)
docker rmi -f $(docker image|grep "dev-" |awk '{print $3}')
然后重新执行一下
【问题编号:202206202151】我用“docker ps -a” 查询到的容器状态是Created。后来我朋友建议我用2.2.5的版本,让链码容器Up了,但我还是不知道是什么原因导致的~
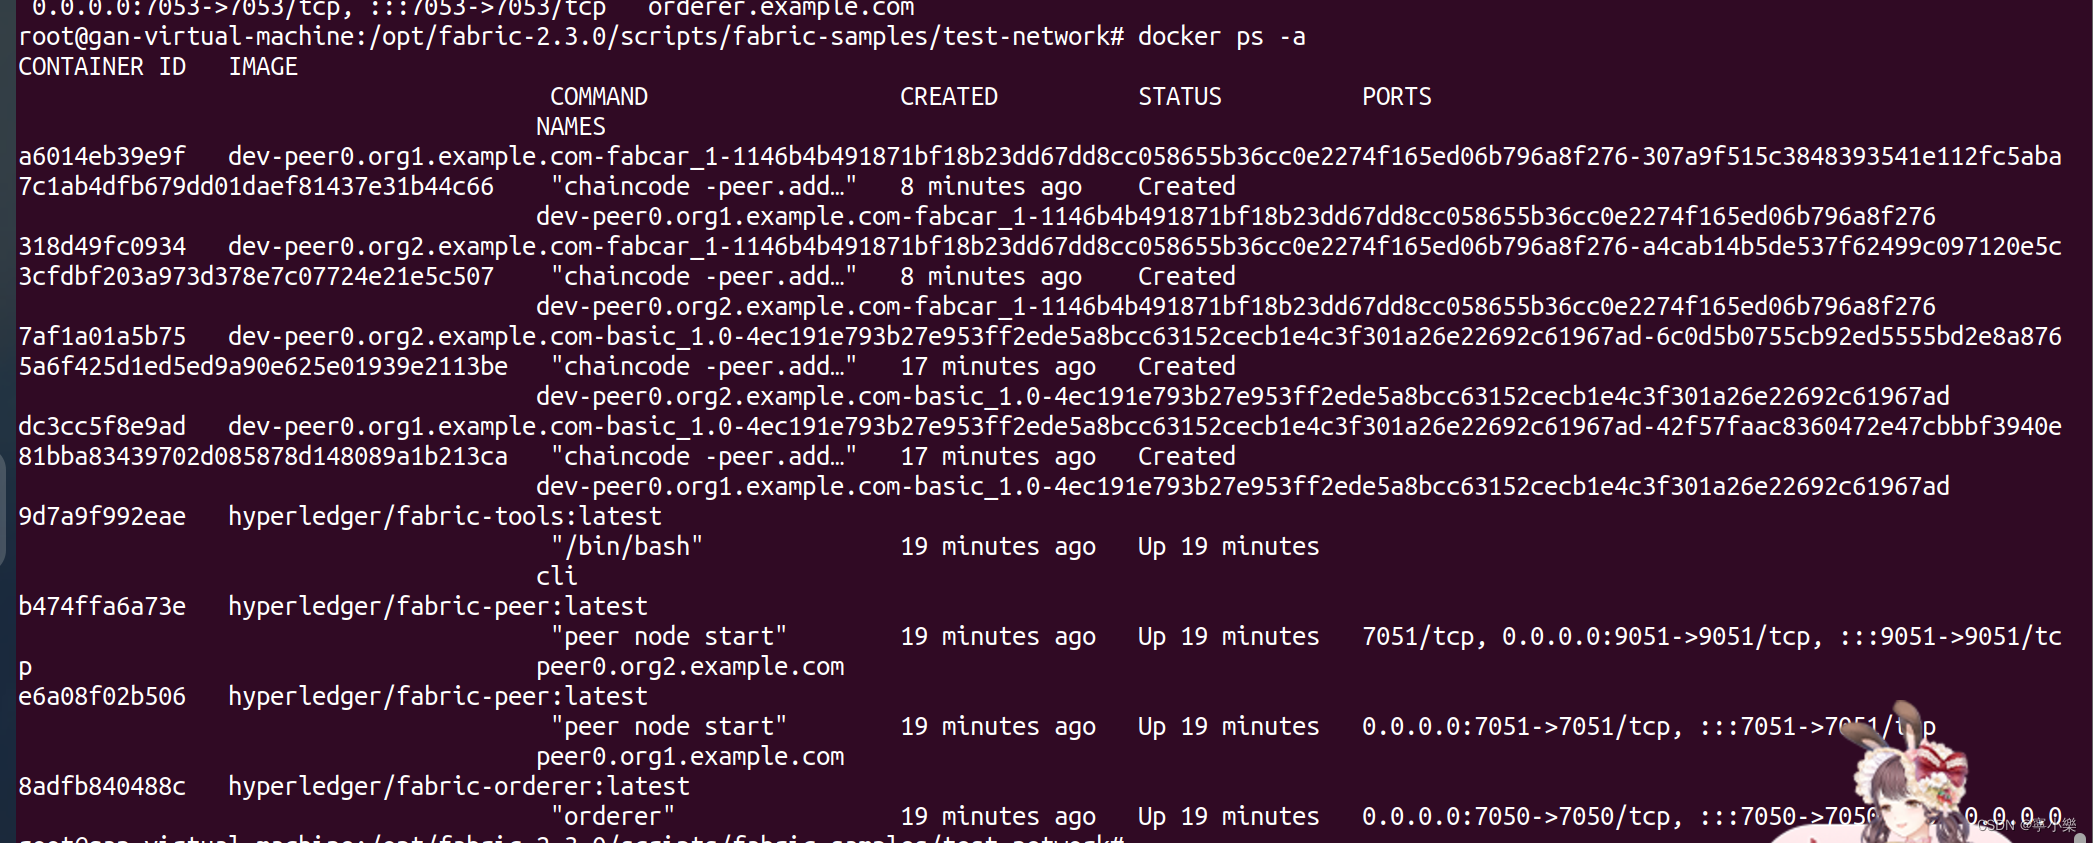
(12)查询
#采用query调用链码中的QueryCar方法查询单部汽车
peer chaincode query -C mychannel -n fabcar -c '{"Args":["QueryCar","CAR0"]}'
#果然,上一步初始化没有成功是查询不了的,但如果上一步成功是可以查询的
(13)新增
#采用invoke调用链码的CreateCar新增一辆汽车
peer chaincode invoke -o orderer.example.com:7050 --tls true --cafile $cafile -C mychannel -n fabcar --peerAddresses peer0O.org1.example.com:7051 --tlsRootCertFiles $org1_CertFiles --peerAddresses peer0.org2.example.com:9051--tlsRootCertFiles $org2_CertFiles -c '{"Args":["CreateCar","CAR10","GEELY","Borui","Blue","Yujialing"]}'
(14)查询新增
#采用query调用链码中的QueryCar方法查询新增的汽车
peer chaincode query -C mychannel -n fabcar -c '{

    " Args":["QueryCar" , "CAR10"]}
(15)修改
#采用invoke调用链码的ChangeCarOwner 更新汽车所有者
peer chaincode invoke -o orderer.example.com:7050 --tls true --cafile $cafile -C mychannel
-n fabcar --peerAddresses
peer0.org1.example.com:7051 --tlsRootCertFiles $org1_CertFiles --peerAddresses peer0.org2.example.com:9051 --tlsRootCertFiles $org2_CertFiles -c '{

    "Args":["ChangeCarOwner","CAR10","小岳岳"]}
6.2 编写自己的链码
#编写链码,存为atcc


package main

import (
"encoding/json"
"fmt"
"log"
"github.com/hyperledger/fabric-contract-api-go/contractapi"
)

//SmartContract provides functions for managing an Asset
type SmartContract struct {


	contractapi.Contract
}


type Asset struct {


	ID string `json: "ID"`
	Owner string `json : "owner"`
	Value int`json : "Value"`
}


func (s *SmartContract) InitLedger(ctx contractapi.TransactionContextInterface) error {


	assets := []Asset{


		{

    ID: "asset1", Owner: "ZhangSan", Value: 300},
		{

    ID: "asset2",Owner: "Lisi", Value: 400},
		{

    ID: "asset3",Owner: "Klay", Value: 500},
	}

	for _, asset := range assets {


		assetjSON, err := json.Marshal(asset)
		if err != nil {


			return err
		}

		err = ctx.GetStub().PutState(asset.ID,assetjSON)
		if err != nil {


			return fmt.Errorf( "failed to put to world state. %v"  , err)
		}
	}
	return nil
}


func(s *SmartContract) ReadAsset(ctx contractapi.TransactionContextInterface, id string) (*Asset, error){


	assetJSON, err := ctx.GetStub().GetState(id)
	if err != nil {


		return nil, fmt.Errorf("failed to read from world state: %v" , err)
	}
	if assetJSON == nil {


		return nil, fmt.Errorf( "the asset %s does not exist", id)
	}

	var asset Asset
	err = json. Unmarshal(assetJSON, &asset)
	if err != nil {


		return nil, err
	}
	return &asset, nil
}


func(s *SmartContract) GetAllAssets(ctx contractapi.TransactionContextInterface) ([]*Asset, error){


// range query with empty string for startKey and endKey does an
// open-ended query of all assets in the chaincode namespace
	resultsIterator,err := ctx.GetStub().GetStateByRange("", "")
	if err != nil {


		return nil,err
	}
	defer resultsIterator.Close()

	var assets []*Asset
	for resultsIterator.HasNext() {


		queryResponse, err := resultsIterator.Next()
		if err != nil {


			return nil, err
		}
		var asset Asset
		err = json.Unmarshal(queryResponse.Value, &asset)
		if err != nil {


			return nil, err
		}
		assets = append(assets, &asset)
	}
	return assets, nil
}


func main() {


	assetChaincode, err := contractapi.NewChaincode(&SmartContract{

    })
	if err != nil {


		log.Panicf("Error creating asset-transfer-basic chaincode: %v" , err)
	}
	if err := assetChaincode.Start(); err != nil {


		log. Panicf("Error starting asset-transfer-basic chaincode:%v" , err)
	}
}
这一部分是我用2.2.5版本成功测了一下fabcar之后再接着学的,所以我是基于之前部署了basic、fabcar两个链码demo的基础上直接运行的。所以就省掉了更改hosts文件和组织信息环境配置的步骤。
//在配置了组织1信息的终端上执行:
//创建链码文件存放目录atcc,并新建atcc.go,写入上述的go语言链码代码段
//我选择在chaincode目录下创建的,这个创建在哪里没关系,自己喜欢就好~【在配置了组织1信息的终端上执行或者配置了组织1信息的终端上执行都可以】
root@gan-virtual-machine:/opt/fabric-2.2.5/scripts/fabric-samples/chaincode# mkdir atcc
root@gan-virtual-machine:/opt/fabric-2.2.5/scripts/fabric-samples/chaincode# cd atcc
root@gan-virtual-machine:/opt/fabric-2.2.5/scripts/fabric-samples/chaincode/atcc# vim atcc.go
//获取链码依赖
root@gan-virtual-machine:/opt/fabric-2.2.5/scripts/fabric-samples/chaincode/atcc# go mod init atcc.go
//go: creating new go.mod: module atcc.go
//go: to add module requirements and sums:
//	go mod tidy             这里它提示我要用go mod tidy,如果执行之后是正常发现了可拉取的依赖包的话,没有这个提醒可以不用执行这句命令
root@gan-virtual-machine:/opt/fabric-2.2.5/scripts/fabric-samples/chaincode/atcc# go mod tidy
//go: finding module for package github.com/hyperledger/fabric-contract-api-go/contractapi
//go: found github.com/hyperledger/fabric-contract-api-go/contractapi in github.com/hyperledger/fabric-contract-api-go v1.1.1
//拉取依赖并下载到vendor目录下存储
root@gan-virtual-machine:/opt/fabric-2.2.5/scripts/fabric-samples/chaincode/atcc# go mod vendor
root@gan-virtual-machine:/opt/fabric-2.2.5/scripts/fabric-samples/chaincode/atcc# ls
//atcc.go  go.mod  go.sum  vendor   这时候可以看到,依赖下载成功啦
//通过组织1打包链码
root@gan-virtual-machine:/opt/fabric-2.2.5/scripts/fabric-samples/chaincode/atcc# peer lifecycle chaincode package atcc.tar.gz --path /opt/fabric-2.2.5/scripts/fabric-samples/chaincode/atcc --label atcc_1
root@gan-virtual-machine:/opt/fabric-2.2.5/scripts/fabric-samples/chaincode/atcc# ls
//atcc.go  atcc.tar.gz  go.mod  go.sum  vendor   可以看到打包完成后,目录下增加了atcc.tar.gz文件
//然后我们将链码包atcc.tar.gz安装到组织1节点上,下面所示:安装成功后,返回status 200且会输出链码包标识ID——“atcc_1:a682cc7b1295ef65592650b9bcd0936ebc7812fb842eee436b8e1ca9dbc1da48”
root@gan-virtual-machine:/opt/fabric-2.2.5/scripts/fabric-samples/chaincode/atcc# peer lifecycle chaincode install atcc.tar.gz
//2022-06-21 19:38:06.193 CST [cli.lifecycle.chaincode] submitInstallProposal -> INFO 001 Installed remotely: response:<status:200 payload:"\nGatcc_1:a682cc7b1295ef65592650b9bcd0936ebc7812fb842eee436b8e1ca9dbc1da48\022\006atcc_1" >
//2022-06-21 19:38:06.193 CST [cli.lifecycle.chaincode] submitInstallProposal -> INFO 002 Chaincode code package identifier: atcc_1:a682cc7b1295ef65592650b9bcd0936ebc7812fb842eee436b8e1ca9dbc1da48
//然后组织1节点要审核链码,通过审核后会输出交易ID——“txid [117c564ffca5a75299a84a613a4c33380c6ed1e6744f2ca85f20efa9823252fd]”
root@gan-virtual-machine:/opt/fabric-2.2.5/scripts/fabric-samples/chaincode/atcc# peer lifecycle chaincode approveformyorg -o localhost:7050 --ordererTLSHostnameOverride orderer.example.com --tls --cafile /opt/fabric-2.2.5/scripts/fabric-samples/test-network/organizations/ordererOrganizations/example.com/orderers/orderer.example.com/msp/tlscacerts/tlsca.example.com-cert.pem --channelID mychannel --name atcc --version 1.0 --package-id atcc_1:a682cc7b1295ef65592650b9bcd0936ebc7812fb842eee436b8e1ca9dbc1da48 --sequence 1
//2022-06-21 19:39:19.540 CST [chaincodeCmd] ClientWait -> INFO 001 txid [117c564ffca5a75299a84a613a4c33380c6ed1e6744f2ca85f20efa9823252fd] committed with status (VALID) at localhost:7051
//可以通过命令查看当前链码的审核状态,因为只有所有组织节点都审核通过之后,才能提交链码。但这个时候只有Org1MSP通过了审核,组织2还没有通过审核
root@gan-virtual-machine:/opt/fabric-2.2.5/scripts/fabric-samples/chaincode/atcc# peer lifecycle chaincode checkcommitreadiness --channelID mychannel --name atcc --version 1.0 --sequence 1 --output json
{


	"approvals": {


		"Org1MSP": true,
		"Org2MSP": false
	}
}
//也可以通过命令查看当前节点上安装的链码
root@gan-virtual-machine:/opt/fabric-2.2.5/scripts/fabric-samples/chaincode/atcc# peer lifecycle chaincode queryinstalled
//Installed chaincodes on peer:
//Package ID: basic_1.0:3cfcf67978d6b3f7c5e0375660c995b21db19c4330946079afc3925ad7306881, Label: basic_1.0
//Package ID: fabcar_1:1146b4b491871bf18b23dd67dd8cc058655b36cc0e2274f165ed06b796a8f276, Label: fabcar_1
//Package ID: atcc_1:a682cc7b1295ef65592650b9bcd0936ebc7812fb842eee436b8e1ca9dbc1da48, Label: atcc_1


//在配置了组织2信息的终端上执行:
root@gan-virtual-machine:/opt/fabric-2.2.5/scripts/fabric-samples/chaincode/atcc# ls
atcc.go  atcc.tar.gz  go.mod  go.sum  vendor
//同之前一样,将链码包atcc.tar.gz安装到组织2节点上,安装成功后也会返回status 200且会输出链码包标识ID——“atcc_1:a682cc7b1295ef65592650b9bcd0936ebc7812fb842eee436b8e1ca9dbc1da48”
root@gan-virtual-machine:/opt/fabric-2.2.5/scripts/fabric-samples/chaincode/atcc# peer lifecycle chaincode install atcc.tar.gz
//2022-06-21 19:41:36.634 CST [cli.lifecycle.chaincode] submitInstallProposal -> INFO 001 Installed remotely: response:<status:200 payload:"\nGatcc_1:a682cc7b1295ef65592650b9bcd0936ebc7812fb842eee436b8e1ca9dbc1da48\022\006atcc_1" >
//2022-06-21 19:41:36.634 CST [cli.lifecycle.chaincode] submitInstallProposal -> INFO 002 Chaincode code package identifier: atcc_1:a682cc7b1295ef65592650b9bcd0936ebc7812fb842eee436b8e1ca9dbc1da48
//然后组织2节点也要审核链码,通过审核后也会输出交易ID——“txid [117c564ffca5a75299a84a613a4c33380c6ed1e6744f2ca85f20efa9823252fd]”
root@gan-virtual-machine:/opt/fabric-2.2.5/scripts/fabric-samples/chaincode/atcc# peer lifecycle chaincode approveformyorg -o localhost:7050 --ordererTLSHostnameOverride orderer.example.com --tls --cafile /opt/fabric-2.2.5/scripts/fabric-samples/test-network/organizations/ordererOrganizations/example.com/orderers/orderer.example.com/msp/tlscacerts/tlsca.example.com-cert.pem --channelID mychannel --name atcc --version 1.0 --package-id atcc_1:a682cc7b1295ef65592650b9bcd0936ebc7812fb842eee436b8e1ca9dbc1da48 --sequence 1
//2022-06-21 19:41:53.240 CST [chaincodeCmd] ClientWait -> INFO 001 txid [50999fd3617bd19d9dc26d9826abdfac3a468628872550574cdd5887184250c8] committed with status (VALID) at localhost:9051
//可以通过命令查看当前链码的审核状态,这时候组织1和组织2都审核通过啦,可以提交链码了
root@gan-virtual-machine:/opt/fabric-2.2.5/scripts/fabric-samples/chaincode/atcc# peer lifecycle chaincode checkcommitreadiness --channelID mychannel --name atcc --version 1.0 --sequence 1 --output json
{


	"approvals": {


		"Org1MSP": true,
		"Org2MSP": true
	}
}
//通过组织2提交链码【通过组织1提交也是可以的,提交一次就行啦~都是同步的。】
//提交成功后会输出两条日志信息,说明提交的交易来自两个节点【真实情况下是多个,有多少个节点审核并通过了链码,这里就会有多少条日志信息,且都是对应于同一条交易ID】
root@gan-virtual-machine:/opt/fabric-2.2.5/scripts/fabric-samples/chaincode/atcc#  peer lifecycle chaincode commit -o localhost:7050 --ordererTLSHostnameOverride orderer.example.com --tls --cafile /opt/fabric-2.2.5/scripts/fabric-samples/test-network/organizations/ordererOrganizations/example.com/orderers/orderer.example.com/msp/tlscacerts/tlsca.example.com-cert.pem --channelID mychannel --name atcc --peerAddresses localhost:7051 --tlsRootCertFiles /opt/fabric-2.2.5/scripts/fabric-samples/test-network/organizations/peerOrganizations/org1.example.com/peers/peer0.org1.example.com/tls/ca.crt --peerAddresses localhost:9051 --tlsRootCertFiles /opt/fabric-2.2.5/scripts/fabric-samples/test-network/organizations/peerOrganizations/org2.example.com/peers/peer0.org2.example.com/tls/ca.crt --version 1.0 --sequence 1
//2022-06-21 19:49:24.598 CST [chaincodeCmd] ClientWait -> INFO 001 txid [b01da77332d3b3525f03a854b5ba4a442010626491a70637aeffd65b622738e0] committed with status (VALID) at localhost:9051
//2022-06-21 19:49:24.624 CST [chaincodeCmd] ClientWait -> INFO 002 txid [b01da77332d3b3525f03a854b5ba4a442010626491a70637aeffd65b622738e0] committed with status (VALID) at localhost:7051
//提交成功输出上面的日志之后,可以用docker ps -a 命令看到docker容器中又多了三个节点对应的atcc链码容器,且均处于Up状态。这时候可以进行链码调用啦~
//首先进行链码初始化,如果成功会返回status200,否则会提示错误原因
root@gan-virtual-machine:/opt/fabric-2.2.5/scripts/fabric-samples/chaincode/atcc# peer chaincode invoke -o orderer.example.com:7050 --tls true --cafile /opt/fabric-2.2.5/scripts/fabric-samples/test-network/organizations/ordererOrganizations/example.com/orderers/orderer.example.com/msp/tlscacerts/tlsca.example.com-cert.pem -C mychannel -n atcc --peerAddresses peer0.org1.example.com:7051 --tlsRootCertFiles /opt/fabric-2.2.5/scripts/fabric-samples/test-network/organizations/peerOrganizations/org1.example.com/peers/peer0.org1.example.com/tls/ca.crt --peerAddresses peer0.org2.example.com:9051 --tlsRootCertFiles /opt/fabric-2.2.5/scripts/fabric-samples/test-network/organizations/peerOrganizations/org2.example.com/peers/peer0.org2.example.com/tls/ca.crt -c '{

    "Args":["InitLedger"]}'
//2022-06-21 19:55:41.739 CST [chaincodeCmd] chaincodeInvokeOrQuery -> INFO 001 Chaincode invoke successful. result: status:200
//初始化成功之后可以采用query调用链码中的ReadAsset方法查询某条asset记录。-c后面接的是链码中的方法及其所需要的参数,这些方法是自己定义的,如InitLedger、ReadAsset、GetAllAssets,自己编写这个链码中只有这三个方法~
root@gan-virtual-machine:/opt/fabric-2.2.5/scripts/fabric-samples/chaincode/atcc# peer chaincode query -C mychannel -n atcc -c '{

    "Args":["ReadAsset","asset1"]}'
//{"ID":"asset1","Owner":"ZhangSan","Value":300}
//也可以采用query调用链码的GetAllAssets查询所有asset记录
root@gan-virtual-machine:/opt/fabric-2.2.5/scripts/fabric-samples/chaincode/atcc# peer chaincode query -C mychannel -n atcc -c '{

    "Args":["GetAllAssets"]}'
//[{"ID":"asset1","Owner":"ZhangSan","Value":300},{"ID":"asset2","Owner":"Lisi","Value":400},{"ID":"asset3","Owner":"Klay","Value":500}]
//补充第14步:Java调用链码扩展: https://www.cnblogs.com/aarond/p/12173797.html   感兴趣的话可以自己下去看~
下面是纯命令,没有终端目录提示,更方便复制粘贴~
//组织1执行
PWD='/opt/fabric-2.2.5/scripts/fabric-samples/test-network'
export PATH=${

    PWD}/../bin:$PATH
export FABRIC_CFG_PATH=${

    PWD}/../config/
export CORE_PEER_TLS_ENABLED=true
export CORE_PEER_LOCALMSPID="Org1MSP"
export CORE_PEER_TLS_ROOTCERT_FILE=${

    PWD}/organizations/peerOrganizations/org1.example.com/peers/peer0.org1.example.com/tls/ca.crt
export CORE_PEER_MSPCONFIGPATH=${

    PWD}/organizations/peerOrganizations/org1.example.com/users/Admin@org1.example.com/msp
export CORE_PEER_ADDRESS=localhost:7051

peer lifecycle chaincode package atcc.tar.gz --path /opt/fabric-2.2.5/scripts/fabric-samples/chaincode/atcc --label atcc_1
peer lifecycle chaincode install atcc.tar.gz
peer lifecycle chaincode approveformyorg -o localhost:7050 --ordererTLSHostnameOverride orderer.example.com --tls --cafile /opt/fabric-2.2.5/scripts/fabric-samples/test-network/organizations/ordererOrganizations/example.com/orderers/orderer.example.com/msp/tlscacerts/tlsca.example.com-cert.pem --channelID mychannel --name atcc --version 1.0 --package-id atcc_1:a682cc7b1295ef65592650b9bcd0936ebc7812fb842eee436b8e1ca9dbc1da48 --sequence 1
peer lifecycle chaincode checkcommitreadiness --channelID mychannel --name atcc --version 1.0 --sequence 1 --output json


//组织2执行
PWD='/opt/fabric-2.2.5/scripts/fabric-samples/test-network'
export PATH=${

    PWD}/../bin:$PATH
export FABRIC_CFG_PATH=${

    PWD}/../config/
export CORE_PEER_TLS_ENABLED=true
export CORE_PEER_LOCALMSPID="Org2MSP"
export CORE_PEER_TLS_ROOTCERT_FILE=${

    PWD}/organizations/peerOrganizations/org2.example.com/peers/peer0.org2.example.com/tls/ca.crt
export CORE_PEER_MSPCONFIGPATH=${

    PWD}/organizations/peerOrganizations/org2.example.com/users/Admin@org2.example.com/msp
export CORE_PEER_ADDRESS=localhost:9051

peer lifecycle chaincode install atcc.tar.gz
peer lifecycle chaincode approveformyorg -o localhost:7050 --ordererTLSHostnameOverride orderer.example.com --tls --cafile /opt/fabric-2.2.5/scripts/fabric-samples/test-network/organizations/ordererOrganizations/example.com/orderers/orderer.example.com/msp/tlscacerts/tlsca.example.com-cert.pem --channelID mychannel --name atcc --version 1.0 --package-id atcc_1:a682cc7b1295ef65592650b9bcd0936ebc7812fb842eee436b8e1ca9dbc1da48 --sequence 1
 peer lifecycle chaincode commit -o localhost:7050 --ordererTLSHostnameOverride orderer.example.com --tls --cafile /opt/fabric-2.2.5/scripts/fabric-samples/test-network/organizations/ordererOrganizations/example.com/orderers/orderer.example.com/msp/tlscacerts/tlsca.example.com-cert.pem --channelID mychannel --name atcc --peerAddresses localhost:7051 --tlsRootCertFiles /opt/fabric-2.2.5/scripts/fabric-samples/test-network/organizations/peerOrganizations/org1.example.com/peers/peer0.org1.example.com/tls/ca.crt --peerAddresses localhost:9051 --tlsRootCertFiles /opt/fabric-2.2.5/scripts/fabric-samples/test-network/organizations/peerOrganizations/org2.example.com/peers/peer0.org2.example.com/tls/ca.crt --version 1.0 --sequence 1
peer chaincode invoke -o orderer.example.com:7050 --tls true --cafile /opt/fabric-2.2.5/scripts/fabric-samples/test-network/organizations/ordererOrganizations/example.com/orderers/orderer.example.com/msp/tlscacerts/tlsca.example.com-cert.pem -C mychannel -n atcc --peerAddresses peer0.org1.example.com:7051 --tlsRootCertFiles /opt/fabric-2.2.5/scripts/fabric-samples/test-network/organizations/peerOrganizations/org1.example.com/peers/peer0.org1.example.com/tls/ca.crt --peerAddresses peer0.org2.example.com:9051 --tlsRootCertFiles /opt/fabric-2.2.5/scripts/fabric-samples/test-network/organizations/peerOrganizations/org2.example.com/peers/peer0.org2.example.com/tls/ca.crt -c '{

    "Args":["InitLedger"]}'
peer chaincode query -C mychannel -n atcc -c '{

    "Args":["ReadAsset","asset1"]}'
peer chaincode query -C mychannel -n atcc -c '{

    "Args":["GetAllAssets"]}'
补充一个小问题~可以不管
前言:
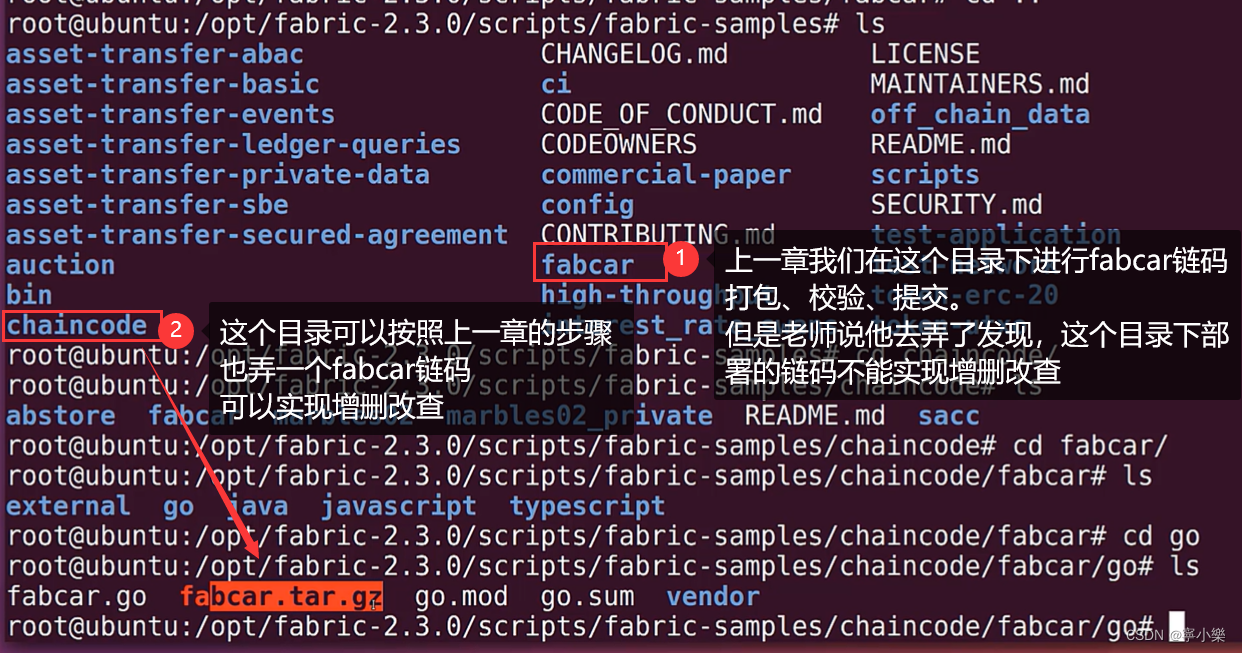
两个打包的链码文件是不同的,这个不重要~跳过就行
fabcar.tar.gz是chaincode目录下打包的,可以实现增删改查
fabcar_.tar.gz是fabcar目录下打包的,上一章节弄的,不能实现增删改查
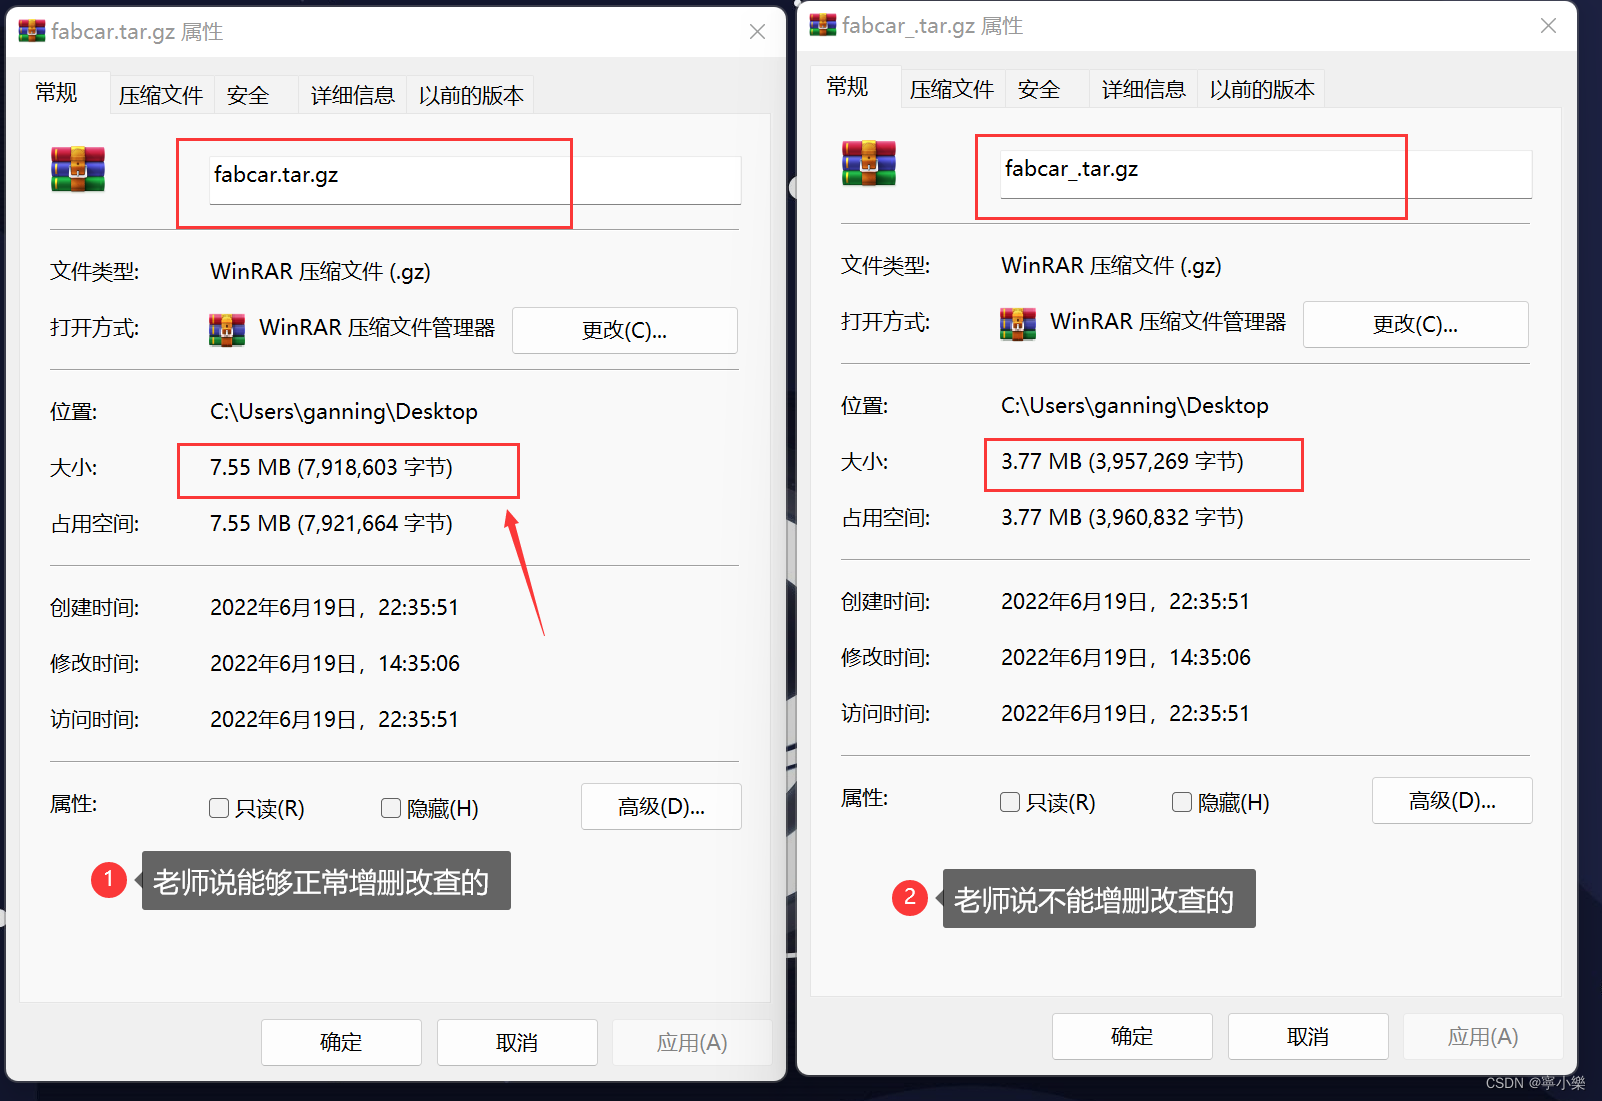
老师的一个是3.多M,一个是2.多M。我怀疑我这边都是可以正常增删改查没有区别的,因为我看了一下目录结构,chaincode目录下打包的7.55M的目录中相当于有两份fabcar目录。内容应该都是一样的吧,太多了,我没能一个个对比文件内容~
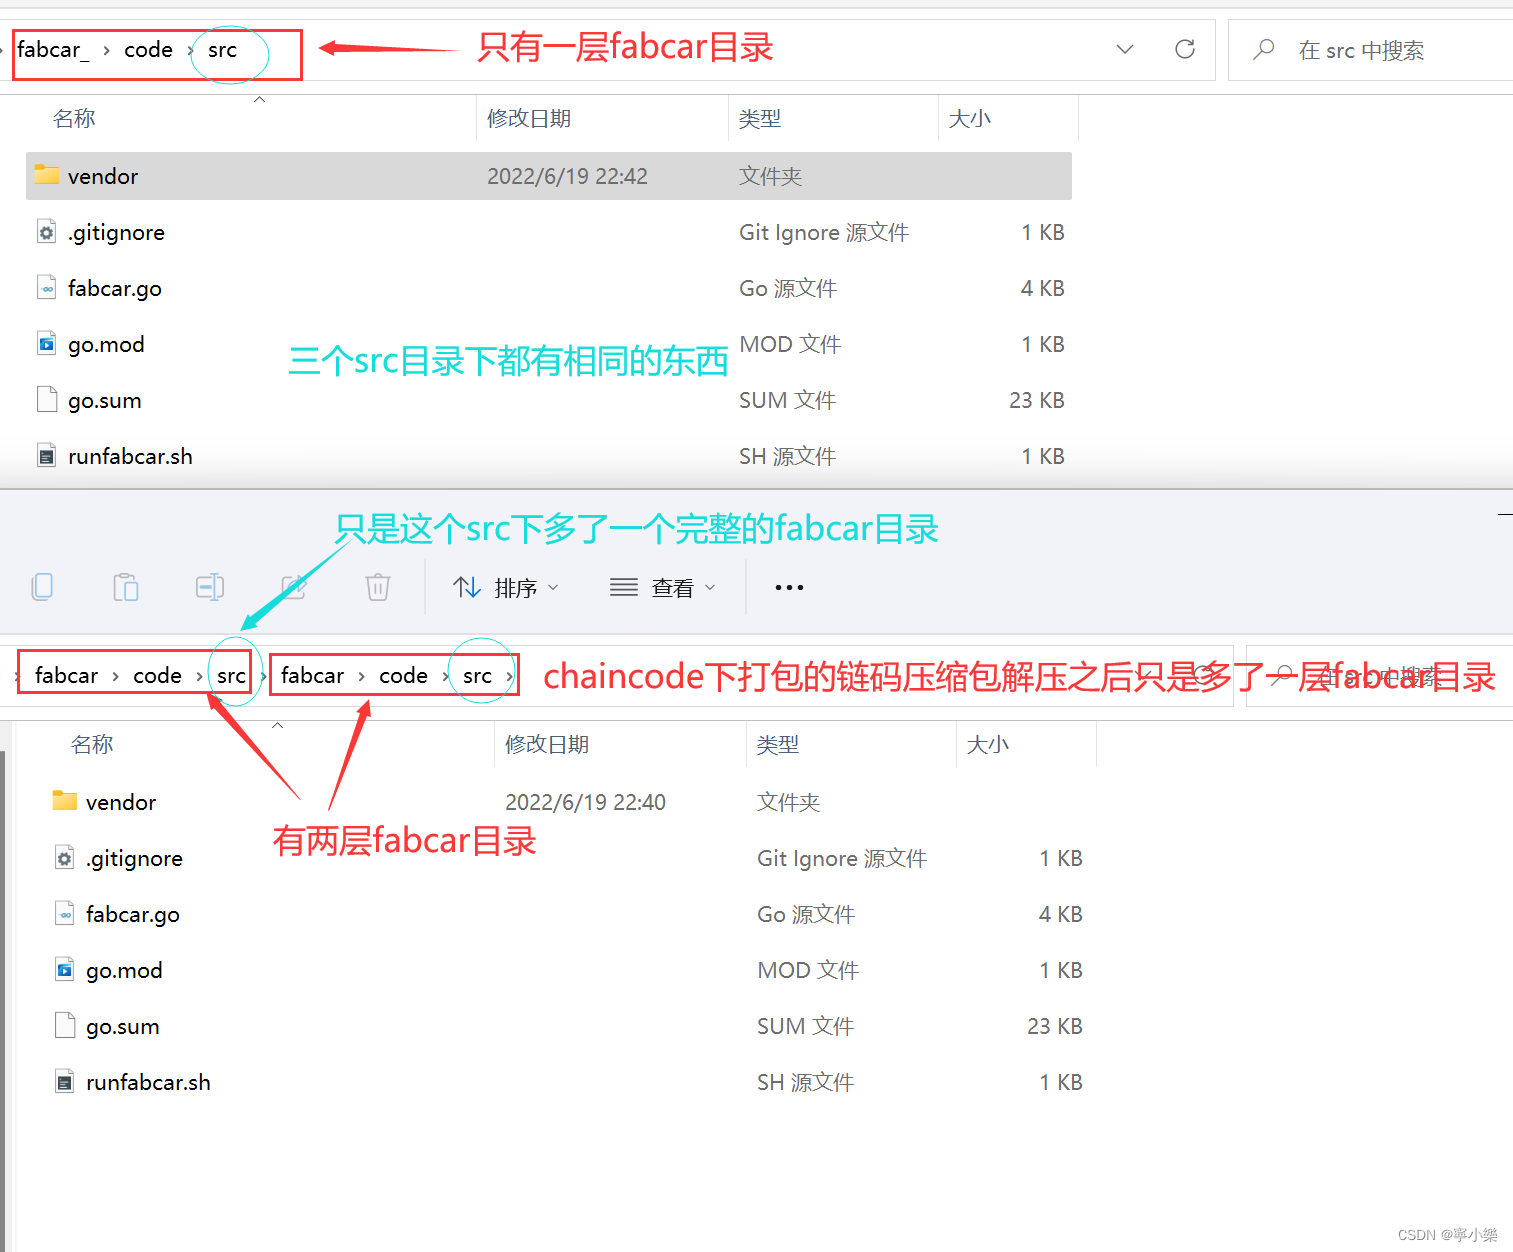
学习小结
虽然这个课程内容还是很基础的,还需要深入学习的东西还有很多很多。但是,通过这个课程了解了shell、go的简单语法,这对之后读代码是有帮助的。另外通过实际案例回顾了区块链相关知识,这对理解区块链以及之后可能需要区块链的地方是有用的。
很感谢大头娃老师~讲得很好!很受益。
路漫漫其修远兮,吾将上下而求索。fighting~