最近在某云上买了一个服务器,价格还是比较合理的。顺便在上边搭建了一个shadowsock服务器,总结一下搭建过程,和遇到的坑。
其中主要参考这个链接的文章http://blog.021xt.cc/archives/98
Ubuntu1604 Server部署
首先需要确保系统里已经安装python.使用如下命令
$ python –version
Python 2.6.8
如果没有安装使用 sudo apt-get install python 来安装python
接下来就要安装shadowsocks,使用如下命令
$ pip install shadowsocks
接下来开始配置Server.主要就配置一个.json 文件就可以了。
文件可以放在/etc/shadowsocks.json 下。
对于单个用户,配置文件如下。
{
    "server":"my_server_ip",
    "server_port":8388,
    "local_address": "127.0.0.1",
    "local_port":1080,
    "password":"mypassword",
    "timeout":300,
    "method":"aes-256-cfb",
    "fast_open": false
}
在这里就遇到坑了,配置好之后,一直不能用,后来发现,买的服务器对应server_port 没有开放,在某云上服务器配置一下就解决了。
还有server IP不知道为什么写IP 地址一直没有用,后来搜索了一下把
那一句该成“server”=”::”就可以了。
多用户配置
{
“server”: “0.0.0.0”,
“port_password”: {
“8381”: “foobar1”,
“8382”: “foobar2”,
“8383”: “foobar3”,
“8384”: “foobar4”
},
“timeout”: 300,
“method”: “aes-256-cfb”
}
同样一定要确保你买的服务器上边对应的端口是开放的。
关于shadowsocks 的一些命令
前台运行命令:
ssserver -c /etc/shadowsocks.json
后台运行命令:
ssserver -c /etc/shadowsocks.json -d start
ssserver -c /etc/shadowsocks.json -d stop
输出log如下:
2017-01-30 14:52:59 INFO connecting s2.googleusercontent.com:443 from 59.172.28.64:37629
2017-01-30 14:52:59 INFO connecting s2.googleusercontent.com:443 from 59.172.28.64:37627
2017-01-30 14:52:59 INFO connecting s2.googleusercontent.com:443 from 59.172.28.64:37626
2017-01-30 14:52:59 INFO connecting s2.googleusercontent.com:443 from 59.172.28.64:37625
2017-01-30 14:52:59 INFO connecting s2.googleusercontent.com:443 from 59.172.28.64:37630
2017-01-30 14:52:59 INFO connecting s2.googleusercontent.com:443 from 59.172.28.64:37628
2017-01-30 14:57:45 WARNING timed out: shadowsocks.org:443
2017-01-30 14:58:46 INFO connecting clients4.google.com:443 from 59.172.28.64:37979
2017-01-30 14:59:33 INFO connecting clients4.google.com:443 from 59.172.28.64:38113
2017-01-30 14:59:40 INFO connecting mtalk.google.com:5228 from 59.172.28.64:38130
开机启动配置,在/etc/rc.local中加入
#start the shadowsocks server
sudo ssserver -c /etc/shadowsocks.json -d start
接下来就是Client配置
Server服务启动之后,就可以在客户端安装SS Client使用了。
SS目前支持Windows、MAC、Linux、AndroidIOS等众多平台。参考:https://shadowsocks.org/en/download/clients.html
Windows: Shadowsocks-win 推荐使用这个
MAC: ShadowsocksX-NG 和 shadowsocks-iOS
Android: Shadowsocks 中文名:影梭
IOS:MobileShadowSocks 和收费的土豆丝 (Potatso)
在Windows上客户端配置界面大概是这个样子
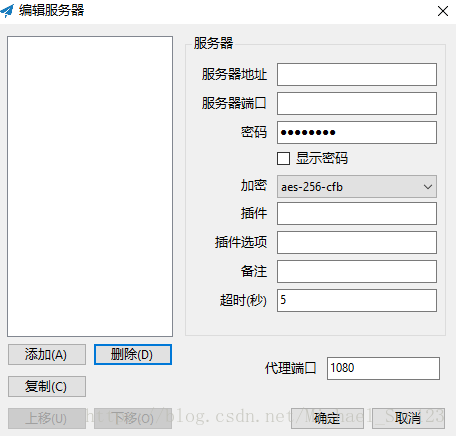
对应填写服务器shadowsocks.json 的配置就可以了。
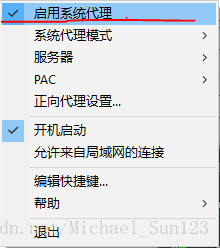
配置好之后,需要勾选启用系统代理
好,现在shadowsocks服务器和客户端都已经搭建好了。