CentOS 7离线安装使用git
一 CentOS 7下载安装配置git
1.1 下载安装
# 1 下载后上传到服务器/opt/software/git
cd /opt/software/git

# 2 解压
tar -zxvf git-2.34.1.tar.gz

# 3 配置安装目录
cd git-2.34.1/
./configure --prefix=/usr/local/git

# 4 编译安装
make && make install
1.2 配置环境变量
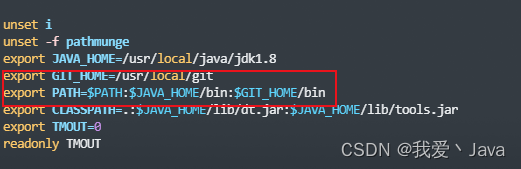
# 修改/etc/profile文件,修改如下。如果有多个PATH,中间用英文冒号隔开
vim /etc/profile
# 加上或修改如下两行
export GIT_HOME=/usr/local/git
export PATH=$PATH:$JAVA_HOME/bin:$GIT_HOME/bin
# 修改完重新加载配置文件
source /etc/profile
# 创建软链(因为安装位置不是默认的,不创建后面使用会报错)
ln -s /usr/local/git/bin/git-receive-pack /usr/bin/git-receive-pack
ln -s /usr/local/git/bin/git-upload-pack /usr/bin/git-upload-pack
# 报错信息
bash: git-receive-pack: command not found
fatal: Could not read from remote repository.
bash: git-upload-pack: command not found
fatal: Could not read from remote repository.

# 查看是否配置成功
git --version
二 上传与下载
2.1 上传-服务器端(centos)操作
2.1.1 添加git用户
useradd git
passwd git
2.1.2 创建文件夹、初始化仓库
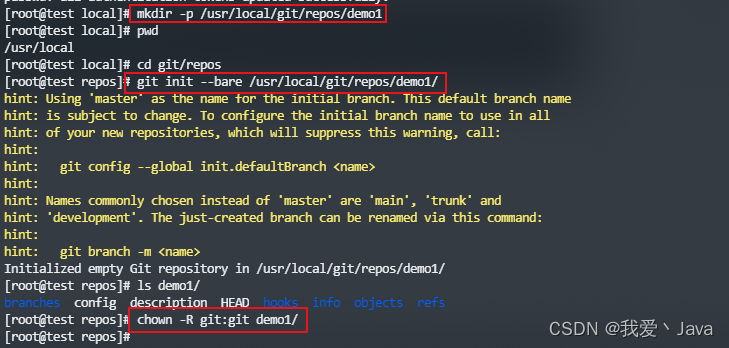
# 创建文件夹
mkdir -p /usr/local/git/repos/demo1
# 初始化仓库
git init --bare /usr/local/git/repos/demo1/
# 修改仓库文件所有者
chown -R git:git demo1/
其中,初始化后每个文件的用途如下(了解)
ls -a /usr/local/git/repos/demo1
branches 分支目录
config 定义项目特有的配置选项
description 仅供给git web使用
HEAD 指示当前的分支
hooks 包含git钩子文件
info 包含一个全局的排除文件
objects 存放所有的数据内容,有info pack
refs 存放指向数据的提交对象指针
index 保存暂存区的信息
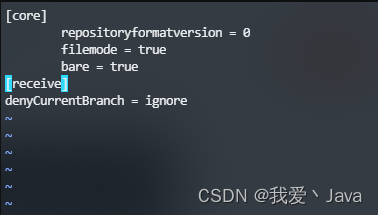
2.1.3 修改仓库配置文件
# 初始化仓库之后,修改配置文件
vim /usr/local/git/repos/demo1/config
# 在最后面添加如下信息
[receive]
denyCurrentBranch = ignore
2.2 上传-本地端(windows)操作(也需要安装git)
# 0 准备工作,如果第一次使用git,执行如下指令。 //禁用自动转换
git config --global core.autocrlf false
# 1 进入项目根目录,然后 git bash here打开窗口,输入指令 :
git init
# . 表示该目录下的全部文件
git add .
git commit -m "第一次提交"
# 创建远程连接,其中demo1是连接的别名
git remote add demo1 git@IP:/usr/local/git/repos/demo1
# push,其中demo1是上面的别名,master是分支
git push demo1 master
2.3 拉取代码
# 在本地新建一个文件夹,进入文件夹,右键空白的地方,git bash here,然后:
git init
# 最后验证是否push成功,试试拉取pull
git clone git@IP:/usr/local/git/repos/demo1