前言
本系列是基于Seata1.5.0版本的源码分析,包含:
- Seata概览
- AT模式下的RM和TM
- AT模式下的TM
- TCC模式
这一章是基于Seata1.5.0版本的概览,包括AT模式架构、SeataServer(TC)概览、Client(TM、RM)概览。
一、术语
1、TC (Transaction Coordinator) - 事务协调者 维护全局和分支事务的状态,驱动全局事务提交或回滚。在Seata中指的就是SeataServer。
2、TM (Transaction Manager) - 事务管理器 定义全局事务的范围:开始全局事务、提交或回滚全局事务。具体到代码中就是通过@GlobalTransactional管理全局事务。
3、RM (Resource Manager) - 资源管理器 管理分支事务处理的资源,与TC通讯,注册分支事务和报告分支事务的状态,驱动分支事务提交或回滚。
二、架构(AT模式)
1、注册中心
SeataServer(TC)通过application.yml中的seata.registry.type设置注册中心类型,基本支持市面上所有的注册中心。
如果TC设置seata.registry.type=file,则TM/RM应当通过配置文件(springboot中的application.yml)发现SeataServer,如seata.service.grouplist.default=127.0.0.1:8091;
如果TC设置seata.registry.type=nacos,则TM/RM应当配置seata.registry.type=nacos,以及其他与Nacos连接需要的配置项,如seata.registry.nacos.server-addr;
2、配置中心
SeataServer(TC)通过application.yml中的seata.config.type设置配置中心类型,基本支持市面上所有的配置中心。如果设置为file,则取本地文件配置(application.yml)。
TM/RM可以自由选择配置中心,也可以使用seata.config.type=apollo配置seata相关配置;
3、存储
SeataServer(TC)通过启动-m参数或application.yml的seata.store.mode决定存储介质,支持file、db、redis。
TC具体存储介质的配置信息读取自配置中心或application.yml,取决于seata.config.type。
TC如果使用db存储,则需要在db中创建四张表:global_table全局表、branch_table分支表、lock_table锁表、distributed_lock分布式锁表(1.5新增)。
RM如果使用AT模式需要通过db存储undo_log回滚日志。
4、TM、RM、TC的关系
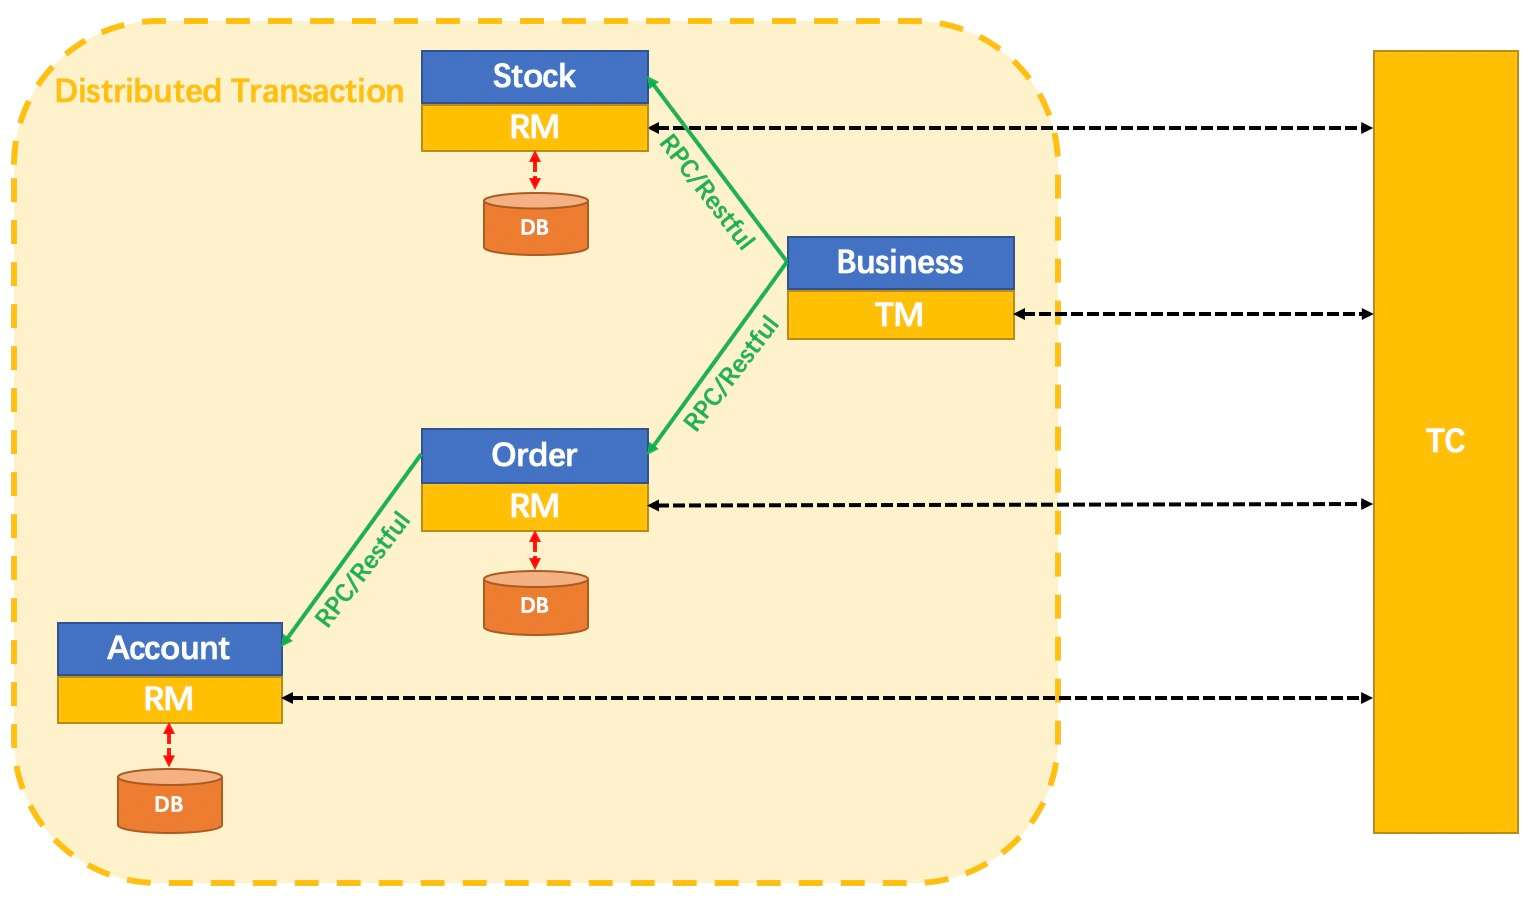
图片来源于Seata 是什么
三、Server(TC)
1、启动参数
1.5.0版本以前,SeataServer的启动类是seata-server模块下的io.seata.server.Server类。
启动参数-p 8091 -h 127.0.0.1 -m db
- p:暴露端口,用于rpc调用;
- h:暴露给注册中心的host;
- m:存储模式,db(jdbc)、file(本地文件、默认)、redis
1.5.0版本这些启动参数也都支持,区别在于启动类改为io.seata.server.ServerApplication类,在原来SeataServer的基础上,集成springboot做了个控制台。
2、配置文件
1.5.0版本以前,seata-server通过registry.conf配置注册中心和配置中心类型,如果配置中心类型为file,则读取file.conf作为seata-server的配置;
1.5.0版本,application.yml代替了registry.conf,如果配置中心类型为file,application.yml也代替了file.conf。此外1.5.0版本还提供了seata控制台功能。
下面是application.yml的示例:
# seata控制台http端口
server:
  port: 7091
# seata应用名
spring:
  application:
    name: seata-server
# seata控制台用户名密码
console:
  user:
    username: seata
    password: seata

seata:
  config:
    # support: nacos, consul, apollo, zk, etcd3
    # 配置中心类型
    type: file
  registry:
    # support: nacos, eureka, redis, zk, consul, etcd3, sofa
    # 注册中心类型
    type: file
  store:
    # support: file 、 db 、 redis
    # 存储介质,也可以通过启动参数-m指定
    mode: file
复制代码
四、Client(TM、RM)
这里使用spring-cloud-alibaba(2021.0.1.0版本)中的seata-example下的4个子模块。
整体调用时序如下:
Step1:business-service(TM)开启全局事务;
Step2:分支事务1,storage-service(RM)扣减库存;
Step3:分支事务2,account-service(RM)扣减账户余额;
Step4:分支事务3,order-service(RM)创建订单;
Step5:business-service(TM)提交或回滚全局事务;
0、改造
由于目前spring-cloud-alibaba还没提供seata1.5对应版本,所以需要对代码做一点改造。
spring-cloud-alibaba-dependencies
升级seata为1.5.0。
<seata.version>1.5.0</seata.version>
复制代码
business-service引入数据源
这里引入数据源只是为了方便启动成功。
<dependency>
    <groupId>org.springframework.boot</groupId>
    <artifactId>spring-boot-starter-jdbc</artifactId>
</dependency>

<dependency>
    <groupId>com.alibaba</groupId>
    <artifactId>druid-spring-boot-starter</artifactId>
    <version>1.1.10</version>
</dependency>
<dependency>
    <groupId>mysql</groupId>
    <artifactId>mysql-connector-java</artifactId>
    <version>8.0.16</version>
</dependency>
复制代码
application.properties配置数据源。
spring.datasource.name="businessDataSource"
spring.datasource.type=com.alibaba.druid.pool.DruidDataSource
spring.datasource.driver-class-name=com.mysql.jdbc.Driver
spring.datasource.url=jdbc:mysql://127.0.0.1:3306/seata?useSSL=false&serverTimezone=UTC
spring.datasource.username=root
spring.datasource.password=root
spring.datasource.druid.max-active=20
spring.datasource.druid.min-idle=2
spring.datasource.druid.initial-size=2
复制代码
更换事务分组配置属性
将spring.cloud.alibaba.seata.tx-service-group改为seata.tx-service-group。
1、数据库
使用AT模式,需要在每个RM连接的数据库内创建一张undo_log表,用于记录回滚快照;
xid:全局事务id;
branch_id:分支事务id;
rollback_info:回滚数据快照;
CREATE TABLE `undo_log` (
  `id` bigint(20) NOT NULL AUTO_INCREMENT,
  `branch_id` bigint(20) NOT NULL,
  `xid` varchar(100) NOT NULL,
  `context` varchar(128) NOT NULL,
  `rollback_info` longblob NOT NULL,
  `log_status` int(11) NOT NULL,
  `log_created` datetime NOT NULL,
  `log_modified` datetime NOT NULL,
  `ext` varchar(100) DEFAULT NULL,
  PRIMARY KEY (`id`),
  UNIQUE KEY `ux_undo_log` (`xid`,`branch_id`)
) ENGINE=InnoDB DEFAULT CHARSET=utf8;
复制代码
2、pom
seata通常是依附于spring-cloud而存在的,客户端使用要加入依赖。对于seata客户端来说,他可能是TM角色也可能是RM角色,两个不同角色的依赖都是一致的。
<dependency>
    <groupId>com.alibaba.cloud</groupId>
    <artifactId>spring-cloud-starter-alibaba-seata</artifactId>
</dependency>
复制代码spring-cloud-starter-alibaba-seata模块自动配置了rpc调用时通用的一些拦截器,用于跨进程传递全局事务信息。
org.springframework.boot.autoconfigure.EnableAutoConfiguration=\
com.alibaba.cloud.seata.rest.SeataRestTemplateAutoConfiguration,\
com.alibaba.cloud.seata.web.SeataHandlerInterceptorConfiguration,\
com.alibaba.cloud.seata.feign.SeataFeignClientAutoConfiguration
复制代码- SeataRestTemplateAutoConfiguration:对于RestTemplate的支持,客户端将全局事务信息放入http请求中,传递给服务端;
- SeataFeignClientAutoConfiguration:与SeataRestTemplateAutoConfiguration类似,无非是客户端使用feign;
- SeataHandlerInterceptorConfiguration:服务端从http请求中获取全局事务信息;
spring-cloud-starter-alibaba-seata依赖了seata-spring-boot-starter,提供seata客户端的自动配置。
org.springframework.boot.autoconfigure.EnableAutoConfiguration=\
io.seata.spring.boot.autoconfigure.SeataDataSourceAutoConfiguration,\
io.seata.spring.boot.autoconfigure.SeataAutoConfiguration,\
io.seata.spring.boot.autoconfigure.HttpAutoConfiguration,\
io.seata.spring.boot.autoconfigure.SeataSagaAutoConfiguration
复制代码- SeataAutoConfiguration:注入GlobalTransactionScanner为@TwoPhaseBusinessAction、@GlobalLock、@GlobalTransactional注解的方法所在的类,自动创建代理;注入FailureHandler处理全局事务处理异常,如begin、commit、rollback异常;
- SeataDataSourceAutoConfiguration:注入SeataAutoDataSourceProxyCreator为DataSource创建代理;
此外seata-spring-boot-starter依赖seata-spring-autoconfigure-client注入一些properties配置。
3、配置
TM和RM配置Seata,主要是配置Seata集群的地址,即TC的地址。
Seata并没有简单采取配置TC集群地址的方式来配置,而是多了事务分组的概念,官方是这样解释事务分组的作用的。
这里多了一层获取事务分组到映射集群的配置。这样设计后,事务分组可以作为资源的逻辑隔离单位,出现某集群故障时可以快速failover,只切换对应分组,可以把故障缩减到服务级别,但前提也是你有足够server集群。
也就是说,比如一个应用原来seata.service.vgroup-mapping指向TC集群A,当TC集群A出现网络故障时,只需要将TC集群切换为B就能快速实现故障转移。
# 事务分组tx-service-group = business-service ->
# TC集群逻辑名称service.vgroup-mapping.business-service = default ->
# 根据seata.registry.type不同,获取TC集群名称对应节点列表
# 使用file的情况取seata.service.grouplist.[TC集群逻辑名称=default]
seata.tx-service-group=business-service
seata.service.vgroup-mapping.business-service=default
## Seata注册中心使用Nacos
#seata.registry.type=nacos      ---------------> 使用nacos作为注册中心
#seata.registry.nacos.server-addr=127.0.0.1:8848 ---------------> nacos注册中心IP:端口
#seata.registry.nacos.application=seata-server     ---------------> Seata服务名(应与seata-server实际注册的服务名一致)
#seata.registry.nacos.group=SEATA_GROUP            ---------------> Seata分组名(应与seata-server实际注册的分组名一致)
## Seata注册中心使用file
seata.registry.type=file
seata.service.grouplist.default=127.0.0.1:8091
复制代码
1)公共配置项:
seata.tx-service-group:为当前应用定义一个事务分组;
seata.service.vgroup-mapping.[事务分组]:指定事务分组对应的TC集群名称;
seata.registry.type:指定注册中心类型;
2)当注册中心使用file作为注册中心时,配置TC集群节点:
seata.service.grouplist.[TC集群名称] = TC集群列表;
3)当seata-server使用Nacos作为注册中心时,配置Nacos相关内容:
seata.registry.nacos.server-addr:Nacos集群地址;
seata.registry.nacos.group:对应seata-server的registry.conf中向Nacos注册的group;
seata.registry.nacos.application:对应seata-server的registry.conf中向Nacos注册的application;
4、代码
在AT模式下,RM角色不需要调用seata相关api,TM角色需要通过@GlobalTransactional注解开启全局事务。
@GlobalTransactional(timeoutMills = 300000, name = "spring-cloud-demo-tx")
@GetMapping(value = "/seata/feign", produces = "application/json")
public String feign() {

    String result = storageService.storage(COMMODITY_CODE, ORDER_COUNT);

    if (!SUCCESS.equals(result)) {
        throw new RuntimeException();
    }

    result = orderService.order(USER_ID, COMMODITY_CODE, ORDER_COUNT);

    if (!SUCCESS.equals(result)) {
        throw new RuntimeException();
    }

    return SUCCESS;

}
复制代码