1.简介
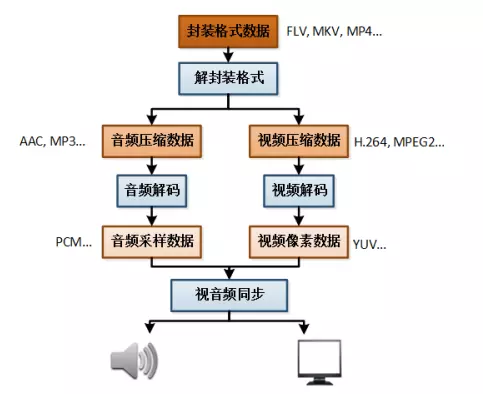
编码视频数据,如下图所示,将原始的YUV数据编码为H.264或者H.265。
2.流程
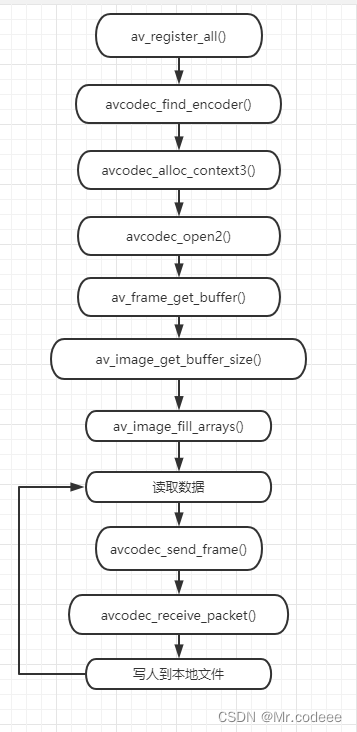
2.1在使用FFmpeg API之前,需要先注册API,然后才能使用API。当然,新版本的库不需要再调用下面的方法。
av_register_all()2.2查找编码器,本例演示编码H.264
    AVCodec* codec = nullptr;

	//找到编码器
	codec = avcodec_find_encoder(AV_CODEC_ID_H264);
	if (!codec)
	{
		fprintf(stderr, "Codec not found\n");
		exit(1);
	}
2.3申请AVCodecContext
    //申请AVCodecContext
    AVCodecContext* codec_ctx = nullptr;
	codec_ctx = avcodec_alloc_context3(codec);
	if (!codec_ctx)
	{
		fprintf(stderr, "Could not allocate audio codec context\n");
		exit(1);
	}
2.4设置视频参数
比如设置视频的宽、高、fps、码率等等
	codec_ctx->bit_rate = 2581504;	//码率 清晰度有关
	codec_ctx->width = 1920;
	codec_ctx->height = 1012;

	AVRational time_base = { 1, 25 };
	AVRational framerate = { 25, 1 };

	codec_ctx->time_base = time_base;
	codec_ctx->framerate = framerate;
	codec_ctx->gop_size = 10;
	codec_ctx->max_b_frames = 1;
	codec_ctx->pix_fmt = AV_PIX_FMT_YUV420P;
2.5打开编码器
	//打开编码器
	if (avcodec_open2(codec_ctx, codec, NULL) < 0)
	{
		fprintf(stderr, "Could not open codec\n");
		exit(1);
	}
2.6设置视频帧的参数
格式、宽、高等。
	AVFrame *frame = av_frame_alloc();
	if (!frame)
	{
		fprintf(stderr, "Could not allocate audio frame\n");
		exit(1);
	}

	frame->format = codec_ctx->pix_fmt;
	frame->width = codec_ctx->width;
	frame->height = codec_ctx->height;
2.7为frame分配空间
	/* allocate the data buffers */
	int ret = av_frame_get_buffer(frame, 0);
	if (ret < 0)
	{
		fprintf(stderr, "Could not allocate audio data buffers\n");
		exit(1);
	}
2.8获取frame的buffer大小,分配一个buffer
	int bufferSize = av_image_get_buffer_size(AV_PIX_FMT_YUV420P,
                frame->width, frame->height, 1);
	uint8_t* buffer = (uint8_t*)av_malloc(bufferSize);
2.9将frame的数据指针指向申请好的buffer,后面只需要操作buffer就行了。
	ret = av_image_fill_arrays(frame->data, frame->linesize,
                    buffer, AV_PIX_FMT_YUV420P, 1920, 1012, 1);
	if (ret < 0)
	{
		exit(1);
	}
2.10读取数据,开始编码
	//打开输出的文件
	char fileName[20] = "output.h264";
	FILE* f = fopen(fileName, "wb");
	if (!f)
	{
		fprintf(stderr, "Could not open %s\n", fileName);
		exit(1);
	}


    //打开输入文件
	char inputFile[20] = {0};

	for(int i=1;i<256;i++)
	{
		sprintf(inputFile, "img/%d.yuv", i);

		FILE* fp = fopen(inputFile, "rb");
		if (!fp)
		{
			fprintf(stderr, "Could not open %s\n", inputFile);
			exit(1);
		}

		//从文件读取数据
		int count = fread(buffer, sizeof(char), bufferSize, fp);

		fclose(fp);

		frame->pts = i;

		//开始编码
		ret = avcodec_send_frame(codec_ctx, frame);

		while (ret >= 0)
		{
			ret = avcodec_receive_packet(codec_ctx, pkt);
			if (ret == AVERROR(EAGAIN) || ret == AVERROR_EOF)
			{
				break;
			}
			else if (ret < 0)
			{
				break;
			}


			//编码后的数据写到本地文件
			fwrite(pkt->data, 1, pkt->size, f);
			av_packet_unref(pkt);
		}
	}

	fclose(f);
3.视频解码为YUV
我在下文中将H.264的数据解码之后,保存了几百帧的YUV数据到本地。
FFmpeg 视频解码(秒懂)_Mr.codeee的博客-CSDN博客
4.源码
将3中的几百帧YUV数据进行编码得到H.264。
#include "pch.h"
#include <iostream>

extern "C"
{
#include "libavformat/avformat.h"
#include "libavutil/dict.h"
#include "libavutil/opt.h"
#include "libavutil/timestamp.h"
#include "libswscale/swscale.h"
#include "libswresample/swresample.h"
#include "libavutil/imgutils.h"
};


int main()
{
	//av_register_all();
	avformat_network_init();

    AVCodec* codec = nullptr;

	//找到编码器
	codec = avcodec_find_encoder(AV_CODEC_ID_H264);
	if (!codec)
	{
		fprintf(stderr, "Codec not found\n");
		exit(1);
	}

    //申请AVCodecContext
    AVCodecContext* codec_ctx = nullptr;
	codec_ctx = avcodec_alloc_context3(codec);
	if (!codec_ctx)
	{
		fprintf(stderr, "Could not allocate audio codec context\n");
		exit(1);
	}

	codec_ctx->bit_rate = 2581504;	//码率 清晰度有关
	codec_ctx->width = 1920;
	codec_ctx->height = 1012;

	AVRational time_base = { 1, 25 };
	AVRational framerate = { 25, 1 };

	codec_ctx->time_base = time_base;
	codec_ctx->framerate = framerate;
	codec_ctx->gop_size = 10;
	codec_ctx->max_b_frames = 1;
	codec_ctx->pix_fmt = AV_PIX_FMT_YUV420P;

	//打开编码器
	if (avcodec_open2(codec_ctx, codec, NULL) < 0)
	{
		fprintf(stderr, "Could not open codec\n");
		exit(1);
	}

	AVPacket *pkt = av_packet_alloc();
	if (!pkt)
	{
		fprintf(stderr, "could not allocate the packet\n");
		exit(1);
	}

	AVFrame *frame = av_frame_alloc();
	if (!frame)
	{
		fprintf(stderr, "Could not allocate audio frame\n");
		exit(1);
	}

	frame->format = codec_ctx->pix_fmt;
	frame->width = codec_ctx->width;
	frame->height = codec_ctx->height;

	/* allocate the data buffers */
	int ret = av_frame_get_buffer(frame, 0);
	if (ret < 0)
	{
		fprintf(stderr, "Could not allocate audio data buffers\n");
		exit(1);
	}

	//打开输出的文件
	char fileName[20] = "output.h264";
	FILE* f = fopen(fileName, "wb");
	if (!f)
	{
		fprintf(stderr, "Could not open %s\n", fileName);
		exit(1);
	}

	int bufferSize = av_image_get_buffer_size(AV_PIX_FMT_YUV420P, frame->width, frame->height, 1);
	uint8_t* buffer = (uint8_t*)av_malloc(bufferSize);

	ret = av_image_fill_arrays(frame->data, frame->linesize, buffer, AV_PIX_FMT_YUV420P, 1920, 1012, 1);
	if (ret < 0)
	{
		exit(1);
	}

	//打开输入文件
	char inputFile[20] = {0};

	for(int i=1;i<256;i++)
	{
		sprintf(inputFile, "img/%d.yuv", i);

		FILE* fp = fopen(inputFile, "rb");
		if (!fp)
		{
			fprintf(stderr, "Could not open %s\n", inputFile);
			exit(1);
		}

		//从文件读取数据
		int count = fread(buffer, sizeof(char), bufferSize, fp);

		fclose(fp);

		frame->pts = i;

		//开始编码
		ret = avcodec_send_frame(codec_ctx, frame);

		while (ret >= 0)
		{
			ret = avcodec_receive_packet(codec_ctx, pkt);
			if (ret == AVERROR(EAGAIN) || ret == AVERROR_EOF)
			{
				break;
			}
			else if (ret < 0)
			{
				break;
			}


			//编码后的数据写到本地文件
			fwrite(pkt->data, 1, pkt->size, f);
			av_packet_unref(pkt);
		}
	}

	fclose(f);

	av_free(buffer);
	avcodec_close(codec_ctx);
	avcodec_free_context(&codec_ctx);
	av_frame_free(&frame);
	av_packet_free(&pkt);


    return 0;
}