RT-thread应用讲解——FLASH分区
目录
前言
因为单片机的存储比较小,所以我们经常会用到外置FLASH来存储一些文件、数据或者OTA等。如果一个FLASH只用来做单一的功能,那只需要把所有内存都分配到这个功能上就行了,但是如果要用一个FLASH同时做多个功能,比如我用一部分内存来做文件系统,一部分用来存OTA升级固件,那在操作内存的时候就要注意地址的分配了,为了方便内存管理,我们通常会进行分区处理。
RT-thread系统就有分区和内存管理相关的软件包,这一点还是很方便的。
FAL软件包:http://packages.rt-thread.org/detail.html?package=fal
FAL软件包可以用于片内flash也可以用于片外flash,我这一讲主要介绍片外flash的使用。
一、挂载FLASH
首先我们要把这个片外flash挂载上。这个我之前的教程已经介绍过了,不知道的同学可以先看下我之前的博客。
RT-thread应用讲解——norflash
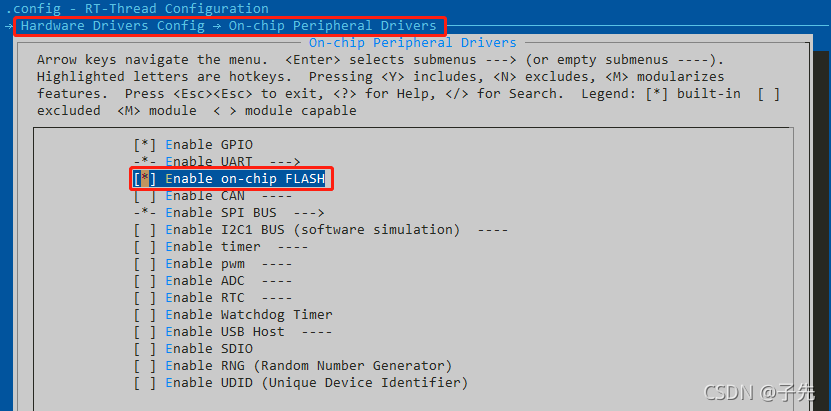
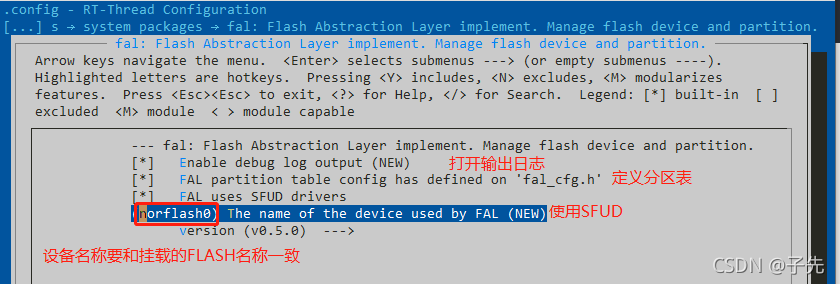
二、ENV配置
1、打开on-chip flash
2、打开FAL软件包
3、重新生成工程
设置完之后保存退出,然后重新生成工程即可。
在env输入下面的命令,重新生成新的工程。
提示:会使用env的话应该都知道这个操作,不多说了。
scons --target=mdk5
三、分区处理
1、定义flash设备表
打开fal_cfg.h文件(在board\ports文件夹里面),找到flash设备的定义,增加片外flash的定义。
注意:fal软件包里面也会有一个fal_cfg.h文件,这个只是demo,默认是不加入到工程里面的,也不会起作用。
定义flash设备表示例代码如下:
extern const struct fal_flash_dev stm32_onchip_flash_16k;
extern const struct fal_flash_dev stm32_onchip_flash_64k;
extern const struct fal_flash_dev stm32_onchip_flash_128k;
extern struct fal_flash_dev nor_flash0;

/* flash device table */
#define FAL_FLASH_DEV_TABLE                                          \
{

                                                                          \
    &stm32_onchip_flash_16k,                                         \
    &stm32_onchip_flash_64k,                                         \
    &stm32_onchip_flash_128k,                                        \
    &nor_flash0,                                                     \
}

2、定义flash分区表
同样是在fal_cfg.h文件里面,根据自己的需要定义分区表。
示例代码如下:
/* ====================== Partition Configuration ========================== */
#ifdef FAL_PART_HAS_TABLE_CFG

/* partition table */
#define FAL_PART_TABLE                                                               \
{

                                                                                          \
    {

      FAL_PART_MAGIC_WROD, "bootload", "onchip_flash_16k", 0 * 1024, 128 * 1024, 0},  \
    {

      FAL_PART_MAGIC_WROD, "app", "onchip_flash_128k", 0 * 1024, 384 * 1024, 0},      \
    {

      FAL_PART_MAGIC_WROD, "download", "norflash0", 0 * 1024, 256 * 1024, 0},         \
    {

      FAL_PART_MAGIC_WROD, "factory", "norflash0", 256 * 1024, 384 * 1024, 0},        \
    {

      FAL_PART_MAGIC_WROD, "easyflash", "norflash0", 640 * 1024, 128 * 1024, 0},      \
    {

      FAL_PART_MAGIC_WROD, "cmb_log", "norflash0", 768* 1024, 128 * 1024, 0},         \
    {

      FAL_PART_MAGIC_WROD, "filesystem", "norflash0", 896 * 1024, 15488 * 1024, 0},   \
}

#endif /* FAL_PART_HAS_TABLE_CFG */
#endif /* _FAL_CFG_H_ */
上面这个分区表详细描述信息如下:
| 分区名 | FLASH设备名 | 偏移地址 | 内存大小 | 说明 |
|---|---|---|---|---|
| “bootload” | “onchip_flash_16k” | 0 | 128 * 1024 字节 | bootload引导程序 |
| “app” | “onchip_flash_128k” | 0 | 384 * 1024 字节 | 应用程序 |
| “download” | “norflash0” | 0 | 256 * 1024 字节 | OTA升级固件 |
| “factory” | “norflash0” | 256 * 1024 | 384 * 1024 字节 | 恢复出厂固件 |
| “cmb_log” | “norflash0” | 640 * 1024 | 128 * 1024 字节 | 运行日志 |
| “filesystem” | “norflash0” | 896 * 1024 | 15488 * 1024 字节 | 文件系统 |
提示:FLASH设备名要根据实际情况来写,比如onchip_flash_16k和onchip_flash_128k是默认的一个定义(在drv_flash_f4.c文件),stm32_onchip_flash_16k指定的起始地址就是stm32f4系列rom的起始地址,onchip_flash_128k则是从128k偏移开始的,如果这几个定义不满足你的需求可以自己在drv_flash_f4.c文件再定义一个。
最后贴一个fal_cfg.h文件完整的代码:
/*
 * Copyright (c) 2006-2018, RT-Thread Development Team
 *
 * SPDX-License-Identifier: Apache-2.0
 *
 * Change Logs:
 * Date           Author       Notes
 * 2018-12-5      SummerGift   first version
 */

#ifndef _FAL_CFG_H_
#define _FAL_CFG_H_

#include <rtthread.h>
#include <board.h>

#define FLASH_SIZE_GRANULARITY_16K   (4 * 16 * 1024)
#define FLASH_SIZE_GRANULARITY_64K   (64 * 1024)
#define FLASH_SIZE_GRANULARITY_128K  (7 * 128 * 1024)

#define STM32_FLASH_START_ADRESS_16K  STM32_FLASH_START_ADRESS
#define STM32_FLASH_START_ADRESS_64K  (STM32_FLASH_START_ADRESS_16K + FLASH_SIZE_GRANULARITY_16K)
#define STM32_FLASH_START_ADRESS_128K (STM32_FLASH_START_ADRESS_64K + FLASH_SIZE_GRANULARITY_64K)

extern const struct fal_flash_dev stm32_onchip_flash_16k;
extern const struct fal_flash_dev stm32_onchip_flash_64k;
extern const struct fal_flash_dev stm32_onchip_flash_128k;
extern struct fal_flash_dev nor_flash0;

/* flash device table */
#define FAL_FLASH_DEV_TABLE                                          \
{

                                                                          \
    &stm32_onchip_flash_16k,                                         \
    &stm32_onchip_flash_64k,                                         \
    &stm32_onchip_flash_128k,                                        \
    &nor_flash0,                                                     \
}
/* ====================== Partition Configuration ========================== */
 #ifdef FAL_PART_HAS_TABLE_CFG

/* partition table */
#define FAL_PART_TABLE                                                               \
{

                                                                                          \
    {

      FAL_PART_MAGIC_WROD, "bootload", "onchip_flash_16k", 0 * 1024, 128 * 1024, 0},  \
    {

      FAL_PART_MAGIC_WROD, "app", "onchip_flash_128k", 0 * 1024, 384 * 1024, 0},      \
    {

      FAL_PART_MAGIC_WROD, "download", "norflash0", 0 * 1024, 256 * 1024, 0},         \
    {

      FAL_PART_MAGIC_WROD, "factory", "norflash0", 256 * 1024, 384 * 1024, 0},        \
    {

      FAL_PART_MAGIC_WROD, "easyflash", "norflash0", 640 * 1024, 128 * 1024, 0},      \
    {

      FAL_PART_MAGIC_WROD, "cmb_log", "norflash0", 768* 1024, 128 * 1024, 0},         \
    {

      FAL_PART_MAGIC_WROD, "filesystem", "norflash0", 896 * 1024, 15488 * 1024, 0},   \
}

#endif /* FAL_PART_HAS_TABLE_CFG */
#endif /* _FAL_CFG_H_ */
3、FAL初始化
在你的工程里面调用fal_init()函数,比如我这里是在main函数里面调用的(放其他位置也是可以的,只要调用了就行)。
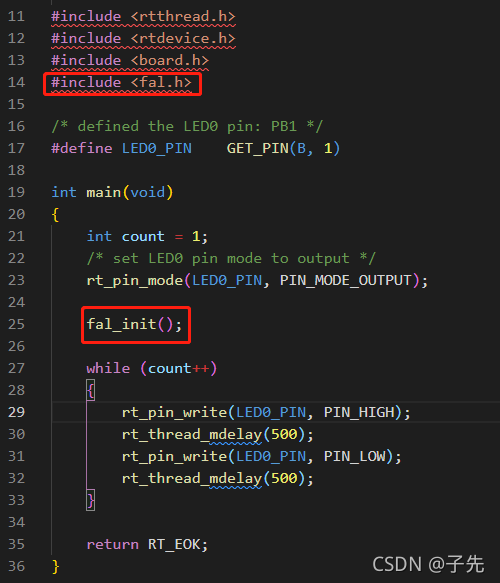
提示:调用fal_init()函数之前要先包含fal.h这个头文件,不然就找不到这个函数了。
四、运行测试
正常运行的日志如下:
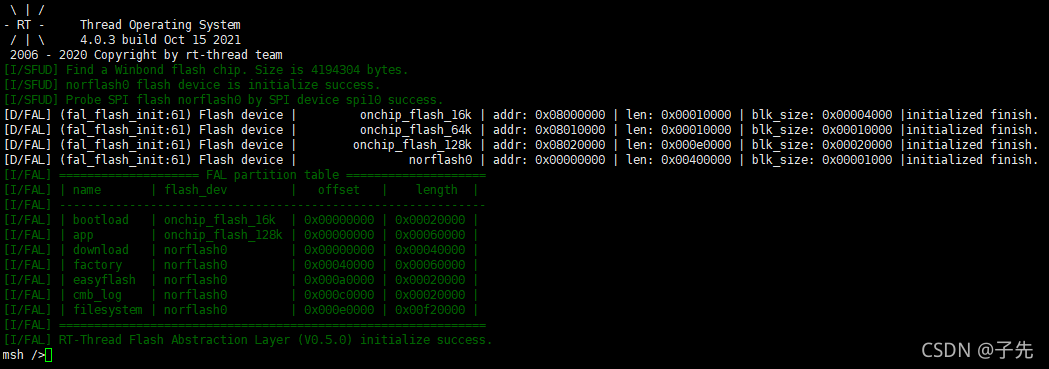
可以通过输出的日志再次核对你的分区是否有误。
fal本身就提供了一些测试命令,可以通过msh命令完成测试。
具体的命令可以输入fal查看。

关于这些测试的命令,我这里就简单地列一下,FAL软件包官方的介绍里面已经有详细的解析了,可以自行查阅。
FAL软件包:http://packages.rt-thread.org/detail.html?package=fal
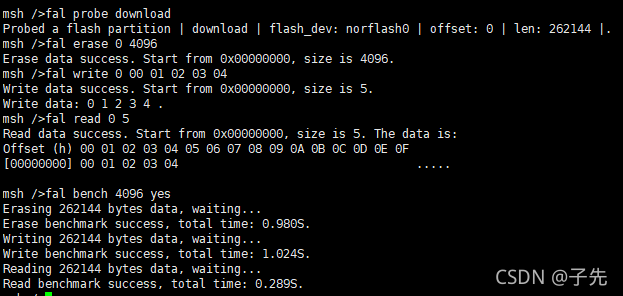
1、指定待操作的Flash设备或Flash分区
示例如下:
fal probe download
2、擦除数据
示例如下:
fal erase 0 4096
3、写入数据
示例如下:
fal write 0 00 01 02 03 04
4、读取数据
示例如下:
fal read 0 5
5、性能测试
性能测试将会测试Flash的擦除、写入及读取速度,同时将会测试写入及读取数据的准确性,保证整个 Flash 或整个分区的 写入与读取数据的一致性。
示例如下:
fal bench 4096 yes
最后贴一个完整的测试示例:
五、结束语
好了,关于FLASH分区的介绍就到这里,如果还有什么问题,欢迎在评论区留言。如果这篇文章能够帮到你,就给我点个赞吧,如果想了解更多RT-thread和单片机的内容,可以关注一下博主,后续我还会继续分享更多的经验给大家。
教程相关源码:
https://pan.baidu.com/s/1N2D8dM31deKIqNqaIQfPiA
提取码:7nsx
RT-thread相关教程汇总:https://blog.csdn.net/ShenZhen_zixian/article/details/120563891