其实关于c++还有一个STL的内容,由于比较繁多,我后面来更,今天我们说界面开发,
当然学东西我们不能只学怎么用,直接去学函数和参数,我们应该了解本质。
现在我们开始说今天的内容。
一.图形显示原理
1.像素点,分辨率,RGB,透明度,显存...
二.Linux上如何编程显示器
linux帧缓存(frambuffer)
编程:其实就是操作/dev/fb*文件
举个例子,如何画点,横线,竖线
#include <stdio.h>
#include <sys/types.h>
#include <sys/stat.h>
#include <fcntl.h>
#include <sys/mman.h>
#include <sys/types.h>
#include <sys/stat.h>
#include <fcntl.h>
#include <sys/ioctl.h>
#include <errno.h>
#include <stdio.h>
#include <linux/fb.h>
#include <sys/mman.h>
#include <time.h>
#include <sys/time.h>
#include <string.h>
#include <stdlib.h>
int main(int argc, char *argv[])
{
int ret ;
struct fb_var_screeninfo fbi_var;//定义可变参数
struct fb_fix_screeninfo fbi_fix;//定义固定参数
struct fb_cmap cmap;
//打开屏幕设备
int fd = open("/dev/fb0",O_RDWR);
if(fd < 0){
perror("open");
close(fd);
}
//得到虚拟屏幕参数
ret = ioctl(fd,FBIOGET_VSCREENINFO,&fbi_var);
if(ret < 0){
perror("ioctl");
return NULL;
}
3. QT是什么
一堆可用于图形界面开发的C++类库
4. QT环境的安装(QT IDE)
1. QT类库
2. 编程编译环境
printf("fbi.var.xres:%u ,fbi.var.yres:%u ,var.bpp:%d\n",fbi_var.xres
,fbi_var.yres,fbi_var.bits_per_pixel);
printf("fbi.var.xoffset:%u ,fbi.var.yoffset:%u\n",fbi_var.xoffset
,fbi_var.yoffset);
//得到实际屏幕参数
ret = ioctl(fd,FBIOGET_FSCREENINFO,&fbi_fix);
if(ret < 0){
perror("ioctl");
return NULL;
}
printf("fbi.fix.smem_start:%lu
,fbi.fix.smem_len:%u\n",fbi_fix.smem_start ,fbi_fix.smem_len);
printf("line_length: %u\n",fbi_fix.line_length);
//获取显存起始地址
int *addr =
mmap(NULL,fbi_fix.smem_len,PROT_READ|PROT_WRITE,MAP_SHARED,fd,0);
if(addr == NULL){
perror("mmap");
ret = munmap(addr,fbi_fix.smem_len);
return NULL;
}
//画竖线
int i = 100;
while(i--)
{
*addr = 0xff00ff00;
addr += 2048; //(得到下一行像素点的显存地址)
}
/*
//画横线
int i = 2048+400;
while(i--)
{
*addr = 0xffff0000;
addr++;
}
*/
close(fd);
return 0;
}
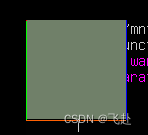
效果图
这个图不是上面的代码,却是改来的,为了看着更清晰
那说到这里,我们怎么去实现我们想要的图形呢?
大家可以看出一个一个去操控点,线,面是很麻烦的,这里要感谢外国的两个大学生,他们用一个假期,用c++封装了大量的库供后面人使用,所以 现在我们来进入今天的内容 QT。
三.QT是什么?
一堆可用于图形开发的c++库
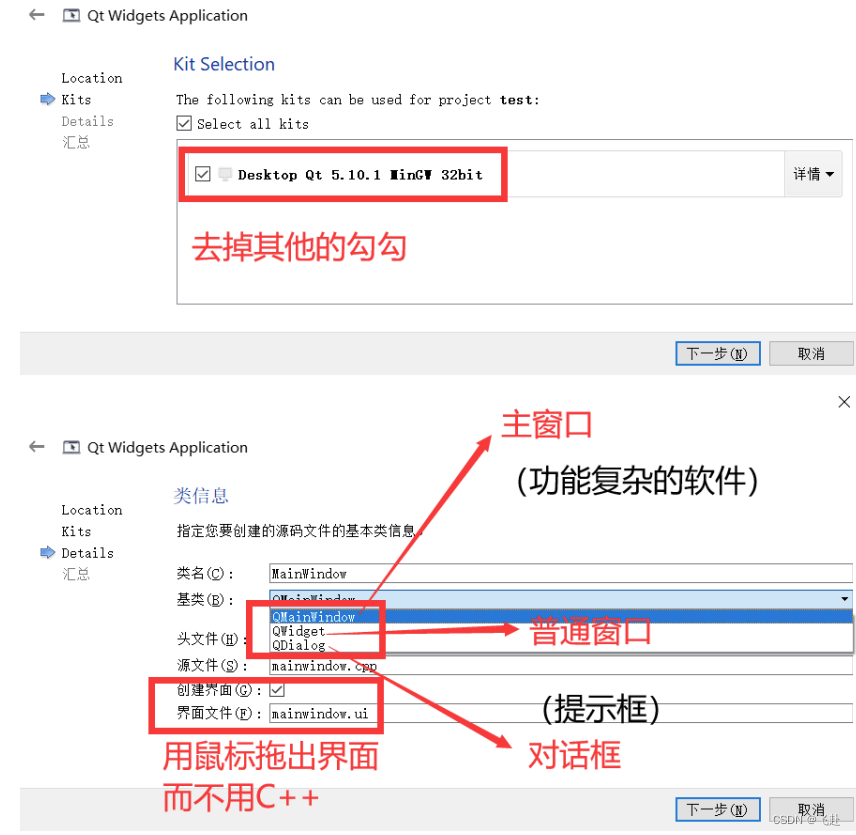
四.QT的安装环境
1. QT类库
2. 编程编译环境
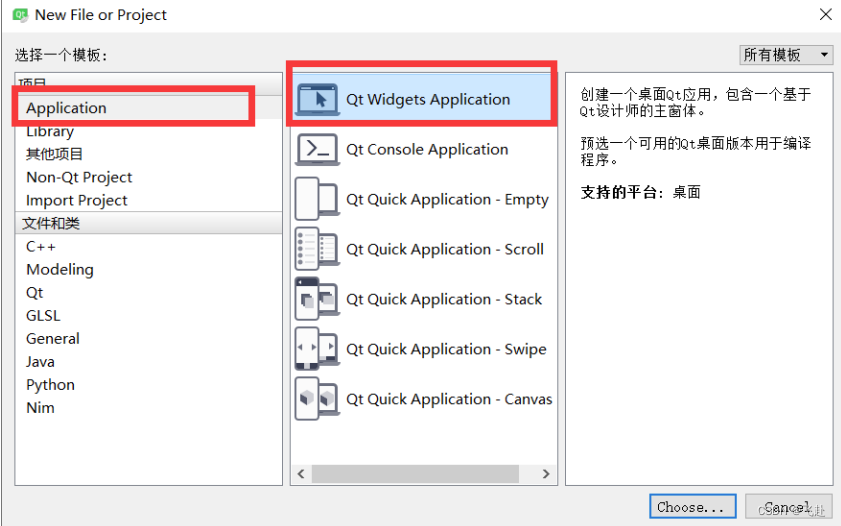
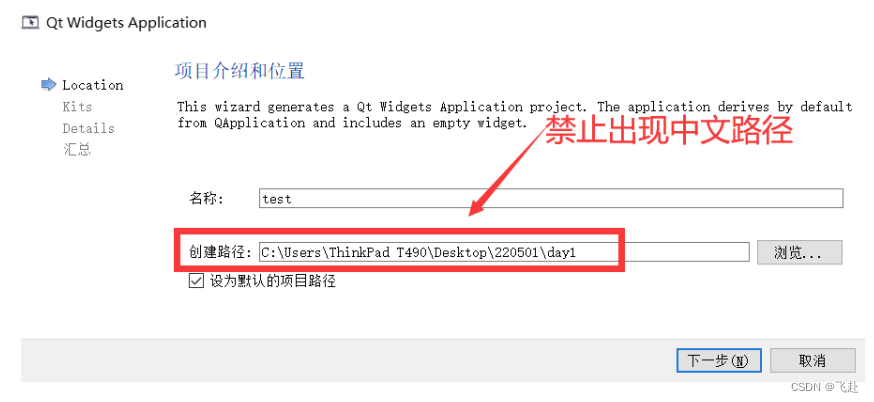
3. 创建工程
五.必要的补充
1. QPushButton 和 QLineEdit
#include "widget.h"

Widget::Widget(QWidget *parent)
    : QWidget(parent)
{
    //2. 将控件真正的new出来
    //将按钮new出来
    bt = new QPushButton;
    bt->setText("登录");
    //bt->show();
    bt->setParent(this);

    le = new QLineEdit;
    le->setParent(this);

    //3. 排版
    le->setGeometry(10, 10, 200, 30);
    bt->setGeometry(100, 100, 100, 50);

    //4. 前后台功能挂接(信号与槽)
    /*按钮发出点击信号的时候,当前界面请关闭*/
    //connect(bt, SIGNAL(clicked(bool)), this, SLOT(close()));
    connect(bt, SIGNAL(clicked(bool)), this, SLOT(le_to_Uper()));
}

Widget::~Widget()
{

}
#ifndef WIDGET_H
#define WIDGET_H

#include <QWidget>
#include <QPushButton>
#include <QLineEdit>

class Widget : public QWidget
{
    Q_OBJECT
//申明槽函数: 此函数未来可以直接调用 也可以  用信号绑定调用
public slots:
    void le_to_Uper()
    {
        QString str = le->text();  //提取文字
        str = str.toUpper(); //文字小写变大写
        le->setText(str); //显示文字
    }

public:
    Widget(QWidget *parent = 0);
    ~Widget();

private:
    //1. 申明自己界面上想要的“子部件”
    //希望界面上有个“按钮”
    QPushButton *bt;
    //希望界面上有一个 行输入框
    QLineEdit *le;
};

#endif // WIDGET_H
#include "widget.h"
#include <QApplication>

int main(int argc, char *argv[])
{
    QApplication a(argc, argv);
    Widget w;
    w.show();

    return a.exec();
}
2.布局
#include "widget.h"
#include <QDebug>

Widget::Widget(QWidget *parent)
    : QWidget(parent)
{
    bt = new QPushButton;
    bt->setParent(this); //设置父控件:回收和显示和父一起了
    bt->setText("登录");  //设置按钮上的文字
    QString str = bt->text(); //提取按钮上的文字
    qDebug()<<str;
    bt->setGeometry(100, 100, 100, 50); //强制设置 控/部件 位置
    bt->setFixedSize(10, 10);//设置固定大小
    bt->setMinimumSize(10, 10);//设置最小大小
    bt->setMaximumSize(10, 10);//设置最大大小

    le = new QLineEdit;
    le->setParent(this);
    le->setText("xxxxxx");
    str = le->text(); //提取按钮上的文字
    qDebug()<<str;
    le->setGeometry(100, 200, 100, 50); //强制设置 控/部件 位置
    le->setEchoMode(QLineEdit::Password); //设置回显方式
    le->setAlignment(Qt::AlignRight); //设置对其方式
    le->setFixedSize(10, 10);//设置固定大小
    le->setMinimumSize(10, 10);//设置最小大小
    le->setMaximumSize(10, 10);//设置最大大小
}

Widget::~Widget()
{

}
#ifndef WIDGET_H
#define WIDGET_H

#include <QWidget>
#include <QPushButton>
#include <QLineEdit>

class Widget : public QWidget
{
    Q_OBJECT

public:
    Widget(QWidget *parent = 0);
    ~Widget();

    //申明需要按钮
    QPushButton *bt;

    //申明需要行编辑框(输入框)
    QLineEdit *le;
};

#endif // WIDGET_H
#include "widget.h"
#include <QApplication>

int main(int argc, char *argv[])
{
    QApplication a(argc, argv);
    Widget w;
    w.show();

    return a.exec();
}
3.QString
#include "widget.h"
#include <QVBoxLayout>

Widget::Widget(QWidget *parent)
    : QWidget(parent)
{
    bt = new QPushButton("1");
    bt1 = new QPushButton("2");
    le = new QLineEdit;

    QVBoxLayout *vbox = new QVBoxLayout;
    vbox->addWidget(le);
    vbox->addWidget(bt);
    vbox->addWidget(bt1);
    setLayout(vbox);

    connect(bt, SIGNAL(clicked(bool)), this, SLOT(xxx()));
    connect(bt1, SIGNAL(clicked(bool)), this, SLOT(xxx()));
}

Widget::~Widget()
{

}
#ifndef WIDGET_H
#define WIDGET_H
#include <QWidget>
#include <QLineEdit>
#include <QPushButton>
#include <QDebug>
class Widget : public QWidget
{
Q_OBJECT
public slots:
void xxx()
{
//0.提取按钮(可能来自于任意的按钮)
QPushButton *xbt = static_cast<QPushButton*>( sender() );
//1.提取按钮的文字
QString str = xbt->text();
//2.追加显示在行编辑框
//a.提取原来的文字
QString str1 = le->text();
//b.拼接新文字
str1.append(str);
//c.重新设置回去
le->setText(str1);
int a = str1.toInt(); //字符串转整型数
qDebug()<<a;
}
public:
Widget(QWidget *parent = 0);
~Widget();
QLineEdit *le;
QPushButton *bt, *bt1;
};
#endif // WIDGET_H
#include "widget.h"
#include <QApplication>

int main(int argc, char *argv[])
{
    QApplication a(argc, argv);
    Widget w;
    w.show();

    return a.exec();
}
4.打印调试
#include "widget.h"
#include <QVBoxLayout>

Widget::Widget(QWidget *parent)
    : QWidget(parent)
{
    //构造需要的控件
    bt = new QPushButton("1");
    bt1 = new QPushButton("2");
    le = new QLineEdit;
    le->setAlignment(Qt::AlignRight);
#if 0
    //垂直布局
    QVBoxLayout *vbox = new QVBoxLayout; //构造一个布局管理器
    vbox->addWidget(le);                 //将需要布局的控件加入布局管理器
    vbox->addWidget(bt);
    this->setLayout(vbox);               //将布局管理器贴在当前界面
#endif

#if 0
    //水平布局
    QHBoxLayout *vbox = new QHBoxLayout; //构造一个布局管理器
    vbox->addWidget(le);                 //将需要布局的控件加入布局管理器
    vbox->addWidget(bt);
    this->setLayout(vbox);               //将布局管理器贴在当前界面
#endif

#if 0
    //网格布局
    QGridLayout *vbox = new QGridLayout; //构造一个布局管理器
    vbox->addWidget(le, 0, 0, 1, 2);     //将需要布局的控件加入布局管理器
    vbox->addWidget(bt, 1, 1);
    this->setLayout(vbox);               //将布局管理器贴在当前界面
#endif

    //混合布局
    QHBoxLayout *hbox = new QHBoxLayout;
    hbox->addWidget(bt);
    hbox->addWidget(bt1);
    QVBoxLayout *vbox = new QVBoxLayout;
    vbox->addWidget(le);
    vbox->addLayout(hbox);
    this->setLayout(vbox);

}

Widget::~Widget()
{

}
#ifndef WIDGET_H
#define WIDGET_H
#include <QWidget>
#include <QPushButton>
#include <QLineEdit>
class Widget : public QWidget
{
Q_OBJECT
public:
Widget(QWidget *parent = 0);
~Widget();
QPushButton *bt, *bt1;
QLineEdit *le;
};
#endif // WIDGET_H
#include "widget.h"
#include <QApplication>

int main(int argc, char *argv[])
{
    QApplication a(argc, argv);
    Widget w;
    w.show();

    return a.exec();
}