Collection接口实现的集合是每次进行单个对象的保存,与之相对的Map集合支持一组对象(偶对象)的存储,Map集合保存的一组对象对象之间的关系是Key = Value(键-值)的结构,在标准的Java类库中包含了Map的几种基本实现。HashMap,Hashtable,TreeMap,LinkedHashMap,WeakHashMap,ConcurrentHashMap,IdentityHashMap。它们的基本接口都是Map,但是它们的行为特性是各不相同的,本博客主要介绍HashMap,Hashtable,TreeMap,ConcurrentHashMap。 先看一下Map接口本身所具有的方法

1:HashMap
HashMap实现子类是Map集合中最常使用的子类。它再JDK1.8以前是(数组+链表),JDK1.8之后是(数组+链表+红黑树)(阙值8以后使用红黑树)。
如下代码示例HashMap的基本操作
        HashMap<Integer,String> hashMap2 = new HashMap<>();
        hashMap2.put(1,"A");
        hashMap2.put(2,"A");
        hashMap2.put(3,"A");
        hashMap2.put(3,"B");
        hashMap2.put(null,null);
        System.out.println(hashMap2);
HashMap的特点:(1)key值不允许重复,如果重复,则会把对应的value更新。(2)key和value都允许为null,key为空有且只能有一个。
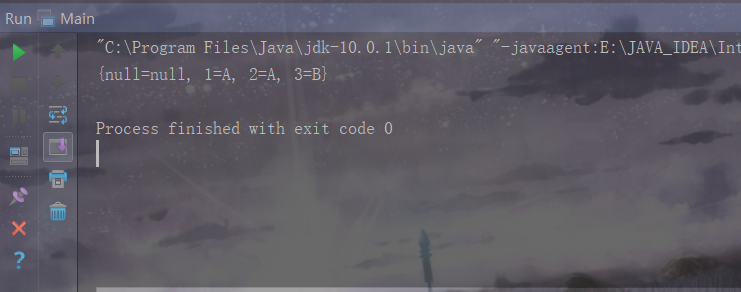
接下来示例:HashMap使用Iterator迭代输出。
        HashMap<Integer,String> hashMap2 = new HashMap<>();
        hashMap2.put(1,"A");
        hashMap2.put(2,"A");
        hashMap2.put(3,"A");
        hashMap2.put(3,"B");
        hashMap2.put(null,null);
//        System.out.println(hashMap2);
        Set<Map.Entry<Integer, String>> set =  hashMap2.entrySet();//获取Set信息
        Iterator<HashMap.Entry<Integer,String>> iterator = set.iterator();//获取Iterator对象
        while(iterator.hasNext()){//迭代输出
            System.out.println(iterator.next());
        }
Collection接口的实现子类有iterator()方法可以获取Iterator对象,但是Map接口没有此方法,现在看一下Collection和Map是如何进行数据保存的。

再Map中有一个方法可以把Map集合转化为Set集合
    public Set<Map.Entry<K,V>> entrySet() {
        Set<Map.Entry<K,V>> es;
        return (es = entrySet) == null ? (entrySet = new EntrySet()) : es;
    }
Set集合就是HashSet,它的里面是含有iterator()方法的。所以进行Iterator输出的时候使用的是间接的方法。


我们使用entrySet()方法把Map集合转化为Set集合,Set集合的父接口是Collection,含有iterator()方法。所以就可以拿到Iterator()对象来进行迭代输出。
示例:取得HashMap中Key值信息
        Set<Integer> set1 = hashMap2.keySet();
        Iterator<Integer> integer = set1.iterator();
        while(integer.hasNext()){
            System.out.println(integer.next());
        }

如果Key值是一个自定义的类对象,那么进行Key值查重的时候就需要覆写自定义类中的hashCode()方法与equals()方法。现在我举个例子来演示自定义类作为Key的时候的查重。
import java.util.*;

class Student{
    private String name;
    private Integer age;

    Student(String name, Integer age){
        this.name = name;
        this.age = age;
    }

    @Override
    public String toString() {
        return this.name+" "+this.age;
    }

    @Override
    public boolean equals(Object obj) {//覆写equals方法
        if(this == obj){
            return true;
        }
        if(obj == null){
            return false;
        }
        if(this.getClass() != obj.getClass()){
            return false;
        }
        Student student = (Student)obj;
        return Objects.equals(this.age,student.age) && Objects.equals(this.name,student.name);
    }

    @Override
    public int hashCode() {//覆写hashCode方法
        return Objects.hash(age,name);
    }

}


public class Main{
    public static void main(String[] args)throws Exception{
        HashMap<Student,String> hashMap1 = new HashMap<>();
        hashMap1.put(new Student("AAA",111),"元素一");
        hashMap1.put(new Student("AAA",111),"元素一");
        hashMap1.put(new Student("CCC",333),"元素一");
        hashMap1.put(new Student("CCC",333),"元素一");
        hashMap1.put(new Student("EEE",555),"元素一");
        System.out.println(hashMap1);

    }
}
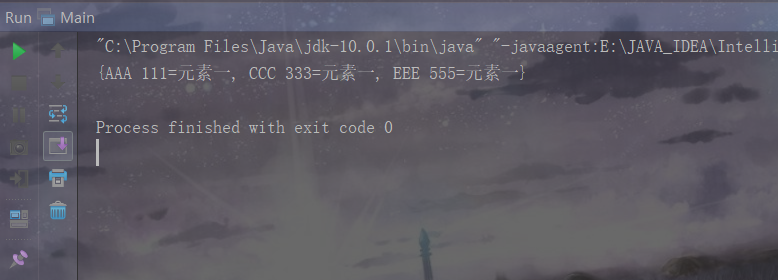
我们可以看到,覆写了Object类的equals()方法与hashCode()方法之后,HashCode的输出结果实现了去重。
2:Hashtable:
Hashtable和HashMap还是有一些不同的:
1:Hashtable中的Key和Value都不允许为空
2:Hashtable是JDK1.0就推出了,但是HashMap是JDK1.2推出的
3:HashMap采用异步操作,线程不安全,而Hashtable采用同步操作,线程安全
4:Hashtable的性能没有HashMap高
现在我们观察一下Hashtable的操作
        Hashtable<Integer,String> hashtable = new Hashtable<>();
        hashtable.put(1,"A");
        hashtable.put(1,"B");
        hashtable.put(2,"C");
        hashtable.put(2,"D");
        hashtable.put(3,"E");
        System.out.println(hashtable);

基本上的操作和HashMap类似,进行自定义类的Key输出的时候也是覆写hashCode()方法和equals()方法。
3:ConcurrentHashMap:
ConcurrentHashMap = Hashtable安全性 + HashMap高性能,既可以保证多个线程查询数据的同步,也可以保持很高效的查询速度,在ConcurrentHashMap中,不允许Key为null;
ConcurrentHashMap的高性能体现在它可以进行数据的分区操作,相比于Hashtable,它采用的不是同步方法而是更加精确的同步锁,所以在进行数据更新的时候只锁对应的区域,而其他区域的访问不受影响。
ConcurrentHashMap在锁的区域使用了读写锁(读操作异步,写操作同步),可以实现数据更高效的进行访问以及提取。
ConcurrentHashMap实现数据分桶的原理:
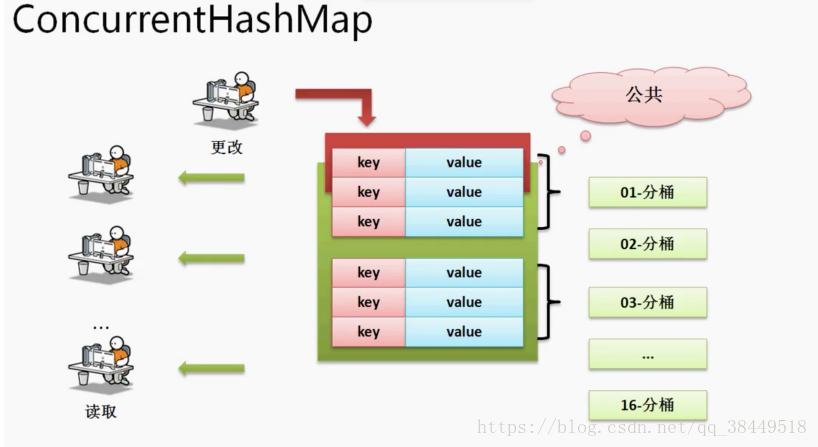
ConcurrentHashMap在进行数据更新的时候,只会锁住更新的区域,而其他区域的更新与访问不会受到影响。
4:TreeMap:
TreeMap是一个可以用来排序的子类,它是按照key值来排序的。
既然是用来排序,那么就会有一个问题,如果使用的是自定义的类对象,那么这个序应该怎么排呢?
其实实现方法和TreeSet的排序一样,只需要实现Comparable接口中的compareTo()方法就可以了。这里要注意的是:只要自定义类实现了Comparable接口,进行数据的重复判断就不依靠Object类的hashCode()方法和equals()方法了,排序的话,需要我们覆写compareTo()方法。
示例:使用自定义类对象的Key并且覆写compareTo()方法。
class Children implements Comparable<Children>{
    private Integer grade;
    private Integer classroom;


    Children(Integer grade, Integer classroom){
        this.grade = grade;
        this.classroom = classroom;
    }

    @Override
    public String toString() {
        return "年级"+this.grade+" "+"班级"+this.classroom;
    }

    @Override
    public int compareTo(Children o) {//覆写compareTo接口
        if(this.grade > o.grade){
            return 1;
        }else if(this.grade < o.grade){
            return -1;
        }else {
            return this.classroom.compareTo(o.classroom);
        }
    }
}


public class Main{
    public static void main(String[] args)throws Exception{
        TreeMap<Children,String> treeMap = new TreeMap<>();
        treeMap.put(new Children(6,1),"AAA");
        treeMap.put(new Children(5,1),"AAA");
        treeMap.put(new Children(4,1),"AAA");
        treeMap.put(new Children(3,1),"AAA");
        treeMap.put(new Children(3,1),"AAA");
        treeMap.put(new Children(2,1),"AAA");
        treeMap.put(new Children(2,1),"AAA");
        System.out.println(treeMap);
    }
}
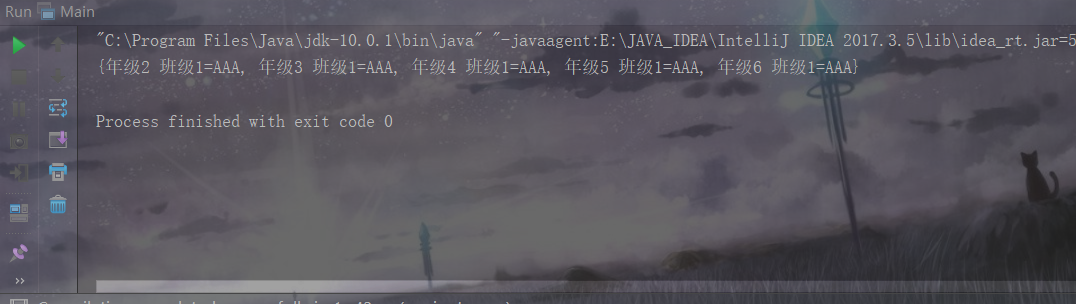
现在TreeMap不仅实现了去重的功能,而且进行了对自定义类对象的Key与String的Value进行了升序排序。
有关Map的四个实现子类的基本概念就先总结到这里,希望能对大家有所帮助。