目录
展示
博客项目
1.创建项目
1)创建 maven 项目,并添加webapp目录
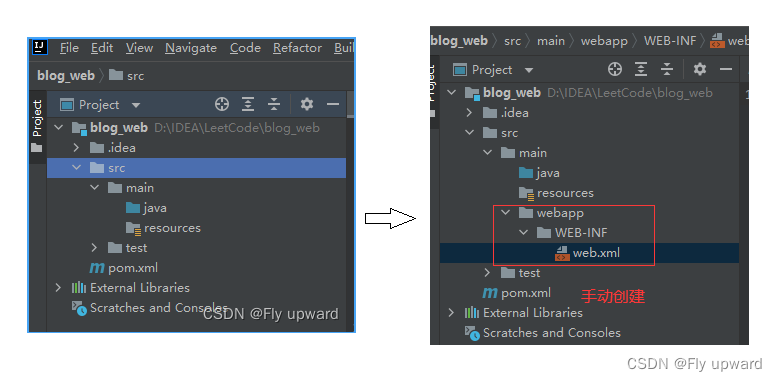
2)配置web.xml
<!DOCTYPE web-app PUBLIC
        "-//Sun Microsystems, Inc.//DTD Web Application 2.3//EN"
        "http://java.sun.com/dtd/web-app_2_3.dtd" >
<web-app>
    <display-name>Archetype Created Web Application</display-name>
</web-app>3)配置 pom.xm
<dependencies>
<!--引入servlet-->
<!-- https://mvnrepository.com/artifact/javax.servlet/javax.servlet-api -->
<dependency>
<groupId>javax.servlet</groupId>
<artifactId>javax.servlet-api</artifactId>
<version>3.1.0</version>
<scope>provided</scope>
</dependency>
<!--引入 jackson-->
<!-- https://mvnrepository.com/artifact/com.fasterxml.jackson.core/jackson-databind -->
<dependency>
<groupId>com.fasterxml.jackson.core</groupId>
<artifactId>jackson-databind</artifactId>
<version>2.12.6.1</version>
</dependency>
<!--引入 mysql-->
<!-- https://mvnrepository.com/artifact/mysql/mysql-connector-java -->
<dependency>
<groupId>mysql</groupId>
<artifactId>mysql-connector-java</artifactId>
<version>5.1.47</version>
</dependency>
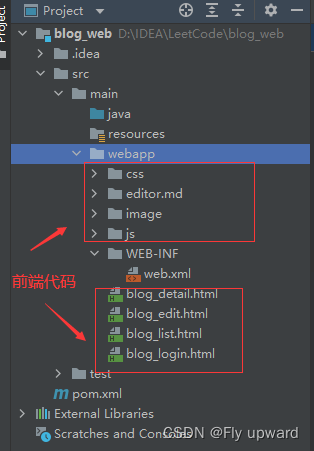
</dependencies>4)引入前端代码
将前端的代码复制到 webapp 目录下
2. 数据库设计
2.1 表设计
需要设计两张表,文章表和用户表
文章表用来存储博客文,用户表用于存储登录用户
--创建库
create database if not exists blog_web;

use blog_web;

drop table if exists blog;
--建博客表
create table blog (
    blogId int primary key auto_increment,
    title varchar(1024),
    content mediumtext,--内容,存放大量数据
    userId int,
    postTime datetime --时间
);

--插入数据
insert into blog values(null, '博客一', '认真学 C', 1, now());
insert into blog values(null, '博客二', '认真学 GO', 1, now());

--用户表
drop table if exists user;
create table user (
    userId int primary key auto_increment,--自增主键
    username varchar(128) unique, --用户唯一
    password varchar(128)
);
--用户
insert into user values(null, 'FlyUpward', '');--密码自己设
insert into user values(null, 'Fly', '');--密码自己设
将表复制到 mysql 中进行建表

2.2 封装数据库操作代码
先在Java目录下创建一个model包,用于存放数据库后端类
2.2.1 创建 DBUtil
这个类用于和数据库建立连接
package model;

import com.mysql.jdbc.jdbc2.optional.MysqlDataSource;
import javax.sql.DataSource;
import java.sql.Connection;
import java.sql.PreparedStatement;
import java.sql.ResultSet;
import java.sql.SQLException;

public class DBUtil {
    private static final String URL =  "jdbc:mysql://127.0.0.1:3306/bolg_web?characterEncoding=utf8&useSSL=false";
    private static final String USERNAME = "root";
    private static final String PASSWORD = "";//自己数据库的密码

    private static volatile DataSource dataSource = null;

    private static DataSource getDataSource() {
        if (dataSource == null) {
            synchronized (DBUtil.class) {
                if (dataSource == null) {
                    dataSource = new MysqlDataSource();
                    ((MysqlDataSource)dataSource).setUrl(URL);
                    ((MysqlDataSource)dataSource).setUser(USERNAME);
                    ((MysqlDataSource)dataSource).setPassword(PASSWORD);
                }
            }
        }
        return dataSource;
    }

    private static Connection getConnection() throws SQLException {
        return getDataSource().getConnection();
    }
    public static void close(Connection connection, PreparedStatement statement, ResultSet resultSet) {
        if (resultSet != null) {
            try {
                resultSet.close();
            } catch (SQLException e) {
                e.printStackTrace();
            }
        }
        if (statement != null) {
            try {
                statement.close();
            } catch (SQLException e) {
                e.printStackTrace();
            }
        }
        if (connection != null) {
            try {
                connection.close();
            } catch (SQLException e) {
                e.printStackTrace();
            }
        }
    }

}
2.2.2 创建实体类
实体类用于表示数据库的记录
1)Blog.java
每个 model.Blog 对象, 对应 blog 表里的一条记录
package model;

import java.sql.Timestamp;
import java.text.SimpleDateFormat;

public class Blog {
    private int blogId;
    private String title;
    private String content;
    private int UserId;
    private Timestamp postTime;

    public int getBlogId() {
        return blogId;
    }

    public void setBlogId(int blogId) {
        this.blogId = blogId;
    }

    public String getTitle() {
        return title;
    }

    public void setTitle(String title) {
        this.title = title;
    }

    public String getContent() {
        return content;
    }

    public void setContent(String content) {
        this.content = content;
    }

    public int getUserId() {
        return UserId;
    }

    public void setUserId(int userId) {
        UserId = userId;
    }

    /*public Timestamp getPostTime() {
        return postTime;
    }*/
    // 把这里的 getter 方法给改了, 不是返回一个时间戳对象, 而是返回一个 String (格式化好的时间)
    public String getPostTime() {
        // 使用 SimpleDateFormat 来完成时间戳到格式化日期时间的转换.
        // 这个转换过程, 需要在构造方法中指定要转换的格式, 然后调用 format 来进行转换
        SimpleDateFormat simpleDateFormat = new SimpleDateFormat("yyyy-MM-dd HH:mm:ss");
        return simpleDateFormat.format(postTime);
    }

    public void setPostTime(Timestamp postTime) {
        this.postTime = postTime;
    }
}
2) User.java
对于用户表里的每一条记录
package model;

public class User {
    private int userId = 0;
    private String username = "";
    private String password = "";

    public int getUserId() {
        return userId;
    }

    public void setUserId(int userId) {
        this.userId = userId;
    }

    public String getUsername() {
        return username;
    }

    public void setUsername(String username) {
        this.username = username;
    }

    public String getPassword() {
        return password;
    }

    public void setPassword(String password) {
        this.password = password;
    }
}
2.2.3 封装数据库增删改查
解 DAODAO 全称为 "data access object",主要的功能就是对于某个数据库表进行增删改查.一般每张数据库表会对应一个 DAO 类. 这是一种给类命名的习惯做法, 并不是强制要求
package model;

import java.sql.Connection;
import java.sql.PreparedStatement;
import java.sql.ResultSet;
import java.sql.SQLException;
import java.util.ArrayList;
import java.util.List;

public class BlogDao {
    //1.插入博客
    public void insert(Blog blog) {
        Connection connection = null;
        PreparedStatement statement = null;

        try {
            //1)和数据库建立连接
            connection = DBUtil.getConnection();
            //2)构造sql语句
            String sql = "insert into blog values(null,?,?,?,now())";
            statement = connection.prepareStatement(sql);
            statement.setString(1,blog.getTitle());
            statement.setString(2,blog.getContent());
            statement.setInt(3,blog.getUserId());
            //30执行SQL
            statement.executeUpdate();
        } catch (SQLException e) {
            e.printStackTrace();
        } finally {
            DBUtil.close(connection,statement,null);
        }
    }

    // 2. 能够获取到博客表中的所有博客的信息 (用于在博客列表页, 此处每篇博客不一定会获取到完整的正文)
    public List<Blog> selectAll() {
        List<Blog> blogs = new ArrayList<>();
        Connection connection = null;
        PreparedStatement statement = null;
        ResultSet resultSet = null;
        try {
            connection = DBUtil. getConnection();
            String sql = "select * from blog order by postTime desc";
            statement = connection.prepareStatement(sql);
            resultSet = statement.executeQuery();//查询
            while (resultSet.next()) {
                Blog blog = new Blog();
                blog.setBlogId(resultSet.getInt("blogId"));
                blog.setTitle(resultSet.getString("title"));
                // 这里需要针对内容进行截断(太长了, 就去掉后面)
                String content = resultSet.getString("content");
                // 这个数字具体写多少, 都可以灵活应对!!
                if (content.length() > 10) {
                    content = content.substring(0,10) + "......";
                }
                blog.setContent(content);
                blog.setUserId(resultSet.getShort("userId"));
                blog.setPostTime(resultSet.getTimestamp("postTime"));
                blogs.add(blog);
            }
        } catch (SQLException e) {
            e.printStackTrace();
        } finally {
            DBUtil.close(connection, statement, resultSet);
        }
        return blogs;
    }

    // 3. 能够根据博客 id 获取到指定的博客内容 (用于在博客详情页)
    public Blog selectOne(int blogId) {
        Connection connection = null;
        PreparedStatement statement = null;
        ResultSet resultSet = null;
        try {
            connection = DBUtil.getConnection();
            String sql = "select * from blog where blogId = ?";
            statement = connection.prepareStatement(sql);
            statement.setInt(1,blogId);
            resultSet = statement.executeQuery();
            // 此处我们是使用 主键 来作为查询条件的. 查询结果, 要么是 1 , 要么是 0.
            if (resultSet.next()) {
                Blog blog = new Blog();
                blog.setBlogId(resultSet.getInt("blogId"));
                blog.setTitle(resultSet.getString("title"));
                blog.setContent(resultSet.getString("content"));
                blog.setUserId(resultSet.getShort("userId"));
                blog.setPostTime(resultSet.getTimestamp("postTime"));
                return blog;
            }
        } catch (SQLException e) {
            e.printStackTrace();
        }finally {
            DBUtil.close(connection, statement, resultSet);
        }
        return null;
    }


    // 4. 从博客表中, 根据博客 id 删除博客.
    public void delete(int blogId) {
        Connection connection = null;
        PreparedStatement statement = null;
        try {
            connection = DBUtil.getConnection();
            String sql = "delete from blog where blogId = ?";
            statement = connection.prepareStatement(sql);
            statement.setInt(1,blogId);
            statement.executeUpdate();
        } catch (SQLException e) {
            e.printStackTrace();
        } finally {
            DBUtil.close(connection, statement, null);
        }
    }
}2)创建 UserDao 类
package model;


import java.sql.Connection;
import java.sql.PreparedStatement;
import java.sql.ResultSet;
import java.sql.SQLException;

//提供了针对用户表的基本操作
public class UserDao {

    public void insert(User user){
        Connection connection = null;
        PreparedStatement statement = null;
        try {
            connection = DBUtil.getConnection();
            String sql = "insert into user values(null,?,?)";
            statement = connection.prepareStatement(sql);
            statement.setString(1, user.getUsername());
            statement.setString(2, user.getPassword());
            statement.executeUpdate();
        } catch (SQLException throwables) {
            throwables.printStackTrace();
        }finally {
            DBUtil.close(connection,statement,null);
        }
    }

    //主要实现
    // 1. 根据用户名来查找用户信息
    //这个会在登录逻辑中使用
    public User selectByName(String username) {
        Connection connection = null;
        PreparedStatement statement = null;
        ResultSet resultSet = null;
        try {
            connection = DBUtil.getConnection();
            String sql = "select * from user where username = ?";
            statement = connection.prepareStatement(sql);
            statement.setString(1, username);
            resultSet = statement.executeQuery();
            // 此处 username 使用 unique 约束, 要么能查到一个, 要么一个都查不到.
            if (resultSet.next()) {
                User user = new User();
                user.setUserId(resultSet.getInt("userId"));
                user.setUsername(resultSet.getString("username"));
                user.setPassword(resultSet.getString("password"));
                return user;
            }
        } catch (SQLException e) {
            e.printStackTrace();
        } finally {
            DBUtil.close(connection, statement, resultSet);
        }
        return null;
    }

    // 2. 根据用户 id 来找用户信息.
    //    博客详情页, 就可以根据用户 id 来查询作者的名字, 把作者名字显示出来.
    public User selectById(int userId) {
        Connection connection = null;
        PreparedStatement statement = null;
        ResultSet resultSet = null;
        try {
            connection = DBUtil.getConnection();
            String sql = "select * from user where userId = ?";
            statement = connection.prepareStatement(sql);
            statement.setInt(1, userId);
            resultSet = statement.executeQuery();
            // 此处 username 使用 unique 约束, 要么能查到一个, 要么一个都查不到.
            if (resultSet.next()) {
                User user = new User();
                user.setUserId(resultSet.getInt("userId"));
                user.setUsername(resultSet.getString("username"));
                user.setPassword(resultSet.getString("password"));
                return user;
            }
        } catch (SQLException throwables) {
            throwables.printStackTrace();
        } finally {
            DBUtil.close(connection, statement, resultSet);
        }
        return null;
    }
}
3.实现博客列表
3.1 约定前后端交互接口
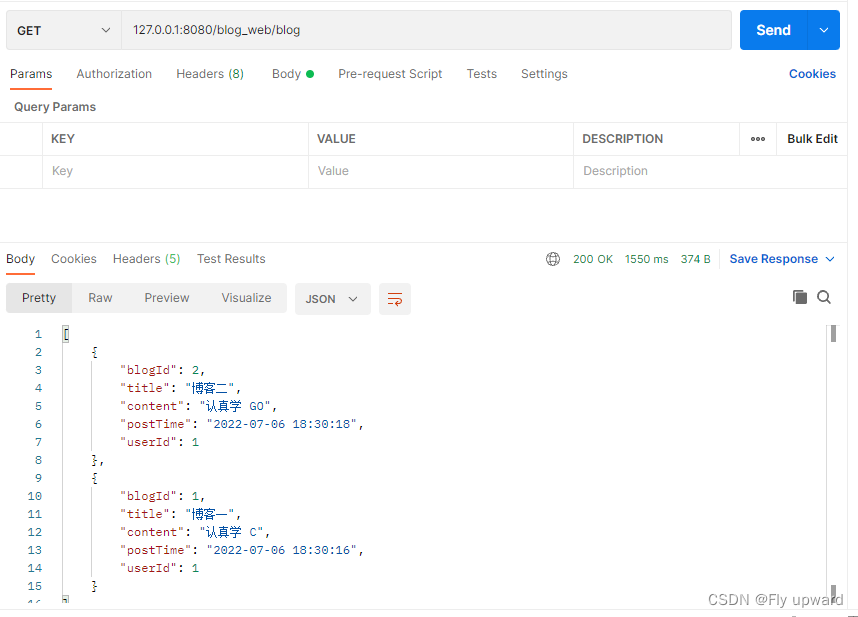
[ 请求 ]GET / blog[ 响应 ][{blogId : 1 ,title : " 第一篇博客 " ,content : " 博客摘要 " ,userId : 1 ,postTime : "2022-07-06 12:00:00"},{blogId : 2 ,title : " 第二篇博客 " ,content : " 博客摘要 " ,userId : 1 ,postTime : "2022-07-06 12:10:00"},...]
3.2 实现服务器代码
1)先获取数据库列表并转换成json 格式,看是否交互成功
@WebServlet("/blog")
public class BlogServlet extends HttpServlet {
    private ObjectMapper objectMapper = new ObjectMapper();
    @Override
    protected void doGet(HttpServletRequest req, HttpServletResponse resp) throws ServletException, IOException {//从数据库中查询到博客列表,转成json 格式
      //获取博客列表
       BlogDao blogDao = new BlogDao();
       List<Blog> blogs = blogDao.selectAll();
       //转换
       String respJson = objectMapper.writeValueAsString(blogs);
       resp.setContentType("application/json;charset=utf8");
       resp.getWriter().write(respJson);

    }
}
2) 通过postman 验证可知,交互成功
3.3 实现客户端代码
<script src="http://libs.baidu.com/jquery/2.0.0/jquery.min.js"></script>
<script>
// 在页面加载的时候, 通过 ajax 给服务器发送数据, 获取到博客列表信息, 并且显示在界面上.
function getBlogList() {
$.ajax({
type: 'get',
url: 'blog',
success: function(body) {
// 获取到的 body 就是一个 js 对象数组, 每个元素就是一个 js 对象, 根据这个对象构造 div
// 1. 先把 .right 里原有的内容给清空
let rightDiv = document.querySelector('.right');
rightDiv.innerHTML = '';
// 2. 遍历 body, 构造出一个个的 blogDiv
for (let blog of body) {
let blogDiv = document.createElement('div');
blogDiv.className = 'blog';
// 构造标题
let titleDiv = document.createElement('div');
titleDiv.className = 'title';
titleDiv.innerHTML = blog.title;
blogDiv.appendChild(titleDiv);
// 构造发布时间
let dateDiv = document.createElement('div');
dateDiv.className = 'date';
dateDiv.innerHTML = blog.postTime;
blogDiv.appendChild(dateDiv);
// 构造博客的摘要
let descDiv = document.createElement('div');
descDiv.className = 'desc';
descDiv.innerHTML = blog.content;
blogDiv.appendChild(descDiv);
// 构造 查看全文
let a = document.createElement('a');
a.innerHTML = '查看全文 >>';
// 此处希望点击之后能够跳转到 博客详情页 !!
// 这个跳转过程需要告知服务器要访问的是哪个博客的详情页.
a.href = 'blog_detail.html?blogId=' + blog.blogId;
blogDiv.appendChild(a);
// 把 blogDiv 挂到 dom 树上!
rightDiv.appendChild(blogDiv);
}
},
error: function() {
alert("获取博客列表失败!");
}
});
}
getBlogList();
</script>
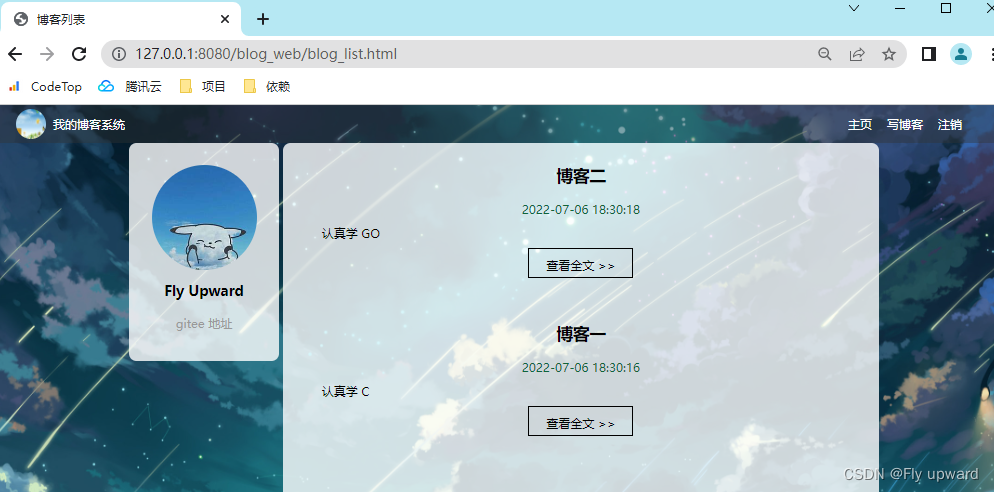
验证
4. 实现博客详情
4.1 约定前后端交互接口
[ 请求 ]GET / blog ? blogId = 1[ 响应 ]{blogId : 1 ,title : " 第一篇博客 " ,content : " 博客正文 " ,userId : 1 ,postTime : "2022-07-06 12:00:00"},
4.2 实现服务器代码
根据 blogId 参数是否存在, 判定当前是获取博客列表还是获取博客详情
    protected void doGet(HttpServletRequest req, HttpServletResponse resp) throws ServletException, IOException {
        resp.setContentType("application/json;charset=utf8");
        BlogDao blogDao = new BlogDao();
        // 先尝试获取到 req 中的 blogId 参数. 如果该参数存在, 说明是要请求博客详情
        // 如果该参数不存在, 说明是要请求博客的列表.
        String param = req.getParameter("blogId");
        if (param == null) {
            //不存在参数,获取列表
            List<Blog> blogs = blogDao.selectAll();
            //把blog 对象转成json 格式
            String respJson = objectMapper.writeValueAsString(blogs);
            resp.getWriter().write(respJson);
        } else {
            // 存在参数, 获取博客详情
            int blogId = Integer.parseInt(param);
            Blog blog = blogDao.selectOne(blogId);
            String respJson = objectMapper.writeValueAsString(blog);
            resp.getWriter().write(respJson);
        }
    }
4.3 实现客户端代码
1) 引入 editor.md
 <!-- 引入 editor.md 的依赖 -->
    <link rel="stylesheet" href="editor.md/css/editormd.min.css" />
    <script src="js/jquery.min.js"></script>
    <script src="editor.md/lib/marked.min.js"></script>
    <script src="editor.md/lib/prettify.min.js"></script>
<script src="editor.md/editormd.js"></script><!-- 右侧内容详情 -->
<div class="right">
<!-- 使用这个 div 来包裹整个博客的内容详情 -->
<div class="blog-content">
<!-- 博客标题 -->
<h3></h3>
<!-- 博客的时间 -->
<div class="date"></div>
<!-- 正文 -->
<div id="content" style="opacity: 80%"></div>
</div>
</div> <script>
function getBlogDetail() {
$.ajax({
type: 'get',
// location.search 拿到了形如 '?blogId=1' 这样的一段内容
url: 'blog' + location.search,
success: function(body) {
// 根据 body 中的内容来构造页面
// 1. 构造博客标题
let h3 = document.querySelector(".blog-content>h3");
h3.innerHTML = body.title;
//2.构造博客发布时间
let dateDiv = document.querySelector('.date');
dateDiv.innerHTML = body.postTime;
// 3. 构造博客正文
// 如果直接把 content 设为 innerHTML, 此时展示在界面上的内容, 是原始的 markdown 字符串
// 此处需要的是渲染后的, 带有格式的效果
// let content = document.querySelector('#content');
// content.innerHTML = body.content;
// 第一个参数对应 id=content 的 html 标签. 渲染后得到的 html 片段就会被放到这个 标签下.
editormd.markdownToHTML('content', {
markdown: body.content
});
}
});
}
getBlogDetail();
</script>验证

5. 实现登陆
5.1 约定前后端交互接口
[ 请求 ]POST /loginContent-Type: application/x-www-form-urlencodedusername=test&password=“ ”[ 响应 ]HTTP/1.1 302Location: blog_list.html
5.2 实现服务器代码
@WebServlet("/login")
public class LoginServlet extends HttpServlet {
    private ObjectMapper objectMapper = new ObjectMapper();

    @Override
    protected void doPost(HttpServletRequest req, HttpServletResponse resp) throws ServletException, IOException {
        req.setCharacterEncoding("utf8");
        resp.setCharacterEncoding("utf8");
        // 1. 获取到请求中的参数
        String username = req.getParameter("username");
        String password = req.getParameter("password");
        System.out.println("username=" + username + ", password=" + password);
        if (username == null || "".equals(username) || password == null || "".equals(password)) {
            // 请求的内容缺失, 肯定是登录失败!!
            resp.setContentType("text/html; charset=utf8");
            resp.getWriter().write("当前的用户名或密码为空,请重新输入!");
            return;
        }
        // 2. 和数据库中的内容进行比较
        UserDao userDao = new UserDao();
        User user = userDao.selectByName(username);
        if (user == null || !user.getPassword().equals(password)) {
            // 用户没有查到或者密码不匹配, 也是登录失败!
            resp.setContentType("text/html; charset=utf8");
            resp.getWriter().write("用户名或密码错误,请重新输入!");
            return;
        }
        // 3. 如果比较通过, 就创建会话.
        HttpSession session = req.getSession(true);
        // 把刚才的用户信息, 存储到会话中.
        session.setAttribute("user", user);

        // 4. 返回一个重定向报文, 跳转到博客列表页.
        resp.sendRedirect("blog_list.html");
    }

    // 这个方法用来让前端检测当前的登录状态.
    @Override
    protected void doGet(HttpServletRequest req, HttpServletResponse resp) throws ServletException, IOException {
        resp.setContentType("application/json;charset=utf8");
        HttpSession session = req.getSession(false);
        if (session == null) {
            // 检测下会话是否存在, 不存在说明未登录!
            User user = new User();
            resp.getWriter().write(objectMapper.writeValueAsString(user));
            return;
        }
        User user = (User) session.getAttribute("user");
        if (user == null) {
            // 虽然有会话, 但是会话里没有 user 对象, 也视为未登录.
            user = new User();
            resp.getWriter().write(objectMapper.writeValueAsString(user));
            return;
        }
        // 已经登录的状态!!
        // 注意, 此处不要把密码给返回到前端
        user.setPassword("");
        resp.getWriter().write(objectMapper.writeValueAsString(user));
    }
}
5.3 实现客户端代码
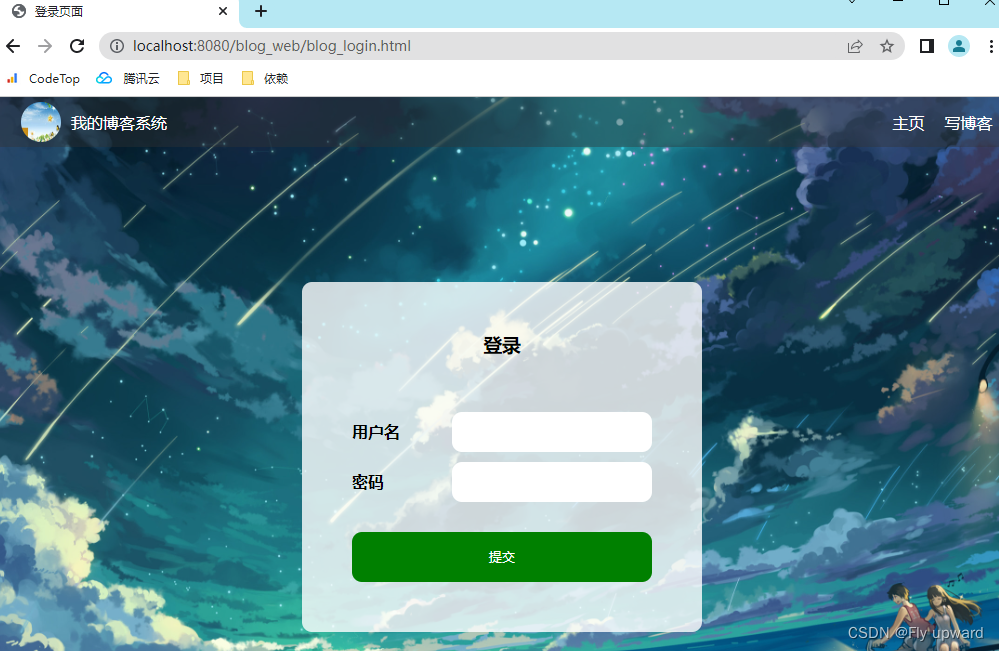
修改blog_login.html
给输入框套上一层 form 标签 . action 为 login, method 为 POST给 input 加上 name 属性。提交按钮改成 <input type="submit" id="submit" value="提交">
      <div class="login-dialog">
            <h3>登录</h3>
            <div class="row">
                <span>用户名</span>
                <input type="text" id="username" name="username">
            </div>
            <div class="row">
                <span>密码</span>
                <input type="password" id="password" name="password">
            </div>
            <div class="row">
                <!-- <button>提交</button> -->
                <input type="submit" id="submit" value="提交">
            </div>
        </div>
修改blog_login.css
将 .row button{ } 和 .row button:active{ } 修改成下面的样式
.row #submit {
    width: 300px;
    height: 50px;
    border-radius: 10px;
    color: white;
    background-color: rgb(0, 128, 0);
    border: none;
    outline: none;
    margin-top: 50px;
}

.row #submit:active {
    background-color: #666;
}
5.4 实现强制要求登陆和写博客
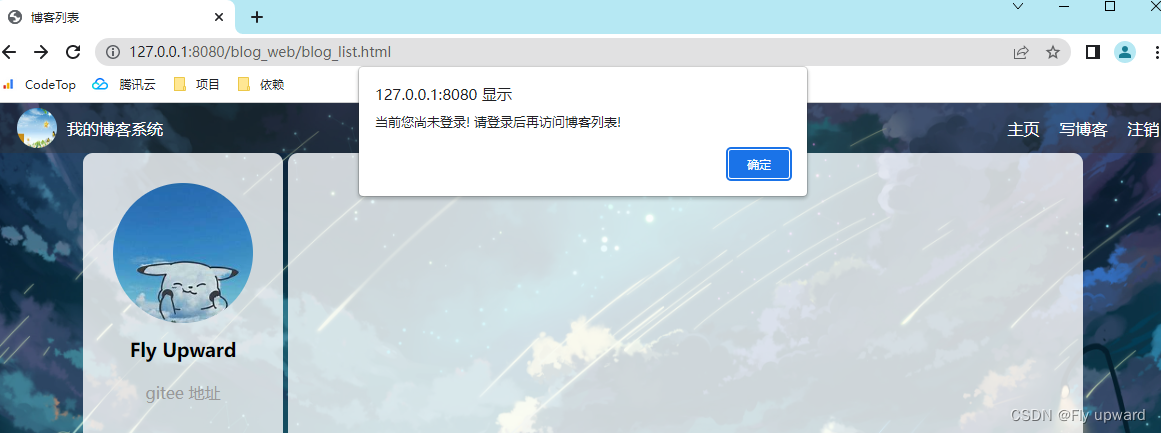
当用户访问 博客列表页 和 博客详情页 时, 如果用户当前尚未登陆, 就自动跳转到登陆页面。
1)修改 BlogServlet
 @Override
    protected void doPost(HttpServletRequest req, HttpServletResponse resp) throws ServletException, IOException {
        HttpSession session = req.getSession(false);
        if (session == null) {
            // 当前用户未登录, 不能提交博客!
            resp.setContentType("text/html;charset=utf8");
            resp.getWriter().write("当前用户未登录,不能提交博客");
            return;
        }
        User user = (User) session.getAttribute("user");
        if (user == null) {
            // 当前用户未登录, 不能提交博客!
            resp.setContentType("text/html;charset=utf8");
            resp.getWriter().write("当前用户未登录,不能提交博客");
            return;
        }
        // 一定要先指定好请求按照哪种编码来解析
        req.setCharacterEncoding("utf8");
        // 先从请求中, 取出参数(博客的标题和正文)
        String title = req.getParameter("title");
        String content = req.getParameter("content");
        if (title == null || "".equals(title) || content == null || "".equals(content)) {
            // 直接告诉客户端, 请求参数不对
            resp.setContentType("text/html;charset=utf8");
            resp.getWriter().write("提交博客失败!缺少必要参数!");
            return;
        }
        // 构造 Blog 对象, 把当前的信息填进去, 并插入数据库中
        // 此处要给 Blog 设置的属性, 主要是 title, content, userId (作者信息)
        // postTime 和 blogId 都不需要手动指定, 都是插入数据库的时候自动生成的.
        Blog blog = new Blog();
        blog.setTitle(title);     //标题
        blog.setContent(content); //摘要
        // 作者 id 就是当前提交这个博客的用户的身份信息
        blog.setUserId(user.getUserId());
        BlogDao blogDao = new BlogDao();
        blogDao.insert(blog);
        // 重定向到, 博客列表页!
        resp.sendRedirect("blog_list.html");
    }
2)修改 blog_list.html
 <!-- 在这里引入上述的 js 文件, 就可以执行到里面的代码, 也就进行了登录状态的监测了 -->
    <script src="js/common.js"></script>
    <script>
        // 针对博客列表页, 调用的时候传入参数
        getUserInfo('blog_list.html');
    </script>
common.js
// 这个文件里放一些页面公共的代码

// 加上一个逻辑, 通过 GET /login 这个接口来获取下当前的登录状态~
function getUserInfo(pageName) {
    $.ajax({
        type: 'get',
        url: 'login',
        success: function(body) {
            // 判定此处的 body 是不是一个有效的 user 对象(userId 是否非 0)
            if (body.userId && body.userId > 0) {
                // 登录成功!
                // 不做处理!
                console.log("当前用户登录成功! 用户名: " + body.username);

                // 根据当前用户登录的情况, 把当前用户名设置到界面上
                if (pageName == 'blog_list.html') {
                    changeUserName(body.username);
                }
            } else {
                // 登录失败!
                // 让前端页面, 跳转到 login.html
                alert("当前您尚未登录! 请登录后再访问博客列表!");
                location.assign('blog_login.html');
            }
        },
        error: function() {
            alert("当前您尚未登录! 请登录后再访问博客列表!");
            location.assign('blog_login.html');
        }
    });
}

function changeUserName(username) {
    let h3 = document.querySelector('.card>h3');
    h3.innerHTML = username;
}
3)修改 blog_detail.html
在文件中增加以下代码
// 加上一个逻辑, 通过 GET /login 这个接口来获取下当前的登录状态
        function getUserInfo(pageName) {
            $.ajax({
                type: 'get',
                url: 'login',
                success: function(body) {
                    // 判定此处的 body 是不是一个有效的 user 对象(userId 是否非 0)
                    if (body.userId && body.userId > 0) {
                        // 登录成功!
                        // 不做处理!
                        console.log("登录成功!用户名:“+ body.username");
                        // 在 getUserInfo 的回调函数中, 来调用获取作者信息
                        getAuthorInfo(body);
                    } else {
                        // 登录失败!
                        // 让前端页面, 跳转到 login.html
                        alert("当前您未登录,请登录后再访问博客列表!");
                        location.assign('blog_login.html');
                    }
                },
                error: function() {
                    alert("当前您未登录,请登录后再访问博客列表!");
                    location.assign('blog_login.html');
                }
            });
        }
        // 判定用户的登录状态
        getUserInfo("blog_detail.html");
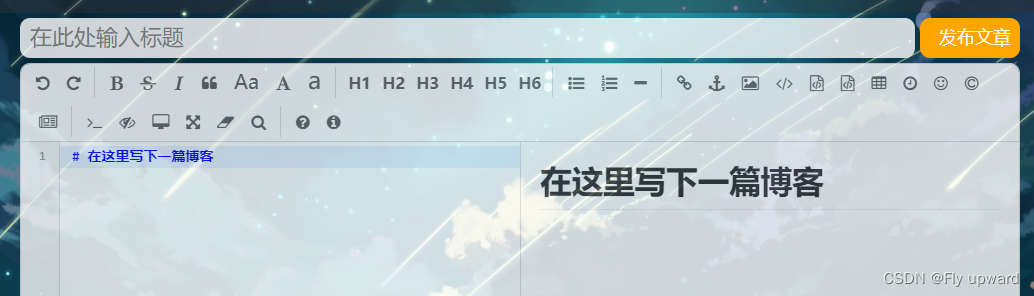
4)修改 blog_edit.html
<!-- 包裹整个博客编辑页内容的顶级容器 -->
    <div class="blog-edit-container">
        <form action="blog" method="post" style="height:100% ">
            <div class="title">
                <input type="text" placeholder="在此处输入标题" name="title" id="title">
                <!-- <button>发布文章</button> -->
                <input type="submit" value="发布文章" id="submit">
            </div>
            <!-- 放置 md 编辑器 -->
            <div id="editor">
                <!-- 为了进行 form 的提交, 此处搞一个 textarea 多行编辑框, 借助这个编辑框来实现表单的提交 -->
                <!-- 可以设置 editor.md, 让编辑器把 markdown 内容也同步的保存到这个隐藏的 textarea 中, 从而可以进行 form 提交 -->
                <textarea name="content" style="display: none"></textarea>
            </div>
        </form>

    </div>
5)修改blog_edit.css
将.blog-edit-container .title button{ }
.blog-edit-container .title button:active{ }
修改成下面的样式
.blog-edit-container .title #submit {
    width: 100px;
    height: 40px;
    border-radius: 10px;
    color: white;
    background-color: orange;
    border: none;
    outline: none;
    font-size: 18px;
}


.blog-edit-container .title #submit:active {
    background-color: #666;
}
验证
6. 实现显示用户信息
6.1 约定前后端交互接口
[ 请求 ]GET /authorInfo[ 响应 ]{userId: 1,username: Fly Upward}
在博客详情页, 获取当前文章作者的用户信息
[ 请求 ]GET /user?blogId=1[ 响应 ]{userId: 1,username: Fly Upward}
6.2 实现服务器代码
建一个AuthorServlet
@WebServlet("/authorInfo")
public class AuthorServlet extends HttpServlet {
    private ObjectMapper objectMapper = new ObjectMapper();

    @Override
    protected void doGet(HttpServletRequest req, HttpServletResponse resp) throws ServletException, IOException {
        resp.setContentType("application/json; charset=utf8");
        // 通过这个方法, 来获取到指定的博客的作者信息.
        String param = req.getParameter("blogId");
        if (param == null || "".equals(param)) {
            // 参数缺少了.
            resp.getWriter().write("{ \"ok\": false, \"reason\": \"参数缺失!\" }");
            return;
        }

        // 根据当前 blogId 在数据库中进行查找, 找到对应的 Blog 对象, 再进一步的根据 blog 对象, 找到作者信息.
        BlogDao blogDao = new BlogDao();
        Blog blog = blogDao.selectOne(Integer.parseInt(param));
        if (blog == null) {
            resp.getWriter().write("{ \"ok\": false, \"reason\": \"要查询的博客不存在!\" }");
            return;
        }

        // 根据 blog 对象, 查询到用户对象
        UserDao userDao = new UserDao();
        User author = userDao.selectById(blog.getUserId());
        if (author == null) {
            resp.getWriter().write("{ \"ok\": false, \"reason\": \"要查询的用户不存在!\" }");
            return;
        }

        // 把 author 返回到浏览器这边
        // 注意要把密码去掉
        author.setPassword("");
        resp.getWriter().write(objectMapper.writeValueAsString(author));
    }
}
为了避免麻烦和混淆,服务器代码在上面的blog_list.html 和 blog_detail.html 已经实现好了。
7. 实现注销登陆
7.1 约定前后端交互接口
[ 请求 ]GET /logout[ 响应 ]HTTP/1.1 302Location: login.html
7.2 实现服务器代码
创建 LogoutServlet
@WebServlet("/logout")
public class LogoutServlet extends HttpServlet {
    @Override
    protected void doGet(HttpServletRequest req, HttpServletResponse resp) throws ServletException, IOException {
        // 先找到当前用户的会话,
        HttpSession session = req.getSession(false);
        if (session == null) {
            // 用户没有登录!! 谈不上注销!
            resp.getWriter().write("当前用户尚未登录! 无法注销!");
            return;
        }
        // 然后把这个用户的会话中的信息给删掉就行了!!
        session.removeAttribute("user");
        resp.sendRedirect("blog_login.html");
    }
}8. 实现删除博客
8.1 约定前后端交互接口
[ 请求 ]GET / user ? blogId = 1[ 响应 ]{userId : 1 ,username : test ,isYourBlog : 1 , // 1 表示当前博客就是登陆者的博客 . 0 表示当前博客不是登陆者的博客}
DELETE /blog?blogId=1[ 响应 ]HTTP/1.1 200
8.2 实现服务器代码
@WebServlet("/blogDelete")
public class BlogDeleteServlet extends HttpServlet {
    @Override
    protected void doGet(HttpServletRequest req, HttpServletResponse resp) throws ServletException, IOException {
        // 1. 检查当前用户是否登录
        HttpSession session = req.getSession(false);
        if (session == null) {
            resp.setContentType("text/html; charset=utf8");
            resp.getWriter().write("当前尚未登录, 不能删除!");
            return;
        }
        User user = (User) session.getAttribute("user");
        if (user == null) {
            resp.setContentType("text/html; charset=utf8");
            resp.getWriter().write("当前尚未登录, 不能删除!");
            return;
        }

        // 2. 获取到参数中的 blogId
        String blogId = req.getParameter("blogId");
        if (blogId == null || "".equals(blogId)) {
            resp.setContentType("text/html; charset=utf8");
            resp.getWriter().write("当前 blogId 参数不对!");
            return;
        }

        // 3. 获取要删除的博客信息.
        BlogDao blogDao = new BlogDao();
        Blog blog = blogDao.selectOne(Integer.parseInt(blogId));
        if (blog == null) {
            resp.setContentType("text/html; charset=utf8");
            resp.getWriter().write("当前要删除的博客不存在!");
            return;
        }

        // 4. 再次校验, 当前的用户是否就是博客的作者
        if (user.getUserId() != blog.getUserId()) {
            // 这一点在前端这里其实也处理过~~ 但是此处还是再校验一次, 不是坏事!!!
            resp.setContentType("text/html; charset=utf8");
            resp.getWriter().write("当前登录的用户不是作者, 没有权限删除!");
            return;
        }

        // 5. 确认无误, 开始删除
        blogDao.delete(Integer.parseInt(blogId));

        // 6. 重定向到博客列表页
        resp.sendRedirect("blog_list.html");
    }
}
8.3 实现客户端代码
修改blog_detail.html
        // 从服务器获取一下当前博客的作者信息, 并显示到界面上.
        // 参数 user 就是刚才从服务器拿到的当前登录用户的信息
        function getAuthorInfo(user) {
            $.ajax({
                type: 'get',
                url: 'authorInfo' + location.search,
                success: function(body) {
                    // 此处的 body, 就是服务器返回的 User 对象, 是文章的作者信息
                    if (body.username) {
                        // 如果响应中的 username 存在, 就把这个值设置到页面上.
                        changeUserName(body.username);

                        if (body.username == user.username) {
                            // 作者和登录的用户是一个人, 则显示 "删除按钮"
                            let navDiv = document.querySelector('.nav');
                            let a = document.createElement('a');
                            a.innerHTML = '删除';
                            // 期望点击删除, 构造一个形如 blogDelete?blogId=6 这样的请求
                            a.href = 'blogDelete' + location.search;
                            navDiv.appendChild(a);
                        }
                    } else {
                        console.log('获取作者信息失败!' + body.reason);
                    }
                }
            });